Blaze Flow - Boiler Klarstein - Free user manual and instructions
Find the device manual for free Blaze Flow Klarstein in PDF.

User questions about Blaze Flow Klarstein
0 question about this device. Answer the ones you know or ask your own.
Ask a new question about this device
Download the instructions for your Boiler in PDF format for free! Find your manual Blaze Flow - Klarstein and take your electronic device back in hand. On this page are published all the documents necessary for the use of your device. Blaze Flow by Klarstein.
USER MANUAL Blaze Flow Klarstein
bar
| Category | Value | |---|---| | Category 1 | 100 | | Category 2 | 100 | | Category 3 | 100 | | Category 4 | 100 | | Category 5 | 100 | | Category 6 | 100 | | Category 7 | 100 | | Category 8 | 100 | | Category 9 | 100 | | Category 10 | 100 | | Category 11 | 100 | | Category 12 | 100 | | Category 13 | 100 | | Category 14 | 100 | | Category 15 | 100 | | Category 16 | 100 | | Category 17 | 100 | | Category 18 | 100 | | Category 19 | 100 | | Category 20 | 100 | | Category 21 | 100 | | Category 22 | 100 | | Category 23 | 100 | | Category 24 | 100 | | Category 25 | 100 | | Category 26 | 100 | | Category 27 | 100 | | Category 28 | 100 | | Category 29 | 100 | | Category 30 | 100 | | Category 31 | 100 | | Category 32 | 100 | | Category 33 | 100 | | Category 34 | 100 | | Category 35 | 100 | | Category 36 | 100 | | Category 37 | 100 | | Category 38 | 100 | | Category 39 | 100 | | Category 40 | 100 | | Category 41 | 100 | | Category 42 | 100 | | Category 43 | 100 | | Category 44 | 100 | | Category 45 | 100 | | Category 46 | 100 | | Category 47 | 100 | | Category 48 | 100 | | Category 49 | 100 | | Category 50 | 100 | | Category 51 | 100 | | Category 52 | 100 | | Category 53 | 100 | | Category 54 | 100 | | Category 55 | 100 | | Category 56 | 100 | | Category 57 | 100 | | Category 58 | 100 | | Category 59 | 100 | | Category 60 | 100 | | Category 61 | 100 | | Category 62 | 100 | | Category 63 | 100 | | Category 64 | 100 | | Category 65 | 100 | | Category 66 | 100 | | Category 67 | 100 | | Category 68 | 100 | | Category 69 | 100 | | Category 70 | 100 | | Category 71 | 100 | | Category 72 | 100 | | Category 73 | 100 | | Category 74 | 100 | | Category 75 | 100 | | Category 76 | 100 | | Category 77 | 100 | | Category 78 | 100 | | Category 79 | 100 | | Category 80 | 100 | | Category 81 | 100 | | Category 82 | 100 | | Category 83 | 100 | | Category 84 | 100 | | Category 85 | 100 | | Category 86 | 100 | | Category 87 | 100 | | Category 88 | 100 | | Category 89 | 100 | | Category 90 | 100 | | Category 91 | 100 | | Category 92 | 100 | | Category 93 | 100 | | Category 94 | 100 | | Category 95 | 100 | | Category 96 | 100 | | Category 97 | 100 | | Category 98 | 100 | | Category 99 | 100 | | Total (Total) = [sum of bars] / [values] * (sum of bars + bars) * (sum of bars + bars) * (sum of bars + bars) * (sum of bars + bars) * (sum of bars + bars) * (sum of bars + bars) * (sum of bars + bars) * (sum of bars + bars) * (sum of bars + bars) * (sum of bars + bars) * (sum of bars + bars) * (sum of bars + bars) * (sum of bars + bars) * (sum in brackets) * (sum in brackets) * (sum in brackets) * (sum in brackets) * (sum in brackets) * (sum in brackets) * (sum in brackets) * (sum in brackets) * (sum in brackets) * (sum in brackets) * (sum in brackets) * (sum in brackets) * (sum in brackets) * (sum in brackets) * (sum in brackets) * (sum in brackets) * (sum in brackets) * (total).* (sum in brackets) * (sum in brackets) * (sum in brackets) * (sum in brackets) * (sum in brackets) * (sum in brackets) * (sum in brackets) * (sum in brackets) * (sum in brackets) * (sum in brackets) * (sum in brackets) * (sum in brackets) * (total).* (sum in brackets) * (sum in brackets) * (sum in brackets) * (sum in brackets)INHALT
Technische Daten 1
natural_image
Symbol of a trash bin crossed with a diagonal line, no text or labels presentBerlin Brands Group UK Limited
PO Box 42
272 Kensington High Street
London, W8 6ND
United Kingdom
Dear Customer,
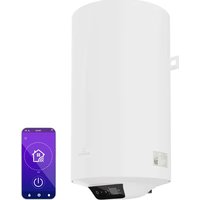
Congratulations on purchasing this equipment. Please read this manual carefully and take care of the following hints on installation and use to avoid technical damages. Any failure caused by ignoring the items and cautions mentioned in the operation and installation instructions are not covered by our warranty and any liability. Scan the QR code to get access to the latest user manual and more product information.

CONTENTS
Technical Data 16
Safety Instructions 17
Scope of delivery 18
Installation 19
Installation steps 22
Operation 22
Troubleshooting 24
Wiring diagram 25
Disposal Considerations 26
Manufacturer & Importer (UK) 26
TECHNICAL DATA
| Item number 10046239 | |
| Rated Power(W) 5500 W | |
| Wire Gauge( mm^2 ) ≥2.5 | |
| Specification Of Electric Meter Digital | electric Meter 10(40)A |
| Earth Leakage Circuit Breaker 40 A | |
| Over Temperature Protection 95 C±3 °C | |
| The Highest Temperature Setting 55 °C | |
| Power supply 230 V - 50 Hz | |
| Rated current 25.0 A | |
| Operating Water Pressure 0.01 - 0.6 MPa | |
| Waterproof Degree IPX4 | |
| Rated pressure 0 MPa |
SAFETY INSTRUCTIONS
- The electric instant water heater must be installed by a professional.
- Please take the time to read this manual carefully and familiarise yourself with the operation of this product!
- Before installation, the electrician should carefully check the power supply circuit and the capacity of the electric meter to ensure that they meet the requirements of this appliance.
- It is compulsory to install a reliable earth wire, if there is no qualified earth wire or it is invalid, do not use this machine.
- Please install the electric leakage protection valve and safe accessories together with this machine.
- If you install your own earth leakage breaker, please turn off the earth leakage breaker and close the inlet valve when not in use.
- If there is any damage to the wiring, please use the special wire supplied by the factory and have it replaced by a professional.
- The water heater must be installed vertically, by first connecting it to the water supply and then to the power supply in order to test it. Do not install where flammable and strong magnetic field is too close.
- If the water pressure is over 0.6 MPa, a pressure relief valve should be installed to ensure safety.
- The water inlet must be fitted with a strainer and the shower head and strainer must be cleaned regularly to remove limescale and dirt.
- The water outlet cannot be connected to a non-standard water valve.
- In the cold area, if the water heater is not used for a long time, it should drain all the water to prevent freezing, if there is ice, do not turn on the electricity.
- If the installation pipe is new, first clean the pipe to remove any debris and then connect it to the water heater.
- To avoid scalding, please test the water temperature with your hand before taking a shower to make sure it is suitable for you.
- In winter, if you cannot get the required temperature when running at the highest power, please reduce the water flow to increase the temperature.
- Please dispose of the packing materials and the old appliance in accordance with environmental protection standards.
- This appliance can be used by children aged from 3 years and above and persons with reduced physical, sensory or mental capabilities or lack of experience and knowledge if they have been given supervision or instruction concerning use of the appliance in a safe way and understand the hazards involved.
- Children should be supervised to ensure that they do not play with the appliance.
- Cleaning and user maintenance shall not be made by children without supervision.
- To ensure safe use, water and electricity are completely separated. The installation of an electrical safety valve is recommended.
- Heat protection: The power is automatically cut off when the temperature reaches 95^ .
- Leakage protection: In the event of a leak, the power supply is automatically
cut off and an error code is displayed.
- Sensor failure protection: If a sensor failure occurs, the machine stops working and sends an alarm.
- WARNING: Do not switch on if there is a possibility that the water in the heater is frozen. Fit only shower heads recommended by the manufacturer and never fit any additional device to restrict the water outlet flow.
- The installation instructions for open-outlet water heaters shall state that the outlet must not be connected to any tap or fitting other than those specified.
- If the supply cord is damaged, it must be replaced by the manufacturer, its service agent or similarly qualified persons in order to avoid a hazard.
- CAUTION: In order to avoid a hazard due to inadvertent resetting of the thermal cut out, this appliance must not be supplied through an external switching device, such as a timer, or connected to a circuit that is regularly switched on and off by the utility.
• The maximum inlet water pressure, in pascals (0.6MPa)
SCOPE OF DELIVERY
| Product name Unit Quantity | ||
| Main body piece 1 | ||
| Hanging boards and screws set 1 | ||
| Shower accessories (selected) | set 1 | |
| Manual and warranty card piece 1 |
Note: It is recommended that an electric leakage valve and other safety accessories are fitted (not supplied).
INSTALLATION


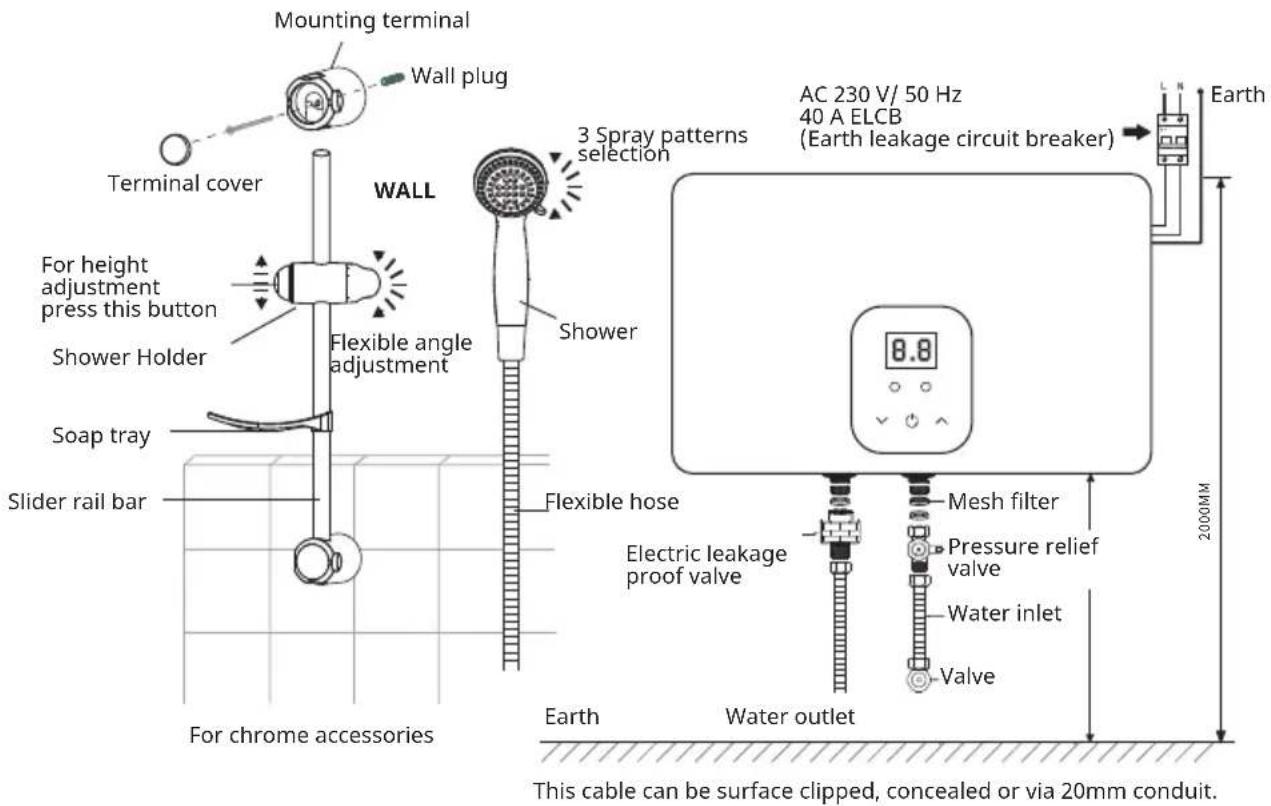
Note: Connect the Live wire (red/brown) to the terminal marked L. Connect the neutral cable (blue/black) to the terminal marked N. Connect the earth lead (yellow/green) to the terminal marked on the rear panel.
INSTALLATION STEPS
- The electric instant water heater must be installed by a qualified professional.
- Prepare the drill (∅6mm), wrench, screwdriver, electrician's knife, electroprobe, multimeter, pliers, pencil, hammer, tape and so on.
- Check the ammeter, air switch and the wire meet the demand or not, make sure the ground wire is really in the ground.
a) The ground wire should connect the ground completely, otherwise accidents may occur.
b) The installation of ELCB (Earth Leakage Circuit Breaker) is mandatory, otherwise accidents may occur.
-
According to the length of the wire and the position of the ELCB to make sure the position of the machine, then according to the installation drawing to mark the location of the screw holes on the wall with a pencil. (As shown) Attach the hanging board to the wall.
-
(As shown) Place the shower bar in the specified position, first use the pencil to mark the screw holes, then carefully drill the holes, finally use the screw to install it.
- Hang up the machine, put the buckles of the machine into the fixed steel plate, then pull down to install the bar.
- According to the installation drawing, the power cable must be connected to the appropriate wire of the ELCB. The live wire is red or brown, the neutral wire is blue or black and the earth wire is yellow-green (make sure the main switch is off before installation).
- Connect the water supply pipe (install the water valve and the electrical check valve) to the water inlet pipe and the water outlet pipe. One end of the water outlet pipe is connected to the electric check valve and the other end is connected to the shower head.
Caution: Each pipe should use a gasket, including the water inlet pipe and pressure relief valve should use a strainer. Please be careful when using a wrench to screw water pipes, force can't be too hasty and fierce, to avoid damaging the water heater.
OPERATION
Function keys
POWER (middle key): Turn appliance on/off.
v (left key): Reduce the temperature.
∧ (right key): Increase the temperature.
Usage
- First switch on the power supply.
- Turn on the water switch, then press "POWER" button.
- Press the "v" or "^" button to adjust the water temperature to obtain the desired temperature.
- Use the water valve to control the water flow. The water temperature will decrease when the water flow is high, and increase when the water flow is low.
- Press the "POWER" button to switch the machine to standby mode when you stop using the machine.
- If the machine will not be used for a long time, please switch off the main power supply.
Screen display
- When the power supply is switched on and the machine is switched on, the temperature is displayed on the screen.
- Adjust the temperature by pressing the "v" or "^" button, you can also use the water valve to change the water flow.
- When the temperature is over 55^ C, it will automatically stop heating to prevent scalding.
- When you stop using hot water, the water temperature of the inner machine still goes up, so the temperature will be very hot when you use it again, please avoid it.
- When you stop using the machine, first turn it off, then close the water after a few seconds to protect the machine.
- Always turn the "POWER" button on the circuit breaker when not in use.
Features
- When you switch on the machine after switching on the water supply, the water starts to heat up immediately.
- Water and electricity are completely separate. It is recommended to install the electrical safety valve to ensure safe use.
- The frequency converter function automatically adjusts the output according to the water flow and temperature.
- The unique heating element can control the temperature automatically.
- There is no need to pre-heat, so there is no loss of heat during a long pre-heating process, saving energy and time.
- Using advanced flow sensitive technology to solve the problem of low water pressure, which normally makes the machine unable to operate normally.
- Intelligent memory function to avoid repeated operation.
- Inside or outside setting of the electric leakage proof valve provides double protection to ensure safe use.
TROUBLESHOOTING
| Problem Possible Cause Solution | ||
| Leak in the connection between the inlet and outlet pipes. | A. Poor connection between the inlet and outlet pipes. | A. Reconnect the pipe. |
| B. The rubber washer is damaged. | B. Replace the washer. | |
| The temperature of the water is too high. | A. Water flow is too low. A. | Adjust the valve to increase water flow. |
| B. Pipe is blocked. B. Empty | the inlet filter and shower. | |
| C. The power or temperature is too high. | C. Reduce the power level or turn down the water temperature. | |
| The water is too cold. A. T | The water flow is too high. | A. Adjust the valve to reduce the water flow. |
| B. The voltage is too low. B. | Check that the voltage is not too low. | |
| C. The power is too low. | C. Select a higher power level. | |
| The water temperature is unstable. | Voltage or water pressure is unstable. | Voltage and water pressure are back to normal. |
| The water flow is decreasing. | The inlet filter or shower is blocked by water impurities. | Remove the water pipe, clean the inlet filter/ shower. |
| ELCB (Earth Leakage Circuit Breaker) switch of the power supply. | A. Electric leakage. A. Don't use it. Send to customer service for repair. | |
| B. Ageing of the ELCB. B. R | Replace the ELCB. | |
| C. ELCB current is too low. | C. Use a high current ELCB. | |
| The screen has no display. | A. Power is not connected. | A. Close the switch to connect the power. |
| B. The screen is damaged. | B. Replace the screen. | |
Error codes
| Error code Failure analysis Solution | ||
| E1 Water outlet | let temperature exceeds 55°C | Select lower power level or reduce temperature |
| E2 Power leak | Send to customer service | |
| E3 Incorrect water inlet temperature sensor or PCB problem | Replace water inlet temperature sensor | |
| E4 Wrong water outlet temperature sensor or PCB problem | Replace water outlet temperature sensor | |
| E5 PCB problem or display board fault | Replace the unit PCB | |
| E6 Warning that water outlet temperature is too high | Replace the water inlet temperature sensor | |
WIRING DIAGRAM
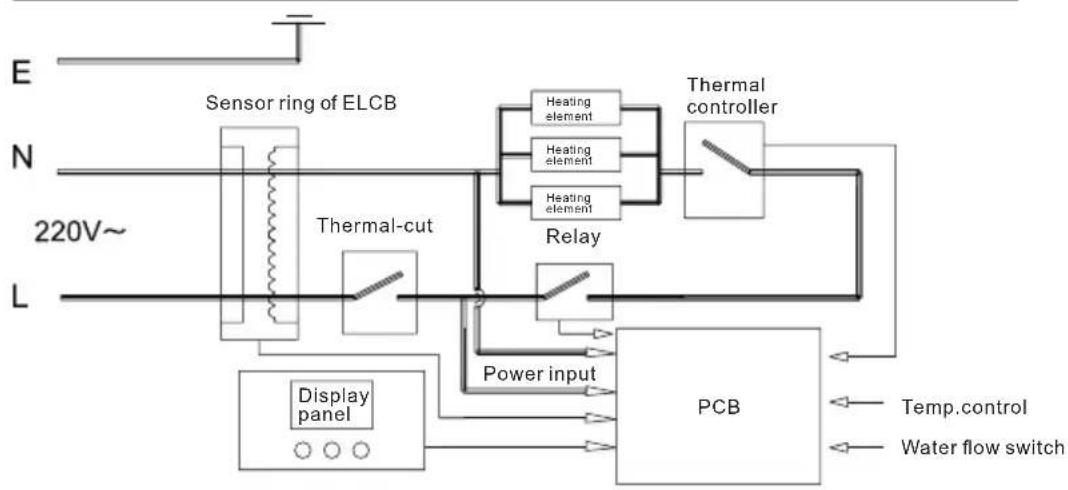
flowchart
graph TD
    E["Power Input"] --> DisplayPanel["Display panel"]
    DisplayPanel --> Thermal-cut["Thermal-cut"]
    Thermal-cut --> HeatControl["Heat controller"]
    HeatControl --> HeatingElement1["Heating element"]
    HeatControl --> HeatingElement2["Heating element"]
    HeatControl --> HeatingElement3["Heating element"]
    HeatControl --> Relay["Relay"]
    Relay --> PowerInput["Power input"]
    PowerInput --> PCB["PCB"]
    PCB --> TempControl["Temp.control"]
    PCB --> WaterFlowSwitch["Water flow switch"]
    TemperatureControl["Temperature control"] --> HeatControl
    TemperatureControl --> HeatLimit["Heating element"]
    TemperatureControl --> HeatLimit2["Heating element"]
    TemperatureControl --> HeatLimit3["Heating element"]
    TemperatureControl --> HeatLimit4["Heating element"]
    TemperatureControl --> HeatLimit5["Heating element"]
    TemperatureControl --> HeatLimit6["Heating element"]
    TemperatureControl --> HeatLimit7["Heating element"]
    TemperatureControl --> HeatLimit8["Heating element"]
    TemperatureControl --> HeatLimit9["Heating element"]
    TemperatureControl --> HeatLimit10["Heating element"]
    TemperatureControl --> HeatLimit11["Heating element"]
    TemperatureControl --> HeatLimit12["Heating element"]
    TemperatureControl --> HeatLimit13["Heating element"]
    TemperatureControl --> HeatLimit14["Heating element"]
    TemperatureControl --> HeatLimit15["Heating element"]
    TemperatureControl --> HeatLimit16["Heating element"]
    TemperatureControl --> HeatLimit17["Heating element"]
    TemperatureControl --> HeatLimit18["Heating element"]
    TemperatureControl --> HeatLimit19["Heating element"]
    TemperatureControl --> HeatLimit20["Heating element"]
    TemperatureControl --> HeatLimit21["Heating element"]
    TemperatureControl --> HeatLimit22["Heating element"]
    TemperatureControl --> HeatLimit23["Heating element"]
    TemperatureControl --> HeatLimit24["Heating element"]
    TemperatureControl --> HeatLimit25["Heating element"]
    TemperatureControl --> HeatLimit26["Heating element"]
    TemperatureControl --> HeatLimit27["Heating element"]
    TemperatureControl --> HeatLimit28["Heating element"]
    TemperatureControl --> HeatLimit29["Heating element"]
    TemperatureControl --> HeatLimit30["Heating element"]
    TemperatureControl --> HeatLimit31["Heating element"]
    TemperatureControl --> HeatLimit32["Heating element"]
    TemperatureControl --> HeatLimit33["Heating element"]
    TemperatureControl --> HeatLimit34["Heating element"]
    TemperatureControl --> HeatLimit35["Heating element"]
    TemperatureControl --> HeatLimit36["Heating element"]
    TemperatureControl --> HeatLimit37["Heating element"]
    TemperatureControl --> HeatLimit38["Heating element"]
    TemperatureControl --> HeatLimit39["Heating element"]
    TemperatureControl --> HeatLimit40["Heating element"]
    TemperatureControl --> HeatLimit41["Heating element"]
    TemperatureControl --> HeatLimit42["Heating element"]
    TemperatureControl --> HeatLimit43["Heating element"]
    TemperatureControl --> HeatLimit44["Heating element"]
    TemperatureControl --> HeatLimit45["Heating element"]
    TemperatureControl --> HeatLimit46["Heating element"]
    TemperatureControl --> HeatLimit47["Heating element"]
    TemperatureControl --> HeatLimit48["Heating element"]
    TemperatureControl --> HeatLimit49["Heating element"]
    TemperatureControl --> HeatLimit50["Heating element"]
    TemperatureControl --> HeatLimit51["Heating element"]
    TemperatureControl --> HeatLimit52["Heating element"]
    TemperatureControl --> HeatLimit53["Heating element"]
    TemperatureControl --> HeatLimit54["Heating element"]
    TemperatureControl --> HeatLimit55["Heating element"]
    TemperatureControl --> HeatLimit56["Heating element"]
    TemperatureControl --> HeatLimit57["Heating element"]
    TemperatureControl --> HeatLimit58["Heating element"]
    TemperatureControl --> HeatLimit59["Heating element"]
    TemperatureControl --> HeatLimit60["Heating element"]
    TemperatureControl --> HeatLimit61["Heating element"]
    TemperatureControl --> HeatLimit62["Heating element"]
    TemperatureControl --> HeatLimit63["Heating element"]
    TemperatureControl --> HeatLimit64["Heating element"]
    TemperatureControl --> HeatLimit65["Heating element"]
    TemperatureControl --> HeatLimit66["Heating element"]
    TemperatureControl --> HeatLimit67["Heating element"]
    TemperatureControl --> HeatLimit68["Heating element"]
    TemperatureControl --> HeatLimit69["Heating element"]
    TemperatureControl --> HeatLimit70["Heating element"]
    TemperatureControl --> HeatLimit71["Heating element"]
    TemperatureControl --> HeatLimit72["Heating element"]
    TemperatureControl --> HeatLimit73["Heating element"]
    TemperatureControl --> HeatLimit74["Heating element"]
    TemperatureControl --> HeatLimit75["Heating element"]
    TemperatureControl --> HeatLimit76["Heating element"]
    TemperatureControl --> HeatLimit77["Heating element"]
    TemperatureControl --> HeatLimit78["Heating element"]
    TemperatureControl --> HeatLimit79["Heating element"]
    TemperatureControl --> HeatLimit80["Heating element"]
DISPOSAL CONSIDERATIONS
natural_image
Symbol of a trash bin with crossed lines indicating no waste or discharge, and a solid black rectangle below (no text or labels)If there is a legal regulation for the disposal of electrical and electronic devices in your country, this symbol on the product or on the packaging indicates that this product must not be disposed of with household waste. Instead, it must be taken to a collection point for the recycling of electrical and electronic equipment. By disposing of it in accordance with the rules, you are protecting the environment and the health of your fellow human beings from negative consequences. For information about the recycling and disposal of this product, please contact your local authority or your household waste disposal service.
MANUFACTURER & IMPORTER (UK)
Manufacturer:
Chal-Tec GmbH, Wallstrasse 16, 10179 Berlin, Germany.
Importer for Great Britain:
Berlin Brands Group UK Limited
PO Box 42
272 Kensington High Street
London, W8 6ND
United Kingdom
Estimado cliente:
CONTENIDO
Datos técnicos 28
natural_image
Symbol of a trash bin with crossed lines indicating no waste or discharge, and a solid black rectangle below (no text or labels)Berlin Brands Group UK Limited
PO Box 42
272 Kensington High Street
London, W8 6ND
United Kingdom
Cher client, chère cliente,
SOMMAIRE
Fiche technique 40
natural_image
Symbol of a trash bin with crossed x and y axes, no text or labels presentBerlin Brands Group UK Limited
PO Box 42
272 Kensington High Street
London, W8 6ND
United Kingdom
Gentile cliente,
INDICE
Dati tecnici 52
natural_image
Symbol of a trash bin with crossed lines indicating no waste or discharge, and a solid black rectangle below (no text or labels)PRODUTTORE E IMPORTATORE (UK)
Produttore:
Chal-Tec GmbH, Wallstraße 16, 10179 Berlino, Germania.
Berlin Brands Group UK Limited
PO Box 42
272 Kensington High Street
London, W8 6ND
United Kingdom

bar
| Category | Value | |---|---| | Category 1 | 100 | | Category 2 | 100 | | Category 3 | 100 | | Category 4 | 100 | | Category 5 | 100 | | Category 6 | 100 | | Category 7 | 100 | | Category 8 | 100 | | Category 9 | 100 | | Category 10 | 100 | | Category 11 | 100 | | Category 12 | 100 | | Category 13 | 100 | | Category 14 | 100 | | Category 15 | 100 | | Category 16 | 100 | | Category 17 | 100 | | Category 18 | 100 | | Category 19 | 100 | | Category 20 | 100 | | Category 21 | 100 | | Category 22 | 100 | | Category 23 | 100 | | Category 24 | 100 | | Category 25 | 100 | | Category 26 | 100 | | Category 27 | 100 | | Category 28 | 100 | | Category 29 | 100 | | Category 30 | 100 | | Category 31 | 100 | | Category 32 | 100 | | Category 33 | 100 | | Category 34 | 100 | | Category 35 | 100 | | Category 36 | 100 | | Category 37 | 100 | | Category 38 | 100 | | Category 39 | 100 | | Category 40 | 100 | | Category 41 | 100 | | Category 42 | 100 | | Category 43 | 100 | | Category 44 | 100 | | Category 45 | 100 | | Category 46 | 100 | | Category 47 | 100 | | Category 48 | 100 | | Category 49 | 100 | | Category 50 | 100 | | Category 51 | 100 | | Category 52 | 100 | | Category 53 | 100 | | Category 54 | 100 | | Category 55 | 100 | | Category 56 | 100 | | Category 57 | 100 | | Category 58 | 100 | | Category 59 | 100 | | Category 60 | 100 | | Category 61 | 100 | | Category 62 | 100 | | Category 63 | 100 | | Category 64 | 100 | | Category 65 | 100 | | Category 66 | 100 | | Category 67 | 100 | | Category 68 | 100 | | Category 69 | 100 | | Category 70 | 100 | | Category 71 | 100 | | Category 72 | 100 | | Category 73 | 100 | | Category 74 | 100 | | Category 75 | 100 | | Category 76 | 100 | | Category 77 | 100 | | Category 78 | 100 | | Category 79 | 100 | | Category 80 | 100 | | Category 81 | 100 | | Category 82 | 100 | | Category 83 | 100 | | Category 84 | 100 | | Category 85 | 100 | | Category 86 | 100 | | Category 87 | 100 | | Category 88 | 100 | | Category 89 | 100 | | Category 90 | 100 | | Category 91 | 100 | | Category 92 | 100 | | Category 93 | 100 | | Category 94 | 100 | | Category 95 | 100 | | Category 96 | 100 | | Category 97 | 100 | | Category 98 | 100 | | Category 99 | 100 | | Total (Total) = [sum of bars] / [values] * (sum of bars + bars) * (sum of bars + bars) * (sum of bars + bars) * (sum of bars + bars) * (sum of bars + bars) * (sum of bars + bars) * (sum of bars + bars) * (sum of bars + bars) * (sum of bars + bars) * (sum of bars + bars) * (sum of bars + bars) * (sum of bars + bars) * (sum of bars + bars) * (sum in brackets) * (sum in brackets) * (sum in brackets) * (sum in brackets) * (sum in brackets) * (sum in brackets) * (sum in brackets) * (sum in brackets) * (sum in brackets) * (sum in brackets) * (sum in brackets) * (sum in brackets) * (sum in brackets) * (sum in brackets) * (sum in brackets) * (sum in brackets) * (sum in brackets) * (total).* (sum in brackets) * (sum in brackets) * (sum in brackets) * (sum in brackets) * (sum in brackets) * (sum in brackets) * (sum in brackets) * (sum in brackets) * (sum in brackets) * (sum in brackets) * (sum in brackets) * (sum in brackets) * (total).* (sum in brackets) * (sum in brackets) * (sum in brackets) * (sum in brackets)