Enduraheat Max 50 - Boiler Klarstein - Free user manual and instructions
Find the device manual for free Enduraheat Max 50 Klarstein in PDF.

| Product Type | Electric storage water heater |
| Brand | Klarstein |
| Model | Enduraheat Max 50 |
| Tank capacity | 50 L |
| Power supply | 220-240 V~ 50-60 Hz |
| Rated power | 1500 W |
| Maximum water pressure | 0.7 MPa (7 bar) |
| Maximum water temperature | 75 °C |
| Dimensions (outer diameter) | 380 mm |
| Dimensions (height) | 715 mm |
| Connection | 1/2" (thread) |
| Nominal current | 8.7 A |
| Plug type | 3-pole with earth |
| Installation height of socket | ≥ 1.8 m |
| Right side clearance | ≥ 0.2 m |
| Safety system | Multifunction valve (non-return, pressure relief) |
| Thermostat | Adjustable with automatic stop |
| Operation indicator | HEATING light |
| Frost protection | Draining recommended below 0 °C |
| Periodic maintenance | Check anode every 6 months, clean tank |
| Repairability | Spare parts available from customer service |
Frequently Asked Questions - Enduraheat Max 50 Klarstein
User questions about Enduraheat Max 50 Klarstein
0 question about this device. Answer the ones you know or ask your own.
Ask a new question about this device
Download the instructions for your Boiler in PDF format for free! Find your manual Enduraheat Max 50 - Klarstein and take your electronic device back in hand. On this page are published all the documents necessary for the use of your device. Enduraheat Max 50 by Klarstein.
USER MANUAL Enduraheat Max 50 Klarstein
bar
| Category | Value | |---|---| | Category 1 | 100 | | Category 2 | 100 | | Category 3 | 100 | | Category 4 | 100 | | Category 5 | 100 | | Category 6 | 100 | | Category 7 | 100 | | Category 8 | 100 | | Category 9 | 100 | | Category 10 | 100 | | Category 11 | 100 | | Category 12 | 100 | | Category 13 | 100 | | Category 14 | 100 | | Category 15 | 100 | | Category 16 | 100 | | Category 17 | 100 | | Category 18 | 100 | | Category 19 | 100 | | Category 20 | 100 | | Category 21 | 100 | | Category 22 | 100 | | Category 23 | 100 | | Category 24 | 100 | | Category 25 | 100 | | Category 26 | 100 | | Category 27 | 100 | | Category 28 | 100 | | Category 29 | 100 | | Category 30 | 100 | | Category 31 | 100 | | Category 32 | 100 | | Category 33 | 100 | | Category 34 | 100 | | Category 35 | 100 | | Category 36 | 100 | | Category 37 | 100 | | Category 38 | 100 | | Category 39 | 100 | | Category 40 | 100 | | Category 41 | 100 | | Category 42 | 100 | | Category 43 | 100 | | Category 44 | 100 | | Category 45 | 100 | | Category 46 | 100 | | Category 47 | 100 | | Category 48 | 100 | | Category 49 | 100 | | Category 50 | 100 | | Category 51 | 100 | | Category 52 | 100 | | Category 53 | 100 | | Category 54 | 100 | | Category 55 | 100 | | Category 56 | 100 | | Category 57 | 100 | | Category 58 | 100 | | Category 59 | 100 | | Category 60 | 100 | | Category 61 | 100 | | Category 62 | 100 | | Category 63 | 100 | | Category 64 | 100 | | Category 65 | 100 | | Category 66 | 100 | | Category 67 | 100 | | Category 68 | 100 | | Category 69 | 100 | | Category 70 | 100 | | Category 71 | 100 | | Category 72 | 100 | | Category 73 | 100 | | Category 74 | 100 | | Category 75 | 100 | | Category 76 | 100 | | Category 77 | 100 | | Category 78 | 100 | | Category 79 | 100 | | Category 80 | 100 | | Category 81 | 100 | | Category 82 | 100 | | Category 83 | 100 | | Category 84 | 100 | | Category 85 | 100 | | Category 86 | 100 | | Category 87 | 100 | | Category 88 | 100 | | Category 89 | 100 | | Category 90 | 100 | | Category 91 | 100 | | Category 92 | 100 | | Category 93 | 100 | | Category 94 | 100 | | Category 95 | 100 | | Category 96 | 100 | | Category 97 | 100 | | Category 98 | 100 | | Category 99 | 100 | | Total (Total) = [sum of bars] / [values] * (sum of bars + bars) * (sum of bars + bars) * (sum of bars + bars) * (sum of bars + bars) * (sum of bars + bars) * (sum of bars + bars) * (sum of bars + bars) * (sum of bars + bars) * (sum of bars + bars) * (sum of bars + bars) * (sum of bars + bars) * (sum of bars + bars) * (sum of bars + bars) * (sum in brackets) * (sum in brackets) * (sum in brackets) * (sum in brackets) * (sum in brackets) * (sum in brackets) * (sum in brackets) * (sum in brackets) * (sum in brackets) * (sum in brackets) * (sum in brackets) * (sum in brackets) * (sum in brackets) * (sum in brackets) * (sum in brackets) * (sum in brackets) * (sum in brackets) * (total).* (sum in brackets) * (sum in brackets) * (sum in brackets) * (sum in brackets) * (sum in brackets) * (sum in brackets) * (sum in brackets) * (sum in brackets) * (sum in brackets) * (sum in brackets) * (sum in brackets) * (sum in brackets) * (total).* (sum in brackets) * (sum in brackets) * (sum in brackets) * (sum in brackets)INHALT
Technische Daten 3
natural_image
Technical line drawing of a mechanical component with dashed fill and curved base (no text or symbols)natural_image
Symbol of a trash bin crossed with a diagonal line, no text or labels presentBerlin Brands Group UK Limited
PO Box 42
272 Kensington High Street
London, W8 6ND
United Kingdom
Dear Customer,
Congratulations on purchasing this equipment. Please read this manual carefully and take care of the following hints on installation and use to avoid technical damages. Any failure caused by ignoring the items and cautions mentioned in the operation and installation instructions are not covered by our warranty and any liability. Scan the QR code to get access to the latest user manual and more product information.

CONTENTS
Technical Data 15
Safety Instructions 16
Installation 17
Maintenance 21
Troubleshooting 22
Wiring diagram 22
Disposal Considerations 23
Manufacturer & Importer (UK) 23
TECHNICAL DATA
| Item number 10045722 1004 | 5723 10045724 | ||
| Water tank volume 30 L 50 L | 80 L | ||
| Power supply 220-240 V~ 50-60 Hz | |||
| Rated power 1500 W | |||
| Rated water pressure 0.7 MPa | |||
| Max water temperature 75 °C | |||
SAFETY INSTRUCTIONS
- The supply socket must be earthed reliably. The rated current of the socket shall not be lower than 8.7A. The socket and plug shall be kept dry to prevent electrical leakage.
- The installation height of the supply socket shall not be lower than 1.8m .
- The wall in which the electric water heater is installed shall be able to bear the load more than two times of the heater fully filled with water without distortion and cracks. Otherwise, other strengthening measures shall be adopted.
- The multifunction valve attached with the heater must be installed at the cold water inlet of this heater (See Fig. 5).
- When using the heater for the first time (or the first use after maintenance), the heater cannot be switched on until it has been fully filled with water.
- When filling the water, at least one of the outlet valves at the outlet of the heater must be opened to exhaust the air. This valve can be closed after the heater has been fully filled with water.
- This appliance is not intended for use by persons (including children) with reduced physical, sensory or mental capabilities or lack of experience and knowledge, unless they have been given training or instructions concerning use of the appliance by a person responsible for their safety.
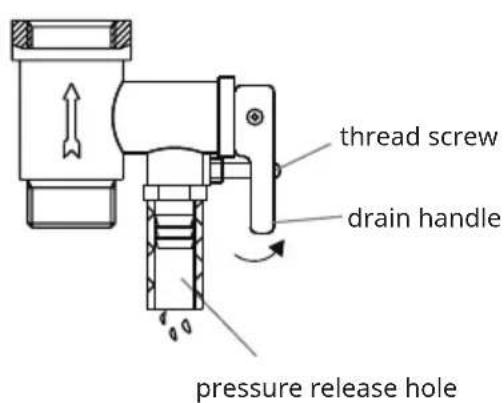
- During heating, there may be drops of water dripping from the pressure release hole of the multifunction valve. This is a normal phenomenon. If there is a large amount of water leak, please contact customer service center for repair. This pressure release hole shall, under no circumstances, be blocked; otherwise, the heater may be damaged, even resulting in accidents.
- The drainage pipe connected to the pressure release hole must be kept sloping downwards.
- Since the water temperature inside the heater can reach up to 75^ , the hot water must not be exposed to human bodies when it is initially used. Adjust the water temperature to a suitable temperature to avoid scalding.
- If the flexible power supply cord is damaged, the special supply cord provided by the manufacturer must be selected, and replaced by the professional
- maintenance personnel.
- If any parts and components of this electric water heater are damaged, please contact customer service center for repair.
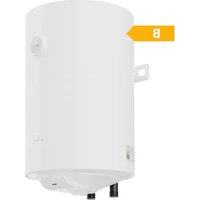
Dimensions
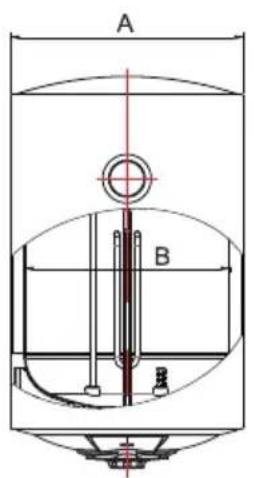
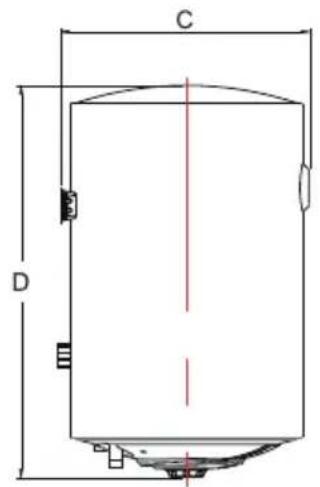
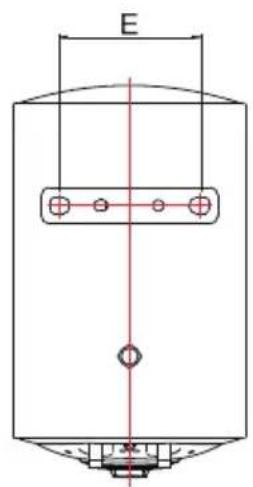
Fig. 1
| 30 L 50 L 80 L | ||
| A (mm) ∅340 ∅380 ∅450 | ||
| B (mm) ∅300 ∅340 ∅410 | ||
| C (mm) 365 405 475 | ||
| D (mm) 618 735 808 | ||
| E (mm) 205 205 205 |
Attention
Please ensure to use the accessories provided along with the product to install this electric water heater. This electric water heater can not be hung on the support until it has been confirmed to be firm and reliable. Otherwise, the electric water heater may drop off from the wall, resulting in damage of the heater, even serious accidents. When determining the locations of the bolt holes, it shall be ensured that there is a clearance not less than 0.2m on the right side of the electric heater. This may be required during maintenance of heater.
How to install
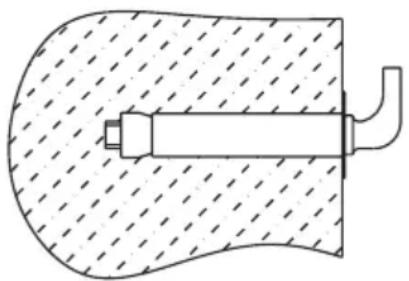
- This electric water heater shall be installed on a solid wall. If the strength of the wall cannot bear the load equal to two times of the total weight of the heater filled fully with water, it is then necessary to install a special support.
- After selecting a proper location, determine the positions of the two holes used for expansion bolts with hook Make two holes in the wall with the corresponding depth and size matching the expansion bolts attached with the heater insert the screws, turn the hook upwards, tighten the nuts to fix firmly, and then hang the electric water heater on it (see Fig. 2).
natural_image
Technical line drawing of a mechanical component with dashed fill pattern (no text or symbols)expansion bolt (with hook)
Fig. 2
• Install the supply socket in the wall. The supply socket should be 3 pin, single phase, 230V/8.7 A. It is recommended to place the socket on the right above the heater. The height of the socket to the ground shall not be less than 1.8m
- If the bathroom is too small, the heater can be installed at another place. However, in order to reduce the pipeline heat losses, the installation position of the heater shall be as near as possible to the heater.
Connection of pipelines
The dimension of multifunction valve & the inlet/outlet pipe is 12 ".
Connection of multifunction valve: install the multifunction valve with the heater on the inlet of the water heater.
In order to avoid leakage when connecting the pipelines, the rubber seal gaskets provided with the heater must be added at the end of the threads(see Fig. 3). Ensure leak proof joints.
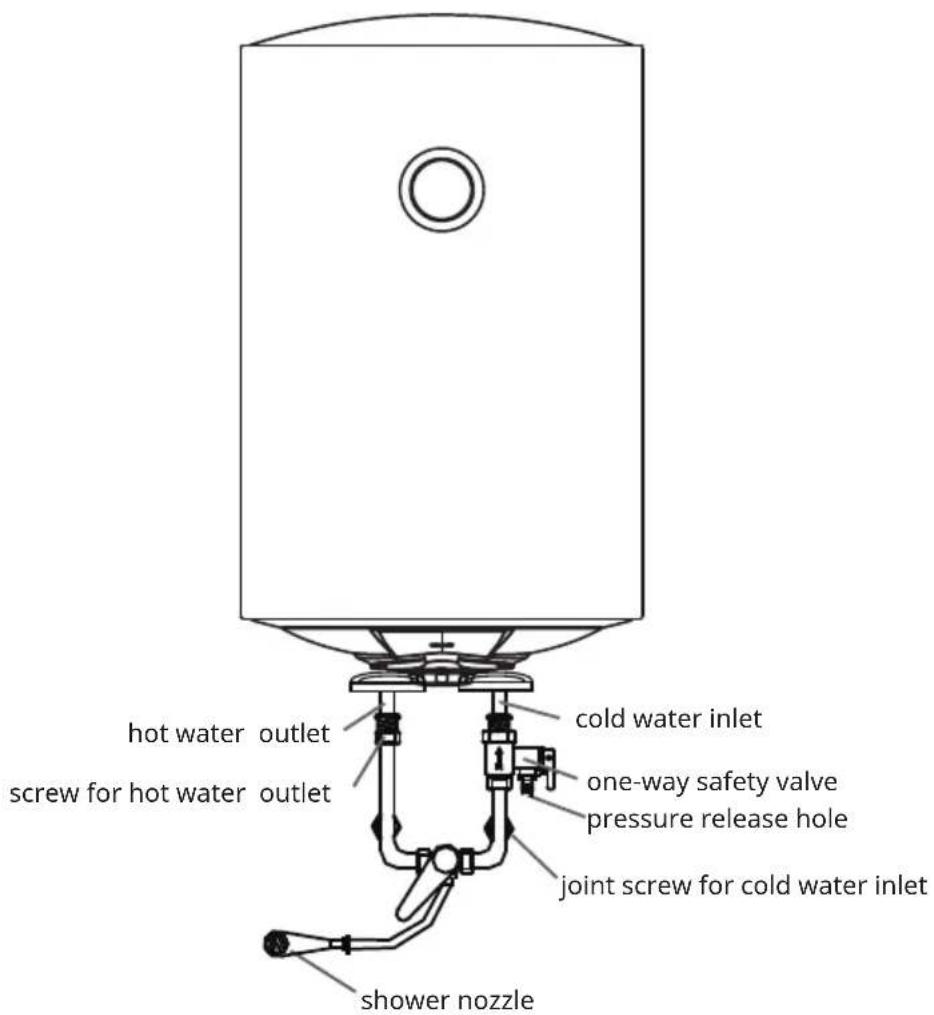
Fig. 3
Multi outlet connection
If you want to realize a multi-way supply system, refer to the method shown in blow illustration for connection of the pipelines.
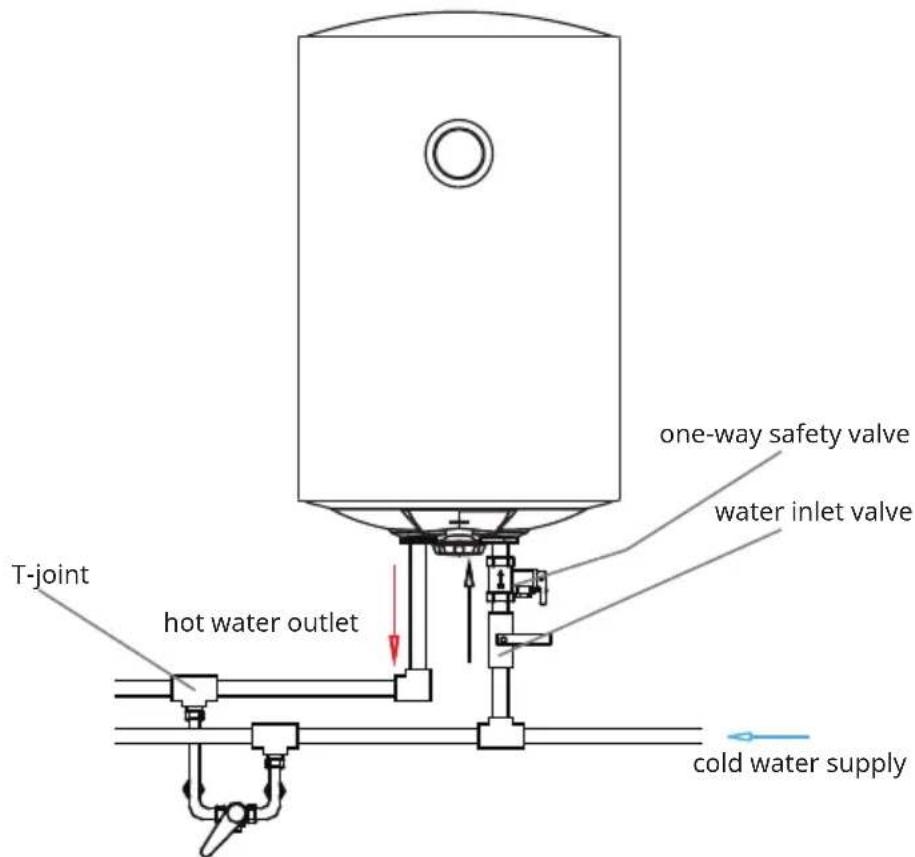
Fig. 4
- First, open any one of the outlet valves at the outlet of the water heater, then, open the inlet valve. The water heater gets filled with water. When water flows out of the outlet pipe it implies that the geyser has been filled fully with water, and the outlet valve can be closed.
Note: During normal operation, the inlet valve shall be always kept open.
- Insert the supply plug into the supply socket, and switch ON.
- Adjust the temperature controller suitably. The HEATING indicator will light up.
- The temperature controller will automatically control the temperature. When the temperature inside the heater has reached the set temperature, it will switch off automatically, when the water temperature falls below the set point the heater will be turned on automatically to restore the heating. When the heater is switched off automatically, the heating indicator will switch off.
Caution: The multifunction valve attached with the heater must be installed at the cold water inlet of this heater (See Fig. 5).
Drainage
Unscrew the thread screw on the multifunction safety valve, and lift the drain handle upwards) (See Fig. 6) to drain the water from the inner tank.
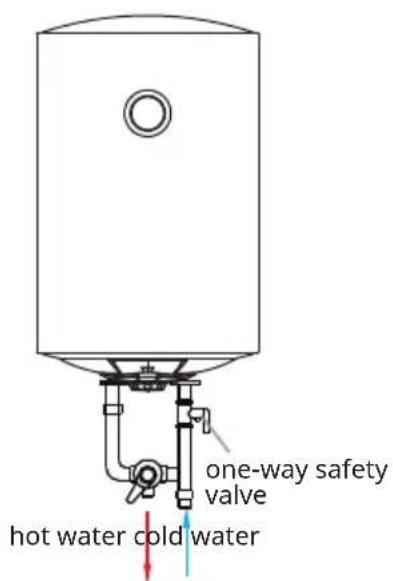
Fig. 5 Fig. 6
MAINTENANCE
- Check the power supply plug and socket frequently to make sure that they have good, reliable contact and are well grounded without overheating phenomenon.
- If the heater is not used for a long time, especially in the regions with low atmospheric temperature (lower than 0^ ), the water inside the heater shall be drained away. This will prevent the damage to the heater due to water freezing in the inner container. Refer to the chapter 'Drainage' in this manual for the method to drain away the water from the inner container).
- In order to ensure that the water heater operates efficiently for long time, it is recommended to clean the inner container and the deposits on the electrical heating components periodically.
- It is recommended to examine the anode protection materials every six months or so. If all the material has been consumed, please replace with the new material.
- Please noye that the thermostat can not be resued after disassembly.
TROUBLESHOOTING
| Problem Reasons Solutions | ||
| The heating indicator light is off. | Failures of the temperature controller. | Contact the customer care center. |
| Water not flowing out of the hot water outlet. | 1.The water supply is cut off. | 1. Wait for restoration of water supply. |
| 2.The water pressure is too low. | 2. Use the heater when the water pressure is appropriate. | |
| 3.The inlet valve of water supply is not open. | 3. Open the inlet valve of water supply. | |
| The water temperature is too high. | Failure of the temperature control system. | Contact the customer care center. |
| Water leakage. | Problem of the seal at pipe joints. | Contact the customer care center |
WIRING DIAGRAM
Temperature controller
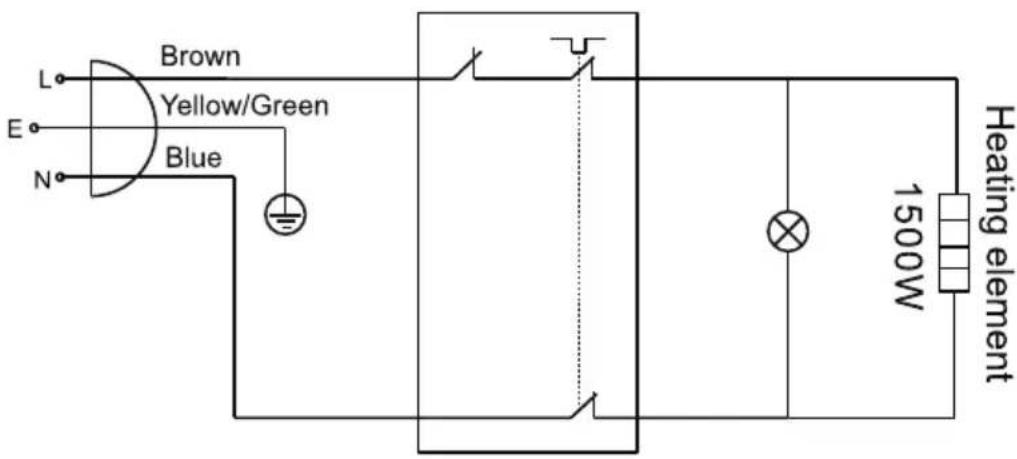
Fig. 7
DISPOSAL CONSIDERATIONS
natural_image
Symbol of a trash bin with crossed lines and a horizontal bar below (no text or labels)If there is a legal regulation for the disposal of electrical and electronic devices in your country, this symbol on the product or on the packaging indicates that this product must not be disposed of with household waste. Instead, it must be taken to a collection point for the recycling of electrical and electronic equipment. By disposing of it in accordance with the rules, you are protecting the environment and the health of your fellow human beings from negative consequences. For information about the recycling and disposal of this product, please contact your local authority or your household waste disposal service.
MANUFACTURER & IMPORTER (UK)
Manufacturer:
Chal-Tec GmbH, Wallstrasse 16, 10179 Berlin, Germany.
Importer for Great Britain:
Berlin Brands Group UK Limited
PO Box 42
272 Kensington High Street
London, W8 6ND
United Kingdom
Cher client, chère cliente,
SOMMAIRE
Fiche technique 25
natural_image
Technical line drawing of a mechanical component with dashed fill and curved base (no text or symbols)natural_image
Symbol of a trash bin crossed with a diagonal line, no text or labels presentBerlin Brands GOIup UK Ltd
PO Box 42
272 Kensington High Street
London, W8 6ND
United Kingdom
Gentile cliente,
INDICE
Dati tecnici 35
natural_image
Technical line drawing of a mechanical component with dashed fill pattern (no text or symbols)natural_image
Symbol of a trash bin crossed with a diagonal line, no text or labels presentPRODUTTORE E IMPORTATORE (UK)
Produttore:
Chal-Tec GmbH, Wallstraße 16, 10179 Berlino, Germania.
Berlin Brands Group UK Limited
PO Box 42
272 Kensington High Street
London, W8 6ND
United Kingdom
Estimado cliente:
CONTENIDO
Datos técnicos 45
natural_image
Technical line drawing of a mechanical component with dashed fill pattern (no text or symbols)natural_image
Symbol of a trash bin crossed with a diagonal line, no text or labels presentBerlin Brands Group UK Limited
PO Box 42
272 Kensington High Street
London, W8 6ND
Reino Unido

bar
| Category | Value | |---|---| | Category 1 | 100 | | Category 2 | 100 | | Category 3 | 100 | | Category 4 | 100 | | Category 5 | 100 | | Category 6 | 100 | | Category 7 | 100 | | Category 8 | 100 | | Category 9 | 100 | | Category 10 | 100 | | Category 11 | 100 | | Category 12 | 100 | | Category 13 | 100 | | Category 14 | 100 | | Category 15 | 100 | | Category 16 | 100 | | Category 17 | 100 | | Category 18 | 100 | | Category 19 | 100 | | Category 20 | 100 | | Category 21 | 100 | | Category 22 | 100 | | Category 23 | 100 | | Category 24 | 100 | | Category 25 | 100 | | Category 26 | 100 | | Category 27 | 100 | | Category 28 | 100 | | Category 29 | 100 | | Category 30 | 100 | | Category 31 | 100 | | Category 32 | 100 | | Category 33 | 100 | | Category 34 | 100 | | Category 35 | 100 | | Category 36 | 100 | | Category 37 | 100 | | Category 38 | 100 | | Category 39 | 100 | | Category 40 | 100 | | Category 41 | 100 | | Category 42 | 100 | | Category 43 | 100 | | Category 44 | 100 | | Category 45 | 100 | | Category 46 | 100 | | Category 47 | 100 | | Category 48 | 100 | | Category 49 | 100 | | Category 50 | 100 | | Category 51 | 100 | | Category 52 | 100 | | Category 53 | 100 | | Category 54 | 100 | | Category 55 | 100 | | Category 56 | 100 | | Category 57 | 100 | | Category 58 | 100 | | Category 59 | 100 | | Category 60 | 100 | | Category 61 | 100 | | Category 62 | 100 | | Category 63 | 100 | | Category 64 | 100 | | Category 65 | 100 | | Category 66 | 100 | | Category 67 | 100 | | Category 68 | 100 | | Category 69 | 100 | | Category 70 | 100 | | Category 71 | 100 | | Category 72 | 100 | | Category 73 | 100 | | Category 74 | 100 | | Category 75 | 100 | | Category 76 | 100 | | Category 77 | 100 | | Category 78 | 100 | | Category 79 | 100 | | Category 80 | 100 | | Category 81 | 100 | | Category 82 | 100 | | Category 83 | 100 | | Category 84 | 100 | | Category 85 | 100 | | Category 86 | 100 | | Category 87 | 100 | | Category 88 | 100 | | Category 89 | 100 | | Category 90 | 100 | | Category 91 | 100 | | Category 92 | 100 | | Category 93 | 100 | | Category 94 | 100 | | Category 95 | 100 | | Category 96 | 100 | | Category 97 | 100 | | Category 98 | 100 | | Category 99 | 100 | | Total (Total) = [sum of bars] / [values] * (sum of bars + bars) * (sum of bars + bars) * (sum of bars + bars). The values in the table represent the sum of the bars and the corresponding sum of the bars. There is no additional data series or categories specified in the code.