HmIP-HAP2 - Access Point Homematic IP - Free user manual and instructions
Find the device manual for free HmIP-HAP2 Homematic IP in PDF.


User questions about HmIP-HAP2 Homematic IP
0 question about this device. Answer the ones you know or ask your own.
Ask a new question about this device
Download the instructions for your Access Point in PDF format for free! Find your manual HmIP-HAP2 - Homematic IP and take your electronic device back in hand. On this page are published all the documents necessary for the use of your device. HmIP-HAP2 by Homematic IP.
USER MANUAL HmIP-HAP2 Homematic IP
natural_image
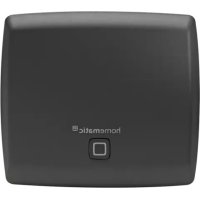
White square-shaped electronic device with concentric square layers, placed on a blue background (no text or symbols visible)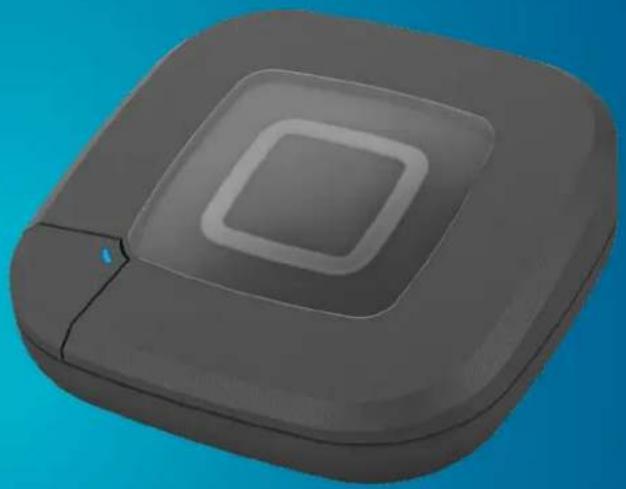
natural_image
3D rendered gray square object with concentric square layers and a small blue mark on the side (no text or symbols)
Installation and operating manual

text_image
A B C D E 80mmAbbildung 1
6 Inbetriebnahme
text_image
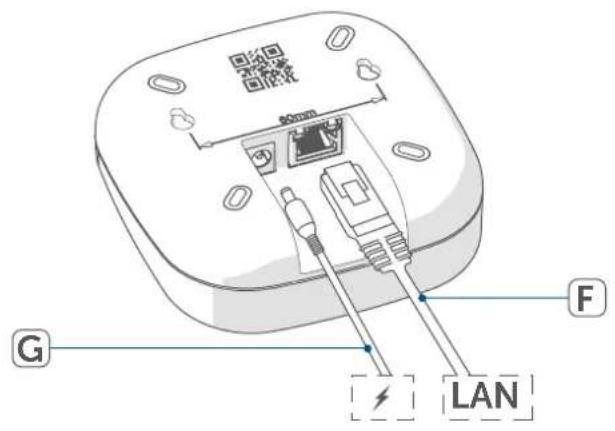
60mm G F LANAbbildung 2
text_image
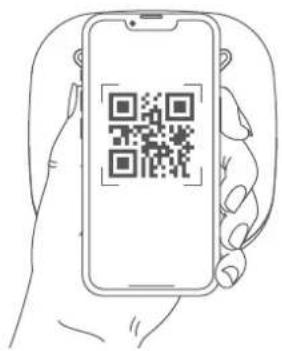
Line drawing of a hand holding a smartphone displaying a QR code on screenAbbildung 3
1 Package contents....13
2 Information about this manual....13
3 Hazard information 13
4 Homematic IP – Smart living, simply comfortable....14
5 Function and device overview....14
6 Start-up....15
6.1 Set-up and mounting of the Access Point 15
6.2 First steps: Pairing devices and adding rooms 16
6.3 Operation and configuration....16
7 Troubleshooting....16
7.1 Command not confirmed 16
7.2 Duty Cycle 16
7.3 Error codes and flashing sequences .....17
8 Restore factory settings....18
8.1 Resetting the Access Point.... 18
8.2 Resetting and deleting the entire installation 18
9 Maintenance and cleaning....19
10 General information about radio operation....19
11 Disposal....19
12 Technical specifications.... 20
1 Package contents
1x Homematic IP Access Point 2
1x Plug-in mains adapter
1x Network cable
2x Screws
2x Plugs
1x User manual
2 Information about this manual
Read this manual carefully before beginning operation with your Homematic IP components. Keep the manual so you can refer to it at a later date if you need to. If you hand over the device to other persons for use, hand over this manual as well.
Symbols used:

Attention!
This indicates a hazard.

Please note: This section contains important additional information.
3 Hazard information

We do not assume any liability for damage to property or personal injury caused by improper use or the failure to observe the hazard information. In such cases any claim under warranty is extinguished! For consequential damages, we assume no liability!

Do not use the device if there are signs of damage to the housing, control elements or connecting sockets, for example, or if it demonstrates a malfunction. If you have any doubts, please have the device checked by an expert.

Do not open the device. It does not contain any parts that can be maintained by the user. In the event of an error, have the device checked by an expert.

For safety and licensing reasons (CE), unauthorized change and/or modification of the device is not permitted.

The device may only be operated indoors and must be protected from the effects of moisture, vibrations, solar or other methods of heat radiation, cold and mechanical loads.

The device is not a toy; do not allow children to play with it. Do not leave packaging material lying around. Plastic films/bags, pieces of polystyrene, etc. can be dangerous in the hands of a child.

For power supply, only use the original power supply unit (5 VDC/600 mA) delivered with the device.

The device may only be connected to an easily accessible power socket outlet. The mains plug must be pulled out if a hazard occurs.

Always lay cables in such a way that they do not become a risk to people and domestic animals.

The device may only be operated within residential buildings.

Using the device for any purpose other than that described in this operating manual does not fall within the scope of intended use and shall invalidate any warranty or liability.
4 Homematic IP – Smart living, simply comfortable
With Homematic IP, you can install your smart home solution in just a few little steps.
The Homematic IP Access Point 2 is the central element of the Homematic IP smart home system and communicates with the Homematic IP radio protocol. You can pair up to 120 Homematic IP devices using the Access Point.
All devices of the Homematic IP system can be configured comfortably and individually with the Homematic IP app. The available functions provided by the Homematic IP system in combination with other components are described in the Homematic IP User Guide.
All current technical documents and updates are provided at www.homematic-ip.com.
5 Function and device overview
The Homematic IP Access Point 2 is the central unit of the Homematic IP system.
It connects the Homematic IP cloud with all Homematic IP devices and transmits configuration data and control commands from the app to all Homematic IP devices. You can simply adjust your smart home control to your personal needs at any time and place.
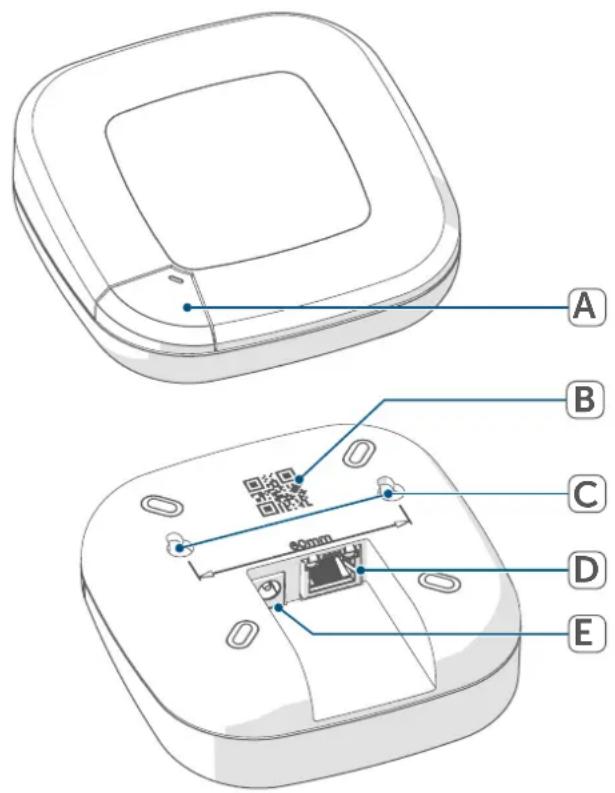
Device overview:
(A) System button and LED
(B) QR code and device number (SGTIN)
(C) Screw holes
(D) Interface: Network cable
(E) Interface: Plug-in mains adapter
text_image
A B C D E 60mmFigure 1
6 Start-up
This chapter describes how to set up your Homematic IP system step by step.
First install the Homematic IP app and set up your Access Point as described in the following section. Once your Access Point has been set up successfully, you can add and integrate new Homematic IP devices to your system.
6.1 Set-up and mounting of the Access Point

The Homematic IP app is available for iOS and Android and can be downloaded for free in the corresponding app stores.
- Download the Homematic IP app in the app store and install it on your device.
- Start the app.
- Place the Access Point close to your router and a socket.

Always keep a minimum distance of 50 cm between the Homematic IP Access Point 2 and your WLAN router.
- Connect the Access Point with the router using the supplied network cable (F). Provide power supply for the device using the supplied plug-in mains adapter (G).
text_image
G F LAN 800mmFigure 2
- Scan the QR code (B) on the back side of your Access Point. You can also enter the device number (SGTIN)(B) of your Access Point manually.
text_image
Hand holding smartphone displaying a QR code on screen, likely for mobile payment or scanning purposesFigure 3
- Please confirm in the app if the LED of your Access Point lights up permanently blue.

If the LED lights up differently, please follow the instructions in the app or (see "7.3 Error codes and flashing sequences" on page 17).
- The Access Point is registered to the server. This may take a few minutes. Please wait.
• After successful registration, please press the system button of your
Access Point for confirmation.
- Pairing will be carried out.
- The Access Point is now set up and immediately ready for use.
6.2 First steps: Pairing devices and adding rooms
As soon as your Homematic IP Access Point 2 and the Homematic IP app are ready for use, you can pair additional Homematic IP devices and place them in different rooms within the app.
- Tap on the main menu symbol at the bottom right of the app home-screen and select the menu item "Pair device".
- Establish the power supply of the device you want to pair to be able to activate the pairing mode. For further information, please refer to the operating manual of the corresponding device.
- Follow the instructions of the app step by step.
- Select the desired solution for your device.
- In the app, give the device a name and create a new room or place the device in an existing room.

Please define the device names very carefully in order to avoid assignment errors when using various devices of the same type. You can change the device and room names at any time.
6.3 Operation and configuration
After having connected your Homematic IP devices and allocated them to rooms, they will be you can comfortably control and configure your Homematic IP system.
For further information about operation via the app and configuration of the Homematic IP system, please refer to the Homematic IP User Guide (available in the download area at www.homematic-ip.com).
7 Troubleshooting
7.1 Command not confirmed
If at least one receiver does not confirm a command, this may be caused by radio interference (see „10 General information about radio operation“ on page 19). The error will be displayed in the app and may be cause by the follow:
- Receiver cannot be reached
- Receiver is unable to execute the command (load failure, mechanical blockade, etc.)
- Receiver is defective
7.2 Duty Cycle
The duty cycle is a legally regulated limit of the transmission time of devices in the 868 MHz range. The aim of this regulation is to safeguard the operation of all devices working in the 868 MHz range. In the 868 MHz frequency range we use, the maximum transmission time of any device is 1% of an hour (i.e. 36 seconds in an hour). Devices must cease transmission when they reach the 1% limit until this time restriction comes to an end. Homematic IP devices are designed and produced with 100% conformity to
this regulation.
During normal operation, the duty cycle is not usually reached. However, repeated and radio-intensive pair processes mean that it may be reached in isolated instances during start-up or initial installation of a system. If the duty cycle limit is exceeded, the device may stop working for a brief period. The device starts working correctly again after a short period (max. 1 hour).
7.3 Error codes and flashing sequences
| Flashing code Meaning Solution | ||
| Blue flashing | Connection to the server is being established | Wait until the connection is established and the LED lights permanently blue. |
| Permanent blue lighting | Normal operation, connection to server is established | You can continue operation. |
| Yellow flashing | No connection to network or router | Connect the Access Point to the network/router. |
| Permanent yellow lighting | No Internet connection | Please check the Internet connection and firewall settings. |
| Permanent turquoise lighting | Router function active (for operation with several Access Points/Central Control Units) | Please continue the operation. |
| Fast turquoise flashing | No connection to Central Control Unit (only when operating with CCU3) | Check the network connection of your CCU |
| Fast orange flashing | Stage before restoring the factory settings | Press and hold down the system button again for 4 seconds, until the LED lights up green. |
| 1x long green lighting Reset | confirmed | You can continue operation. |
| 1x long red lighting Reset | failed Please try again. |
8 Restore factory settings
The factory settings of your Access Point as well as of your entire installation can be restored. The operations distinguish as follows:
- Resetting the Access Point: Here, only the factory settings of the Access Point will be restored. The entire installation will not be deleted.
- Resetting and deleting the entire installation:
Here, the entire installation is reset. Afterwards, the app has to be uninstalled and reinstalled. The factory settings of your single Homematic IP devices have to be restored as to enable them to be connected again.
8.1 Resetting the Access Point
To restore the factory settings of the Access Point, please proceed as follows:
- Disconnect the Access Point from the power supply. Therefore, unplug the mains adapter.
- Plug-in the mains adapter again and press and hold down the system button for 4s at the same time, until the LED will quickly start flashing orange.
- Release the system button again.
- Press and hold down the system button again for 4 seconds, until the LED lights up green. If the LED lights up red, please try again.
- Release the system button to finish the procedure.
The device will perform a restart and Access Point is being reset.
8.2 Resetting and deleting the entire installation
During the reset, the Access Point must be connected to the cloud so that all data can be deleted. Therefore, the network cable must be plugged in during the process and the LED must light up blue continuously afterwards.
To reset the factory settings of the entire installation, the procedure described above must be performed twice in succession, within 5 minutes:
- Reset the Access Point as described above.
- Wait at least 10 seconds until the LED permanently lights up blue.
- Immediately afterwards, perform the reset for the second time by disconnecting the Access Point from the power supply again and repeating the previously described steps.
After the second restart, your system will be reset.
9 Maintenance and cleaning

The device does not require you to carry out any maintenance. Enlist the help of an expert to carry out any maintenance or repairs.
Clean the device using a soft, lint-free cloth that is clean and dry. You may dampen the cloth a little with lukewarm water in order to remove more stubborn marks. Do not use any detergents containing solvents, as they could corrode the plastic housing and label.
10 General information about radio operation
Radio transmission is performed on a non-exclusive transmission path, which means that there is a possibility of interference occurring. Interference can also be caused by switching operations, electrical motors or defective electrical devices.

The range of transmission within buildings can differ greatly from that available in the open air. Besides the transmitting power and the reception characteristics of the receiver, environmental factors such as humidity in the vicinity have an important role to play, as do on-site structural/screening conditions.
Hereby, eQ-3 AG, Maiburger Str. 29, 26789 Leer/Germany declares that the radio equipment type Homematic IP HmIP-HAP2, HmIP-HAP2-A is in compliance with Directive 2014/53/EU.
The full text of the EU declaration of conformity is available at the following internet address:
www.homematic-ip.com
11 Disposal
Instructions for disposal

This symbol means that the device must not be disposed of as
household waste, general waste, or in a yellow bin or a yellow sack.
For the protection of health and the environment, you must take the product and all electronic parts included in the scope of delivery to a municipal collection point for old electrical and electronic equipment to ensure their correct disposal. Distributors of electrical and electronic equipment must also take back obsolete equipment free of charge.
By disposing of it separately, you are making a valuable contribution to the reuse, recycling and other methods of recovery of old devices.
Please also remember that you, the end user, are responsible for deleting personal data on any old electrical and electronic equipment before disposing of it.
Information about conformity

The CE mark is a free trademark that is intended exclusively for the authorities and does not imply any assurance of properties.

For technical support, please contact your retailer.
12 Technical specifications
Device short name: HmIP-HAP2, HmIP-HAP2-A
Supply voltage
Plug-in mains adapter (input): 100 V-240 V/50 Hz
Power consumption
plug-in mains adapter: 2.5 W max.
Supply voltage: 5 V
DC
Current consumption: 500 mA max.
Standby power consumption: < 1 W
Degree of protection: IP20
Ambient temperature: 5 to 35 °C
Dimensions (W x H x D): 104 x 104 x 40 mm
Weight: 165 g
Radio frequency band: 868.0-868.6 MHz
869.4-869.65 MHz
Maxium radiated power: 10 dBm max.
Receiver category: SRD category 2
Typ. open area RF range: 400 m
Duty cycle: < 1 % per h/< 10 % per h
Network: 10/100 MBit/s, Auto-MDIX
Subject to technical changes.
Table des matières
1x Homematic IP Access Point 2
text_image
80mm G F LANFigure 2
text_image
Line drawing of a hand holding a smartphone displaying a QR code on its screenFigure 3
1x Homematic IP Access Point 2
text_image
Line drawing of a hand holding a smartphone displaying a QR code on its screenFigura 3
1x Homematic IP Access Point 2
text_image
A B C D E 80mmFigura 1
6 Messa in funzione
text_image
GPIO 40mm G F LANFigura 2
text_image
Hand holding smartphone displaying a QR code on screenFigura 3
1x Homematic IP Access Point 2
1x Netadapter
1x Netwerkkabel
2x Schroef
2x Plug
text_image
80mm G F LANAfbeelding 2
text_image
Hand holding smartphone displaying a QR code on screen, likely for mobile payment or scanning purposes.Afbeelding 3
Free download of the Homematic IPapp!

text_image
Blue QR code image, scannable for digital content retrieval
Download on the
App Store

text_image
Blue QR code image, scannable for digital content retrieval
GET IT ON
Google Play
Bevollmächtigter des Herstellers: Manufacturer's authorised representative

eQ-3 AG
Maiburger Straße 29
26789 Leer / GERMANY
www.eQ-3.de