
KOTAN ABT-1000 - Toaster AIWA - Free user manual and instructions
Find the device manual for free KOTAN ABT-1000 AIWA in PDF.

| Product type | 2-Slot Toaster |
| Brand | Aiwa |
| Model | KOTAN ABT-1000 |
| Power supply | 230 V ~ 50 Hz |
| Rated power | 850 W |
| Dimensions (L x D x H) | 28 x 18 x 20 cm |
| Weight | 1.5 kg |
| Power cord length | 80 cm |
| Exterior material | Stainless steel |
| Browning adjustment | 6 levels (1-2 light, 3-4 medium, 5-max dark) |
| Additional functions | Defrost, reheat, manual stop (Stop) |
| Indicator lights | Power LED, indicators for defrost and reheat |
| Crumb tray | Removable, from the bottom |
| Cord storage | Under the base, with clips |
| Maintenance | Wipe with a damp cloth, do not use abrasives |
| Safety | Automatic shutdown at end of cycle, Stop button for cancellation |
| Warranty | 2 years, after-sales service by authorized center |
| Repairability | Spare parts available from the manufacturer |
| Compliance | EU low voltage, EMC, RoHS, ecodesign directives |
| Package contents | Toaster, instruction manual |
Frequently Asked Questions - KOTAN ABT-1000 AIWA
User questions about KOTAN ABT-1000 AIWA
0 question about this device. Answer the ones you know or ask your own.
Ask a new question about this device
Download the instructions for your Toaster in PDF format for free! Find your manual KOTAN ABT-1000 - AIWA and take your electronic device back in hand. On this page are published all the documents necessary for the use of your device. KOTAN ABT-1000 by AIWA.
USER MANUAL KOTAN ABT-1000 AIWA
natural_image
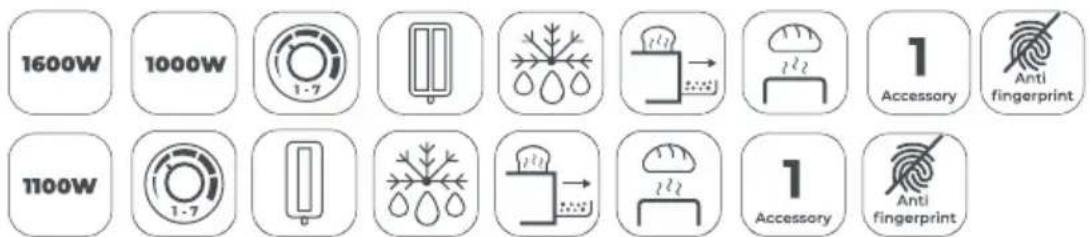
Line drawings of three different kitchen appliances: a flat-screen oven, a vertical cylindrical heater with control buttons, and a standard airway (no text or symbols present)KOTAN ABT-1000 : 220V-240V\~ | 50 Hz /60Hz | 840W-1000W KONAGAI ABT-1200 : 220V-240V\~ | 50 Hz /60Hz | 920W - 1100W KOFOTATSU ABT-1600 : 220V-240V\~ | 50 Hz /60Hz | 1340W - 1600W
(EN) Toasted bread machine - Instruction Manual
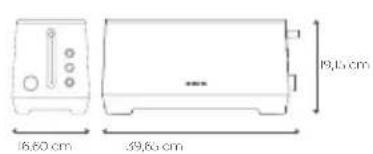
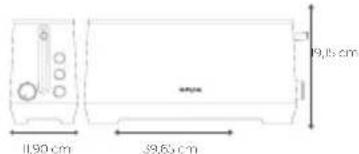
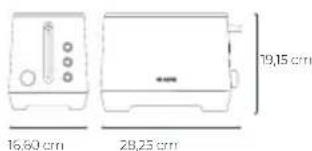
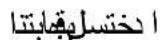
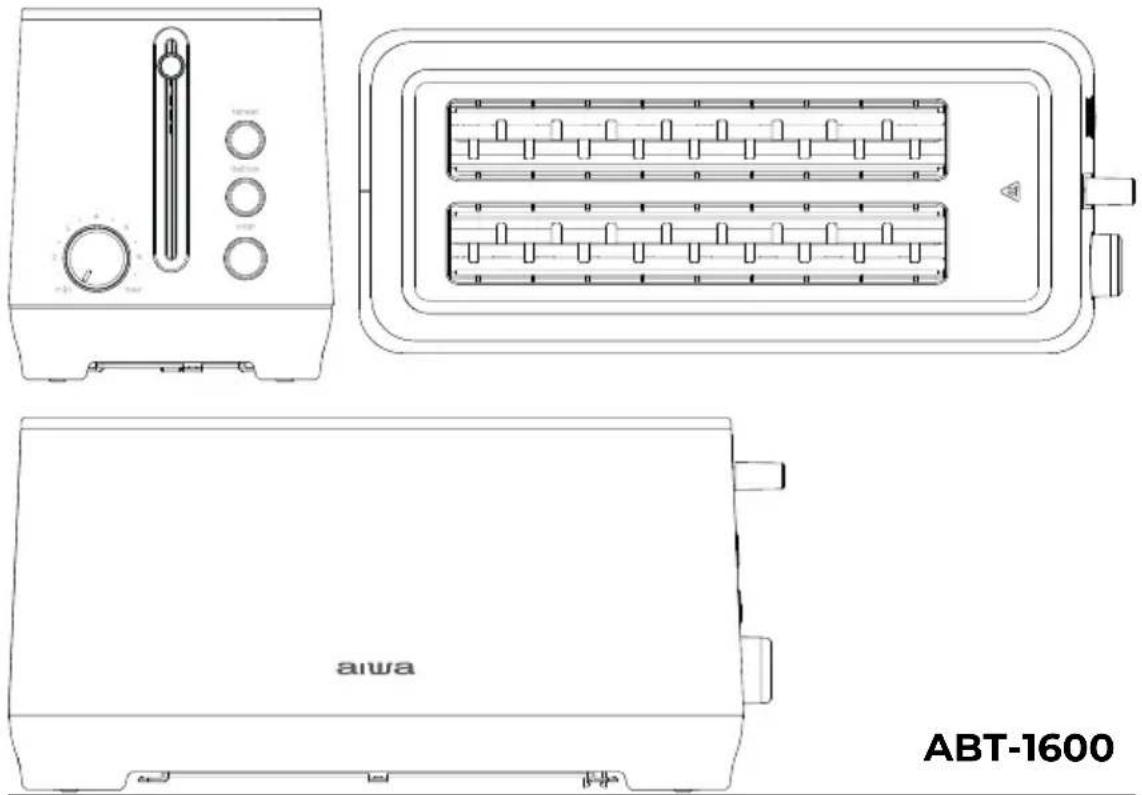
| ABT-1600 | ABT-1200 | ABT-1000 | |
| Power | 1600W | 1100 W | 1000 W |
| Slide Size (wide) | ultra wide slot 4 cm | ultra wide slot 4 cm | ultra wide slot 4 cm |
| Slide Size (long) | 14 cm | 25,5 cm | 25,5 cm |
| Slots | 2 | 1 | 2 |
| Browning control settings | 7 | 7 | 7 |
| Functions | Defrost, reheat, stop | Defrost, reheat, stop | Defrost, reheat, stop |
CONTENT
Contenido, Contenuto, Contenu, Inhalt, Conteúdo, Inhoud, Съдържание, Периєхојево, Zawartość, Obsah, Continut, Tartalom, Садржај, йçerik, Содержание,

MESURES
Measurements, Medidas, Misure, Mesures, Maße, Medidas, Afmetingen, Merki, Metrñóseis, Wymiary, Merania, Măsurători, Méretek, Mepe, Ölçümler, Измерения,
KOFOTATSU ABT-1600.
KONAGAI ABT-1200
KOTAN ABT-1000
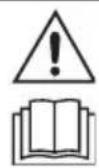
ATTENTION: BEFORE USING THE DEVICE, READ ALL THE INSTRUCTIONS AND WARNINGS INCLUDED IN THIS MANUAL AND ON THE DEVICE.
GETTING TO KNOW YOUR TOASTER
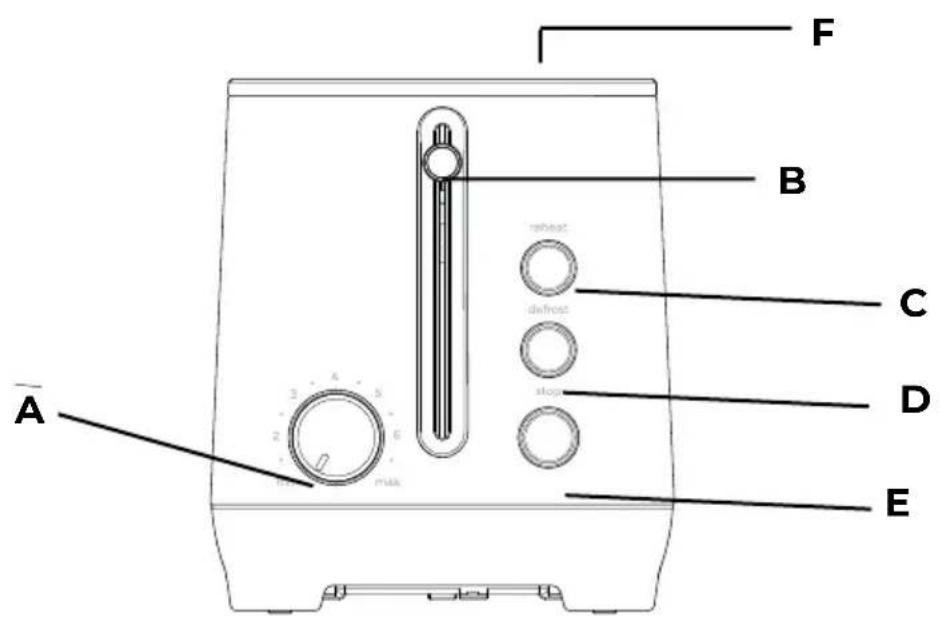
PARTS
A. Browning control knob
B. High lift carriage control lever
C. Reheat button
D. Defrost button
E. Stop button
F. Slot
(ES) Atención: antes de usar el dispositivo, lea todas las instrucciones y advertencias incluidas en este manual y en el dispositivo. Partes A. Perilla de control de dorado B. Palanca de control de elevación C. Botón de recalentamiento D. Botón de descongelación E. Botón de parada F. Ranura
(IT) Attenzione: prima di usare il dispositivo, leggere tutte le istruzioni e avvertenze incluse in questo manuale e sul dispositivo. A. Manopola di controllo della doratura B. Leva di controllo del sollevamento C. Pulsante di riscaldamento D. Pulsante di scongelamento E. Pulsante di arresto F. Fessura
(FR) Attention : avant d'utiliser l'appareil, lisez toutes les instructions et avertissements inclus dans ce manuel et sur l'appareil. A. Bouton de contrôle du brunissage B. Levier de contrôle de levage élevé C. Bouton de réchauffage D. Bouton de décongélation E. Bouton d'arrêt F. Fente
(DE) Achtung: Lesen Sie vor der Verwendung des Geräts alle Anweisungen und Warnungen in diesem Handbuch und auf dem Gerät. A. Bräunungsregler B. Hebel für hohe Hebung. C. Aufwärmtaste D. Auftautaste E. Stopptaste F. Schlitz
(PT) Atenção: antes de usar o dispositivo, leia todas as instruções e avisos incluídos neste manual e no dispositivo.A. Botão de controle de tostagem B. Alavanca de controle de elevação alta C. Botão de reaquecimento D. Botão de descongelamento E. Botão de parada F. Ranhura
(NL) Let op: lees voor het gebruik van het apparaat alle instructies en waarschuwingen in deze handleiding en op het apparaat. A. Bruiningsregelknop B. Hoogheflift hendel C. Opwarmknop D. Ontdooiknop E. Stopknop F. Gleuf
(ВС) Внимание: преди да използвате устройството, прочетете всички инструкции и предупреждения, включени в това ръководство и на устройството. А. Копче за регулиране на изпичането В. Лост за високо повдигане С. Бутон за претопляне Д. Бутон за размразяване Е. Бутон за спиране F. Слот
(EL) Προσοχή: πριν χρησιμοποιήσετε τη συσκευή, διαβάστε όλες τις οδηγίες και προειδοποιήσεις που περιλαμβάνονται σε αυτό το εγχειρίδιο και στη συσκευή. Α. Κουμπί ελέγχου ψησίματος Β. Μοχλός υψηλής ανύψωσης C. Κουμπί επαναθέρμανσης D. Κουμπί απόψυξης E. Κουμπί διακοπής F. Υποδοχή
(PL) Uwaga: przed użyciem urządzenia przeczytaj wszystkie instrukcje i ostrzeżenia zawarte w tym podręczniku i na urządzeniu. A. Pokrętło regulacji opiekania B. Dźwignia podnoszenia wysokości C. Przycisk podgrzewania D. Przycisk rozmrażania E. Przycisk stop F. Gniazdo
(SK) Upozornenie: pred použitím zariadenia si prečítajte všetky pokyny a varovania uvedené v tomto návode a na zariadení. A. Ovládacie gombík opekania B. Páka vysokého zdvihu C. Tlačidlo opätovného ohrevu D. Tlačidlo rozmrazovania E. Tlačidlo zastavenia F. Štrbina
(RO) Atenție: înainte de a utiliza dispozitivul, citiți toate instrucțiunile și avertismentele incluse în acest manual și pe dispozitiv. A. Buton de control al rumenirii B. Manetă de ridicare înaltă C. Buton de reîncălzire D. Buton de decongelare E. Buton de oprire F. Fanta
(HU) Figyelem: a készülék használata előtt olvassa el az összes utasítást és figyelmeztetést ebben a kézikönyvben és a készüléken. A. Pirítás vezérlögomb B. Magas emelésű kocsi vezérlőkar C. Újramelegítés gomb D. Kiolvasztás gomb E. Leállítás gomb F. Nyílás
(SR) Пажња: пре коришћења уређаја, прочитајте сва упутства и упозорења укључена у овај приручник и на уређају. А. Дугме за контролу пржења В. Полуга за подизање С. Дугме за поновно загревање Д. Дугме за одмрзавање Е. Дугме за заустављање F. Отво
(TR) Dikkat: Cihazı kullanmadan önce, bu kılavuzda ve cihazda yer alan tüm talimatları ve uyarıları okuyun. A. Kızartma kontrol düğmesi B. Yüksek kaldırma taşıma kolu C. Yeniden ısıtma düğmesi D. Çözülme düğmesi E. Durdurma düğmesi F. Yuva
(RU) Внимание: перед использованием устройства прочтите все инструкции и предупреждения, включенные в это руководство и на устройстве. А. Ручка регулировки поджаривания В. Рычаг высокого подъема С. Кнопка повторного нагрева Д. Кнопка разморозки Е. Кнопка остановки F. Слот
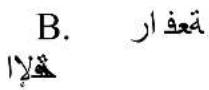
(AR)
A.


MODELS OF TOASTERS
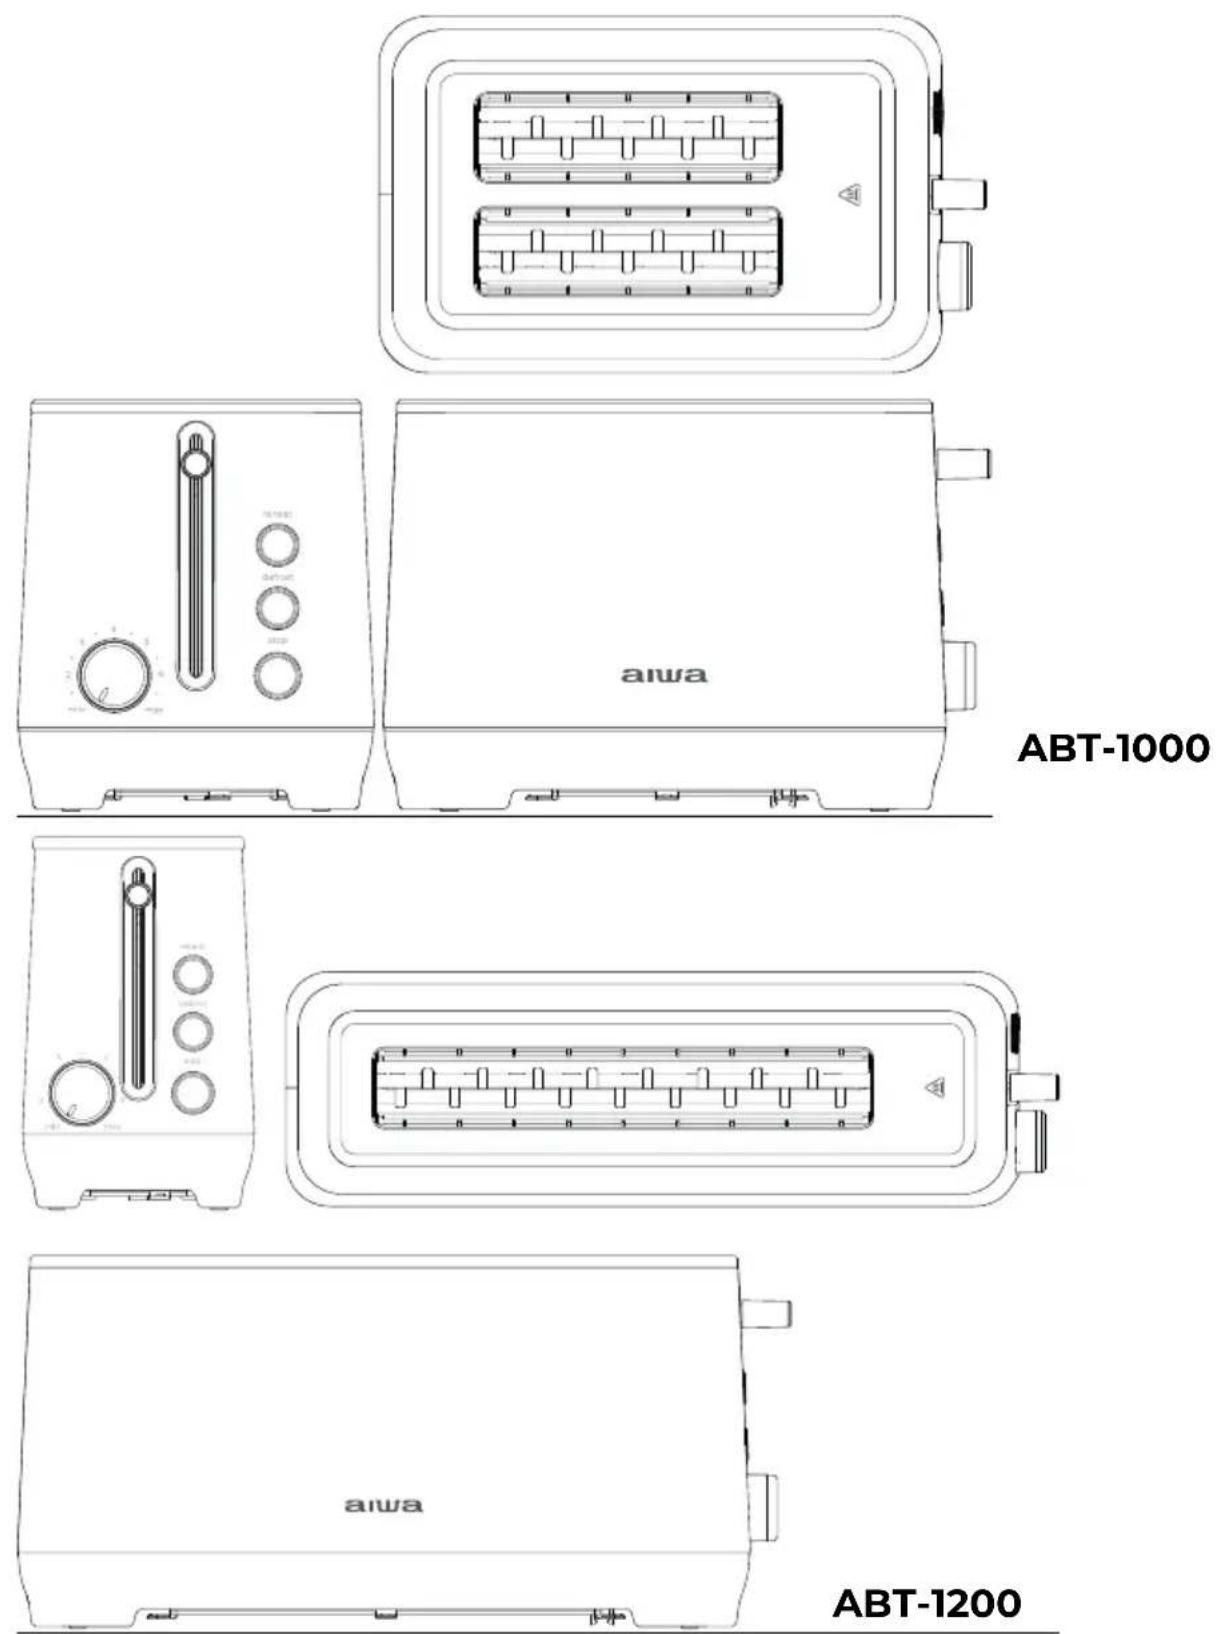
USING THE BUN WARMER
BEFORE FIRST USE
Unpacking and Preparation
- Remove all packing materials, promotional labels, and tapes from the unit.
- Take out all accessories from the package and read this manual thoroughly, paying special attention to operating instructions, warnings, and important safety measures to avoid injury or property damage.
- Unwind the power cord. Check that the crumb tray is in place and that there is nothing in the toaster slots. Plug power cord into the wall outlet.
USE YOUR TOASTER
-
Insert slice(s) of bread
-
Set the browning control
Turn the knob to select desired toast shade:
| BROWNING CONTROL SETTING | SHADE |
| 1-2 | LIGHT |
| 2-4 | MEDIUM |
| 5-MAX | DARK |
Some notes on browning
Toasting is a combination of cooking and drying the bread. Therefore, to achieve the same shade, the bread different in moisture level needs varying toasting time.
- For slightly dry bread, use a lower setting than you normally would.
- For very fresh bread or whole wheat bread, use a higher setting than normal.
- Breads with very uneven surfaces (such as English muffins) will require a higher toast setting.
- Thickly cut pieces of bread (including bagels or baguettes and English muffins) will take longer to toast, sometimes significantly longer, since more moisture must be evaporated from the bread before toasting can occur. Very thick pieces may require two cycles.
- When toasting raisin or other fruit breads, remove any loose raisins, etc. from the surface of the bread before putting into the toaster. This will help prevent fruit pieces from falling into the toaster or sticking to the guide wires in the slot.
Toaster pastries
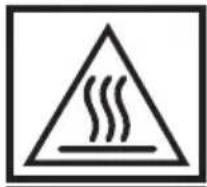
- Exercise caution with toaster pastries; the filling can become quite hot, long before the surface of the pastry becomes browned. Never leave toaster pastries unattended while toasting or warmin.
- To begin toasting
Press the carriage lever until it locks into the down position.
4. To stop toasting
When the toasting cycle is finished, the toast will be raised. If you wish to stop the cycle before it is finished, simply press the Stop button.
Tips
- Never force foods into the toasting slot. Foods should fit freely between the guide wires.
- Do not place buttered breads or pastries with fillings or frostings in the toaster, as this could create a fire hazard.
- After use, unplug your toaster from the electrical outlet.
Defrost button
The Defrost button is designed to first defrost and then toast the bread, which extends the toasting cycle slightly.
1. Insert slice(s) of bread.
Be sure that multiple slices do not overlap and the carriage is in the up position.
2. Set the browning knob.
Settings 1-2
For refrigerated breads and thinner frozen items such as frozen pancakes.
Settings 3-4
For toaster pastries, frozen waffles and (thin) French toast, and refrigerated bagels.
Settings 5-6
For thicker frozen items such as bagels, hand-cut bread and thick French toast.
3. To begin toasting
Press the carriage lever until it locks into the down position. The LED display and the stop indicator lights up simultaneously.
4. Press the Defrost button, the defrost function is on.
The defrost indicator lights up.
To stop cycle
When the defrost cycle is complete, the toaster will raise the bread. If you wish to stop the cycle before it is finished, simply press the Stop button to interrupt. After use, unplug the toaster from the electrical outlet.
Reheat button
The reheat feature allows you to reheat bread without browning or toasting.
1. Insert slice(s) of bread.
Be sure that multiple slices do not overlap and the carriage is in the up position.
2. To begin reheating
Press the carriage lever until it locks into the down position.
3. Press the Reheat button.
The reheat indicator lights up.
To stop cycle
When the reheat cycle is completed, the toaster will raise the bread. If you wish to stop the cycle before it is finished, simply press the Stop button to interrupt
CLEANING YOUR TOASTER
Always allow the toaster to cool completely before cleaning.
- Always unplug the toaster from the electrical outlet before cleaning.
- Do not use abrasive cleaners. Simply wipe the exterior with a clean damp cloth and dry thoroughly. Apply any cleansing agent to a cloth, not to the toaster, before cleaning.
- To remove crumbs, slide out the crumb tray and discard crumbs. Wipe clean the replace. Never operate the toaster without the crumb tray in place.
- To remove any pieces of bread remaining in the toaster, turn the toaster upside down and gently shake. Never insert any hard or sharp instruments into the slot, as this could damage the toaster and cause a safety hazard.
- Never wrap the cord around the outside of the toaster. Use the cord storage cleats on the underside of the toaster.
- Any other servicing should be performed by an authorized service representative.
GUARANTEE AND SERVICES
If you require services or repairing, or have any doubt, you can communicate with the local Customer Center.
If there is no Customer Center near your location, you can communicate with your local dealer.

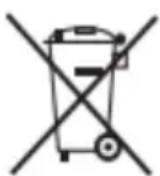
This symbol means that in case you wish to dispose of the product once its working life has ended, take it to an authorized waste agent for the selective collection of waste electrical and electronic equipment (WEEE) This appliance complies with Directive 2014/35/EU on Low Voltage, Directive 2014/30/EU on Electromagnetic Compatibility, Directive 2011/65 EU on the restrictions of the use of certain hazardous substances in electrical and electronic equipment and Directive 2009/125/EC on the ecodesign requirements for energy-related products
natural_image
Symbol of a trash bin crossed out by a diagonal line, with a solid black rectangle below (no text or numbers present)www.aiwa-industries.com
All Pictures shown are for illustration purpose only.
All Rights Reserved. All other trademarks are property of their respective owners.
All specifications are subject to change without prior notice.
Aiwa Europe S.L., Av. Siglo XXI, 34, ES-08840.
REV. 02/02/2024 VI