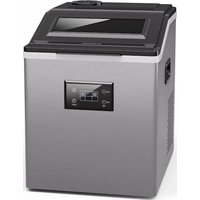
FrostMaster - Ice Maker Klarstein - Free user manual and instructions
Find the device manual for free FrostMaster Klarstein in PDF.


User questions about FrostMaster Klarstein
0 question about this device. Answer the ones you know or ask your own.
Ask a new question about this device
Download the instructions for your Ice Maker in PDF format for free! Find your manual FrostMaster - Klarstein and take your electronic device back in hand. On this page are published all the documents necessary for the use of your device. FrostMaster by Klarstein.
USER MANUAL FrostMaster Klarstein
text_image
COOKINGCO COOKINGCO KINGCOOKING KINGCOOKING COOKINGCO KINGCOOKING KINGCOOKING KINGCOOKING
KLARSTEIN
www.klarstein.com

area
| Category | Value | | -------- | ----- | | 1 | 100 | | 2 | 100 | | 3 | 100 | | 4 | 100 | | 5 | 100 | | 6 | 100 | | 7 | 100 | | 8 | 100 | | 9 | 100 | | 10 | 100 | | 11 | 100 | | 12 | 100 | | 13 | 100 | | 14 | 100 | | 15 | 100 | | 16 | 100 | | 17 | 100 | | 18 | 100 | | 19 | 100 | | 20 | 100 | | 21 | 100 | | 22 | 100 | | 23 | 100 | | 24 | 100 | | 25 | 100 | | 26 | 100 | | 27 | 100 | | 28 | 100 | | 29 | 100 | | 30 | 100 | | 31 | 100 | | 32 | 100 | | 33 | 100 | | 34 | 100 | | 35 | 100 | | 36 | 100 | | 37 | 100 | | 38 | 100 | | 39 | 100 | | 40 | 100 | | 41 | 100 | | 42 | 100 | | 43 | 100 | | 44 | 100 | | 45 | 100 | | 46 | 100 | | 47 | 100 | | 48 | 100 | | 49 | 100 | | 50 | 100 | | 51 | 100 | | 52 | 100 | | 53 | 100 | | 54 | 100 | | 55 | 100 | | 56 | 100 | | 57 | 100 | | 58 | 100 | | 59 | 100 | | 60 | 100 | | 61 | 100 | | 62 | 100 | | 63 | 100 | | 64 | 100 | | 65 | 100 | | 66 | 100 | | 67 | 100 | | 68 | 100 | | 69 | 100 | | 70 | 100 | | 71 | 100 | | 72 | 100 | | 73 | 100 | | 74 | 100 | | 75 | 100 | | 76 | 100 | | 77 | 100 | | 78 | 100 | | 79 | 100 | | 80 | 100 | | Note: The actual values are not provided in the code. I have used the label 'Value' as a placeholder for the value detection. You would need to run the code to get the actual values from the code list. Please note that the actual values would be the result of this example. You would need to run the code to get the actual values from the code list. You would need to run the code to get the actual values from the code list. You would need to run the code to get the actual values from the code list. You would need to run the code to get the actual values from the code list. You would need to run the code to get the actual values from the code list. You would need to run the code to get the actual values from the code list. You would need to run the code to get the actual values from you would need to run the code. You would need to run the code to get the actual values from you would need to run the code.text_image
QR code image containing encoded data, no visible human-readable textINHALT
Technische Daten 2
natural_image
Line drawing of a laboratory ice cream machine with control panel and ventilation slots (no text or symbols)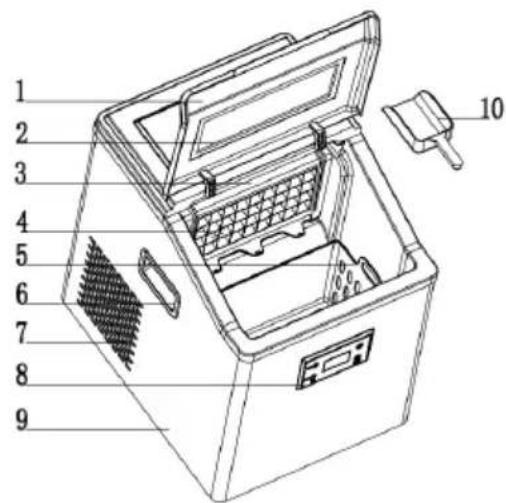
text_image
Technical diagram of a device with numbered parts for identification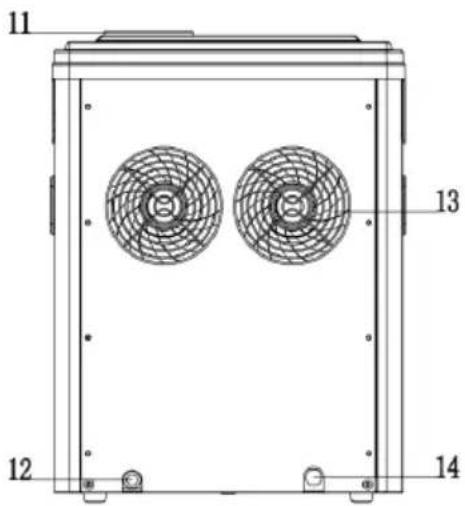
text_image
11 13 12 14When the ice full symbol lights up, indicates the ice machine has stopped making ice. It goes on ice-making after the ice cubes are removed.
Selbstreinigung
natural_image
Symbol of a trash bin crossed with a diagonal line, no text or labels presentBerlin Brands Group UK Limited
PO Box 42
272 Kensington High Street
London, W8 6ND
United Kingdom
Dear Customer,
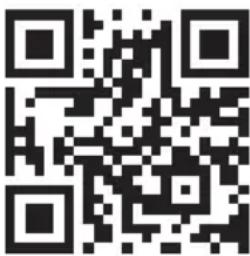
Congratulations on purchasing this device. Please read the following instructions carefully and follow them to prevent possible damages. We assume no liability for damage caused by disregard of the instructions and improper use. Scan the QR code to get access to the latest user manual and more product information.
text_image
QR code image containing encoded data, no visible human-readable textCONTENTS
Technical Data 21
Safety Instructions 21
Product Description 24
Getting Started 27
Operation of the Machine 27
Cleaning and Care 33
Troubleshooting 33
Disposal Considerations 35
Manufacturer & Importer (UK) 35
TECHNICAL DATA
| Item number 10046193 | |
| Power supply 220-240 V~ 50/60 Hz | |
| Protection class I | |
| Climate class SN/N/ST | |
| Maximum current 1,4 A | |
| Maximum Power 230 W | |
| Refrigerant (quantity) R290 (40 g) | |
| Ice basket storage capacity 3 L | |
| Measurements 424 x 330 x 440 mm | |
| Weight 13.6 kg |
SAFETY INSTRUCTIONS
- Place the device on a level surface.
- Use the device indoors only.
- Unplug the device from the power outlet when not in use.
- Never immerse the power cord and plug in water or other liquids.
- Only use accessories that are expressly recommended by the manufacturer for this device.
- Do not place the device directly under an electrical outlet.
- Do not let the power cord hang from the work surface so that children cannot pull on it.
- Do not overfill the unit, otherwise short circuits and electric shocks may occur.
- Make sure that the lid is always closed during operation.
- Do not pull the plug out of the outlet by the cord, but hold it by hand when unplugging.
- Use this device only for its intended purpose. We accept no liability for damage caused by disregarding the instructions and improper use. Only use the device in the household.
- Do not connect the device to a timer or remote-controlled socket.
- Do not immerse the device in water.
- If the power cord or plug is damaged, it must be replaced by the manufacturer, an authorized service centre, or a similarly qualified person.
- Follow local regulations for disposal of equipment containing flammable gas.
- Do not store highly flammable or explosive substances in the device.
- Fill the device only with potable water.
• Children from the age of 8, mentally, sensory and physically impaired
persons may only use the device if they have been familiarized in detail with the functions and safety precautions by a supervisor responsible for them beforehand and understand the associated risks.
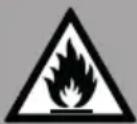
This appliance contains the refrigerant propane (R290), a natural gas which is environmentally friendly. Although it is flammable, it does not damage the ozone layer and does not increase the greenhouse effect. The use of this coolant has, however, led to a slight increase in the noise level of the appliance. In addition to the noise of the compressor, you might be able to hear the coolant flowing around the system. This is unavoidable, and does not have any adverse effect on the performance of the appliance. Care must be taken during the transportation and setting up of the appliance that no parts of the cooling system are damaged. Leaking coolant can damage the eyes.
WARNING
Fire hazard due to improper disposal! Please observe the local regulations for the disposal of appliances containing flammable refrigerants and gases.
- Keep ventilation openings in the unit housing free of obstacles.
- Do not damage the refrigerant circuit.
- Do not use any mechanical devices or other means to accelerate the defrosting process or the ice recovery process.
- Do not use other types of electrical appliances inside the ice cube machine.
Special Notes
WARNING
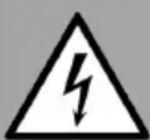
Risk of electric shock
This is a class I appliance. Connect the appliance to an earthed socket with protective contacts. Failure to do so may result in fatal injury from electric shock.
- When positioning the unit, make sure that the power cord is not pinched or damaged.
- Make sure that there are no multiple sockets or power supplies on the back of the unit.
To avoid contamination of food, please follow the instructions below:
a
- Regularly clean surfaces that may come into contact with food. Clean the water drain regularly.
- If the appliance contains a water tank, clean it if it has not been used for 48 hours. Rinse the tank if no water has been removed for 5 days.
WARNING
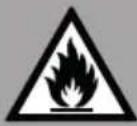
When using, servicing and disposing of the unit, pay attention to the left symbol on the rear of the unit or on the compressor. This symbol warns of possible fires. There are flammable substances in the refrigerant lines and in the compressor. Keep the appliance away from sources of fire during use, maintenance and disposal.
- During transportation, do not tilt the machine more than 45 degrees, do not reverse the machine. This may damage the compressor and the sealing system.
- Remove all packing materials, check the machine carefully and make sure that the machine, power cord and plug are normal.
- The machine should be on a level surface. To ensure sufficient ventilation, the distance of the back of ice maker to the wall should be at least 150 mm, it should be away from the oven, radiator or other heat source.
- Before using the machine for the first time, place the machine and leave the transparent cover open for at least two hours.
- Make sure that the home voltage is consistent with the voltage indicated by the machine.
• Distilled water is not allowed. Mineral water is recommended. - When the indoor temperature is lower than 15^ , small ice is recommended. When the indoor temperature is higher than 30^ , large ice is recommended.
- Do not touch the evaporator while the ice maker is in use or making ice, as this may freeze your skin.
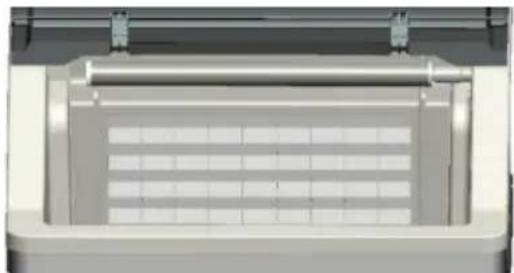
natural_image
Close-up of a white industrial ventilation duct with grid pattern and metal clamps (no text or symbols visible)PRODUCT DESCRIPTION
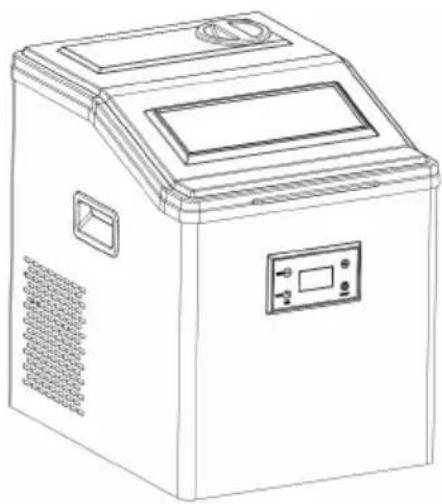
natural_image
Line drawing of a laboratory ice cream machine with control panel and ventilation slots (no text or symbols)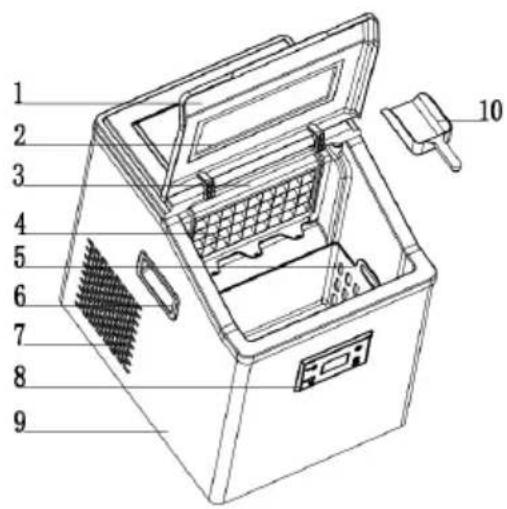
text_image
Technical diagram of a closed kitchen appliance with numbered parts for identification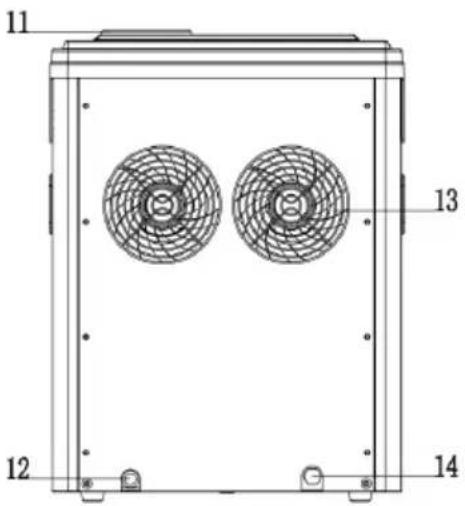
text_image
11 13 12 141 Front cover
2 Transparent window
3 Sprinkler pipe
4 Evaporator
5 Ice storage basket
6 Handle
7 Heat air outlet
8 Operation panel
9 Stainless housing shell
10 Ice scoop
11 5L bottle water inlet (with dust cover)
12 Tap water inlet
13 Exhaust fan
14 Power cord plug
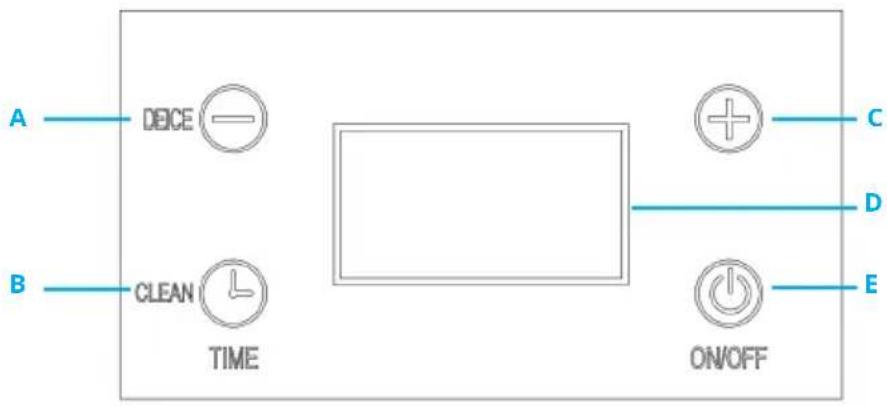
Control panel
text_image
A DEICE B CLEAN TIME ON/OFF C D EA DEICE (-)
- Smaller ice setting: By pressing the "-" button to decrease ice making time and thickness of ice. Press "-" one time to decrease one minute. The shorter the ice making time, the thinner the ice will be. Minimum setting: "-1M"... "-6M" (Use when the machine is in ice-making mode)
- Timer setting reduction: By Pressing the "-" button after press the "TIME" button to reduce the time setting. Press "-" one time, decrease one hour. Timer setting can be decreased from 24H to 01H. Use when the machine is in standby mode.
- Deice: Pressing the “-” for 5 seconds to enter into deicing ices mode. Use when the machine is in ice-making mode.
B TIME/CLEAN
- Timer setting: Press the "TIME" button at first, then press the "+" , "-" button, set idea time for starting ice-making reservation. Time setting range is "01H ...24H". Use when the machine is in standby mode).
- Self-cleaning: Press the "CLEAN" button for 5 seconds to enter into self-cleaning mode. Use when the machine is in standby mode.
C (+)
- Larger ice setting: By Pressing the "+" button to increase ice making time and thickness of ice. Press "+" one time to increase one minute. The longer the ice making time, the thicker the ice will be. Maximum setting: "+1M"... "+6M" (Use when the machine is in ice-making mode.
- Timer setting increase: By Pressing the "+" button after press the "TIME" button to increase the time setting. Press "+" one time to increase one hour. Timer setting can be increased from 01H to 24H. Use when the machine is in standby mode.
• Water inlet mode setting selection: The upper left corner of the screen
displays "01" after power on, indicating that the machine defaults 5L bottle of water inlet. Press "+" for 5 seconds, and the upper right corner of the screen display changes into "02", indicating that the machine enters the tap water inlet mode. If press "+" for 5 seconds, the upper right corner of the screen display changes back into "01", then enter into the default 5L bottle water inlet. The system has a memory function, restarting the machine will repeat the last time the water intake mode is set. (Use when the machine is in standby mode).
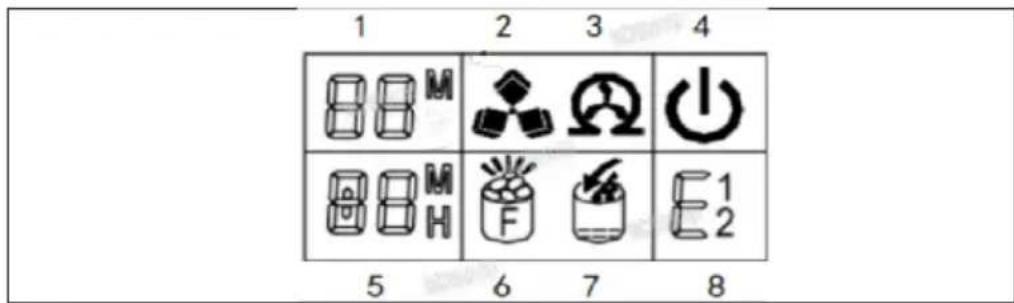
D LCD display
text_image
1 2 3 4 88M 88H 8 6 7 E1 E2 5 6 7 8- Ice-making time countdown and water inlet mode display
"M" - Ice making time countdown (By minutes); "01"- Indicates default 5L bottle water inlet
- Ice-making and De-ice symbols
The symbol of ice is rotating indicates ice is making. The symbol of ice is blinking indicates de-ice.
-
Automatic self-cleaning symbol: Once the machine enters the self-cleaning period, the symbol will light up.
-
ON/OFF switch symbol: The symbol blinking indicates the machine is off ice-making. The symbol not blinking indicates the machine is on ice-making.
-
Time setting display: "H" lights up indicates the timer setting by hours. "M" lights up indicates the ice-making time setting by minutes.
-
Ice full symbol: Once the ice is full in the ice basket, the symbol will light up.
-
Water inlet and water shortage symbol: Flashing arrows indicate water is in-letting to the machine for the next round of ice-making; The entire symbol is fully illuminated indicating the machine is short of water and needs to be refilled the water.
-
Fault display: "E1" indicates temperature sensor is damaged. "E2" indicates ice making is abnormal or return air temperature sensor is damaged.
E ON/OFF:
By pressing "ON/OFF" button after plug in, the machine enters ice-making mode. By pressing the "ON/OFF" button for 2 seconds then, the machine enters shutdown off mode.
GETTING STARTED
Unpacking your ice maker
- Open the package and remove all internal and external packaging. Remove tape and glue from your ice maker before using. Check to see if there's ice storage basket and ice scoop or not. If any accessories are missing, please contact customer service.
- The power socket must be reliably grounded and have a separate plug power supply: 220-240V\~50Hz/60Hz.
- Place the ice machine out of direct sunlight and away from heat sources and radiation. Place the ice machine horizontally and ensure there is at least 15cm of clearance on the sides and rear.
- If the machine has been inverted during transportation or handling, it is recommended that the machine be left to stand for at least 2 hours before starting.
- After you remove all of the packaging materials, clean the inside of your ice maker before using it.

CAUTION: HEALTH RISK
Fill with potable water only. Only use drinking water.
Add water into the machine (external water source)
- Select the water inlet mode.
Plug in, the LCD displays "01" or "02" and the ON/OFF symbol keeps flashing.
"01" indicates 5L bottle water inlet mode, "02" indicates tap water inlet mode.
Press the "+" button for 5 seconds to ex-switch the water inlet mode.
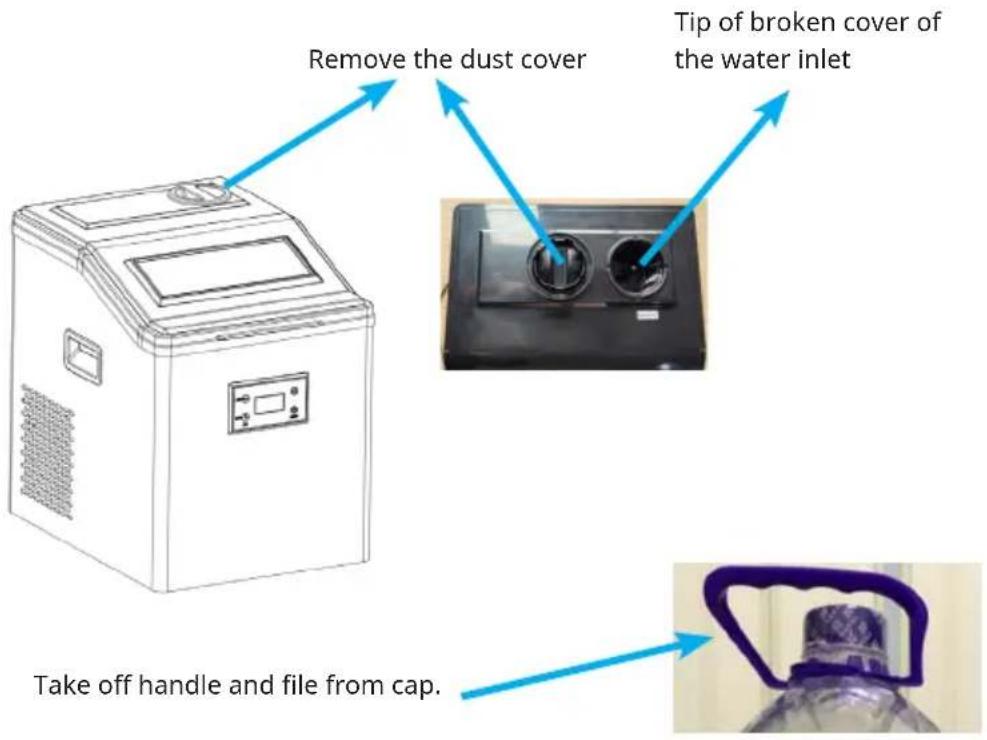
- Refill with bottle water:
After selecting the water inlet mode and when LCD displays "01", follow below steps.
a. Remove the dust cover from ice machine 5L bottle water inlet.
b. Take off the cap and handle and lifting ring of the 5L bottled water.
c. Turn the mouth of the bucket downward and align it with the tip of the broken cover of the water inlet, press hard. The 5L bottled water will open and supply water downward. Water will begin to flow into the tank causing air bubbles in the bottle.
text_image
Remove the dust cover Tip of broken cover of the water inlet Take off handle and file from cap.
text_image
5 L bottle waterRefill with tap water
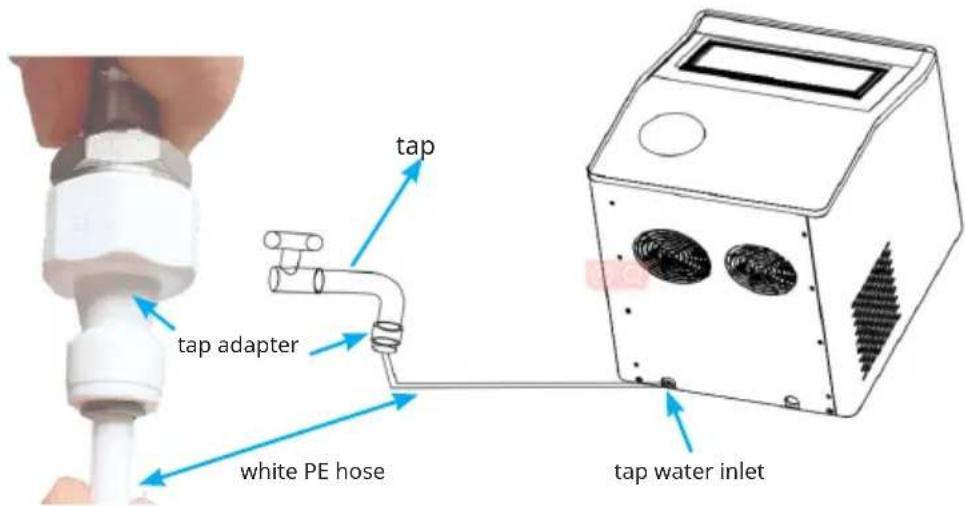
After select the water inlet mode and when LCD displays "02", follow below steps.
a. Connect the one side(20mm) of adapter with faucet.
b. Connect the one side of white PE hose with another side(Dia.6.5mm) of adapter.
c. Connect the another side of white PE hose with "tap water inlet" faucet adapter (water inlet/water pressure ≤ 0.8Pa). If with poor water quality, please connect the with a filter.
text_image
tap tap adapter white PE hose tap water inletAttention
- Please add drinking water, preferably barreled or bottled purified water and distilled water. The quality of the water directly affects the transparency of the ice cubes and the service life of the machine.
- Refill the bottled water only if the machine lacks water and the water shortage symbol is light up in the deicing mode.
- The unit has a memory function for the water supply mode. When the machine is turned on again, it will repeat the last water inlet mode.
- The size of the bottle mouth of bottled water must match the size of the water inlet on the top of the machine.
Ice making
Plug in. Press the "ON/OFF" button on the operation panel, bottled water goes into the water tank of the machine to supply the water. When the water reaches the standard water level, the machine starts to make ice. The power symbol is always on and the ice-making symbol rotates dynamically. After a few minutes of ice-making, the number "13M" appears in the upper left corner, indicating that it will take 13 minutes for the ice-making to end, and the ice-making countdown starts from 13 minutes to 1 minute then disappears, and then enter de-ice mode. The de-ice symbol is blinking and the ice on the evaporator falls into the ice storage basket.
The machine produces 36 PCS of clear cubes of ice per cycle. Each single ice size is 22x22mm.
The default ice-making time of the machine is 13 minutes per cycle and the LCD displays "+0M", the countdown starts from "13M".
Each ice making cycle takes about 13-25 minutes, and varies depending on the ambient temperature and the temperature of the water added. The first ice making time will be longer due to the higher ambient temperature, but the ice making cycle will not exceed 30 minutes.
Deice: When the machine is in ice-making mode and the sprinkler pipe above the evaporator begins to spray water down. By pressing the "-" button for 5 seconds, the machine enters the force de-ice, and ice cubes from the ice tray will automatically fall down and be removed into the ice storage basket. Deice takes about 1-2 minutes.
When the machine is in deice mode, the machine automatically refills the water tank from bottled water via the solenoid water valve for next cycle ice making. The water inlet arrow symbol on the LCD display continues to flash until the water replenishment reaches the standard level of the water tank and goes out. If the water replenishment cannot reach the standard level of the water tank, the water shortage symbol lights up and the machine stops working. In this case, you need to follow the water refilling instructions to refill water for the machine. After refilling the water, press the "ON/OFF" button to start a new cycle of ice-making. Otherwise, it will wait for about 15 minutes and turn on automatically to start a new cycle of ice-making. Attention: There will be a 3-minute delay before it restarts after the ice machine stops working.
When the machine is in ice-making mode, by pressing the "ON/OFF" button for 2 seconds to stop ice-making. Then the machine enters standby mode.
Ice cube thickness and ice-making time adjustment guide: When the machine is in ice-making mode, you can adjust the next cycle's ice-making time and thickness of ice block to get the desired ice size and time by
pressing the "+" and "-" buttons on the operation panel.
| LCD display | -6M -5M -4 | M -3M -2M | -1M 0M | ||||
| Ice making time | 7 min 8 | min 9 min | 10 min 1 | 1 min 12 | min 13 min | ||
| LCD display | +1M +2M | +3M +4M | +5M +6M | ||||
| Ice making time | 14 min | 15 min 16 | min 17 m | n 18 min | 19 min |
- The machine has a memory function for the ice-making time and ice cube thickness setting. When the machine is restarted to make ice, it will return to the last time ice-making time setting.
- The longer the ice-making time is set, the thicker the ice will be.
- The adjustment is only for the next cycle ice making time and ice thickness, not for the current round of ice making.
When the ice full symbol lights up, indicates the ice machine has stopped making ice. It goes on ice-making after the ice cubes are removed.
Self-cleaning
Fulfill the water tank with bottled water and plug in. By pressing "CLEAN" button for 5 seconds, the machine is entered into self-cleaning mode. Auto self cleaning takes 5 minutes. The cleaning symbol on the LCD rotates dynamically, and LCD displays time countdown from "05M, 04M,03M,02M,01M". The machine will automatically go into standby mode after 5 minutes self cleaning. Pressing the "ON/OFF" button can stop and off self-cleaning processing.
Timer setting
When the machine is in standby mode, press "TIME" button at first. Then press the "+" and "-" buttons, to reserve the desired time needed for the machine to auto-start ice-making mode. Timer setting range "01H...24H". Press the "+" or "-" button one time to increased or decreased 1 hour. Note: "H" blinking means the time is adjusting. "H" stops blinking after no operation of "+" or "-" button for 8 seconds and timer setting is completed. LCD has a countdown display.
Cancel the timer setting: By pressing "TIME" button.
Drainage of ice machine
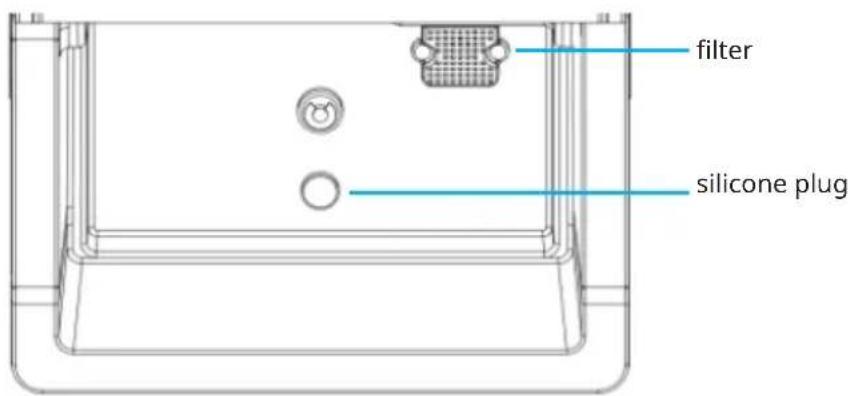
text_image
filter silicone plugOpen the front cover of the ice machine, take out the ice basket, and then pull out the silicone plug of the water tank to drain the water in the water tank. After drainage is completed, reset the silicone plug.
The machine must be in standby mode to drain the water in the water tank.
For your healthy, please change the water every 24 hours and clean the machine liner and water tank every 3 days.
CLEANING AND CARE
Before using your ice maker, it is strongly recommended to clean it thoroughly.
- Take out the ice basket.
- Clean the interior with diluted detergent, warm water and a soft cloth.
- Then use the water to rinse the inside parts, and drain out the water by unplugging the drain cap on front bottom side.
- Draining the machine: When the machine is switched off, remove the drain plug to empty the water tank and the water in the liner. Replace the drain plug after emptying.
- For more hygienic and clean ice, you can add water and let the machine make ice in 1-2 cycles. Then discard all the ice and drain the water.
- The outside of the ice maker should be cleaned regularly with a mild detergent solution and warm water.
- Dry the interior and exterior with a clean soft cloth.
- When the machine is not to be used for a long time, drain water completely and dry the interior.
- Check the filter at the bottom of the water tank and and sprinkler pipe above the evaporator to see if they are blocked by dirty debries, affecting the flow of water. Clean them regularly.
- If there is ice on the evaporator and the adhesion is very strong, you cannot use objects to force it off. Press the button for 5 seconds to defrost. Defrosting takes approximately 1 - 3 minutes.
- If the ice on the evaporator is thin, defrosting will take longer than 3 minutes, simply touch the white panel under the bottom of the evaporator to stop defrosting.
TROUBLESHOOTING
| PROBLEM POSSIBLE CAUSE SUGGESTED SOLUTIONS | ||
| "Water short-age" indicator light up. | Lack of Water. Stop the | ice maker, fill water, and press "ON/OFF" button again to restart the unit. |
| The liquid level switch float card does not float up. | Clean the water tank and liquid level switch. | |
| "Ice full" indicator lights up. | There is too much ice in the ice storage basket and it is full. | Remove ice from ice basket.Continuous press "Select" button 5 seconds, the unit could make ice 10 cycles even "Ice" indicator is on. |
| Ice cubes have poor transparency. | Poor water quality. Replace purified water and distilled water in barrels or bottles, and filter and soften the water quality. | |
| Ice cubes are too thin. | Ambient temperature is too high. | 1. Move the machine to a lower temperature place.2. Press the "+" button to increase the ice making time. |
| Poor ventilation The back and left and right sides of the ice machine should be at least 20 cm away from obstructions. | ||
| Ice too thick Ambient temperature is too low. | Press the "-" key to reduce the ice making time. | |
| The ice cubes are not full and irregular. | The water quality in the water tank is poor and the water tank is too dirty. | Clean the water tank and change the water. |
| The small hole in the sprinkler pipe is blocked or the water direction of the sprinkler pipe is deviated. | 1. Clean the sprinkler pipe and unblock the 9 small holes.2. Adjust the water direction of the sprinkler pipe. | |
| The ice making process is normal, but ice cubes cannot be generated. | Ambient temperature or water temperature is too high. | Please make ice when the ambient temperature is lower than 32°C, and add a certain amount of cold water to the water tank. |
| Refrigeration system leaks. | Contact after-sales service personnel. | |
| Refrigeration system clogged. | Contact after-sales service personnel. | |
DISPOSAL CONSIDERATIONS
natural_image
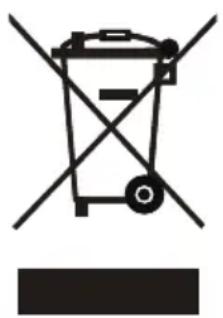
Symbol of a trash bin with crossed lines indicating no waste, and a solid black rectangle below (no text or labels)If there is a legal regulation for the disposal of electrical and electronic devices in your country, this symbol on the product or on the packaging indicates that this product must not be disposed of with household waste. Instead, it must be taken to a collection point for the recycling of electrical and electronic equipment. By disposing of it in accordance with the rules, you are protecting the environment and the health of your fellow human beings from negative consequences. For information about the recycling and disposal of this product, please contact your local authority or your household waste disposal service.
This product contains batteries. If there is a legal regulation for the disposal of batteries in your country, the batteries must not be disposed of with household waste. Find out about local regulations for disposing of batteries. By disposing of them in accordance with the rules, you are protecting the environment and the health of your fellow human beings from negative consequences.
MANUFACTURER & IMPORTER (UK)
Manufacturer:
Chal-Tec GmbH, Wallstrasse 16, 10179 Berlin, Germany.
Importer for Great Britain:
Berlin Brands Group UK Limited
PO Box 42
272 Kensington High Street
London, W8 6ND
United Kingdom
Estimado cliente:
text_image
QR code image containing encoded data, no visible human-readable textCONTENIDO
Datos técnicos 38
natural_image
Line drawing of a laboratory ice cream machine with control panel and ventilation slots (no text or symbols)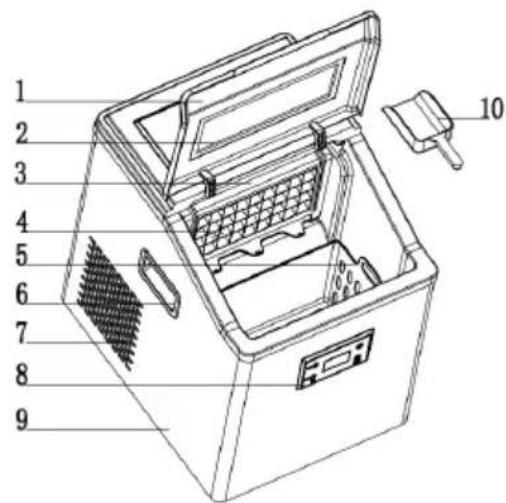
text_image
Technical diagram of a device with numbered parts for identification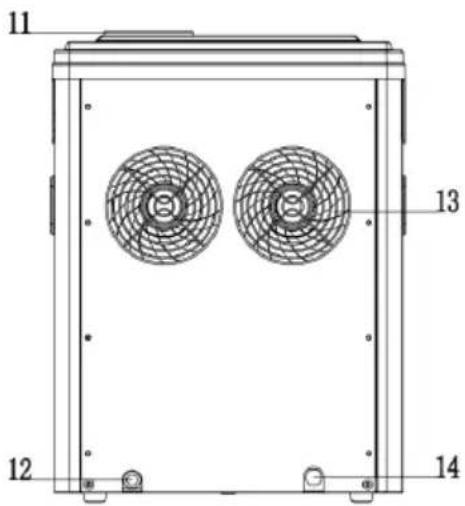
text_image
11 13 12 14natural_image
Symbol of a trash bin with crossed lines indicating no waste or discharge, and a solid black rectangle below (no text or labels)Berlin Brands Group UK Limited
PO Box 42
272 Kensington High Street
London, W8 6ND
United Kingdom
Cher client, chère cliente,
text_image
QR code image containing encoded data, no visible human-readable textSOMMAIRE
Fiche technique 55
natural_image
Line drawing of a laboratory ice cream machine with control panel and ventilation slots (no text or symbols)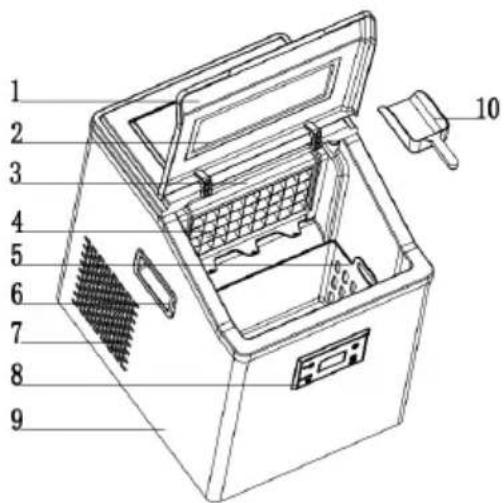
text_image
Technical diagram of a device with numbered parts for identification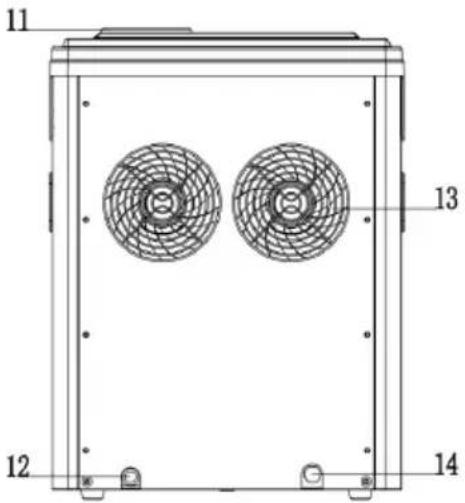
text_image
11 13 12 14natural_image
Symbol of a trash bin with crossed lines indicating no waste, and a solid rectangle below (no text or labels)Berlin Brands Group UK Limited
PO Box 42
272 Kensington High Street
London, W8 6ND
United Kingdom
Gentile cliente,
text_image
QR code image containing encoded data, no visible human-readable textINDICE
Dati tecnici 72
natural_image
Line drawing of a laboratory ice cream machine with control panel and ventilation slots (no text or symbols)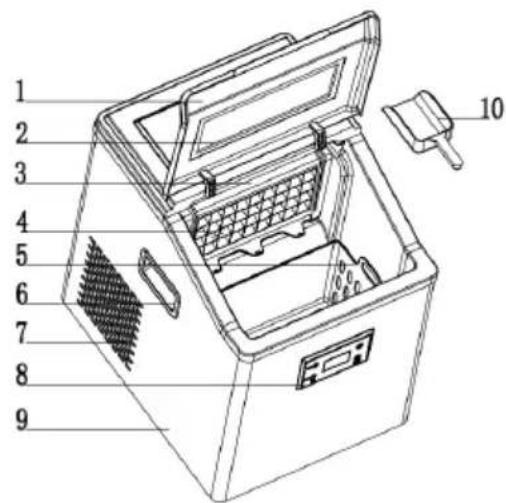
text_image
Technical diagram of a closed storage unit with numbered parts for identification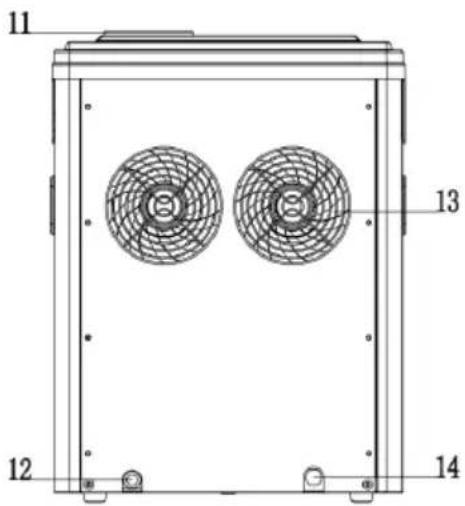
text_image
11 13 12 14natural_image
Symbol of a trash bin with crossed lines indicating no waste or discharge, and a solid black rectangle below (no text or labels)PRODUTTORE E IMPORTATORE (UK)
Produttore:
Chal-Tec GmbH, Wallstraße 16, 10179 Berlino, Germania.
Berlin Brands Group UK Limited
PO Box 42
272 Kensington High Street
London, W8 6ND
United Kingdom

area
| Category | Value | | -------- | ----- | | A | 100 | | B | 100 | | C | 100 | | D | 100 | | E | 100 | | F | 100 | | G | 100 | | H | 100 | | I | 100 | | J | 100 | | K | 100 | | L | 100 | | M | 100 | | N | 100 | | O | 100 | | P | 100 | | Q | 100 | | R | 100 | | S | 100 | | T | 100 | | U | 100 | | V | 100 | | W | 100 | | X | 100 | | Y | 100 | | Z | 100 |