
LD24EGH244 - TV FAR - Free user manual and instructions
Find the device manual for free LD24EGH244 FAR in PDF.

| Product type | LED TV |
| Brand | FAR |
| Model | LD24EGH244 |
| Screen size | 60 cm (24 inches) |
| Resolution | 1366 x 768 pixels |
| Brightness | 200 cd/m² |
| Contrast ratio | 3000:1 |
| Viewing angle | 178° horizontal / 178° vertical |
| Aspect ratio | 16:9 |
| Power supply | 100-240 V~ 50/60 Hz, 36 W |
| Power consumption | 18 kWh/1000 h (class E) |
| Standby consumption | < 0.5 W |
| Gross weight | 3.2 kg |
| Dimensions (with stand) | 551 x 205 x 376.5 mm |
| VESA wall mount | M4, 100 x 100 mm |
| TV systems | PAL, SECAM |
| Video system | PAL, NTSC |
| Antenna input | 75 Ω (standard socket) |
| Audio output | 2 x 3 W |
| Inputs | AV, HDMI, USB, CI |
| Functions | DVB-T/T2, PVR, teletext, OSD menu |
| Safety class | Double insulation (class II) |
| Accessories included | Remote control, manual, power cord, feet, screws, energy label |
| Spare parts available | Main board, panel, remote control, speaker (7 years) |
Frequently Asked Questions - LD24EGH244 FAR
User questions about LD24EGH244 FAR
0 question about this device. Answer the ones you know or ask your own.
Ask a new question about this device
Download the instructions for your TV in PDF format for free! Find your manual LD24EGH244 - FAR and take your electronic device back in hand. On this page are published all the documents necessary for the use of your device. LD24EGH244 by FAR.
USER MANUAL LD24EGH244 FAR
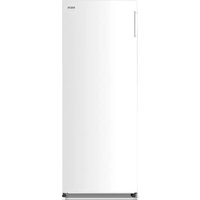
natural_image
Front view of a black rectangular TV with 'FAR' branding on the front panel (no additional text or symbols visible)TÉLÉVISEUR LED
Menu Image (Picture) 15
Menu Son (Sound)....17
Menu Heure (Time)....19
Menu Verrouillage (Lock)....21
Menu Configuration (Setup)....24
Menu Média (Media)
natural_image
Warning symbol of a lightning bolt inside a triangle (no text or numbers)natural_image
Silhouette of a person climbing a ladder inside a circle with a diagonal line (no text or symbols)natural_image
Top-down schematic of a flat-screen TV with internal components and connectors (no text or symbols)1
natural_image
Top-down schematic of a computer monitor layout showing front, top, and side views with no text or symbols2
3
Remarque :
natural_image
Technical line drawing of a device rear panel with a red arrow indicating a component (no text or symbols present)natural_image
Technical line drawing of a mechanical assembly with two vertical supports and internal components (no text or symbols)Image (Menu Picture)
Mode Image (Picture)
Bloquer programme (Channel Lock)
Langue TT (TT Language)
Langues audio (Audio Languages)
natural_image
Modern flat-screen TV displaying a colorful terraced rice field with green and yellow patterns (no text or symbols visible)natural_image
Front view of a black FXR television displaying on a flat-screen monitor (no visible text or symbols on screen)LED COLOR TELEVISION
Model No. LD24EGH244
CE
WARNING
- The apparatus shall not be exposed to dripping or splashing. No objects filled with liquids, such as vases, shall be placed on the apparatus.
- Minimum distance around the apparatus for sufficient ventilation is 10 cm.
- The ventilation should not be impeded by covering the ventilation openings with items, such as newspapers, table-cloths, curtains, etc...
- No naked flame sources, such as lighted candles, should be placed on the apparatus.
- The apparatus shall be used in moderate climates only.
- The plug shall remain readily operable.
- CAUTION: Danger of fire or explosion if battery is replaced with incorrect type.
- Different types of batteries or new and used batteries are not to be mixed.
- Batteries are to be inserted with the correct polarity.
- The supplier is clear from his responsibility for all kinds of incidents caused by the non-respect of battery polarity; the appliance will not be covered by the warranty if damaged.
- Exhausted batteries are to be removed from the product.
- Batteries shall be disposed of in a safe way. Only dispose of batteries in specific collection containers (contact your retailer for more information) in order to protect the environment.
- Warning: Batteries shall not be exposed to excessive heat such as sunshine, fire or the like.
- If the supply cord is damaged, it must be replaced by the manufacturer, its service agent or similarly qualified persons in order to avoid a hazard.
- This equipment is a Class II or double insulated electrical appliance. It has been designed in such a way that it does not require a safety connection to electrical earth.
- If you need access to the list of spare parts and technical documentation for your product, please go to https://sav-pieces.conforama.fr. There you will be able to buy spare parts for repairing your product or having it repaired.
- Figures and illustrations in this User Manual are provided for reference only and may differ from actual product appearance.
Product design and specifications may be changed without notice.
Wall-mounting the TV set
Warning: For a safe use of your appliance, please follow the below safety rules:
- Check that the wall type or partition type is able to withstand the weight of the TV set and wall mount.
• Make sure you are using the appropriate dowel type, depending on the wall type (concrete, brick, plasterboard, plaster blocks...). If you are unsure, seek for professional advice.
- Follow the installation instructions provided with the wall mount and use the screws recommended by the manufacturer.
• Install the TV set on a vertical wall.
- Make sure that the cables position might not create a tripping or falling hazard for people nearby."
WARNING
Never place a television set in an unstable location. A television set may fall, causing serious personal injury or death. Many injuries, particularly to children, can be avoided by taking simple precautions such as:
- Using cabinets or stands recommended by the manufacturer of the television set.
- Only using furniture that can safely support the television set.
- Ensuring the television set is not overhanging the edge of the supporting furniture.
- Not placing the television set on tall furniture (for example, cupboards or bookcases). without anchoring both the furniture and the television set to a suitable support.
- Not placing the television set on cloth or other materials that may be located between the television set and supporting furniture,
- Educating children about the dangers of climbing on furniture to reach the television set or its controls.
If your existing television set is being retained and relocated, the same considerations as above should be applied.
Wall-mounted screw:22-24inch M4, 28-70inch M6, 75inch M8
Note: don't hang at an angle to avoid the risk of falling off.
Specifications
| Screen Size | 60cm(LD24EGH244) | |
| Display Type | TFT LED | |
| Resolution(Pixel) | 1366x768 | |
| Brightness | 200 (cd/m2) | |
| Color | 16.7M | |
| Contrast Ratio | 3000:1 | |
| View Angle(H/V) | 178/178 | |
| Aspect Ratio | 16:9 | |
| Power Source | 100-240V~ 50/60Hz 36W | |
| TV System | PAL, SECAM | |
| Video Input Format | PAL,NTSC | |
| Antenna Input | Standard antenna socket 75Ω | |
| Audio Output | L/R 2X3W | |
| Input | Video | Video 1.0vp-p75Ω; |
| Audio | STEREO | |
| Gross Weight | 3.2kg | |
| Dimensions(with stand) | 551 x 205 x 376.5mm | |
| Wall mount Standard | M4(100mm x 100mm) | |
| Operating Temperature | 5°C to 35°C | |
| Storage Temperature | -15°C to 45°C | |
| Remote control | 38MHz; 0.06W | |
| DVB-T/T2 | Up to 860Mhz; with +-3db power consumption | |
Energy information
brand - FAR
reference of the model - LD24EGH244
energy efficiency class - E
visible screen diagonal in inches and centimeters -24inch/60cm
Power consumption per 1000h - 18kWh
Power consumption per 1000h under HDR mode - N/A
Stand by and off-mode power consumption - <0.5W / -
Screen resolution in physical horizontal and vertical pixel count
- 1366*768
Table Of Contents
Preparations Guide
Safety Information....2
Important Safety Precautions....3
Installed And Connected TV
TV Bracket assemble....4
TV Buttons And Terminal Interface....5
External device connect ion diagram....6
Install And Connect TV....7
TV Stand installation Instructions....7
TV Menu
First Time Installation....8
Channel Menu....10
Picture Menu....14
Sound Menu....16
Time Menu....17
Lock Menu....19
Hotel Mode....21
Setup Menu....22
Media Menu
Media Operation....25
Photo Menu....26
Music Menu....27
Movie Menu....28
Text Menu....29
Other Information
Help....30
Remote Controller....31
Maintenance....33
Safety Information
CAUTION
RISK OF ELECTRIC SHOCK DO NOT OPEN
High voltages are used in the operation of this product. to reduce the risk of electric shock, do not remove cover of the cabinet, refer servicing to qualified service personal
If the TV any changes or coarse adjustment, electric shocks to be hurt, do not attempt to open a machine-maintenance, customer contact centres needed overhaul.

The exclamation point within an equilateral triangle is intended to alert the user to the presence of important operating in the literature accompanying the appliance.

natural_image
Warning symbol of a lightning bolt inside a triangle (no text or numbers)Warning The lightning flash with arrowhead symbol within an equilateral triangle, is intended to alert the user to the presence of uninsulated dangerous voltage within the products enclosure that may be of sufficient magnitude to constitute a risk of electric shock to persons.
Attention:
This device is intended for household and office use in all EU countries (as well as other countries which apply EU directives on the subject) without restriction.
Important Safety Precautions
1) Read these instructions.
2) Keep these instructions.
3) Heed all warnings.
4) Follow all instructions.
5) Do not use this apparatus near water.
6) Clean only with dry cloth.
7) Do not block any ventilation openings. Install in accordance with the manufacturer's instructions.
8) Do not install near any heat sources such as radiators, heat registers, stoves, or other apparatus (including amplifiers) that produce heat.
9) Do not defeat the safety purpose of the polarized or grounding-type plug. A polarized plug has two blades with one wider than the other. A grounding type plug has two blades and a third grounding prong. The wide blade or the third prong are provided for your safety, If the provided plug does not fit into your outlet, consult an electrician for replacement of the obsolete outlet.
10) Protect the power cord from being walked on or pinched particularly at Plugs, convenience receptacles, and the point where they exit from the apparatus.
11) Only use attachments /accessories specified by the manufacturer.
12) Use only with the cart, stand, tripod, bracket, or table specified by the manufacturer, or sold with the apparatus. When a cart is used caution when moving the cart/apparatus combination to avoid injury tip-over.
13) Unplug this apparatus during lightning storms or when unused for long periods of time.
Caution:
14) To reduce the risk of fire or electric shock, do not expose this apparatus to rain or moisture.
15) The mains plug is used as disconnect device, the disconnect device shall remain readily operable.
16) The socket-out shall be installed near the equipment and shall be easily accessible.
17) This product should never be placed in a built-in installation such as a bookcase or rack unless proper ventilation is provided or the manufacture's instructions have been adhered to.
18) The apparatus shall not be exposed to dripping or splashing and that no objects filled with liquid, such as vases, shall be placed on the apparatus.
19) Do not place any sources of danger on the apparatus (e.g. liquid filled objects, lighted candles).
20) Wall or Ceiling Mounting - The appliance should be mounted to a wall or ceiling only as recommended by the manufacturer.
21)

Never place the TV, remote control or batteries near naked flames or other heat sources, including direct sunlight. To prevent the spread of fire, keep candles or other flames away from the TV, remote control and batteries at all times.
22) The USB terminal should be loaded with 0.5 A under normal operation.
These servicing instructions are for use by qualified service personnel only. To reduce the risk of electric shock do not perform any servicing other than that contained in the operating instructions. unless you are qualified to do so.
23) The battery shall not be exposed to excessive heat such as sunshine, fire or the like.
24) This equipment is a Class II or double insulated electrical appliance. It has been designed in such a way that it does not require a safety connection to electrical earth
25) The maximum using environment temperature is 45 degrees. The Maximum using altitude is 2000 meters
26) This logo indicates the absence of cadmium because the concentration values of cadmium (Cd) by weight in any part of the homogeneous material of the television do not exceed 0.01% in accordance with Directive 2011/65/EU.

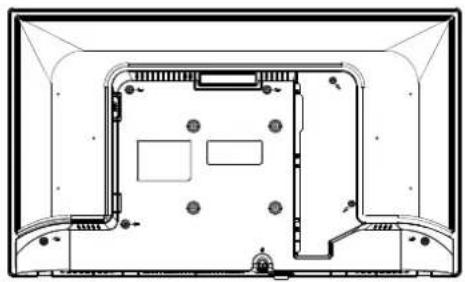
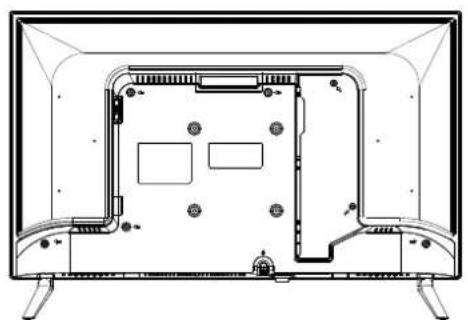
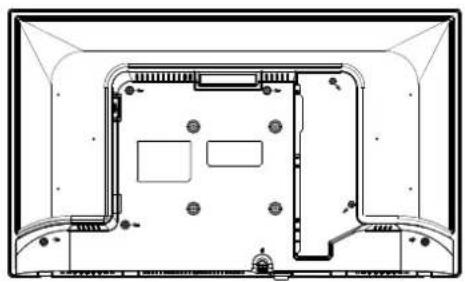
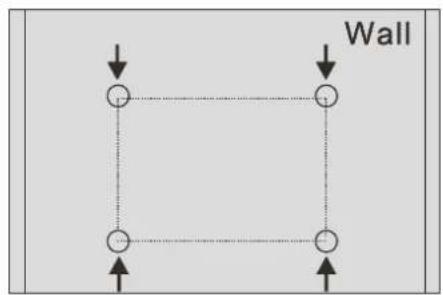
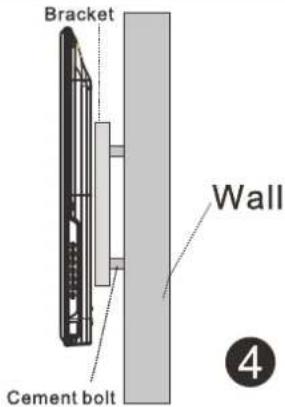
TV Bracket assemble
Fix the TV on the wall
- First, put the TV on the table smoothly and put some soft cloth on the table to avoid scratching the screen.
- User the screw driver to take off the screws which are fixed on the bottom stand (the direction of the arrow, refer to the ptoto1). And take off the bottom stand (please take off the screws and bottom stand carefully).
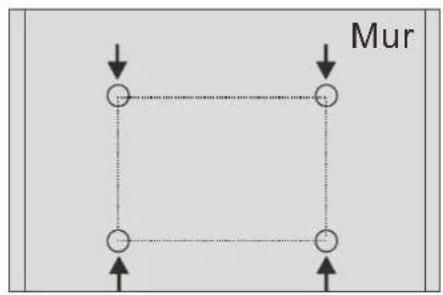
- Make one bracket which can fix on the wall according to the size of arrow direction of photo2 and photo3.
- Drill four holes properly on the wall (the size only for reference) and put into four screws. (optional parts) Drill four holes properly on the wall (the size only for reference) and put into four screws. (optional parts)
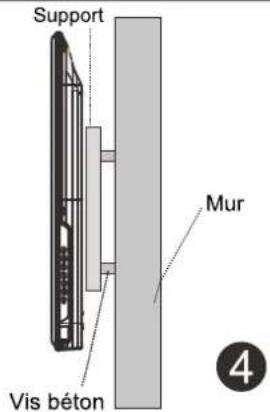
- according to the step 4, use the screwdriver to lock the screw on the back of the TV. then hang the TV on the wall.
natural_image
Technical line drawing of a flat-screen TV rear panel with visible internal components and mounting feet (no text or symbols)1
natural_image
Top-down schematic of a computer monitor layout showing front, top, and side views with no text or symbols2
flowchart
graph TD
    A["•"] --> B["•"]
    B --> C["•"]
    C --> D["•"]
    D --> E["•"]
    E --> F["•"]
    F --> G["•"]
    G --> H["•"]
    H --> I["•"]
    I --> J["•"]
    J --> K["•"]
    K --> L["•"]
    L --> M["•"]
    M --> N["•"]
    N --> O["•"]
    O --> P["•"]
    P --> Q["•"]
    Q --> R["•"]
    R --> S["•"]
    S --> T["•"]
    T --> U["•"]
    U --> V["•"]
    V --> W["•"]
    W --> X["•"]
    X --> Y["•"]
    Y --> Z["•"]
    Z --> A
    style A fill:#fff,stroke:#000
    style B fill:#fff,stroke:#000
    style C fill:#fff,stroke:#000
    style D fill:#fff,stroke:#000
    style E fill:#fff,stroke:#000
    style F fill:#fff,stroke:#000
    style G fill:#fff,stroke:#000
    style H fill:#fff,stroke:#000
    style I fill:#fff,stroke:#000
    style J fill:#fff,stroke:#000
    style K fill:#fff,stroke:#000
    style L fill:#fff,stroke:#000
    style M fill:#fff,stroke:#000
    style N fill:#fff,stroke:#000
    style O fill:#fff,stroke:#000
    style P fill:#fff,stroke:#000
    style Q fill:#fff,stroke:#000
    style R fill:#fff,stroke:#000
    style S fill:#fff,stroke:#000
    style T fill:#fff,stroke:#000
    style U fill:#fff,stroke:#000
    style V fill:#fff,stroke:#000
3
Note:
- This product does not include a wall mount bracket.
- when you assemble the TV, there should be no other articles on the around and front and please keep the distance from other articles.
- When assemble the TV, please ask the career man to fix in order to avoid the danger.
- The fixing picture is only for reference.
- Please follow the use manual about bracket assemble to fix the TV.
- Attach the mounting bracket from the VESA compatible wall mounting kit.
TV Buttons And Terminal Interface
TV Buttons
Note : The key instructions are subject to below.

Display \ Hide key icon : When there is no button icon popping up, press the key, the key icon will pop up like the picture shows above, the key icon will automatically turn off after 5 seconds of inactivity.
Icon selection : Short press the button, move the loop to the right, select the icon.
Icon function selection : Long press the key to achieve the function of the selected icon.
Icon Description :
: Power off Icon : Corresponding to the "POWER" button of remote .
: Menu Icon : Corresponding to the "MENU" button of remote.
: Source Icon : Corresponding to the "SOURCE" button of remote.
: CH+ Icon : Corresponding to the "CH+" button of remote.
: CH- Icon : Corresponding to the "CH-" button of remote.
+ : Volume+ Icon : Corresponding to the "VOL+" button of remote.
: Volume- Icon : Corresponding to the "VOL-" button of remote.
Terminal Interface
Note: The following are the various terminal interface, the actual position and arrangement, the number of different models may be different.
 | AV inputExternal AV Signal Input AndRelevant Right/Left Sound Channel |  | ANT 75Connect the antennal/cadle tv input(75/VHF/UHF) |
 | CI SLOTThe card reader input CI(common interface) this requires CAM (conditional access module) used for pay TV. |  | USB inputConnect a USB device here to play its media files or to recordprograms via the PVR function. |
 | HDMI inputDigital signal input from HDMI video connector. |  | COAXIALConnect the SPDIF receiver. |
 | EARPHONE outputWhen earphones are plugged in,speakers are disabled |  | ANT 75(S2)Input for connecting the satellite antenna (DVB-S/S2) |
External device connection diagram

flowchart
graph TD
    A["DVD"] --> D["AV input connection"]
    B["Set-top boxes"] --> D
    D --> E["HVDC"]
    E --> F["USB connection"]
    F --> G["TV connection"]
    H["HDMI"] --> I["HDMI input connection"]
    J["TV"] --> K["TV connection"]
Install And Connect TV
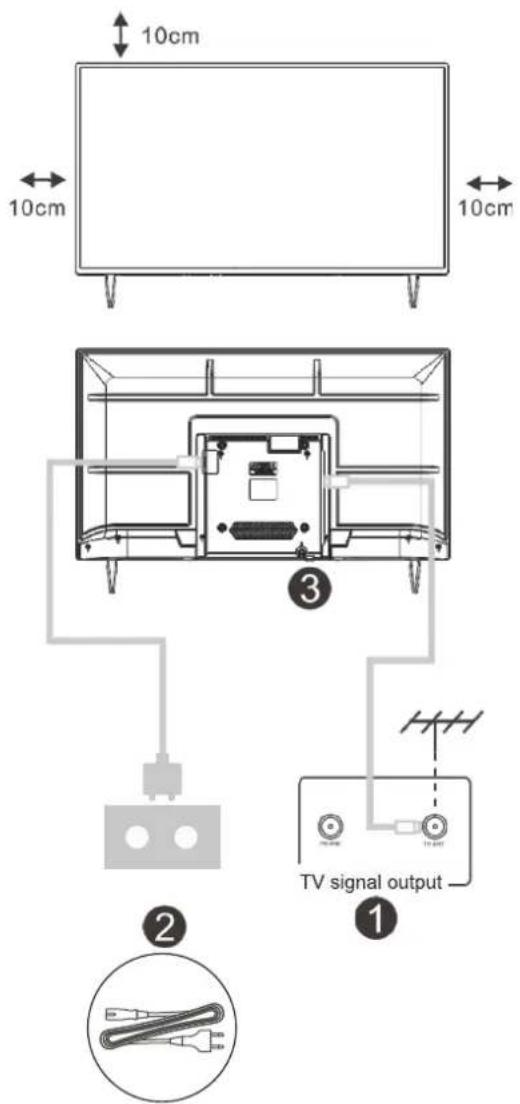
Set your TV
To put your TV on a firm place which can bear the weight of the TV. To avoid danger, please don't positions the TV near water or heating place (such as light, candle, heating machine), do not block the ventilation at the back of TV.
Connect antenna and power
- Connect the antenna cable to the antenna socket on the back of the TV.
- To plug the power cord of TV (AC 100-240V\~50/60Hz).
Turn on TV
- Connect the power supply, enter the standby mode (red light), press the power button of the TV or the power button on the remote control to turn on the TV
Note: If the model has a CI card slot on its top, a silicone plug for the CI card slot can be found in the accessory bag (for models without CI card slot, there is no such silicone plug), please insert the silicone plug into the slot when the CI card is not in use.
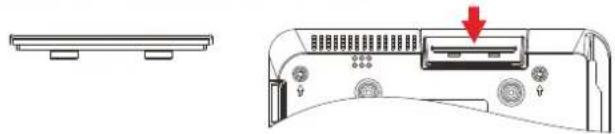
natural_image
Technical line drawing of a computer monitor rear panel with a red arrow indicating a component (no text or symbols present)Note: Picture for reference purposes only.
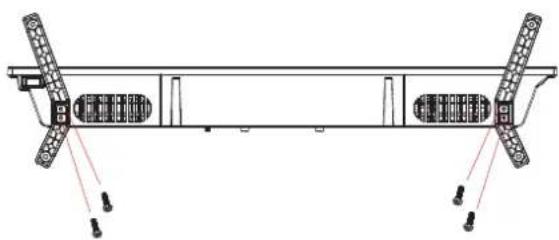
TV Stand Installation Instructions
- Open the carton and remove the TV and scattered accessories and base (some models without base).
- to avoid the injury of the TV, covered with a soft mattress, put it on the table, face down on a soft mattress, the base of the neck is fixed on the TV with screws.
3.screw the base and connected to the TV. - the installation is complete.
Note:
Picture for reference purposes only.
Please prevail in kind
natural_image
Technical line drawing of a mechanical assembly with two vertical supports and internal components (no text or symbols)First Time Installation
Connect an RF cable from the Tv's input called "RF-In" and to your TV Aerial socket.
Select Language
Press ◀/▶ button to select the language to be used for menus and message.
Select Country
Press ▼ / ▲ button to highlight country menu.
Press ◀/▶ button to select the country you want to.
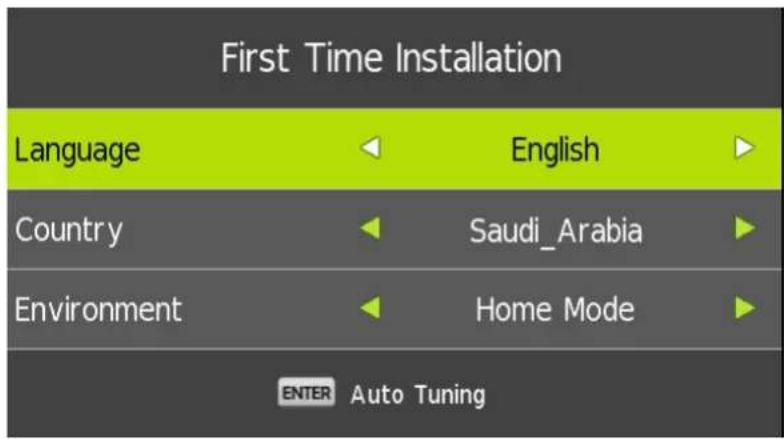
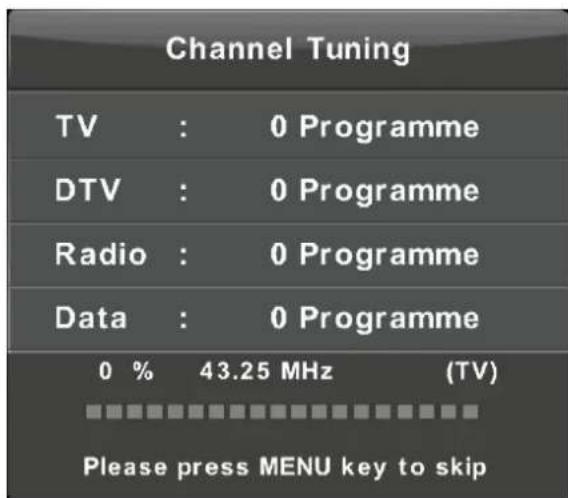
Auto Tuning
First tuning ATV, press Menu and left arrow button to skip ATV tuning,
Second tuning DTV, press Menu and left arrow button to skip DTV tuning.
Channel Tuning
TV : 0 Programme
DTV : 0 Programme
Radio : 0 Programme
Data : 0 Programme
0 % 46.25 MHz (TV)
Please press MENU key to skip
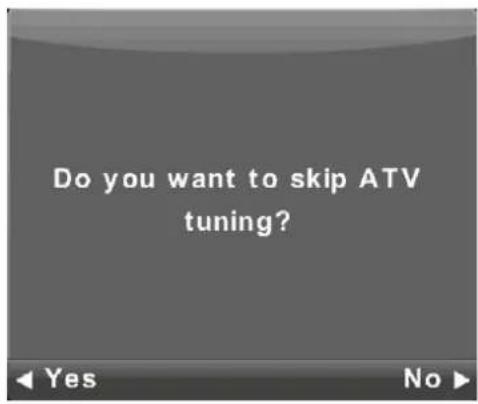
Do you want to skip ATV tuning?
Yes No
Channel Tuning
TV : 0 Programme
DTV : 0 Programme
Radio : 0 Programme
Data : 0 Programme
50 % VHF CH 1 (DTV)

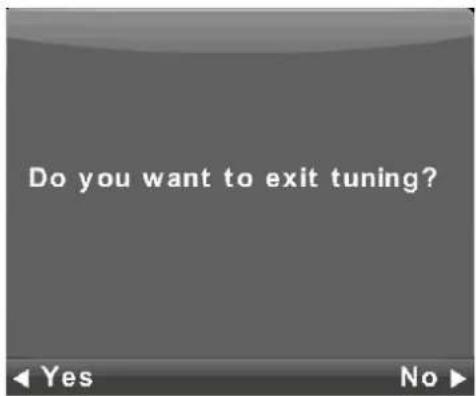
Please press MENU key to exit
Do you want to exit tuning?
Yes No
Main Menu Operation
Channel Menu
Press MENU button to display the main menu.
Press◀/▶button to select CHANNEL in the main menu.
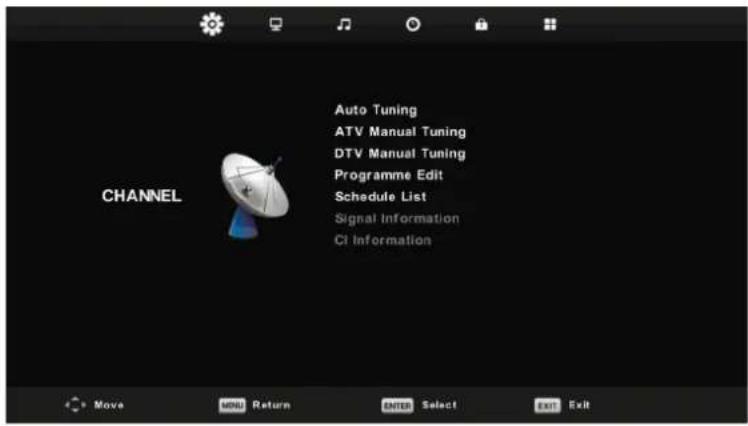
- Press ▼/▲ button to select the option that you want to adjust in the CHANNEL menu.
- Press Enter button to adjust.
- After finishing your adjustment, Press Enter button to save and return to the previous menu.
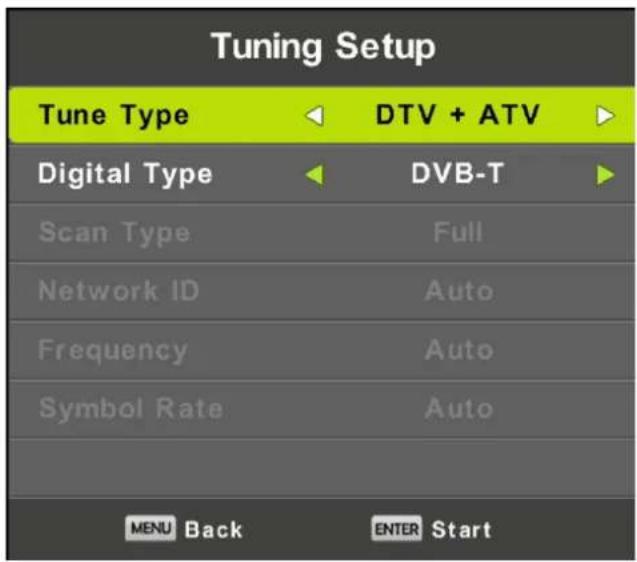
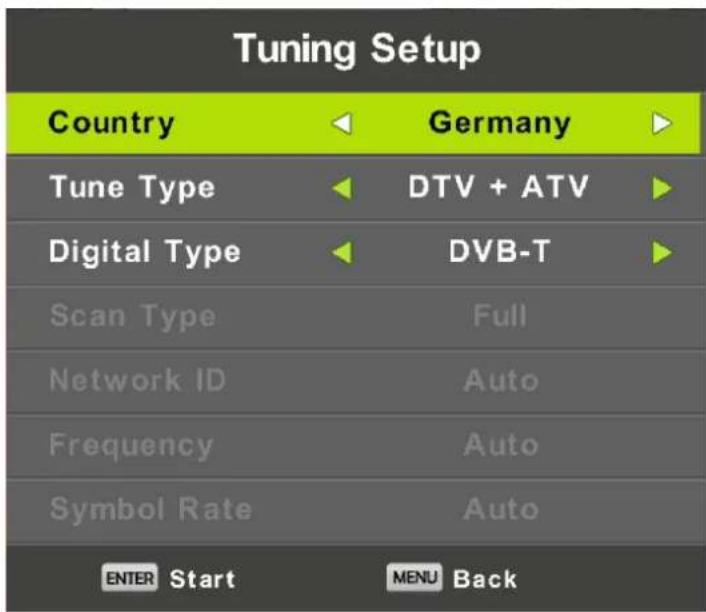
Auto Tuning
Press ▼/▲ button to select Auto Tuning, then press Enter/▶ button to enter.

ATV Manual Tuning
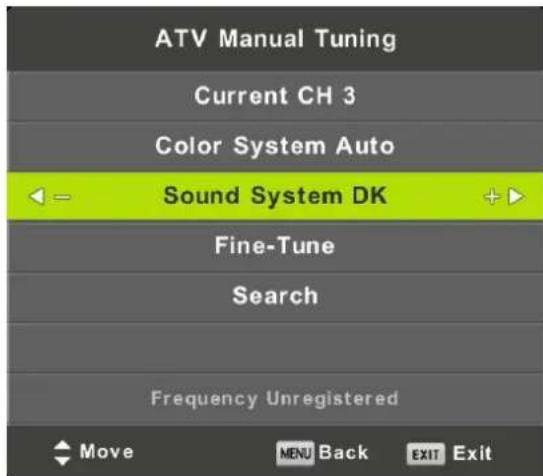
Current CH
Set the channel number.
Color System
Select the color system
(Available System: AUTO, PAL, SECAM)
Sound System
Select the Sound system
Fine-Tune
Adjust the frequency of the channel finely.
Search
Start searching channel.
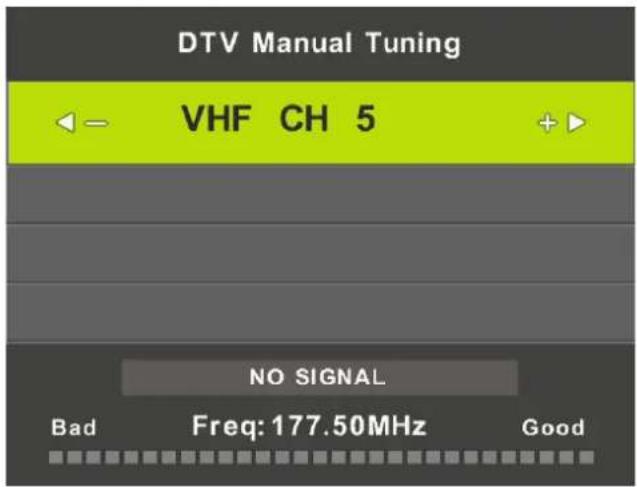
DTV Manual Tuning
Press ▼/▲ button to select DTV Manual Tuning, then press Enter button to enter sub-menu.
Press ◀/▶ button to select channel, then press Enter button to search program.
Programme Edit
Press ▼/▲ button to select Program Edit, then press Enter button to enter sub-menu.
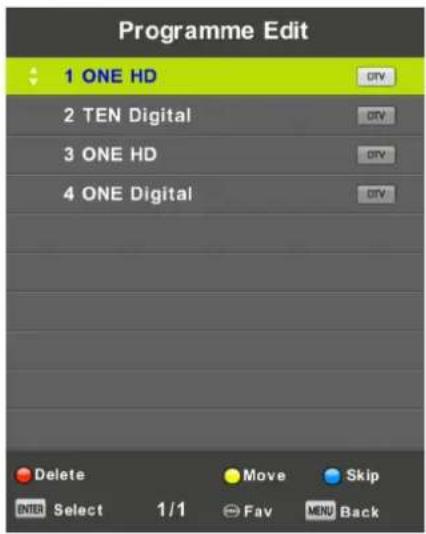

The three colored key is the shortcut key for programming the channel.
First press ▼ / ▲ to highlight the channel you want to select, then:
Press the Red button to delete the program in the list.
Press the Yellow button to move the channel in the list.
Press the Blue button to skip the selected channel.
Press Fav button to add or remote the channel to your favorite list.
(Your TV set will skip the channel automatically when using
CH+/- to view the channels.)
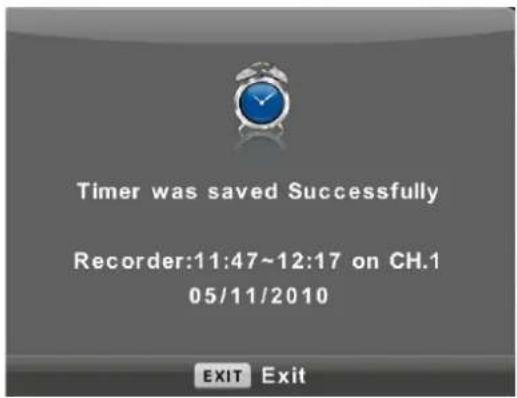
Schedule List
Press ▼/▲ button to select Schedule List, then press Enter button to enter sub-menu. It is available in DTV and satellite source.
![Schedule List (0% Used) 11:44 05 Nov 1/1 Programme Title Date 1 ONE HD 1 [DTV]Manual Timer Set 05/11/2010 Manual Timer Set 11:47~12:17 Move Add Edit Exit](/content/2026/04/730877/images/6f8646f79300c717c0361b8d9e74b4bba7164429b556fd1f60754f15e166c562.jpg)
Press the YELLOW button to enter the interface below.
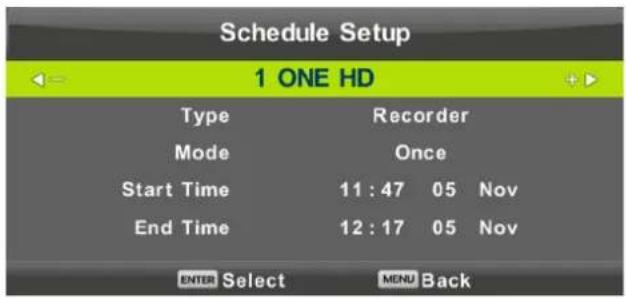
When the time appointment is conflict, it will produce a warning message.
Signal Information
Press ▼ / ▲ button to select Signal Information, press the Enter button to see the detail information about the signal. Only available when there is signal in DTV.

CI Information (Need to support the CI function)
Press ▼/ ▲button to select CI Information, then press the Enter button to display detail if you has inserted the CI card
Picture Menu
Press MENU button to display the main menu.
Press ◀/▶ button to select PICTURE in the main menu.
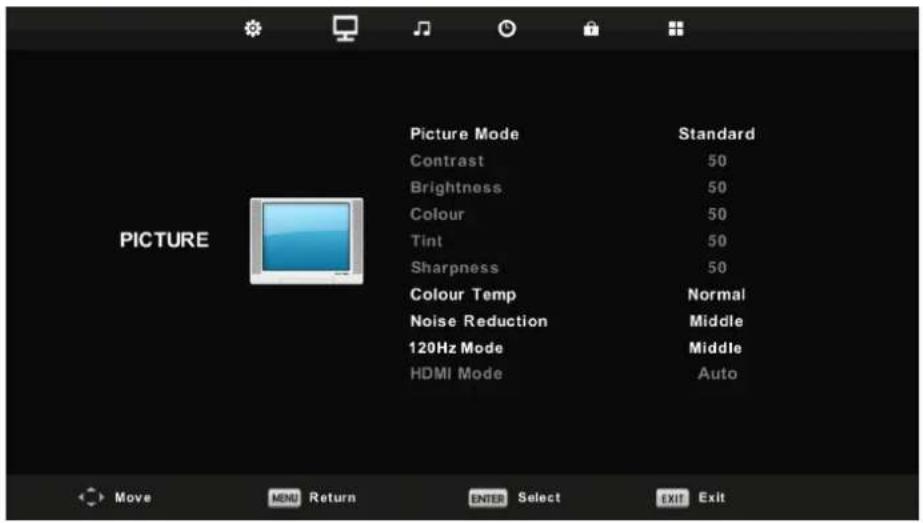
Note: 120Hz MODE Function only supported with UHD TV
- Press ▼ / ▲ button to select the option that you want to adjust in the PICTURE menu.
- Press OK button to adjust
- After finishing your adjustment, Press MENU button to save and return back to the previous menu.
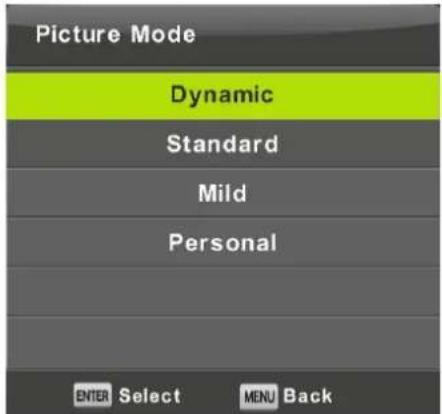
Picture Mode
Press ▼ / ▲ button to select Picture Mode, then press OK button to enter sub-menu.
You can change the value of contrast, brightness, color, sharpness and tint when the picture is in Personal mode.
TIPS: You can press PMODE button to change the Picture Mode directly.
Contrast/ Brightness/ Color/ Tint / Sharpness
Press ▼ / ▲ button to select option, then press Enter/▶ button to adjust.
Contrast Adjust the highlight intensity of the picture, but the shadow of the picture is invariable.
Brightness Adjust the optical fiber output of the entire picture, it will effect the dark region of the picture.
Color Adjust the saturation of the color based on your own like.
Tint Use in compensating color changed with the transmission in the NTSC code.
Sharpness Aadjust the peaking in the detail of the picture.
Color Temp
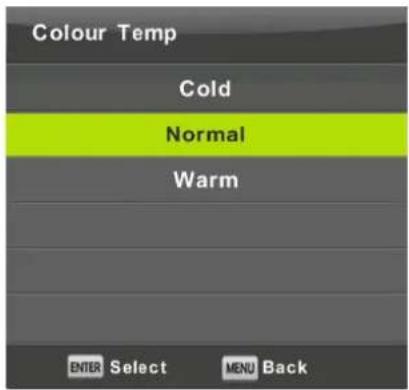
Change the overall color cast of the picture.
Press ▼ / ▲ button to select Color Temperature, then press OK button to enter sub-menu.
Press ▲/▼ button to select. (Available Picture mode: Cool, Medium, Warm).
Cold Increase the blue tone for the white.
Normal Increase the sex-linked colors for the white.
Warm Increase the red color for the white.
Noise Reduction
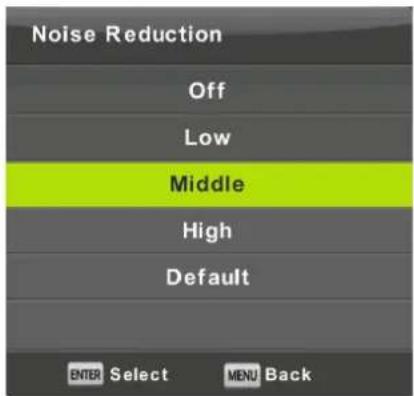
To filter out and reduces the image noise and improve picture quality. Press ▼ / ▲ button to select Noise Reduction, then press OK button to enter sub-menu.
Off Select to turn off video noise detection.
Low Detect and reduce low video noise.
Middle Detect and reduce moderate video noise.
High Detect and reduce enhanced video noise.
Default Set as Default.
HDMI Mode
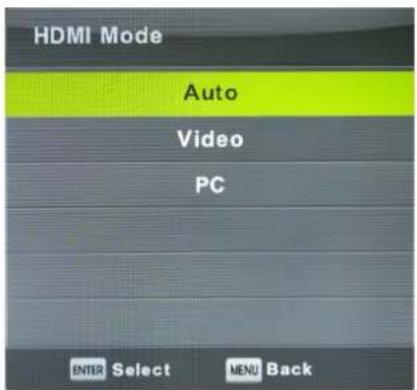
Press ▼ / ▲ button to select HDMI Mode, then press OK button to enter sub-menu.
Press ▼ / ▲ button to select . (Available Picture mode: Auto, Video, PC).
Sound Menu
Press MENU button to display the main menu.
Press ◀/▶ button to select SOUND in the main menu.
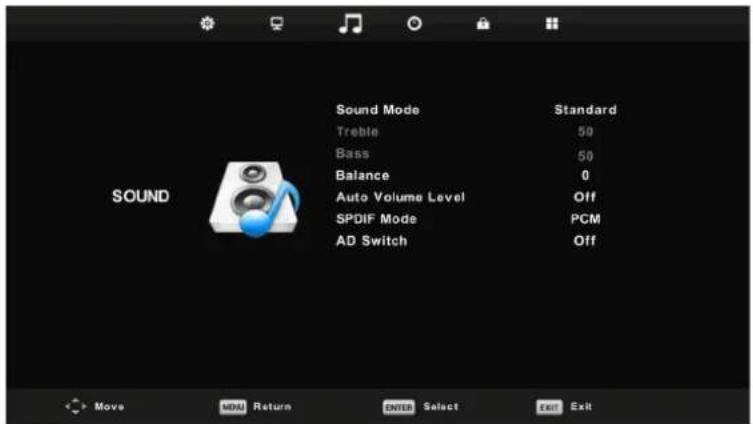
- Press ▼/▲ button to select the option that you want to adjust in the SOUND menu.
- Press Enter button to adjust.
- After finishing your adjustment, Press Enter button to save and return to the previous menu.
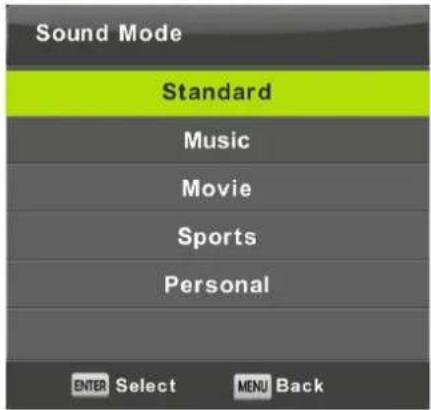
Sound Mode
Press ▼ / ▲ button to select Sound Mode, then press Enter button to enter sub-menu.
Press▼/▲ button to select.
You can change the value of Treble and Bass when the sound is in Personal mode.
TIPS: You can press SMODE button on the remote control to change the Sound Mode directly.
Standard Produces a balanced sound in all environments.
Music Preserves the original sound.Good for musical programs.
Movie Enhances treble and bass for a rich sound experience.
Sports Enhances vocals for sports.
Personal Select to customize picture settings.
Note: The treble and bass are only available in personal mode, you can adjust them as you like.
Balance
Press▼/▲ button to select option, Press◀/▶ button to adjust.
Auto Volume level
Press▼/▲ button to select Auto Volume Level, then press◀/▶ button to select On or Off.
SPDIF Mode
Press▼/▲ button to select SPDIF Mode, then press ◀/▶ button to select Off / PCM / Auto.
AD Switch
Press ▼ / ▲ button to select AD Switch, then press ◀/▶ button to select On or Off.
Amblyopia function for the blind, the tracks will be mixed describe the current screen.
It need codestream to support.
NOTE:
Balance: This item can adjust the speaker's output, it enables you to listen to best at your position.
Auto Volume: This item is used for reducing the difference between channel and program's volume automatically.
Time Menu
Press MENU button to display the main menu.
Press ◀/▶ button to select TIME in the main menu.
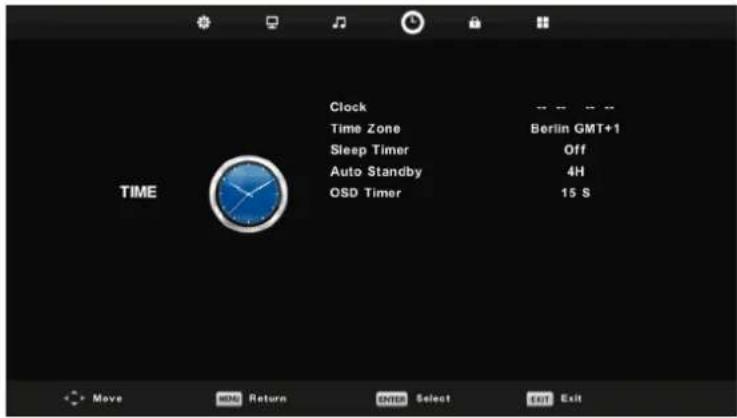
- Press▼/▲ button to select the option that you want to adjust in the TIME menu.
- Press Enter button I to adjust.
- After finishing your adjustment, Press Enter button to save and return to the previous menu.
Time Zone
Press ▼ / ▲ button to select Time Zone, then press Enter button to enter sub-menu.
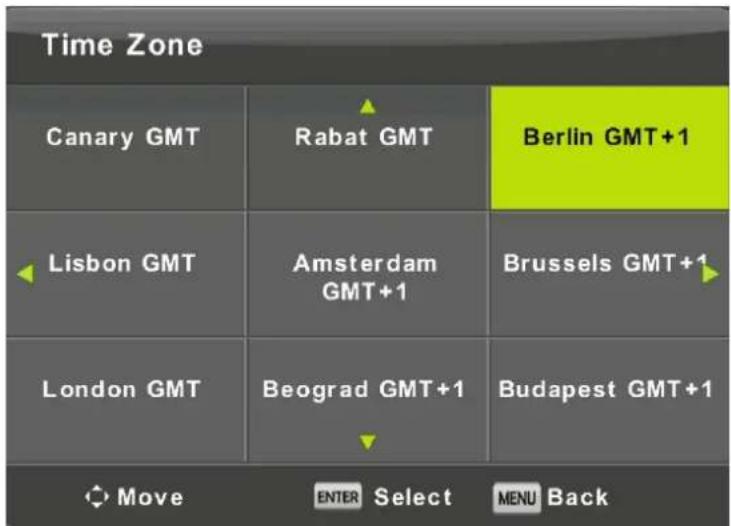
Press ▼ / ▲ / ◀ / ▶ button to select time zone.
Sleep Timer
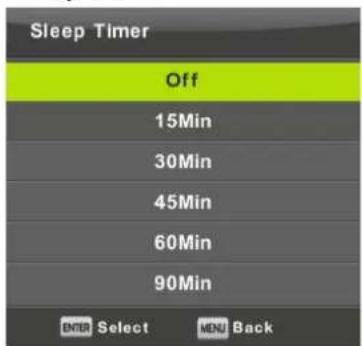
Press▼/▲button to select Sleep Timer, then press Enter button to enter sub-menu.
Press ▼/▲ button to select.
Press ▼/▲ button to select.
Tips: The remote control does not make any operation in the hypothesis time, it will close down automatically. If you do any operation, it will reset the time.
OSD Timer
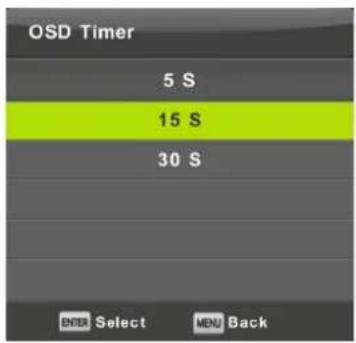
Press ▼/▲ button to select OSD Timer, then press Enter button to enter sub-menu.
Press ▼/▲ button to select.
Lock Menu
Press MENU button to display the main menu.
Press ◀/▶ button to select Lock in the main menu.
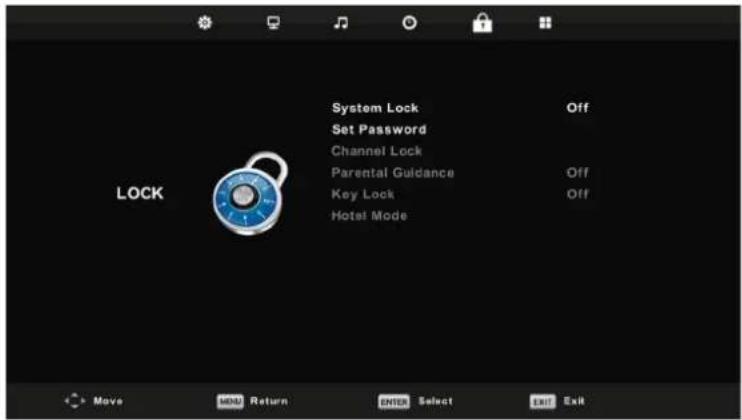
- Press ▼ / ▲ button to select the option that you want to adjust in the SYSTEM LOCKmenu.
- Press Enter/◄/► button to adjust.
- After finishing your adjustment, Press MENU button to return back to the previous menu.
System Lock
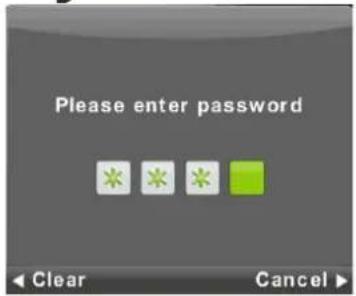
Press ▼ / ▲ button to select System Lock, then press Enter button to make the following 3 options valid.
Default password is 0000/8888, and if forget what you set, please call the service center.
Set Password
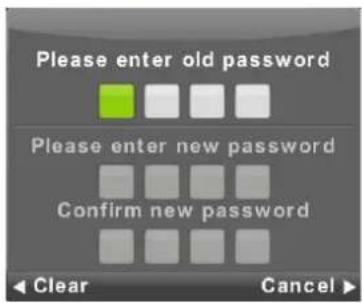
Press ▼ / ▲ button to select Set Password, then press Enter button to enter sub-menu to set new password.
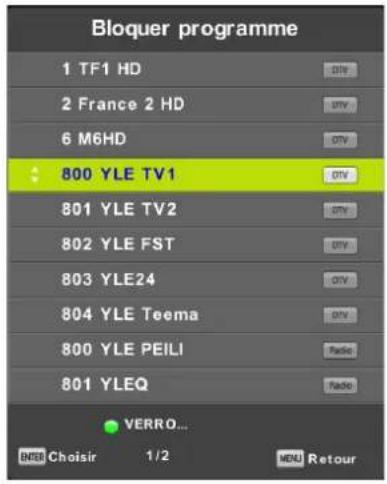
Channel Lock
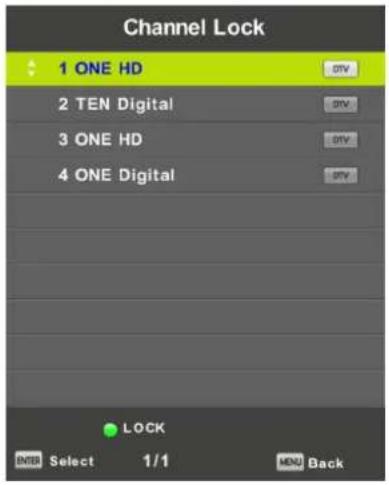
Press ▼ / ▲ button to select Channel Lock then press Enter button to enter sub-menu to select. Press Green button to lock or unlock the channel.
Parental Guidance
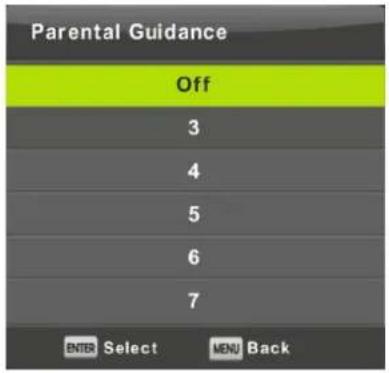
Press ▼ / ▲ button to select Parental Guidance, then press Enter button to enter sub-menu to select the number of age which is suitable for your children.
Key Lock
Press ▼ / ▲ button to select Key Lock, then press ◀/▶ button to select Off or On. When Key Lock's statue is on, you can't use the Key panel button.
Hotel Mode(Need support the Hotel Mode)
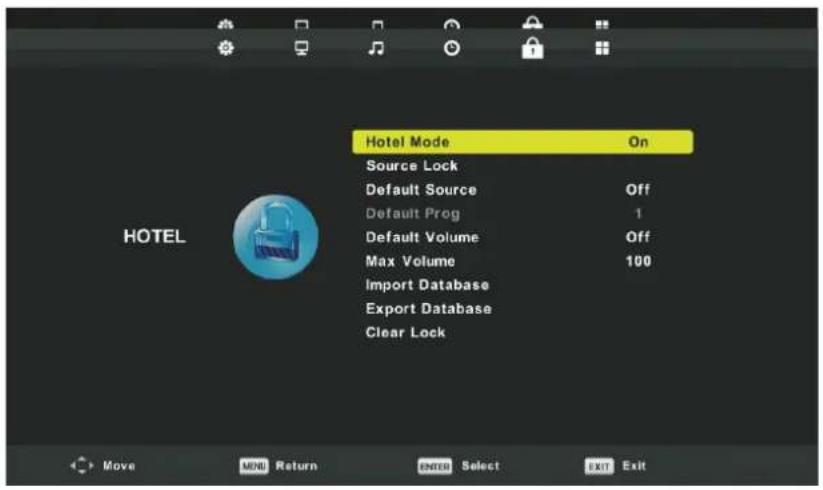
- Press ▼ / ▲ button on the remote control to select hotel mode in the Lock menu.
- Press Enter button on the remote control to enter the sub-menu.
- After finishing your adjustment, Press MENU button to save and return back to the previous menu.
Hotel Mode
Press ▼ / ▲ button to select Hotel Mode, then press ◀/▶ button to select on or off.
Source Lock
Press ▼ / ▲ button to select Source Locke, then press Enter button to enter sub-menu to select.
Default Source
Press ▼ / ▲ button to select Default Source, then press Enter button to enter sub-menu to select.
Default Prog
Press ▼ / ▲ button to select Default Prog, then press ◀/▶ button to adjust.
It is available when the default source is TV.
Max Volume
Press ▼ / ▲ button to select Max Volume, then press ◀/▶ button to adjust.
Clear Lock
Press ▼ / ▲ button to select Clear Lock, then press Enter button to clear the setting you have done before.
Setup Menu
Press MENU button to display the main menu.
Press ◀/▶ button to select SETUP in the main menu.
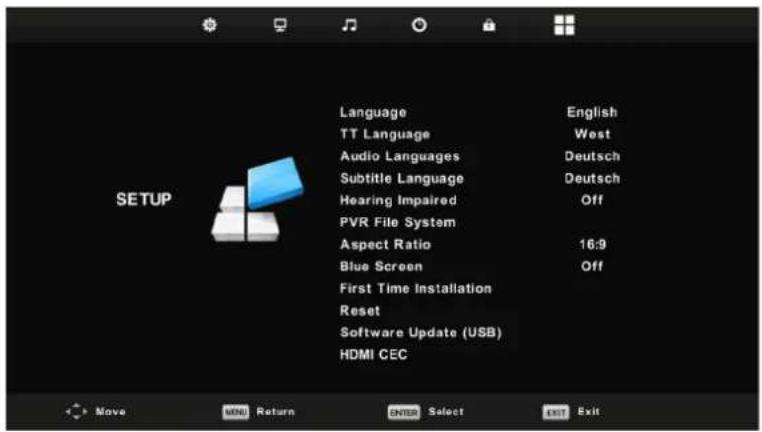
- Press ▼/▲ button to select the option that you want to adjust in the SETUP menu.
- Press Enter button to adjust.
- After finishing your adjustment, Press Enter button to save and return to the previous menu.
OSD Language
Select an OSD menu language can be displayed. Default English is selected as menu language.
Press ▼ / ▲ / ◀ / ▶ button to select Menu Language.

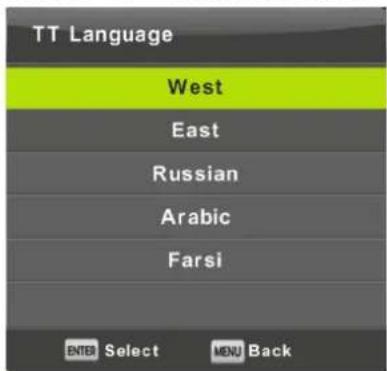
TT Language
Press ▼ / ▲ button to select TT Language, then press Enter button to enter sub-menu. Press ▼ / ▲ button to select TT language.
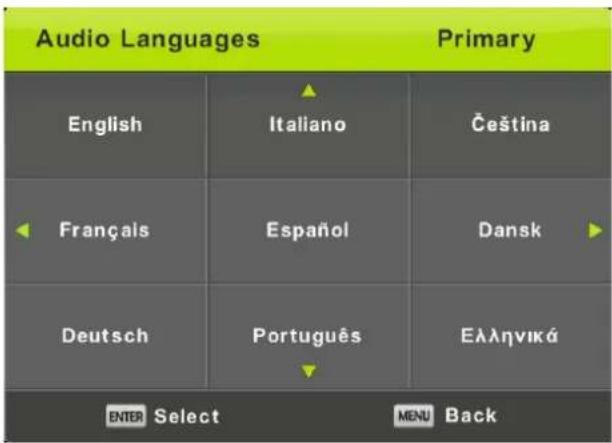
Audio Languages
Press ▼ / ▲ button to select Audio Languages, then press Enter button to enter sub-menu.
Press ◀/▶ button to select the primary of Audio Languages.
Press ▼ / ▲ / ◀ / ▶ button to select the Audio Languages.
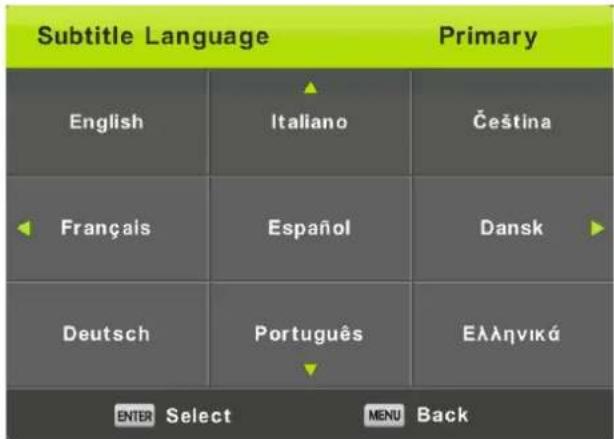
Subtitle Language
Press ▼ / ▲ button to select Subtitle Language, then press Enter button to enter sub-menu.
Press ◀ / ▶ button to select the primary of Subtitle Language.
Press ▼ / ▲ / ◀/▶ button to select the Subtitle Language.
Hearing Impaired
Press ▼ / ▲ button to select Hearing Impaired, then press Enter button to select On or Off.
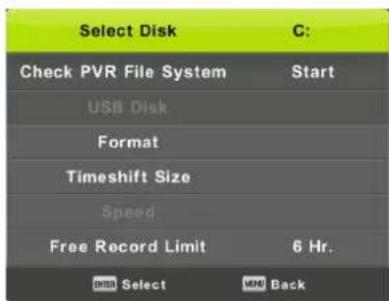
PVR File System
Press ▼ / ▲ button to select PVR File System, then press Enter button to enter sub-menu.
Press ▼ / ▲ button to select Check PVR File System,
then press Enter button to enter. Then it will check the USB speed.
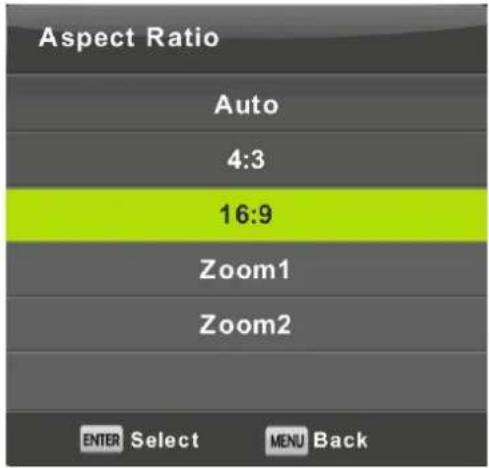
Aspect Ratio
Press ▼ / ▲ button to select Aspect Ratio, then press Enter button to enter sub-menu. Press ▼ / ▲ button to select aspect ratio. (Available options are: Auto, 4:3, 16:9, Zoom1, Zoom2).
Blue Screen
Press ▼ / ▲ button to select Blue Screen, then press Enter button to select On or Off.
First Time Installation
Press ▼ / ▲ button to select First time installation, then press Enter button to enter.
Reset
Press ▼ / ▲ button to select Reset, then press Enter button to enter sub-menu.
Software Update(USB)
Press ▼ / ▲ button to select Software Update (USB), plug your USB device in the USB slot, then press Enter button to update the right software.
HDMI CEC(Need to support the HDMI CEC/ARC function)
Press ▼ / ▲ button to select HDMI CEC, then press Enter button to enter the sub-menu.

CEC Control
Press 7/△ button to select CEC Control and press I/> button to select On /Off.
Audio Receiver
Press // △ button to select Audio Receiver and press //> button to select On / Off.
Device Auto Power Off
Press 7/ \ button to select Device Auto Power Off and press 1/> button to select On /Off.
TV Auto Power On
Press 7/Δ button to select TV Auto Power On and press I/> button to select On /Off.
Device Lists
View the CEC Device List.
Press 7/ \ button to select Device List and press ENTER/> button to enter the sub-menu.
Device Menu
Switch to the root menu of the current playback device. It cannot be selected when it is not an HDMI channel. After selecting, it is required to close the main menu regardless of whether the channel is connected to a CEC device.
Notes:
- Noise Reduction in PICTURE option is invalid.
- AD Switch in SOUND option is invalid.
- TIME menu and description are the same as that for Air mode.
- Block Program and Parental Guidance in LOCK option is invalid.
- Audio Languages, Subtitle Language, Hearing Impaired and PVR File System in SETUP option is invalid.
6.PC mode has no CHANNEL menu.
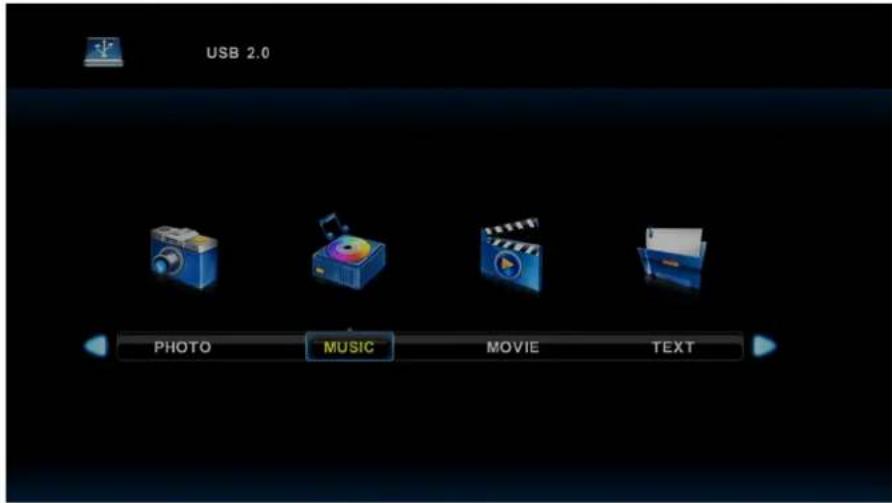
Media OPERATION
Note: Before operating Media menu, Plug in USB device, then press Source button to set the Input Source to Media.
Press ▼ / ▲ button to select Media in the Source menu, then press Enter button to enter.
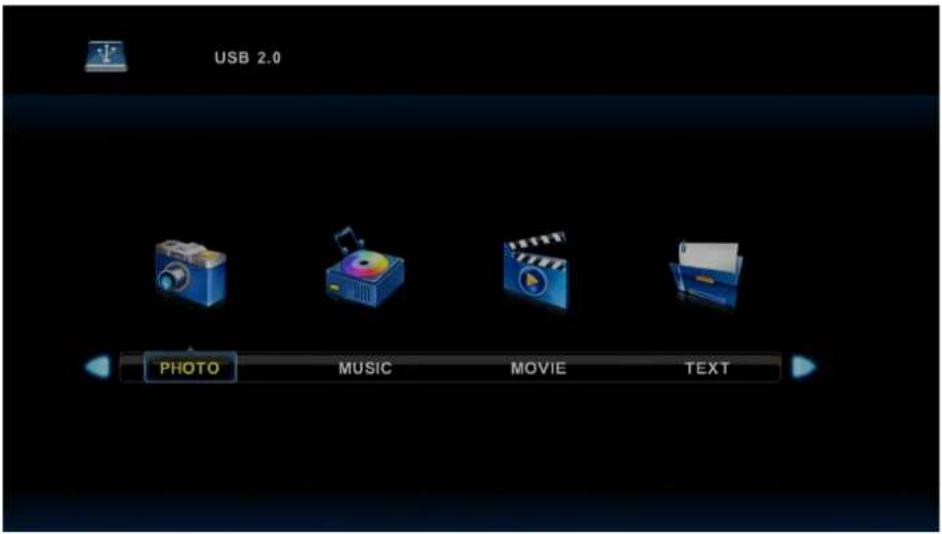
Press ◀/▶ button to select the option you want to adjust in the main Media menu,
then press Enter button to enter.
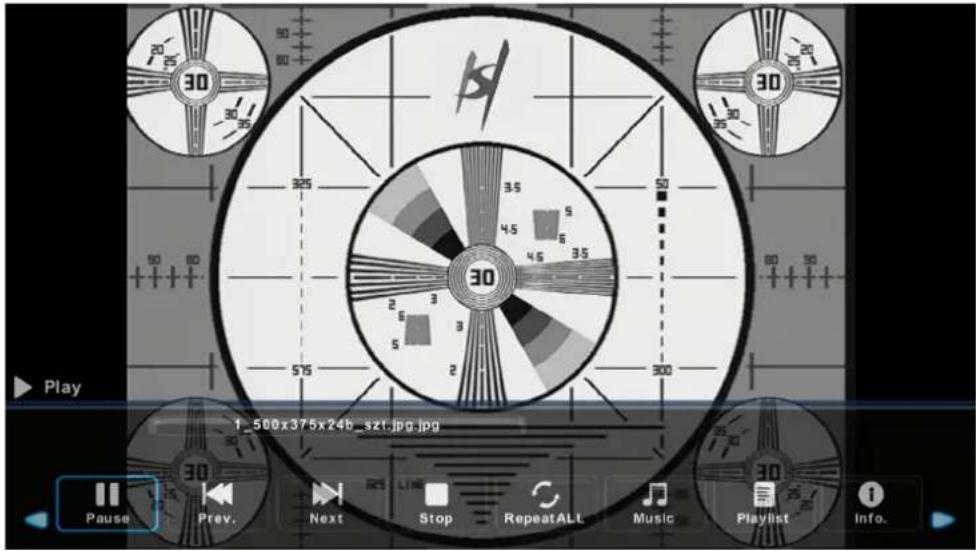
Photo Menu
Press◀/▶ button to select PHOTO in the main menu, then press Enter button to enter.
Press Exit button to return to the previous menu and exit menu to quit.

Press◀/▶ button to select the file you want to watch in the file selecting menu, then press enter button to display picture.
When highlighting the option you select, the file information will appear on the right and picture will be previewed in the center.
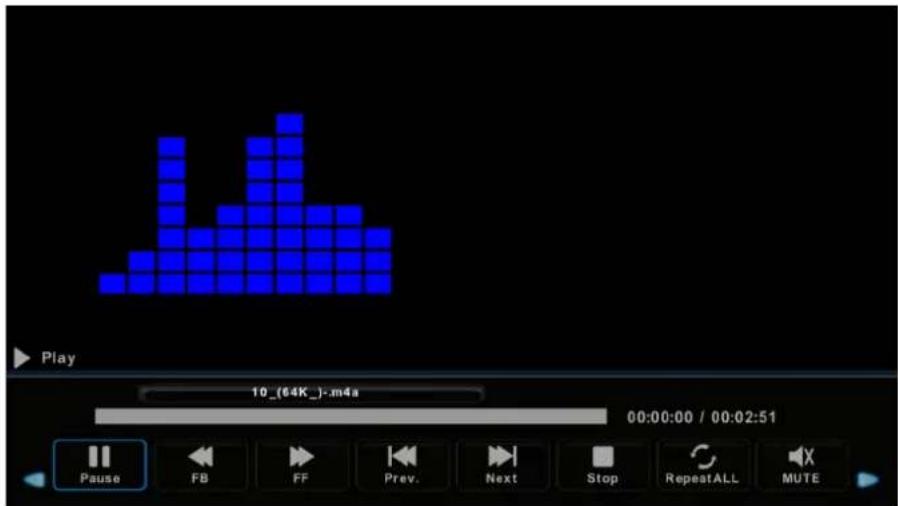
Music Menu
Press◀/▶ button to select MUSIC in the main menu, then press Enter button to enter.
Press Exit button to return to the previous menu and exit menu to quit.
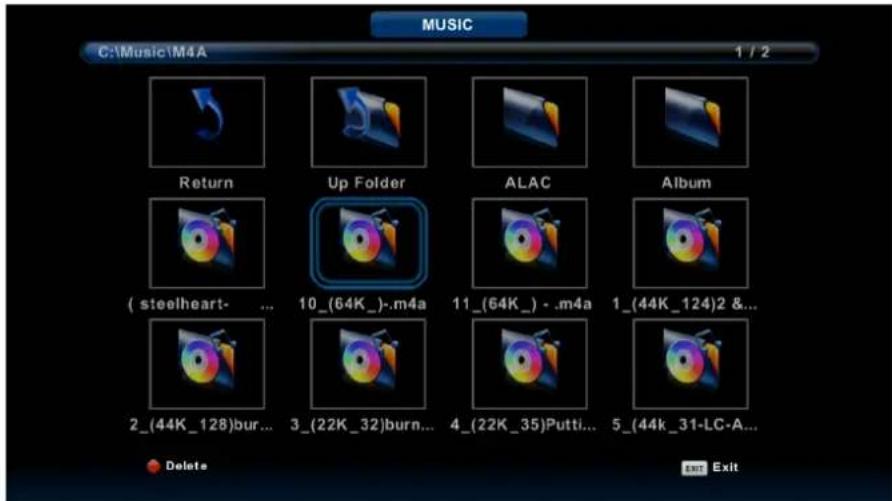
Press◀/▶ button to select drive disk you want to watch, then press Enter button to enter.
Press ◀/▶ button to select return option to the previous menu.
Movie Menu
Press◀/▶button to select MOVIE in the main menu, then press Enter button to enter.
Press Exit button to return to the previous menu and exit menu to quit.
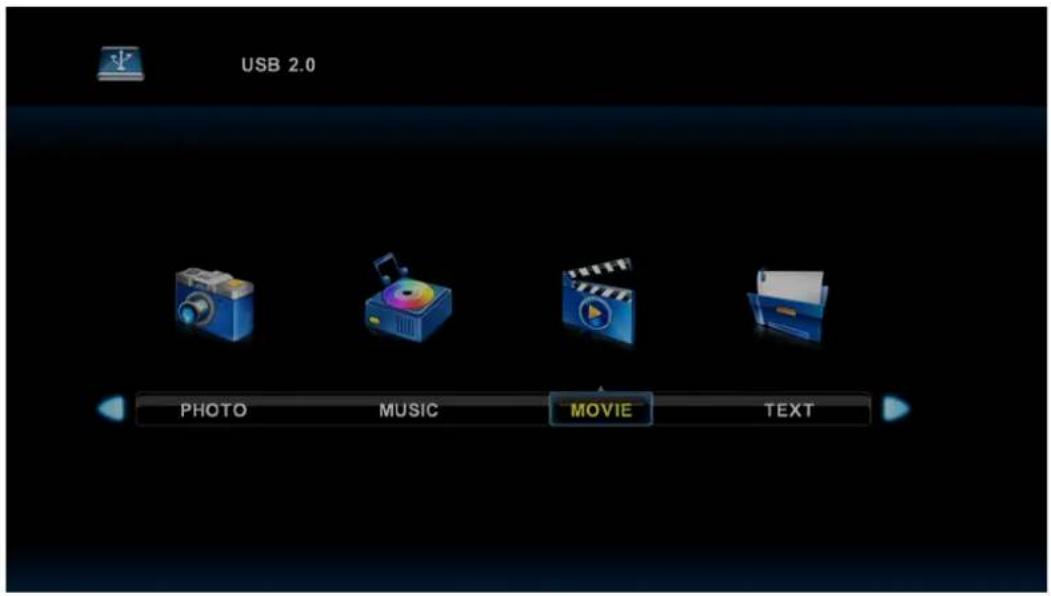
Press ◀/▶ button to select drive disk you want to watch, then press Enter button to enter.
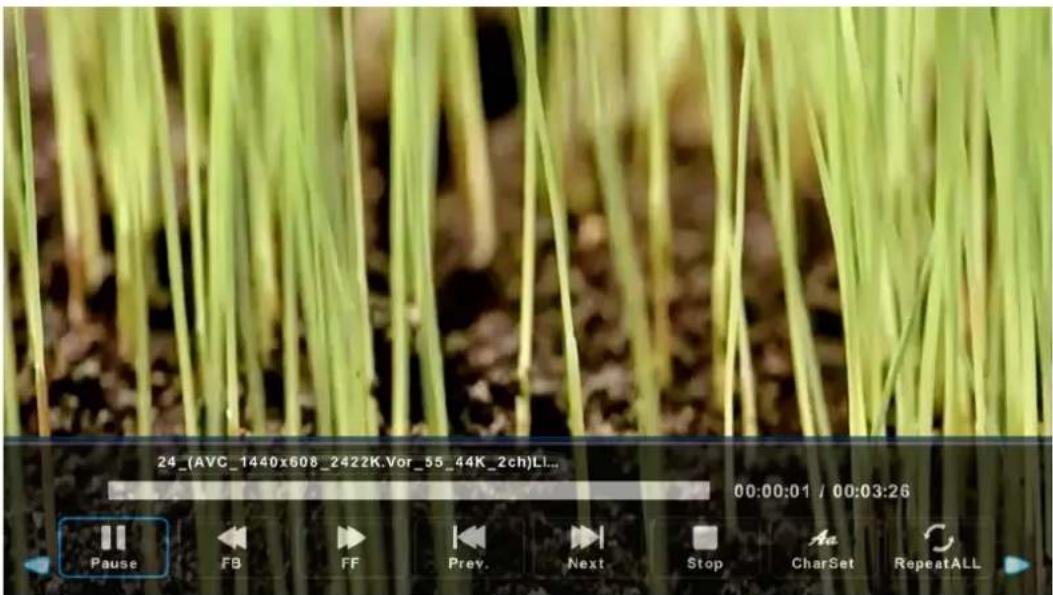
Press enter button to play the selected movie.
Press display button to select menu in the bottom you want to run, then press Enter button to operate.
Press Exit button to back to the previous menu and exit button to quit the entire menu.
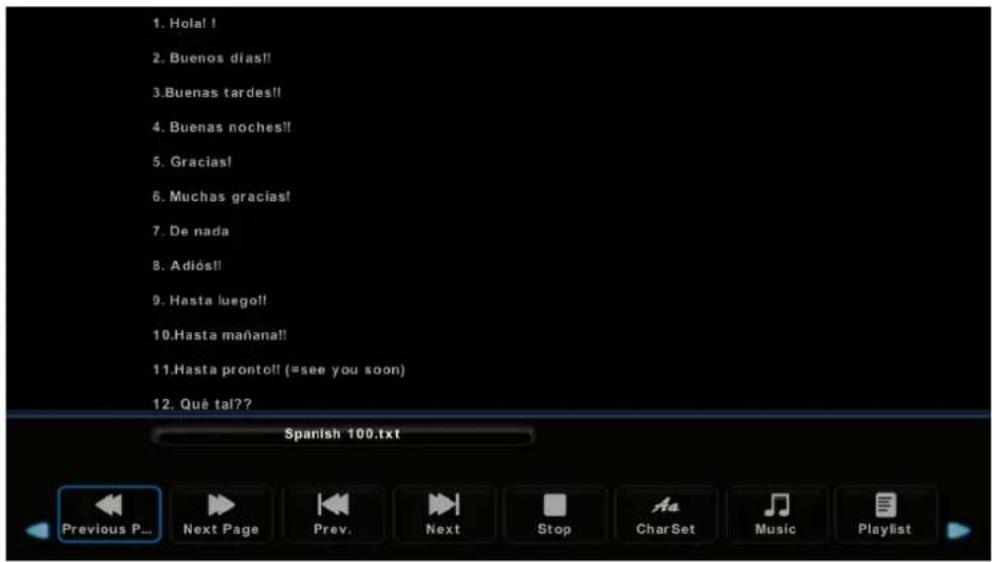
Text Menu
Press◀/▶ button to select TEXT in the main menu, then press Enter button to enter.
Press Exit button to return to the previous menu and exit menu to quit.
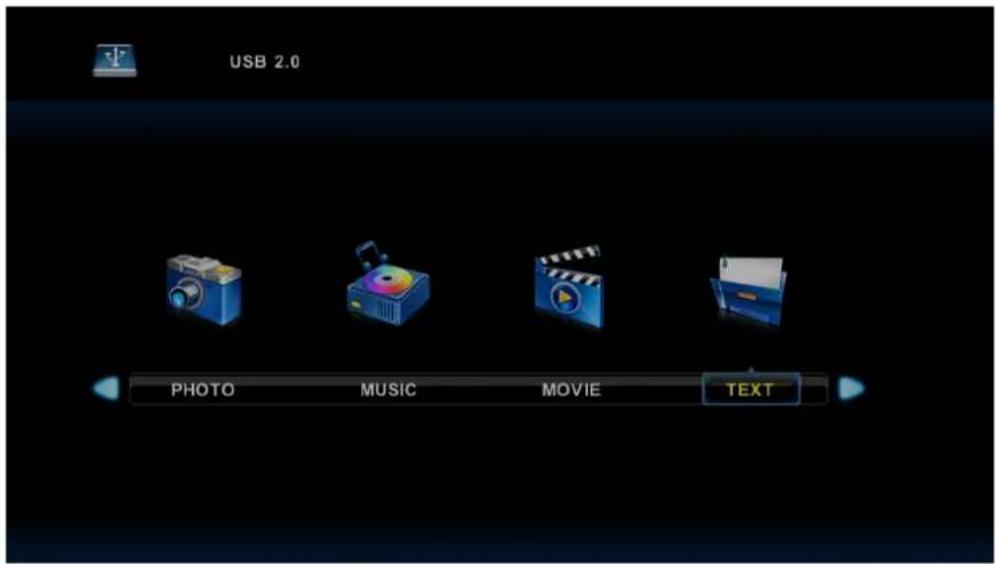
Press ◀/▶ button to select drive disk you want to watch, then press Enter button to enter.
Press ◀/▶ button to select return option to back to the previous menu.
Help
| No power | ·Check if the AC cord of TV is plugged in or not. If there's still no power, please disconnect the plug, and reconnect to the socket after 60 seconds. Turn the power back on. |
| Signal not received properly | ·Double or phantom images may appear on your TV if there are high buildings or mountains close to where you are. You can adjust the image thru manual operation: consult instruction of vernier regulation, or adjust the direction of the external antenna.·If you use an indoor antenna, under certain circumstances signal reception may be more difficult. Adjust the direction of the antenna for optimum reception. If this does not improve reception, you may have to switch to an external antenna. |
| No picture | ·Check if the antenna at the back of the TV is connected properly.·View other channels to see if the problem still occurs. |
| Video appears with no audio | ·Try increasing the volume.·Check if the TV's sound is on mute or not. |
| Audio is present, but video does not appear or is discolored | ·Try adjusting the contrast and brightness. |
| Static noise affects video and audio quality | ·Check if the antenna at the back of the TV is connected properly. |
| Broken lines on screen | ·Electrical appliances such as hair dryers or vacuums etc. may be interfering with your TV set. Switch these appliances off. |
| Remote doesn't work | ·Make sure the plastic bag which came with the remote control is removed. Try using the remote in a shorter distance from the TV. Check if the placement of the batteries is correct, or try using new batteries with the remote control.·The TV will go into Standby mode if it receives no response in a few minutes. |
| No video (PC mode) | ·Please check if the cable is connected to the HDMI port correctly, or if the cable is bent in some places. |
| Vertical line blinking (PC Mode) | ·Enter the main menu, and adjust the vertical placement to eliminate the vertical line. |
| Horizontal tearing (PC Mode) | ·Adjust the horizontal placement of the screen to clear any horizontal lines. |
| Screen is too bright or dark (PC Mode) | ·Adjust the brightness or contrast in the main menu. |
| No response from the PC | ·Check if the PC's display resolution is set to a compatible resolution for the TV. |
| Lines appearing when a device is connected to the RCA port | ·Make sure you are using a cable of good quality. |
| Problems are unresolved | ·Unplug the power cable and wait for 30 seconds, then reconnect to the socket. If problems still persist, do not attempt to repair the TV by yourself. Kindly contact the service center. |
Do not leave your TV displaying a static image, whether it is from a paused video, menu screen, etc. for an extended period of time, doing so will damage the display and may cause image burn-in.

LIFE TIME: 60,000 Hrs
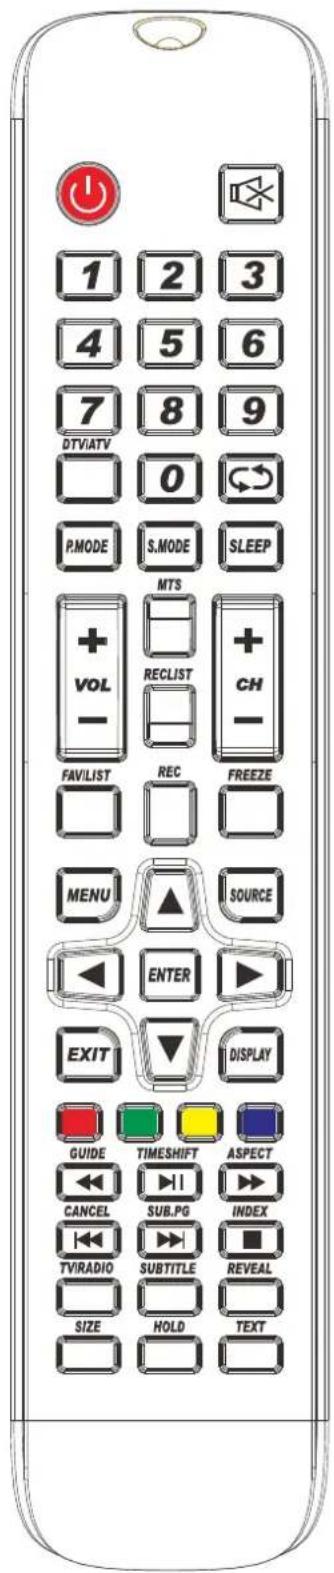
Remote Controller
- ⏻: Set your TV to power on or standby mode.
- ☒: Press to mute the sound. Press again or press VOL+ to unmute.
- 0-9: Press 0\~9 to select a TV channel directly while watching TV. The channel will change after 2 seconds. Applicable for entering page number in teletext mode and so on.
- DTV/ATV: Switch between Analog and Digital TV
- Return to the previous viewed program.
- S.MODE: Press to cycle through the different sound settings
- SLEEP: Select amount of time before TV turn itself off automatically.
8 MTS : Press to search the NICAM modes. - P.MODE: Press to cycle through the different picture settings
- MENU: Allow you to navigate the on-screen menus.
- SOURCE: Open the main menu, press to list the sources
- ▲▼ ◀▶ ENTER: Allow you to navigate the on-screen menus and adjust the system settings to your preference.
- EXIT: Exit from the menu or sub-menu and cancel the function in process (if applicable)
- DISPLAY: Press to display the source and channel's info.
Battery Installation:
Remove the battery compartment lid on the rear of the remote control by sliding the lid down, then off. Put two AAA batteries inside the battery compartment with their + and - ends aligned as indicated. Do not mix old and new batteries or different types of batteries.
Slide the lid until you hear it click into place.
Using the Remote Control:
Unless stated, otherwise, the remote control can operate all the features of the TV.
Always point the remote control directly at the remote sensor in front of the TV.

- VOL+/VOL-: Press to increase / decrease the sound level.
- TV/RADIO : When watching channel, allows you to switch between TV and Radio modes
- GUIDE:1. Launches the EPG (Electronic Program Guide) 2. Fast reverse in PVR or Media Player mode.
- TIME SHIFT: 1.DTV channel time shift Function. 2.play on PVR or Media Player mode.
- CANCEL: 1. When a page is selected in the mode of text, it may take some time before it becomes available, pressing the CANCEL key will return to the TV mode. When the required page is found, the page number will appear at the top of the TV picture, press the CANCELkey to return to the mode of text for you to browse this page.
- Previous chapter in PVR or Media Player mode
- INDEX:1. Request the Index page in Teletext mode. 2.Exit the playing function in PVR or Media Player mode.
- SIZE: Change the size of display in Teletext mode.
- REVEAL: Reveal or Hide the hidden words.
- COLOR BUTTONS: Teletex switch of the analog parts, the items selection in the menu of the digital parts and the practice of the MHEG5 in the DVB menu.
- CH+/CH- : Press to scan through channels.
- FAV/LIST: press to open the favorite list. then you can select the favorite channel.
- ASPECT: 1. Select picture scale.
- fast forward in PVR or Media Player mode.
- FREEZE: press to freeze the picture
- SUB. PG 1. Press to access sub page.
- Next chapter in PVR or Media Player mode.
- SUBTITLE: To show and set the language of current DTV.
- HOLD: HOLD On or Off for current page display.
- TEXT: Switch the teletext on and off.
- RECLIST: Show the recorded list.
- REC: Record begin in PVR mode.
Maintenance
For cleaning and maintenance instructions, refer to paragraphbelow of the instructions.
Early malfunctions can be prevented. Careful and regular cleaning can extend the life of your new TV. Be sure to turn the power off and unplug the power cord before you begin any cleaning.
Cleaning the screen
- Here's a great way to keep the dust off your screen for a while. Wet a soft cloth in a mixture of lukewarm water and a little fabric softener or dish washing detergent. Wring the cloth until it's almost dry, and then used it to wipe the screen.
- Make sure the excess water is off the screen, and then let it air-dry before you turn on your TV.
Cleaning the cabinet
To remove dirt or dust, wipe the cabinet with a soft, dry, lint-free cloth. Please be sure not to use a wet cloth.
Extended Absence

If you expect to leave your TV dormant for a long time (such as a vacation), it's a good idea to unplug the power cord to protect against possible damage from lightning or power surges.

Dolby
AUDIO
Manufactured under license from Dolby Laboratories. Dolby, Dolby Audio, and the double-D symbol are trademarks of Dolby Laboratories Licensing Corporation.
Disposal of old electrical appliances
European directive 2012/19/EU on Waste from Electrical and Electronic Equipment (WEEE), requires that used household appliances are not thrown into the normal municipal waste stream. Used appliances must be collected separately in order to optimize the rate of recovery and recycling of materials that compose them, and to reduce the impact on human health and on the environment. The crossed bin symbol is affixed to all the products to remind you of the obligations of separated collection.
Information on the meaning of the conformity mark

The CE marking indicates that the product meets the main requirements of European Directives 2014/35 / EU (Low Voltage), 2014/30 / EU (Electromagnetic Compatibility), 2014/53 / EU (Radio Equipment), 2011/65 / EU (Limitation of the use of certain hazardous substances in electronic equipment).


Replacing certain parts of your appliance may lead to a danger. Please ensure that you have the necessary skills and own all tools required to carry out the self-repair operations safely. Otherwise, please contact a qualified professional.
You could also find this user manual on our website: www
If you have a problem with your product, please go to your Conforama store.
Scan the QR code on energy lable to access the main information relating to it.
Main accessories
| Name Piece/Unit | |
| User's manual | 1 |
| Remote control | 1 |
| Power cord | 1 |
| Stand feet | 2 |
| Screws | 4 |
| Energy Label | 1 |
Recommended Spare Parts list
| Name | SAP No. | Piece/Unit | Availa ble time |
| Mainboard | 306011C663E48014 | 1 | 7 years |
| Panel | 2300124TA1Z00110 | 1 | 7 years |
| Remote control | 30604T509HUN0004 | 1 | 7 years |
| Speaker | 30605T0405X10001 | 2 | 7 years |
Conforama
EU Declaration of conformity
We, CONFORAMA France, 80 Bld du Mandinet 77432 Lognes, France, declare that the below product:
Product designation: Television
Supplier reference: LE-24TA1
natural_image
Large television displaying a colorful terraced rice field with green and yellow patterns (no text or symbols visible)has been designed, manufactured and marketed in compliance with the following European Union harmonization legislation:
| REGULATION | APPLICABLE STANDARDS |
| RED Directive 2014/53/EU | EN 62368-1:2020 +A11:2020EN 55032:2015 +A1:2020EN IEC 61000-3-2:2019 +A1:2021EN 61000-3-3:2013 +A2:2021EN 55035:2017 +A11:2020EN 303 340 - V1.2.1, EN 303 372-2 V1.2.1EN 50663:2017, EN 62479:2010 |
| ErP Directive 2009/125/ECEnergy Label Regulation 2019/2013/EUEco-design Regulation 2019/2021/EU | EN 62087-1:2016, EN 62087-2:2016EN 62087-3:2016, EN 50564:2011 |
| RoHS Directive 2011/65/EU and 2015/863/EU | IEC 62321-1:2013, IEC 62321-2:2013IEC 62321-3-1:2013, IEC 62321-5:2013IEC 62321-4:2013+A1:2017, IEC 62321-7-1:2015IEC 62321-7-2:2017, ISO 17075-1:2017IEC 62321-6:2015, IEC 62321-8:2017 |
This declaration of conformity is issued under the sole responsibility of the manufacturer.
Done in logneson 25/06/2024
By Christian DE MEERSCHMAN
As Quality Director
Signature:

HIGH-DEFINITION MULTIMEDIA INTERFACE
CONFORAMA France SA

- Menu Média (Media)
- Remarque :
- Image (Menu Picture)
- Bloquer programme (Channel Lock)
- Langue TT (TT Language)
- Langues audio (Audio Languages)
- WARNING
- Wall-mounting the TV set
- Energy information
- Table Of Contents
- Preparations Guide
- Installed And Connected TV
- TV Menu
- Media Menu
- Other Information
- Safety Information
- CAUTION
- Attention:
- Important Safety Precautions
- Caution:
- TV Bracket assemble
- Fix the TV on the wall
- Note:
- TV Buttons And Terminal Interface
- TV Buttons
- Terminal Interface
- Install And Connect TV
- Set your TV
- Connect antenna and power
- Turn on TV
- TV Stand Installation Instructions
- First Time Installation
- Select Language
- Select Country
- Auto Tuning
- Channel Tuning
- Main Menu Operation
- Channel Menu
- DTV Manual Tuning
- Programme Edit
- Schedule List
- Signal Information
- CI Information (Need to support the CI function)
- Picture Menu
- Picture Mode
- Contrast/ Brightness/ Color/ Tint / Sharpness
- Sound Menu
- Sound Mode
- Balance
- Auto Volume level
- SPDIF Mode
- AD Switch
- Time Menu
- Time Zone
- Sleep Timer
- Lock Menu
- System Lock
- Set Password
- Channel Lock
- Parental Guidance
- Key Lock
- Hotel Mode(Need support the Hotel Mode)
- Hotel Mode
- Source Lock
- Default Source
- Default Prog
- Max Volume
- Clear Lock
- Setup Menu
- OSD Language
- TT Language
- Audio Languages
- Subtitle Language
- Hearing Impaired
- PVR File System
- Aspect Ratio
- Blue Screen
- Reset
- Software Update(USB)
- HDMI CEC(Need to support the HDMI CEC/ARC function)
- Notes:
- Media OPERATION
- Photo Menu
- Music Menu
- Movie Menu
- Text Menu
- Help
- Remote Controller
- Battery Installation:
- Using the Remote Control:
- Maintenance
- Cleaning the screen
- Cleaning the cabinet
- Extended Absence
- Disposal of old electrical appliances
- Information on the meaning of the conformity mark
- Conforama
- EU Declaration of conformity
Brand : FAR
Model : LD24EGH244
Category : TV