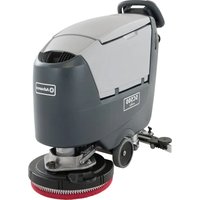
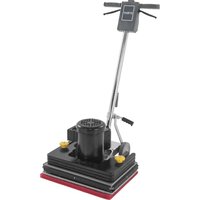
SC500 - Floor cleaner ADVANCE - Free user manual and instructions
Find the device manual for free SC500 ADVANCE in PDF.


| Product Type | Automatic scrubber for smooth floors in commercial and industrial environments |
| Model | Advance SC500 (20D B, X20D B, X20R B) |
| Cleaning width | 20 inches (530 mm) |
| Wash water tank capacity | 45 liters (12 US gal) |
| Recovery water tank capacity | 45 liters (12 US gal) |
| Dimensions (L × W × H) | 1277 × 720 × 1063 mm (with squeegee) |
| Empty weight (without batteries) | 85 kg (model 20D B) / 88 kg (models X20D B and X20R B) |
| Maximum operating weight | 207 kg (model 20D B) / 210 kg (models X20D B and X20R B) |
| Power supply | 24 V DC (two 12 V batteries) |
| Recommended battery type | WET, GEL, AGM (according to configuration) |
| Standard battery capacity | 2 × 12 V 105 Ah (C5) |
| Built-in battery charger | 24 V, 13 A |
| Operating time (standard batteries) | 3.5 hours (standard conditions EN 60335-2-72) |
| Total power consumption | 500 W |
| Brush motor power | 0.6 hp (450 W) or 0.9 hp (670 W) depending on model |
| Suction motor power | 0.37 hp (280 W) |
| Traction motor power | 0.27 hp (200 W) |
| Traction speed | 0 to 5 km/h (variable) |
| Sound pressure at operator ear | 63 or 65 dB(A) depending on model |
| Arm vibration level | Less than 2.5 m/s² |
| Maximum operating slope | 2% |
| IP protection degree | X4 |
| Working temperature range | 0 °C to +40 °C |
| Operating humidity | 30% to 95% |
| Main functions | Simultaneous washing and drying, EcoFlex system, silent mode, adjustable brush pressure, operator/supervisor smart key |
| Optional accessories | Brushes of different materials, disks, protective skirt, rubber blades, USB port |
| Routine maintenance | Cleaning of brush, squeegee, tanks, filter, and draining of EcoFlex system |
| Spare parts | Original parts available from Advance after-sales service |
| Safety | Emergency stop by disconnecting battery connector, overload protection, magnetic key, automatic shutdown when inactive |
Frequently Asked Questions - SC500 ADVANCE
User questions about SC500 ADVANCE
0 question about this device. Answer the ones you know or ask your own.
Ask a new question about this device
Download the instructions for your Floor cleaner in PDF format for free! Find your manual SC500 - ADVANCE and take your electronic device back in hand. On this page are published all the documents necessary for the use of your device. SC500 by ADVANCE.
USER MANUAL SC500 ADVANCE
11/2014 Revised 07/2017 (C)
FORM NO.9099980000


English
Espanol
Français
Portugues
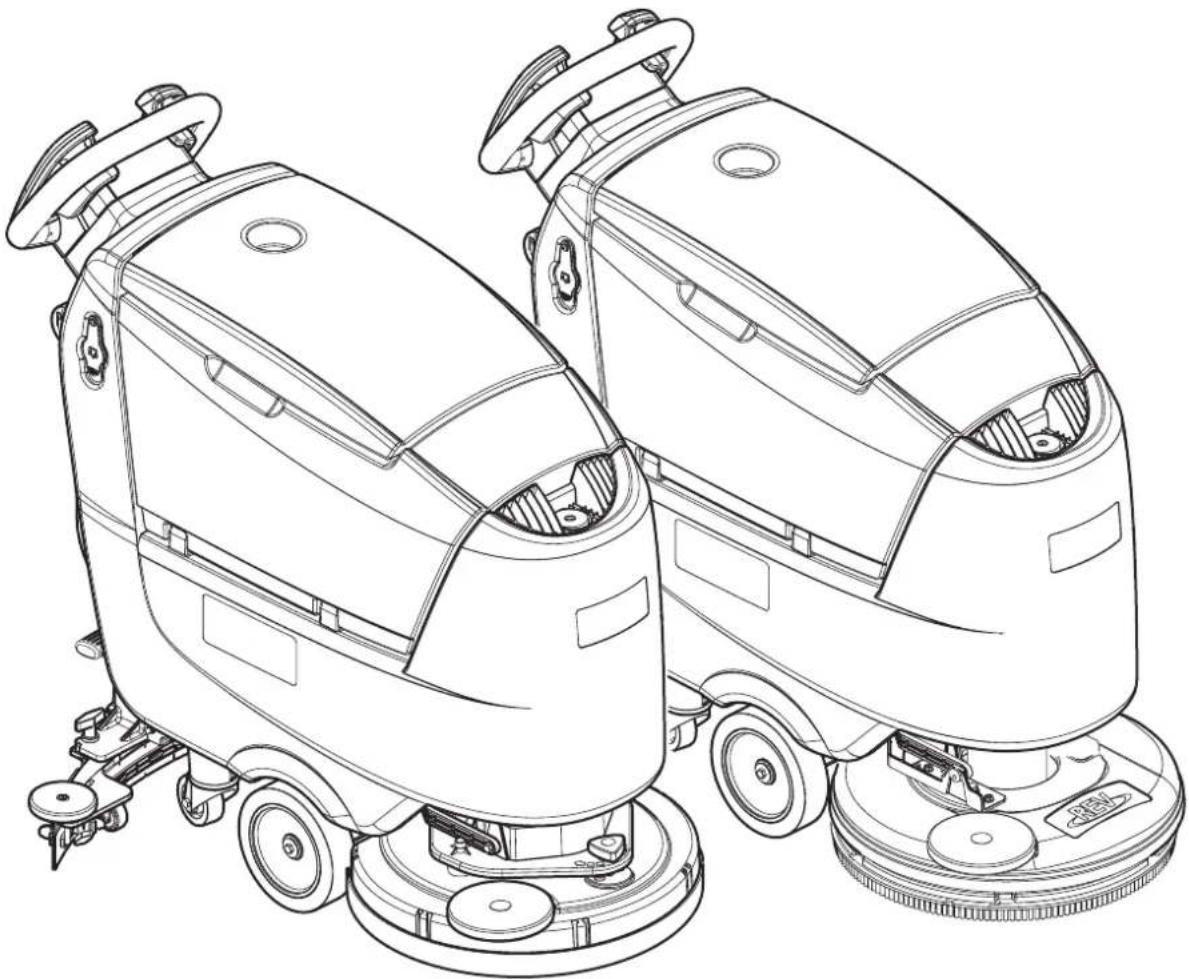
Models No.:
9087403020, 9087405020, 9087404020
See previous manual for the models no.:
9087352020, 9087353020, 9087354020
TABLE OF CONTENTS
INTRODUCTION 2
MANUAL PURPOSE AND CONTENTS 2
TARGET 2
HOW TO KEEP THIS MANUAL 2
IDENTIFICATION DATA. 2
OTHER REFERENCE MANUALS 2
SPARE PARTS AND MAINTENANCE 2
CHANGES AND IMPROVEMENTS 2
OPERATION CAPABILITIES 3
CONVENTIONS 3
UNPACKING/DELIVERY 3
SAFETY 3
VISIBLE SYMBOLS ON THE MACHINE 3
SYMBOLS THAT APPEAR ON THIS MANUAL 4
GENERAL INSTRUCTIONS 4
MACHINE DESCRIPTION 6
MACHINE STRUCTURE 6
CONTROL PANEL 8
ACCESSIONS/OPTIONS 9
TECHNICAL DATA. 9
WIRING DIAGRAM. 10
USE/OPERATION 11
MAGNETIC SMART KEY 11
BATTERY CHECK/SETTING ON A NEW MACHINE 11
BATTERY INSTALLATION 11
BEFORE MACHINE START-UP 12
MACHINE START AND STOP 14
MACHINE OPERATION (SCRUBBING/DRYING) 15
TANK EMPTYING. 17
AFTER USING THE MACHINE 17
MACHINE LONG INACTIVITY 17
MAINTENANCE 18
SCHEDULED MAINTENANCE TABLE 18
BATTERY CHARGING 19
SUPERVISOR KEY (YELLOW) 20
SQUEEGEE CLEANING 22
SQUEEGEE BLADE CHECK AND REPLACEMENT 22
CLEANING THE BRUSH 23
RECOVERY TANK CLEANING 23
WASHING WATER FILTER CLEANING 24
MACHINE TRACKING ADJUSTMENT 24
ECOFLEX DETERGENT TANK CLEANING 25
DRAINING THE ECOFLEX SYSTEM 26
FUSE CHECK/REPLACEMENT 26
TROUBLESHOOTING 27
SCRAPPING 28
INTRODUCTION

NOTE
The numbers in brackets refer to the components shown in Machine Description chapter.
MANUAL PURPOSE AND CONTENTS
The purpose of this Manual is to provide the operator with all necessary information to use the machine properly, in a safe and autonomous way. It contains information about technical data, safety, operation, storage, maintenance, spare parts and disposal. Before performing any procedure on the machine, the operators and qualified technicians must read this Manual carefully. Contact Advance in case of doubts concerning the interpretation of the instructions and for any further information.
TARGET
This Manual is intended for operators and technicians qualified to perform the machine maintenance.
The operators must not perform procedures reserved for qualified technicians. Advance will not be answerable for damages coming from the non-observation of this prohibition.
HOW TO KEEP THIS MANUAL
The Instructions for use Manual must be kept near the machine, inside an adequate case, away from liquids and other substances that can cause damage to it.
IDENTIFICATION DATA
The machine serial number and model name are marked on the plate (4).
Year of production (Date code: A17 means January 2017) and model number are marked on the same plate.
This information is useful when requiring machine spare parts. Use the following table to write down the machine identification data.
| Model |
| Model Number |
| Serial Number |
OTHER REFERENCE MANUALS
- Electronic battery charger Manual, to be considered as integral part of this Manual
- Spare Parts List (supplied with the machine)
Service Manual (that can be consulted at Advance Service Centers)
SPARE PARTS AND MAINTENANCE
All necessary operating, maintenance and repair procedures must be performed by qualified personnel or by Advance Service
Centers. Only original spare parts and accessories must be used.
Contact Advance for service or to order spare parts and accessories, specifying the machine model name, model number and serial number.
CHANGES AND IMPROVEMENTS
Advance constantly improves its products and reserves the right to make changes and improvements at its discretion without being obliged to apply such benefits to the machines that were previously sold.
Any change and/or addition of accessories must be approved and performed by Advance.
The SC500 scrubber-dryer is used to clean (scrubbing and drying) smooth and solid floors, in commercial and industrial environment, under safe operation conditions by a qualified operator.
The scrubber-dryer cannot be used for fitted carpet and carpet cleaning.
CONVENTIONS
Forward, backward, front, rear, left or right are intended with reference to the operator's position, that is to say in driving position with the hands on the handlebar (1).
UNPACKING/DELIVERY
To unpack the machine, carefully follow the instructions on the packing.
When the machine is delivered, check that the packing and the machine were not damaged during transportation.
In case of visible damages, keep the packing and have it checked by the carrier that delivered it. Call the carrier immediately to fill in a damage claim.
Please check that the following items have been supplied with the machine:
-
Technical documents:
-
Scrubber-dryer Instructions for use Manual
- Battery Charger Manual
- Scrubber-dryer Spare Parts List

WARNING!
The Products sold with this Manual contain or may contain chemicals that are known to certain governments (such as the State of California, as identified in its Proposition 65 Regulatory Warning Law) to cause cancer, birth defects or other reproductive harm. In certain locations (including the State of California) purchasers of these Products that place them in service at an employment job site or a publicly accessible space are required by regulation to make certain notices, warnings or disclosures regarding the chemicals that are or may be contained in the Products at or about such work sites. It is the purchaser's responsibility to know the content of, and to comply with, any laws and regulations relating to the use of these Products in such environments. The Manufacturer disclaims any responsibility to advise purchasers of any specific requirements that may be applicable to the use of the Products in such environments.
SAFETY
The following symbols indicate potentially dangerous situations. Always read this information carefully and take all necessary precautions to safeguard people and property.
The operator's cooperation is essential in order to prevent injury. No accident prevention program is effective without the total cooperation of the person responsible for the machine operation. Most of the accidents that may occur in a factory, while working or moving around, are caused by failure to comply with the simplest rules for exercising prudence. A careful and prudent operator is the best guarantee against accidents and is essential for successful completion of any prevention program.
VISIBLE SYMBOLS ON THE MACHINE

WARNING!
Carefully read all the instructions before performing any operation on the machine.

WARNING!
Do not wash the machine with direct or pressurized water jets.
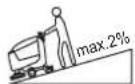
WARNING!
Do not use the machine on slopes with a gradient exceeding the specifications.
SYMBOLS THAT APPEAR ON THIS MANUAL

DANGER!
It indicates a dangerous situation with risk of death for the operator.

WARNING!
It indicates a potential risk of injury for people.

CAUTION!
It indicates a caution or a remark related to important or useful functions.
Pay careful attention to the paragraphs marked by this symbol.

NOTE
It indicates a remark related to important or useful functions.

CONSULTATION
It indicates the necessity to refer to the Instructions for use Manual before performing any procedure.
GENERAL INSTRUCTIONS
Specific warnings and cautions to inform about potential damages to people and machine are shown below.

DANGER!
Before performing any maintenance, repair, cleaning or replacement procedure, remove the magnetic smart key and disconnect the battery connector.
- This machine must be used by properly trained operators only.
- Do not wear jewels when working near electrical components.
- Do not work under the lifted machine without supporting it with safety stands.
- Do not operate the machine near toxic, dangerous, flammable and/or explosive powders, liquids or vapors: This machine is not suitable for collecting dangerous powders.
- When using lead (WET) batteries, keep sparks, flames and smoking materials away from the batteries. During the normal operation explosive gases are released.
- When using lead (WET) batteries, battery charging produces highly explosive hydrogen gas. During battery charging, lift the recovery tank and perform this procedure in well-ventilated areas and away from naked flames.

WARNING!
- Carefully read all the instructions before performing any maintenance/repair procedure.
The magnetic smart key has a built-in magnet. Do not place objects having magnetic bands (such as credit cards, electronic keys, phone cards) near the key. The built-in magnet can damage or erase the data stored on the magnetic bands.
Before using the battery charger, ensure that frequency and voltage values, indicated on the machine serial number plate, match the electrical mains voltage. - Do not pull or carry the machine by the battery charger cable and never use the battery charger cable as a handle. Do not close a door on the battery charger cable, or pull the battery charger cable around sharp edges or corners. Do not run the machine on the battery charger cable.
- Keep the battery charger cable away from heated surfaces.
- Do not charge the batteries if the battery charger cable or the plug are damaged.
To reduce the risk of fire, electric shock, or injury, do not leave the machine unattended when it is plugged in. Before performing any maintenance procedure, disconnect the battery charger cable from the electrical mains. - Do not smoke while charging the batteries.
- To avoid any unauthorized use of the machine, remove the magnetic smart key.
- Do not leave the machine unattended without being sure that it cannot move independently.

WARNING!
Always protect the machine against the sun, rain and bad weather, both under operation and inactivity condition. Store the machine indoors, in a dry place: This machine must be used in dry conditions, it must not be used or kept outdoors in wet conditions.
Before using the machine, close all doors and/or covers as shown in the Instructions for use Manual.
This machine is not intended for use by persons (including children) with reduced physical, sensory or mental capabilities, or lack of experience and knowledge, unless they have been given supervision or instruction concerning use of the machine by a person responsible for their safety.
- Children should be supervised to ensure that they do not play with the machine.
- Close attention is necessary when used near children. Use only as shown in this Manual. Use only Advance's recommended accessories.
- Check the machine carefully before each use, always check that all the components have been properly assembled before use. If the machine is not perfectly assembled it can cause damages to people and properties.
Take all necessary precautions to prevent hair, jewels and loose clothes from being caught by the machine moving parts.
-Do not use the machine on incline.
- Do not tilt the machine more than the angle indicated on the machine itself, in order to prevent instability.
- Do not use the machine in particularly dusty areas.
- Use the machine only where a proper lighting is provided.
While using this machine, take care not to cause damage to people or objects.
- Do not bump into shelves or scaffoldings, especially where there is a risk of falling objects.
- Do not lean liquid containers on the machine, use the relevant can holder.
The machine operating temperature must be between +32^ and 104^ (0 °C and +40 °C).
The machine storage temperature must be between +32^ and 104^ (0 °C and +40 °C).
The humidity must be between 30% and 95% .
- When using floor cleaning detergents, follow the instructions on the labels of the detergent bottles.
- To handle floor cleaning detergents, wear suitable gloves and protections.
- Do not use the machine as a means of transport.
- Do not allow the brush/pad to operate while the machine is stationary to avoid damaging the floor.
In case of fire, use a powder fire extinguisher, not a water one.
- Do not tamper with the machine safety guards and follow the ordinary maintenance instructions scrupulously.
- Do not allow any object to enter into the openings. Do not use the machine if the openings are clogged. Always keep the openings free from dust, hairs and any other foreign material which could reduce the air flow.
- Do not remove or modify the plates affixed to the machine.
- When the machine is to be pushed for service reasons (missing or discharged batteries, etc.), the speed must not exceed 2.5mi/h ( 4km/h ).
- This machine cannot be used on roads or public streets.
- Pay attention during machine transportation when temperature is below freezing point. The water in the recovery tank or in the hoses could freeze and seriously damage the machine.
- Use brushes and pads supplied with the machine or those specified in the Instructions for use Manual. Using other brushes or pads could reduce safety.
In case of machine malfunctions, ensure that these are not due to lack of maintenance. If necessary, request assistance from the authorised personnel or from an authorised Service Center.
If parts must be replaced, require ORIGINAL spare parts from an Authorised Dealer or Retailer.
To ensure machine proper and safe operation, the scheduled maintenance shown in the relevant chapter of this Manual, must be performed by the authorised personnel or by an authorised Service Center.
- Do not wash the machine with direct or pressurised water jets, or with corrosive substances.
The machine must be disposed of properly, because of the presence of toxic-harmful materials (batteries, etc.), which are subject to standards that require disposal in special centres (see Scrapping chapter).
MACHINE DESCRIPTION
MACHINE STRUCTURE
- Drive handlebar
- Forward/reverse gear and activation paddle
- Control panel
- Serial number plate/technical data/conformity certification
- Battery charger
- Battery charger cable
- Battery charger cable housing and document holder
- Squeegee lifting/lowering pedal
- Battery connector (red). This connector also works as EMERGENCY push-button, to stop immediately all functions.
-
Rear pivoting wheels
-
Squeegee vacuum hose
- Recovery water drain hose
- Washing water level and drain hose
- Squeegee mounting handwheels
- Squeegee adjusting knob
- Tank lifting handle
- Washing water filter
- Washing water tap:
A) Open tap
B) Closed tap
- Recovery tank cover
- Can holder
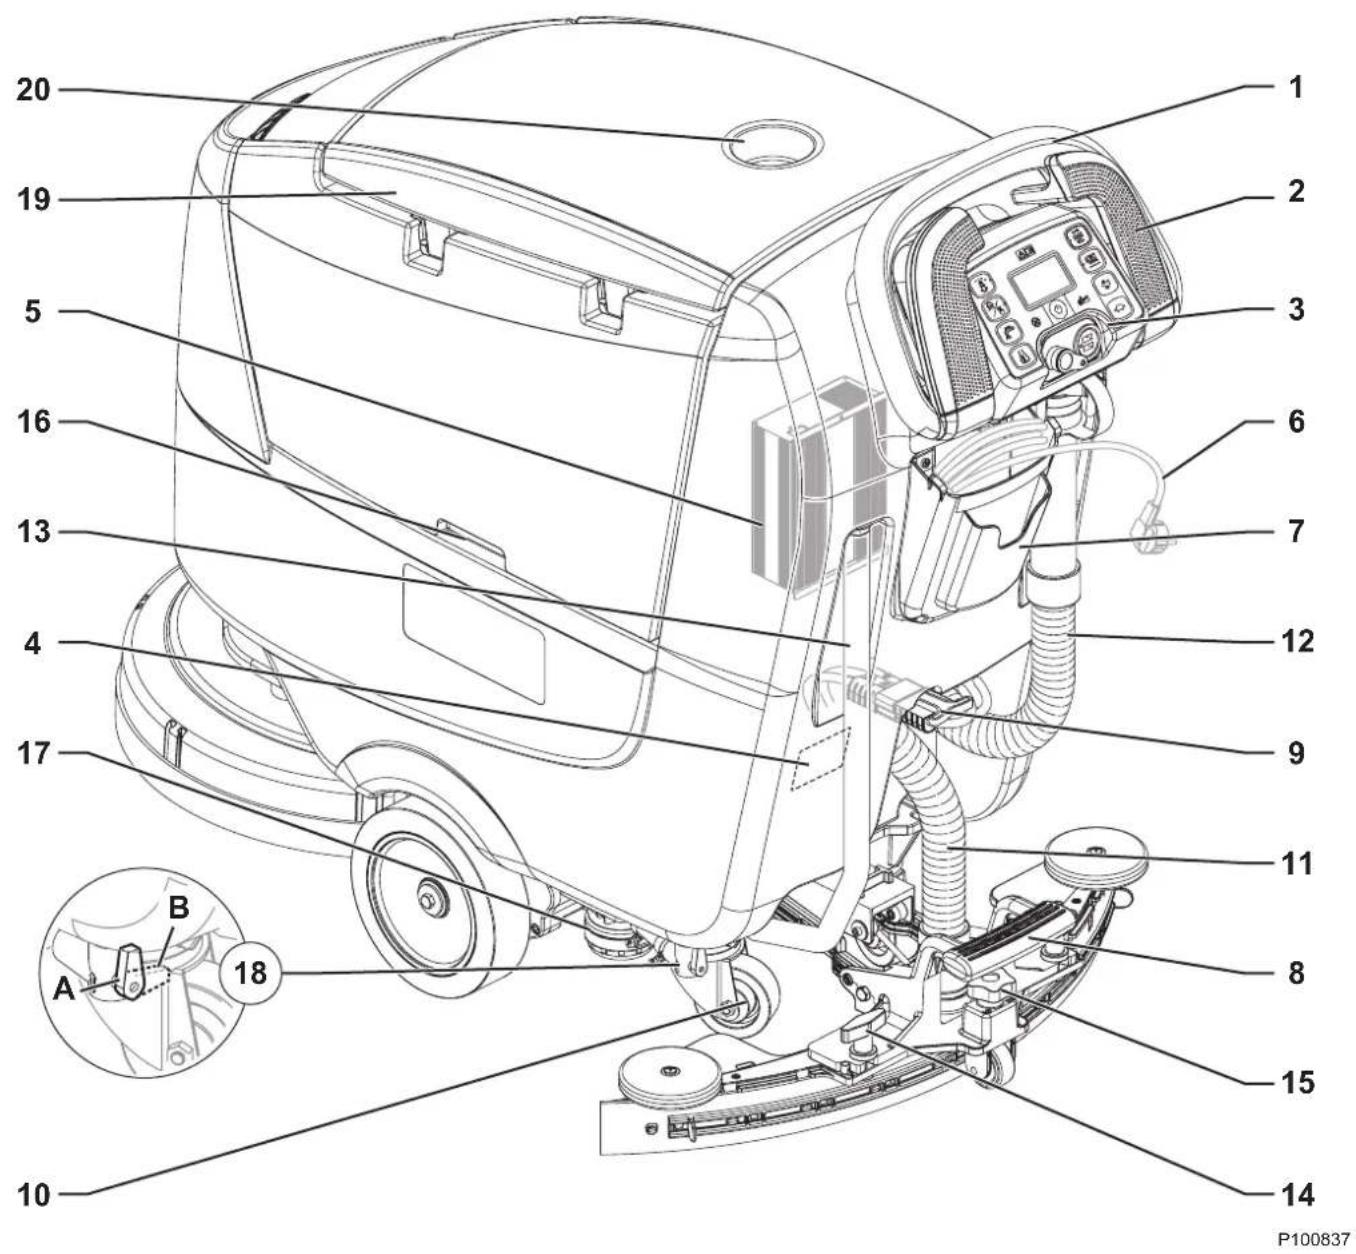
MACHINE STRUCTURE (Continues)
- Washing water tank
- Washing water tank front filler
- Water removable filler hose
- Washing water tank side filler cap
- EcoFlex detergent tank (*)
- Disc brush deck
- Brush
- Front driving wheels
-
Squeegee
-
Debris collection tank
- Vacuum grid with automatic shut-off float
- Vacuum system motor
- Recovery tank
- Recovery water tank cover (open)
- Machine straight forward movement adjusting knob
- Batteries (optional)
- REV deck (^**)
- REV brush (^**)
(*) Not for SC500 20D B version
(^**) For REV version only
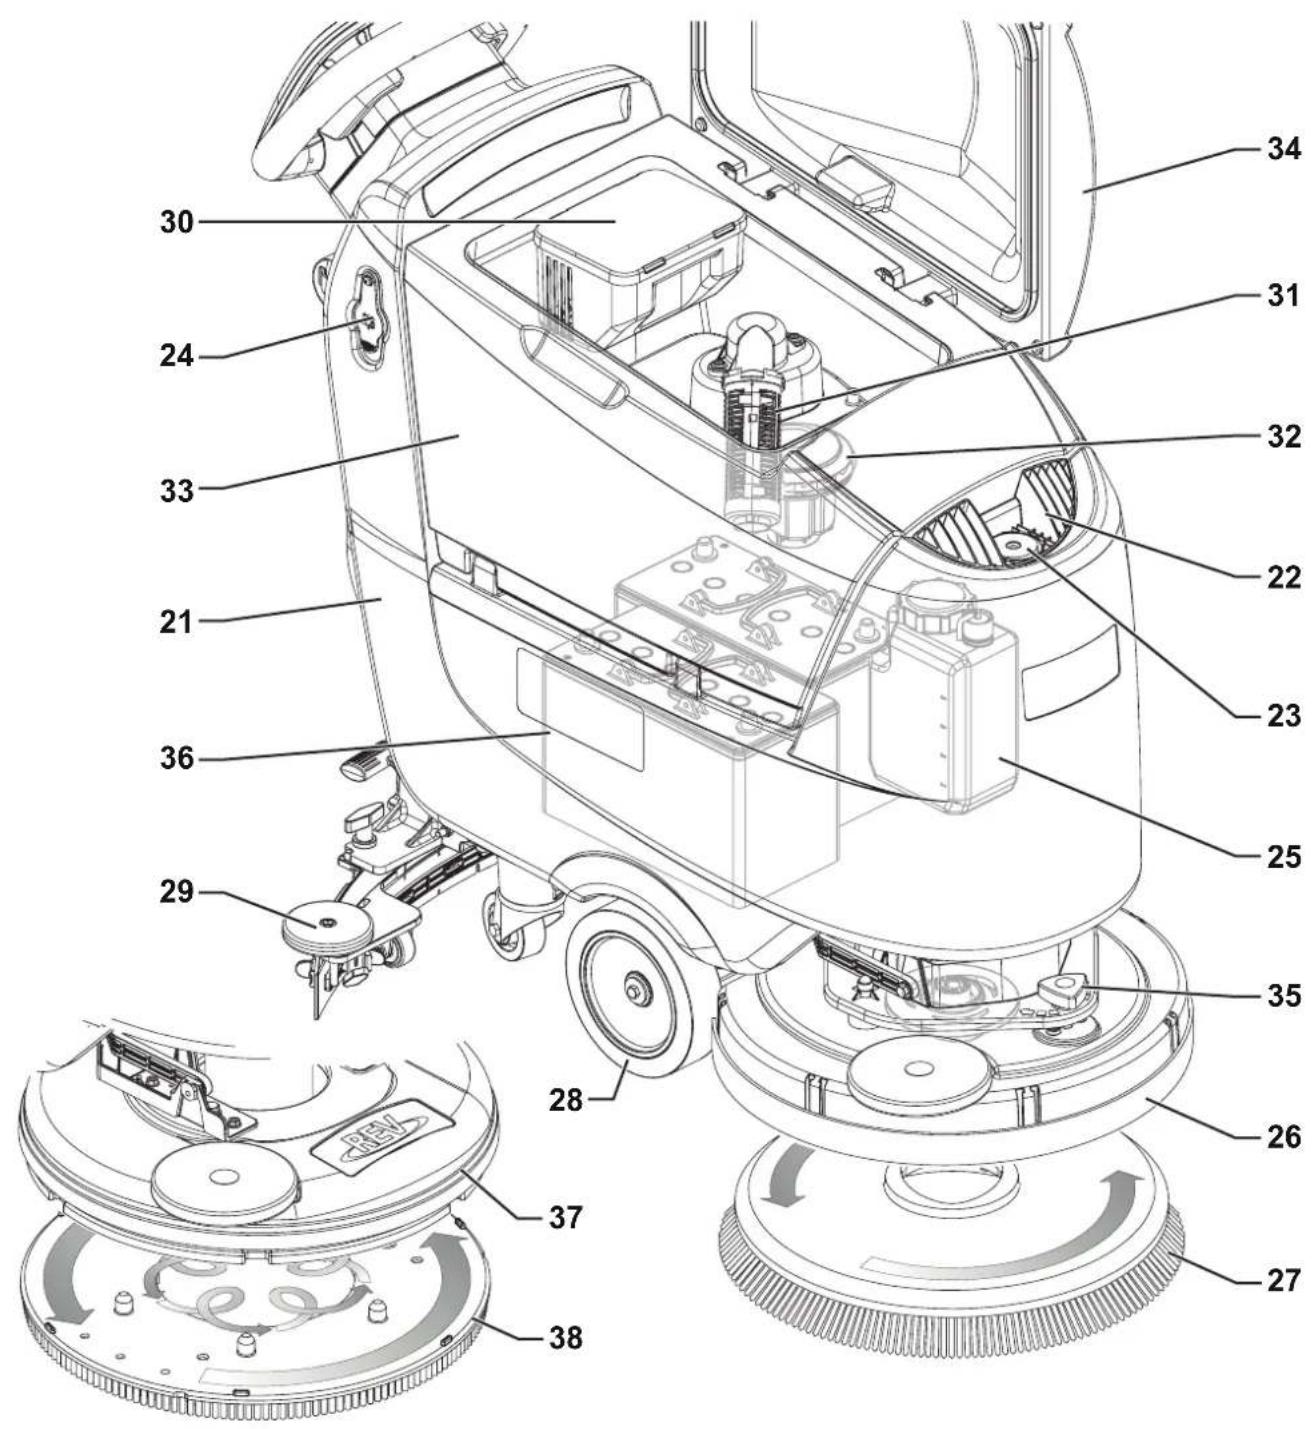
P100854
CONTROL PANEL
- Smart key reader
- Start/stop push-button
- One-Touch™ Scrub ON/OFF push-button
- Flashing green LED: Brush deck moving up/down
- Green LED: Ready for work
Red LED: Extra pressure active (hold for one second) - Brush release push-button
- Flashing LED - Releasing system activated
- REV function push-button (^**)
LED on - system activated - Machine speed adjustment push Buttons
Hare-Increase machine speed - Tortoise - Decrease machine speed
- EcoFlex system push-button ()
LED on - EcoFlex system on - Led flashing - Temporary override
- Vacuum system adjustment/deactivation push-button
LED on - solution flow activated - Solution flow adjustment push-button
-
Detergent percentage adjustment push-button
-
Display, items displayed:
A) Hours worked
B) Battery type
C) Battery charge level
D) Vacuum mode
E) Brush work mode
F) Detergent solution flow quantity
G) Detergent percentage quantity
H) Percentages of detergent in the washing water
1) EcoFlex system override timer (^)
J) Maximum machine speed setting
K) Auto shut-off timer
L) Battery charging with on-board battery charger
M) EcoFlex system drain activation (^)
-
Magnetic smart key
-
Blue = User key
- Yellow = Supervisor key
() Not for SC500 20D B version
(^*) For REV version only
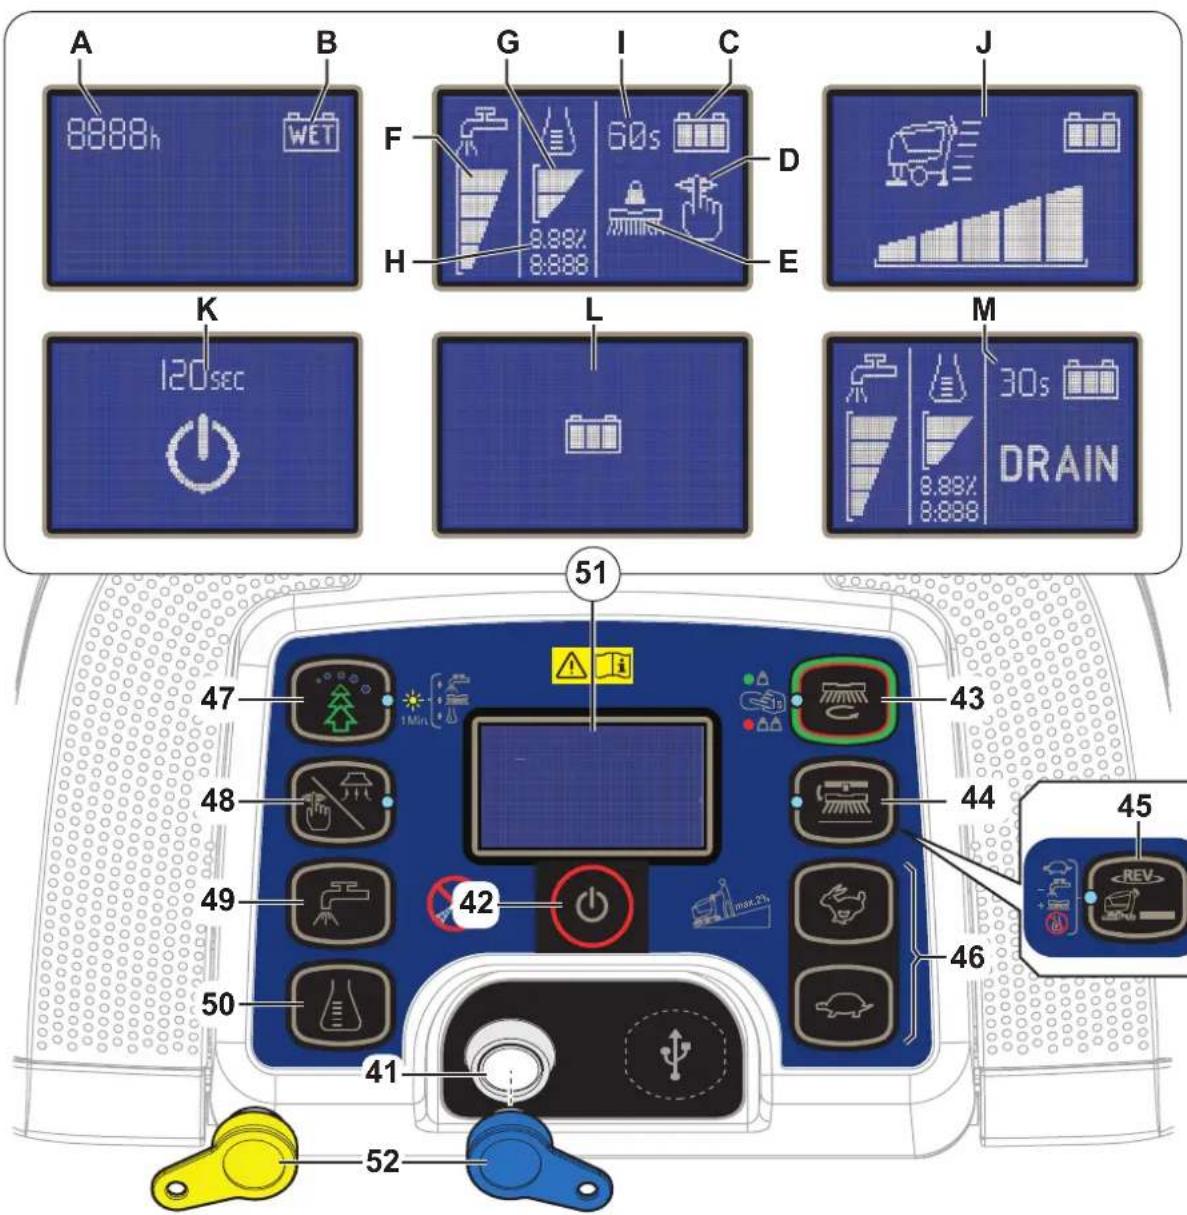
P100855
ACCESSORIES/OPTIONS
In addition to the standard components, the machine can be equipped with the following accessories/options, according to the machine specific use:
-
GEL/AGM batteries
-
Splash-shield
Brushes of different materials
Natural rubber squeezegee blades
- Pads of different materials
-USB port
For further information concerning the optional accessories, contact an authorised Retailer.
TECHNICAL DATA
| Model | Advance SC500 20D B SC500 X20D B | Advance SC500 X20R B |
| Washing water tank capacity 12 US gal (45 liters) | ||
| Recovery tank capacity 12 US gal (45 liters) | ||
| Machine length 50.3 in (1,277 mm) 51.2 in (1,302 mm) | ||
| Machine width with squeezegee 28.3 in (720 mm) | ||
| Machine width without squeezegee 21 in (532 mm) 21.2 in (538 mm) | ||
| Machine height 41.8 in (1,063 mm) | ||
| Cleaning width 20 in (530 mm) | ||
| Driving wheel diameter | 7.8 in (200 mm) | |
| Driving wheel specific pressure on the floor | 101 psi (0.7 N/mm²) | |
| Rear wheel diameter | 3.1 in (80 mm) | |
| Rear wheel specific pressure on the floor | 304 psi (2.1 N/mm²) | |
| Brush/pad diameter | 20 in (530 / 508 mm) | |
| Brush pressure with extra-pressure function turned off | 33 lb (15 kg) | 49 lb (22 kg) |
| Brush pressure with extra-pressure function turned on | 66 lb (30 kg) | 66 lb (30 kg) |
| Solution flow values | 0.75 cl/m / 1.5 cl/m 3.0 cl/m / 2.8 l/min | 0.38 cl/m / 0.75 cl/m 1.5 cl/m / 2.8 l/min |
| EcoFlex system detergent percentage (not for SC500 20D B) | Ratio 1:400 ÷ 1:33 (0.25 % ÷ 3 %) | |
| Sound pressure level at workstation (ISO 11201, ISO 4871, EN 60335-2-72) (LpA) | 63 ± 3 dB(A) | 65 ± 3 dB(A) |
| Sound pressure level at workstation in silent mode (LpA) | 60 ± 3 dB(A) | 61 ± 3 dB(A) |
| Machine sound power level (ISO 3744, ISO 4871, EN 60335-2-72) (LwA) | 81 dB(A) | 83 dB(A) |
| Vibration level at the operator's arms (ISO 5349-1, EN 60335-2-72) | < 98.4 in/s² (< 2.5 m/s²) | |
| Maximum gradient when working | 2 % | |
| Drive system motor power | 0.27 hp (200 W) | |
| Drive speed (variable) | 0 - 3.1 mi/h (0 - 5 km/h) | |
| Vacuum system motor power | 0.37 hp (280 W) | |
| Vacuum system circuit capacity | 29.9 in H₂O (760 mm H₂O) | |
| Brush motor power | 0.6 hp (450 W) | 0.9 HP (670 W) |
| Brush rotation speed | 155 rpm - | |
| Total absorbed power (*) | 0.7 hp (500 W) | |
| IP protection class | X4 | |
| Protection class (electric) | III (I for the battery charger) | |
| Battery compartment size | 13.7x13.7x10.2 in (350x350x260 mm) | |
| System voltage | 24 V | |
| Standard batteries (2) | 12 V 105 AhC5 | |
| Battery charger | 24 V 13 A | |
| Operating time (standard batteries) (*) | 3.5 hour | |
| Weight without batteries and with empty tanks | 187 lb (85 kg) | 194 lb (88 kg) |
| Gross vehicle weight (GVW) | 456 lb (207 kg) | 463 lb (210 kg) |
| Shipping weight | 256 lb (116 kg) 262 Lb (119 kg) | 262 lb (119 kg) |
(*) Values reflect standard operating conditions (EN 60335-2-72)
WIRING DIAGRAM
Key
BAT 24V batteries
C1 Battery connector
C2 Battery charger connector
CH Battery charger
EB1 Main controller machine
EB2 Display controller
EB3 User interface controller
EV1 Solenoid valve
F1 Main controller fuse
F2 Signal circuit fuse
F3 USBfuse
F4 Brush motor fuse
F5 Drive system motor fuse
IB Smart Key
M1 Brush motor
M2 Vacuum system motor
M3 Drive system motor
M4 EcoFlex pump ()
M5 Brush deck actuator
RV1 Speed potentiometer
SW1 Detergent level sensor
TCU TrackClean (optional)
USB USB port (optional)
Color codes
| BK Black | |
| BU Blue | |
| BN Brown | |
| GN Green | |
| GY Grey | |
| OG | Orange |
| PK Pink | |
| RD Red | |
| VT Violet | |
| WH | White |
| YE | Yellow |
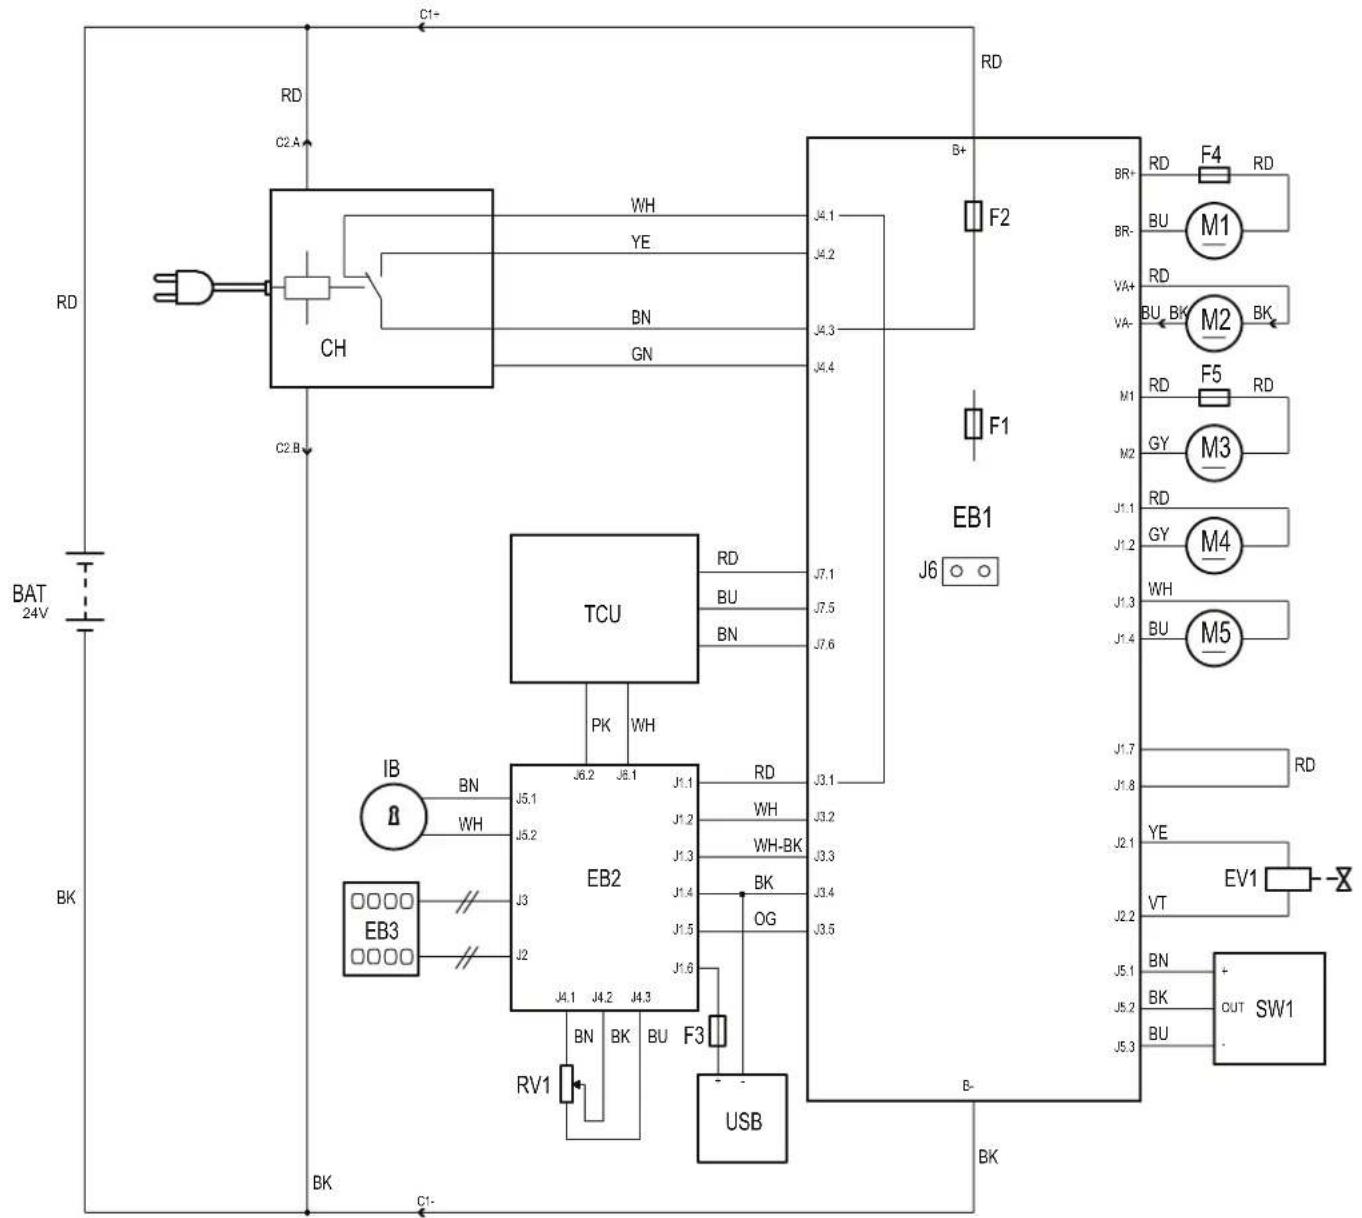
P100856
USE/OPERATION

WARNING!
On some points of the machine there are some adhesive plates indicating:
While reading this Manual, the operator must pay particular attention to the symbols shown on the plates (see Visible Symbols On The Machine paragraph).
Do not cover these plates for any reason and immediately replace them if damaged.
MAGNETIC SMART KEY
A magnetic smart key (52) is required to start the machine. If the start switch (42) is pressed and the key is not in the key reader (41), the display will turn on temporarily and it will show a key insertion request, then it will turn off.
There are two different magnetic smart keys:
- User key (blue) for scrubbing/drying operations and basic information.
- Supervisor key (yellow) for accessing additional features (see the Supervisor key paragraph in Maintenance chapter).
BATTERY CHECK/SETTING ON A NEW MACHINE

WARNING!
The electric components of the machine can be seriously damaged if the batteries are either improperly installed or connected. The batteries must be installed by qualified personnel only.
Check the batteries for damage before installation.
Handle the batteries with great care.
The machine requires 2 12V batteries, connected according to the diagram shown in Figure 1.
The machine can be supplied in one of the following modes:
Batteries already installed on the machine
- Ensure that the battery connector (9) is connected.
- When first using the machine with new batteries, perform a full charging cycle (see the procedure in Maintenance chapter).
Without batteries
- Buy appropriate batteries (see "Technical Data" paragraph). For battery choice and installation, apply to qualified battery Retailers.
- Set the machine according to the type of batteries installed as shown in the Supervisor key section of the Maintenance chapter.
BATTERY INSTALLATION
Battery Installation
- Remove the user key (52).
- Disconnect the battery connector (9).
- Lift the cover (34) and check that the recovery tank (33) is empty; if not, empty it using the drain hose (12).
- Close the cover (34).
- Grasp the handle (16) and carefully lift the tank (33).
- The machine is supplied with cables suitable to install 2 12V batteries. Carefully lift the batteries up to the compartment, then install them correctly.
- Route and install the battery cable as shown in Figure 1, then carefully tighten the nut on each battery terminal.
- Connect the battery connector (9).
- Grasp the handle (16) and carefully lower the tank (33).
Battery Charging
- Fully charge the batteries (see the procedure in Maintenance chapter).
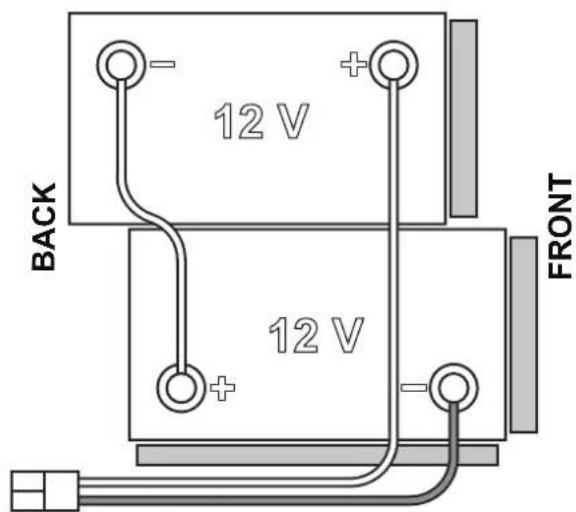
Figure 1
P100841
BEFORE MACHINE START-UP

WARNING!
When starting the machine, or before operating the One-Touch push-button (43), make sure that there is no foreign material between the deck and the tank assembly which could obstruct the deck movement. If the machine has been turned off without lifting the deck, the deck would lift automatically at next machine start-up.
Brush or pad-holder removal/installation (Disc system)
- According to the kind of cleaning to be performed, the machine can be equipped either with the brush (A, Fig. 2) or the pad-holder (B) with pad (C) together with the appropriate deck.
- Place the brush (A) or the pad-holder (B) under the deck (26).
- Place the user key (52) in the key reader (41), then press the push-button (42) to turn on the machine.
- Press the turtle push-button (46) to reduce the driving speed to idle.
- Press the One-Touch push-button (43) to lower the deck on the brush.
- To engage the brush, press the paddle (2), then release it. If necessary, repeat the procedure until the brush is engaged.

CAUTION!
Turn the machine speed to idle and slightly press the paddle, otherwise the machine starts to move.
- To remove the brush, the deck must be lifted by pressing the One-Touch push-button (43), then press the release push-button (44).
When the display shows the icon (51), wait until the brush is lowered onto the floor.
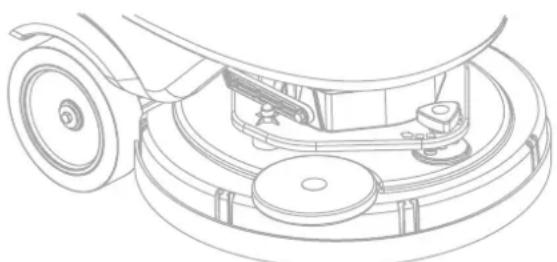
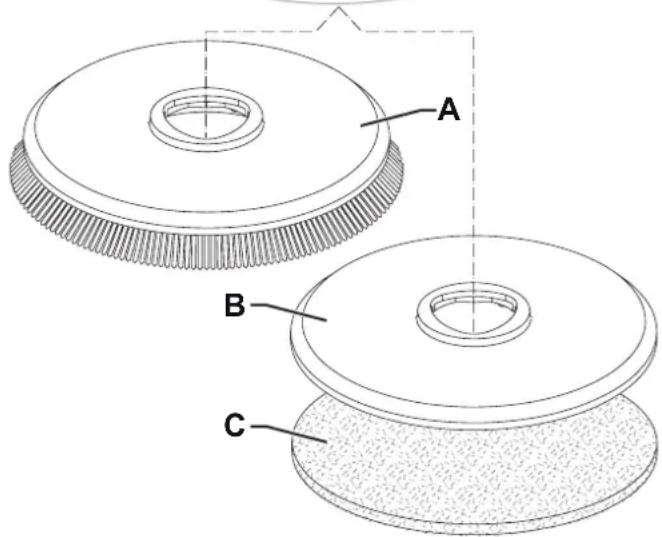
Figure 2
P100842
Available brushes and their relevant application guides (suggestions only)
| Models 46 GRIT 80 GRIT 180 GRIT | 240 GRIT 500 | GRIT PROLENE PROLITE | UNION MIX | ||||
| General cleaning: | |||||||
| Concrete | |||||||
| Terrazzo floor | |||||||
| Ceramic tiles/quarrystones | |||||||
| Marble | |||||||
| Vinyl tiles | |||||||
| Rubber tiles | |||||||
| Polishing: | |||||||
| Rubber tiles | |||||||
| Marble | |||||||
| Vinyl tiles | |||||||
Brush or pad-holder removal/installation (REV system)
- Make sure that the REV deck (37) is lifted.
- Turn off the machine and remove the user key (52).
-
According to the kind of cleaning to be performed, install the pad (A, Fig. 3) or the brush (C, optional) and note the following:
-
Place the pad (A) under the deck and press it until it is fastened with the Velcro of the drive disc (B).
-
Place the brush (C, optional) under the deck, and then match the centering pins (D) to the respective holes of the drive disc (B), and then engage the brush with the three mounting screws (E).
-
To remove the pad or brush, proceed in the reverse order.
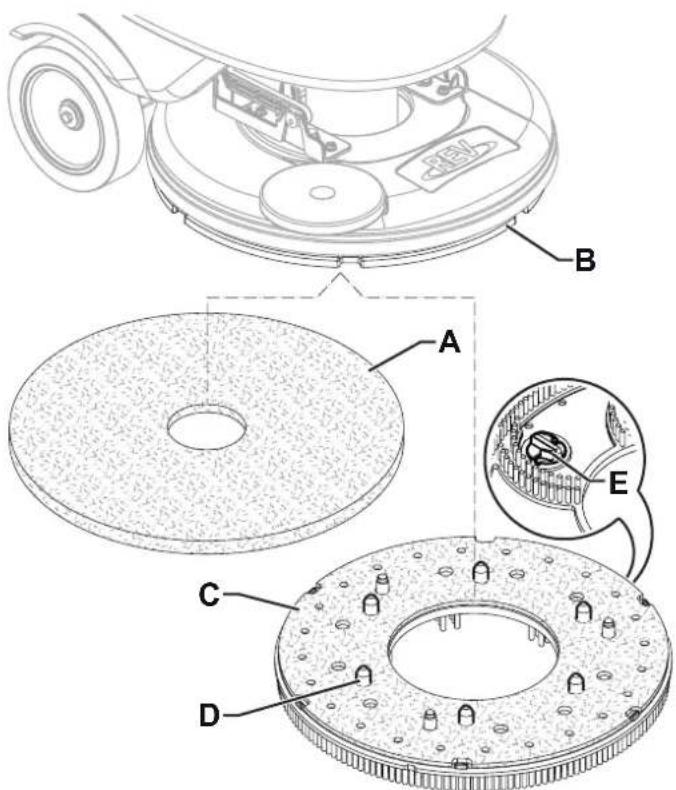
Figure 3
P100857
Squeegee installation
- Install the squeezegee (A, Fig. 4) and fasten it to the bracket (C) with the handwheels (B).
- If necessary, adjust the squeegee with the knob (D) so that the rear blade (E) and front blade (F) touch the floor as shown in the figure.
Solution tank filling

CAUTION!
Use only low-foam and non-flammable detergents, intended for automatic scrubber applications.

WARNING!
When using floor cleaning detergents, follow the instructions on the labels of the detergent bottles.
To handle floor cleaning detergents, wear suitable gloves and protections.

NOTE
If the machine is equipped with EcoFlex system pour clean water in the tank, otherwise pour solution.
- Ensure that the solution valve (18) is open (18-A).
- To fill the solution tank (21) use the front filler (22), or open the cap (24) to access the side filler.
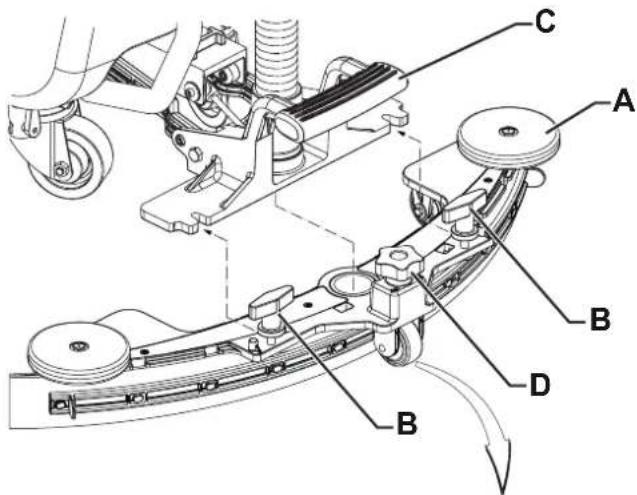
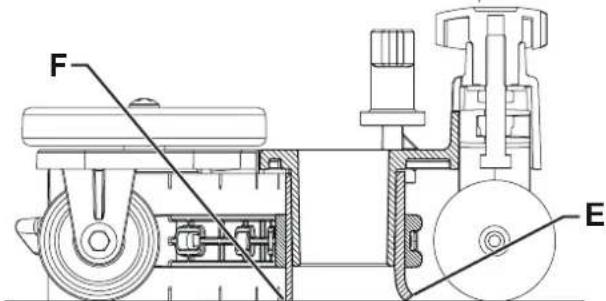
Figure 4
P100843
(For machines without EcoFlex system)
- Fill the tank (21) with a solution suitable for the work to be performed.
Do not fill the tank completely, leave a few inches from the edge. Use the level hose (13) as reference. Always follow the dilution instructions on the label of the chemical product used to prepare the solution. The solution temperature must not exceed 40^ .
(For machines with EcoFlex system)
- Fill the tank (21) with clean water. Use the water removable filler hose (23). Do not fill the tank completely, leave a few inches from the edge. Use the level hose (13) as reference. The water temperature must not exceed 40^ .
Detergent tank filling (For machines with EcoFlex system)
- Lift the cover (34) and check that the recovery tank (33) is empty; if not, empty it using the drain hose (12).
- Close the cover (19).
- Grasp the handle (16) and carefully lift the tank (33).
- Fill the tank (25) with a detergent suitable for the work to be performed (highly concentrated detergent). Do not fill the detergent tank completely, leave a few inches from the edge.

CAUTION!
Use only low-foam and non-flammable detergents, intended for automatic scrubber applications.

NOTE
To accelerate filling of the hoses and system operation (with a new system, if the system has been emptied for cleaning, etc.), it is a good idea to drain the EcoFlex system once or several times (see the procedure in the Maintenance chapter).
MACHINE START AND STOP
Starting the machine
- Prepare the machine as shown in the previous paragraph.
- To turn on the machine, place the user key (52) in the key reader (41), then press the push-button (42).
- In the first 2 seconds after machine start-up, the display (51) indicates the machine working hours (51-A) and the type of batteries installed (51-B).

NOTE
Check the battery charge level.
When the display shows at least one segment of the battery symbol (51-C) which is on but not flashing, the machine is ready for use.
When the battery symbol (51-C) shows just one segment flashing, the batteries have to be charged (see the procedure in Maintenance chapter).
- Drive the machine to the area it is required by starting it with your hands on the handlebar (1) and pushing the paddle (2) forward to move forward, and backwards to move in reverse. The speed can be adjusted by pressing the paddle (2) more or less. The maximum speed can be set with the push Buttons (46).
Stopping the machine
- Stop the machine by releasing the paddle (2).
- Turn off the machine by pressing push-button (42), then remove the user key (52).

NOTE
The machine is running without the user key (52) in the key reader (41), it automatically switches off after 10 seconds of complete idle.

NOTE
If the machine is on but not working, it automatically turns off after 5 minutes.
- Make sure that the machine cannot move independently.

CAUTION!
In the event of an emergency when you must stop all machine functions immediately, disconnect the battery connector (9).
Reset the machine functions by connecting again the connector.
MACHINE OPERATION (SCRUBBING/DRYING)
- Start the machine as shown in the previous paragraph.
- Lower the squeegee (29) with the pedal (8).
- Press the One-Touch push-button (43) to lower the brush deck and start scrubbing and drying.
- Start cleaning by manoeuvring the machine and pressing the paddle (2).
If necessary, adjust the maximum speed with the push Buttons (46).
- Adjust the solution flow by pressing the push-button (49) as necessary, depending on the type of cleaning to be performed.

NOTE
For the first 3 flow levels (Fig. 4), the amount of solution dispensed is automatically adjusted according to the machine speed, in order to obtain a constant amount of solution per linear meter of cleaning.
Level 4 (when enabled) supplies the maximum possible quantity of detergent solution, regardless of the machine speed (to enable or disable this, see the Supervisor key section in the Maintenance chapter).
The level 0 closes the solution flow completely.
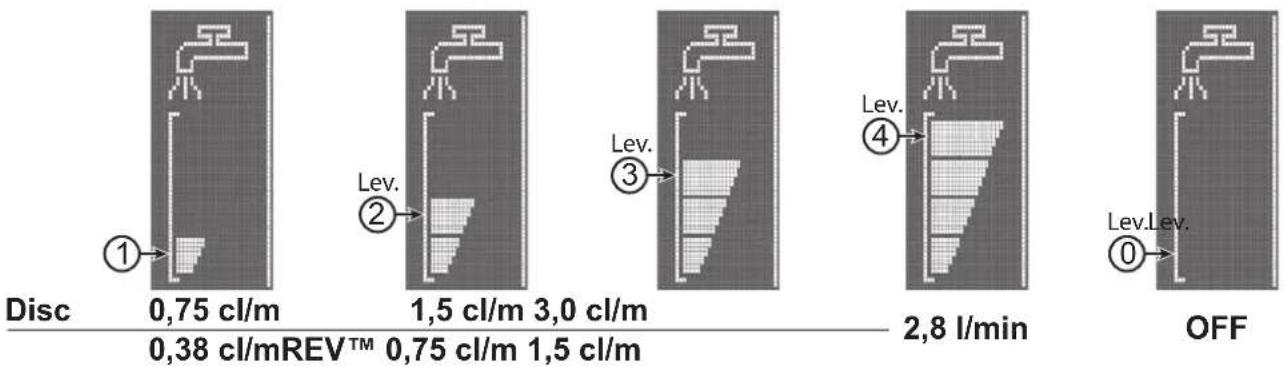
Figure 5
P100858
- If necessary, to reduce the noise, turn on the mute function by pressing the switch (48).

NOTE
For correct scrubbing/drying of floors at the sides of the walls, Advance suggests to go near the walls with the right side of the machine as shown in figure 6.
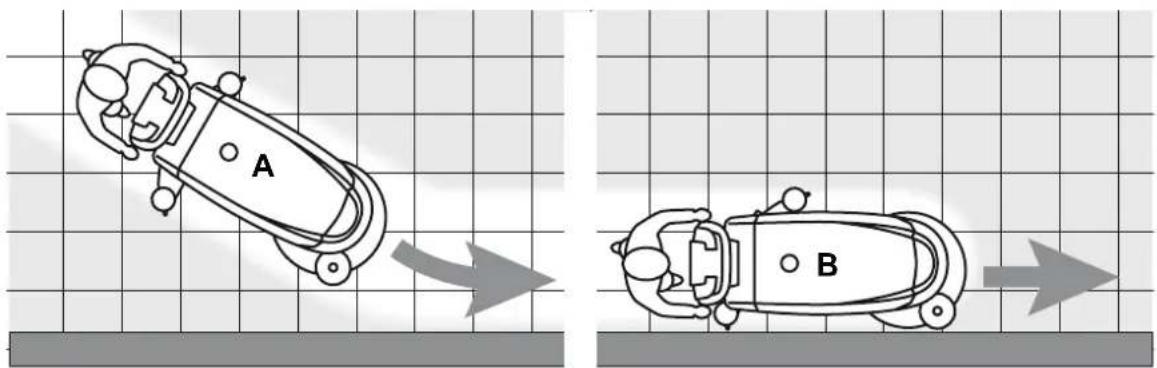
Figure 6
P100845

CAUTION!
To avoid any damage to the floor surface, turn off the brush when the machine is stationary, especially when the extra pressure function is on.
- At the end of the work, press the One-Touch push-button (43) to lift the brush deck. After 10 seconds, the vacuum system turns off too.
- Lift the squeegee (29) with the pedal (8).
Adjusting of detergent concentration in the washing water
(For machines with EcoFlex system)
The system for mixing the detergent in the washing water is automatically activated when the brush is running.
The percentage of detergent added to the washing water is set to level 1 (Fig. 7).
By pressing the push-button (50), it is possible to set the percentage level to 2, or reset it to level 0.
The set percentages are shown on the display (51-H).
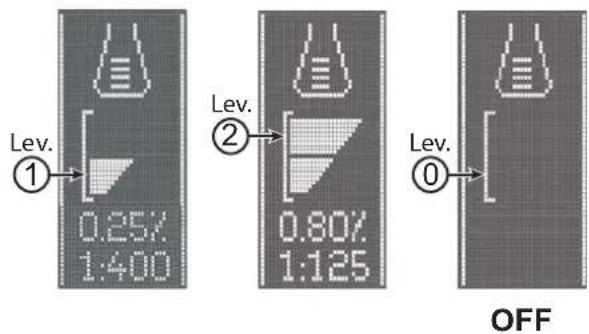
Figure 7
P100846
EcoFlex system
Press the EcoFlex push-button (47) when stronger washing power is needed temporarily.
With the EcoFlex system activated (LED flashing), increased solution flow, activation of the extra pressure of the brush and an increase in the solution detergent concentration (level 2 if the level was set to 1 - level 1 if the level was set to 0) is obtained. Press the EcoFlex push-button (47) again, to restore the original settings (LED on).

NOTE
If the EcoFlex push-button (47) is not pressed again, the original settings are restored automatically after 60 seconds.

NOTE
All of the above solution flow and detergent concentration values are factory settings.
To change these settings, see the Supervisor key section in the Maintenance chapter.
REV system (for REV version only)
Press the REV push-button (45) when a specific washing mode is required.
With the REV system activated the drive speed is decreased, the brush extra pressure is activated, the detergent is stopped and the washing water quantity is reduced.
Working with brush extra pressure function turned on
If the floor proves to be particularly difficult to clean, it is possible to turn on the brush extra pressure function, according to the following procedure:
- Press the One-Touch push-button (43) to lower the brush deck as shown in "Starting The Machine" paragraph.
- Press and hold the One-Touch push-button (43) for more than 1 second. The extra pressure function activation is shown by

on the display (51).
- To return to normal pressure, press and hold the One-Touch push-button (43) for more than 1 second.
- To lift the brush deck without returning to the normal pressure, press the One-Touch push-button (43) and release it immediately.

CAUTION!
In case of brush motor overload, due to foreign bodies which prevent them from turning, or to excessively aggressive floors/brushes, the safety system stops the brush after about one minute of continuous overload. If the overload takes place when the extra pressure function is on, the system automatically turns the extra pressure function off.
If the overload persists, the brush stops.
To start scrubbing again after a brush stop due to overload, turn off and then on the machine with the pushbutton (42).
Battery discharge during operation
When there is only one segment turned on and flashing on the battery symbol (51-C), it is advisable to charge the batteries, because the residual autonomy will last for a few minutes (depending on battery characteristics and work to be performed). When the battery symbol (51-C) is flashing and no segment is turned on, the battery autonomy is over. After a few seconds, the brush is automatically tuned off, while the vacuum system and the drive system stay on, to finish drying the floor and drive the machine to the appointed recharging area.

CAUTION!
Do not use the machine with discharged batteries, to avoid damaging the batteries and reducing the battery life.
TANK EMPTYING
An automatic float shut-off system (31) turns off the vacuum system when the recovery tank (33) is full. The vacuum system deactivation is signalled by a sudden increase in the vacuum system motor noise, and the floor is not dried.

CAUTIONI
If the vacuum system turns off accidentally (for example, when the float is activated because of a sudden machine movement), to resume the operation: turn off the vacuum system by pressing the push-button (48), then open the cover (34) and check that the float inside the grid (31) has gone down. Then close the cover (34) and turn on the vacuum system by pressing the push-button (48).
When the recovery tank (33) is full, empty it according to the following procedure.
Recovery tank emptying
- Raise the brush deck by pressing the One-Touch push-button (43).
- Lift the squeegee (29) with the pedal (8).
- Drive the machine to the appointed disposal area.
- Turn off the machine with the push-button (42) and remove the user key (52).
- Empty the recovery tank (33) with the drain hose (12). Then, rinse the tank with clean water.
Washing water tank emptying
- Perform steps 1 to 4.
- Empty the washing water tank (21) using the level hose (13). Then, rinse the tank with clean water.
AFTER USING THE MACHINE
After working, before leaving the machine:
- Remove the brush as shown in the relevant paragraph.
- Remove the user key (52).
- Empty the tanks (21) and (33) as shown in the relevant paragraphs.
- Perform the daily maintenance procedures (see the Maintenance chapter).
- Store the machine in a clean and dry place, with the brush and the squeezegee lifted or removed.
MACHINE LONG INACTIVITY
If the machine is not going to be used for more than 30 days, proceed as follows:
- Perform the procedures shown in After using the machine paragraph.
- For versions with EcoFlex system, empty the detergent tank (25) and clean the system with a draining cycle (see the procedure in Maintenance chapter).
- Close the solution tank valve (18-B).
- Disconnect the battery connector (9).
MAINTENANCE
The lifespan of the machine and its maximum operating safety are ensured by correct and regular maintenance.
The following table provides the scheduled maintenance. The intervals shown may vary according to particular working conditions, which are to be defined by the person in charge of the maintenance.

WARNING!
The procedures must be performed with the machine off and the battery disconnected.
Moreover, read carefully the instructions in the Safety chapter before performing any maintenance procedure.
All scheduled or extraordinary maintenance procedures must be performed by qualified personnel, or by an authorised Service Center.

CAUTION!
When the Service icon scheduled maintenance

appears on the display (51), contact an authorised Advance Service Centre for
This Manual describes only the simplest and most common maintenance procedures.
For other maintenance procedures shown in the Scheduled Maintenance Table, refer to the Service Manual that can be consulted at any Service Center.
SCHEDULED MAINTENANCE TABLE
| Procedure | Daily, after using the machine | Weekly | Every six months | Yearly |
| Battery Charging | ||||
| Squeezegee Cleaning | ||||
| Brush/pad cleaning | ||||
| Recovery tank and debris tray cleaning, and cover gasket check | ||||
| EcoFlex system cleaning and draining | ||||
| Squeezegee blade check | ||||
| Washing water filter cleaning | ||||
| Battery (WET) fluid level check | ||||
| Squeezegee blade replacement | ||||
| Drive and brush motor vent check and cleaning (1) | ||||
| Brush motor carbon brush check or replacement (1) | ||||
| Drive system motor carbon brush check or replacement (1) | ||||
| Brush deck vibration-damper replacement (only for REV version) (1) |
(1) This maintenance procedure must be performed by an authorised Advance Service Center.
BATTERY CHARGING

NOTE
Charge the batteries when there is only one flashing segment displayed in the battery symbol (51-C), or at the end of the shift.
Keeping the batteries charged make their life last longer.

CAUTION!
When the batteries are discharged, charge them as soon as possible, as that condition makes their life shorter.
Check for battery charge at least once a week.

WARNING!
When using lead (WET) batteries, battery charging produces highly explosive hydrogen gas. Charge the batteries in well-ventilated areas and away from naked flames.
Do not smoke while charging the batteries.
Keep the recovery tank raised until the battery charging cycle is over.

WARNING!
Pay close attention when charging WET CELL batteries, as there may be battery fluid leakages. The battery fluid is corrosive. If it comes in contact with skin or eyes, rinse thoroughly with water and consult a physician.
- Drive the machine to the appointed recharging area.
- Ensure that the machine is off and the user key (52) has been removed.
- Lift the cover (34) and check that the recovery tank (33) is empty; if not, empty it using the drain hose (12).
- Close the cover (19).
- Grasp the handle (16) and carefully lift the tank (33).
- (For WET CELL batteries only) Check the level of electrolyte inside the batteries. If necessary, unscrew the caps and top up. When the correct level is restored, close the caps and clean the tops of the batteries.
- Plug the battery charger (6) into the mains electricity supply (the mains voltage and frequency must be compatible with the battery charger values shown on the machine serial number plate).

NOTE
When the battery charger is connected to the electrical mains, all machine functions are automatically cut off.
When the first or second segment from the left in the battery symbol (51-L) is flashing, this means that the battery charger is charging the batteries.
When the third segment from the left in the battery symbol (51-L) is flashing, this means that the battery charger is finishing the battery charging cycle.
- When all segments of the battery symbol (51-L) are steadily lit, the battery charging cycle is complete.
- Disconnect the battery charger plug (6) from the mains and place it in its holder (7).
- Carefully lower the recovery tank (33).
- Now the machine is ready to be used.

NOTE
For further information about the operation of the battery charger (5), see the relevant Manual.
SUPERVISOR KEY (YELLOW)
The supervisor key (yellow) allows you to check some additional information on some machine operating parameters and to adjust others to your specific requirements.
Main Screen (E, Fig. 8)
- Place the supervisor key (yellow) in the key reader (41) in place of the user key (blue), then press the push-button (42) to access the main screen of the display.
- Press push-button (A) to change the machine settings (see Machine Settings Screen section).
- Press push-button (B) to check for any stored machine alarms (see Alarms Log Screen section).
- Press push-button (C) to check the machine's hours of operation (see Operating Time Counter Screen section).
- Press the push-button (D) to enter the user key management menu (see the User Key Management Screen paragraph).
Machine Settings Screen (F, Fig. 8)
This function allows you to customise some parameters described in the following table.
- Press push-button (C) to increase the value of the current parameter. Press push-button (D) to decrease the value of the current parameter.
- Press push-button (A) to move to the next parameter.
- Press push-button (B) to return to the main screen.
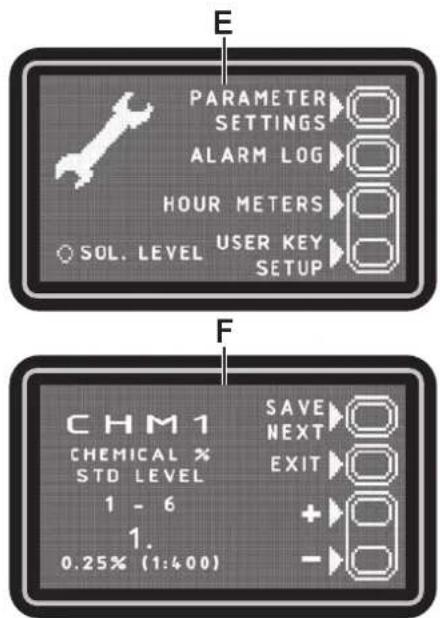
Figure 8
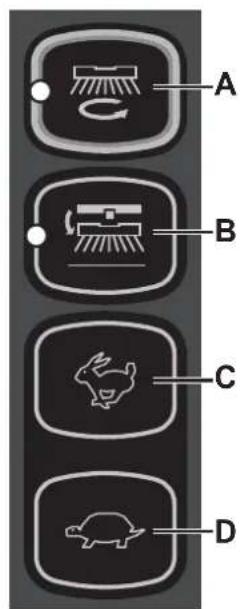
P100847
| TABLE OF MODIFIABLE PARAMETERS Values | |||||
| Code Description Minimum Factory Setting Maximum | |||||
| CHM1 | Detergent concentration level 1 | 1:400 (0.25 %) | 1:400 (0.25 %) | 1:33 (3 %) | |
| CHM2 | Detergent concentration level 2 | 1:400 (0.25 %) | 1:125 (0.80 %) | 1:33 (3 %) | |
| P1/P3 | Level 1 solution flow rate in relation to level 3 -flow rate as function of speed) | 0 % | 25 % | 100 % | |
| P2/P3 | Level 2 solution flow rate in relation to level 3 -flow rate as function of speed) | 0 % | 50 % | 100 % | |
| P3 | Level 3 solution flow rate -flow rate as function of speed) | DISC | 1.0 cl/m | 3.0 cl/m | 5.0 cl/m |
| REV | 1.0 cl/m | 1.5 cl/m | 5.0 cl/m | ||
| P4 | Enablement of level 4 (2.8 l/min regardless of speed) | OFF | OFF | ON | |
| SPT | EcoFlex function timer | 0 (disabled) | 60 sec. | 300 sec. | |
| XPRES | Brush deck extra pressure enablement | OFF | ON | ON | |
| FVMIN | Minimum forward speed | 0 % | 25 % | 100 % | |
| FVMAX | Maximum forward speed | 10 % | 100 % | 100 % | |
| RVMAX | Maximum reverse speed | 10 % | 30 % | 50 % | |
| BAT (**) | Installed battery type (see table) | 0 | 1 | 5 | |
| TOFF | Automatic shut-off time | 0 (disabled) | 300 sec. | 600 sec. | |
| BRGH | Display contrast | 5 | 20 | 50 | |
| VRID | Vacuum power in silent mode | 1 | 1 | 5 | |
| RPM (*) | Reduced brush rpm activation threshold | 5 | 9 | 20 | |
| RESET | Restore factory settings for all parameters | OFF | OFF | ON | |
(^*) Increase the value of this parameter to reduce the brush motor speed in a wider range of applications and vice versa.
(^**) As described in the Use/operation chapter, set the machine and the on-board battery charger on the basis of the type of battery to be installed by modifying the BAT parameter from the table below:
| Installed battery type Value | ||
| WET Wet cell batteries 0 | ||
| GEL / AGM Generic GEL or AGM batteries 1 | ||
| GEL DISCOVER GEL batteries or DISCOVER® brand 2 | ||
| GEL OPTIMA GEL batteries or OPTIMATM brand 3 | ||
| GEL EXIDE GEL batteries or EXIDE®/SONNENSHINE brand 4 | ||
| GEL FULLRIVER | GEL batteries or FULLRIVER® brand | 5 |
Alarms log screen (G, Fig. 9)
This function allows you to check for any stored alarms on the machine. Use this function only with support from a Advance Service Centre to solve any operating problems. To return to the main screen (E, Fig. 8), press push-button (A) repeatedly.
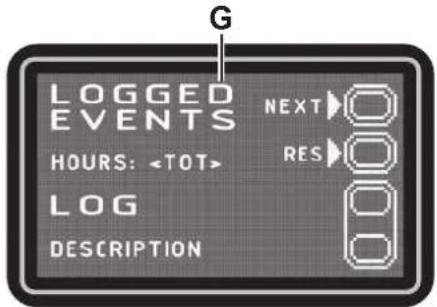
Figure 9
P100848
Operating Time Counter Screen (H, Fig. 10)
This function allows you to check the total accumulated hours of work for each machine subsystem:
TOTAL counter (machine running time)
- DRIVE counter (drive system usage time)
BRUSH counter (brush rotation system usage time)
VACUUM counter (vacuum system usage time)
To return to the main screen (E, Fig. 8), press push-button (A).
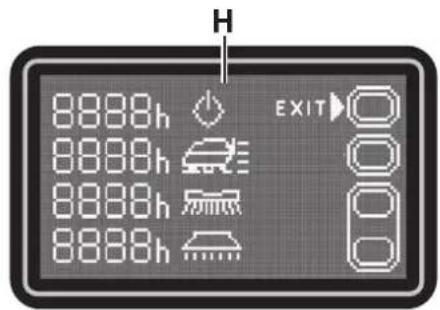
Figure 10
P100849
User Key Management Screen (I, Fig. 11)
This feature allows to determine whether the machine can be used with any user key (factory setting) or only with one or more specific user keys.
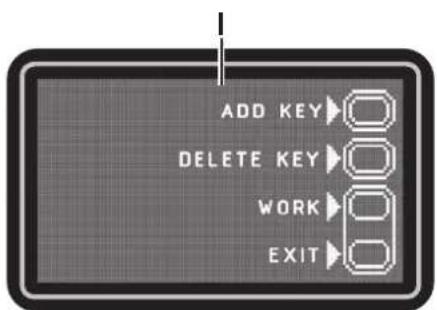
Figure 11
P100849
Identification of a specific user key to be used for the machine:
- Remove the Supervisor key (if any) from the key reader.
-
Place the user key in the key reader and press the push-button (A).
-
Removal of a specific user key from the list of keys to be used for the machine:
-
Remove the Supervisor key (if any) from the key reader.
-
Place the user key in the key reader and press the push-button (B).
-
Return to factory setting (any user key enabled for the machine):
-
Remove the Supervisor key (if any) from the key reader.
- Press the push-button (B).
- Confirm the operation by pressing the push-button (A).
To return to the user mode screen, press push-button (C).
To return to the main screen (E, Fig. 7), press push-button (A).
SQUEEGEE CLEANING

NOTE
The squeegee must be clean and its blades must be in good conditions in order to get a good drying.

CAUTION!
It is advisable to wear protective gloves when cleaning the squeegee because there may be sharp debris.
- Drive the machine on a level floor.
- Ensure that the machine is off and the user key (52) has been removed.
- Loosen the handwheels (14) and remove the squeegee (29).
- Wash and clean the squeegee. In particular, clean the compartments (A, Fig. 11) and the vacuum hole (B). Check the condition of the front (C) and rear (D) blades, ensuring there are no cuts and tears; if necessary, replace them as shown below.
- Install the squeegee in the reverse order of removal.
SQUEEGEE BLADE CHECK AND REPLACEMENT
- Clean the squeegee as shown in the previous paragraph.
- Check the condition of the front (C, Fig. 11) and rear (D) blades, ensuring there are no cuts and tears; if necessary, replace them as shown below. Check that the front corner (E) of the rear blade is not worn; otherwise, turn the blade to replace the worn corner with one of the three remaining intact corners. If the other corners are worn too, replace the blade according to the following procedure:
Using the tab (F), release and remove the elastic strap (G) from the fasteners (H), then turn or replace the rear blade (D).
Install the blade in the reverse order of removal. Fasten the elastic strap (G) to the fasteners (H) starting from one side. To make the fastening procedure easier, secure the fasteners one at a time, by locking the strap before the fastener with one hand (M) and pulling it with the other hand (N).
- Unscrew the handwheels (I) and remove the strap (J), then turn or replace the front blade (C).
- Install the blade in the reverse order of removal.
-
Install the squeegee (27) and screw down the handwheels (14).
-
Lower the squeegee to the floor to check the height of the blades, proceeding as follows:
-
Check that the lip (K) of the front blade (C) and the lip (L) of the rear blade (D) are resting as shown in the figure.
- Use the knob (15) to make adjustments.
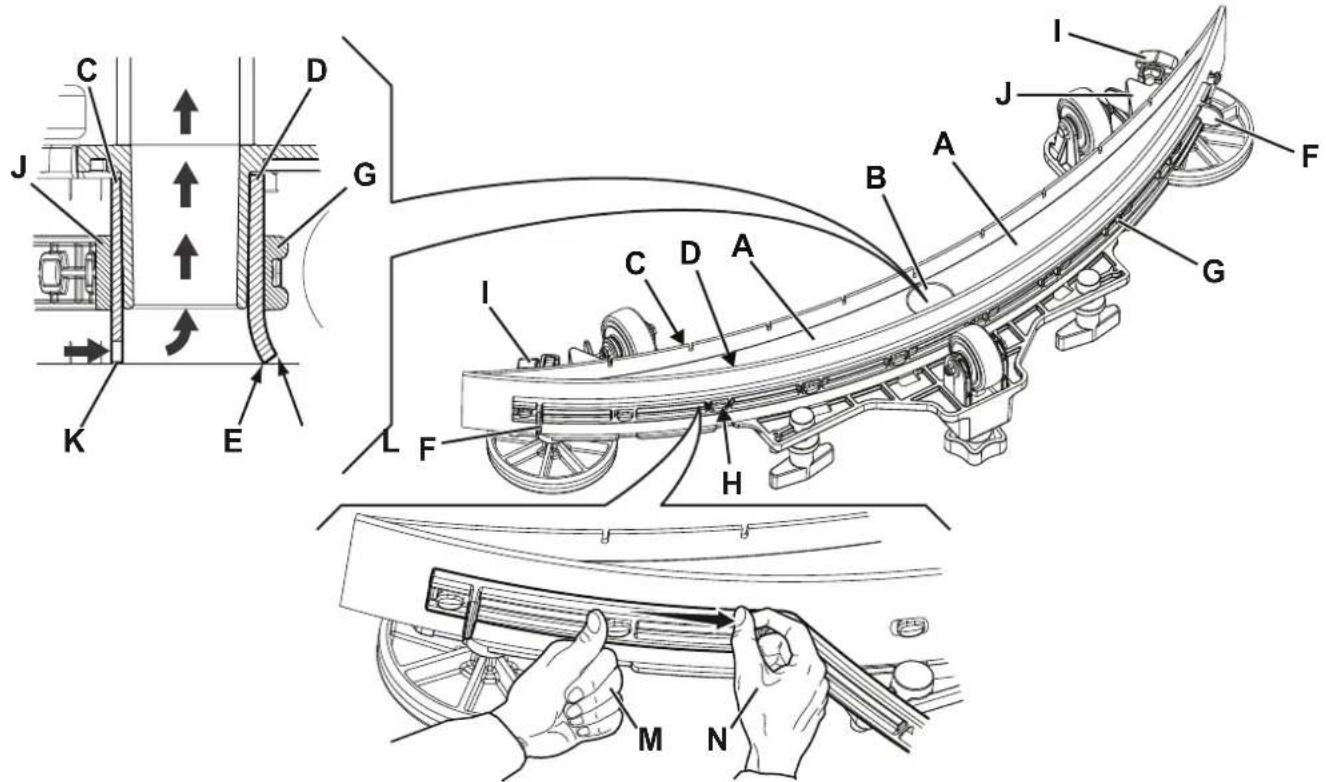
Figure 11
P100850
CLEANING THE BRUSH

CAUTION!
It is advisable to wear protective gloves when cleaning the brush because there may be sharp debris.
- Remove the brush as shown in Use/operation chapter.
- Clean the brush with water and detergent.
- Check the condition of the brush bristles, ensuring they are not excessively worn; if necessary, replace the brush.
RECOVERY TANK CLEANING
- Drive the machine to the appointed disposal area.
- Ensure that the machine is off and the user key (52) has been removed.
- Raise the cover (34).
- Drain the water from the tank with the drain hose (12).
- Clean the vacuum grid (31), release the fasteners (A, Fig. 12), open the grid (B) and recover the float (C) then clean it carefully and reinstall it.
- Remove the debris collection tank (D) and open its cover, then clean it carefully and reinstall it on the vacuum hose.
- Check the condition of the tank cover gasket (E).

NOTE
The gasket (E) allows the creation of a vacuum in the tank, which is necessary to suck up the recovery water.
If necessary, replace the gasket (E) by removing it from its housing (F). When fitting the new gasket, position the joint (G) in the area shown in the figure.
- Check that the seating surface (H) of the gasket (E) is in good condition, clean and suitable to form a seal with the gasket itself.
- Close the cover (19).
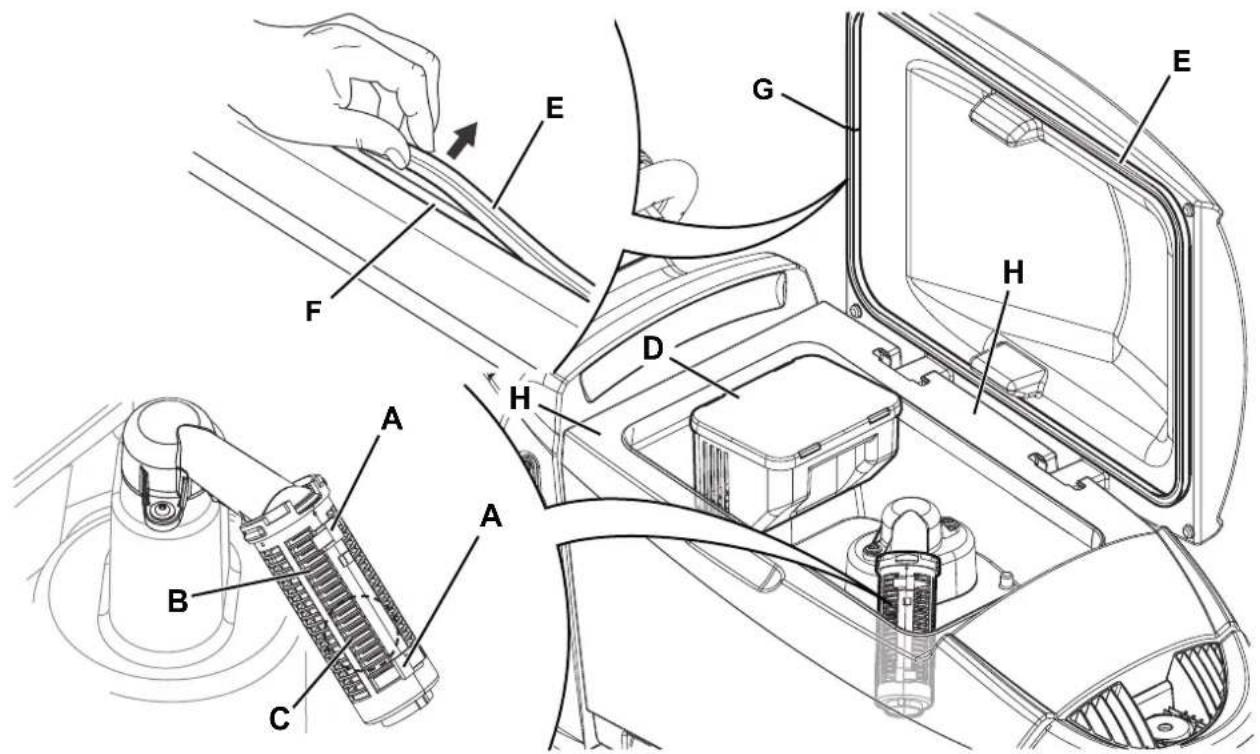
Figure 12
P100851
WASHING WATER FILTER CLEANING
- Drive the machine on a level floor.
- Ensure that the machine is off and the user key (52) has been removed.
- Close the washing water valve (A, Fig. 13). The valve is closed when it is in position (B) and it is open when it is in position (C).
- Remove the transparent cover (D) and the gasket (E), then remove the filter strainer (F). Wash and rinse them, then refit them carefully onto the filter support (G).
- Open the valve (A).
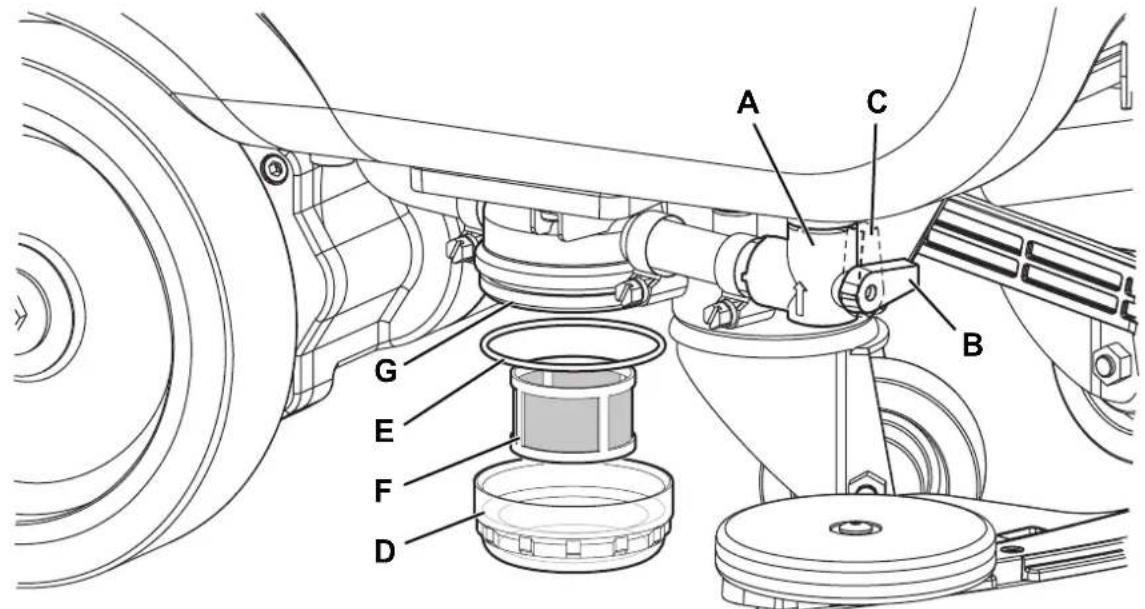
Figure 13
P100852
MACHINE TRACKING ADJUSTMENT
The machine tracking (straight movement) may vary according to the type of floor to be cleaned and depending on whether the brush or the pad is used.
If it is difficult to keep the machine moving straight as it tends to pull to the left or to the right with the brush deck lowered and during cleaning, adjust the handwheel (35) by turning it clockwise or counter-clockwise to correct this pull and obtain a generally neutral straight-ahead movement.
ECOFLEX DETERGENT TANK CLEANING
(For machines with EcoFlex system)
Clean the detergent tank (25) as follows.
- Drive the machine to the appointed disposal area.
- Ensure that the machine is off and the user key (52) has been removed.
- Lift the cover (34) and check that the recovery tank (33) is empty; if not, empty it using the drain hose (12).
- Close the cover (19).
- Grasp the handle (16) and carefully lift the tank (33).
- Unscrew the cap (A, Fig. 14) from the detergent tank (B).
- Remove the tank.
- Rinse and wash out the tank with clean water in the appointed disposal area.
- Replace the detergent tank (B) as shown in the figure, then refit the cap (A).
- When the detergent tank has been drained, it may be necessary to drain the EcoFlex system too (see procedure in following section).
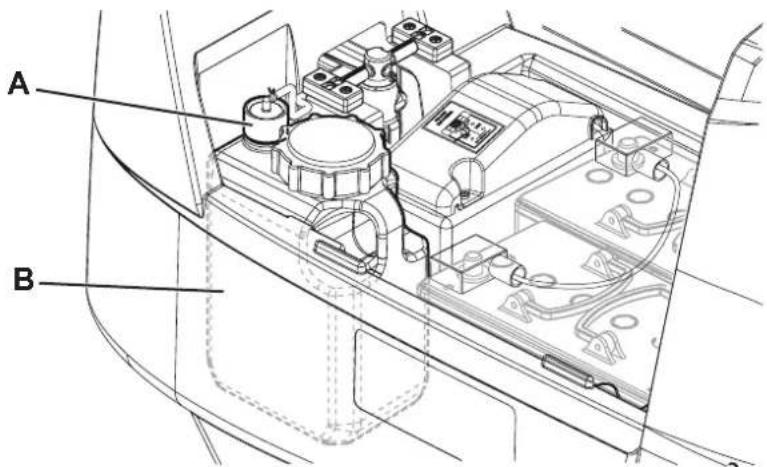
Figure 14
P100853
(For machines with EcoFlex system)
Clean the detergent tank following the procedure in the previous section.
To remove residual detergent from the detergent hoses and pump, proceed as follows.
- To turn on the machine, place the user key (52) in the key reader (41), then press the push-button (42).
- Check that the detergent quantity indicator (51-G) on the display has at least one segment lit.
- Press and hold buttons (49) and (50) at the same time until screen (51-M) appears on the display (after approximately 5 seconds).
- Release buttons (49) and (50) and wait for the countdown timer on the display to finish and the vacuum system to be activated.
- Collect the detergent remained on the floor.
- Turn off the machine with the push-button (42) and remove the user key (52).
- Raise the tank (33), then check that the detergent tank hose (25) is empty; if not, perform steps 3 to 7 again.

NOTE
The draining cycle lasts about 30 seconds, then the vacuum function automatically turns on, which allows to remove the detergent remained.
The draining cycle can also be performed with the detergent tank (25) full of water, thus cleaning the system thoroughly. It is advisable to perform this type of draining to clean the EcoFlex system from dirt and deposits if the machine has not been used/cleaned for a long time.
The draining cycle can also be performed to quickly fill the detergent supply hose when the tank (25) is full but the system is still empty.
If necessary, the draining cycle can be performed several times in succession.
FUSE CHECK/REPLACEMENT

NOTE
All machine electrical circuits are protected by auto-resettable electronic devices. The safety fuses activates only in case of serious damage.
It is recommended to have the fuses replaced by qualified personnel only.
Refer to the Service Manual available at any Advance Retailer.
TROUBLESHOOTING
| TROUBLE POSSIBLE CAUSE | REMEDE | |
| The motors are not operating; the display (51) and button LEDs do not turn on. | The battery connector is disconnected. Connect. | |
| The batteries are completely discharged. Charge the batteries. | ||
| The machine does not move and the display (51) shows the alarm:WARNING ALARM T3 | Machine turned on with paddle pressed. Release the paddle.If the problem persists, contact an authorised Service Center. | |
| At machine start-up, the button (43) LED flashes and the brushes do not work. | Machine switched off without first raising the brush deck. | Wait for the deck to raise before turning the brushes on again by pressing the switch. |
| The brush does not operate; the battery symbol (51-C) border flashes and the display shows the alarm message:WARNING ALARM G4 | The batteries are discharged. Charge the batteries.If the problem persists, replace the batteries. | |
| When working, the display shows the alarm message:WARNING ALARM F2 | Brush motor overload. Use a different/less aggressive brush and/or avoid working with extra pressure turned on. | |
| There are foreign materials (tangled threads, etc.) preventing the brush from rotating. | Clean the brush hub. | |
| The display (51) shows the alarm message:WARNING ALARM T2 | Drive motor overload. Turn off the machine and then turn it on again.Avoid using the machine on slopes greater than those indicated or going over excessively tall obstacles. | |
| While recharging the batteries with the on-board battery charger, the display (51) shows the alarm message:WARNING ALARM C4 or C5 | Battery charger not able to correctly recharge the batteries within the maximum time. | Run the battery charging cycle again.If the problem persists, replace the batteries. |
| The display (51) shows an alarm message of the following type:WARNING ALARM XXWhere "XX" is a code other than those listed above. | The machine electronic control system is in alarm condition. | Turn off the machine and then turn it on again.If the problem persists, contact an authorised Service Center. |
| The display (51) shows the alarm message:INVALID SMART KEY | The user key is not enabled. Add the specific user key to the list of enabled user keys. | |
| The dirty water vacuuming is insufficient. The recovery tank is full. Empty the tank. | ||
| The vacuum grid is clogged or the float is stuck closed. | Clean the vacuum grid. | |
| Debris collection filter container clogged. | Clean. | |
| The hose is disconnected from the squeegee. | Connect. | |
| The squeegee is dirty or the squeegee blades are worn or damaged. | Clean the squeegee or overturn/replace the blades. | |
| The tank cover is not properly closed, or the gasket is damaged. | Correctly close the cover or clean/replace the gasket. | |
| The solution flow is insufficient. | The washing water tank is empty. | Refill. |
| The washing water filter is dirty. | Clean the filter. | |
| The EcoFlex system tank is dirty/encrusted. | Clean with the drain cycle. | |
| The squeegee leaves marks on the floor. | There is debris under the squeegee blades. | Remove the debris. |
| The squeegee blades are worn, chipped or torn. | Overturn or replace the blades. | |
| The squeegee has not been balanced with the handwheel. | Adjust the squeegee. | |

NOTE
The machine is inoperative without the battery charger. In case of battery charger malfunction, contact an authorised Service Center.
For any further information, contact Advance Service Centres.
SCRAPPING
Have the machine scrapped by a qualified scraper.
Before scrapping the machine, remove and separate the following materials, which must be disposed of properly according to the
Law in force:
Batteries
Brushes
- Plastic hoses and components
- Electrical and electronic components (*)
(*) Refer to the nearest Advance Center especially when scrapping electrical and electronic components.
Machine material composition and recyclability
| Type Recyclable | percentage | SC500 weight percentage |
| Aluminium 100 % 7 % | ||
| Electric motors - various 29 % 29 % | ||
| Ferrous materials 100 % 2 % | ||
| Wiring harness 80 % 2 % | ||
| Liquids 100 % 0 % | ||
| Plastic - non-recyclable material 0 % 2 % | ||
| Plastic - recyclable material | 100 % 7 % | |
| Polyethylene | 92 % 48 % | |
| Rubber | 20 % 2 % |
INDICE
INTRODUCCION 2
FINALIDAD Y OBJECTO DE ESTE MANUAL 2
DESTINATARIOS 2
CONSERVACION DEL MANUAL 2
DATOS DE IDENTIFICACION 2
OTROS MANUALES DE REFERENCIA 2
PIEZAS DE REPUESTO Y MANTENIMIENTO 2
MODIFICACIONES Y MEJORAS 2
CHARACTERISTICAS DE FUNCIONAMIENTO 3
CONVENCIONES 3
DESEMBALAJE/ENTREGA 3
SEGURIDAD 3
CONSERVATION DU MANUEL
STRUCTURE DE LA MACHINE
STRUCTURE DE LA MACHINE (suite)
ACCESSIONS / OPTIONS
CONSERVACAO DO MANUAL
Ecrá principal (E, Fig. 8)
- TABLE OF CONTENTS
- INTRODUCTION 2
- UNPACKING/DELIVERY 3
- SAFETY 3
- MACHINE DESCRIPTION 6
- USE/OPERATION 11
- MAINTENANCE 18
- TROUBLESHOOTING 27
- SCRAPPING 28
- INTRODUCTION
- MANUAL PURPOSE AND CONTENTS
- TARGET
- HOW TO KEEP THIS MANUAL
- IDENTIFICATION DATA
- OTHER REFERENCE MANUALS
- SPARE PARTS AND MAINTENANCE
- CHANGES AND IMPROVEMENTS
- CONVENTIONS
- UNPACKING/DELIVERY
- WARNING!
- SAFETY
- VISIBLE SYMBOLS ON THE MACHINE
- SYMBOLS THAT APPEAR ON THIS MANUAL
- DANGER!
- CAUTION!
- NOTE
- CONSULTATION
- GENERAL INSTRUCTIONS
- MACHINE DESCRIPTION
- MACHINE STRUCTURE
- MACHINE STRUCTURE (Continues)
- CONTROL PANEL
- ACCESSORIES/OPTIONS
- WIRING DIAGRAM
- Key
- USE/OPERATION
- MAGNETIC SMART KEY
- BATTERY CHECK/SETTING ON A NEW MACHINE
- Batteries already installed on the machine
- Without batteries
- BATTERY INSTALLATION
- Battery Charging
- BEFORE MACHINE START-UP
- Brush or pad-holder removal/installation (Disc system)
- Brush or pad-holder removal/installation (REV system)
- Squeegee installation
- Solution tank filling
- (For machines without EcoFlex system)
- (For machines with EcoFlex system)
- Detergent tank filling (For machines with EcoFlex system)
- MACHINE START AND STOP
- Starting the machine
- Stopping the machine
- MACHINE OPERATION (SCRUBBING/DRYING)
- Adjusting of detergent concentration in the washing water
- EcoFlex system
- REV system (for REV version only)
- Working with brush extra pressure function turned on
- Battery discharge during operation
- TANK EMPTYING
- CAUTIONI
- Recovery tank emptying
- Washing water tank emptying
- AFTER USING THE MACHINE
- MACHINE LONG INACTIVITY
- MAINTENANCE
- SUPERVISOR KEY (YELLOW)
- Main Screen (E, Fig. 8)
- Machine Settings Screen (F, Fig. 8)
- Alarms log screen (G, Fig. 9)
- Operating Time Counter Screen (H, Fig. 10)
- User Key Management Screen (I, Fig. 11)
- SQUEEGEE CLEANING
- SQUEEGEE BLADE CHECK AND REPLACEMENT
- CLEANING THE BRUSH
- RECOVERY TANK CLEANING
- WASHING WATER FILTER CLEANING
- MACHINE TRACKING ADJUSTMENT
- ECOFLEX DETERGENT TANK CLEANING
- FUSE CHECK/REPLACEMENT
- SCRAPPING
- INDICE
- INTRODUCCION 2
- DESEMBALAJE/ENTREGA 3
- SEGURIDAD 3
- CONSERVATION DU MANUEL
- STRUCTURE DE LA MACHINE
- STRUCTURE DE LA MACHINE (suite)
- ACCESSIONS / OPTIONS
- CONSERVACAO DO MANUAL
- Ecrá principal (E, Fig. 8)
Brand : ADVANCE
Model : SC500
Category : Floor cleaner