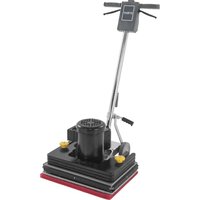
FM810 ST - Floor cleaner ADVANCE - Free user manual and instructions
Find the device manual for free FM810 ST ADVANCE in PDF.


| Product type | Commercial floor scrubber-polishers |
| Brand | Advance |
| Model | FM810 ST |
| Power supply | 115 V, 60 Hz, 1.5 HP (1120 W) |
| Pad rotation speed | 3540 rpm |
| Pad dimensions | 355 mm × 508 mm (14 × 20 inches) |
| Total weight | 72.8 kg (160.5 lbs) |
| Sound pressure level (ISO 11201) | 69 dBA |
| Protection rating | IPX0 |
| Grounding | Required (3-prong plug, 120 V AC) |
| Pad type | Self-gripping, minimum thickness 9.5 mm |
| Solution tank | Optional |
| Main functions | Cleaning, sanding, floor finishing |
| Safety | Safety lock button, switch levers, thermal circuit breaker |
| Routine maintenance | Replace pad if worn (thickness ≤ 9.5 mm), check power cord |
| Spare parts and service | Advance authorized service centers (phone 800-989-2235) |
| Modifications | Prohibited without written agreement from Nilfisk-Advance Inc. |
| Transport | Requires two persons due to weight (72.8 kg) |
| Intended use | Commercial only |
| Main materials | Ferrous metals (52%), electrical systems (38%), aluminum (1%) |
Frequently Asked Questions - FM810 ST ADVANCE
User questions about FM810 ST ADVANCE
0 question about this device. Answer the ones you know or ask your own.
Ask a new question about this device
Download the instructions for your Floor cleaner in PDF format for free! Find your manual FM810 ST - ADVANCE and take your electronic device back in hand. On this page are published all the documents necessary for the use of your device. FM810 ST by ADVANCE.
USER MANUAL FM810 ST ADVANCE
natural_image
Technical line drawing of a mechanical testing apparatus with a coiled spring and cylindrical component (no text or symbols)
Instructions For Use - Original Instructions
| Introduction | A-2 |
| Parts and Service | A-2 |
| Nameplate | A-2 |
| Unpacking the Machine | A-2 |
| Cautions and Warnings | A-3 |
| Grounding Instructions | A-4 |
| Know Your Machine | A-5 |
| Transporting the Machine | A-6 |
| Machine Setup | A-7 |
| Operating the Machine | |
| Operating Instructions – Floor Finish Recoat Prep | A-8 |
| Operating Instructions - Scrubbing | A-9 |
| Troubleshooting | A-10 |
| Technical Specifications | A-10 |
INTRODUCTION
This manual will help you get the most from your Advance floor machine. Read it thoroughly before operating the machine.
Note: Bold numbers in parentheses indicate an item illustrated on page A-5 unless otherwise noted.
This product is intended for commercial use only.
PARTS AND SERVICE
Repairs, when required, should be performed by your Authorized Advance Service Center, who employs factory trained service personnel, and maintains an inventory of Advance original replacement parts and accessories.
Call Advance for repair parts or service. Please specify the Model and Serial Number when discussing your machine.
If your dealer is unable to assist you, please call Advance at 800-989-2235.
MODIFICATIONS
Modifications and additions to the cleaning machine which affect capacity and safe operation shall not be performed by the customer or user without prior written approval from Nilisk-Advance Inc. Unapproved modifications will void the machine warranty and make the customer liable for any resulting accidents.
NAMEPLATE
The Model and Serial Number of your machine are shown on the Nameplate in the battery compartment. This information is needed when ordering repair parts for the machine. Use the space below to note the Model and Serial Number of your machine for future reference.
Model
Serial Number
UNPACKING THE MACHINE
When the machine is delivered, carefully inspect the shipping packaging and the machine for damage. If damage is evident, save the shipping carton (if applicable) so that it can be inspected. Contact the Advance Customer Service Department immediately to file a freight damage claim.
WARNING!
The Products sold with this Manual contain or may contain chemicals that are known to certain governments (such as the State of California, as identified in its Proposition 65 Regulatory Warning Law) to cause cancer, birth defects or other reproductive harm. In certain locations (including the State of California) purchasers of these Products that place them in service at an employment job site or a publicly accessible space are required by regulation to make certain notices, warnings or disclosures regarding the chemicals that are or may be contained in the Products at or about such work sites. It is the purchaser's responsibility to know the content of, and to comply with, any laws and regulations relating to the use of these Products in such environments. The Manufacturer disclaims any responsibility to advise purchasers of any specific requirements that may be applicable to the use of the Products in such environments.
CAUTIONS AND WARNINGS
SYMBOLS
Advance uses the symbols below to signal potentially dangerous conditions. Read this information carefully and take the necessary steps to protect personnel and property.

DANGER!
Is used to warn of immediate hazards that will cause severe personal injury or death.

WARNING!
Is used to call attention to a situation that could cause severe personal injury.

CAUTION!
Is used to call attention to a situation that could cause minor personal injury or damage to the machine or other property.

Read all instructions before using.
GENERAL SAFETY INSTRUCTIONS
Specific Cautions and Warnings are included to warn you of potential danger of machine damage or bodily harm.

DANGER!
* Failure to read the Owner's Manual prior to operating or servicing your Advance machine could result in injury to you or to other personnel; damage to the machine or to other property could occur as well. You must have training in the operation of this machine before using it. If you or your operator(s) cannot read English, have this manual explained fully before attempting to operate this machine.
* Sanding/finishing wood floors can create an explosive or combustible environment. Do not operate this machine around solvents, thinners, alcohol, fuels, floor finishes, wood dust or any other flammable materials. Cigarette lighters, pilot lights, electrical sparks and all other sources of ignition should be extinguished or avoided. Keep work area well ventilated.
* Dust generated from sanding wood floors can spontaneously ignite or explode. Promptly dispose of any sanding dust in a metal container clear of any combustibles. Do not dispose in a fire.
* Electrocution could occur if the machine is being serviced while the machine is connected to a power source. Disconnect the power supply before servicing.
* Electrocution or fire could occur if the machine is being operated with a damaged power cord. Keep the power cord clear of the pad. Always lift the cord over the machine. Do not move the machine by the power cord.
* Shock hazard. Do not use the machine if it has been rained on or sprayed with water.
* To avoid injury keep hands, feet, and loose clothing away from all moving parts on the machine. Disconnect the power cord before replacing the pad, changing the abrasive, or when servicing. Do not operate the machine unless all guards are in place. Never leave the machine unattended while connected to a power source.

WARNING!
* Injury can occur if protective clothing or equipment is not used while sanding. Always wear safety goggles, protective clothing, and dust mask while sanding.
* This sander is not to be used on pressure treated wood. Some pressure treated woods contain arsenic and sanding pressure treated wood produces hazardous dust. Inhaling hazardous dust from pressure treated wood can cause serious injury or death. Sanding pressure treated wood decks or uneven surfaces can damage the sander which is not covered under warranty or damage waiver.
* Any alterations or modifications of this machine could result in damage to the machine or injury to the operator or other bystanders. Alterations or modifications not authorized by the manufacturer voids any and all warranties and liabilities.
SAVE THESE INSTRUCTIONS
120VAC GROUNDING INSTRUCTIONS
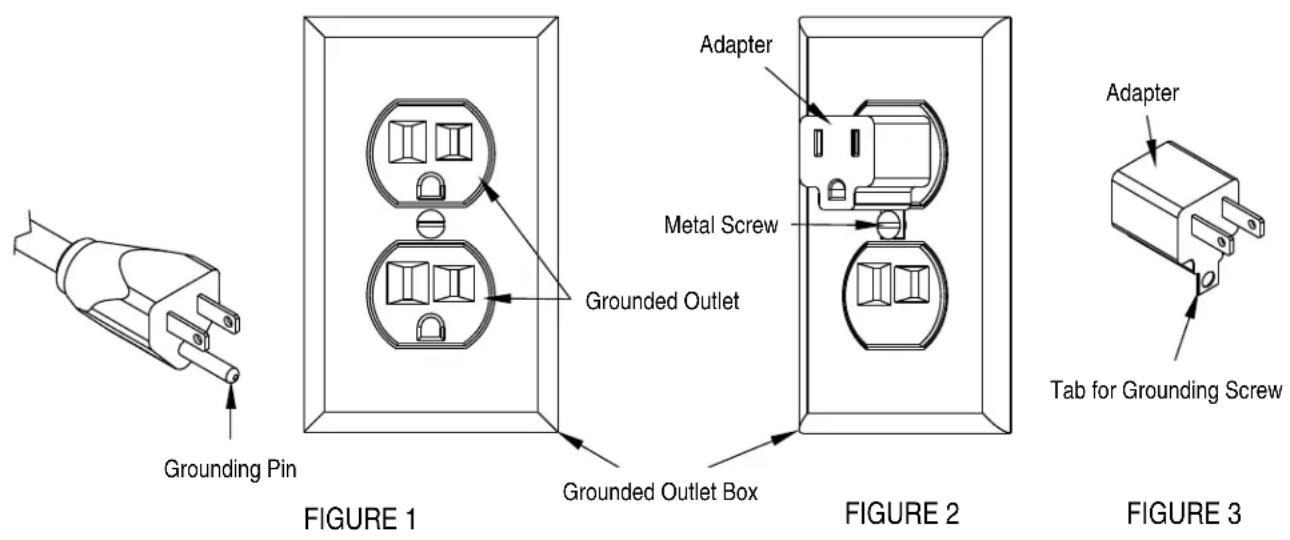
This appliance must be grounded. If it should electrically malfunction, grounding provides a path of least resistance for electric current to reduce the risk of electric shock. This appliance is equipped with a cord having an equipment-grounding conductor and grounding plug. The plug must be plugged into an appropriate outlet that is properly installed and grounded in accordance with all local codes and ordinances.
DANGER!
Improper connection of the equipment-grounding conductor can result in a risk of electric shock. Check with a qualified electrician or service person if you are in doubt as to whether the outlet is properly grounded. Do not modify the plug provided with the appliance. If it will not fit the outlet, have a proper outlet installed by a qualified electrician.
This appliance is for use on a nominal 120-volt circuit, and has a grounding plug that looks like the plug illustrated in Figure 1 below. A temporary adapter illustrated in Figures 2 and 3 may be used to connect this plug to a 2-pole receptacle as shown in Figure 2 if a properly grounded outlet is not available. The temporary adapter should be used only until a properly grounded outlet (Figure 1) can be installed by a qualified electrician. The green-colored rigid ear, tab, or the like extending from the adapter must be connected to a permanent ground such as a properly grounded outlet box cover. Whenever the adapter is used, it must be held in place by a metal screw. Grounding adapters are not approved for use in Canada.
Replace the plug if the grounding pin is damaged or broken.
The Green (or Green/Yellow) wire in the cord is the grounding wire. When replacing a plug, this wire must be attached to the grounding pin only.
Extension cords connected to this machine should be 12 gauge minimum wire size, three-wire cords with three-prong plugs and outlets. DO NOT use extension cords more than 50 feet (15 m) long.
PLEASE NOTE: FOR NORTH AMERICA ONLY
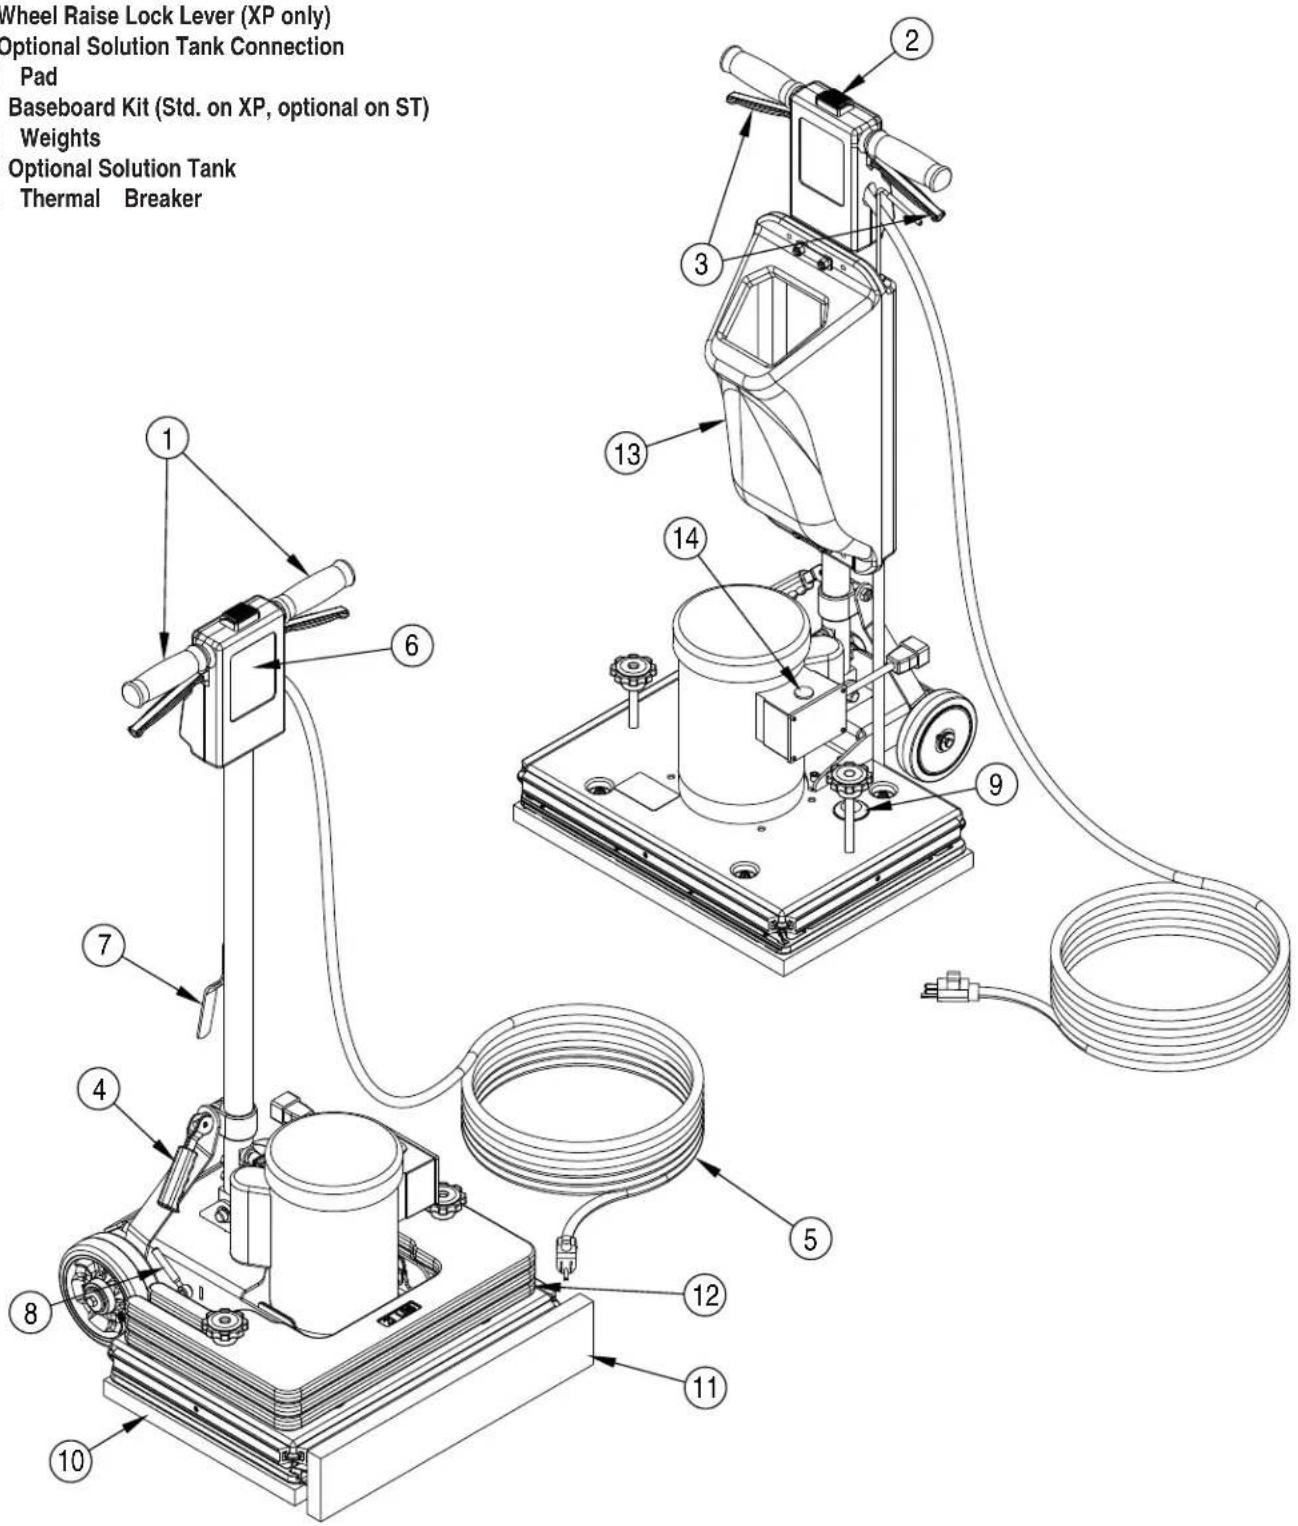
KNOW YOUR MACHINE
1 Operator Handle Grips
2 Switch Lever Safety Lock Button
3 Switch Levers - Squeeze - ON / Release - OFF
4 Handle Release Compression Lever
5 Power Cord
6 Operator Handle
7 Cord Hook
8 Wheel Raise Lock Lever (XP only)
9 Optional Solution Tank Connection
10 Pad
11 Baseboard Kit (Std. on XP, optional on ST)
12 Weights
13 Optional Solution Tank
14 Thermal Breaker
TRANSPORTING THE MACHINE
To transport the machine, follow this procedure:
1 Unplug the machine from the wall outlet and wrap the Power Cord (5) around the Cord Hook (7) and the Operator Handle Grips (1).
2 Raise and lock the handle in the upright position. To lock the handle, push down on the Handle Release Compression Lever (4).
3 Remove all three weights (12) and place in cargo area.
FM810 ST
4 Pick the machine up by grabbing the handle tube and the base and place in cargo area.

WARNING!
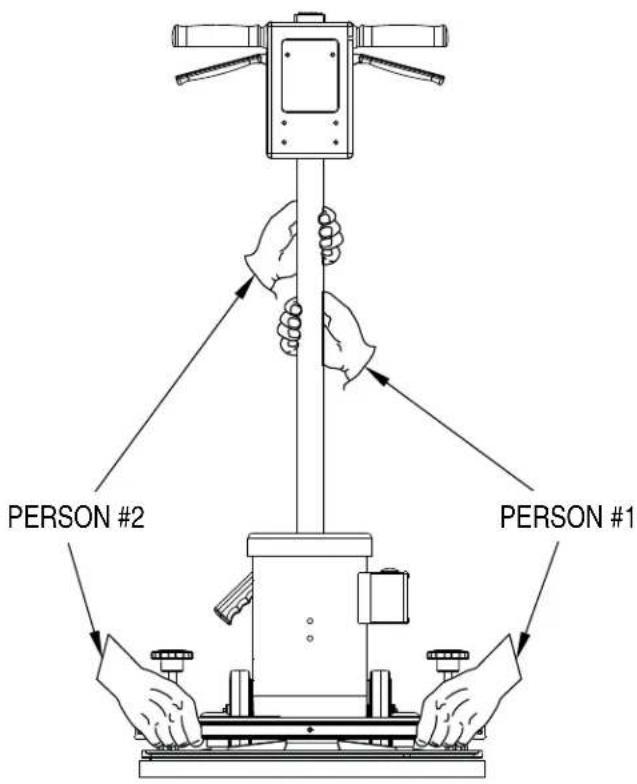
The machine is heavy (97.5 lbs./44.2 kg). To avoid injury or damage to the machine use a firm grip and proper lifting technique. Use two people, one person on each side of the machine as shown in Figure 1.
5 Secure machine to prevent movement in cargo area.
FM810 XP
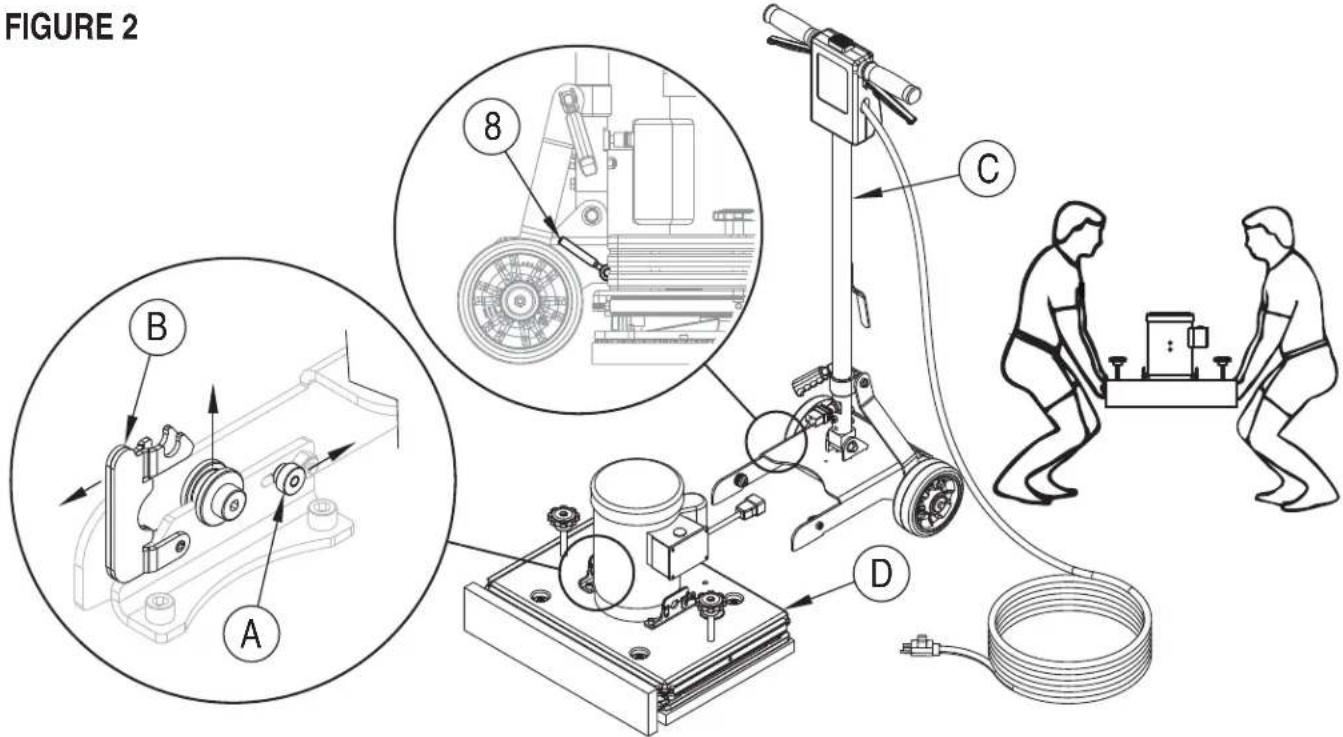
4 Remove the handle assembly from the base as shown in Figure 2.
A. Unplug the motor from the handle.
B. With the Wheel Lock Lever (8) in the up position (wheels down position), Slide Knob (A) back and flip Latch (B) up as shown.
NOTE: There are two of these latches, one on each side of the motor.
C. Tilt the Handle Assembly (C) back slightly and roll it away from the Base Assembly (D).
5 Pick the base assembly up and place in cargo area.

WARNING!
The base is heavy (about 78 lbs./35.4 kg). To avoid injury or damage to the machine use a firm grip and proper lifting technique. Use two people, one person on each side of the base as shown in Figure 2.
6 Carefully lift the handle assembly up and place in cargo area.
7 Secure machine to prevent movement in cargo area.
6 Carefully lift the handle assembly up and place in cargo area. 7 Secure machine to prevent movement in cargo area.
FIGURE 1
MACHINE SETUP
To prepare the machine for use follow this procedure:
1 Familiarize yourself with the machine. Read all danger, warning, and caution statements and the Operation and Parts Manual before operating the machine.
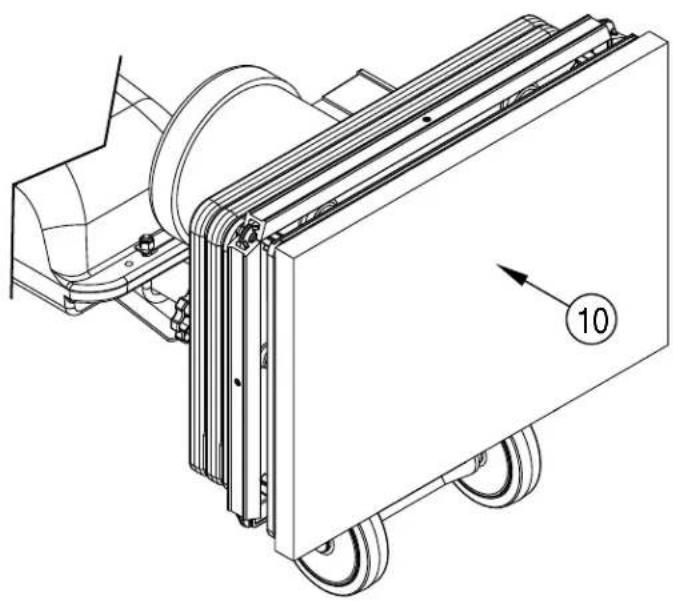
2 Install or replace the Pad (10). The pad should be replaced if it has become matted down to a thickness of 3/8" (9.5mm) or less. To install or replace the pad, follow these instructions:
a.) Lock the Operator Handle (6) in the upright position.
b.) Tilt the machine back until it fully rests on the Handle (6).
c.) Standing over the machine, remove existing pad then center new pad over grip face.
d.) Press Pad (10) against grip face until the hooks in the driver have set in the pad. See Figure 3.
e.) Return machine to the upright position.
CAUTION!
Damage to the grip face will occur if the machine is operated without a pad or with a pad that is 3/8" (9.5 mm) or thinner.
WARNING!
Never put yourself or let others be in a position to get injured if the machine should tip or fall, while replacing the pad or changing abrasive. Injury can occur if the machine is connected to a power source while installing the pad or abrasive. Disconnect the machine before installing the pad or abrasive.
FIGURE 3
natural_image
Technical line drawing of a mechanical cart with wheels and a numbered component (no text or symbols)OPERATING INSTRUCTIONS – FLOOR FINISH RECOAT PREP
To operate the machine with an abrasive, follow this procedure:
1 Move machine to work location. Decide the best approach to abrading the desired area. When operating the machine, work so that you are moving away from the power supply. This will help to avoid entanglement with the power cord and reduce the need to move the power cord as frequently.
2 Install the abrasive. Use the same procedure outlined in MACHINE SETUP for installing the pad. To install the abrasive, peel the film off the back of the abrasive; center the abrasive over the pad and press it against the pad. The adhesive on the abrasive will hold it to the pad.
NOTE: When using screen or pad abrasive, set the screen on the floor then move the machine over the screen. Lower the machine until the pad comes to rest on the screen. Make sure the screen is centered on the pad.

WARNING!
Injury can occur if the machine is connected to a power source while installing the pad or abrasive. Disconnect the machine before installing the pad or abrasive.
3 Connect the machine to an appropriately fused and grounded circuit.
4 Machine may be operated with the handle in the vertical position or lowered. Release the handle by pulling up on the Handle Release Compression Lever (4). Bring the handle to a comfortable position, and lock the handle.
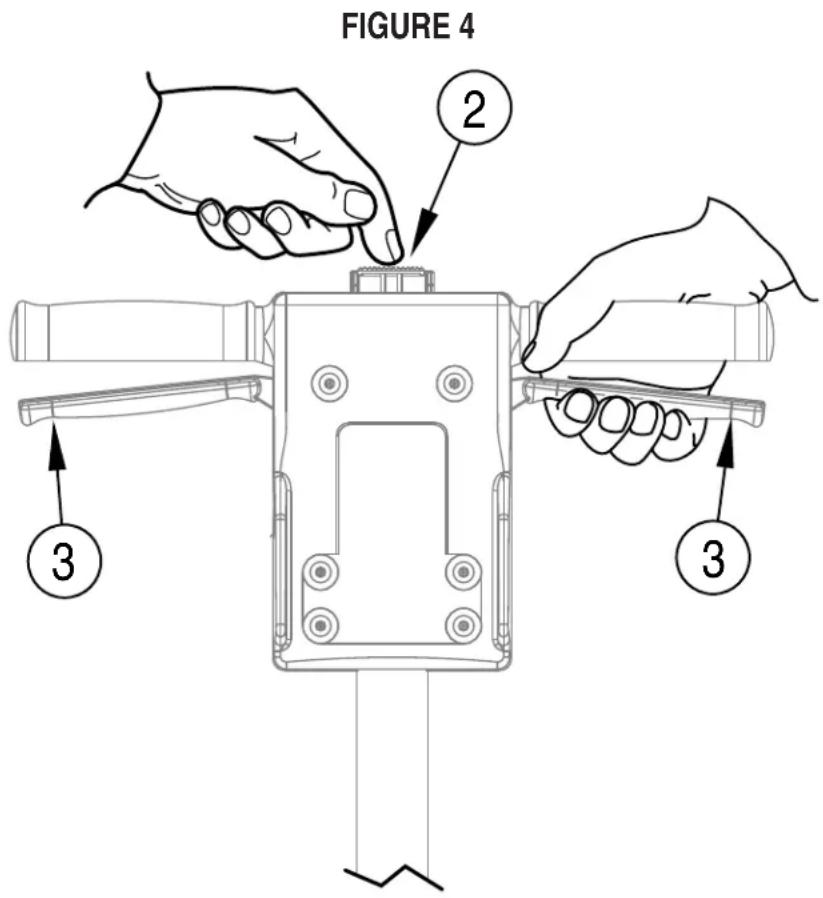
5 See Figure 4. Push the Switch Lever Safety Lock Button (2), and apply pressure to the Switch Levers (3). To stop the machine, release the Switch Levers (3).

CAUTION!
To prevent damage to the flooring and to reduce swirling, keep the machine in motion while the motor is running.
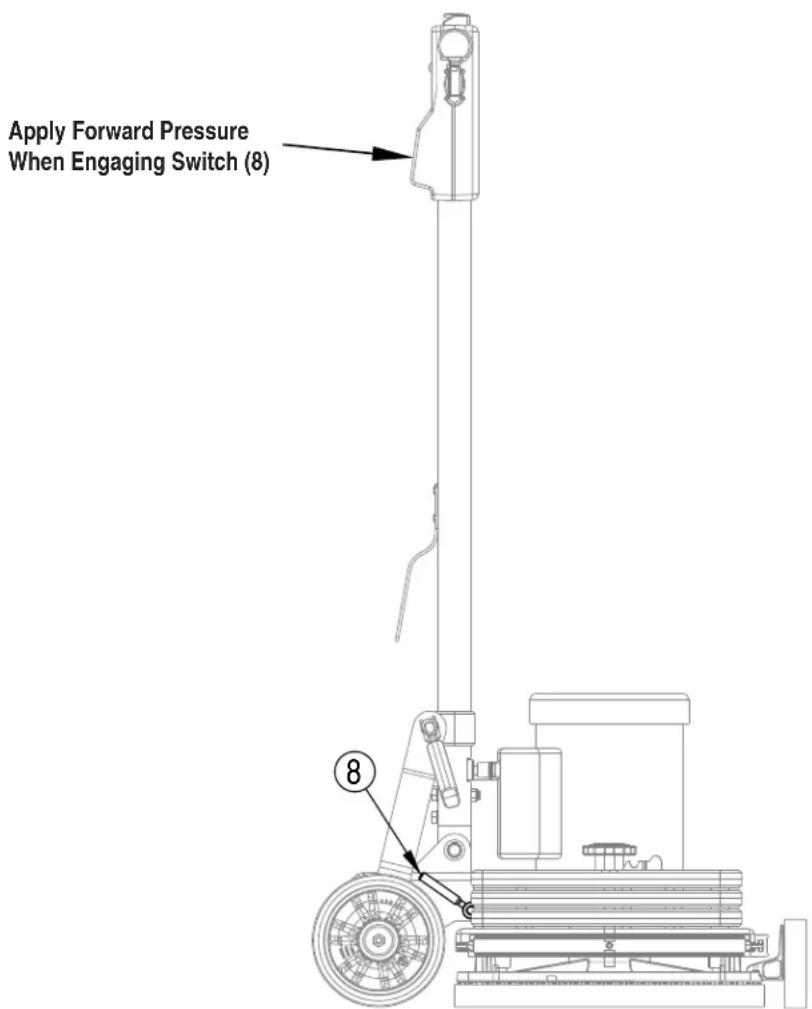
This model may be operated with the rear wheels up so that the pad deck is floating. Or it may be operated with the wheels down and in contact with the floor. In the down position, the machine moves forward and backward much like a lawn mower and is more controllable and less fatiguing. To switch between wheels up or wheels down position, activate the Lever (8) as shown in Figure 5 while applying pressure on the handle to lift the wheels.
OPERATING INSTRUCTIONS - SCRUBBING
To operate the machine as a scrubber, follow this procedure:
1 Move machine to work location. Decide the best approach to scrubbing the desired area. When scrubbing the area, work so that you are moving away from the power supply. This will help to avoid entanglement with the power cord and reduce the need to move the power cord as frequently.
2 Follow the procedure outlined in MACHINE SETUP for installing the pad.
WARNING!
Injury can occur if the machine is connected to a power source while installing the pad. Disconnect the machine before installing the pad.
3 Connect the machine to an appropriately fused and grounded circuit.
4 Release the handle by pulling up on the Handle Release Compression Lever (4). Bring the handle to a comfortable position, and lock the handle.
5 See Figure 4. Push the Switch Lever Safety Lock Button (2), and apply pressure to the Switch Levers (3). To stop the machine, release the Switch Levers (3).
CAUTION!
To prevent damage to the flooring and to reduce swirling, keep the machine in motion while the motor is running.
This model may be operated with the rear wheels up so that the pad deck is floating. Or it may be operated with the wheels down and in contact with the floor. In the down position, the machine moves forward and backward much like a lawn mower and is more controllable and less fatiguing. To switch between wheels up or wheels down position, activate the Lever (8) as shown in Figure 5 while applying pressure on the handle to lift the wheels.
FIGURE 5
TROUBLESHOOTING
| Problem Cause Action | ||
| Motor will not start. No power. | Switch Lever Safety Lock Button (2) not depressedDefective switch / Faulty connection | Check power supply and connectionDepress Switch Lever Safety Lock Button (2) before activating Switch Levers (3).Contact an authorized Advance Dealer. |
| Motor fails to start / runs sluggish. Low voltage from excessive length or undersized extension cord.Defective start capacitor.Defective start switch.Defective start/run capacitorDefective motor low voltage | Use a 12 Ga extension cord, not to exceed 50' length.Contact an authorized Advance Dealer.Contact an authorized Advance Dealer.Contact an authorized Advance Dealer. | |
| Fuse / Circuit Breaker repeatedly trips. Low voltage. | Eliminate extension cord. Locate power source closer to work site. Have voltage checked by a qualified electrician. | |
| Bad connection.Defective motor. | Contact an authorized Advance Dealer.Contact an authorized Advance Dealer. | |
TECHNICAL SPECIFICATIONS (as installed and tested on the unit)
Model FM810 ST FM810 XP
Model Number 56105614 56105616
Electrical
Pad/Brush Speed
Pad/Brush Size
Total Weight (w/cord)
Sound Pressure Level (ISO 11201)
Protection Grade
Protection Class
1.5HP - 115V/60Hz
3540 rpm
14" x 20" (355mm x 508mm)
160.5 lbs. (72.8 kg)
69dBA
IPX0

1.5HP - 115V/60Hz
3540 rpm
14" x 20" (355mm x 508mm)
171 lbs. (77.5 kg)
69dBA
IPX0

Material Composition and Recyclability
| Type | % of machine weight | % recyclable |
| Aluminum | 1% | 100% |
| Electrical / motors / engines - misc | 38% | 70% |
| Ferrous metals | 52% | 100% |
| Harnesses / cables | 6% | 67% |
| Liquids | 0% | 0% |
| Plastic - non-recyclable | 2% | 0% |
| Plastic - recyclable | 1% | 100% |
| Polyethylene | 0% | 0% |
| Rubber | 1% | 100% |
ÍNDICE
Página
natural_image
Technical line drawing of a mechanical cart with wheels and a numbered component (no text or symbols)INSTRUCCIONES DE FUNCIONAMIENTO - FREGADO
natural_image
Technical line drawing of a mechanical cart with rollers and a numbered component (no text or symbols)INSTRUCTIONS D'UTILISATION – PRÉPARATION DE LA REPRISE DE LA COUCHE DE FINITION
14600 21st Avenue North
Plymouth, MN 55447-3408
www.advance-us.com
Phone: 800-989-2235
Fax: 800-989-6566
©2015 Nilfi sk-Advance, Inc.
- INTRODUCTION
- PARTS AND SERVICE
- MODIFICATIONS
- NAMEPLATE
- UNPACKING THE MACHINE
- WARNING!
- CAUTIONS AND WARNINGS
- SYMBOLS
- DANGER!
- CAUTION!
- GENERAL SAFETY INSTRUCTIONS
- SAVE THESE INSTRUCTIONS
- 120VAC GROUNDING INSTRUCTIONS
- KNOW YOUR MACHINE
- TRANSPORTING THE MACHINE
- FM810 ST
- FM810 XP
- MACHINE SETUP
- OPERATING INSTRUCTIONS – FLOOR FINISH RECOAT PREP
- OPERATING INSTRUCTIONS - SCRUBBING
- TECHNICAL SPECIFICATIONS (as installed and tested on the unit)
- Model FM810 ST FM810 XP
- ÍNDICE
- Página
- INSTRUCCIONES DE FUNCIONAMIENTO - FREGADO
- INSTRUCTIONS D'UTILISATION – PRÉPARATION DE LA REPRISE DE LA COUCHE DE FINITION
Brand : ADVANCE
Model : FM810 ST
Category : Floor cleaner