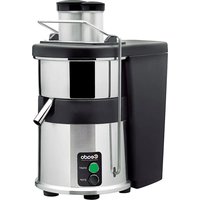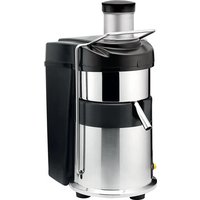
ES500 - Juicer Ceado - Free user manual and instructions
Find the device manual for free ES500 Ceado in PDF.


User questions about ES500 Ceado
0 question about this device. Answer the ones you know or ask your own.
Ask a new question about this device
Download the instructions for your Juicer in PDF format for free! Find your manual ES500 - Ceado and take your electronic device back in hand. On this page are published all the documents necessary for the use of your device. ES500 by Ceado.
USER MANUAL ES500 Ceado
natural_image
Illustration of a juicer with a handle and control panel (no text or symbols)ES500S
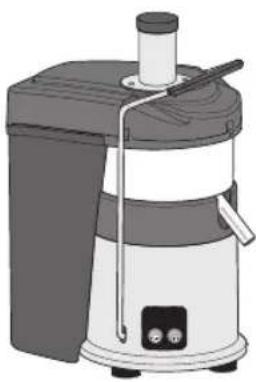
natural_image
Illustration of a small electric juice maker with a black lid and white body, emitting steam from a pipe (no text or symbols visible)ES700
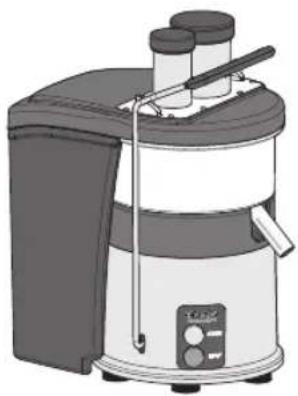
natural_image
Illustration of a juice<|im_start|> Greenland Jamaica blender with control panel (no text or symbols)ES900
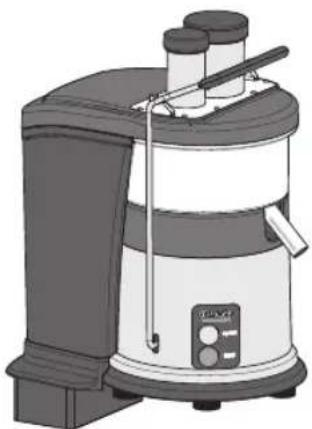
natural_image
Illustration of a white and gray coffee maker with a side-mounted stand (no text or symbols visible)CENTRIFUGA
This is a commercial juice extractor for the preparation of fruit and vegetable juices with automa pulp ejection.
Like all appliances, it should be used with particular care to avoid injury to personnel and damage to the appliance.
It is essential to read these instructions carefully before using the appliance and to follow the s recommendations.

Do not use the appliance if you have not read and understood these instructions!
GB
Page 20
CENTRIFUGEUSE
In counterOn counter
natural_image
Illustration of a juicer with a control panel and labeled part (no text or symbols on the device itself)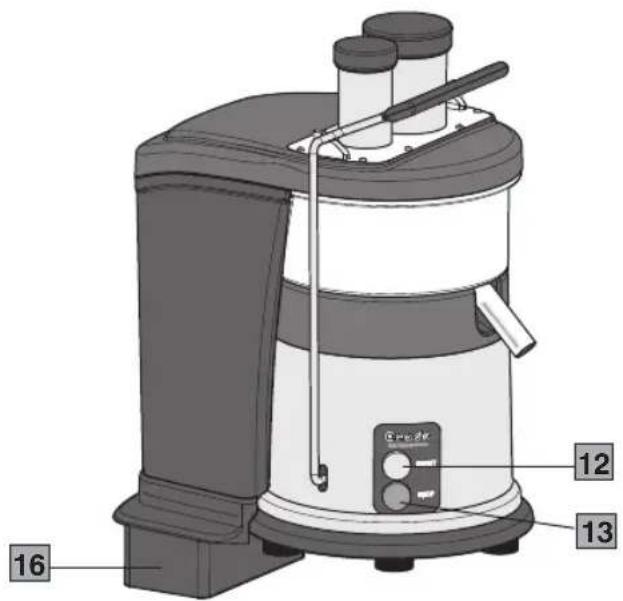
text_image
12 13 16Fig. 5
NORME DI SICUREZZA AVVERTENZE GENERALI
natural_image
Mechanical assembly diagram showing a component with a numbered label (3) and dashed alignment lines, no readable text or symbols present.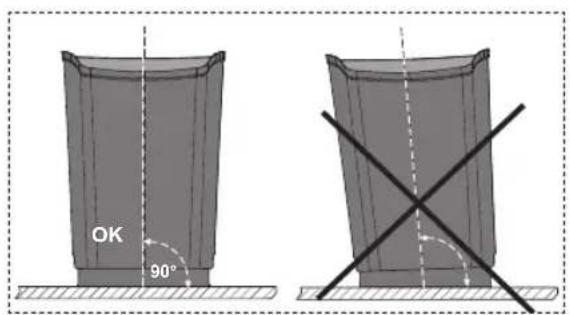
text_image
OK 90°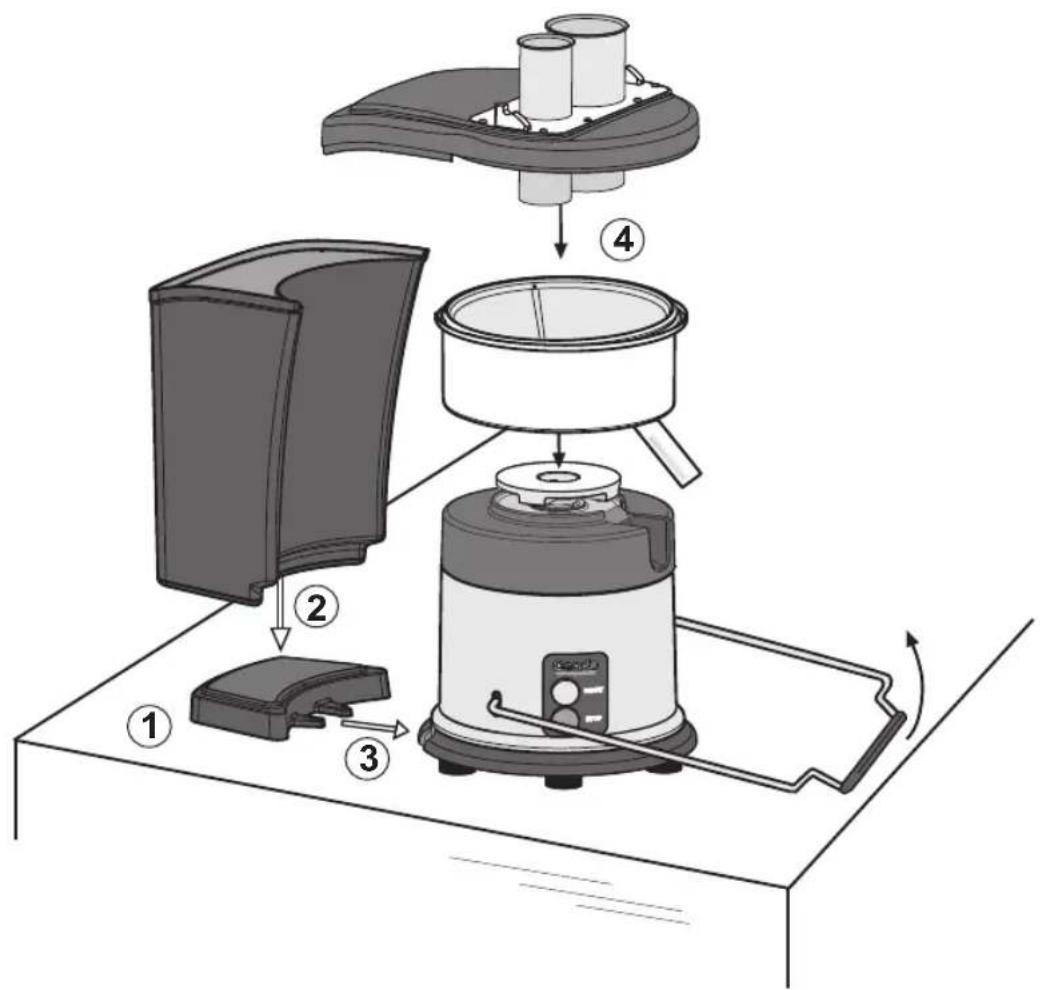
text_image
Diagram of a food cleaning or cooking process with labeled steps including blender, oven, and kitchen applianceFig. A
Modello ES900 - In counter
natural_image
Diagram of a device with a tool inserted into a housing component, labeled with number 1 (no text or symbols on the diagram itself)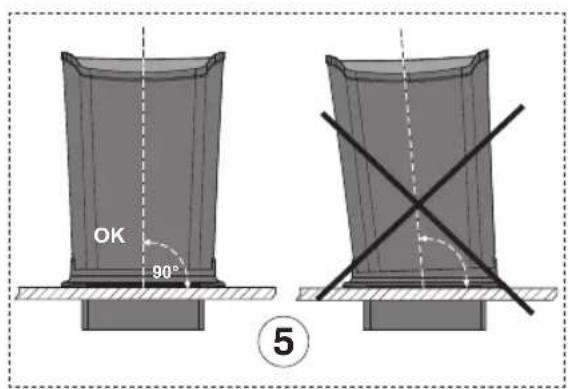
text_image
OK 90° ⑤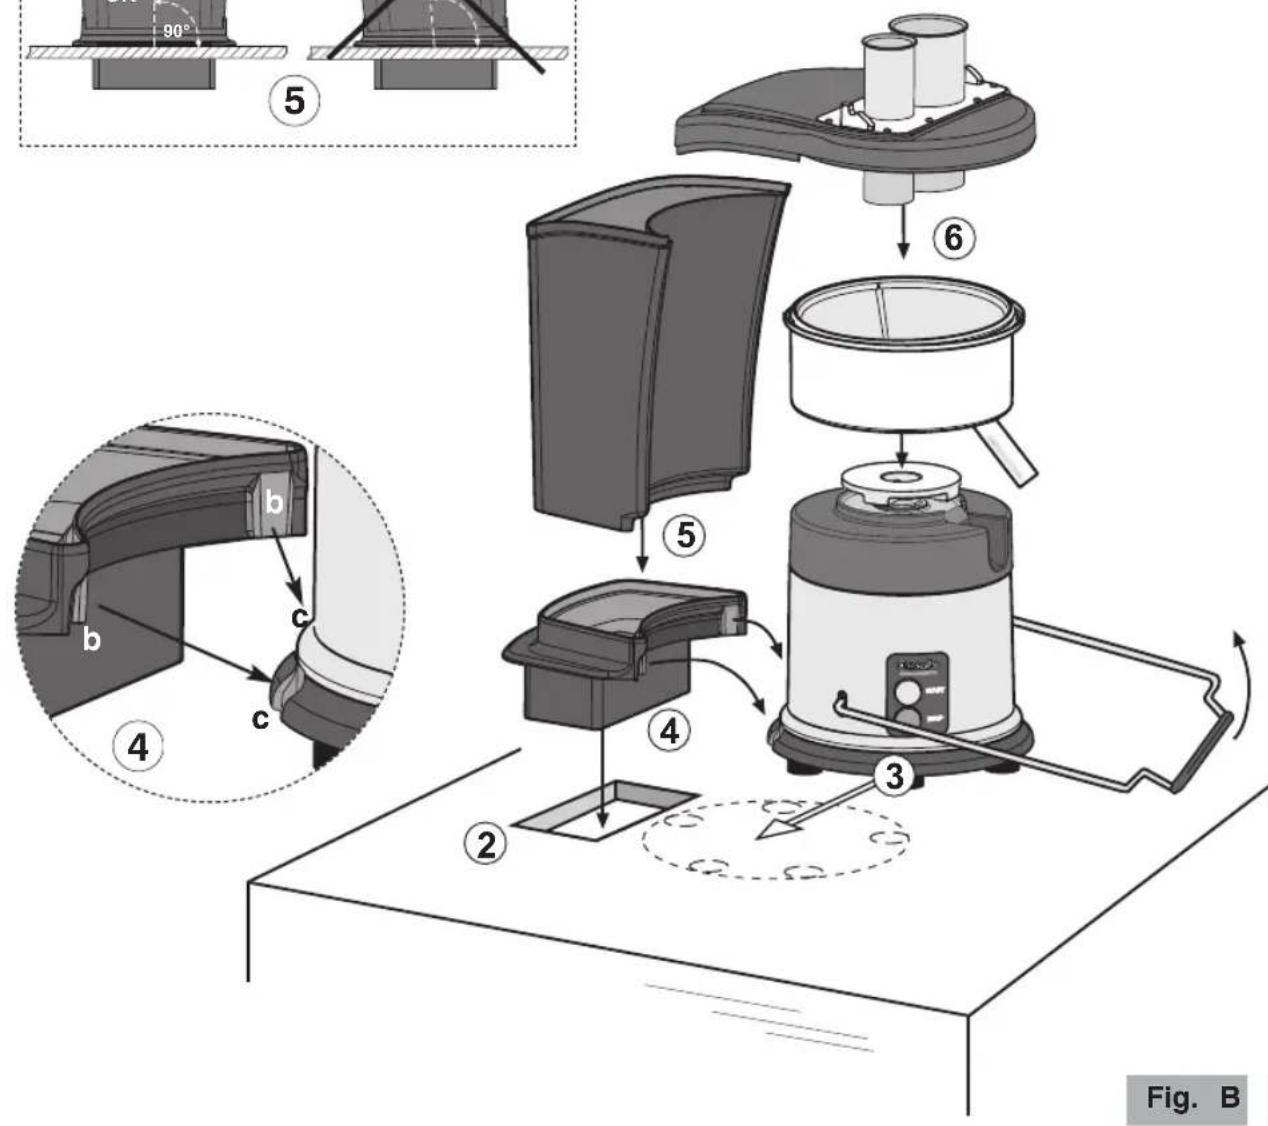
text_image
90° ⑤ ⑥ ② ③ ④ ⑤ ④ ③ Fig. BUSO

natural_image
Simple line drawing of a rectangular container with a curved lid (no text or symbols)Fig. 6
natural_image
Illustration of a hand using a cylindrical tool to press or press a cylindrical component on a base (no text or symbols)Fig. 7
natural_image
Illustration of hands brushing a bowl with a brush and falling faucet (no text or symbols)natural_image
Exploded view diagram of a kitchen appliance showing internal components like a blender, filter, and oven (no text or labels)Fig. 9
ES500
natural_image
Exploded view diagram of a kitchen appliance showing internal components like a lid, funnel, and base (no text or labels)Fig. 10
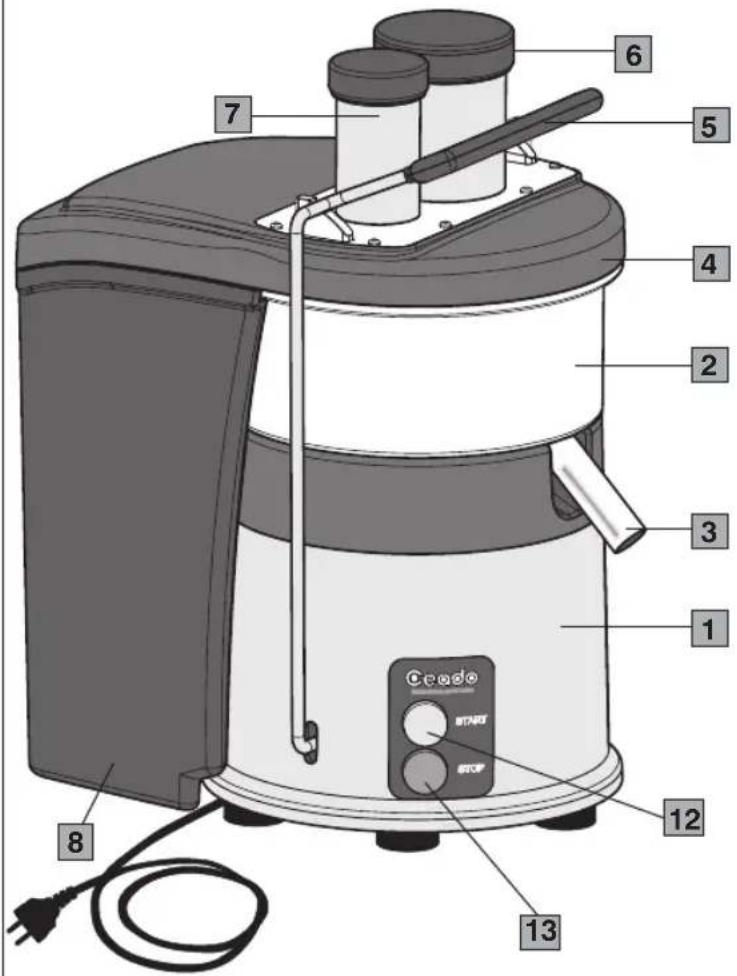
1 Motor housing
2 Bowl
3 Spout
4 Juicer cover
5 Locking arm
6 Food pusher
7 Feed chute
8 Pulp container
9 Basket
10 Pulp retainer
11 Grating disc
12 START button
13 STOP button
14 Motor shaft
15 Drive disc
Model ES900 (Fig. 5)
16 Discharge connection
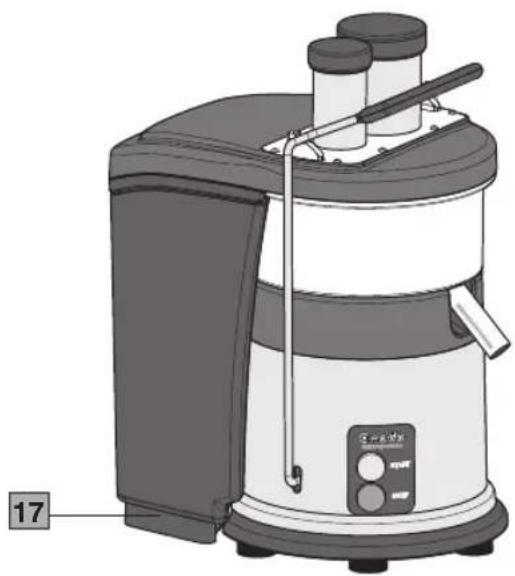
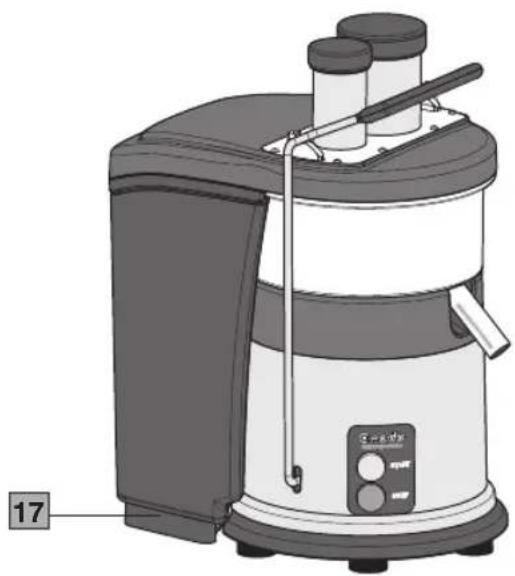
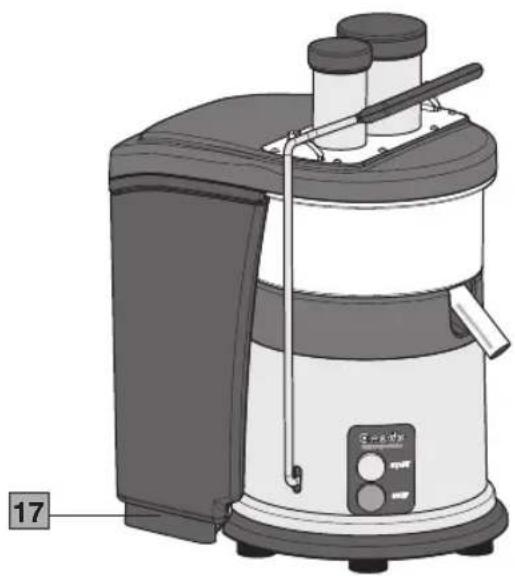
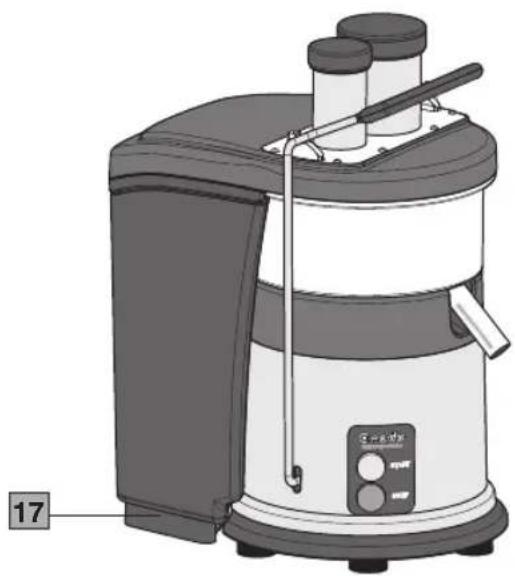
17 Pulp container support
text_image
Labeled diagram of a coffee maker with numbered parts and control panel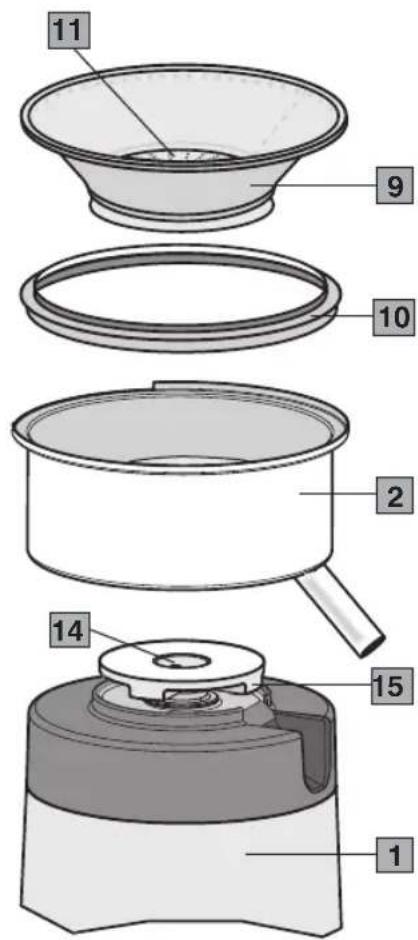
text_image
11 9 10 2 14 15 1Fig. 2
Fig. 1
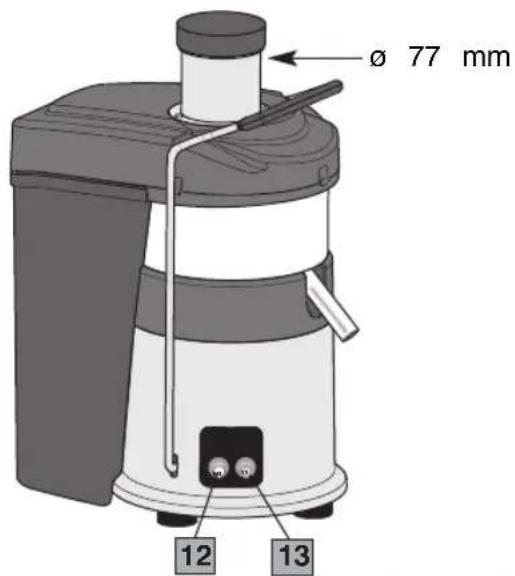
Model ES500 with feed chute ∅ 77 mm
text_image
Ø 77 mm 12 13Fig. 3
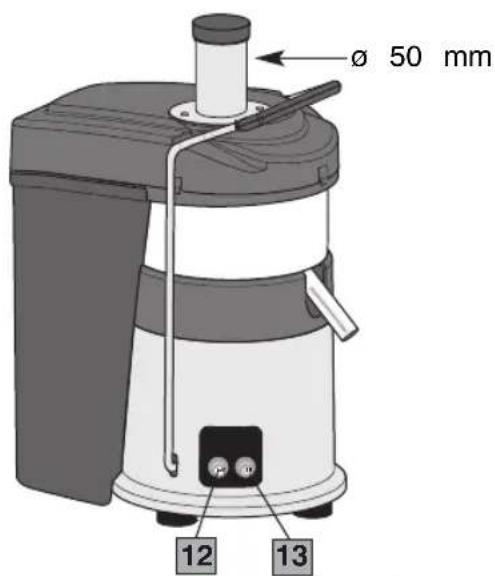
Model ES500S with feed chute ∅ 50 mm
text_image
Ø 50 mm 12 13Fig. 4
Model ES900 with double feed chute ø 77 mm and ø 50 mm
In counterOn counter

natural_image
Illustration of a juicer with a control panel and labeled part (no text or symbols on the device itself)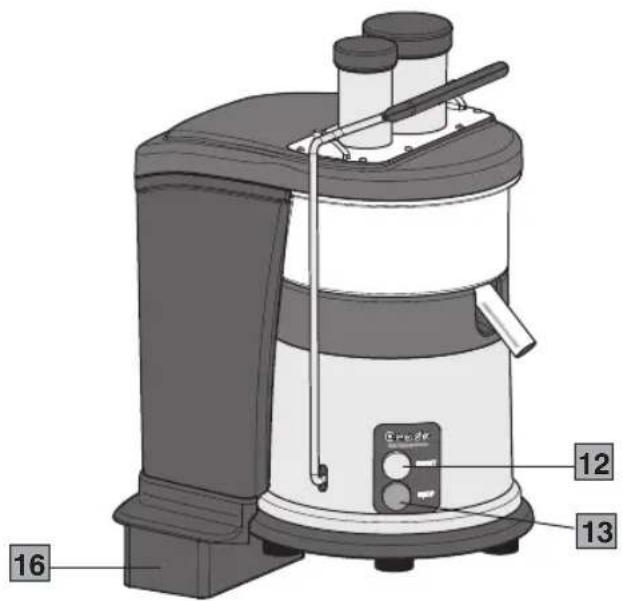
text_image
12 13 16Fig. 5
SAFETY RECOMMENDATIONS GENERAL INSTRUCTIONS
- Read the following instructions carefully before using the appliance.
- Installation and maintenance should be carried out by qualified personnel only.
- This appliance is intended for professional use, and should therefore be used by adults and qualified personnel only.
- This appliance is not meant for use by persons (including children) with reduced mental, sensorial or physical abilities or without experience and knowledge, unless they have been duly instructed on the use of such appliance and are supervised by a person responsible for their safety.
CHILDREN SHOULD BE SUPERVISED SO AS TO ENSURE THAT THEY DO NOT PLAY WITH THE APPLIANCE
- Never use this appliance for purposes other than extracting juice from pieces of fruit and vegetables. Any other use is dangerous.
- Always work under safe conditions: do not use the appliance with wet hands or feet. Do not use outdoors.
- Keep the original package for possible future use. It is the most suitable protection against damage during transport.
- In case of fire use CO_2 extinguishers. Do not use water or powder extinguishers.
- Never place the appliance in water!
- Do not disassemble the appliance or attempt to perform any repair inside it.
- Always unplug the appliance before performing any maintenance or cleaning and when it is not in use.
- Never pull the appliance by the cord to move it. Never unplug it by pulling the cord or touching it with wet hands.

If the power cord is damaged, it must be replaced by the manufacturer or by its technical assistance service or, in any case, by someone having equivalent knowledge, so as to prevent any risk.
- WARNING: BE CAREFUL to never insert utensils, metal objects other rigid or sharp materials in the basket as it is dangerous a could cause injury.
- During maintenance procedures and while unpacking, do not hold lift the appliance by the locking arm of the juicer cover.
- When cleaning the appliance use care in handling the basket so do not alter the alignment or reduce the performance of the appliance.
- Do not use the appliance if it is damaged or has loose part. Immediately contact an authorized Service Center.
- Do not push fruit or vegetables into the feed chute with your 1 Always use the food pusher provided.
- Do not touch the sharp teeth of the grating disc.
- Do not insert fruit with stones (e. g. peaches, apricots, etc.) with first removing the stone.
- On model with two feed chutes never insert the 50 pusher 77 chute.
- Never use the appliance if the rotating basket is damaged.

WARNING: DO NOT PUT FINGERS OR ANYTHING OTHER THAN THE APPROPRIATE FOOD PUSHER PROVIDED WITH THE APPLIANCE INSIDE THE FEED CHUTE. ALWAYS USE THE FOOD PUSHER TO PUSH THE FRUIT TOWARDS THE ROTATING GRATING DISC.
SAVE THESE INSTRUCTIONS
CE
The EC declaration of conformity for this appliance is available in the Productssection of our website www.ceado.com.
INSTALLATION
Comply with the safety recommendations indicated above and hereafter when installing the appliance.
- Before starting to use the appliance carefully wash and dry all the removable parts in contact with food.
- Make sure that the mains voltage is as indicated on the rating label of the appliance and the electrical system is grounded and equipped with a switch.
- Install the appliance in a DRY, PROTECTED place, far from water sprays or splashes, heat sources, open flames and inflammable substances.
Place the appliance on a flat, horizontal, stable surface where it cannot tip over.
- Plug the appliance into a socket protected by a suitably rated circuit breaker (MCB) or fuses Do not use an adaptor plug.
- Stretch the power cable out to full length. Do not let it pass over sharp edges or hot surfaces. Do not let oil spill on it. Do not let the power cable hang loose from the counter on which the appliance stands.
- To use the appliance more easily, we suggest that the appliance is placed on a table or co-top so that the juice spout and the controls face towards the right side of the user (suggest height for counter top from a round level: 90 cm (36 inches), to be adjusted according to height of the user).
Installation of model ES900: "on counter" and "in counter"
"ON counter" installation (Fig. A)
- Place the pulp container support (17, Fig. 5) near the housing from the rear.
- Place the pulp container to its support ensuring that it is in a perfectly straight position.
- Move the pulp container and support assembly into its position, taking care to insert the rubber hook of the support around the foot under the bottom of the appliance (3, Fig
- Complete the installation of the appliance by correctly positioning the bowl and the juicer cov and closing the locking arm.
"IN counter" installation (Fig. B)
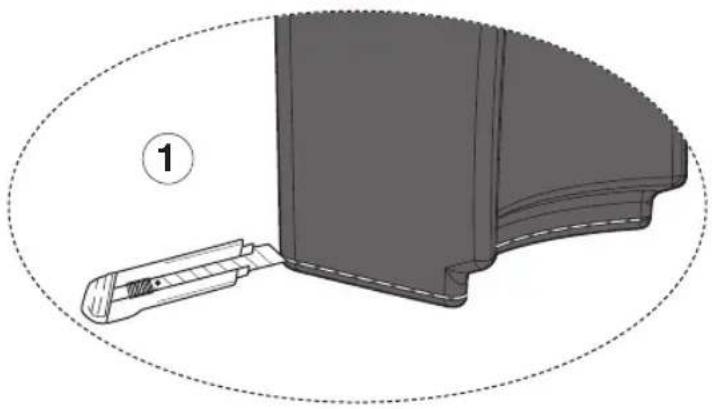
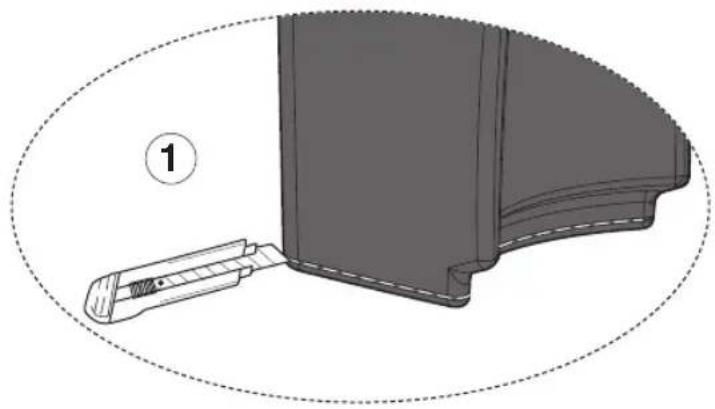
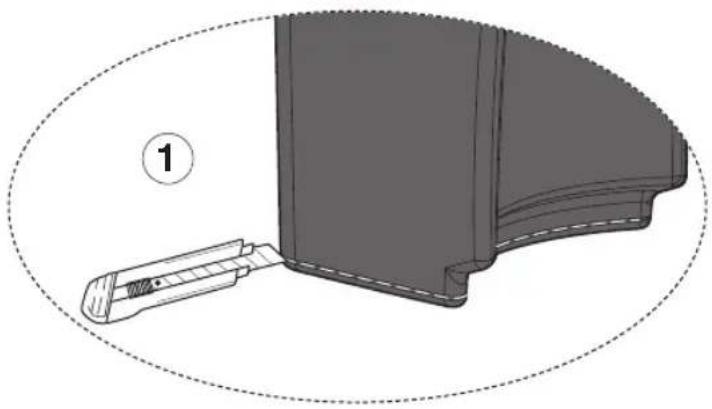
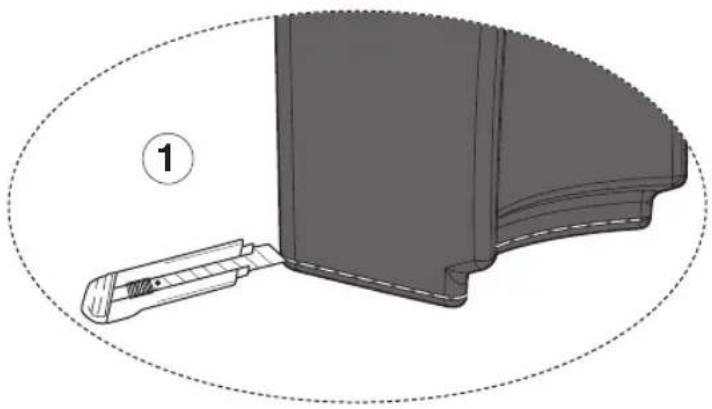
- Cut the pulp container with a cutter following the pre-cut mark on the bottom of the container (1, Fig. B).
- Drill the worktop to insert the discharge connection using the "installation TEMPLATE" provided (see attached sheet).
- Place the appliance without the juicer cover, the pulp container and the bowl in the final position with the aid of the indication of the position of the feet on the installation template
- Place the discharge connection (16, Fig. 5) in the hole just created, taking care to insert the fixing hooks "b" correctly into the holes "c" provided in the bottom of the appliance (Fig. B).
- Insert the pulp container completely into the discharge connection, ensuring that it is in a perfectly straight position.
- Complete the installation of the appliance by correctly positioning the bowl and the juicer cov and closing the locking arm.
Model ES900 - On counter
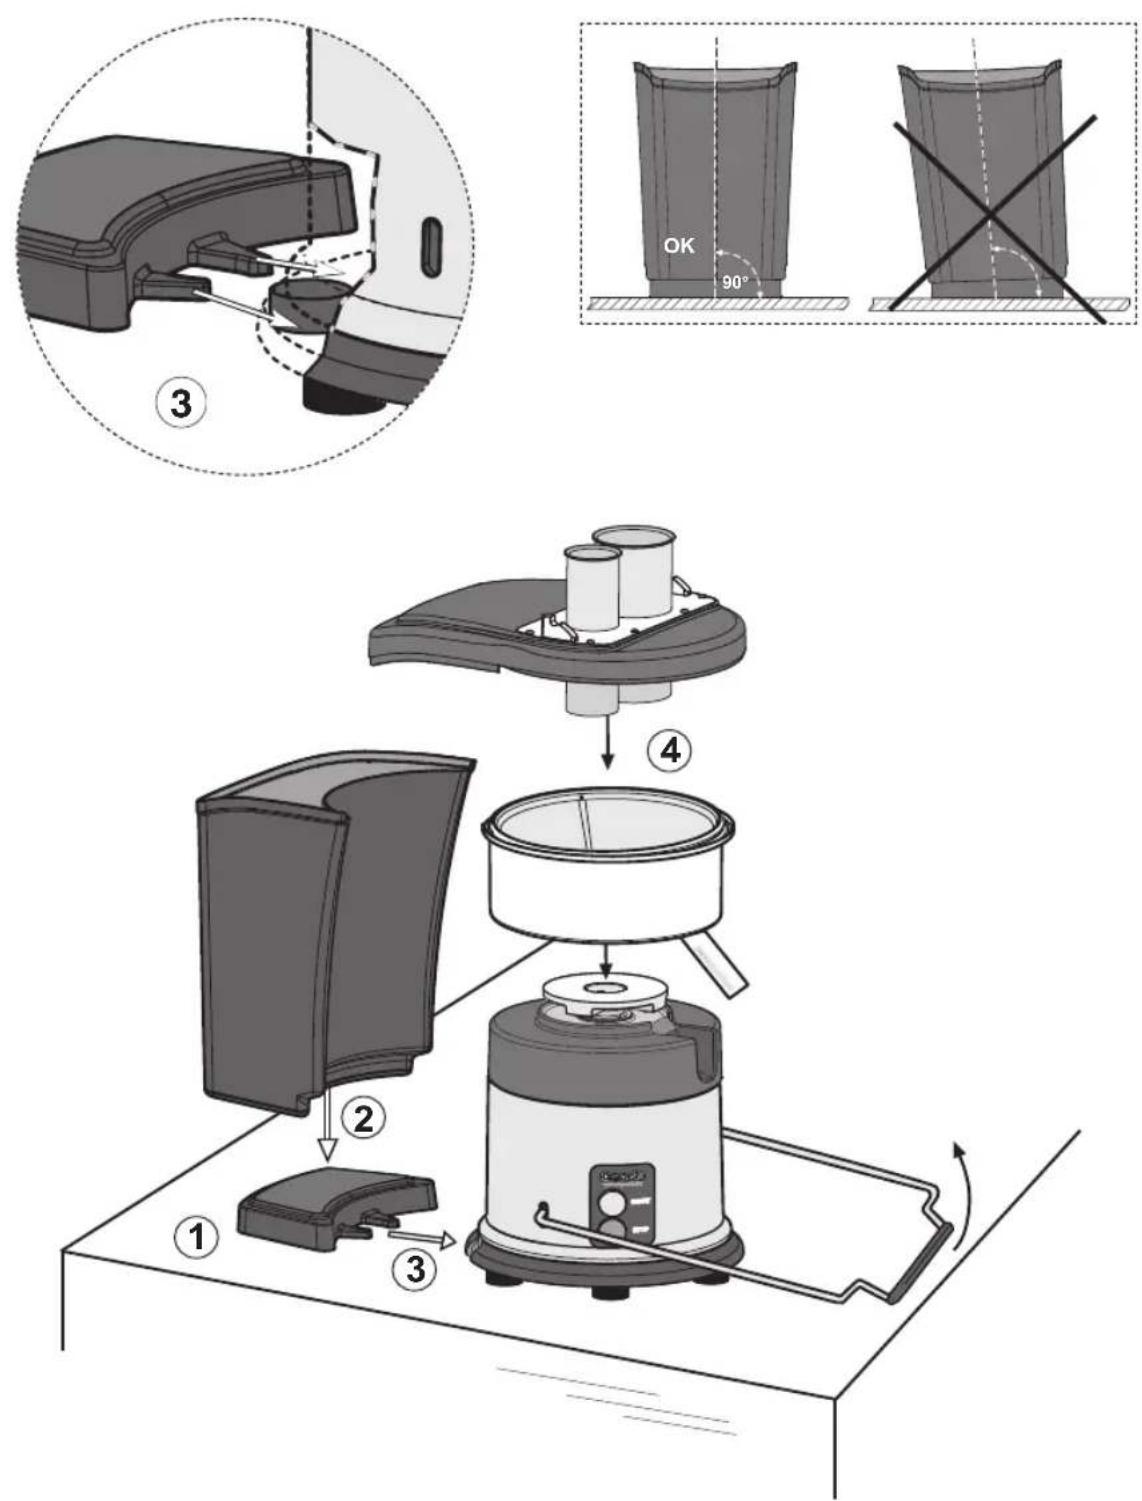
Fig. A
Model ES900 - In counter
natural_image
Diagram of a device with a tool inserted into a housing, labeled with number 1 (no text or symbols on the diagram itself)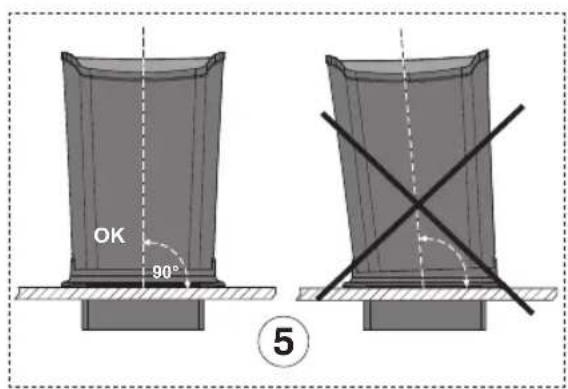
text_image
OK 90° ⑤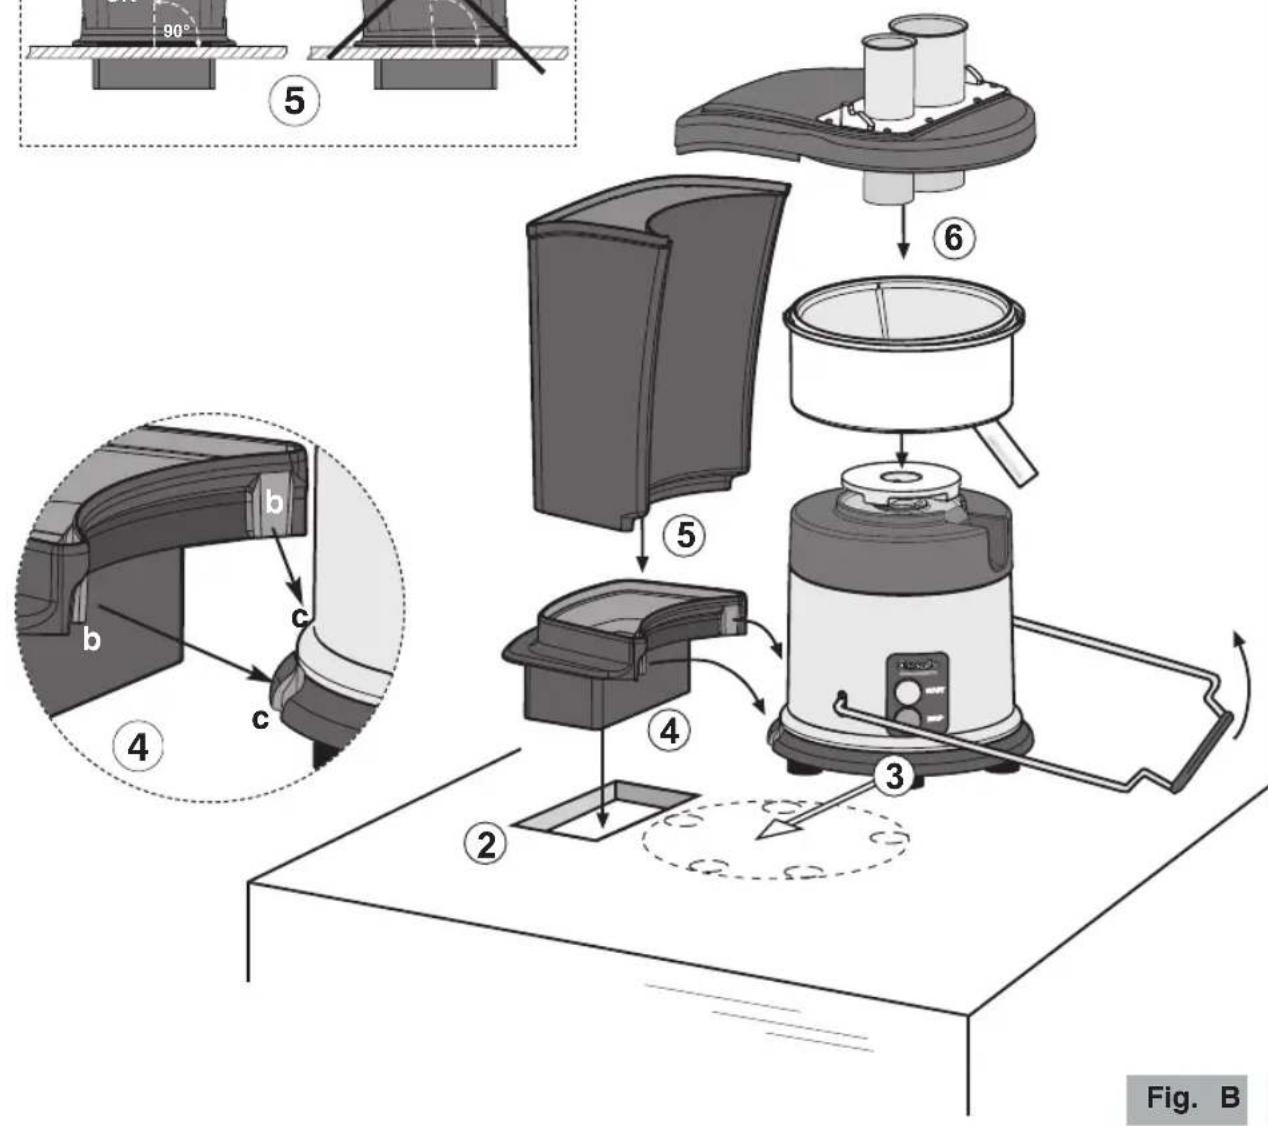
text_image
90° ⑤ ⑥ ② ③ Fig. BUSE

Make sure the tabletop and feet are clean to ensure grip during operation.

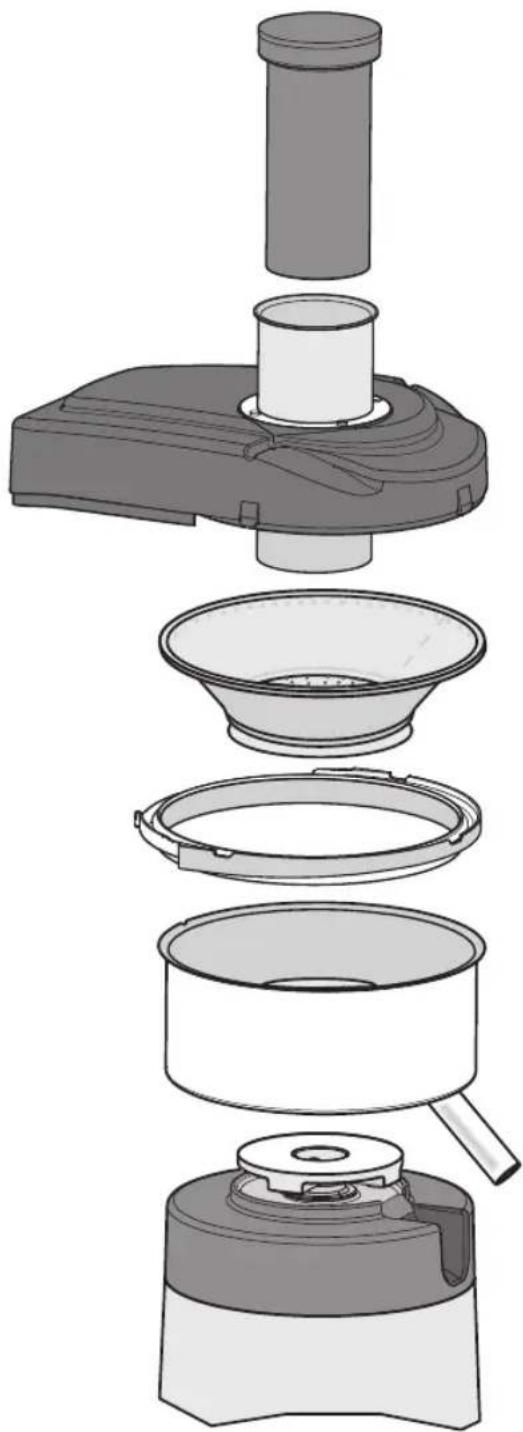
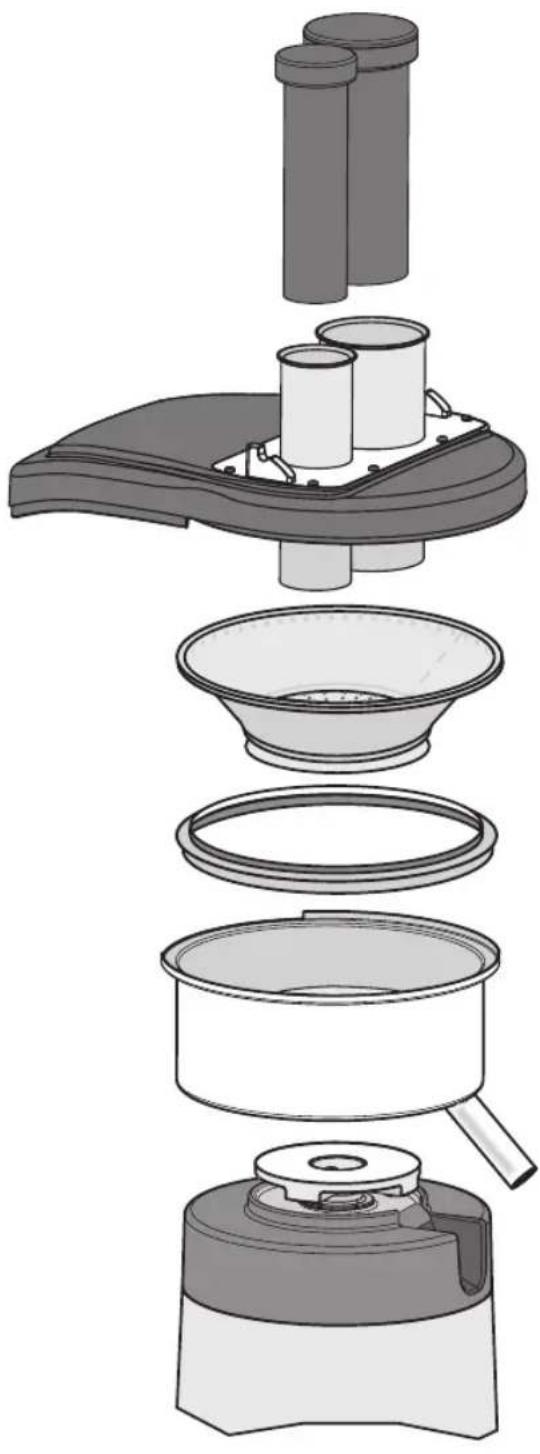
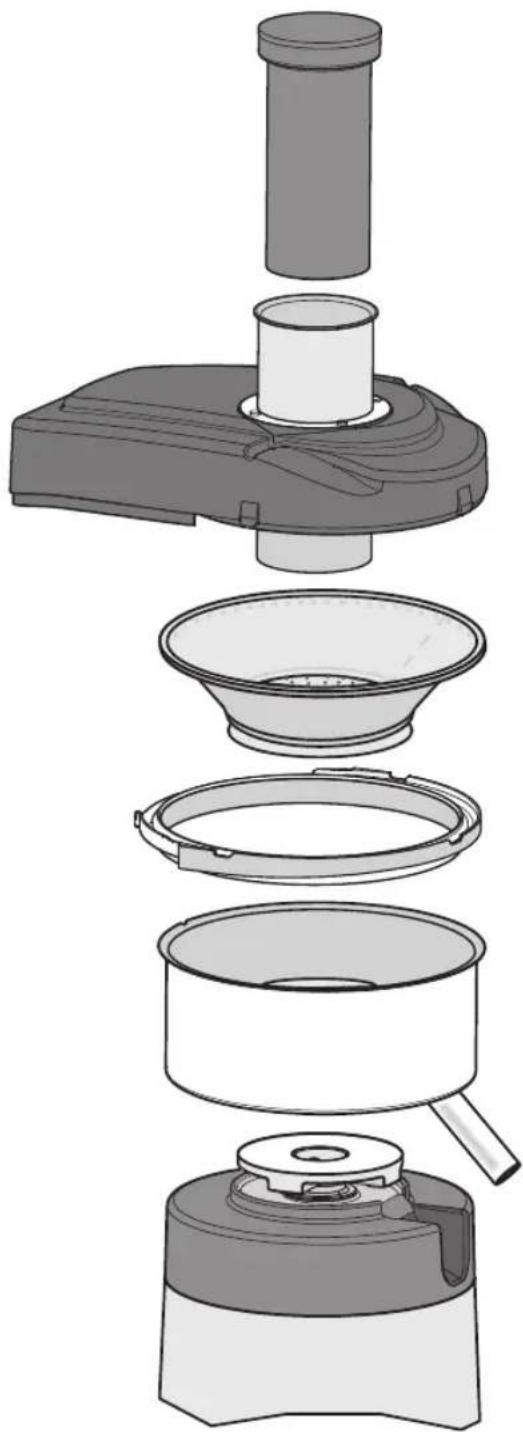
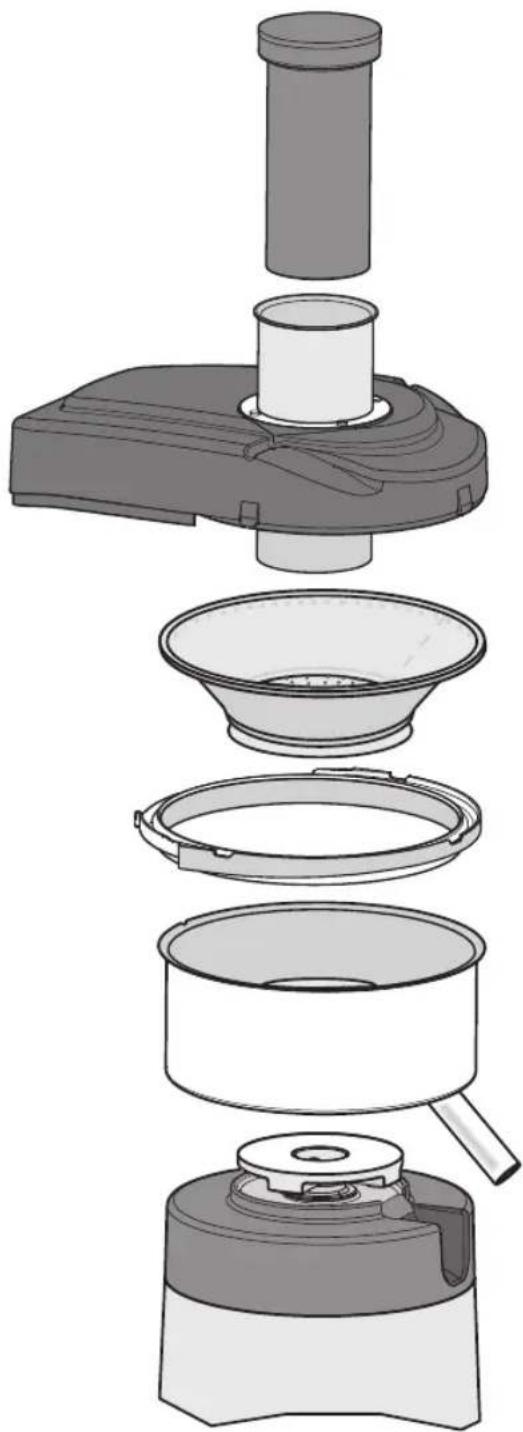
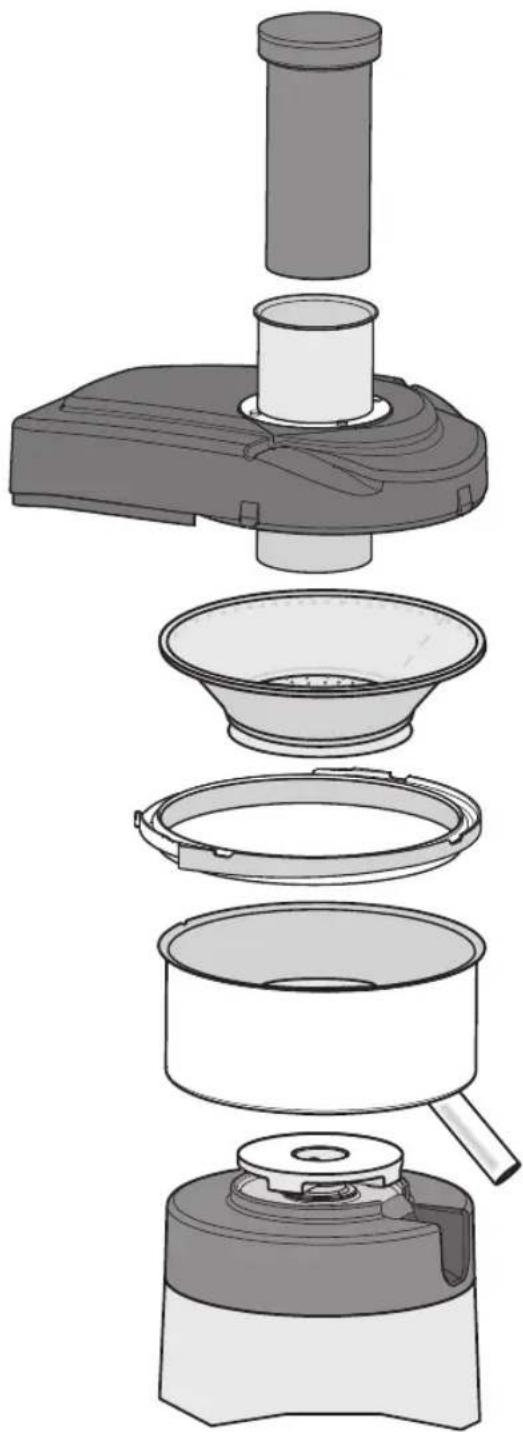
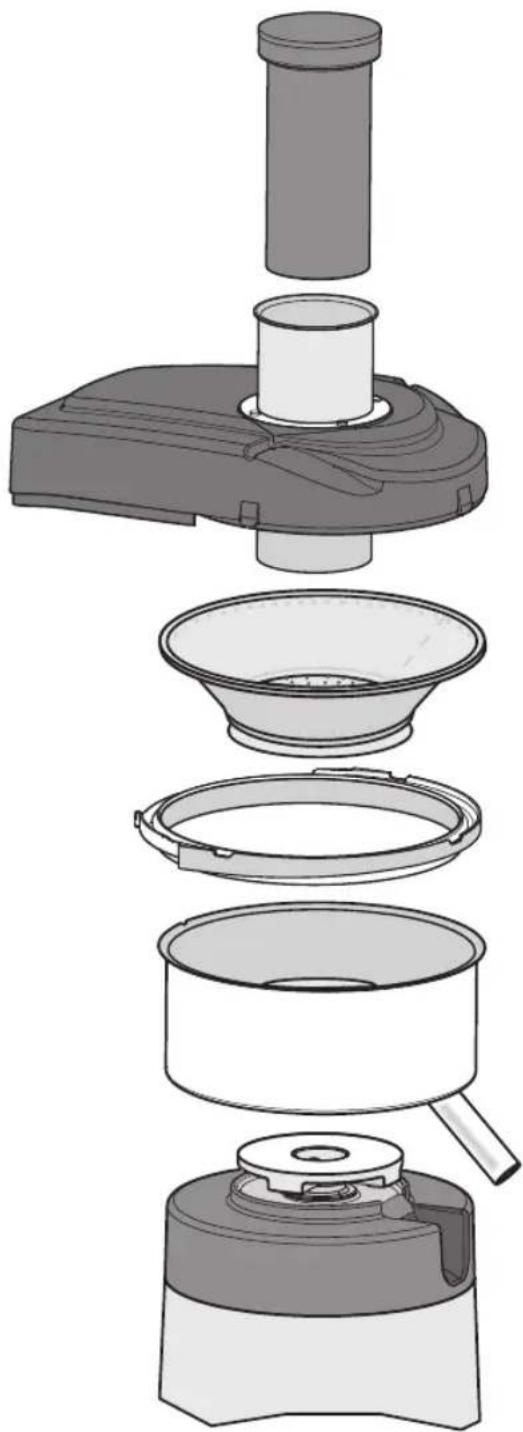
Before first use: rinse all of the parts that will have contact with food in running water i.e.; food pusher, juicer cover, basket, bowl, pulp container and pulp retainer. To disassemble various parts see Fig. 9, Fig. 10 and Fig. 11.

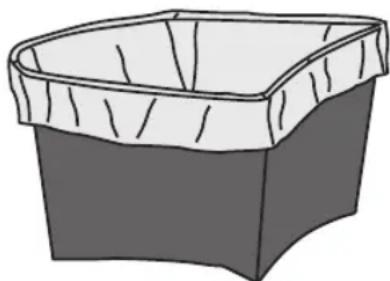
Suggestions (only for ES500, ES500S and ES700 models): to reduce the cleaning procedures to a minimum we suggest placing a biodegradable plastic bag inside the pulp container and folding the top of the bag over the edge of the pulp container (see Fig. 1) using this method, once you have finished using the appliance, you can put the waste into a composting or waste bin.
natural_image
Simple line drawing of a rectangular container with a curved lid (no text or symbols)Fig. 6
1 Wash the fruit or vegetables you will use.
NOTE: Many types of fruit and vegetables for example apples, carrots and cucumbers fit through the feed chute without having to be cut into pieces. When you make juice from it is a good idea to insert the larger end of the carrot first, or to cut the carrot in two pieces.
For models with feed chute 50 mm, use the latter to juice carrots. To optimize the juic chop fruit into smaller pieces.
2 Ensure that the juice extractor is correctly assembled. Ensure that the basket is properly cleaned before each use.
3 Check to see that locking arm is hooked on to the juicer cover.
4 Place a container under the spout of the bowl.
5 Turn on the motor by pushing the START button.
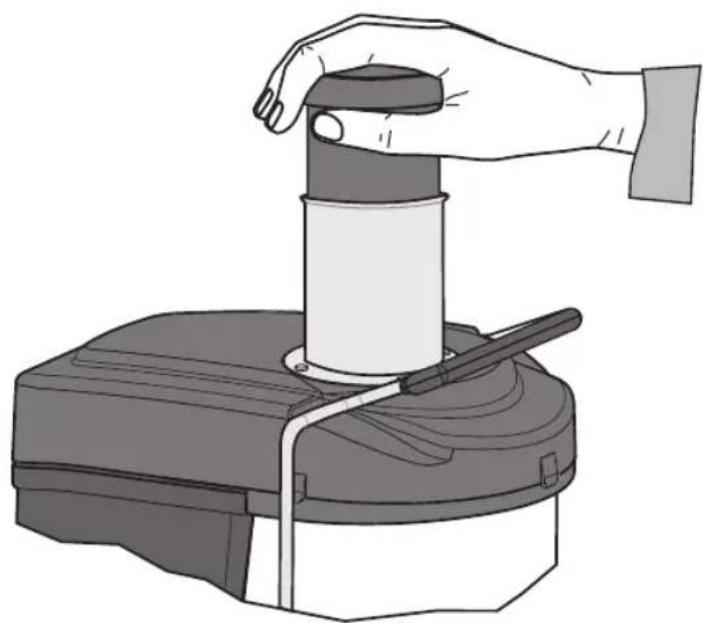
6 Use the food pusher provided, to gradually push down the fruit and/or vegetables towards spinning grating disc at the bottom of the feed chute (see Fig. 7). To obtain more juice press the food pusher lightly. Do not insert fruit and/or vegetables when the motor is off.

NEVER USE YOUR FINGERS TO PUSH THE FRUIT AND/OR VEGETABLES DOWN THE FEED CHUTE OR TO CLEAN THE CHUTE. ALWAYS USE THE FOOD PUSHER PROVIDED.
7 The juice will pour from the spout into the container placed below the spout. The separate will accumulate in the pulp container.
8 Continue to use the appliance until the container is filled with juice or until you have finish the fruit or vegetables you are using or ensure the pulp container has become filled with p
9 Turn the motor off by pushing the STOP button.
Note: Always wait until the motor has come to a complete stop before unhooking the locki

Never use the locking arm to turn the appliance off. This could wear out the safety mechanisms (safety microswitch and motor brake).

When the appliance is not in use leave the locking arm hooked to the juicer cover.
Only for ES500, ES500S and ES700 models:

When using the appliance control the level of pulp in the pulp container (with the motor off). The quantity of fruit or vegetables that can be used before the pulp container is filled varies depending on the type of fruit or vegetables used.

Should blockage occur while the appliance is in use before the pulp container is filled with pulp it is a good idea to turn the appliance off and find the cause of the blockage.
NOTE! When using the juice extractor the pulp container can be emptied by turning the applan off and carefully removing the pulp container (put the pulp container in place before turn the juice extractor back on).
natural_image
Illustration of a hand using a cylindrical tool to press or press a mechanical component (no text or symbols visible)Fig. 7
CLEANING AND MAINTENANCE
Suggestions (only for ES500, ES500S and ES700 models): to reduce the cleaning procedures a minimum we suggest placing a biodegradable plastic bag inside the pulp container, folding the of the bag over the edge of the pulp container (see Fig. 6). By using this method, once you finished using the appliance, you can put the waste directly in a composting or waste bin.

Before each cleaning remove the appliance's plug.
By keeping the appliance well-cleaned and in working order you can maximize the quality of the juice extracted and guarantee a longer life for the appliance itself. For this reason, a every use, you should clean the basket, bowl, juicer cover, pulp container, pulp retainer, food pusher so that residues do not harden and encrust the appliance.
To clean the motor housing, clean with a cloth dampened with water or alcohol or with spray neutral solution.
Wipe with a dry cloth.

Never put the motor housing under running water and never immerse the appliance water.
To clean the juicer cover, bowl, basket, pulp container, pulp retainer and food pusherinse under running water and wash with warm water and washing liquid. Rinse and dry.
To disassemble these components, unhook the locking arm and remove in this order; food pusher, juicer cover, basket, pulp retainer, and bowl (Fig. 9, Fig. 10). Reassemble in the order taking care to place the juice spout in the appropriate slot of the motor housing, place pulp retainer correctly, place the basket in the bowl, making sure that the basket's clutch is correctly inserted on the drive disc and position the juicer cover on the bowl.
- The removable parts of the juice extractor, with the exception of the pulp container, are dishwasher safe. The pulp container should not be immersed in hot water. Hot water can deform the pulp container making it impossible to use.
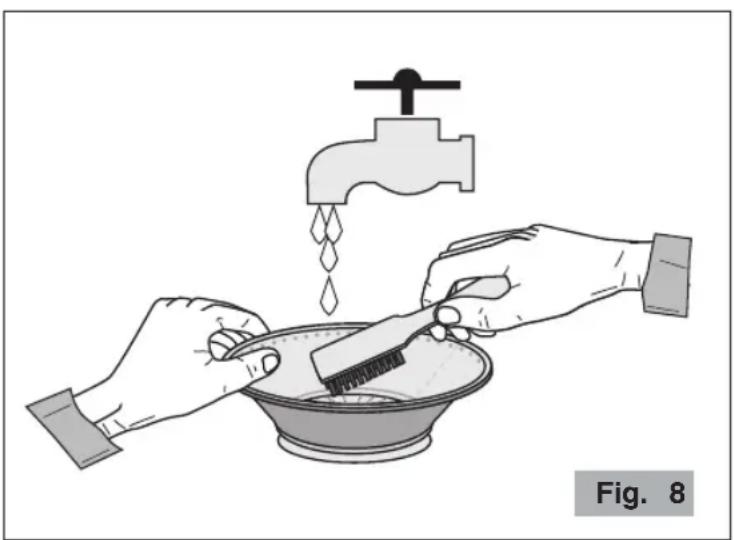
- To obtain a higher yield of juice always control that the basket is well-cleaned by using a brush. Put the basket under running water and use the brush to clean the inside of the (see Fig. 8). Hold the basket up against the light to make sure that none of the perforated blocked. Should the perforations of the strainer remain blocked, immerse the basket in a solution of hot water with 12% lemon juice or vinegar to loosen the blocked material.
natural_image
Illustration of hands brushing a bowl with a brush, using a faucet (no text or symbols)Alternatively, wash the basket in a dishwasher.
- Handle the basket with care as even the slightest damage to the pulp container can cause the juice extractor to vibrate undesirably during use.
As some products (such as peeled citrus fruits, celery and tomatoes) can easily encrust or obstruct the perforations, you should frequently clean the basket.
ES700
ES900
natural_image
Exploded view diagram of a kitchen appliance showing internal components like a blender, filter, and oven (no text or labels)Fig. 9
ES500
natural_image
Exploded view diagram of a kitchen appliance showing internal components like a lid, funnel, and base (no text or labels)Fig. 10

THE BASKET HAS SMALL SHARP TEETH. DO NOT TOUCH THE TEETH WHEN YOU HANDLE THE BASKET.

Do not use abrasive products or sponges to clean the basket.

Do not let traces of fruit or vegetables dry and harden on the pulp container, bas juicer cover or food pusher.

Never use bleach or chlorine-based cleaning products on the juice extractor.

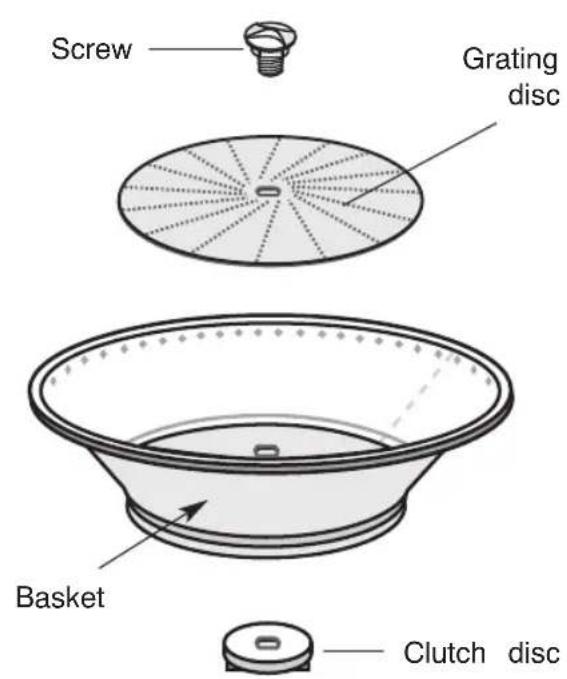
For a periodic deep-cleaning you can disassemble the parts of the basket by unscrewing clutch disc (Fig. 11).
To disassemble the parts of the basket, hold the basket still with one hand and unscrew clutch disc. Pull the screw out of the basket.
Wash all of the parts in warm water with dish soap, removing any residues with the brus Reassemble in reverse order (Fig. 11) making sure that the parts are tightly attached to c another.
text_image
Screw Grating disc Basket Clutch discFig. 11
INFORMATION ON FRUIT AND VEGETABLE JUICES
Freshly-made juices should be consumed immediately following their extraction to obtain maximum vitamin content.
PURCHASE AND STORAGE OF FRUIT AND VEGETABLES
- Always wash fruit and vegetables before juicing.
- Always use fresh produce.
- To save money and obtain higher-quality juices, always use fruit and vegetables that are in season.
- Always keep produce ready to juice by washing it before putting it in the refrigerator.
- Most fruit and vegetables can be kept at room temperature. Delicate fruit and vegetables, such as tomatoes, berries, lettuce, celery, cucumbers and herbs should be kept in the refrigerator until use.
- Do not use overly ripe fruit because it clogs the basket very quickly.
PREPARATION OF FRUIT AND VEGETABLES
- Fruit or vegetables with a hard or inedible skin or rind, such as melon, pineapple, mango, kiiv, etc., must be peeled before being inserted in the juice extractor.
- All citrus fruits must be peeled be fore being inserted in the juice extractor.
- Remove the stones from fruits such as peaches, apricots, plums, etc., before inserting the fruit in the juice extractor.
- A small quantity of lemon juice can be added to apple juice to prevent discoloration.
Suggestions: the juice extractor also gives a high yield of juice from oranges. Remember to always peel oranges and all citrus fruits before inserting them in the juice extractor (we also suggest p the oranges in the refrigerator before use).
RECOMMENDATIONS FOR PROPER USE
When you make juice from different types of ingredients with different consistencies it is a good to start with the softer ingredients and then subsequently use the harder ingredients.
When you make juice from herbs or lettuce you should press them together to form compact b or mix them together with other ingredients to obtain a better result.
NOTE! Herbs and lettuce give a low yield of juice. This is due to the characteristics of t produce and of the juice extractor. It is therefore advisable to always make juice from he and lettuce mixed together with other fruit or vegetables.
Different types of fruit and vegetables yield different quantities of juice. The amount of juice vari even between fruit and vegetables of the same kind, for example two apples of the same varie with the same weight can produce different quantities of juice. Given the fact that juice recipes not an exact science, using precise quantities of ingredients for each juice recipe is not a determining factor for the successful outcome of the recipe.
NOTE! To obtain a high yield of juice always press the food pusher lightly.
TROUBLESHOOTING
(See Table on the next page)
In case of any malfunction, defect of the appliance or if you suspect any breakage after a fat the appliance immediately.
If you are unable to solve the problem referring to the table below, contact an Authorized Ser Centre.
Only qualified experts should repair the appliance.
We are not liable for any damage caused by repairs not made correctly and/or by unauthorized personnel. In these cases the warranty does not apply.
| Problem | Solution |
| The appliance does not turn on. | Make sure the feed chute is empty.Make sure it is plugged in.Make sure the safety circuit breaker is closed.Make sure the locking arm is correctly hooked onto the juicer cover.If the problem occurs itself after a long period of intensive use or overfilling, the motor could be in thermal protection lock! Wait at least 20 minutes and try again. The waiting time can be reduced by putting the appliance in a cool place. |
| The appliance vibrates in an abnormal manner. | The vibration can be caused by:Incorrect positioning of the basket. Check alignment.Deterioration of the structural components of the basket. Check and replace if necessary.Accumulation of pulp in the basket. Check and empty pulp if necessary.Full container. |
| Juice does not come out of the spout. | Blockage of the basket. Check and clean the basket.The opening of the spout is blocked. Check and clean the bowl and spout.Use of fruit that has too much pulp or is too ripe. Check and clean the bowl and basket. |
| Excessive accumulation of pulp in the basket. | Try to alternate between soft and hard fruits when using the juice extractor. |
| Pulp appears excessively wet and a low quantity of juice is produced. | Try to insert the fruit or vegetables more slowly and with less force.Make sure that the basket is always carefully cleaned with a nylon brush. Put the basket under running water and use the brush to clean the inside of the strainer (see Fig. 8), holding the basket up against the light to make sure that none of the perforations are blocked. Should the perforations of the strainer remained blocked, immerse the basket in a solution of hot water with 12% lemon juice or vinegar to loosen the material that blocked them.Alternatively, wash the basket in a dishwasher.Fruit too ripe. |
DISPOSAL
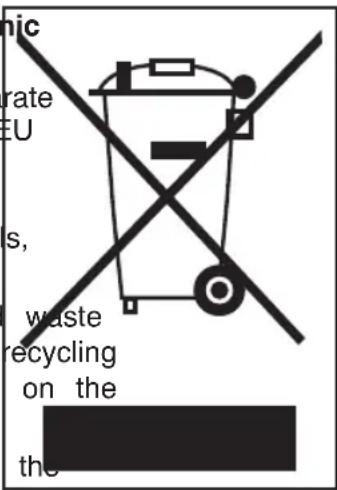
Correct disposal of this product (waste electrical and electronic equipment)
(Applicable in the European Union and other countries with separate collection systems in conformity with European Directive 2012/19/EU and subsequent updates)
This product has been made from high-quality parts and materials, which can be re-used and recycled.
Therefore, do not throw the product away with normal household at the end of its working life. Take it to a collection point for electrical and electronic devices. This is indicated by this symbol product and in the operating manual.
Please contact your local government office for information about exact location of the closer collection point.
text_image
nic rate EU s, waste recycling on the theWARRANTY
This product is guaranteed against faulty materials and workmanship.
The warranty period may vary according to local laws or commercial uses of the country when product is marketed. Therefore, please contact the retailer from whom the product was purchased
During the warranty period, this product can either be repaired or replaced, at the manufacture discretion, at no additional cost only if it has been used according to the instructions in this maintenance manual.
If the products needs maintenance or repairs during the warranty period, contact your retailer for shipping instructions. The product should be shipped in its original package or other suitable packing.
The warranty does not apply in case of neglect, misuse, abuse or unauthorized repairs. This warranty does not apply to parts subject to deterioration through normal use such as wear to basket, the grating disc, etc.
The warranty is limited to the costs of repair or replacement of the product or its defective pay an amount equivalent to the price paid for its purchase. No additional requests of damages will be available to the purchaser.
The manufacturer will not accept any liability and the warranty will be invalidated if there is failure to follow these instructions and the technical and/or safety standards in the country where the appliance is to be used.
In any case these instructions cannot cover every possible event and the user is recommended to use the appliance responsibly.
THE MANUFACTURER RESERVES THE RIGHT TO MAKE ANY ALTERATIONS TO THE APPLIANCE WITHOUT NOTICE
CENTRIFUGEUSE
Composants principaux (Fig. 1 - Fig. 2 - Fig. 3)
text_image
Labeled diagram of a coffee maker with numbered parts and control panel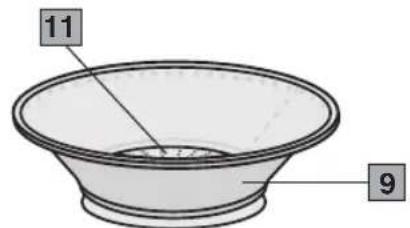
text_image
11 9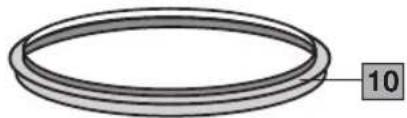
natural_image
Simple line drawing of a coiled tube or ring with a labeled dimension (10) on the side, no text or symbols present.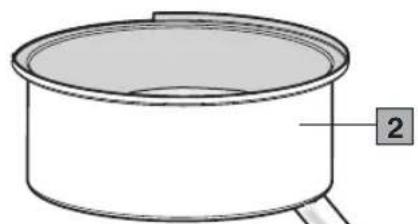
natural_image
Simple line drawing of a cylindrical container with a lid and label '2' pointing to the side (no text or symbols on the object itself)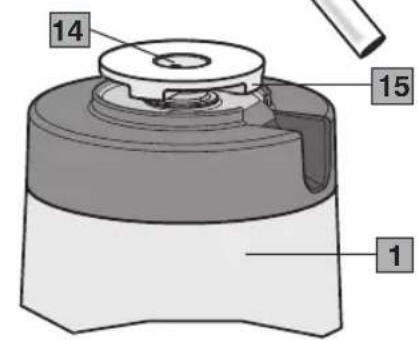
text_image
1 14 15 1Fig. 2
Fig. 1
In counterOn counter
natural_image
Illustration of a juicer with control panel and side arm (no text or symbols)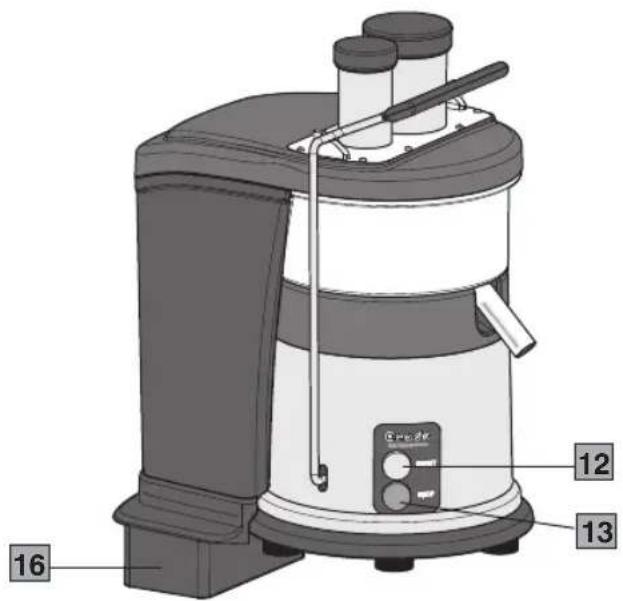
text_image
12 13 16Fig. 5
NORMES DE SÉCURITÉ INSTRUCTIONS GÉNÉRALES
Installation "ON counter" (Fig. A)
Installation "IN counter" (Fig. B)
natural_image
Mechanical assembly diagram showing a component being inserted into a housing, with no visible text or symbols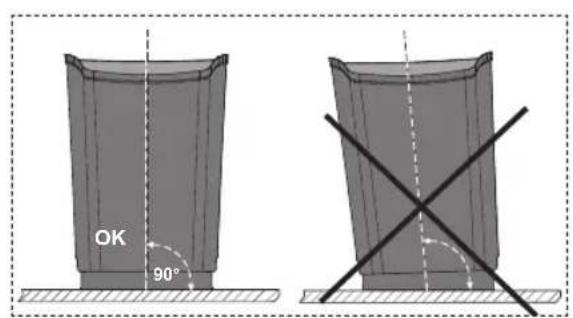
text_image
OK 90°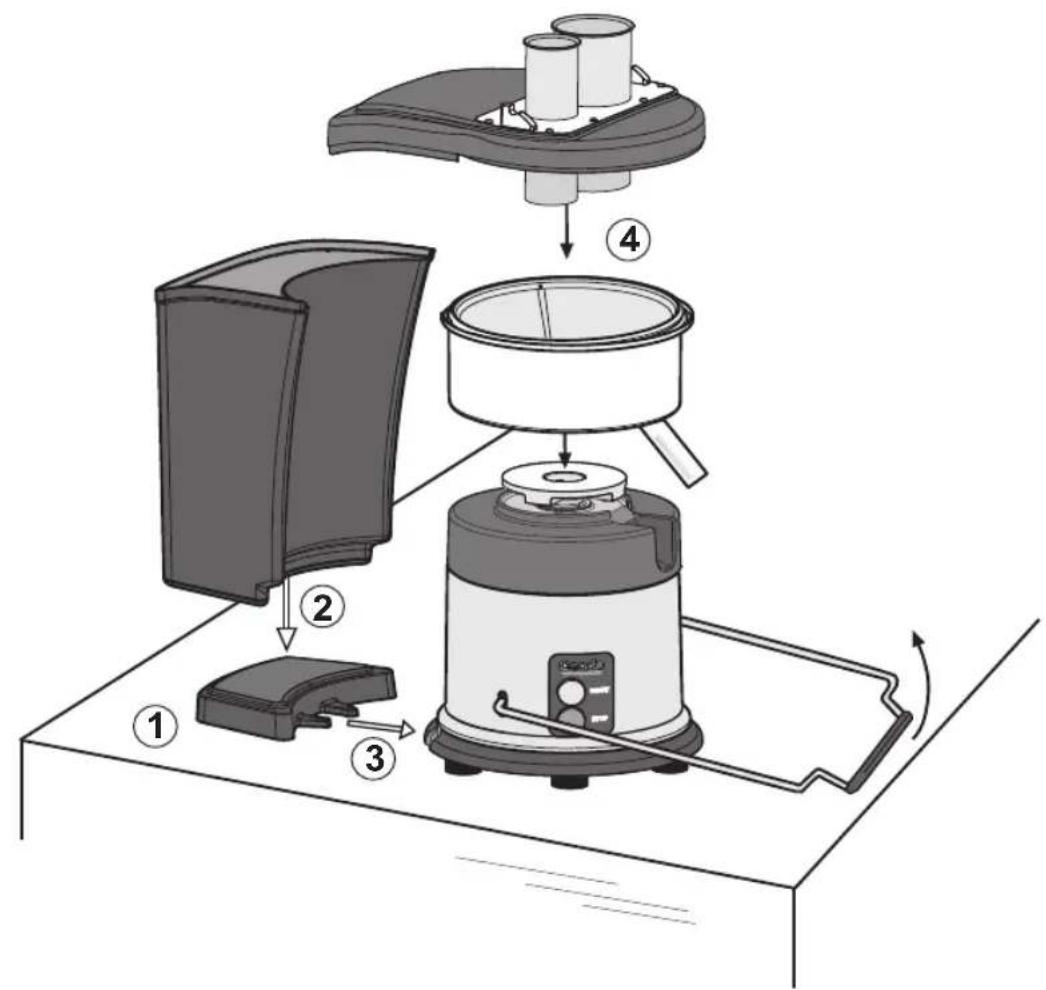
text_image
Diagram of a coffee maker's internal processing steps, labeled with numbered components and directional arrows.Fig. A
natural_image
Diagram of a device with a tool inserted into a housing component, labeled with number 1 (no text or symbols on the diagram itself)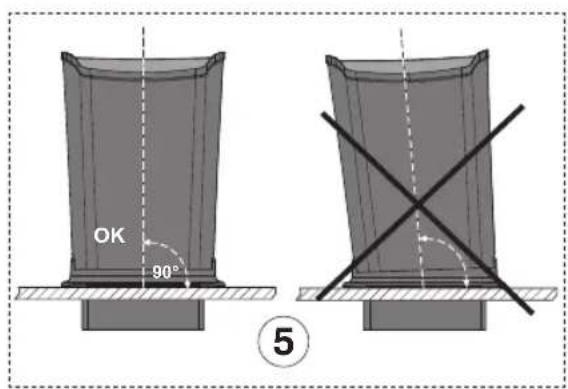
text_image
OK 90° ⑤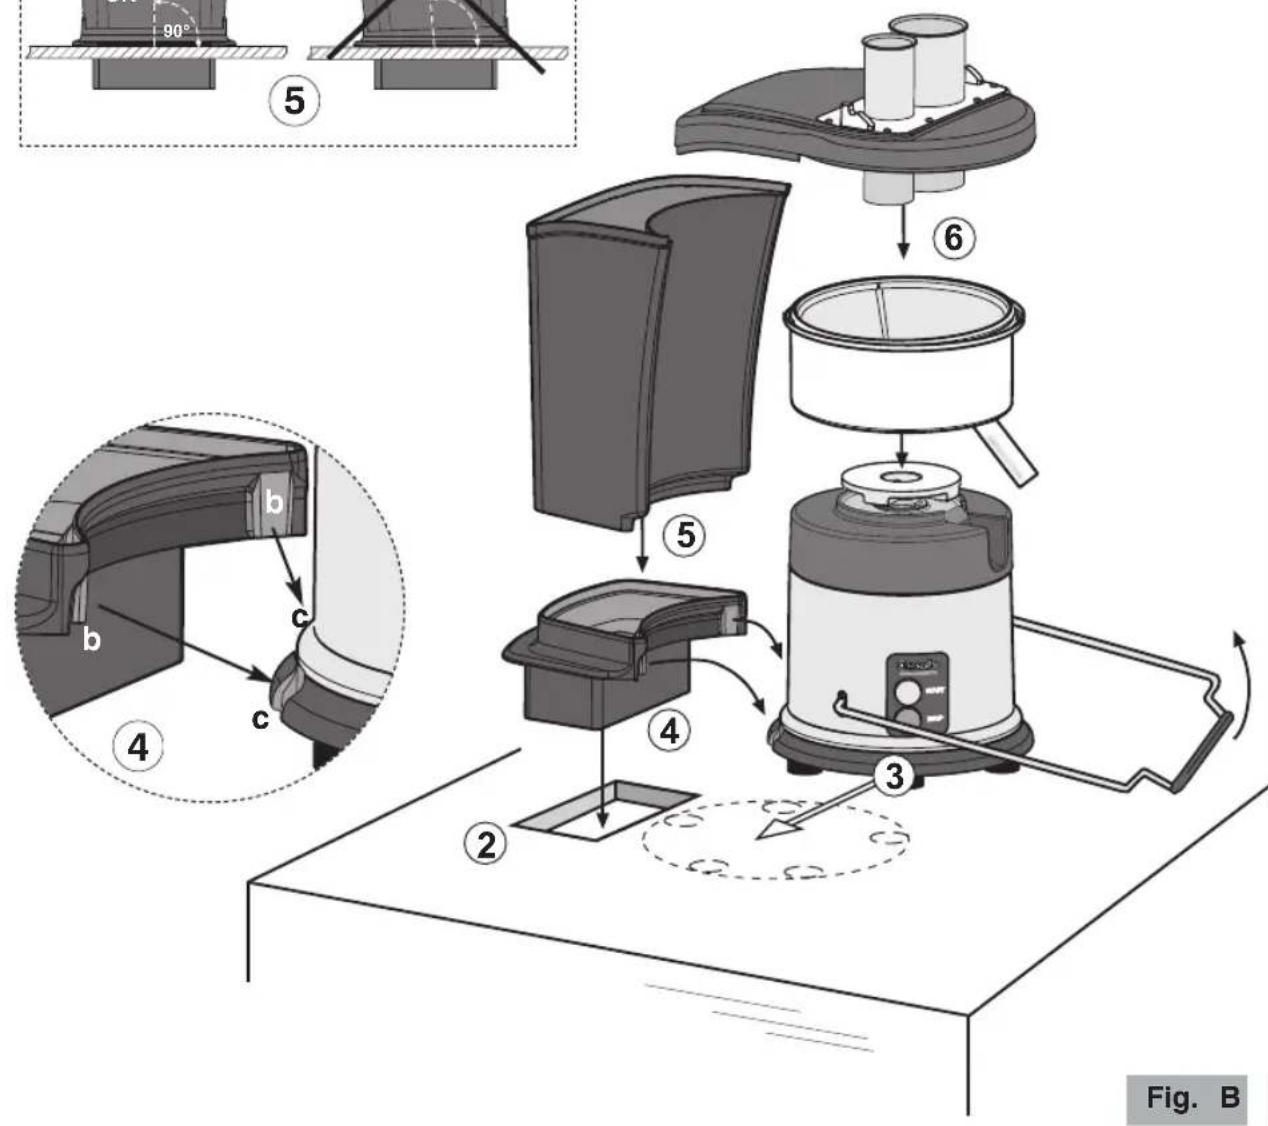
text_image
90° ⑤ ⑥ ② ③ ④ ⑤ ④ ③ Fig. BEMPLOI

natural_image
Simple line drawing of a rectangular container with a curved lid (no text or symbols)Fig. 6
natural_image
Illustration of a hand using a cylindrical tool to press or press a cylindrical component on a base (no text or symbols)Fig. 7
NETTOYAGE ET ENTRETIEN
natural_image
Illustration of hands brushing a bowl with a brush, using a faucet (no text or symbols)natural_image
Exploded view diagram of a kitchen appliance showing internal components like a blender, filter, and oven (no text or labels)Fig. 9
ES500
natural_image
Exploded view diagram of a kitchen appliance showing internal components like a lid, funnel, and base (no text or labels)Fig. 10
CONDITIONS DE GARANTIE
text_image
Labeled diagram of a coffee maker with numbered parts and control panel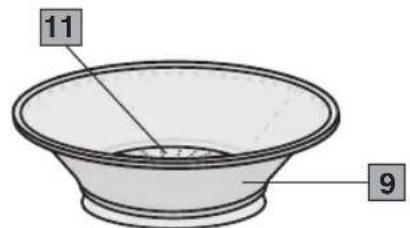
text_image
11 9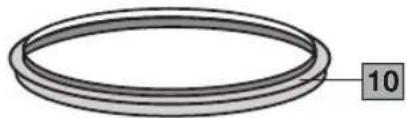
natural_image
Simple line drawing of a coiled tube or ring with a labeled dimension (10) on the side, no text or symbols present.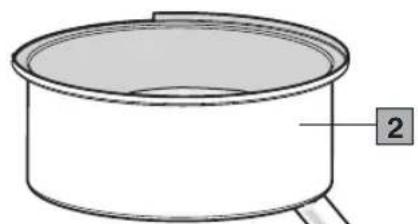
natural_image
Simple line drawing of a cylindrical container with a lid and label '2' pointing to the side (no text or symbols on the object itself)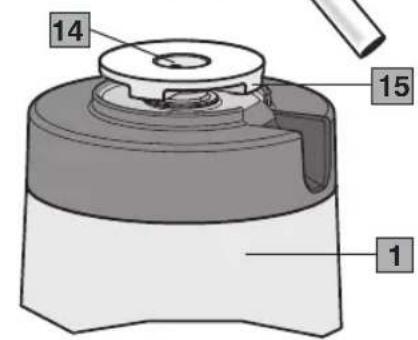
text_image
1 14 15 1Abb. 2
Abb. 1
In counterOn counter
natural_image
Illustration of a juicer with control panel and side arm (no text or symbols)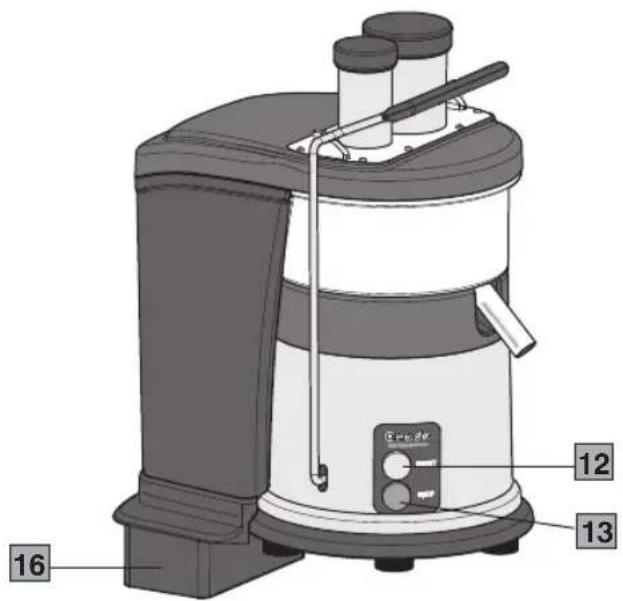
text_image
12 13 16Abb. 5
Installation "ON counter" (Abb. A)
Installation "IN counter" (Abb. B)
natural_image
Mechanical assembly diagram showing a component being inserted into a housing, with no visible text or symbols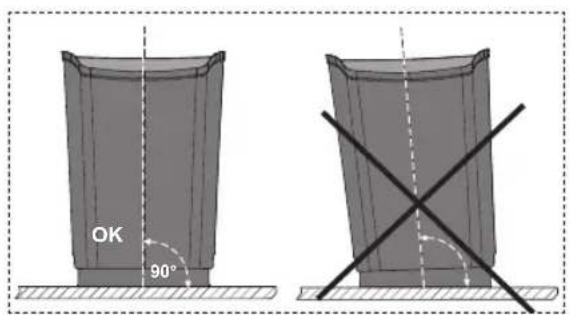
text_image
OK 90°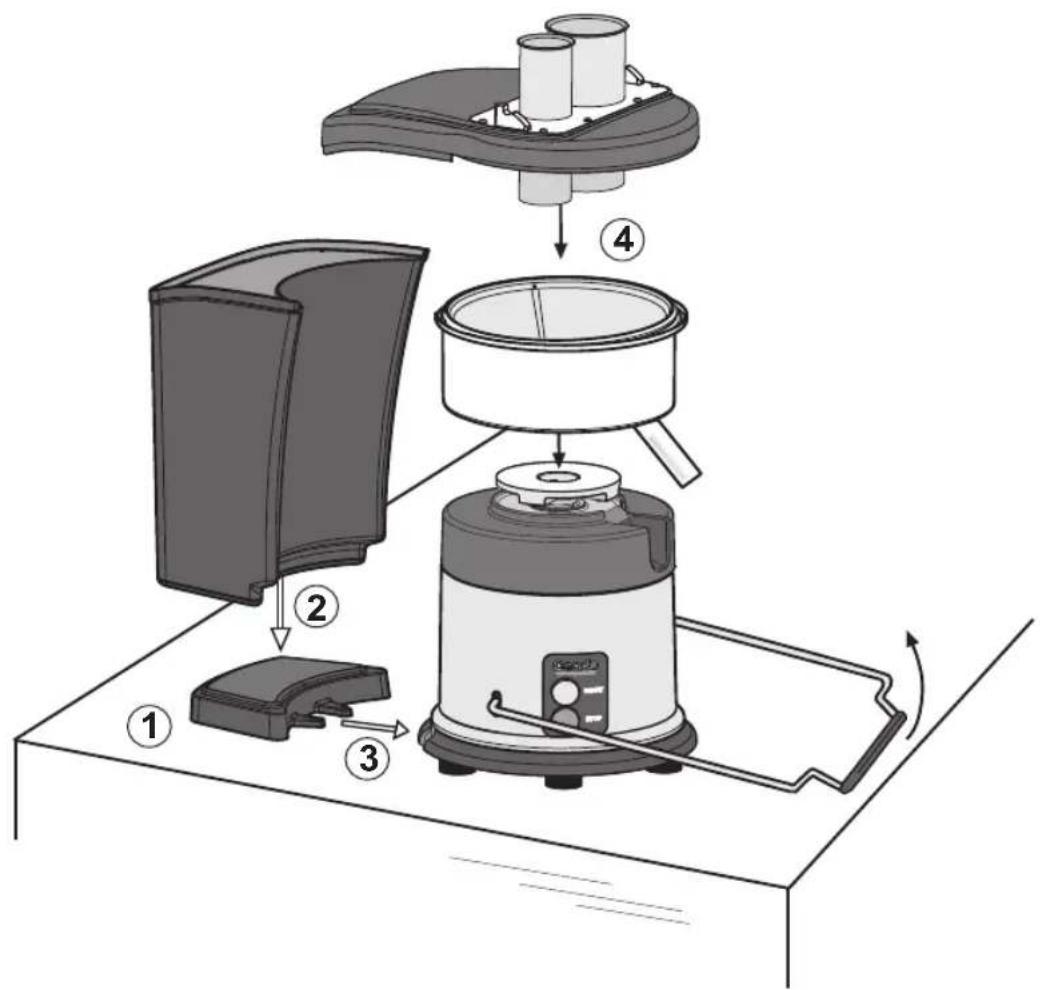
text_image
Diagram of a food cleaning or cooking process with labeled steps including blender, oven, and kitchen applianceAbb. A
Modell ES900 - In counter
natural_image
Diagram of a device with a tool inserted into a housing component, labeled with number 1 (no text or symbols on the diagram itself)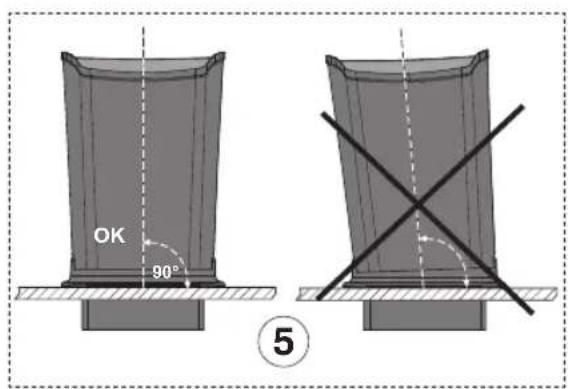
text_image
OK 90° ⑤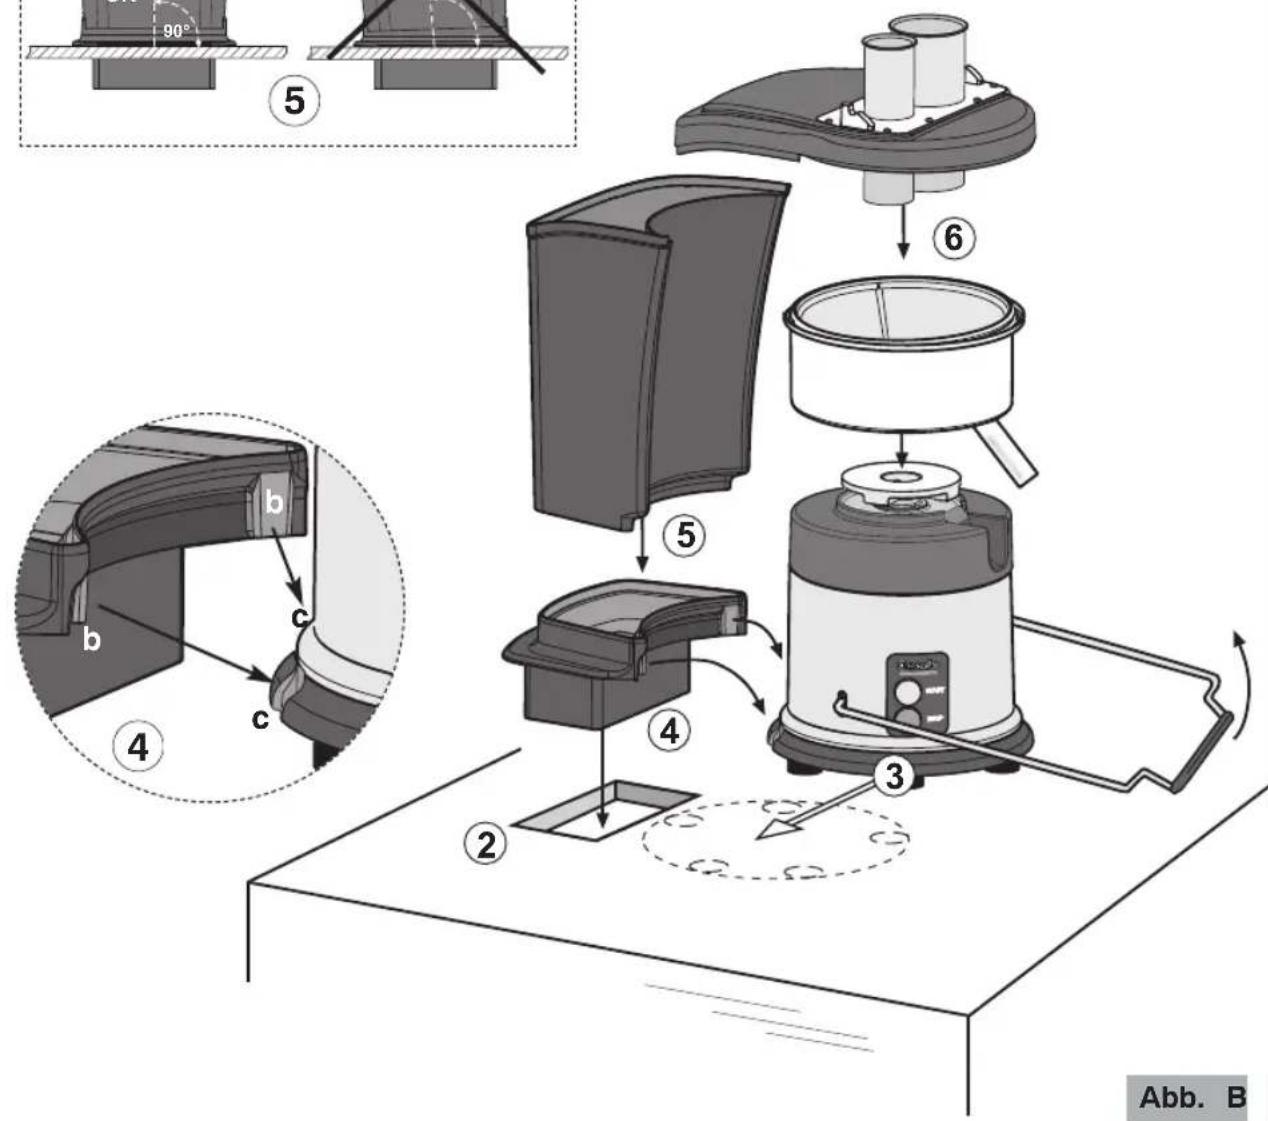
text_image
90° ⑤ ⑥ ② ③ Abb. BVERWENDUNG

natural_image
Simple line drawing of a rectangular container with a curved lid (no text or symbols)Abb. 6
natural_image
Illustration of a hand using a cylindrical tool to press or press a mechanical component (no text or symbols present)Abb. 7
natural_image
Illustration of hands cleaning a basin with a faucet and water drop (no text or symbols)natural_image
Exploded view diagram of a kitchen appliance showing internal components like a blender, filter, and oven (no text or labels)Abb. 9
ES500
natural_image
Exploded view diagram of a kitchen appliance showing internal components like a lid, funnel, and base (no text or labels)Abb. 10

text_image
Labeled diagram of a coffee maker with numbered parts and control panel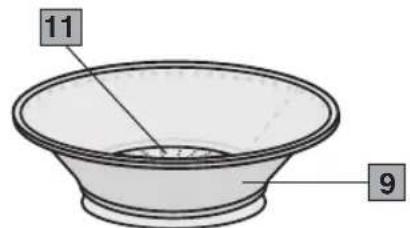
text_image
11 9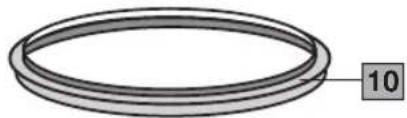
natural_image
Simple line drawing of a coiled tube or ring with a labeled dimension (10) on the side, no text or symbols present.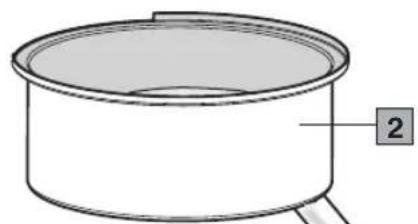
natural_image
Simple line drawing of a cylindrical container with a lid and label '2' pointing to the side (no text or symbols on the object itself)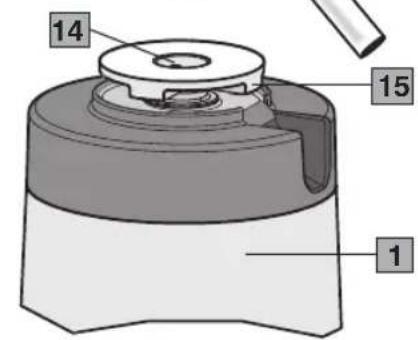
text_image
1 14 15 1Fig. 2
Fig. 1
In counterOn counter
natural_image
Illustration of a juicer with control panel and side arm (no text or symbols)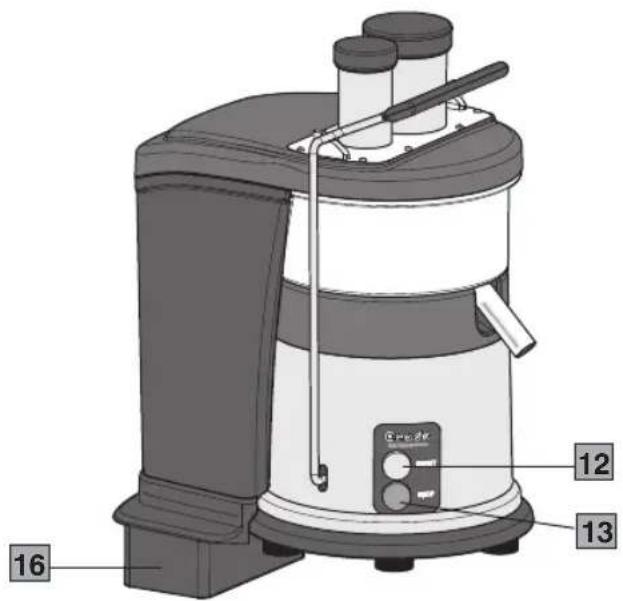
text_image
12 13 16Fig. 5
natural_image
Mechanical assembly diagram showing a component with a dashed line indicating a joint or connection (no text or symbols present)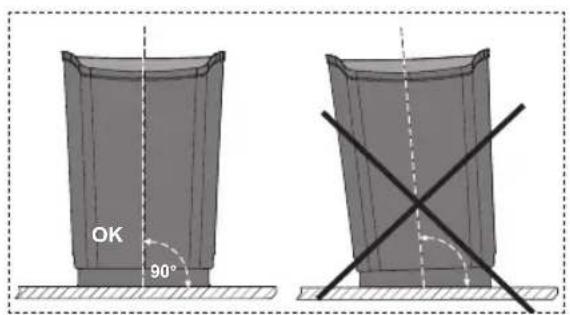
text_image
OK 90°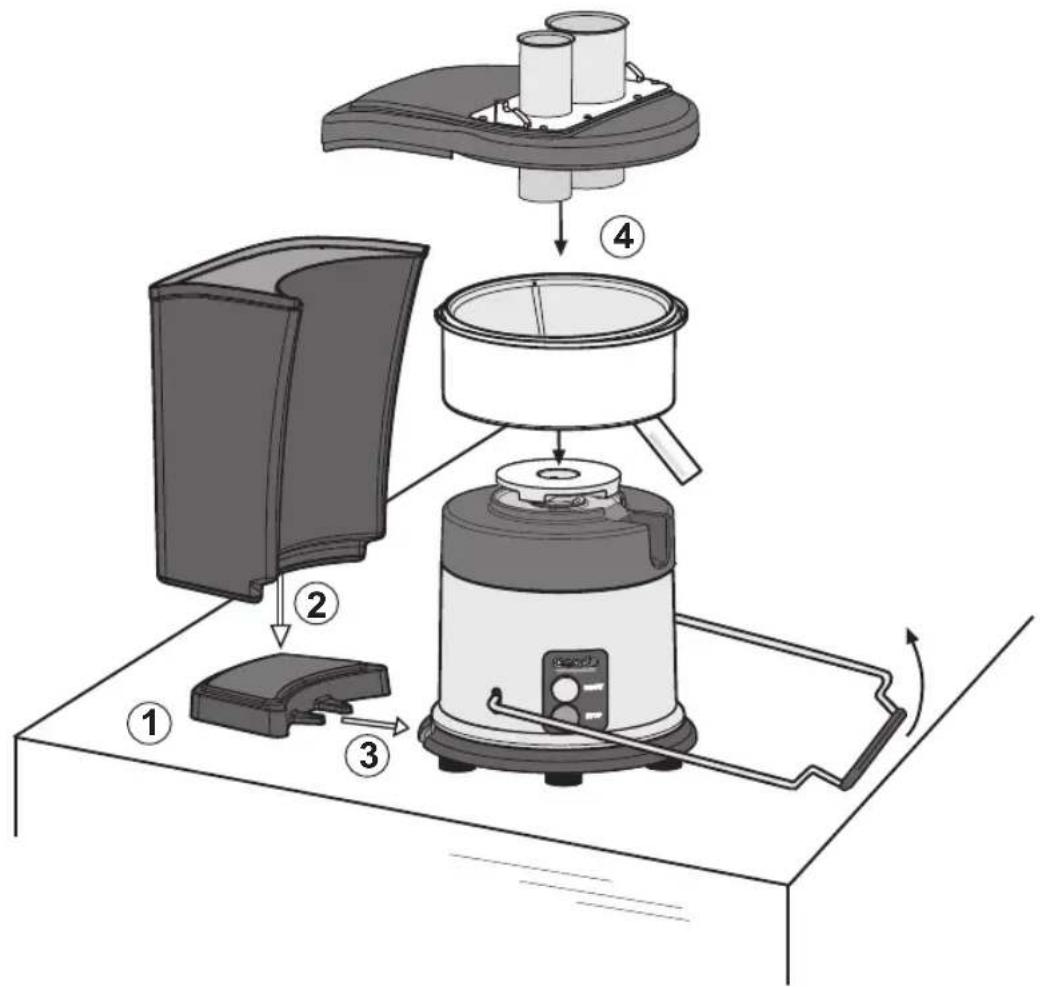
text_image
Diagram of a microwave oven assembly with labeled parts including fan, lid, and heaterFig. A
Modelo ES900 - In counter
natural_image
Diagram of a device with a tool inserted into a housing component, labeled with number 1 (no text or symbols on the diagram itself)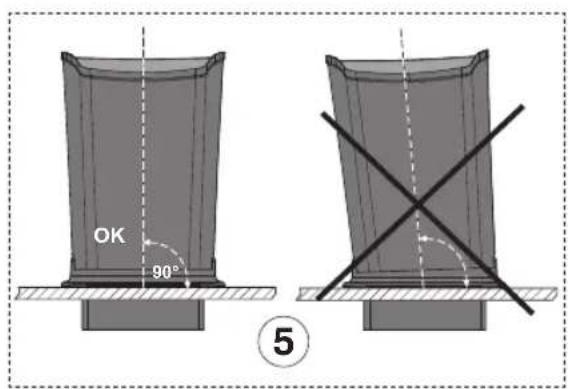
text_image
OK 90° ⑤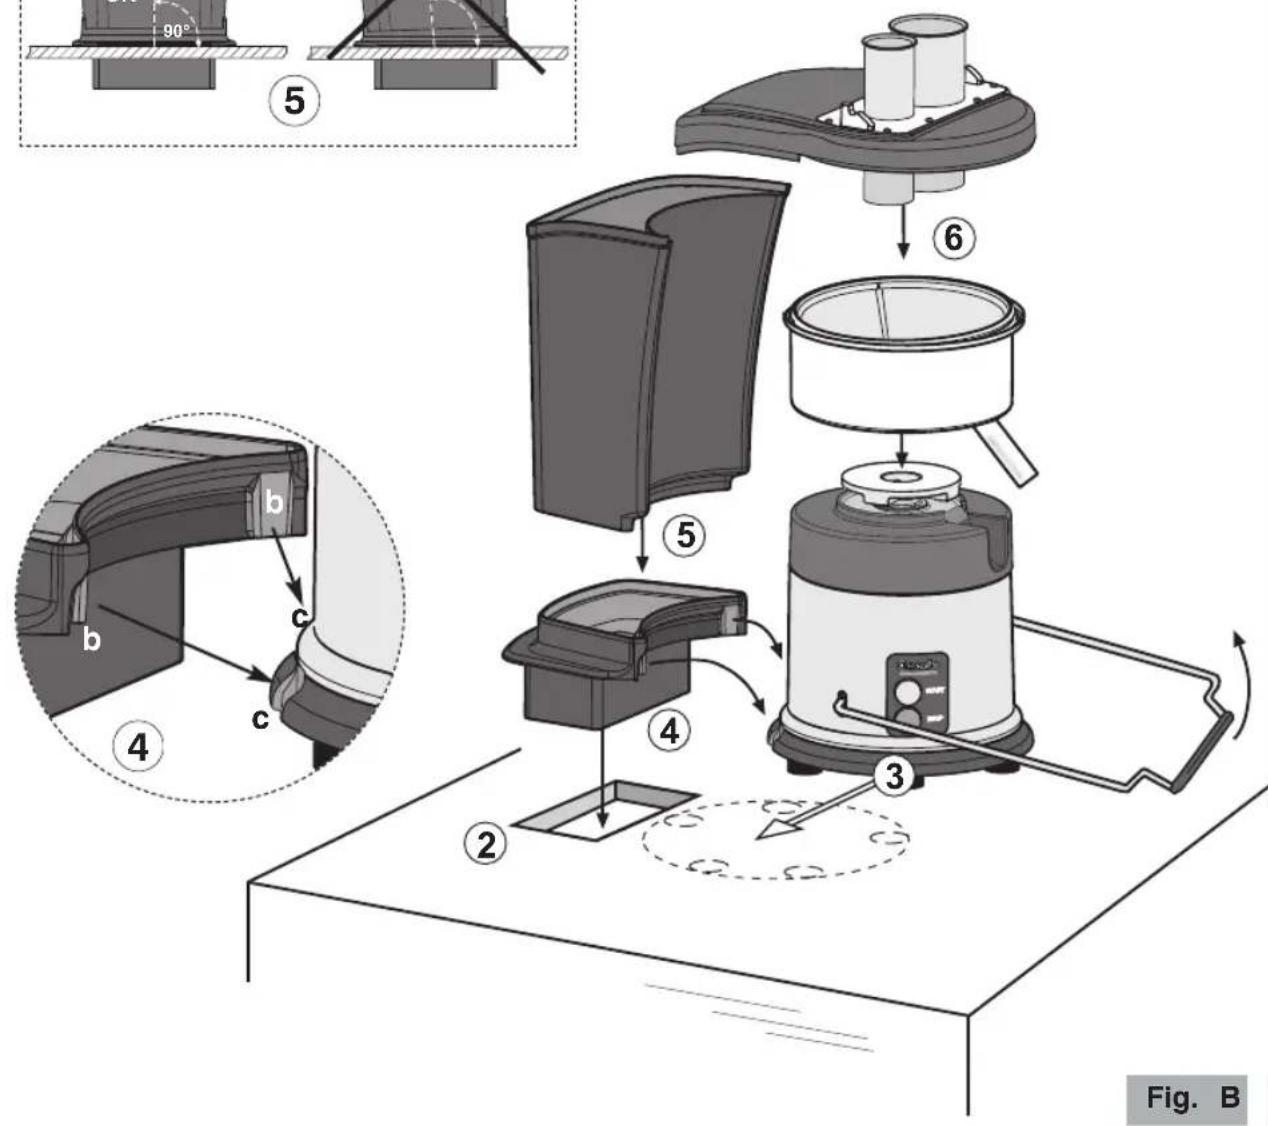
text_image
90° ⑤ ⑥ ② ③ Fig. BUSO

natural_image
Simple line drawing of a rectangular container with a curved lid (no text or symbols)Fig. 6
natural_image
Illustration of a hand using a cylindrical tool to press or press a cylindrical component on a base (no text or symbols)Fig. 7
LIMPIEZA Y MANTENIMIENTO
natural_image
Illustration of hands washing a bowl with a tool, using a faucet to prevent water drop (no text or symbols)natural_image
Exploded view diagram of a kitchen appliance showing internal components like a tray, funnel, and pot (no text or labels)Fig. 9
ES500
natural_image
Exploded view diagram of a kitchen appliance showing internal components like a lid, funnel, and base (no text or labels)Fig. 10