
PORT12VHF-BK-MKII-POOLPACK - Portable speaker IBIZA SOUND - Free user manual and instructions
Find the device manual for free PORT12VHF-BK-MKII-POOLPACK IBIZA SOUND in PDF.

| Product Type | Portable standalone speaker with underwater speaker and VHF microphones |
| Brand | Ibiza Sound |
| Model | PORT12VHF-BK-MKII-POOLPACK |
| Dimensions (speaker) | 360 x 345 x 560 mm |
| Weight (speaker) | 10.9 kg |
| Dimensions (underwater speaker) | 310 x 260 x 60 mm |
| Weight (underwater speaker) | 3.8 kg |
| Power Supply | 15 V == 4 A (AC adapter) or built-in battery 12 V 4.5 Ah |
| Power Consumption | 80 W |
| Main Speaker | Boomer 12" (30 cm), impedance 4 Ω, sensitivity 97 dB, max SPL 109 dB |
| Frequency Range (speaker) | 40 - 20,000 Hz |
| Frequency Range (underwater speaker) | 80 - 20,000 Hz, power 30 W, impedance 8 Ω |
| Main Functions | Bluetooth, USB/SD, wireless VHF microphone (handheld and headset), VOX, TWS, REC, EQ, echo, line/mic/guitar/AUX inputs |
| Bluetooth Frequency | 2402 - 2480 MHz (max RF power 2.91 dBm) |
| VHF Handheld Microphone Frequency | 207.5 MHz (max RF power 7.67 dBm) |
| VHF Headset Microphone Frequency | 203.5 MHz (max RF power 7.56 dBm) |
| Battery Life | Not specified, lead-acid battery 12 V 4.5 Ah |
| Maintenance and Cleaning | Disconnect before cleaning. Use a dry cloth. Do not use harsh chemicals. |
| Spare Parts and Reparability | Contact your dealer. Repairs must be carried out by a specialist. |
| Safety | Do not use near water (speaker not splash-resistant). Use only on battery with the underwater speaker. Disconnect during storms. |
| Included Accessories | Underwater speaker, 2 VHF microphones (handheld and headset), remote control, AC adapter |
Frequently Asked Questions - PORT12VHF-BK-MKII-POOLPACK IBIZA SOUND
User questions about PORT12VHF-BK-MKII-POOLPACK IBIZA SOUND
0 question about this device. Answer the ones you know or ask your own.
Ask a new question about this device
Download the instructions for your Portable speaker in PDF format for free! Find your manual PORT12VHF-BK-MKII-POOLPACK - IBIZA SOUND and take your electronic device back in hand. On this page are published all the documents necessary for the use of your device. PORT12VHF-BK-MKII-POOLPACK by IBIZA SOUND.
USER MANUAL PORT12VHF-BK-MKII-POOLPACK IBIZA SOUND
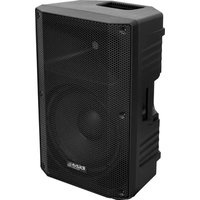
SYSTEME DE SONORISATION PORTABLE AUTONOME
12"/30cm 700W
SPECIAL PISCINE
AVEC HAUT-PARLEUR AQUATIQUE DE 30W
REF:
PORT12VHF-BK-MKII-POOLPACK

natural_image
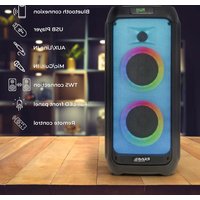
Product photo of a portable electronic device with headsets, earphones, and a blue cable (no visible text or symbols)MANUAL
EN - Instructionmanual - p. 3
WITH USB, BLUETOOTH, REMOTE CONTROL, VHF HAND & HEADSET MICS & UNDERWATER SPEAKER
IMPORTANT SAFETY INSTRUCTIONS AND DANGER WARNINGS
Please unplug the unit from the mains if the supplied underwater speaker is connected to the main speaker to avoir a shock hasard. When the speaker is used with the underwater speaker, it must only be powered via the built-in battery.
Please note that the main speaker is NOT splashwater resistant. Please keep it away from eventual splashwater when used near a swimming pool.
- Please read the manual carefully and keep it for future reference.
• All safety instructions and warnings must be adhered to. They are part of the manual and must be kept with the manual. - Any guarantee claims are rendered invalid if damage occurs due to non-observance of these operating instructions. We assume no liability for any consequent damage.
We assume no liability for personal injury or damage to property caused by incorrect handling or non-observance of the safety instructions. Any guarantee claims expire in such cases.
• Unauthorized conversions and/or modifications of the appliance are not permitted for safety and licensing reasons (CE). - The appliance is approved for operation in dry, closed rooms only ⏻. Do not operate the device nearby water, such as in bathrooms or nearby swimming pools.
• The appliance may not be exposed to extreme temperatures ( < +5^ / > +35^ ) in operation.
• The appliance may not be subjected to strong vibrations or heavy mechanical strain.
• The appliance may not be exposed to excessive moisture (due to dripping or sprayed water, for example). - Do not place any recipients filled with liquids, such as glasses or vases, on top of or directly next to the appliance. They could fall over, causing water to enter the appliance. Never pour out liquids above the appliance. Do not place any small objects, such as coins or paper clips, on the appliance since they could fall inside the appliance. You run a high risk of causing a fire or life-threatening electrocution! If any liquid or objects enter the appliance nevertheless, pull the mains plug out of the socket immediately and contact a specialist.
• Always pull the mains plug out of the mains socket:
Before cleaning the appliance
If there is a thunderstorm
If you will not be using the appliance for a long period of time (>1 week)
• Do not leave the appliance unattended while operating it. - Never place the appliance on an unstable or movable surface. Persons could be injured or the appliance damaged by it falling down.
- When using a rack, make sure it is in a stable position and is transported securely. Installation on uneven, slanted surfaces or stopping the rack abruptly during transport can result in the rack overturning or appliances falling from or out of the rack and injuring people.
• Live components can be exposed by opening covers or removing components (unless this can be done without tools). Contact points can also be live. If the appliance has to be opened in order to calibrate, service, repair or replace components or assemblies, all of its poles must be disconnected from all sources of voltage first. If the appliance has to be kept open and under voltage during maintenance or repairs, this work may only be carried out by a specialist who is familiar with the risks involved and the relevant regulations. - Never connect the appliance directly after transferring it from a cold to a warm room. The condensation water that forms could destroy the appliance or result in an electric shock. Allow the device to reach room temperature before connecting it. Wait until the condensation water has evaporated. This can take some hours.
- Do not place any naked flames such as those of burning candles on or next to the appliance.
- Do not place the appliance on soft surfaces such as carpets or beds. Do not cover the air vents of the appliance. Do not obstruct the air circulation with objects such as magazines, table cloths or curtains. This prevents the dissipation of heat from the appliance and can result in overheating.
• Only use the appliance in a moderate climate, not in tropical environments. - All persons involved in operating, installing and servicing the appliance and putting it into service must be trained and qualified accordingly and observe these operating instructions.
• Defective mains cables may only be replaced by specialists. Danger of shock hazard!
Restrictions of Use
- As the product contains a transmission/reception system of VHF signals, it is exclusively meant for professional use. The user of the product is fully responsible for the use he makes of the product. The distributor cannot be held responsible for an eventual misuse by the user of the product.
POWER SUPPLY: BATTERY & AC OPERATION
Prior to using this system for the first time, please insert the supplied mains adaptor into the DC input socket (24) and plug the other end on a suitable wall outlet. The charge indicator lights up in orange indicating that the battery is charging. Let the unit charge continuously until the indicator (21) lights up in green.
NOTE: Please shut down the power switch after you have finished using the system.
IMPORTANT NOTE ON BATTERIES
- PRIOR to using the unit for the first time, please charge fully the battery without any interruption.
- Charge the battery regularly after each use. Don't wait until it is discharged!
- DON'T allow the battery to discharge completely! Once the battery is fully discharged, the current drain for recharging will be so high that it will damage the charger and/or the power supply of the unit.
- If you don't use the unit for a longer period of time, please CHARGE THE BATTERY COMPLETELY AT 100% and check/charge it once per month otherwise the battery will be out of use. The life time of the battery depends on the observance of these recommendations.
** BATTERIES ARE NOT COVERED BY THE WARRANTY **
We cannot be held responsible for damaged batteries further to the non-observance of these basic rules.
PLAY MP3/WMA MUSIC
- Switch on power (23). The LED indicator (22) lights up in green.
- Insert a USB stick (1) or an SD card (13) into the relevant input
- Select a title via the ◀ or ▶ buttons and press ▶ || (16)
- Insert an RCA plug into the LINE IN sockets (8)
- Insert a wired microphone into MIC INPUT (9)
- Adjust the MIC VOL (5)
VOX FUNCTION
When VOX function is enabled, the music level will decrease when somebody talks into one of the microphones. The music level becomes normal when the user stops talking into the microphone.
To activate this function, switch the VCV switch (19) to on. If you want to disable this function, set this switch to off position
REC FUNCTION
Disconnect the speakerbox from your Bluetooth device. Insert a USB stick or SD card. The speaker will automatically switch into USB/SD mode. Connect now the speakerbox to your Bluetooth device and start playing your music. Short press the REC button to record your voice and the music on the inserted USB stick or SD card. Press again to stop recording. Keep the REC button pressed to play the recorded file.
BLUETOOTH FUNCTION
- Switch on your Bluetooth device and activate the Bluetooth connect function
- Select IBIZA-PORT in the list of found devices and connect.
- Press the MODE switch to BT function,
- Now you can play Bluetooth music.
TWS FUNCTION
This function allows to pair 2 PORT12VHF-MKII-TWS with 1 single Bluetooth source to enjoy wireless stereo sound.
Turn off the Bluetooth feature on your smartphone. Switch on both speakers and select BT-AUDIO mode on both. Keep the TWS button on one of the speakers (master speaker) pressed for a few seconds. If the connection was successful, you will hear the message "left channel" from the master speaker, and "right channel" from the slave speaker. Activate the Bluetooth function of your smartphone and select IBIZA-PORT in the list of found devices. Now the master speaker is connected to your Bluetooth source. After that, you can use any mode to play music in TWS mode.
HOW TO USE THE VHF MICS
Switch on the VHF function by pressing the VHF button (27) to on. Switch on the VHF microphone via the switch on the mic body. The box will automatically select the wireless microphone. Adjust the volume via the VHF mic volume controls (6).
USE OF THE POOLPACK
Please connect the supplied underwater speaker to the input on the bottom of the rear panel.
Play your input source as usually and adjust the master output volume via the master volume control (18) until you reach the desired volume UNDER WATER.
After that, rotate the small volume control next to the underwater speaker input on the bottom of the rear panel to adjust the aerial volume of the box to the desired level. Indeed, the underwater volume will probably be too loud for the audience being outside the water. If the red LED above the input connector lights up, reduce the volume.
CONTROLS ON THE REAR PANEL
NO PORT12VHF-BK-MKII-POOLPACK
| 1 USB port |
| 2 EQ: Press to cycle through various music styles |
| 3 MODE: Cycle through USB / LINE / BLUETOOTH |
| 4 MIC ECHO control |
| 5 Microphone Volume |
| 6 VHF microphone volume controls |
| 7 VHF Mic signal indicator |
| 8 Line input |
| 9 Microphone/Guitar inputs |
| 10 AUX (Ipod) input |
| 11 Mixed output |
| 12 Display |
| 13 SD socket |
| 14 Short press: Repeat one/all tracks; Long press: pairing 2 PORT12VHF-BK-MKII boxes with 1 BT source |
| 15 REC: Short Press to record, long press to play recorded file |
| 16 Play/Pause/Radio search |
| 17 Short press: Backward/Forward; Long press: VOL-/VOL+ |
| 18 Master volume control |
| 19 VOX control activated/deactivated |
| 20 Treble & Bass control |
| 21 Battery Volume and Charge LED |
| 22 Power ON (green) and Battery low (red) LED |
| 23 Power Switch |
| 24 15V= 4A power supply input |
| 25 VHF Antenna B |
| 26 VHF Antenna A |
| 27VHF function ON/OFF switch. Press to ON prior to using the VHF microphones |
REMOTE CONTROL
ON/OFF button
MODE: Press until the desired operating mode is displayed
MUTE: Sound stop
▶|| Play/pause: Press to play a track, press to pause. In FM mode: Search for radio stations
REC: Press to start, stop and play a recorded file
◄/CH-: back to the previous track. In FM mode: back to the previous radio station
▶/CH+: Go to the next track. In FM mode: Go to the next radio station
RPT: Repeat one/repeat all tracks
TWS: Press to switch the unit into TWS pairing mode to connect to a 2nd PORT-12VHF-BK-MKII box
VOL-: Reduce the volume
Vol+: Increase the volume
EQ: Select among several sound modes (Rock, Pop, Jazz, Classic, Flat)
TRK: Track selection. Press the TRK button, select a track via the number keys (0-9) and press ENTER to confirm
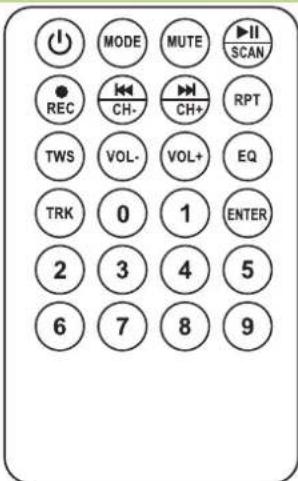
Number buttons: Press the number of the desired track
ENTER: Once you have made your selection, press ENTER to confirm.
RECOMMENDATIONS FOR THE BATTERY IN THE REMOTE CONTROL

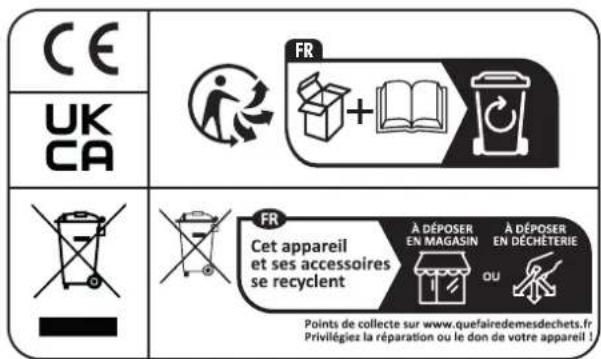
This symbol indicates that used batteries should not be disposed of with household waste but deposited in separate collection points for recycling.
ATTENTION: Danger of explosion if battery is incorrectly placed. Only replace by the same or equivalent type.
WARNING: Do not swallow the battery. Danger of chemical burns. The supplied remote control contains a button cell. In case of ingestion, it might cause serious internal burns within only 2 hours that might lead to death.
Keep new and old batteries out of the reach of children.
If the battery compartment doesn't close properly, stop using the product and keep it out of the reach of children.
If you are in doubt whether the batteries have been swallowed or introduced into any other part of the body, contact immediately a doctor.
CARE
Before cleaning the unit, disconnect it from the mains. Do not use aggressive cleaning agents. Use a clean cloth to wipe any dust or dirt from the product. We are not liable for damage arising from incorrect handling, improper use or wear and tear. We reserve the right to make technical changes.
SPECIFICATIONS
Woofer 12"/30cm
Tweeter 1"/25mm compression driver
Sensitivity 97dB±2dB
Max. SPL 109dB
Impedance 4 Ohm
Freq. range....40-20,000Hz
Built-in battery 12V=4.5Ah
Bluetooth frequency 2402-2480MHz
Max. BT RF power 2.91dBm
VHF handheld mic freq....207.5MHz
Mic Hand max. RF power 7.67dBm
VHF headset mic freq....203.5MHz
Mic Head max. RF power 7.56dBm
Power supply....15V= 4A
Consumption....80W
Dimensions 360 x 345 x 560mm
Weight....10.9kg
Underwater speaker
Freq. range....80-20.000Hz
Power 30W
Impedance 8 Ohms
Rated acoustic power....105dB
Max. acoustic power 118dB
Dispersion 1kHz/4kHz (-6dB) 180°/180°
Dimensions 310 x 260 x 60mm
Weight....3.8kg

This marking indicates that this product should not be disposed with other household wastes throughout the EU. To prevent possible harm to the environment or human health from uncontrolled waste disposal, recycle it responsibly to promote the sustainable reuse of material resources. To return your used device, please use the return and collection systems or contact the retailer where the product was purchased. They can take this product for environmental safe
recycling.
THE CE DECLARATION IS AVAILABLE FOR DOWNLOADING ON OUR WEBSITE
Tweeter 1"/25mm compression driver
Tweeter 1"/25mm compression driver

Any questions or problems?
Contact us

IBIZALIGHTSOUND
Follow us on Instagram

Join us on facebook
Assembled in PRC • Designed by LOTRONIC S.A. • Rue F. Englert 17 • Bt 2 • B - 1480 Tubize
https://ibizashop.eu/
- SYSTEME DE SONORISATION PORTABLE AUTONOME
- MANUAL
- WITH USB, BLUETOOTH, REMOTE CONTROL, VHF HAND & HEADSET MICS & UNDERWATER SPEAKER
- IMPORTANT SAFETY INSTRUCTIONS AND DANGER WARNINGS
- Restrictions of Use
- POWER SUPPLY: BATTERY & AC OPERATION
- IMPORTANT NOTE ON BATTERIES
- PLAY MP3/WMA MUSIC
- VOX FUNCTION
- REC FUNCTION
- BLUETOOTH FUNCTION
- TWS FUNCTION
- HOW TO USE THE VHF MICS
- USE OF THE POOLPACK
- CONTROLS ON THE REAR PANEL
- REMOTE CONTROL
- RECOMMENDATIONS FOR THE BATTERY IN THE REMOTE CONTROL
- CARE
- SPECIFICATIONS
- Underwater speaker
Brand : IBIZA SOUND
Model : PORT12VHF-BK-MKII-POOLPACK
Category : Portable speaker