Delicatessa 90 Slim - Cooker Klarstein - Free user manual and instructions
Find the device manual for free Delicatessa 90 Slim Klarstein in PDF.


| Product type | Built-in induction hob |
| Brand | Klarstein |
| Model | Delicatessa 90 Slim |
| Article number(s) | 10035734, 10045611, 10045612, 10045613 |
| Number of cooking zones | 3 (including one flexible zone) |
| Total power | 7000 W |
| Power supply | 220-240 V ~ 50/60 Hz |
| Dimensions (W x H x D) | 900 x 63 x 350 mm |
| Built-in dimensions (W x D) | 880 x 330 mm |
| Cooking zone diameters | Left and center-left and right zones: 180 mm; flexible zone: 180 x 380 mm (usable as 2 zones of 180 mm) |
| Special functions | Boost, keep warm, timer (99 min max), pause, child lock, flexible zone, automatic shut-off, overflow protection |
| Safety | Child lock, automatic shut-off, residual heat indicator, pan detection, overvoltage/undervoltage protection |
| Cleaning | Do not use steam cleaner; use a soft cloth or special induction hob cleaner |
| Usage | Domestic and similar (staff kitchens, inns, etc.) |
| Energy efficiency class | Not specified (consumption: 186.6 Wh/kg) |
| Warranty | Consult manufacturer's conditions |
Frequently Asked Questions - Delicatessa 90 Slim Klarstein
User questions about Delicatessa 90 Slim Klarstein
0 question about this device. Answer the ones you know or ask your own.
Ask a new question about this device
Download the instructions for your Cooker in PDF format for free! Find your manual Delicatessa 90 Slim - Klarstein and take your electronic device back in hand. On this page are published all the documents necessary for the use of your device. Delicatessa 90 Slim by Klarstein.
USER MANUAL Delicatessa 90 Slim Klarstein
text_image
QR code image containing encoded data, no visible human-readable textINHALTSVERZEICHNIS
Produktdatenblatt 4
text_image
3 KLASTON 2 4 1 5 6 7natural_image
Illustration of a cylindrical electronic component with mounting base (no text or symbols)Töpfe und Pfannen
text_image
Diagram showing two hand positions with checkmark and cross symbols, likely indicating correct and incorrect states.natural_image
Symbol of a trash bin crossed with a diagonal line, no text or numbers presentBerlin Brands Group UK Limited
PO Box 42
272 Kensington High Street
London, W8 6ND
United Kingdom
Dear Customer,
Congratulations on purchasing this device. Please read the following instructions carefully and follow them to prevent possible damages. We assume no liability for damage caused by disregard of the instructions and improper use. Scan the QR code to get access to the latest user manual and more product information.

text_image
QR code image containing encoded data, no visible human-readable textCONTENT
Product Data Sheet 24
Safety Instructions 25
Instructions on Use and Maintenance 26
Operating Principle 28
Device Overview 29
Control Panel 29
Installation 30
Choosing the Right Cookware 33
Operation 34
Display Warnings 37
Cleaning and Care 37
Troubleshooting 38
Disposal Considerations 40
Manufacturer & Importer (UK) 40
TECHNICAL DATA
| Item number | 10035734, 10045611, 10045612, 10045613 |
| Power supply 220-240 V ~ 50/60 Hz | |
| Total power consumption 7000 W | |
| Cooking zones 3 | |
| Product size W x H x D (mm) 900 x 63 x 350 | |
| Built-in dimensions W x D (mm) 880 x 330 |
PRODUCT DATA SHEET
| Symbol Value Unit | |||
| Model identification | 10035734, 10045611, 10045612, 10045613 | ||
| Type of hob | Built-In Hob | ||
| Number of cooking zones and/or areas | 3 | ||
| Heating technology (induction cooking zones and cooking areas, radiant cooking zones, solid plates) | Induction cooking zones | ||
| For circular cooking zones or area: diameter of useful surface area per electric heated cooking zone, rounded to the nearest 5 mm | 18/18 cm | ||
| For non-circular cooking zones or areas: length and width of useful surface area per electric heated cooking zone or area, rounded to the nearest 5 mm | LW | 3818 | cm |
| Energy consumption per cooking zone or area calculated per kg | EC Electric Cooking Hob | 181,2/192,2/180,9/197,8/180,9 | Wh/kg |
| Energy consumption for the hob calculated per kg | EC Electric Cooking Hob | 186,6 Wh/kg | |
SAFETYINSTRUCTIONS
Electrical Shock Hazard
- Disconnect the appliance from the mains electricity supply before carrying out any work or maintenance on it.
- Connection to a good earth wiring system is essential and mandatory.
- Alterations to the domestic wiring system must only be made by a qualified electrician.
- Failure to follow this advice may result in electrical shock or death.

CAUTION
Risk of injury! Panel edges are sharp. Failure to use caution could result in injury or cuts.
General Instructions
- Read these instructions carefully before installing or using this appliance.
- No combustible material or products should be placed on this appliance at any time.
- Please make this information available to the person responsible for installing the appliance as it could reduce your installation costs.
- In order to avoid a hazard, this appliance must be installed according to these instructions for installation.
- This appliance is to be properly installed and earthed only by a suitably qualified person.
- This appliance should be connected to a circuit which incorporates an isolating switch providing full disconnection from the power supply.
- Failure to install the appliance correctly could invalidate any warranty or liability claims.
- This device may be only used by children 8 years old or older and persons with limited physical, sensory and mental capabilities and / or lack of experience and knowledge, provided that they have been instructed in use of the device by a responsible person who understands the associated risks.
- Children shall not play with the appliance. Cleaning and user maintenance shall not be made by children without supervision.
-
If the supply cord is damaged, it must be replaced by the manufacturer, its service agent or similarly qualified persons in order to avoid a hazard.
-
If the surface is cracked, switch off the appliance to avoid the possibility of electric shock, for hob surfaces of glass-ceramic or similar material which protect live parts.
- Metallic objects such as knives, forks, spoons and lids should not be placed on the hob surface since they can get hot. A steam cleaner is not to be used.
- Do not use a steam cleaner to clean your cooktop.
- The appliance is not intended to be operated by means of an external timer or separate remote-control system.
- The cooking process has to be supervised. A short term cooking process has to be supervised continuously.
- Unattended cooking on a hob with fat or oil can be dangerous and may result in fire. NEVER try to extinguish a fire with water, but switch off the appliance and then cover flame e.g. with a lid or a fire blanket.

WARNING
Risk of fire! do not store other items on the cooking surfaces, except pans and pots.
INSTRUCTIONS ON USE AND MAINTENANCE
Electrical Shock Hazard
- Do not cook on a broken or cracked cooktop. If the cooktop surface should break or crack, immediately switch off the appliance, unplug the power cord from the wall outlet and contact a qualified technician.
- Switch off the induction hob before cleaning and maintenance and pull out the mains plug.
- Failure to follow this advice may result in electrical shock or death.
Health Hazard
- This appliance complies with electromagnetic safety standards.
- However, persons with cardiac pacemakers or other electrical implants (such as insulin pumps) must consult with their doctor or implant manufacturer before using this appliance to make sure that their implants will not be affected by the electromagnetic fi eld.
- Failure to follow this advice may result in death.
CAUTION
Risk of burns! During use, accessible parts of this appliance will become hot enough to cause burns. Do not let your body, clothing or any item other than suitable cookware contact the Induction glass until the surface is cool.
- Keep children away.
- Handles of saucepans may be hot to touch. Check saucepan handles do not overhang other cooking zones that are on.
- Keep handles out of reach of children.
- Failure to follow this advice could result in burns and scalds.

WARNING
Risk of injury! The razor-sharp blade of a cooktop scraper is exposed when the safety cover is retracted. Use with extreme care and always store safely and out of reach of children. Failure to use caution could result in injury or cuts.
General Instructions
- Never leave the appliance unattended when in use. Boilover causes smoking and greasy spillovers that may ignite.
- Never use your appliance as a work or storage surface.
- Never leave any objects or utensils on the appliance.
- Do not place or leave any magnetisable objects (e.g. credit cards, memory cards) or electronic devices (e.g. computers, MP3 players) near the appliance, as they may be affected by its electromagnetic field.
- Never use your appliance for warming or heating the room.
- After use, always turn off the cooking zones and the cooktop as described in this manual (i.e. by using the touch controls).
- Do not rely on the pan detection feature to turn off the cooking zones when you remove the pans.
- Do not allow children to play with the appliance or sit, stand, or climb on it.
- Do not store items of interest to children in cabinets above the appliance. Children climbing on the cooktop could be seriously injured.
-
Do not leave children alone or unattended in the area where the appliance is in use.
-
Children or persons with a disability which limits their ability to use the appliance should have a responsible and competent person to instruct them in its use. The instructor should be satisfied that they can use the appliance without danger to themselves or their surroundings.
- Do not repair or replace any part of the appliance unless specifically recommended in the manual. All other servicing should be done by a qualified technician.
- Do not place or drop heavy objects on your cooktop.
- Do not stand on your cooktop.
- Do not use pans with jagged edges or drag pans across the Induction glass surface as this can scratch the glass.
- Do not use scourers or any other harsh abrasive cleaning agents to clean your cooktop, as these can scratch the Induction glass.
- This appliance is intended to be used in household and similar applications such as: staff kitchen areas in shops, offices and other working environments; farm houses; by clients in hotels, motels and other residential type environments; bed and breakfast type environments.
- The appliance and its accessible parts become hot during use.
- Care should be taken to avoid touching heating elements.
- Children less than 8 years of age shall be kept away unless continuously supervised.
OPERATING PRINCIPLE
Induction cooking is a safe, advanced, efficient, and economical cooking technology. It works by electromagnetic vibrations generating heat directly in the pan, rather than indirectly through heating the glass surface. The glass becomes hot only because the pan eventually warms it up.
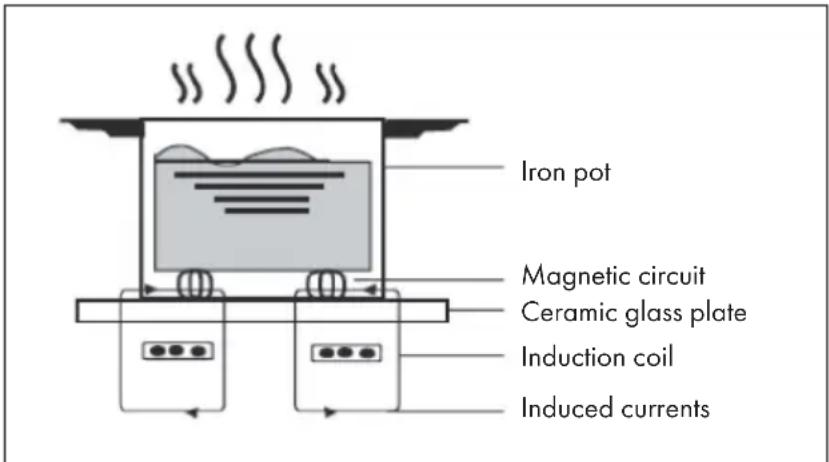
text_image
Iron pot Magnetic circuit Ceramic glass plate Induction coil Induced currentsDEVICE OVERVIEW
text_image
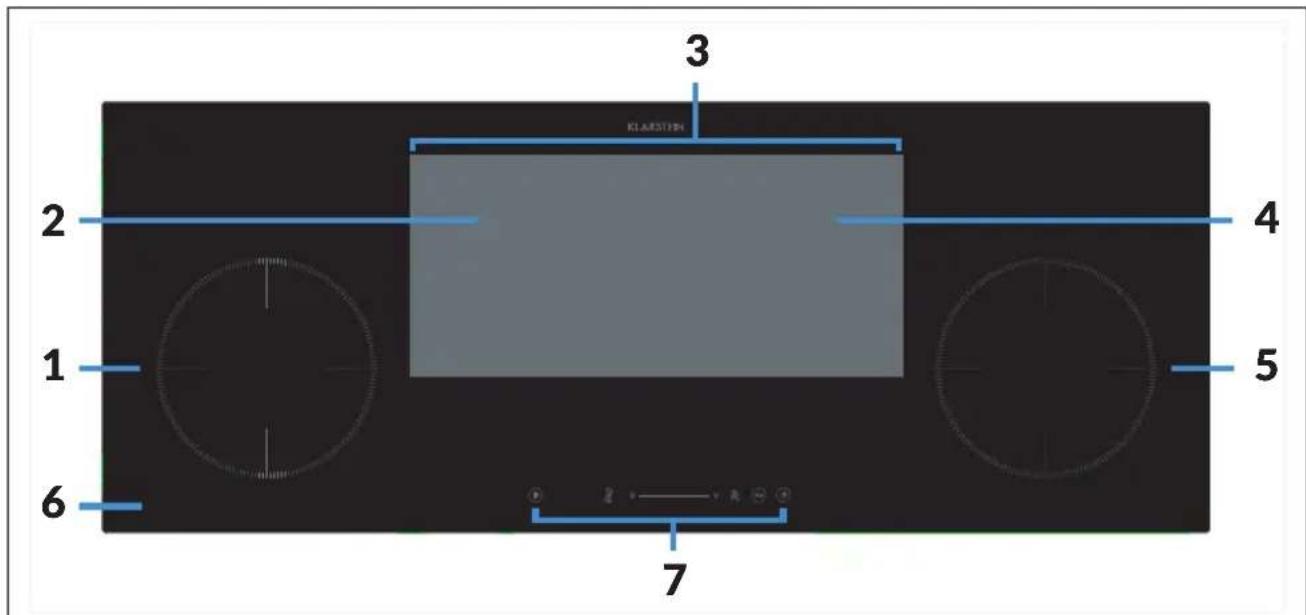
3 KLASTIN 2 4 1 5 6 7| 1 | Left cooking zone ( 180), 1500/1800 W | 5 | Right cooking zone ( 180), 2000/2300 W |
| 2 | Middle left cooking zone ( 180), 2000/2300 W | 6 | Glass plate |
| 3 | Flexible area, 2500/2800 W | 7 | Control panel |
| 4 | Middle right cooking zone ( 180), 1500/1800 W |
CONTROL PANEL
| 1 | 2 | 3 | 4 | 5 | ||
| 6 | 7 | 8 | 9 | 10 | 11 | 12 |
| 1 | Left cooking zone | 5 | Right cooking zone | 9 | Power/Timer slider touch controls | |
| 2 | Middle left cooking zone | 6 | Pause control | 10 | Boost control | |
| 3 | Flexible area | 7 | Timer control | 11 | Child lock control | |
| 4 | Middle right cooking zone | 8 | Keep warm control | 12 | ON/OFF control | |
INSTALLATION
After unpacking the product, check for any damage during transport. In case of problems, contact costumer service.
Built-in Dimensions and Minimum Distances
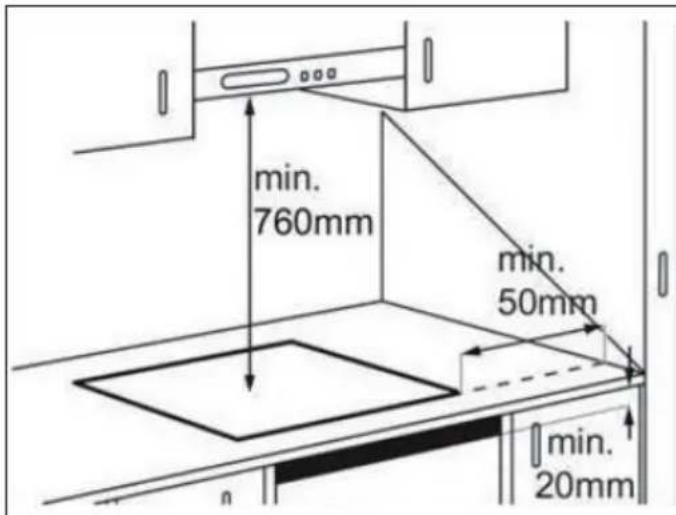
Note: The distance between the underside of the appliance and the separator panel must respect the dimensions given in the figure (min. 50 mm).
- In order to ensure the correct operation of the appliance, do not obstruct the minimum required clearance (min. 20 mm) on the worktop for air flow out.
- If an undertop oven is installed, make sure the oven is equipped with a cooling system.
- Do not install the hob above a dishwasher or washing machine, so that the electronic circuits do not come into contact with steam or moisture which could damage them.
Adjusting the Bracket Position
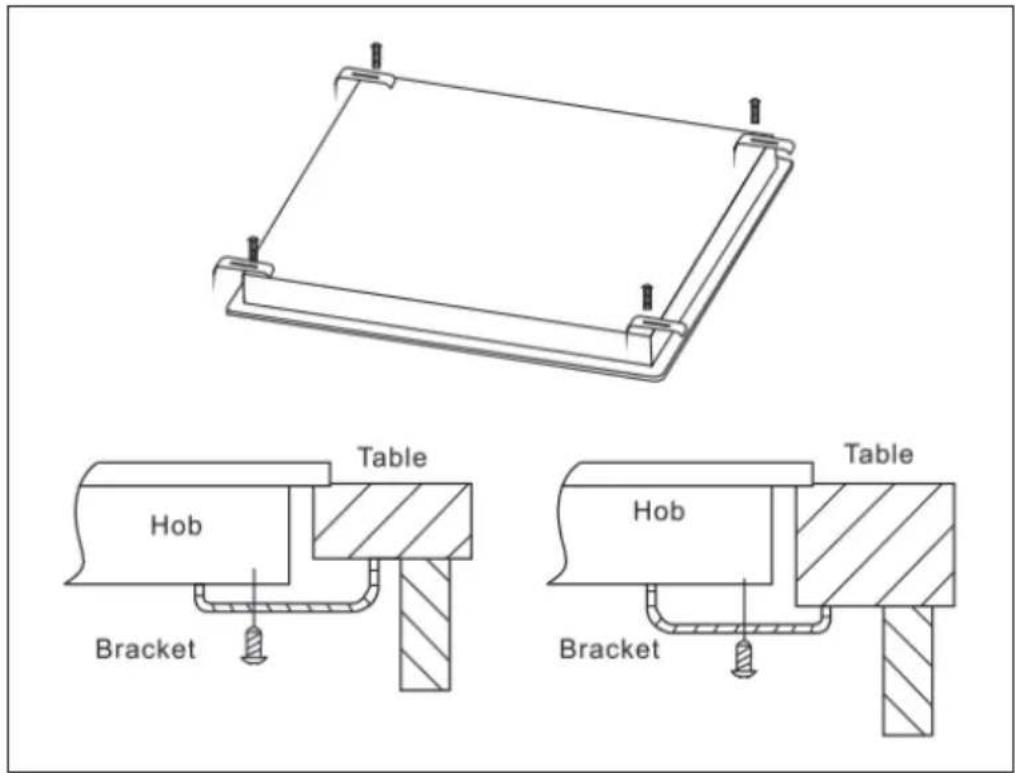
- The appliance should be placed on a stable, smooth surface (use the packaging). Do not apply force onto the controls protruding from the hob.
- Fix the hob on the work surface by screwing 4 brackets on the bottom case of the hob (see picture) after installation.
- Adjust the brackets to the thickness of the work surface.
text_image
Technical diagram showing two structural components with labeled parts: a frame and two tables, each with 'Hob' and 'Bracket' labels.Connecting the Hob to the Mains Power Supply

WARNING
Risk of injury! Disconnect the appliance from the power supply. Installation must be carried out by qualified personnel who know the current safety and installation regulations.
- The manufacturer declines all liability for injury to persons or animals and for damage to property resulting from failure to observe the regulations provided in this chapter.
- The power cable must be long enough to allow the hob to be removed from the worktop.
- Before connecting the hob to the mains power supply, check that:
- The domestic wiring system is suitable for the power drawn by the hob.
- The voltage corresponds to the value given in the rating plate.
-
The power supply cable sections can withstand the load specified on the rating plate.
-
To connect the hob to the mains power supply, do not use adapters, reducers, or branching devices, as they can cause overheating and fire.
- The power supply cable must not touch any hot parts and must be positioned so that its temperature will not exceed 75 °C at any point.
- The power supply should be connected in compliance with the relevant standard, or a single-pole circuit breaker. The method of connection is shown below.
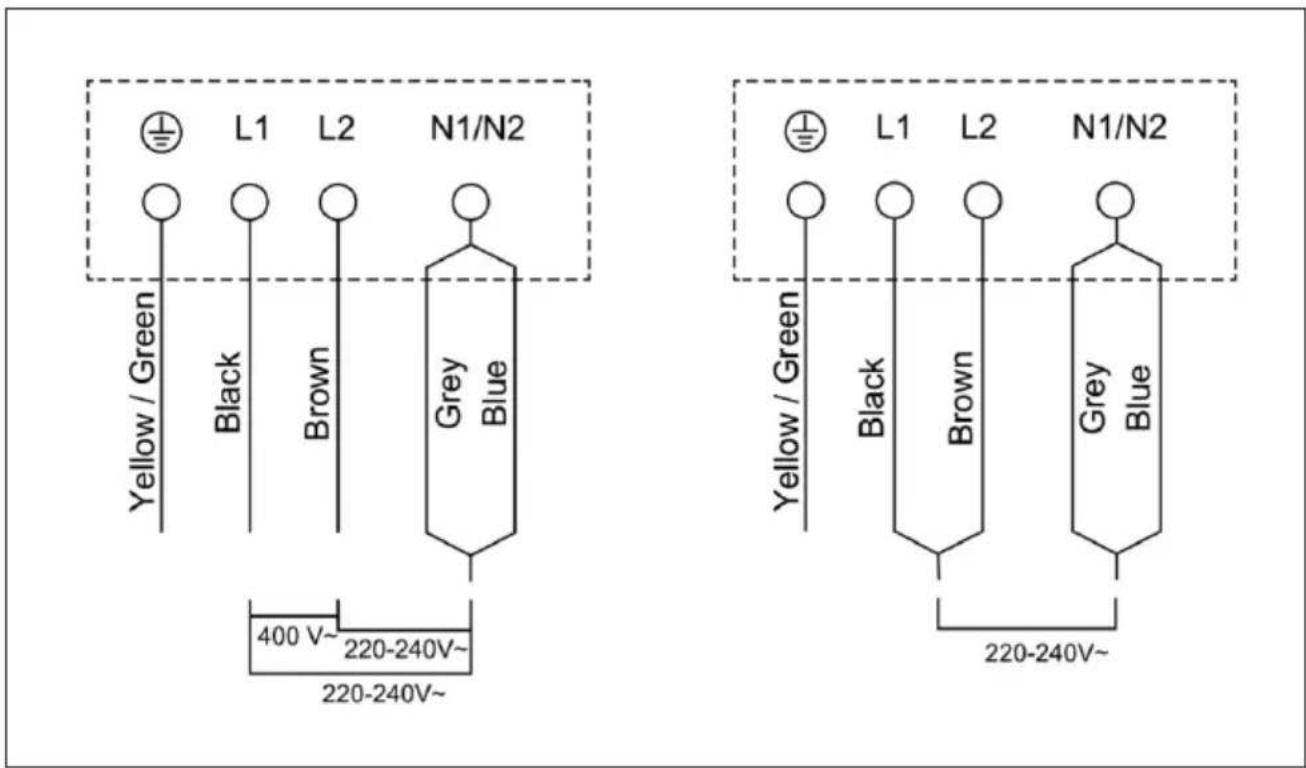
text_image
L1 L2 N1/N2 Yellow / Green Black Brown Grey Blue 400 V~ 220-240V~ 220-240V~ L1 L2 N1/N2 Yellow / Green Black Brown Grey Blue 220-240V~- If the power cord is damaged or needs to be replaced, contact the manufacturer or customer service to prevent damage to property and/or personal injury.
- If the appliance is being connected directly to the mains supply, an omnipolar circuit breaker must be installed with a minimum gap of 3 mm between the contacts.
- The installer must ensure that the correct electrical connection has been made and that it complies with safety regulations.
• The cable must not be bent or compressed. - The cable must be checked regularly and only replaced by a qualified person.
CHOOSING THE RIGHT COOKWARE
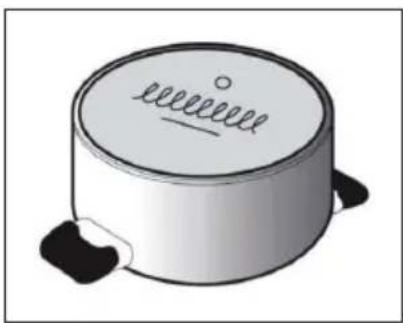
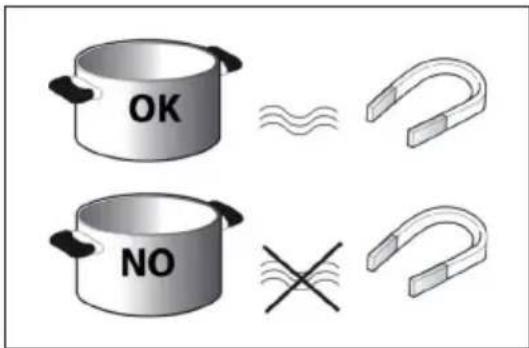
Note: The cooking zones will not switch on if pots are not the right size. Only use pots bearing the symbol "INDUCTION SYSTEM" (see figure below). Place the pot on the required cooking zone before switching the hob on.
natural_image
Illustration of a cylindrical electronic component with two side slots and a circular top (no text or symbols)Pots and Pans
Use a magnet to check if the pot is suitable for the induction hob. Pots and pans are unsuitable if not magnetically detectable.
- Cookware made from the following materials is not suitable: pure stainless steel, aluminium or copper without a magnetic base, glass, wood, porcelain, ceramic, and earthenware.
- Make sure pots have a smooth bottom, otherwise they could scratch the hob. Check the dishes.
- Never place hot pots or pans on the surface of the hob's control panel. This could result in damage.
text_image
OK NO• The bottom diameter of pots or pans should be at least 10 cm.
Note: To avoid damaging the glass-ceramic surface permanently, do not use pots and pans whose bottoms are not perfectly flat, or metal pots with enamelled bottoms.
OPERATION
Energy Saving Tips
- Use pots and pans with bottom width equal to that of the cooking zone.
• Only use flat-bottomed pots and pans. - When possible, keep pot lids on during cooking.
• Use a pressure cooker to save even more energy and time. - Place the pot in the middle of the cooking zone marked on the hob.
Notes on Touch Control
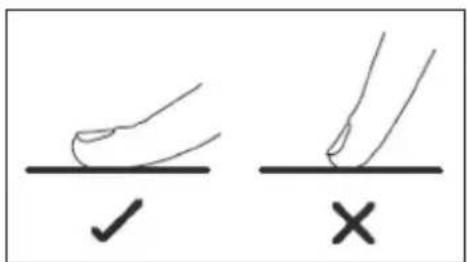
- The controls respond to touch, so you don't need to apply any pressure.
• Use the ball of your finger, not its tip.
text_image
Diagram showing two hand positions with checkmark and cross symbols, likely indicating correct and incorrect states.• You will hear a beep each time a touch is registered.
- Make sure the controls are always clean, dry, and that there is no object (e.g. a utensil or a cloth) covering them. Even a thin film of water may make the controls difficult to operate.
On/Off Control
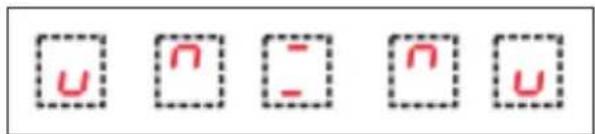
To switch the hob on, switch on the hob and hold the ON/OFF control button (12) for three seconds and the cooking zone displays light up.
text_image
u n - n uCooking Level Adjustment
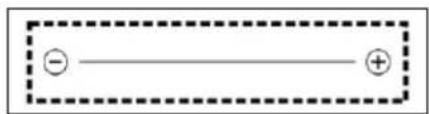
Once the hob is switched on and the pot is positioned on the chosen cooking zone touch the corresponding button for the selected cooking zone. An indicator will flash where you touched. Then adjust the power level by touching the slider control (9).
text_image
- +Child Lock
This function locks the controls to prevent accidental switching on the hob.
- To activate the child lock function, hold the child lock control button (11) for 3 seconds. The timer shows "Lo". Then the control panel is locked.
- To deactivate the control panel lock, switch on the hob and hold the child lock control button (11) for 3 seconds. The "Lo" display goes off and the hob is active again.
Timer
The timer can be used to set cooking time for a maximum of 99 minutes for all cooking zones.
- Select the cooking zone to be used with the timer. Touch the timer control (7), the "10" will be shown in the timer display and the "0" flashes. Set the time by touching the slider control (9).
- Touch the timer control (7) again, the "1" will flash. Set the time by touching the slider control (9).
• After a few seconds, the timer begins the countdown. - Once the set time has elapsed, one acoustic signal sounds and the hob switches off automatically.
- To deactivate the timer, select the cooking zone to be used with the timer and touch the timer control (7). Set the desired cooking time to "00" by touching the slider control (9).
Boost Function
Select a cooking zone and then touch the boost control button (10). The cooking zone indicator shows "b" for the corresponding cooking zone and the cooking zone heats up at maximum power.
Keep Warm Function
Select a cooking zone and then press the keep warm control button (8). The cooking zone indicator shows "c", this means choosing the heating level for warming up and keeping warm (about 55 ± 15 °C) with 2 litres of water.
Pause Control
- When the cooking zones are running, touch the pause control button (8), all displays will show "P" and stop heating.
- At this moment only the pause control button (6), the ON/OFF control button (12) and the child lock control button (11) can be operated.
- Touch the pause control button (8) again, the displays show the original setting, and the cooking zones keep on heating.
Flexible Area
- This area can be used as a single zone or as two different zones, according to the cooking needs anytime.
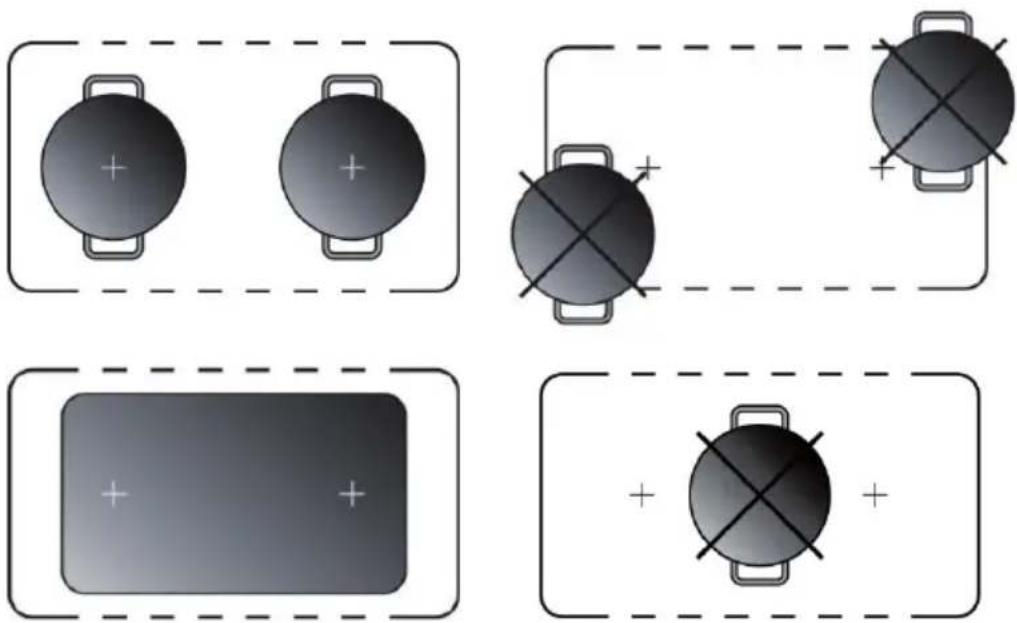
- The flexible area is made of two independent inductors that can be controlled separately. When used as a single cooking zone, when the cookware is moved from one zone to the other one within the flexible area, the same power level of the zone where the cookware was originally placed is maintained. The part that is not covered by cookware is automatically switched off.
Note: Make sure to place the cookware centred on the single cooking zone. In case of big pots, oval, rectangular and elongated pans, make sure to place the pans centred on the cooking zone covering both cross.
Examples of Correct and Incorrect Placement of Cookware:
Water Overflow Protection
The hob will automatically shut down within 10 seconds if water overflows the control panel.
Auto Switch Off
The hob will automatically switch off when you did not set cooking time, forgot to switch off the hob, and did not operate the hob at all.
The default working times for various power levels are shown in the below table:
| Power level Keep | warm (c) 1 3 4 5 | 6 7 8 | 9 | ||||||
| Default working timer (hour) | 8 8 8 4 4 | 4 2 2 | 2 |
DISPLAY WARNINGS
Residual Heat Indicator
- The hob is fitted with a residual heat indicator for each cooking zone.
• These indicators alert the user when cooking zones are still hot. - If the display shows, the cooking zone is still hot.
- If the residual heat indicator of a given cooking zone is lit, that zone can be used, for example, to keep a dish warm or to melt butter.
- When the cooking zone cools down, the display goes off.
Incorrect or Missing Pot Indicator
- If you are using a pot that is not suitable, not correctly positioned or not of the correct dimensions for your induction hob, the icon will appear in the display. If no pot is detected within 120 seconds, the hob switches off.
CLEANING AND CARE
- Never clean the appliance with a steam cleaner.
- Before cleaning, make sure the cooking zones are switched off and that the residual heat indicator Hs not displayed.
Note: Do not use abrasive sponges or scouring pads. Their use could eventually ruin the glass.
- After each use, clean the hob (when it is cool) to remove any deposits and stains due to food residuals.
- Sugar or foods with a high sugar content damage the hob and must be immediately removed.
- Salt, sugar and sand could scratch the glass surface.
- Use a soft cloth, absorbent kitchen paper or a specific hob cleaner (follow the manufacturer's instructions).
TROUBLESHOOTING
- Read and follow the instructions given in the section "Operation".
- Check that the electricity supply has not been shut off.
• Dry the hob thoroughly after cleaning it. - If, when the hob is switched on, alphanumeric codes appear on the display, consult the following table for instructions.
- If the hob cannot be switched off after using it, disconnect it from the power supply.
| Error code | Possible Cause Solution | |
| U- | No pot or unsuitable pot. Place a suitable pot on the desired cooking zone. | |
| E0 | The display board cannot receive the signal from the filter board. | Check the connection between the display board and the filter board. If there is no connection, replace the filter board. |
| EA | The display board cannot receive the signal from the power board. | Check the connection between the display board and the power board. If there is no connection, replace the power board. |
| E1 | High voltage. | Please inspect whether the power supply is normal.Power on after the power supply is normal. |
| E2 | Low voltage. | Please inspect whether the power supply is normal.Power on after the power supply is normal. |
| E3 - E4 | Abnormal temperature. | Please inspect the pot.Please restart after the hotplate cools down. |
| F3 - F5F9 - FA | NTC short or open. | Contact customer service and specify the error code. |
Notes: If you are unable to solve the problem despite the above instructions, contact customer service. Describe the problem as precisely as possible.
Noises Made by the Hob
- Induction hobs can make whistling or crackling sounds during normal operation, these actually come from the pots and pans as a result of the characteristics of the bottoms (for example, bottoms made of several layers of material, or uneven bottoms). These noises vary depending on the pots and pans used and the amount of food they contain, and are not indicative of a defect of any kind.
- In addition, the induction hob is equipped with an internal cooling system to control the temperature of electronic parts. As a result, during operation and for several minutes after the hob has been switched off, the noise of the cooling fan will be audible. This is perfectly normal and indeed essential for proper functioning of the appliance.
DISPOSAL CONSIDERATIONS
natural_image
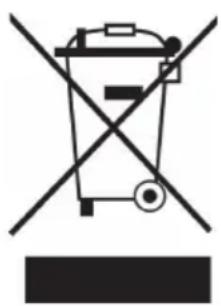
Symbol of a trash bin crossed with a diagonal line, no text or numbers presentIf there is a legal regulation for the disposal of electrical and electronic devices in your country, this symbol on the product or on the packaging indicates that this product must not be disposed of with household waste. Instead, it must be taken to a collection point for the recycling of electrical and electronic equipment. By disposing of it in accordance with the rules, you are protecting the environment and the health of your fellow human beings from negative consequences. For information about the recycling and disposal of this product, please contact your local authority or your household waste disposal service.
MANUFACTURER & IMPORTER (UK)
Manufacturer:
Chal-Tec GmbH, Wallstrasse 16, 10179 Berlin, Germany.
Importer for Great Britain:
Berlin Brands Group UK Limited
PO Box 42
272 Kensington High Street
London, W8 6ND
United Kingdom
Chère cliente, cher client,
text_image
QR code image containing encoded data, no visible human-readable textSOMMAIRE
FICHE DE DONNÉES PRODUIT
text_image
3 KLASTON 2 4 1 5 6 7Installation des supports
natural_image
Illustration of a cylindrical electronic component with two black base pins and a circular top surface (no text or symbols)text_image
Diagram showing two hand positions with checkmark and cross symbols, likely indicating correct and incorrect states.natural_image
Symbol of a trash bin crossed with a diagonal line, no text or numbers presentBerlin Brands Group UK Limited
PO Box 42
272 Kensington High Street
London, W8 6ND
United Kingdom
Estimado cliente,
text_image
QR code image containing encoded data, no visible human-readable textÍNDICE
text_image
3 KLASTON 2 4 1 5 6 7| 1 | Zona izquierda ( 180), 1500/1800 W | 5 | Zona derecha ( 180), 2000/2300 W |
| 2 | Zona central izquierda ( 180), 2000/2300 W | 6 | Placa de cristal |
| 3 | Zona fl exible, 2500/2800 W | 7 | Panel de control |
| 4 | Zona central derecha ( 180), 1500/1800 W |
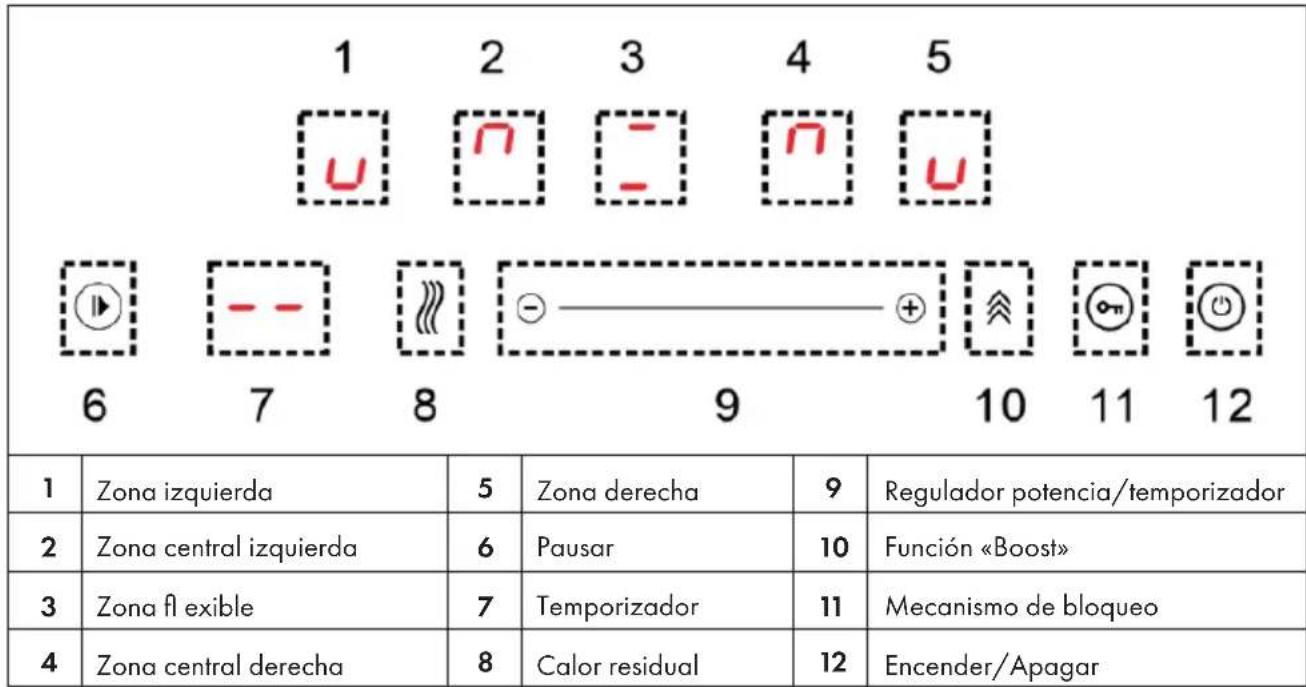
PANEL DE CONTROL
natural_image
Illustration of a cylindrical electronic component with two black base pins and a circular top surface (no text or symbols)Ollas y sartenes
text_image
Diagram showing two hand positions with checkmark and cross symbols, likely indicating correct and incorrect states.natural_image
Symbol of a trash bin crossed with a diagonal line, no text or numbers presentBerlin Brands Group UK Limited
PO Box 42
272 Kensington High Street
London, W8 6ND
United Kingdom
Gentile cliente,
text_image
QR code image containing encoded data, no visible human-readable textINDICE
text_image
3 KLASTON 2 4 1 5 6 7natural_image
Illustration of a cylindrical electronic component with two black base pins and a circular top surface (no text or symbols)Pentole e padelle
text_image
Diagram showing two hand positions with checkmark and cross symbols, likely indicating correct and incorrect states.natural_image
Symbol of a trash bin crossed with a diagonal line, no text or numbers presentPRODUTTORE E IMPORTATORE (UK)
Produttore:
Chal-Tec GmbH, Wallstraße 16, 10179 Berlino, Germania.
Berlin Brands Group UK Limited
PO Box 42
272 Kensington High Street
London, W8 6ND
United Kingdom

area
| Category | Value | | -------- | ----- | | 1 | 100 | | 2 | 100 | | 3 | 100 | | 4 | 100 | | 5 | 100 | | 6 | 100 | | 7 | 100 | | 8 | 100 | | 9 | 100 | | 10 | 100 | | 11 | 100 | | 12 | 100 | | 13 | 100 | | 14 | 100 | | 15 | 100 | | 16 | 100 | | 17 | 100 | | 18 | 100 | | 19 | 100 | | 20 | 100 | | 21 | 100 | | 22 | 100 | | 23 | 100 | | 24 | 100 | | 25 | 100 | | 26 | 100 | | 27 | 100 | | 28 | 100 | | 29 | 100 | | 30 | 100 | | 31 | 100 | | 32 | 100 | | 33 | 100 | | 34 | 100 | | 35 | 100 | | 36 | 100 | | 37 | 100 | | 38 | 100 | | 39 | 100 | | 40 | 100 | | 41 | 100 | | 42 | 100 | | 43 | 100 | | 44 | 100 | | 45 | 100 | | 46 | 100 | | 47 | 100 | | 48 | 100 | | 49 | 100 | | 50 | 100 | | 51 | 100 | | 52 | 100 | | 53 | 100 | | 54 | 100 | | 55 | 100 | | 56 | 100 | | 57 | 100 | | 58 | 100 | | 59 | 100 | | 60 | 100 | | 61 | 100 | | 62 | 100 | | 63 | 100 | | 64 | 100 | | 65 | 100 | | 66 | 100 | | 67 | 100 | | 68 | 100 | | 69 | 100 | | 70 | 100 | | 71 | 100 | | 72 | 100 | | 73 | 100 | | 74 | 100 | | 75 | 100 | | 76 | 100 | | 77 | 100 | | 78 | 100 | | 79 | 100 | | 80 | 100 | | Note: The actual values are not provided in the code. I have used the label 'Value' as a placeholder for the value detection. You would need to run the code to get the actual values from the code list. Please note that the actual values would be the result of this example. You would need to run the code to get the actual values from the code list. You would need to run the code to get the actual values from the code list. You would need to run the code to get the actual values from the code list. You would need to run the code to get the actual values from the code list. You would need to run the code to get the actual values from the code list. You would need to run the code to get the actual values from the code list. You would need to run the code to get the actual values from you would need to run the code.