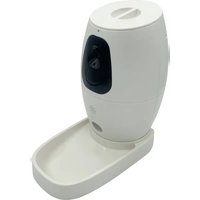
PET1680 - Pet feeder Berger & Schröter - Free user manual and instructions
Find the device manual for free PET1680 Berger & Schröter in PDF.


User questions about PET1680 Berger & Schröter
0 question about this device. Answer the ones you know or ask your own.
Ask a new question about this device
Download the instructions for your Pet feeder in PDF format for free! Find your manual PET1680 - Berger & Schröter and take your electronic device back in hand. On this page are published all the documents necessary for the use of your device. PET1680 by Berger & Schröter.
USER MANUAL PET1680 Berger & Schröter
natural_image
White public water purifier with black control panel and circular vent, no visible text or symbolsArt. Nr. 32482
Bedienungsanleitung
Smart Pet Feeder
Operating instructions
Smart Pet Feeder
Mode d'emploi
text_image
Labeled diagram of a device with numbered parts for identification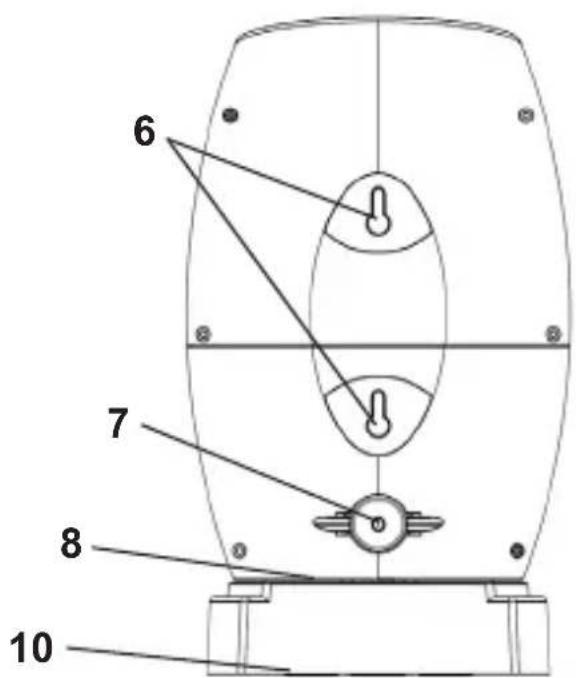
text_image
6 7 8 10text_image
Warning sign with black starburst symbol inside yellow triangle, indicating explosion hazardnatural_image
Diagram of a circular mechanical component with internal features and connecting rods, no text or symbols presentnatural_image
Technical line drawing of a mechanical component with pulleys and internal components (no text or symbols)natural_image
Top-down schematic of a vehicle or vehicle chassis with four circular components and structural brackets (no text or symbols)Wandmontage
natural_image
Technical line drawing of a mechanical component with mounting base and side features (no text or symbols)Vor dem Start
natural_image
Close-up of a mechanical component with a black arrow pointing to a small circular feature (no visible text or symbols)Hinweis:
text_image
QR code image containing encoded data, no visible human-readable textWiFi verbinden
natural_image
A tabby cat lying on a wooden surface, captured in a photo editing interface with no visible text or symbols on the cat or floor.EN Operating instructions
Smart Pet Feeder, smart feeding station and camera for pets
Scope of delivery
1x Smart Pet Feeder
1x power cable 5V
1x screwdriver
1x mounting kit (3x long screws, 3x plugs, 6x small screws, 5x round stickers, 4x oval stickers)
Technical data
| Video size 720P@30FPS | |
| Aperture F 2.2, f=2.6 mm | |
| Lens 115° | |
| Focus 0,2 m ~ infinity | |
| Storage medium Micro SD card (not included), up to 32 GB | |
| Night vision IR flash (within 8 m) | |
| Picture format JPEG | |
| Video format H.264 | |
| Wifi 2.4G (802.11b/g/n), distance | 20 m |
| Power source DC5V/ 2A | |
| Capacity 500 ml | |
| dimensions approx. 149 x 145 x 220 mm | |
| Laser weight approx. 730 g | |
| Laser wavelength 650 nm | |
| Max. Laser output power ≤1mW |
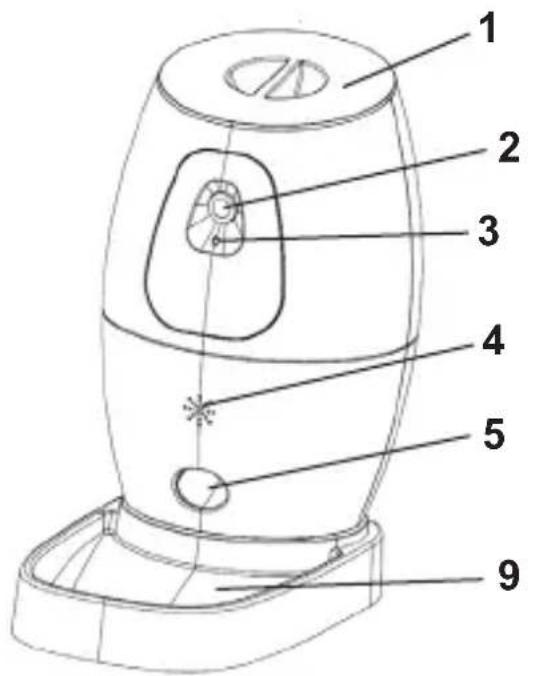
text_image
Labeled diagram of a device with numbered parts for identification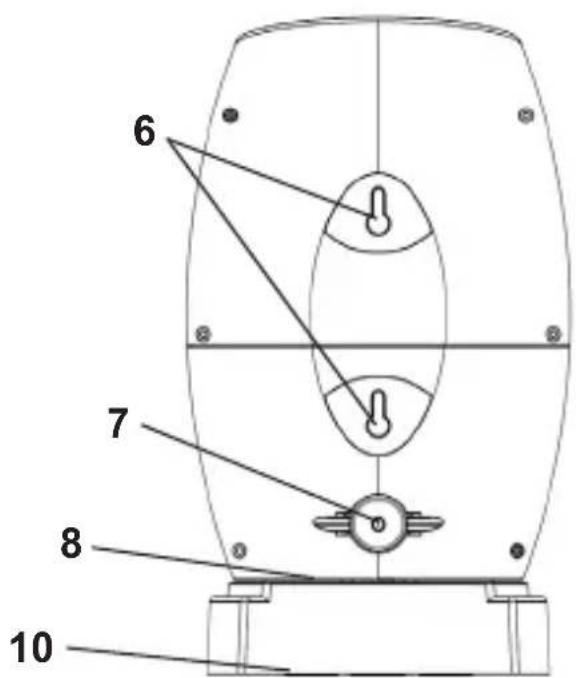
text_image
6 7 8 10| 1. lining barrel cover 6. holes for hanging | |
| 2. lens 7. power connection | |
| 3. brightness sensor 8. oval stickers | |
| 4. loudspeaker 9. feeding bowl | |
| 5. feed output 10. round stickers |
Safety measures before use
-
Do not drop the device and do not subject it to strong impacts.
-
Never attempt to open the housing of the device or modify it in any way. Maintenance and repairs should only be carried out by authorised service providers. If a repair is necessary, please contact the dealer directly.
-
The appliance is for indoor use only, do not place it outside.
-
Use a dry and soft cloth to clean the appliance regularly to remove dust and dirt.
-
The built-in laser is assigned to laser class 2 in accordance with DIN EN 60825-1. Make sure that the appliance is positioned so that your pet does not get the laser directly in the eye.

text_image
Warning sign with black starburst symbol inside yellow triangle, indicating explosion hazard- Ensure that no power, water or heating lines are laid at the planned drilling location.
- The plugs supplied are only suitable for installation on concrete and stone. Before starting the installation, please check the installation site carefully to ensure that it is suitable for the wall plugs. If in doubt, consult a specialist.
Installation
This product can be hung on the wall or placed directly on the floor/table etc. The food tray is removable. You can also use the appliance without the food tray.
Note: The product must be placed as close as possible to the router, preferably at a distance of 3 metres. The device and the router should not be placed directly against the wall, as this may result in a weak communication signal between the router and the device. Device. If this is the case, the feeding station will repeatedly play the sound „Please connect network“.
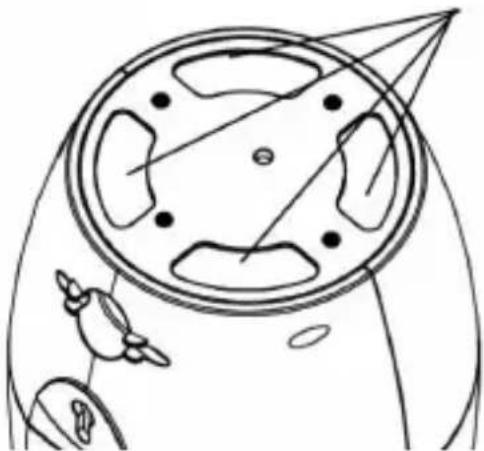
Installation without feeding tray
Use the oval stickers supplied for this purpose. Remove the protective paper and stick the stickers onto the notches provided on the underside of the feeding station. Now remove the transparent protective film and set the feeding station down.
Tip: If the stickers are dirty after prolonged use, you can clean them. The stickiness remains unchanged.
natural_image
Diagram of a circular mechanical component with internal features and connecting rods, no text or symbols presentInstallation with feeding tray
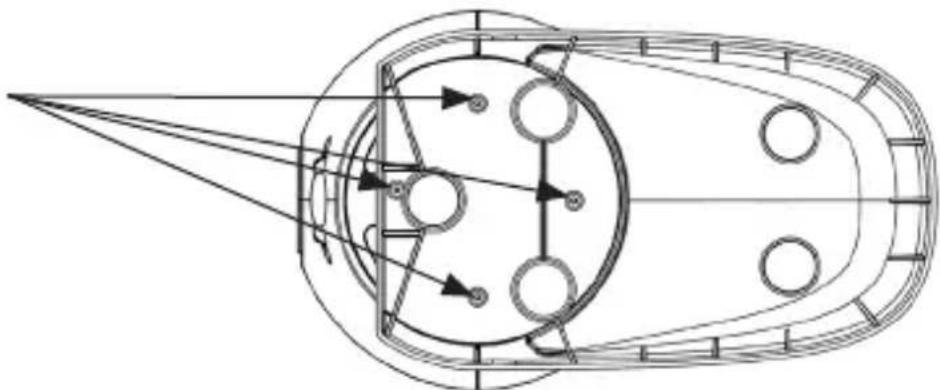
Align the appliance and the food tray with the four holes located on the underside. Use the four small screws supplied and the screwdriver provided.
natural_image
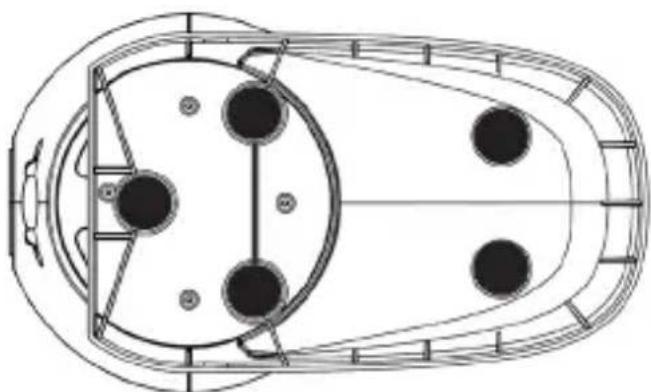
Technical line drawing of a mechanical component with pulleys and internal components (no text or symbols)Use the round stickers supplied for this purpose. Remove the protective paper and stick the stickers onto the notches provided on the underside of the feeding station. Now remove the transparent protective film and set the feeding station down.
natural_image
Top-down schematic of a vehicle or tank layout with four circular components and structural elements (no text or labels)Wall mounting
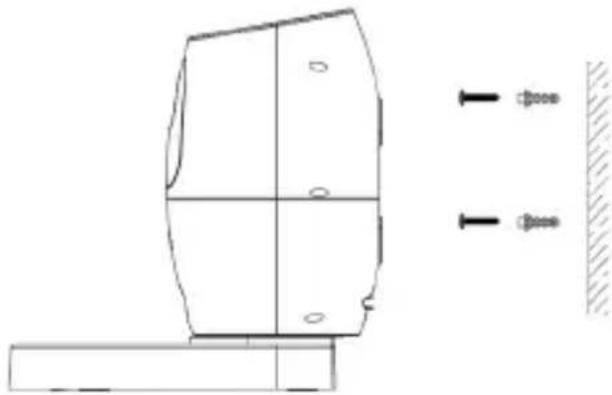
- Use a drill bit with a diameter of 6 mm. Drill two holes about 78 mm apart.
- Use the screws and dowels supplied to fix them.
- Now hang the feeding station with the holes on the back on the two screws.
If you need to mount this product on the wall, please prepare the following tools:
- Drill bit
- 6 mm masonry/concrete drill bit concrete drill bit
• Phillips screwdriver
natural_image
Technical line drawing of a mechanical component with mounting holes and a side view showing bolted fasteners (no text or symbols)Before the start
Insert memory card
A micro SD card with up to 32 GB can be used. This is not included in the scope of delivery.
- Open the cover of the feed barrel and then the cover of the card slot. This is where the card slot is located. (see illustration)
- Slide the memory card into the slot. Ensure that the direction is correct. Never force the card into the slot.
- Format the memory card before use.
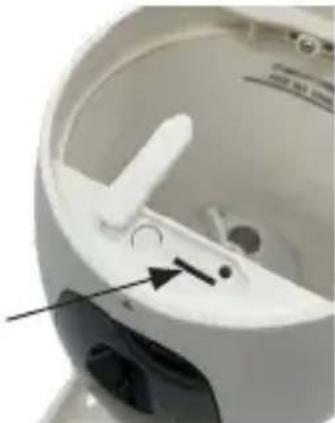
natural_image
Close-up of a white mechanical component with a black arrow pointing to a small circular feature (no text or symbols visible)- To remove the card from the memory card slot of the device, press the edge of the memory card in slightly, the card will peek out a little at the top. will peek out a little at the top. Then remove the card.
Note:
- Before using the memory card, please click on the Settings button in the Smart Pets app to format the memory card.
- When inserting or removing the memory card, switch off the power first. switch off the power first. This product does not support hot inserting and removing the memory card.
Connect power
Plug the supplied mains adapter into the power connection on the back of the device. Now connect the power supply unit to the power supply.
Add food
- Open the lid of the food barrel by reaching into the grooves provided and pulling the lid upwards.
- You can then pour dry pet food into the barrel. Do not forget to close the lid again after filling the food.
Note:
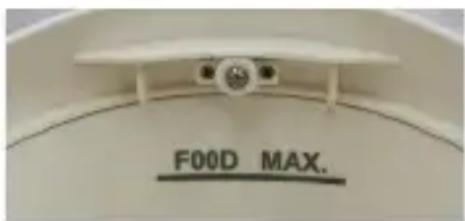
- The inside of the drum is labelled „FOOD MAX“. Please do not exceed the maximum filling quantity.
- The diameter of the filled food should not be larger than 10 mm. Round food is much more suitable than square food.
text_image
FOOD MAX.Cleaning
The food container can be wiped clean directly. The soft rubber brush, metal cover, blade and rotating shaft are connected. To clean them, you must first remove the three screws on the metal cover. Hold the soft rubber brush to remove the part. After cleaning, the parts should be reassembled. Adjust the position of the rotation shaft according to the direction of the motor shaft so that they match. Insert the soft rubber brush into the food container. You can shake the rotation shaft slightly so that it fits better with the motor shaft. Then fit the three screws. During this process, please do not turn the motor to avoid damage.
Download app
You can scan this QR code to go to a page where you can download the „Smart Pets“ app. You can install it on your tablet or smartphone and control the device remotely via a WiFi connection.

Connect WiFi
- Open the „Smart Pets“ app.
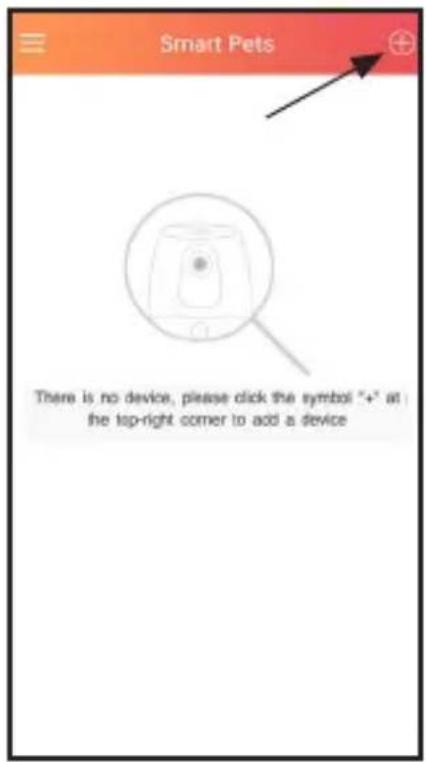
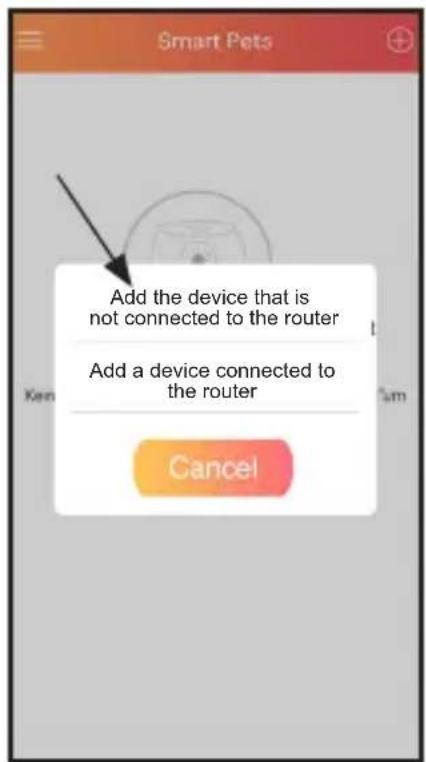
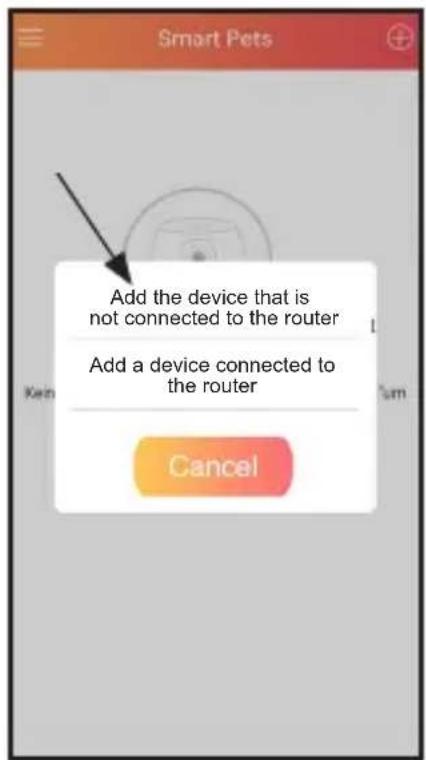
- Click on the „+“ symbol in the top right-hand corner to add a device.
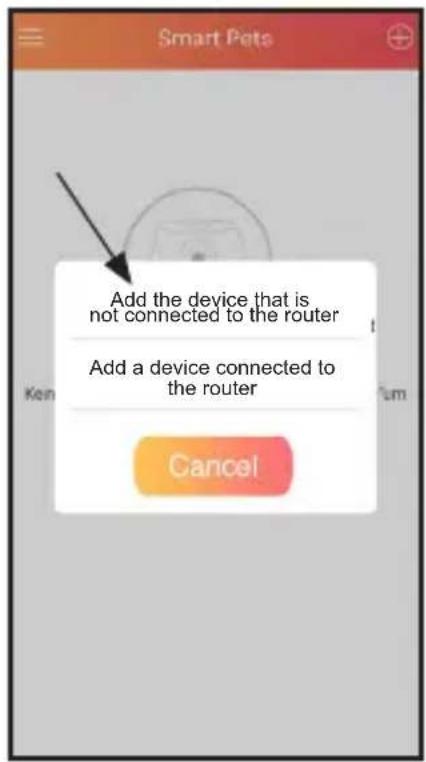
- Click on „Add the device that is not connected to the router“.
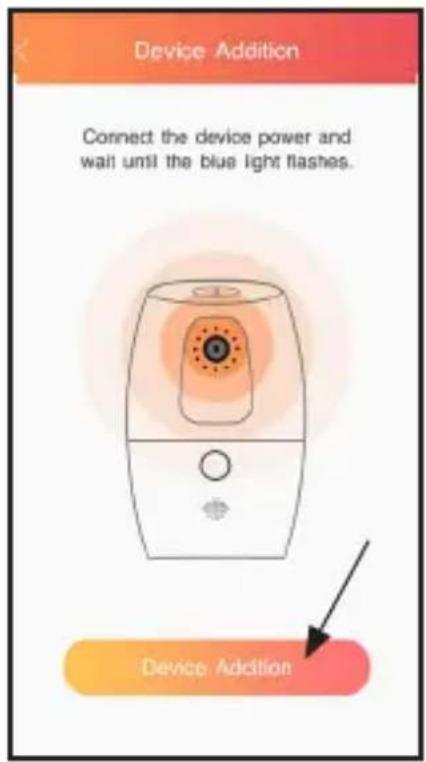
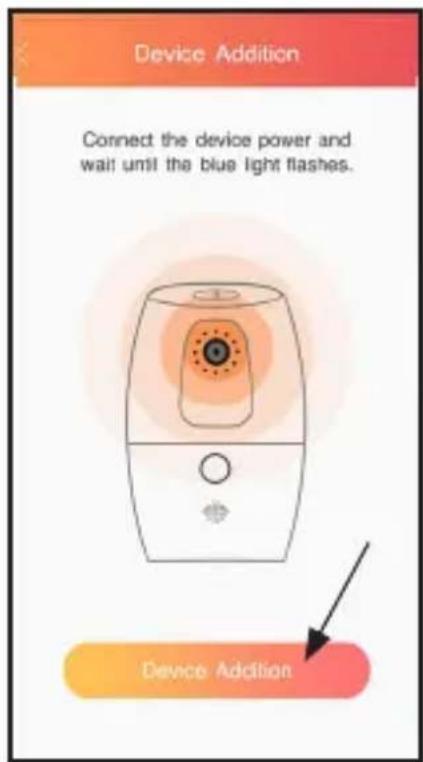
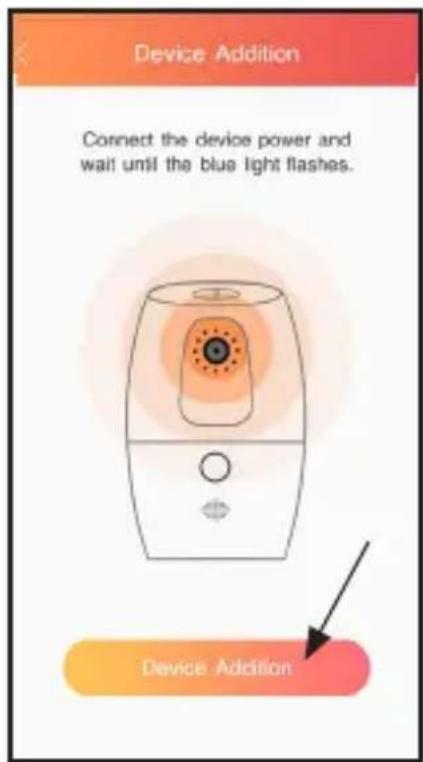
- You will then see the following screen. Please connect the feeding station to the power supply, then a blue light will start flashing. This indicates that the feeding station is ready to connect. Now click on „Additional device“ to connect.
2
text_image
Smart Pets There is no device, please click the symbol "+" at the top-right corner to add a device3
text_image
Add the device that is not connected to the router Add a device connected to the router Cancel4
text_image
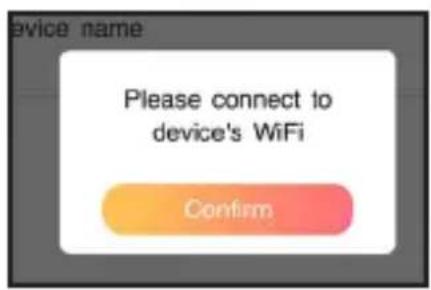
Device Addition Connect the device power and wall until the blue light flashes. Device Addition- You must now connect to the device's WiFi. Click on „Confirm“.
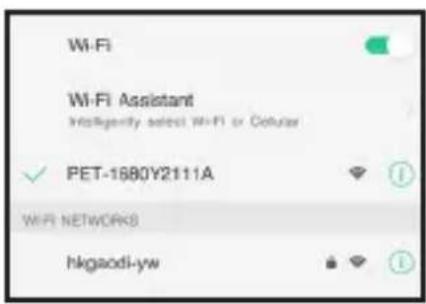
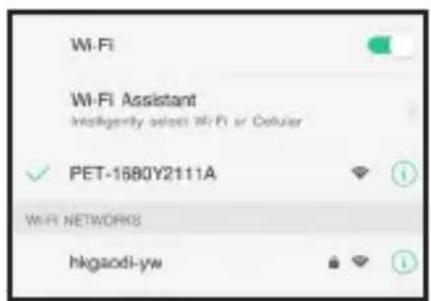
- The app will automatically redirect you to your WiFi settings. Search for „PET-1680****“ in your list and establish a connection.
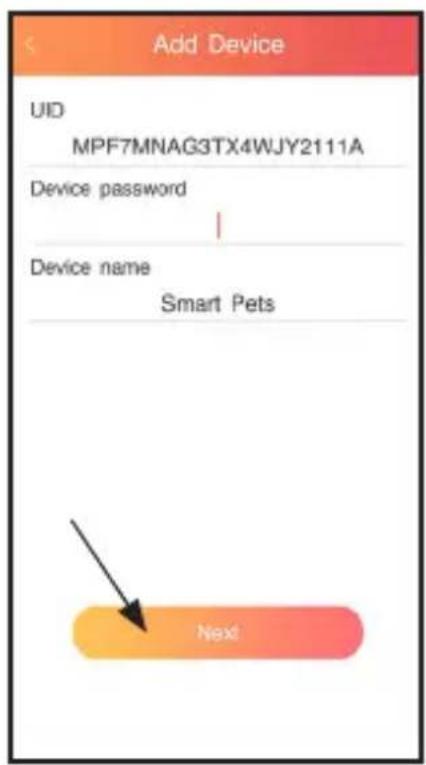
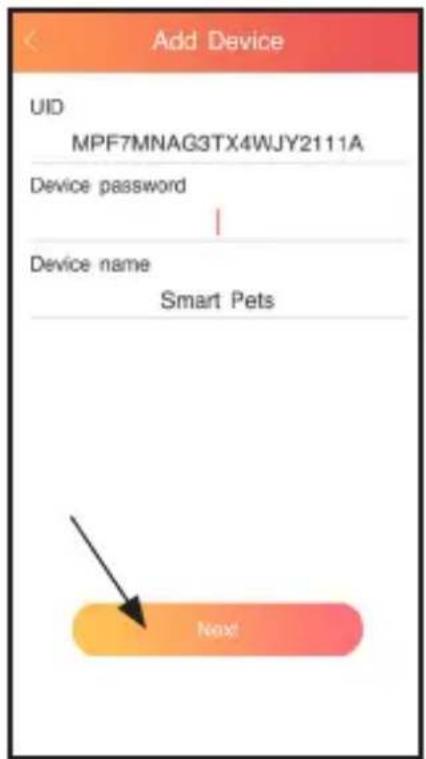
- Return to the app, the UID is automatically recognised via the connected WiFi. Enter the initial password „12345678“. Then click on „Next“.
- The question „Connect to the WiFi network?“ appears on the screen - Click on „Confirm“.
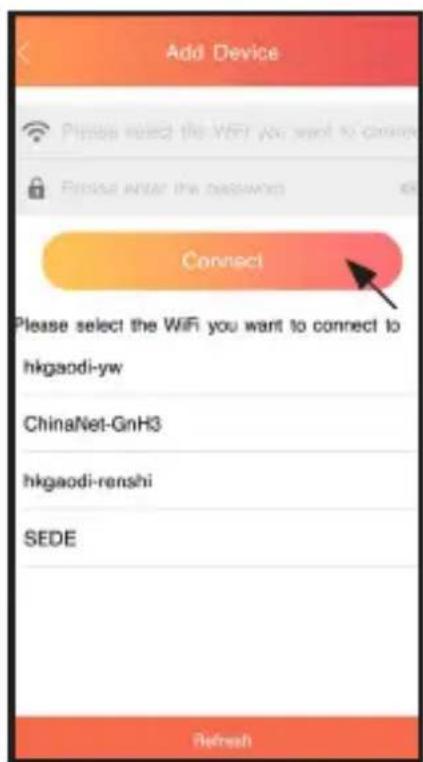
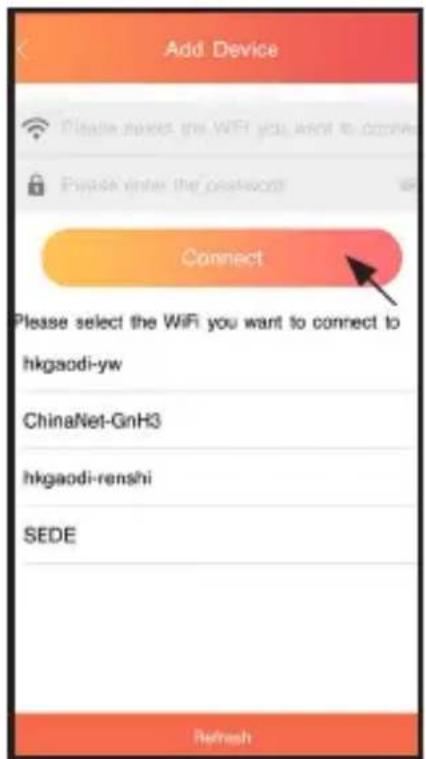
- Now select the WiFi network you want to connect to and enter the password. Then click on „Connect“.
- After the connection is successful, the light will turn solid blue and you will hear a sound: „Camera online“. Then click on the device icon to see the main screen.
- The app will ask you to change the password of the device. Now set a new password.
6
text_image
device name Please connect to device's WiFi Confirm
text_image
Wi-Fi Wi-Fi Assistant InfoRegularity select Wi-Fi or Cellular ✓ PET-1680Y2111A WIFI NETWORKS hkgao di-yw7
text_image
Add Device UID MPF7MNAG3TX4WJY2111A Device password | Device name Smart Pets Next⑨
text_image
Add Device Please select the WiFi you want to connect to hkgaodi-yw ChinaNet-GnH3 hkgaodi-renshi SEDE RefreshNote:
- The original password is „12345678“. Please memorise your new password.
- If you have forgotten your password, please open the lid of the lid of the feed barrel to find the reset button. This is next to the memory card slot. Press and hold the reset button for a few seconds and only release it when you hear a beep. The password is reset to „12345678“.
User interface and function
Settings
General settings
- Change password
- Sharing when taking a picture (share photos)
- Motion detection / sound detection
• Continuous recording
Settings for feeding
- Manual feeding: The user can set the amount of food manually. It goes from 1-60 portions. 1g is calculated per portion.
- Automatic feeding: For new feeding times, you need to click on the „+“ sign in the upper right corner to add an automatic feeding setting. You can select the amount of feed and start time, as well as whether to record the feeding. Click on „Done“ to save the setting.
Audio settings
- Here you can select which sound is played, e.g. when feeding. There are five different sounds to choose from.
- You can record new sounds via „Add new audio“ and play them later.
Event management
- This is an overview list in which the motion and sound detection events are listed.
Synchronise time
• You can update the date and time here
Share
- The user can share the device's account with friends by scanning the QR code displayed in the Pet Smart app.
Formatting the TF card (memory card)
- Formatting deletes all data on the memory card.
- Before using the memory card, please click on this button to format it first.
Version update
- Check the version and update the app.
User interface (Normal)
text_image
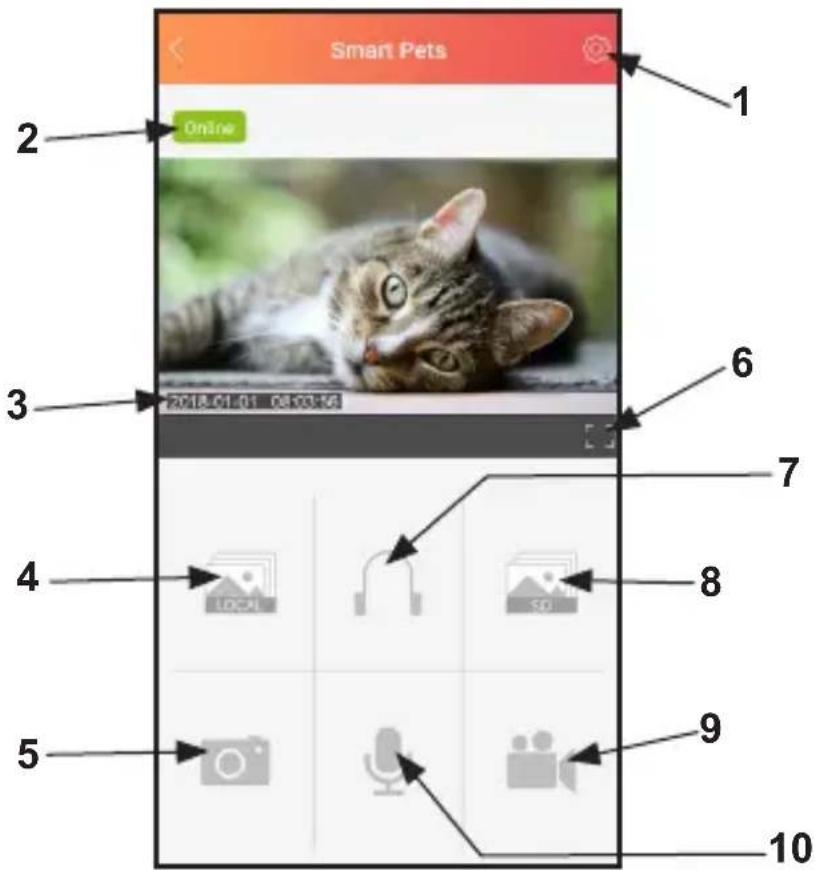
Smart Pets 1 2 Online 3 2018.01.01 08:00:16 6 7 4 LOCAL 8 5 9 10- Settings
- Status: Shows whether the device is online or offline.
- Date and time
- Local storage space: View the photo and video files stored on the smartphone. Click on „Edit“ in the top right corner of the user interface to delete video files and share or delete photo files.
- Take photo: Click this button to take photos. Photos are saved in the local album.
- Full screen: The display is shown in full screen (landscape format). Other functions are possible in full screen, e.g. the laser pointer.
- Voice monitoring: If you click on this symbol, you can hear your pet via the camera.
- SD card memory: If you have activated the „Continuous recording“ setting, the recordings are saved here. This only works if you have inserted a memory card and it is formatted.
- Record videos: Click on this button to record a video. This is saved in the local memory.
- Voice function: Press and hold this button to speak to your pet in front of the feeding station. Your voice will come out of the device.
User interface (full screen)
natural_image
A tabby cat lying on a wooden surface, captured in a photo editing interface with no visible text or symbols on the cat or background.
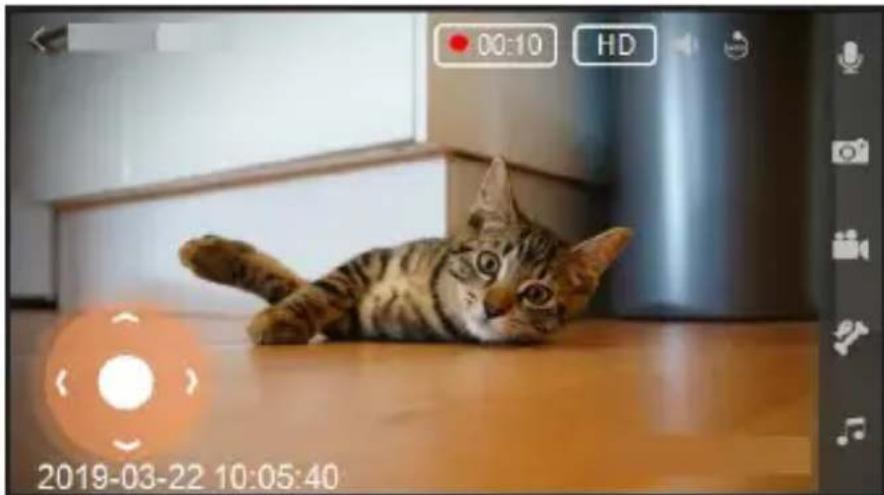
When the button is pressed, you can talk to your pet in front of the feeding station. Your voice will come out of the device.
Take a photo.

Record a video. The video length is displayed on the screen during recording.
Click on this button to feed your pet. The food is dispensed from the food outlet of the appliance.

Play a sound. You can specify the sound via the audio settings

If you click on this icon, you can hear your pet's voice remotely via the device.

You can switch between HD and VGA.

You can activate the automatic laser with this symbol. The laser dot moves automatically.

You can use the arrows to control the laser dot manually.
Problem solution
- What does it mean if the LED light on the appliance flickers?
- The LED light remains lit after the power connection. It flickers while connecting to the WiFi. It then remains permanently lit when it has successfully connected.
- Despite following the instructions, the WiFi connection is not established. What should I do?
a. Please check whether the distance between the device and WiFi is too long or extends over several floors and rooms.
b. If your WiFi does not have a password or WEP encryption, we strongly recommend that you switch to WAP2(AES) encryption. To protect your privacy.
c. Make sure you have entered the correct password.
- How can I share my recordings?
- Select the „Share“ option in the app settings to create a QR code. Take a screenshot and then send the QR code to the person in question. They must first download the „Smart Pets“ app. The code will open the app to read the QR code, then you can find and connect the device.
- Why does the picture slow down when several people are connected at the same time?
- The device supports multiple people online at the same time. If the speed of one person is slower, this can affect the connection speed. You should therefore set the picture quality to a lower level.
- Where is the best place to position the device?
- Place the device in an open area. Not in a corner and as close as possible to the WiFi router.
- What type of pet food is suitable for the appliance?
a. Only dry pet food, no wet or sticky food.
b. Rounded food with a diameter of less than 10 mm. Food with angular shapes does not come out so easily and can get stuck more quickly.
- What is the movement radius of the laser?
- The range is 60^ to the left, 60^ to the right, up to 15^ , downwards up to 15^ . The stronger the mains signal, the faster the laser reacts.
- Why does a little food remain and not come out?
- If used for too long with an overfilled feed barrel, the motor power may decrease. Always pay attention to the marking in the feed barrel when filling. If only a little feed remains, the feed will always be deflected from the inlet, no matter how the brush is turned, so that it cannot come out. You should top up the feed at this point.
- Why is no food coming out even though I have entered it in the app?
a. Food needs to be refilled.
b. The inlet of the metal cover is blocked and the soft rubber brush cannot rotate here. You need to remove the food stuck in the inlet and carefully move the soft rubber brush out of the stuck position.
c. The blades under the metal cover are jammed. You must remove the blades and the food with a fine rod. Otherwise, unscrew this part and remove the stuck food.
d. If there are unusual noises and the motor does not run, the motor may be broken. Send it back to the manufacturer for repair.
10. Can the motor of the machine also run in the other direction?
- The motor of this machine has a reverse function, which is also a form of protection. If the soft rubber brush or the blade catches on a piece of food during rotation, the motor stops rotating immediately. After a few seconds, the motor turns back. After the motor has come to a standstill, it rotates normally again and the machine can be used normally.
FR Mode d'emploi
text_image
Labeled diagram of a device with numbered parts for identification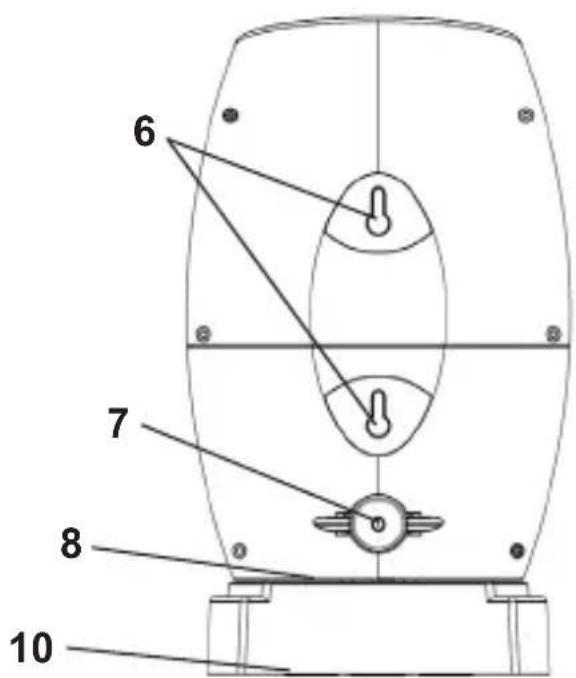
text_image
6 7 8 10text_image
Warning sign with black triangular triangle and central explosion symbolnatural_image
Diagram of a circular mechanical component with internal features and connecting rods, no text or symbols presentnatural_image
Technical line drawing of a mechanical component with pulleys and internal components (no text or symbols)natural_image
Top-down schematic of a vehicle or tank layout with four circular components and structural elements (no text or labels)Montage mural
natural_image
Technical line drawing of a mechanical component with mounting base and side features (no text or symbols)Avant le départ
natural_image
Close-up of a white mechanical component with a black arrow pointing to a small circular feature (no text or symbols visible)Remarque:
text_image
QR code image containing encoded data, no visible human-readable textConnector le WiFi
text_image
Smart Pets There is no device, please click the symbol "+" at the top-right corner to add a device3
text_image
Add the device that is not connected to the router Add a device connected to the router Cancel④
text_image
Device Addition Connect the device power and wait until the blue light flashes. Device Additiontext_image
device name Please connect to device's WiFi Confirm Wi-Fi Wi-Fi Assistant Intelligerally detect WiFi or Cellular ✓ PET-1680Y2111A Wi-Fi NETWORKS hkgaodi-yw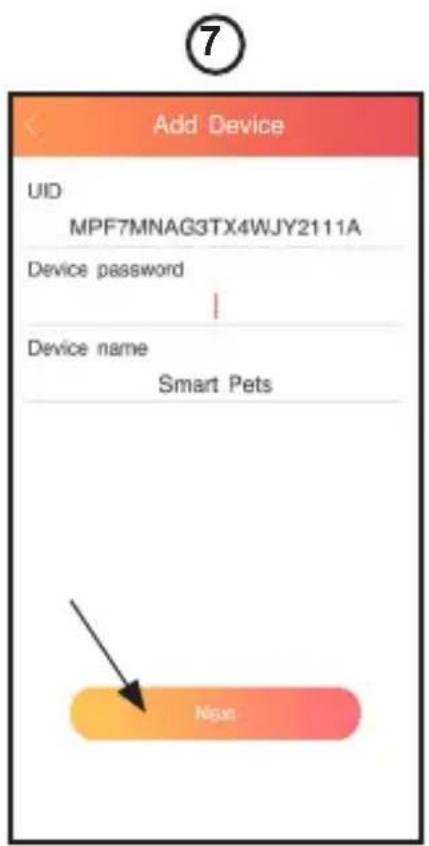
text_image
Add Device UID MPF7MNAG3TX4WJY2111A Device password | Device name Smart Pets Next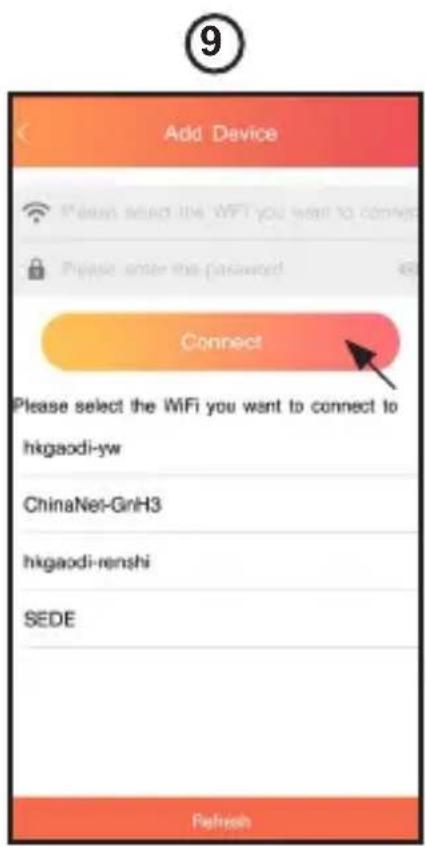
text_image
Add Device Please select the WiFi you want to connect to hkgaoedi-yw ChinaNet-GnH3 hkgaoedi-renshi SEDE RefreshRemarque:
natural_image
A tabby cat lying on a wooden surface, looking at camera interface (no text or symbols on the cat or background)
text_image
Labeled diagram of a device with numbered parts for identification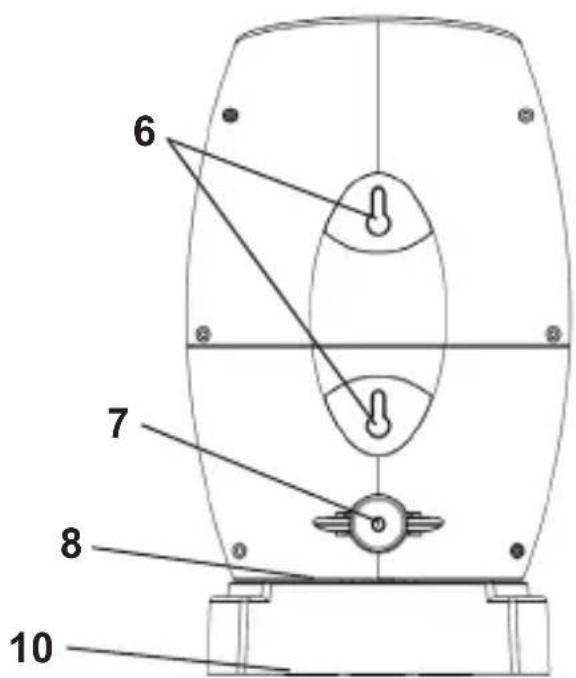
text_image
6 7 8 10text_image
Warning sign with black starburst symbol inside yellow triangle, indicating explosion hazardnatural_image
Diagram of a circular mechanical component with internal features and connecting rods, no text or symbols presentnatural_image
Technical line drawing of a mechanical component with pulleys and internal components (no text or symbols)natural_image
Top-down schematic of a vehicle or tank layout with four circular components and structural elements (no text or labels)Wandmontage
natural_image
Technical line drawing of a mechanical component with mounting base and side features (no text or symbols)Voordat u begint
natural_image
Close-up of a white mechanical component with a black arrow pointing to a small circular feature (no text or symbols visible)Opmerking:
text_image
QR code image containing encoded data, no visible human-readable textWiFi aansluiten
text_image
Smart Pets There is no device, please click the symbol "✓" at: the top-right corner to add a device③
text_image
Add the device that is not connected to the router Add a device connected to the router Cancel4
text_image
Device Addition Connect the device power and wait until the blue light flashes. Device Additiontext_image
device name Please connect to device's WiFi Confirm
text_image
Wi-Fi Wi-Fi Assistant Intelligerly select Wi-Fi or Celulier ✓ PET-1680Y2111A Wi-Fi NETWORKS hkgaodi-yw7
text_image
Add Device UID MPF7MNAG3TX4WJY2111A Device password | Device name Smart Pets Next⑨
text_image
Add Device Please select the WiFi you want to connect to hkgaodi-yw ChinaNet-GnH3 hkgaodi-renshi SEDE RefreshOpmerking:
natural_image
A tabby cat lying on a wooden surface, captured in a photo editing interface with no visible text or symbols on the cat or background.