
WHWBU60D2B - Fridge WHIRLPOOL - Free user manual and instructions
Find the device manual for free WHWBU60D2B WHIRLPOOL in PDF.

| Product type | Built-in wine cellar |
| Brand | Whirlpool |
| Model | WHWBU60D2B |
| Maximum capacity | 44 bottles |
| Temperature zones | 2 zones: upper 5-10 °C, lower 10-18 °C |
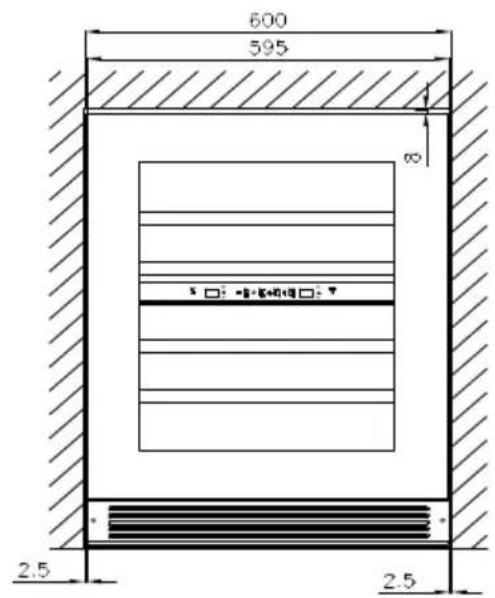
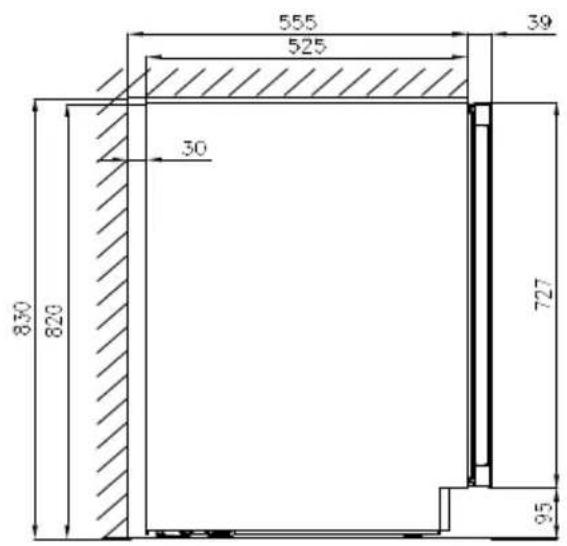
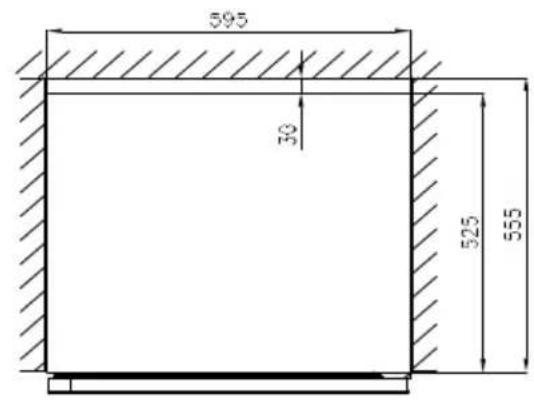
| Dimensions (W × H × D) | 595 × 820 × 555 mm |
| Power supply | 220-240 V, 50 Hz |
| Operating modes | Standard (STD), Economy (ECO), Demo (DEMO) |
| Automatic door opening | Yes, by rotary button and switch |
| LED lighting | Adjustable: 24h on, 30 min, 1 min |
| Temperature alarm | Yes, visual and audible if temperature >23 °C or <0 °C |
| Temperature memory | Yes, restores settings after power failure |
| Key lock | Yes, activated by pressing 3 seconds |
| Celsius/Fahrenheit switching | Yes, by pressing 3 seconds |
| Shelves | Removable, maximum 6 shelves |
| Cabinet fixing | Upper and lower brackets provided |
| Cleaning | Interior: hot water and baking soda; exterior: mild detergent |
| Spare parts available | Thermostats, sensors, circuits, LED: 7 years; handles, hinges, shelves: 7-10 years |
| Energy class (light source) | G |
| Door reversibility | Not available |
Frequently Asked Questions - WHWBU60D2B WHIRLPOOL
User questions about WHWBU60D2B WHIRLPOOL
0 question about this device. Answer the ones you know or ask your own.
Ask a new question about this device
Download the instructions for your Fridge in PDF format for free! Find your manual WHWBU60D2B - WHIRLPOOL and take your electronic device back in hand. On this page are published all the documents necessary for the use of your device. WHWBU60D2B by WHIRLPOOL.
USER MANUAL WHWBU60D2B WHIRLPOOL
Installation of Your Wine Cooler 2
Indications 2
The control panel of your wine Cooler.... 3
Storage diagram 4
Installation dimensions 5
Fixation 6
How to remove the shelf 7
Automatic door opening function 7
Recommended DRINKING temperature 8
Temperature Alarm 8
Temperature Recollection Function 8
CARE AND MAINTENANCE 9
Cleaning Your Wine cooler 9
Power Failure 9
Moving Your Wine cooler 9
Availability Of Spare Parts 9
TROUBLESHOOTING GUIDE.... 10

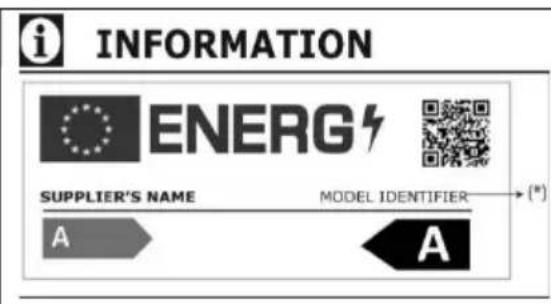
INFORMATION
ENERG

SUPPLIER'S NAME
MODEL IDENTIFIER
→ (*)
The model information as stored in the product data base can be reached by entering following website and searching for your model identifier (*) found on energy label.
https://eprel.ec.europa.eu/
In order to receive a complete assistance, please register your product on www.register10.eu
Installation of Your Wine Cooler
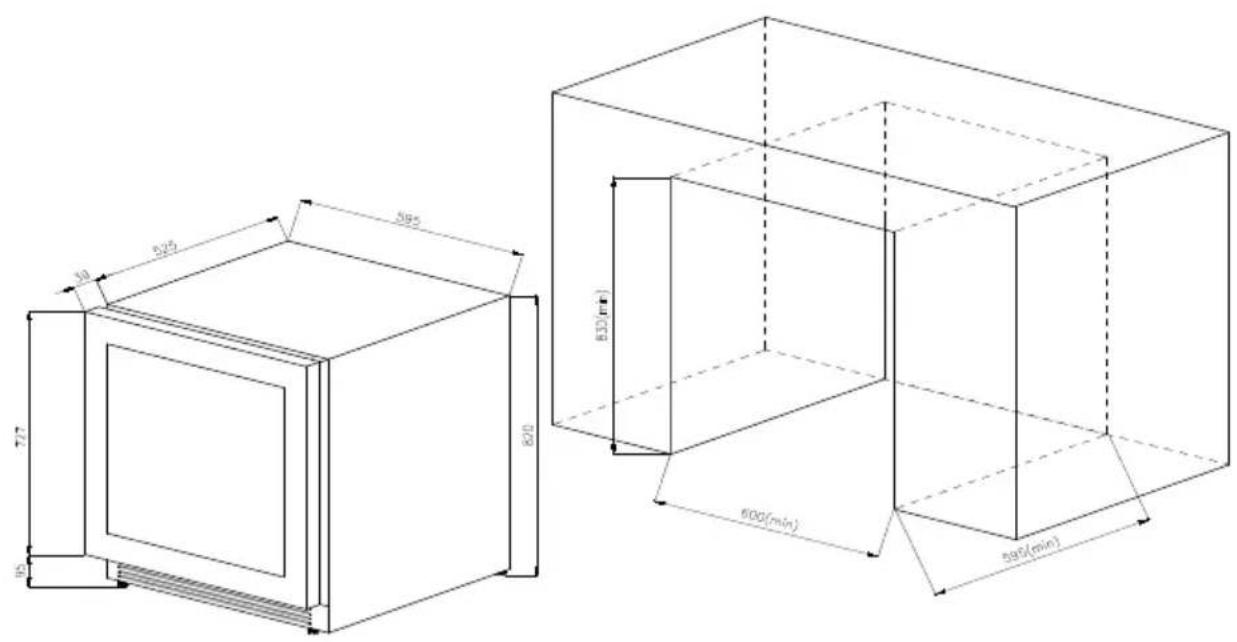
This appliance is designed to be for built-in installation.
There is not foreseen door reversibility. Do not try to reverse the door. This appliance is intended to be used exclusively for the storage of wine.
Place your Wine cooler on a floor that is strong enough to support it when it is fully loaded. To level your Wine cooler, adjust the front leveling leg at the bottom of the Wine cooler.
Locate the Wine cooler away from direct sunlight and sources of heat (stove, heater, radiator, etc.). Direct sunlight may affect the acrylic coating and heat sources may increase electrical consumption.
Extreme cold ambient temperatures and moist areas may also cause the unit not to perform properly. Plug the Wine cooler into an exclusive, properly installed-grounded wall outlet. Any questions concerning power and/or grounding should be directed toward a certified electrician or an authorized Products service center.
Indications
- Store wine in sealed bottles;
- Refrain to overload the cabinet;
- Do not open the door unless necessary;
- Opening the door for long periods can cause a significant increase of the temperature in the compartments of the appliance.
- Clean regularly surfaces that can come in contact with bottles and accessible drainage systems.
- If the refrigerating appliance is left empty for long periods, switch off, defrost, clean, dry, and leave the door open to prevent mold developing within the appliance.
- Refrain to cover shelves with aluminum foil or any other shelf material which may prevent air circulation;
-
Should the Wine cooler be stored without use for long periods it is suggested, after a careful cleaning, to leave the door ajar to allow air to circulate inside the cabinet in order to avoid possible formations of condensation, mold or odors.
• This product contains a light source of energy efficiency class G. -
Press and hold this button (⏻) for 3 seconds to turn off the appliance. With a slight press again to turn it on. After electrifying, the power supply key is long and bright.
- Changing the running modes
The default setting is "STD" (Standard) mode when appliance connect the power. Each press button to alternate the three modes: STD, ECO and DEMO.
-
Changing the LED light mode The default setting is door open light on with 50% brightness, door close light off. Each press button to alternate different modes: 24Hr, 30Min and 1Min.
-
24 Hr : The light will stay constantly illuminated whether the door is open or closed. (100% brightness when door open and 50% brightness when door closed).
- 30 Min : Delay off function A: 100% brightness when door open. 50% brightness when door closed and LED light will tune off automatically after 30 minutes.
-
1 Min : Delay off function B. 100% brightness when door open. 50% brightness when door closed and LED light will tune off automatically after one minute.
-
Upper zone temperature setting (up button) ∧ ① Press this button to increase the temperature by one degree increments. When the setting reaches the temperature upper limit value 10 °C. The set temperature will no change again.
- Upper zone temperature setting (down button) √ ② Press this button to lower the temperature by one degree increments. When the setting reach the temperature lower limit value 5 °C. The set temperature will no change again.
- Lower zone temperature setting (up button) ∧ ③ Press this button to increase the temperature by one degree increments. When the setting reach the temperature upper limit value 18^ C. The set temperature will no change again.
- Lower zone temperature setting (down button) √ ④ Press this button to lower the temperature by one degree increments. When the setting reach the temperature lower limit value 10 °C. The set temperature will no change again.
- To switch between the Celsius or Fahrenheit. Press and hold and for 3 seconds to switch between C and F. The indicator light will illuminate on the desired temperature setting.
- Key Lock button 🔒 The default setting is unlock when appliance connect the power. Press and hold the 🔒 button for 3 seconds to lock it. And press again and hold this 🔒 button for 3 seconds for unlock.
Temperature control range : upper zone: 5-10 °C , lower zone: 10-18 °C . The product have power off memory function.
Storage diagram
Total : 44 bottles max
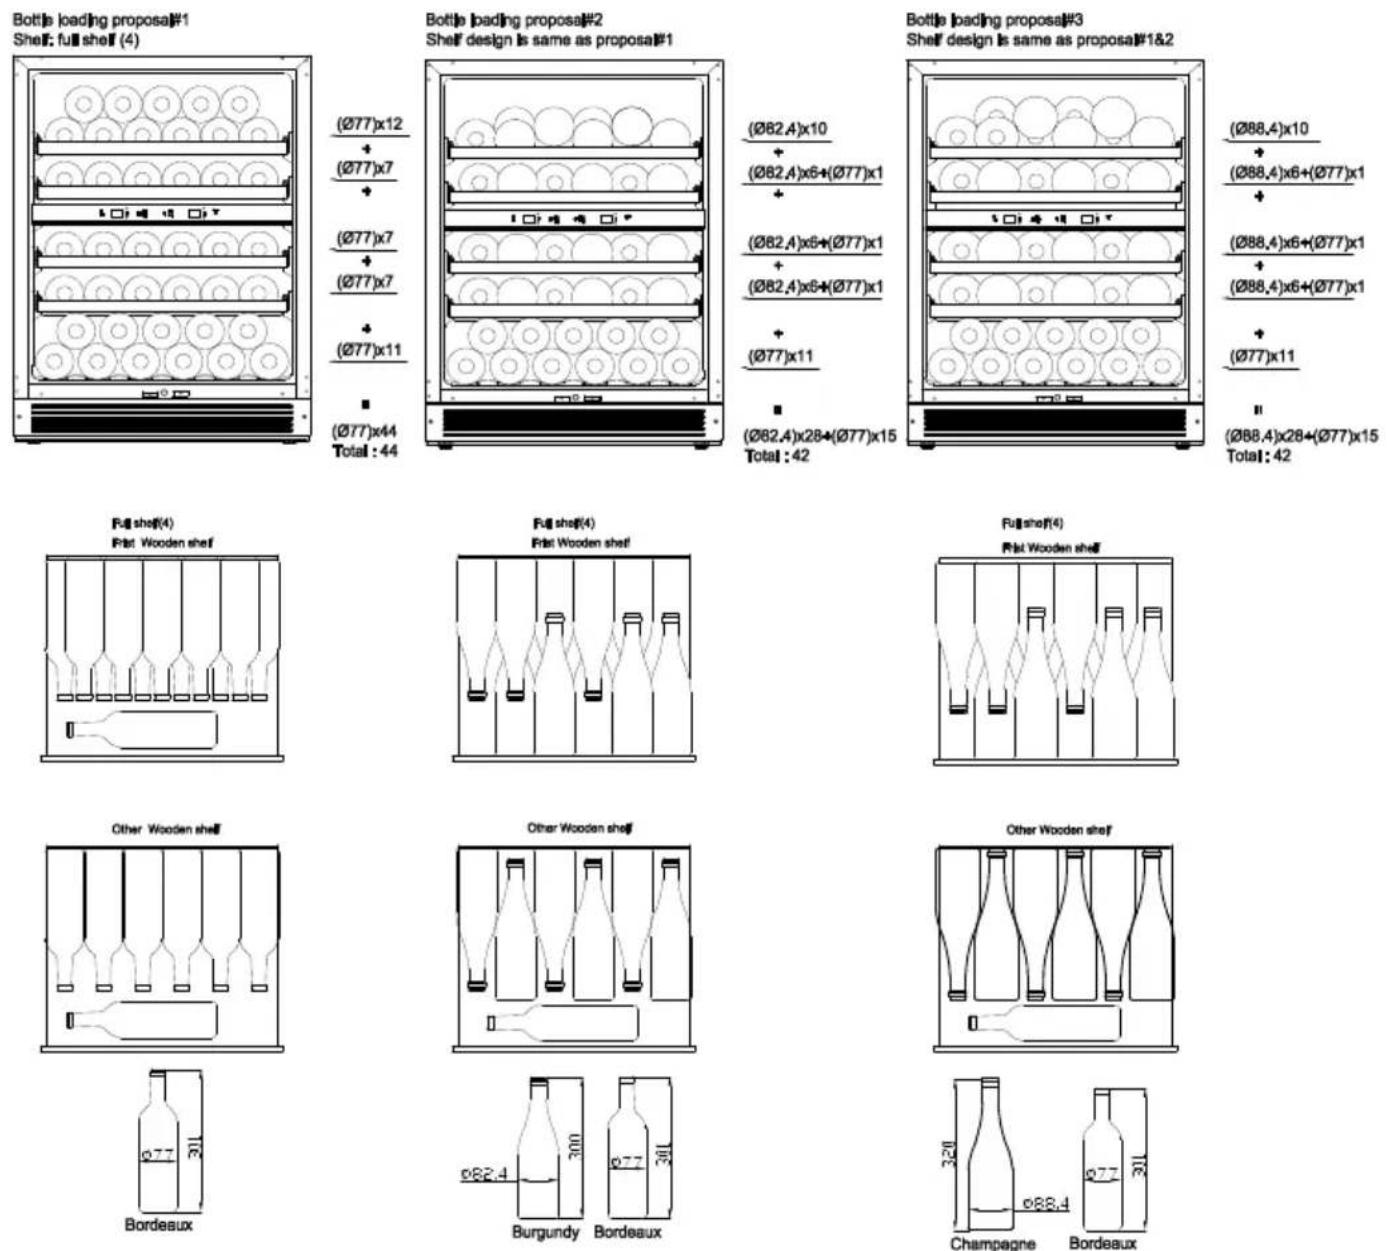
NOTE: The most energy-saving configuration requires the food box not to be positioned in the product.
Installation dimensions
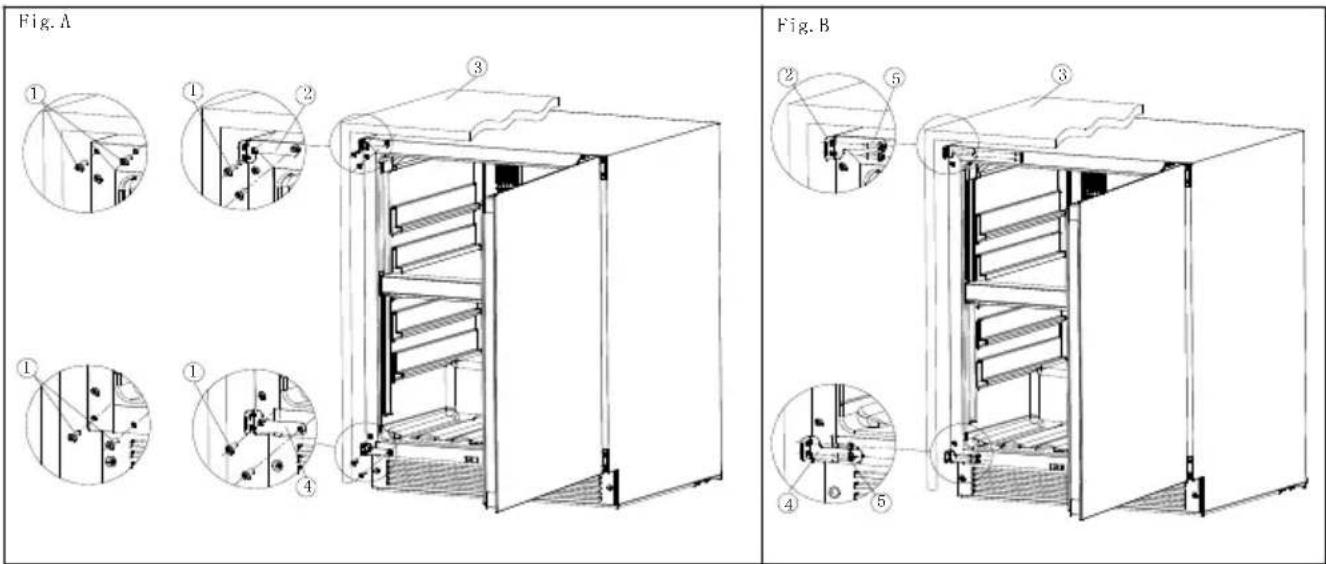
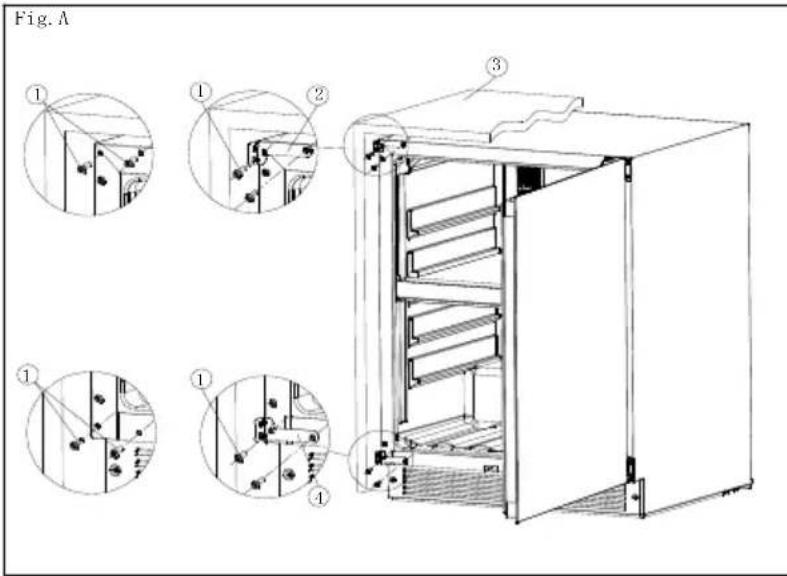
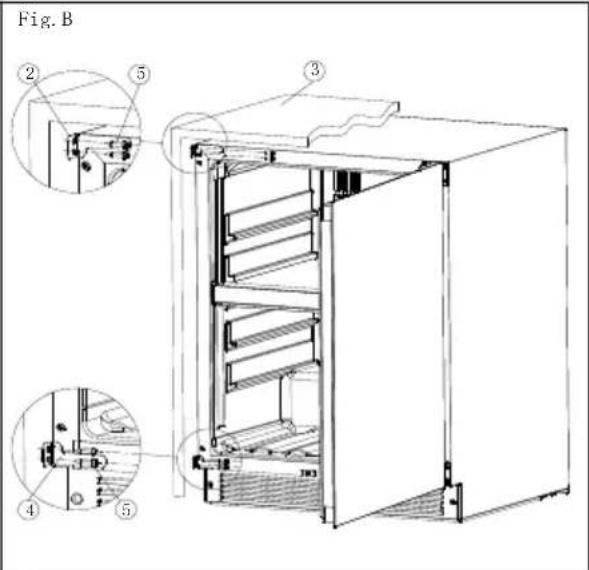
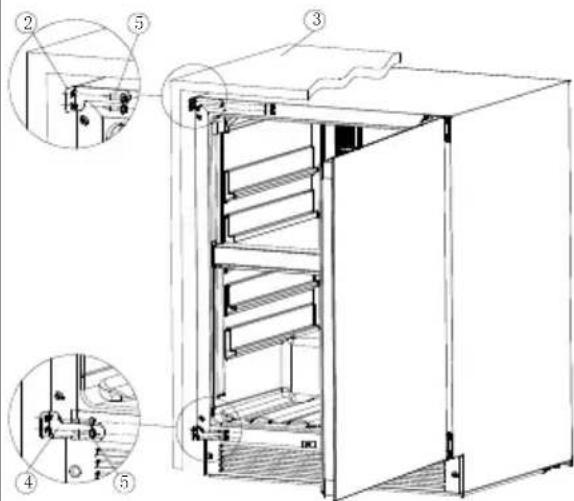
Fixation
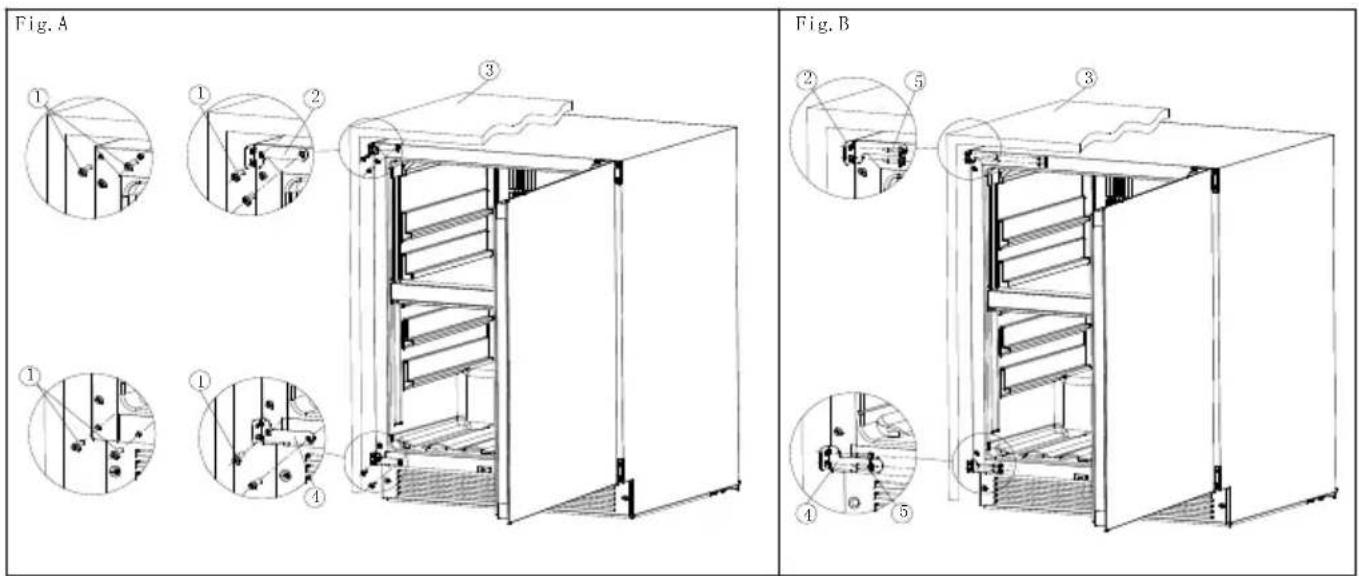
1 - M5*8 screws * 4 pieces
2 - Upper bracket * 1 piece
3 - Furniture
4 - Lower bracket * 1 piece
5 - ST4*12 self tapping screws * 4 pieces
- Built-in product into furniture, adjust product to the right place, then open the door to remove 2 screws from top-left corner and 2 screws from lower-left corner;
- Remove the spare part listed above from user manual bag ;
- Use 4 pieces of ①M5*8 screws to fix ②upper bracket on product's top-left screw holes and fix ④lower bracket on product's lower-left screw holes;
- Use 4 pieces of ⑤ST4*12 self tapping screws to fix ②upper bracket and ④lower bracket on the furniture.
How to remove the shelf
To prevent damaging the door gasket, make sure to have the door all the way opened when pulling shelves out of the rail compartment. To Remove Shelves :
- Fully extend the shelf you wish to remove (Fig. A)
- Pull the shelf towards you until the buckle is released. (Fig. B)
- Holding the shelf track with both hands, push the shelf up horizontally (Fig. C)

natural_image
Diagram of a refrigerator interior showing tray and shelf structure (no text or symbols)
natural_image
Diagram of a refrigerator interior showing rack arrangement and a hand valve (no text or symbols)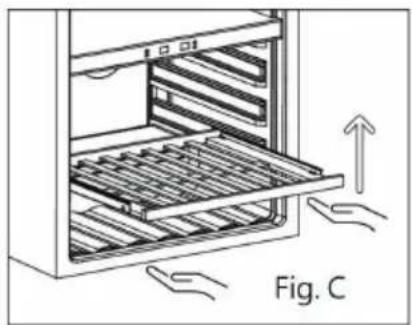
natural_image
Diagram of a refrigerator interior with hand gestures indicating lifting or positioning (no text or symbols)Automatic door opening function
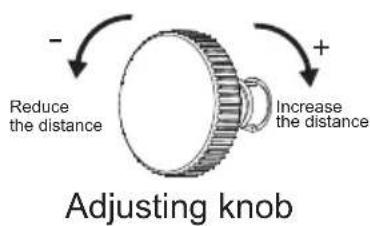
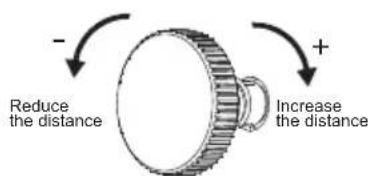
The automatic door opening function works by pressing the switch in front of the cabinet through the knob on the door to trigger the opening action.
The door clearance may change due to vibration and other factors in transit, it causes the automatic door opening function is insensitive or cannot be used normally.
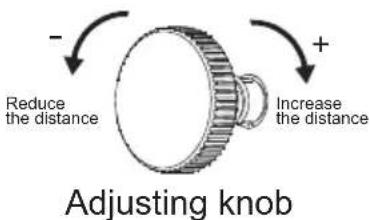
Please check the distance between the knob and the switch in
the door closed state and adjust to the most appropriate distance by rotating the knob. The door is opening automatically after power on, it indicates the distance between the knob and the switch is too close.
There is no response even press the door hard, it indicates the distance between the knob and the switch is too far.
The door is opening automatically even by gently touch, it indicates the distance between the knob and the switch is too close.
Please adjust the knob on the basis of the 1/4 circle in the above cases: rotate to the left, the knob is extended out of the door frame; rotated to the right, the knob is retracted into the door frame.
Recommended DRINKING temperature
The following (approximate) temperatures are recommended for wine drinking :
| For storing ALL TYPES OF WINES 12 – 14 °C | |
| Champagne NV, Sparkling 6 °C | |
| Champagne Vintage 10 °C | |
| Dry White Semillon, Sauvignon Blanc 8 °C | |
| Dry White Gewürztraminer, Riesling 10 °C | |
| Dry White Chardonnay 10 °C | |
| Vintage Chardonnay 14 °C | |
| Sweet White Sauternes Monbaillac, Late Harvest ice wine 10 °C | |
| Sweet whites vintage Sauternesz 14 °C | |
| Beaujolais 13 °C | |
| Red Pinot Noir 16 °C | |
| Vintage Pinot Noir red 18 °C | |
| Red Grenache, Syrah | 16 °C |
| Red Cabernet, Merlot, French, Australian, New Zealand, Chilean, Argentinean, Italian, Spanish, Californian | 18 °C |
Temperature Alarm
If inner temperature is higher than 23^ C, The “HI” is shown in display panel, and the buzzer alarm after one hour continuously. It inform that the inner temperature is too high, please check the reason. If inner temperature is lower than 0^ C, The “LO” is shown in display panel, and the buzzer alarm and the malfunction indicator light light at the same time.
Temperature Recollection Function
In the event of a power interruption, wine cooler can remember the previous temperature settings, and when the power is recovery, the cooler temperature will go back the same setting temperature as power off.
Note : In the event of a power interruption, wine cooler can remember the previous temperature settings, and when the power is recovery, the cooler temperature will go back the same setting temperature as power off.
CARE AND MAINTENANCE
Cleaning Your Wine cooler
- Turn off the power, unplug the appliance, and remove all items including shelves and rack.
- Wash the inside surfaces with a warm water and baking soda solution. The solution should be about 2 tablespoons of baking soda to a quart of water.
- Wash the shelves with a mild detergent solution.
- Wring excess water out of the sponge or cloth when cleaning area of the controls, or any electrical parts.
- Wash the outside cooler with warm water and mild liquid detergent. Rinse well and wipe dry with a clean soft cloth.
Power Failure
Most power failures are corrected within a few hours and should not affect the temperature of your appliance if you minimize the number of times the door is opened. If the power is going to be off for a longer period of time, you need to take the proper steps to protect your contents.
Moving Your Wine cooler
- Remove all items.
- Securely tape down all loose items (shelves) inside your appliance.
- Turn the adjustable leg up to the base to avoid damage.
- Tape the door shut.
- Be sure the appliance stays secure in the upright position during transportation. Also protect outside of appliances with a blanket, or similar item..
Availability Of Spare Parts
- Thermostats, temperature sensors, printed circuit boards and light sources are available for a minimum period of seven years after placing the last unit of the model on the market.
- Door handles, door hinges, trays and baskets for a minimum period of seven years and door gaskets for a minimum period of ten years, after placing the last unit of the model on the market.
TROUBLESHOOTING GUIDE
| PROBLEM POSSIBLE CAUSE | |
| Wine cooler does not operate. | Not plugged in. |
| The appliance is turned off. | |
| The circuit breaker tripped or a blown fuse. | |
| Wine cooler is not cold enough. | Check the temperature control setting. |
| External environment may require a higher setting. | |
| The door is opened too often. | |
| The door is not closed completely. | |
| The door gasket does not seal properly. | |
| Turns on and off frequently. | The room temperature is hotter than normal. |
| A large amount of contents has been added to the Wine cooler. | |
| The door is opened too often. | |
| The door is not closed completely. | |
| The temperature control is not set correctly. | |
| The door gasket does not seal properly | |
| The light does not work. | Not plugged in. |
| The circuit breaker tripped or a blown fuse. | |
| The bulb has burned out. | |
| The light button is “OFF”. | |
| Vibrations. Check to assure that the Wine cooler is level. | |
| The Wine cooler seems to make too much noise. | The rattling noise may come from the flow of the refrigerant, which is normal. |
| As each cycle ends, you may hear gurgling sounds caused by the flow of refrigerant in your Wine cooler. | |
| Contraction and expansion of the inside walls may cause popping and crackling noises. | |
| The Wine cooler is not level. | |
| The door will not close properly. | The Wine cooler is not level. |
| The door was reversed and not properly installed. | |
| The gasket is dirty. | |
| The shelves are out of position. | |
SOMMARIO
natural_image
Diagram of a refrigerator interior showing internal shelves and a door, labeled Fig. A (no text or symbols on the diagram itself)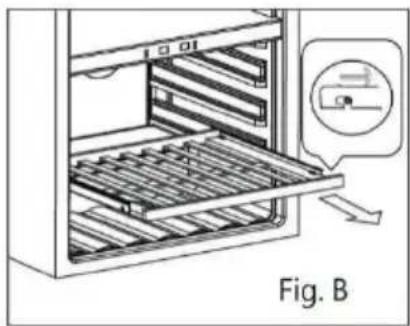
natural_image
Diagram of a refrigerator interior showing internal shelves and a hand gesture (no text or symbols)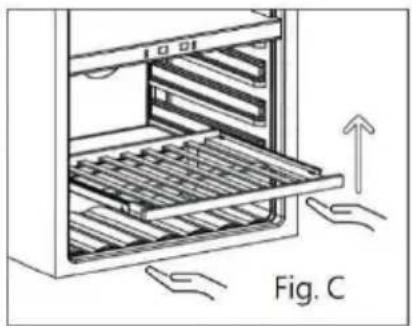
natural_image
Diagram of a refrigerator interior with hand gestures indicating lifting or positioning (no text or symbols)https://eprel.ec.europa.eu/
Fijación
natural_image
Diagram of a refrigerator interior showing the door, shelves, and drawer (no text or symbols)
natural_image
Diagram of a refrigerator interior showing the door, shelves, and ventilation duct (no text or symbols)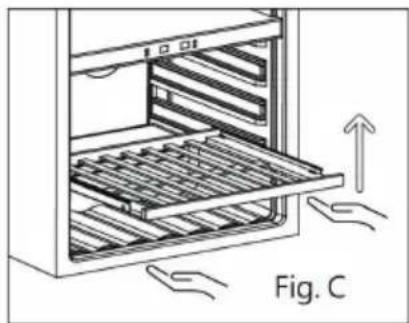
natural_image
Diagram of a refrigerator interior with hand gestures indicating lifting or positioning (no text or symbols)Remover as prateleiras 7
https://eprel.ec.europa.eu/
Fixação n
Remover as prateleiras
natural_image
Diagram of a refrigerator interior showing internal shelves and a door, labeled Fig. A (no text or symbols on the diagram itself)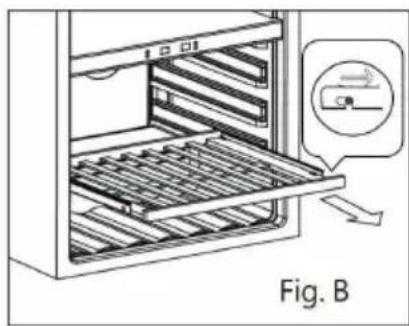
natural_image
Diagram of a refrigerator interior showing internal shelves and a labeled component (no text or symbols on the diagram itself)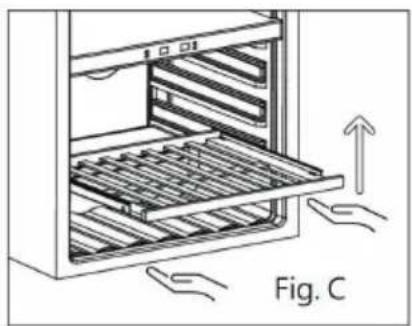
natural_image
Diagram of a refrigerator interior with hand gestures indicating lifting or positioning (no text or symbols)Temperatura recomendada para as BEBIDAS
natural_image
Diagram of a refrigerator interior showing internal shelves and a door, labeled Fig. A (no text or symbols on the diagram itself)
natural_image
Diagram of a refrigerator interior showing internal shelves and a hand gesture (no text or symbols)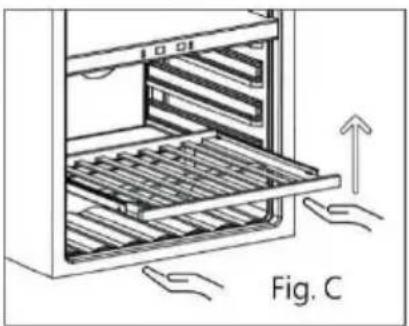
natural_image
Diagram of a refrigerator interior with hand gestures indicating lifting or positioning (no text or symbols)Funkcija automatskog otvaranja vrata
Adjusting knob
Funkcija automatskog otvaranja vrata radi pritiskom na prekidač na prednjoj strani uređaja putem okretne tipke na vratima kako bi se aktiviralo otvaranje.
Fig. B
① Vijci M5*8 * 4 komada
② Gornji nosač * 1 komad
③ Nameštaj
④ Donji nosač * 1 komad
⑤ *12 ST4 samoreznih vijaka* 4 komada
- Proizvod ugrađen u nameštaj, stavite proizvod na pravo mesto, a zatim otvorite vrata da uklonite 2 zavrtnja iz gornjeg levog ugla i 2 zavrtnja iz donjeg levog ugla;
- Uklonite gore navedeni rezervni deo iz kesice sa uputstvom za upotrebu;
- Koristite 4 komada ① M5*8 zavrtnja da pričvrstite ② gornji držač u gornje leve otvore za zavrtnje na proizvodu i pričvrstite ④ donji držač u donje leve rupe za zavrtnje na proizvodu:
- Koristite 4 komada ⑤ ST4*12 samoureznih vijaka da pričvrstite ② gornji i ④ donji nosač za nameštaj.
Uklanjanje polica
natural_image
Diagram of a refrigerator interior showing internal shelves and a door, labeled Fig. A (no text or symbols on the diagram itself)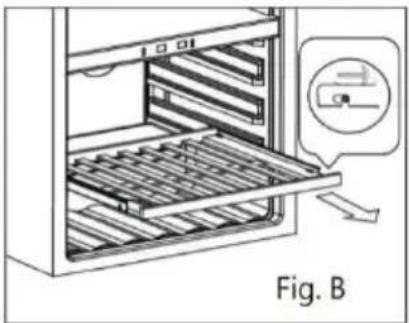
natural_image
Diagram of a refrigerator interior showing internal shelves and ventilation slots, with a magnified inset highlighting a hand mechanism (no text or symbols)
natural_image
Diagram of a kitchen appliance with a tray and side panel, labeled Fig. C (no text or symbols on the diagram itself)Funkcija automatskog otvaranja vrata
Funkcija automatskog otvaranja vrata radi pritiskom na prekidač na prednjoj strani uređaja preko okretnog dugmeta na vratima da bi se aktiviralo otvaranje.
Udaljenost otvaranja vrata može da se promeni usled vibracija i drugih faktora u transportu koji mogu učiniti funkciju automatskog otvaranja vrata neprimetnom ili nemogućnošću da se normalno koristi.
Proverite rastojanje između okretnog dugmeta i
prekidača kada su vrata zatvorena i podesite na najpogodnije rastojanje okretanjem okretnog dugmeta. Ako se vrata automatski otvore nakon uključivanja uređaja, to znači da je rastojanje između okretnog dugmeta i prekidača premalo.
Ako nema odgovora čak ni kada snažno pritisnete vrata, to ukazuje da je rastojanje između okretnog dugmeta i prekidača preveliko.
Ako se vrata automatski otvaraju čak i laganim dodirom, to ukazuje da je rastojanje između okretnog dugmeta i prekidača premalo.
Molimo vas da podesite okretno dugme na osnovu ¼ kruga u gornjim slučajevima: rotirajte ulevo, okretno dugme je produženo izvan okvira vrata; rotirajte udesno, dugme se uvlači u okvir vrata.
Preporučena temperatura za PIĆA
UPUTSTVA ZA REŠAVANJE PROBLEMA
https://eprel.ec.europa.eu/
natural_image
Diagram of a refrigerator interior showing internal shelves and a door, labeled Fig. A (no text or symbols on the diagram itself)
natural_image
Diagram of a refrigerator interior showing internal shelves and a hand valve, labeled Fig. B (no text or symbols on the diagram itself)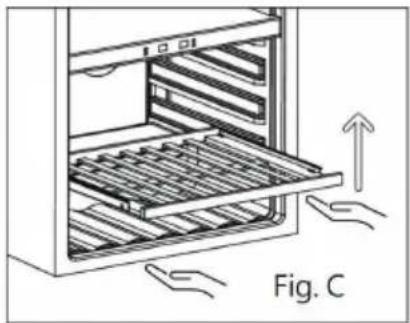
natural_image
Diagram of a refrigerator interior with hand gestures indicating lifting or positioning (no text or symbols)https://eprel.ec.europa.eu/
natural_image
Diagram of a refrigerator interior showing a rack with an open door and a directional arrow indicating flow (no text or symbols)
natural_image
Diagram of a refrigerator interior showing tray, shelves, and door (no text or symbols)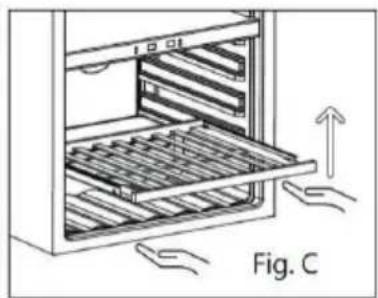
natural_image
Diagram of a refrigerator interior with hand gestures indicating lifting or opening (no text or symbols)Adjusting knob
HANDLEIDING VOOR PROBLEEMOPLOSSING ...... 10
natural_image
Diagram of a refrigerator interior showing internal shelves and a door, labeled Fig. A (no text or symbols on the diagram itself)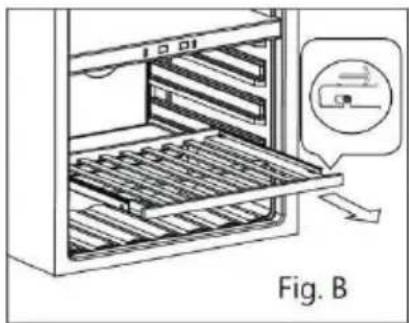
natural_image
Diagram of a refrigerator interior showing internal shelves and a labeled component (no text or symbols on the diagram itself)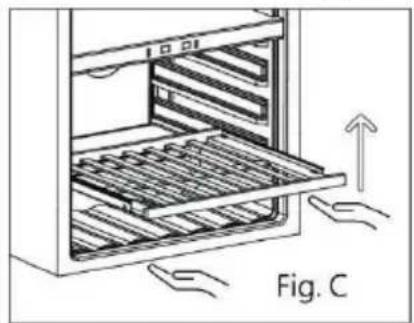
natural_image
Diagram of a refrigerator interior with hand gestures indicating lifting or positioning (no text or symbols)HANDLEIDING VOOR PROBLEEMOPLOSSING
natural_image
Diagram of a refrigerator interior showing internal shelves and a directional arrow, labeled Fig. A (no text or symbols on the diagram itself)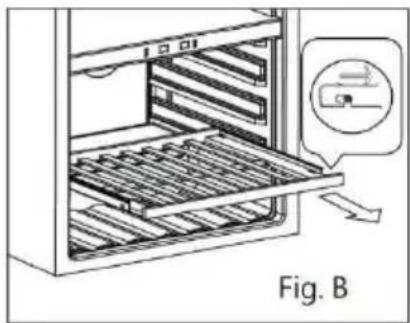
natural_image
Diagram of a refrigerator interior showing internal shelves and a hand gesture, labeled Fig. B (no text or symbols on the diagram itself)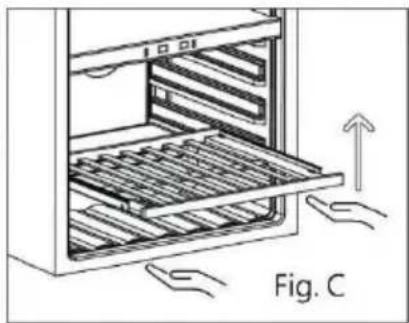
natural_image
Diagram of a refrigerator interior with hand gestures indicating lifting or positioning (no text or symbols)natural_image
Diagram of a refrigerator interior showing internal shelves and a door, labeled Fig. A (no text or symbols on the diagram itself)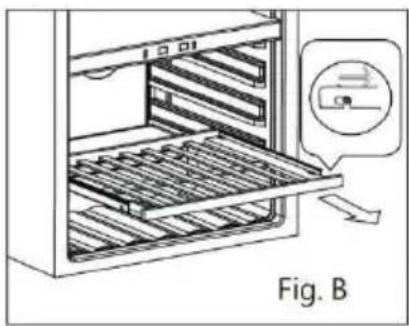
natural_image
Diagram of a refrigerator interior showing internal shelves and a hand valve, labeled Fig. B (no text or symbols on the diagram itself)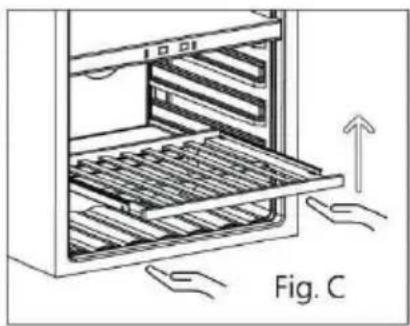
natural_image
Diagram of a refrigerator interior with hand gestures indicating lifting or positioning (no text or symbols)
- INFORMATION
- In order to receive a complete assistance, please register your product on www.register10.eu
- Installation of Your Wine Cooler
- There is not foreseen door reversibility. Do not try to reverse the door. This appliance is intended to be used exclusively for the storage of wine.
- Indications
- Storage diagram
- Fixation
- How to remove the shelf
- Automatic door opening function
- Recommended DRINKING temperature
- Temperature Alarm
- Temperature Recollection Function
- CARE AND MAINTENANCE
- Cleaning Your Wine cooler
- Power Failure
- Moving Your Wine cooler
- Availability Of Spare Parts
- SOMMARIO
- Fijación
- Fixação n
- Remover as prateleiras
- Temperatura recomendada para as BEBIDAS
- Funkcija automatskog otvaranja vrata
- Uklanjanje polica
- Preporučena temperatura za PIĆA
Brand : WHIRLPOOL
Model : WHWBU60D2B
Category : Fridge