SHSK 3.7 A1 - Hair clippers SILVERCREST - Free user manual and instructions
Find the device manual for free SHSK 3.7 A1 SILVERCREST in PDF.


| Product Type | Compact Hair Trimmer |
| Brand | SilverCrest |
| Model | SHSK 3.7 A1 |
| Battery Runtime | Approx. 40 minutes |
| Charging Time | Approx. 90 minutes |
| Battery Type | Integrated rechargeable lithium-ion, 3.7 V, 700 mAh |
| Power Supply | Power adapter 5 V, 1000 mA (MODEL ZDJ050100EU or ZDJ050100BS) |
| Cutting Lengths with Comb | 1.5 / 2.0 / 2.5 / 3.0 / 4.5 / 6.0 / 9.0 / 12.0 / 15.0 mm (9 combs included) |
| Cutting Length without Comb | 0.5 to 1.0 mm depending on angle |
| Protection Class (trimmer) | IPX5 (protection against water jets) |
| Protection Class (adapter) | IP44 or IP20 depending on model |
| Cleaning | Washable under running water (except power adapter) |
| Maintenance of the Cutting Unit | Oil every 6 months with supplied oil or sewing machine oil |
| Replacement of the Cutting Unit | Possible, removable cutting unit (sold separately) |
| Included Accessories | 9 combs, power adapter, cleaning brush, oil bottle, storage case |
| Warranty | 3 years from date of purchase |
| Usage | Household use, for human hair only |
| Operating Temperature | -10 °C to +40 °C |
Frequently Asked Questions - SHSK 3.7 A1 SILVERCREST
User questions about SHSK 3.7 A1 SILVERCREST
0 question about this device. Answer the ones you know or ask your own.
Ask a new question about this device
Download the instructions for your Hair clippers in PDF format for free! Find your manual SHSK 3.7 A1 - SILVERCREST and take your electronic device back in hand. On this page are published all the documents necessary for the use of your device. SHSK 3.7 A1 by SILVERCREST.
USER MANUAL SHSK 3.7 A1 SILVERCREST
natural_image
Close-up of a black and gray electronic device with a textured top and side profile (no visible text or symbols)
text_image
www.fidl-service.comCOMPACT HAIR TRIMMER SHSK 3.7 A1
HOYER Handel GmbH
Tasköprüstraße 3
DE-22761 Hamburg
DEUTSCHLAND
Status of information · Version des informations · Stand van de informatie Informationernes stand · Stand der Informationen:
09/2017 ID: SHSK 3.7 A1_17_V1.3
IAN 291770 IAN 291770 DK
NL GB IE DK FR BE NI DE


- Overview ...... 3
- Intended purpose .... 5
- Safety instructions .... 5
- Items supplied 10
- Charging 11
- Operation 12
6.1 Before switching on for the first time..... 12
6.2 Pushing on/ removing the comb attachments 12
6.3 Cutting hair 13
6.4 Handling of the hair trimmer 14
- Cleaning and care 16
7.1 Power unit 16
7.2 Comb attachments.... 16
7.3 Hair trimmer with blade unit.... 17
- Disposal 18
- Troubleshooting 19
- Technical specifications 20
- Ordering accessories 22
- Warranty of the HOYER Handel GmbH ... 23
2
GB


1. Overview
1 Blade unit
2 LED (charging and operating display):
| during operation without power unit: | |
| lit green: Battery sufficiently charged | |
| flashing red: The battery | must be charged |
| connected to the power unit: | |
| lit green: Battery fully charged | |
| lit red: The battery is being charged | |
3 On/ off switch
4 Release buttons for the blade unit
5 Connection for power unit
6 Power unit
7 9 comb attachments for 1.5 mm to 15 mm cutting length (some not shown)
8 Mount for comb attachment
Not shown:
9 Cleaning brush
10 Oil bottle
11 Storage pouch
Thank you for your trust!
Congratulations on your new compact hair trimmer.
For a safe handling of the device and in order to get to know the entire scope of features:
- Thoroughly read these user instructions prior to initial use.
- Above all, observe the safety instructions!
- The device should only be used as described in these user instructions.
- Keep these user instructions for reference.
- If you pass the device on to someone else, please include this copy of the user instructions. The user instructions are a part of the product.
We hope you enjoy your new compact hair trimmer!
Symbols on your device

Suitable for washing under running water.
4




2. Intended purpose
This compact hair trimmer is intended exclusively for cutting human hair.
The device is designed for private home use and must not be used for commercial purposes. The device must only be used indoors.
Foreseeable misuse
WARNING! Risk of material damage!
Do not use the device to cut artificial hair or animal hair.
3. Safety instructions
Warnings
If necessary, the following warnings will be used in these user instructions:
DANGER! High risk: failure to observe this warning may result in injury to life and limb.
WARNING! Moderate risk: failure to observe this warning may result in injury or serious material damage.
CAUTION: low risk: failure to observe this warning may result in minor injury or material damage.
NOTE: circumstances and specifics that must be observed when handling the device.

GB
5

Instructions for safe operation
- This device can be used by children from the age of 8 and people with restricted physical, sensory or intellectual abilities or people without adequate experience and/ or understanding, if they are supervised or instructed on how to use this device safely and if they are aware of the resulting hazards. Children must not play with the device. Cleaning and maintenance by the user must not be performed by children without supervision.
- Keep children under the age of 8 away from the device and the power cable.
This symbol indicates that you can clean the device under running water. DANGER! Disconnect the device from the plug-in power unit prior to doing so. Only use the included original power unit for mains operation.

DANGER for children
Children must not play with packing material. Do not allow children to play with plastic bags. There is a risk of suffocation.
- Keep the device out of the reach of children.
6
GB


DANGER to and from pets and livestock
Electrical devices can represent a hazard to pets and livestock. In addition, animals can also cause damage to the device. For this reason you should keep animals away from electrical devices at all times.
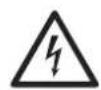
DANGER! Risk of electric shock due to moisture
The following safety instructions apply to the power unit and the device connected to the power unit.
Whilst in battery mode, the device can be rinsed under running water, however it cannot be submerged in water (protection class IPX5).
- Do not use the connected device in the vicinity of bathtubs, showers, washbasins or other vessels containing water.
- Never touch the connected device with wet hands.
- The connected device, the cable and the power unit must never be rinsed under running water.
- If the connected device has fallen into water, pull out the power unit immediately, and only then remove the device from the water. Do not use the device again, but have this checked by a specialist.
- If the device is used in a bathroom, the power unit must be pulled out after use, as the proximity of water represents a hazard, even when the device is switched off.
- Installation of a residual current device (FI/ RCD) with a rated residual operating current of no more than 30 mA is recommended to provide additional protection. Ask your electrician for advice. The installation should only be carried out by a qualified electrician.
The following safety instructions also apply to the device in battery mode:
- The device, the cable and the power unit must not be immersed in water or any other liquids.
- Should liquid enter the device, have it checked before starting the device up again.

DANGER! Risk of electric shock
- Never put the device into operation if there are visible damages to the device, the power unit or the cable or if the device has been dropped before.
- Connect the cable to the device before plugging the power unit into a wall socket.
- Only connect the power unit to a properly installed, easily accessible wall socket, the voltage of which corresponds to the specifications on the rating plate. The wall socket must continue to be easily accessible after the device is plugged in.
- Ensure that the cable cannot be damaged by sharp edges or hot surfaces.
- Ensure that the cable is not trapped or crushed.
- When removing the power unit from the wall socket, always pull the power unit and never the cable.
- Pull the power unit out of the wall socket, ...
... after every use,
... after each charging process,
... if there is a fault,
... before connecting the device to the cable,
... before you clean the device and
... during thunderstorms.
8



To avoid any risk, do not make modifications to the device. Repairs must be carried out by a specialist workshop or the Service Centre.

DANGER from batteries
- Protect the battery against mechanical damages. Fire hazard!
Do not expose the device to direct sunshine or heat. The ambient temperature should not be lower than -10 °C and higher than +40 °C. - The charge contacts on the device must not be connected by metallic objects.
- The battery may only be charged with the original accessory (power unit).
- Should the electrolyte solution leak out of the battery, avoid contact with eyes, mucous membranes and skin. Rinse immediately with plenty of clean water and consult a doctor. The electrolyte solution can cause irritation.
WARNING! Risk of injury from cutting
The tips of the blade unit are sharp. Handle with care.
- Do not use the device with a damaged blade unit or a damaged comb attachment.
- Switch off the device, ...
... before replacing or changing the comb attachments,
... before your remove or insert the blade unit,
... as well as prior to any cleaning.
GB
9


WARNING! Risk of injury
- Do not use the device on open wounds, cuts, sunburn or blisters.
- Place the cable in such a way that no one trips over it or steps on it.
WARNING! Risk of material damage
- Use the original accessories only.
- Never place the device on hot surfaces (e.g. hot plates) or near heat sources or open fire.
- Do not cover the power unit to prevent overheating.
- The device may be cleaned under running water. Do not use any other liquids.
- Do not use any astringent or abrasive cleaning agents.
4. Items supplied
1 Compact hair trimmer
9 Comb attachments 7
1 Power unit 6
1 Cleaning brush 9
1 Oil bottle 10
1 Storage pouch 11
1 Copy of the user instructions
10



5. Charging
NOTES:
- Before the device is used for the first time, and during the following three charging procedures, the device should be charged for 90 minutes in each case.
- When the batteries are nearly empty, the LED 2 flashes red. The device can then only be used for a short time without being connected to the electricity supply.
-
When the battery is fully charged, the device can be used for approximately 40 minutes without being connected to the power supply.
-
Switch off the device with the on/off switch 3 if necessary.
- Connect the power unit 6 to the connector 5 of the device.
- Insert the power unit 6 into a readily accessible wall socket whose voltage matches the voltage stated on the rating plate.
- The LED 2 is lit red and the battery is charged. When the battery is fully charged, the LED 2 is lit green. When the battery is fully charged, the device can be used for approximately 40 minutes without being connected to the power supply.
6. Operation
6.1 Before switching on for the first time
CAUTION :
- After unpacking, there may still be oil residues on the cutting blades of the blade unit 1. Remove these with an absorbent, lint-free cloth before using the device for the first time.
Regardless of the charging state of the battery, the compact hair trimmer can always be used in mains operation.
- Before switching to mains operation, ensure that the device is switched off.
- Connect the power unit 6 to the connector 5 of the device.
- Insert the power unit 6 into a readily accessible wall socket whose voltage matches the voltage stated on the rating plate.
- Switch on the device with the on/off switch 3.
6.2 Pushing on/ removing the comb attachments
WARNING! Risk of injury!
- Switch off the device before replacing or changing one of the comb attachments 7.
The comb attachments 7 are marked on the underside with the cutting length:
(1.5/2.0/2.5/3.0/4.5/6.0/9.0/12.0/15.0 mm)
12



Pushing on
- Figure A: to push on one of the comb attachments 7, push it over the blade unit 1 from the front, and press it upwards at the rear of the device until it audibly clicks into the mount 8.
Removing
- Release the comb attachment 7 at the mount 8, and push it forwards off the blade unit 1.
6.3 Cutting hair

DANGER! Risk of electric shock due to moisture!
- The hair trimmer and the power unit 6 must not be submerged in water, and must therefore not be operated in a shower/ bath.
WARNING! Risk of injury!
- The tips of the blade unit 1 are sharp. Handle with care.
WARNING!
- Do not use the device on open wounds, cuts, sunburn or blisters.
NOTE: Trimming hair is possible both in battery mode and in mains operation.
- Comb through long hair before cutting it.
- Select the appropriate comb attachment 7 for the desired cutting length: (1.5/2.0/2.5/3.0/4.5/6.0/9.0/12.0/15.0 mm).
- Without a comb attachment 7, you achieve a cutting length of 0.5 to 1.0 mm, depending on the angle at which you hold the hair trimmer against the skin.


- Hold the hair trimmer with the underside parallel to the skin surface.
- Move the blade unit 1 of the hair trimmer slowly and evenly against the direction of hair growth.
- Stretch your skin in complicated areas, such as the neck, to achieve better results.
- After each use for cutting hair, switch the device off and clean the parts carefully (see “Cleaning and care” on page 16).
6.4 Handling of the hair trimmer
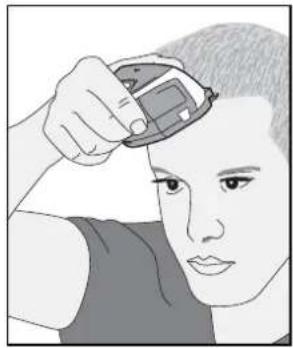
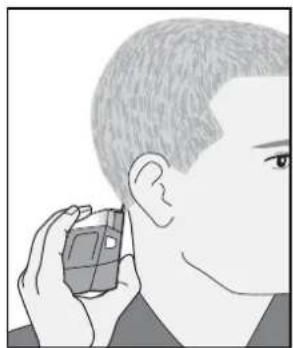
The particularly compact form of this hair trimmer allows trimming of one's own hair even in difficult to access locations such as - for example - in the neck area or at the back of your head.
natural_image
Illustration of a person adjusting their hair with a device (no text or symbols visible)Top of the head:
Hold the device at the front with your thumb. The other fingers grasp the rear side of the device.
natural_image
Illustration of a person holding a small object near their head (no text or symbols visible)Back of the head and neck:
Hold the device on the underside with your thumb. The other fingers grasp the top and front sides of the device.
14




natural_image
Illustration of a person wearing a pair of glasses, hand holding the eyeshadow (no text or symbols)Sides:
Grasp the device from its sides.
natural_image
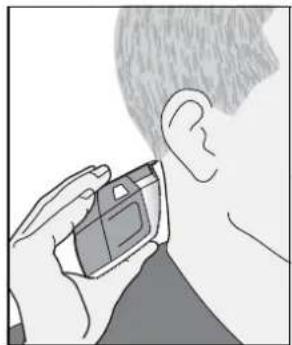
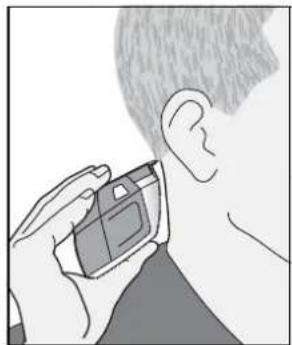
Illustration of a person holding a small electronic device near the ear (no text or symbols visible)Hairlines:
In order to cut hairlines (particularly in the neck area), turn over the device and hold it vertically to the skin surface. Work from the top downwards.
Hold the device at the top with your thumb. The other fingers grasp the rear side and underside of the device.


15

7. Cleaning and care

DANGER! Risk of electric shock!
- Pull the power unit 6 out of the wall socket before you clean the device.
WARNING! Risk of injury!
- Always switch off the device before cleaning it.
WARNING! Risk of material damage!
- The hair trimmer may be cleaned under running water. Do not use any other liquids.
- Do not use any astringent or abrasive cleaning agents.
NOTE: clean the device after every use.
7.1 Power unit
• Wipe down the power unit 6 with a damp cloth.
7.2 Comb attachments
- Remove the comb attachment 7.
- Rinse the comb attachments 7 with water and let them dry before reattaching them to the device.
7.3 Hair trimmer with blade unit
Replacing the blade unit
You can reorder a new blade unit 1 (see "Ordering accessories" on page 22).
• Figure B: press the release buttons 4 and pull out the blade unit 1.
- Slide the new blade unit 1 into the hair trimmer from the front until it clicks into place.
Dry cleaning of the blade unit
- Use the cleaning brush 9 supplied to remove residual hairs from the blade unit 1 after every use.
Wet cleaning of the blade unit and hair trimmer
The hair trimmer and blade unit 1 may be cleaned under clean running water.
- Remove the comb attachment 7, if necessary.
- Clean the blade unit 1 and the hair trimmer under running water.
- Allow the parts to dry completely.
Oiling the blade unit
For oiling, use the oil 10 supplied, or an acid-free oil, e.g. sewing machine oil.
- Every 6 months or so, apply a few drops of oil onto the cutting blade of the blade unit 1 from above.
- Switch the device on for a few minutes to spread the oil around.
- Using a soft, lint-free cloth, wipe off the surplus oil, if necessary.
8. Disposal
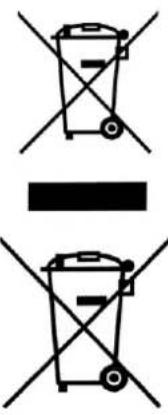
The battery integrated into this device must not be disposed of in household waste. The device must be disposed of properly with the battery installed.
text_image
Diagram showing three crossed-out waste bins with prohibition signs, indicating no waste or no waste.This product is subject to the provisions of European Directive 2012/19/EC. The symbol showing a wheelie bin crossed through indicates that the product requires separate refuse collection in the European Union. This applies to the product and all accessories marked with this symbol. Products identified with this symbol may not be discarded with normal household waste, but must be taken to a collection point for recycling electric and electronic appliances. Recycling helps to reduce the consumption of raw materials and protect the environment.
Packaging
When disposing of the packaging, make sure you comply with the environmental regulations applicable in your country.
9. Troubleshooting
If your device fails to function as required, please try this checklist first. Perhaps there is only a minor problem, and you can solve it yourself.

DANGER! Risk of electric shock!
- Do not attempt to repair the device yourself under any circumstances.
| Fault Possible causes / Action | |
| No function | Has the device been connected to the power supply?Inspect the connections.Is the battery empty? |
| The device cannot be switched on. | Is the battery empty? |
| Cutting performance is deteriorating. | Bl a d e u n i t 1B l a d e u n i t 1New blade units 1 are available for reorder. |
| Battery cannot be charged or the battery performance is very low. | The battery have reached the end of its service life. The device with the installed battery must be disposed of properly (see “Disposal” on page 18). |
cleaned?
oiled?
10. Technical specifications
| Model: SHSK 3.7 A1 | |
| Hair trimmer: Input: 5 V , 1 | 000 mA === |
| Protection type of the hair trimmer: | IPX5 (protection against jet of water from all directions) |
| Battery: | 1x 3.7 V Li-ion, 700 mAh |
| Power unit(MODEL ZDJ050100EU or MODEL ZDJ050100BS): | Input: 100-240 V ~ 50/60 Hz,0.2 A max.Output: +○-5 V === , 1000 mA |
| Protection class of the power unit: | II □ |
| Protection type of the power unit(MODEL ZDJ050100EU): | IP44 (protection against penetration by solid foreign objects with a diameter >1.0 mm / protection against water splashes from all directions) |
| Protection type of the power unit(MODEL ZDJ050100BS): | IP20 (protection against penetration by solid foreign objects with a diameter >12.5 mm) |
| Ambient conditions: only approved for indoor use | |
| Operating temperature: -10 | °C to +40 °C |
Subject to technical modification.
20



Technical Symbols
 | Double insulation |
 | With the CE marking, HOYER Handel GmbH declares the conformity with EU guidelines. |
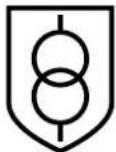 | Enclosed safety transformer |
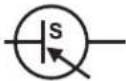 | Switched-mode power supply |

11. Ordering accessories
Accessories for the compact hair trimmer SHSK 3.7 A1 can be reordered.
Order online
shop.hoyerhandel.com

text_image
shop.hoyerhandel.comThe QR code will take you to a website where you can reorder.
Scan the QR code with your smartphone/ tablet.
22



12. Warranty of the HOYER Handel GmbH
Dear Customer,
your device is provided with a 3 year warranty starting with the purchase date. In the event of product defects, you are entitled to statutory rights against the vendor. These statutory rights are not restricted by our warranty presented in the following.
Warranty conditions
The warranty period starts with the purchase date. Please keep the original purchase receipt in a safe place. This document is required to verify the purchase.
If within three years from the purchase date of this product a material or factory defect occurs, the product will be repaired or replaced by us – at our discretion – free of charge to you. This warranty implies that within the period of three years the defective device and the purchase receipt are presented, including a brief written description of the defect and the time it occurred.
If the defect is covered by our warranty, the repaired or a new product will be returned to you. No new warranty period starts with a repair or replacement of the product.
Warranty period and statutory claims for defects
The warranty period is not extended when the warranty has been claimed. This also applies to replaced and repaired parts. Any damages and defects already existing at the time of purchase must be reported immediately upon unpacking. Repairs arising after the expiration of the warranty period are .
Warranty coverage
The device was produced carefully according to strict quality guidelines and tested diligently prior to delivery.
The warranty applies to material or factory defects.
Excluded from the warranty are wear parts subject to normal wear and damages to fragile parts, e.g. switches, batteries, lamps or other parts manufactured from glass.
This warranty expires if the product is damaged, not used as intended or not serviced. For the proper operation of the product, all instructions listed in the operating instructions must be observed carefully. Any form of use and handling that is advised against in the operating instructions or warned against must always be avoided.
The product is only intended for private and not for commercial use. In the case of incorrect and improper treatment, use of force and interventions not performed by our authorised Service Centre, the warranty shall cease.
Handling in case of a warranty claim
In order to ensure prompt processing of your matter, please observe the following notes:
- Please keep the article number IAN: 291770 and the purchase receipt as a purchase verification for all inquiries.
- The article number can be found on the rating plate, an engraving, the title page of your instructions (in the bottom left), or as a label on the rear or underside of the device.
- If faulty operation or other defects occur, first contact the Service Centre listed in the following by telephone or email.
- Then, you are able to send a product reported as defective free of charge to the service address specified to you, including the purchase receipt and the information on the defect and when it occurred.

Please visit www.lidl-service.com to download this and many other manuals, product videos and software.
24




Service Centre
GB Service Great Britain
Tel.: 0871 5000 720 (£ 0.10/ Min.)
E-Mail: hoyer@lidl.co.uk
IE Service Ireland
Tel.: 1890 930 034
(0,08 EUR/ Min., (peak)) (0,06 EUR/ Min., (off peak))
E-Mail: hoyer@lidl.ie
IAN: 291770
Supplier
Please note that the following address is no service address. First contact the aforementioned Service Centre.
HOYER Handel GmbH
Tasköprüstraße 3
22761 Hamburg
Germany



25

Sommaire
natural_image
Illustration of a person using a medical device to adjust their hair (no text or symbols visible)Sommet de la tête :
natural_image
Illustration of a person holding a small object, no text or symbols presentnatural_image
Illustration of a person holding a small object, possibly a mask or device, with no visible text or symbols.Côtés :
natural_image
Illustration of a person holding a small electronic device, viewed from the side (no text or symbols visible)Contours :
text_image
Diagram showing two types of waste sorting symbols: one with a left blank rectangle and another with crossed-out circles.shop.hoyerhandel.com

text_image
shop.hoyerhandel.comnatural_image
Illustration of a person using a medical or CT scanner to apply eye examination (no text or symbols visible)Bovenkant hoofd:
natural_image
Illustration of a person holding a small object near their ear (no text or symbols visible)Achterhoofd en nek:
natural_image
Illustration of a person wearing a face mask and holding an eye area (no text or symbols)Zijkanten:
natural_image
Illustration of a person holding a small electronic device, viewed from the side (no text or symbols visible)Contouren:
text_image
Diagram showing two types of waste sorting symbols: one with crossed-out bins and the other with crossed-out bins, indicating no disposal or recycling.shop.hoyerhandel.com

text_image
shop.hoyerhandel.comnatural_image
Illustration of a person using a medical or CT scanner to apply a procedure (no text or symbols visible)natural_image
Illustration of a person holding a small object, no text or symbols presentBaghoved og nakke:
natural_image
Illustration of a person wearing a pair of glasses, hand holding the eyeshadow (no text or symbols)Sider:
Grib om apparatet fra siderne.
natural_image
Illustration of a person holding a small electronic device near the ear (no text or symbols visible)Konturer:
text_image
Diagram showing two types of waste sorting symbols: one with a trash can and the other with a bin, both crossed out by diagonal lines.shop.hoyerhandel.com

text_image
shop.hoyerhandel.comnatural_image
Illustration of a person using a medical or CT scanner to apply eye examination (no text or symbols visible)Oberkopf:
natural_image
Illustration of a person holding a small object, no text or symbols presentnatural_image
Illustration of a person wearing a face mask and holding an eye mask (no text or symbols visible)Seiten:
natural_image
Illustration of a person holding a small electronic device, head view showing ear (no text or symbols)Konturen:
text_image
Diagram showing two types of waste sorting symbols: one with a left blank box and another with crossed-out bins.shop.hoyerhandel.com