
Ci2 Wall - Air-conditioner OLIMPIA SPLENDID - Free user manual and instructions
Find the device manual for free Ci2 Wall OLIMPIA SPLENDID in PDF.

| Product type | Wall-mounted air conditioner |
| Brand | Olimpia Splendid |
| Model | Ci2 Wall |
| Category | Air conditioner |
| Power supply | 220-240 V ~ 50 Hz |
| Cooling capacity | 2.15 - 3.18 kW (depending on model) |
| Heating capacity | 2.94 - 4.30 kW (depending on model) |
| Hydraulic service pressure | Max: 1.6 MPa - Min: 0.15 MPa |
| Sound power level | 39 - 57 dB(A) (depending on model and speed) |
| Operating modes | Auto, Cooling, Heating, Dehumidification, Fan |
| Fan speeds | Auto, Low, Medium, High |
| Remote control | Infrared with display, AAA 2×1.5 V batteries |
| Additional functions | Timer (on/off), horizontal and vertical oscillation, ECO mode, auto restart, key lock |
| Display | LED on indoor unit: temperature, timer, mode |
| Filter maintenance | Clean every 2 weeks with frequent use; wash with water or vacuum |
| Error codes | EE (DC motor), E3 (T2 sensor), E2 (T1 sensor), E8 (water level), E7 (EEPROM) |
| Safety | Mandatory grounding, residual current circuit breaker recommended, anti-freeze protection |
| Operating environment | Domestic only; outdoor temperature: cooling 21-43°C, heating -5-24°C |
| Dimensions and weight | Not specified in the manual |
Frequently Asked Questions - Ci2 Wall OLIMPIA SPLENDID
User questions about Ci2 Wall OLIMPIA SPLENDID
0 question about this device. Answer the ones you know or ask your own.
Ask a new question about this device
Download the instructions for your Air-conditioner in PDF format for free! Find your manual Ci2 Wall - OLIMPIA SPLENDID and take your electronic device back in hand. On this page are published all the documents necessary for the use of your device. Ci2 Wall by OLIMPIA SPLENDID.
USER MANUAL Ci2 Wall OLIMPIA SPLENDID
natural_image
Line drawing of a double air conditioner unit with cooling fins and ventilation slots (no text or symbols)natural_image
Line drawing of a cylindrical air conditioner unit with no text or symbols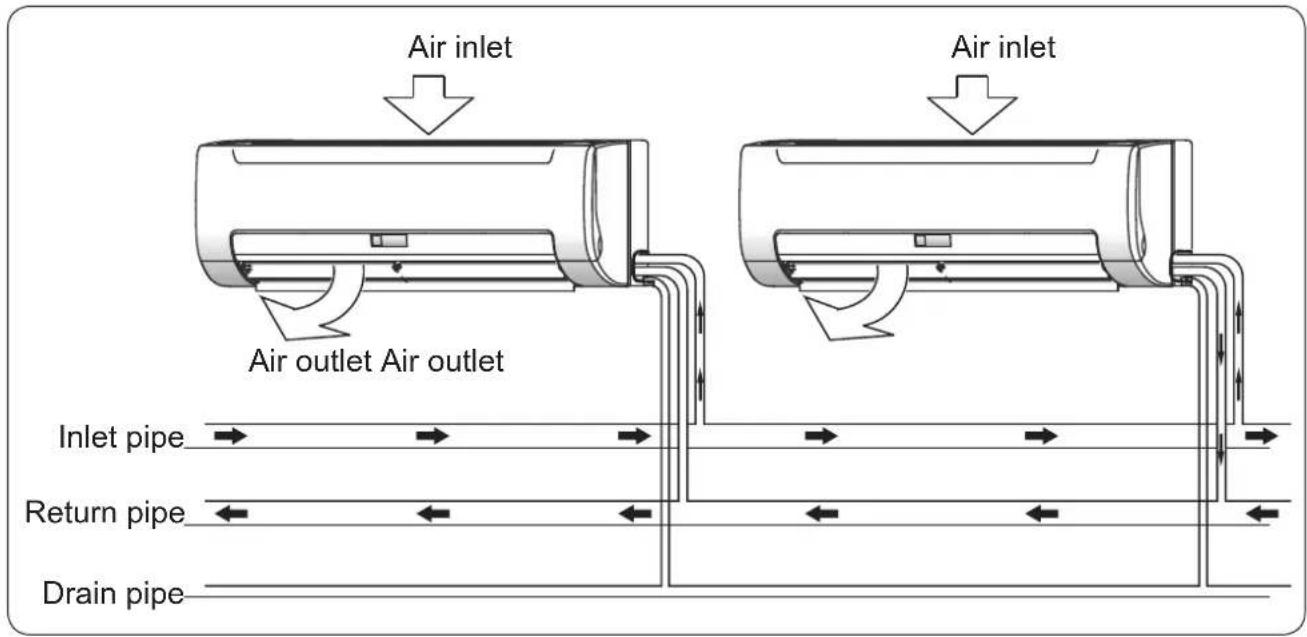

natural_image
Line drawing of a remote control casing with an arrow indicating left motion (no text or symbols)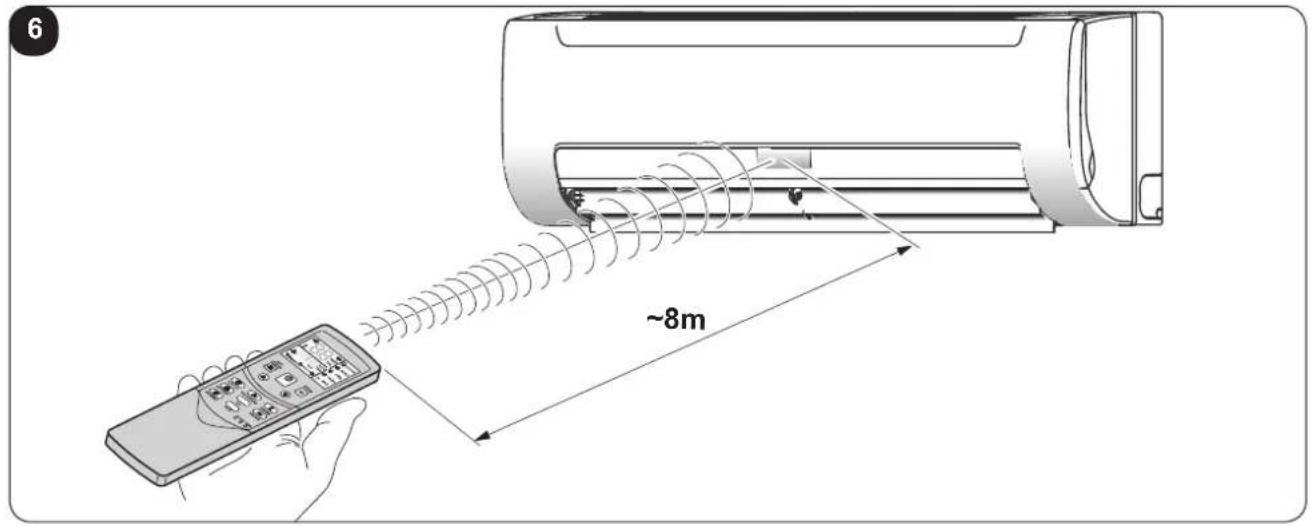

INDICE GENERALE
0 -AVVERTENZE 3

1 -DESCRIPTION OF THE APPLIANCE 10
1.1 - IDENTIFICATION OF THE MAIN COMPONENTS 10
INFORMATION RESERVED FOR THE "INSTALLATION TECHNICIAN"
2 - CORRECT USE OF THE APPLIANCE 11
2.1 - WARNINGS.... 11
2.2 - OPERATING CONDITIONS....11
SECTION FOR THE TECHNICIAN AND USER
3 - USE OF THE APPLIANCE....12
3.1 - RECOMMENDATIONS FOR ENERGY SAVING 12
3.2 - REMOTE CONTROL KEYS (FIG. B)....13
3.3 - REMOTE CONTROL DISPLAY (FIG.C) 15
3.4 - USE OF THE REMOTE CONTROL....16
3.4.a - Insertion of batteries....16
3.4.b - Replacement of batteries 16
3.4.c - Location of the remote control....17
3.5 - USE OF THE APPLIANCE....17
3.5.a - AUTO mode (Automatic) 17
3.5.b - COOL / HEAT / FAN mode....17
3.5.c - DRY mode (dehumidification)....18
3.5.d - Using the timer 18
3.5.d.a - Switch-on timer 18
3.5.d.b - Switch-off timer 18
3.5.d.c - Combined setting of the switch-on timer and the switch-off timer 18
3.5.d.d - Modifying the timer....18
3.5.e - Adjusting the direction of the air flow....19
3.6 - RESETTING ALL REMOTE CONTROL FUNCTIONS (IF PRESENT) 19
3.7 - LOCK SETTINGS....19
3.8 - CHANGE MODE 19
3.9 - AUTORESTART....19
4 - MAINTENANCE AND CLEANING 20
4.1 - CLEANING....20
4.1.a - Cleaning the appliance and the remote control....20
4.1.b - Cleaning the suction filter 20
4.2 - MAINTENANCE 21
4.3 - SYMPTOMS THAT DO NOT INDICATE APPLIANCE MALFUNCTIONING....21
4.4 - ERROR CODES....22
5 - TECHNICAL DATA....23
6 - TROUBLESHOOTING 23
7 - INCONVENIENCES AND POSSIBLE REMEDIES 24
EN - 1
ILLUSTRATIONS
The illustrations are grouped on the initial pages of the manual
MAIN INDEX
The main index of this manual is given on page "EN-1"
0 - WARNINGS
0.1 - GENERAL INFORMATION
First of all, we would like to thank you for choosing our appliance.
0.2 - SYMBOLS
The pictograms in the next chapter provide the necessary information for correct, safe use of the machine in a rapid, unmistakable way.
0.2.1 - Editorial pictograms

Service
Refers to situations in which you should inform the SERVICE department in the company: CUSTOMER TECHNICAL SERVICE.

Index
Paragraphs marked with this symbol contain very important information and recommendations, particularly as regards safety.
Failure to comply with them may result in:
- danger of injury to the operators
- loss of the warranty
- refusal of liability by the manufacturer.

Raised hand
Refers to actions that absolutely must not be performed.
EN-2

als to the personnel that the operation described could cause electrocution if not performed according to the safety rules.

GENERIC DANGER
It informs the personnel concerned that if the operation is not carried out in compliance with the safety regulations, it presents the risk of suffering physical damage.

DANGER DUE TO HEAT
It informs the personnel concerned that if the operation is not carried out in compliance with the safety regulations, it presents the risk of burns due to contact with components at very high temperatures.

DO NOT COVER
icates to the personnel concerned, that it is prohibited to cover the appliance, to prevent over-heating.

ATTENTION
indicates that this document must be read carefully before installing and/or using the appliance.
- Indicates that the assistance personnel must handle the appliance following the installation manual.

ATTENTION
indicates that there may be additional information in attached manuals.
- Indicates that information is available in the user manual or in the installation manual.

ATTENTION
vicates that the assistance personnel must handle the appliance following the installation manual.
0.3 - GENERAL WARNINGS
WHEN USING ELECTRICAL EQUIPMENT, BASIC SAFETY PRECAUTIONS MUST ALWAYS BE FOLLOWED IN ORDER TO REDUCE RISKS OF FIRE, ELECTRIC SHOCKS AND INJURY, INCLUDING THE FOLLOWING:

- This document is restricted in use to the terms of the law and may not be copied or transferred to third parties without the express authorization of the manufacturer, OLIMPIA SPLENDID.
Our machines are subject to change and some parts may appear different from the ones shown here, without this affecting the text of the manual in any way.

Read this manual carefully before performing any operation (installation, maintenance, use) and follow the instructions contained in each chapter.
-
Follow these instructions carefully to prevent material damage and injury to the operator or other persons. Incorrect use due to failure to respect the instructions can cause injury or damage.
-
Keep the manual carefully for future reference.
-
After removing the packaging, check that the appliance is in perfect condition. The packaging materials must not be left within reach of children as they can be dangerous.
-
THE MANUFACTURER IS NOT RESPONSIBLE FOR DAMAGES TO PERSONS OR PROPERTY CAUSED BY FAILURE TO FOLLOW THE INSTRUCTIONS IN THIS MANUAL.
-
The manufacturer reserves the right to make any changes it deems advisable to its models, although the essential features described in this manual remain the same.
-
Failing to comply with the instructions contained in this manual, and using the unit with temperatures exceeding the permissible temperature range will invalidate the warranty.
-
Routine maintenance of the filters and general external cleaning can be done by the user as these operations are not difficult or dangerous.
-
During assembly and at each maintenance operation, it is necessary to respect the precautions indicated in this manual and on the labels located inside or on the appliance, as well as to take all the precautions suggested by common sense and by the Safety Regulations in force in the country of installation.
EN - 4
0.4 - IMPORTANT SAFETY INFORMATION
The safety precautions listed are divided into two categories. In either case, important safety information is listed which must be read carefully.

WARNING
ure to observe a warning may result in death.

WARNING
ure to observe a caution may result in injury or damage to the equipment.

WARNING
-
Do not disconnect the electric power supply manually when the appliance is running, since malfunctioning could occur.
-
Ask your dealer for installation of the air conditioner.
Incomplete installation performed by yourself may result in a water leakage, electric shock, and fire. - Ask your dealer for improvement, repair, and maintenance.
Incomplete improvement, repair, and maintenance may result in a water leakage, electric shock, and fire.
- In the event of operating anomalies (e.g. strange noise, bad odour, smoke, abnormal temperature rise, electric dispersions, etc.), switch the appliance off immediately and disconnect the electric power supply.
For repair work contact solely the technical service centres authorised by the manufacturer and ask for original spare parts to be used. Failure to do this can affect the safety of the appliance.
- Do not wet the indoor unit and the remote control.
Short circuits or fires may occur.
- If a fuse blows, do not replace it with one that has a different amperage and do not use cables of any type.
Use of wire or copper wire may cause the unit to break down or cause a fire. - It is not good for your health to expose your body to the air flow for a long time.
-
Do not insert fingers, rods or other objects into the air inlet or outlet. When the fan is rotating at high speed, it will cause injury.
-
Never use a flammable spray such as hair spray, lacqueror paint near the unit. It may cause a fire.
-
Never touch the air outlet or the horizontal blades while the swing flap is in operation. Fingers may become caught or the unit may break down.
-
Do not obstruct the air inlet and outlet grids in any manner.
-
Do not insert extraneous items in the air inlet and outlet grids as this will create the risk of electrical shocks, fire or damages to the appliance. Objects touching the fan at high speed can be dangerous.
-
Do not inspect the unit or perform maintenance personally. Repairing the appliance yourself is extremely dangerous. Contact a qualified professional.
- Do not dispose this product as unsorted municipal waste. Collection of such waste separately for special treatment is necessary.
- If the appliance is installed and used in a small room, the concentration of water (condensate) must be kept within the limits because a leak would reduce the cooling capacity.
Contact your dealer to prevent water leaks.
- Turn off any combustible heating devices, ventilate the room, and contact the dealer where you purchased the unit.
Do not use the air conditioner until a service person confirms that portion where the water leaks is repaired.
-
The most common cause of overheating is dust or lint deposit in the appliance. Regularly remove these accumulations by disconnecting the appliance from the power socket and vacuuming the grids.
-
If an appliance of this type is no longer to be used, it is recommended to make it non-operational by cutting the power supply cable, AFTER it has been disconnected electrically. Hazardous parts of the appliance must be rendered harmless, especially as there is a risk of children playing with it.

CAUTION
-
Do not use the appliance for purposes different than the declared use. To prevent deterioration of the quality, do not use the unit to cool precision tools, foodstuffs, plants, animals or works of art.
-
Before cleaning, be sure to stop the operation, turn the breaker off or pull out the supply cord, otherwise, an electric shock and injury may result.
-
Make sure that a safety RCD Residual Current Device is installed to prevent electric shocks or fires.
- Be sure the air conditioner is grounded.
In order to avoid electric shock, make sure that the unit is grounded and that the earth wire is not connected to gas or water pipe, lightning conductor or telephone earth wire.
- In order to avoid injury, do not remove the fan guard of the outdoor unit.
- Do not operate the air conditioner with a wet hand. An electric shock may happen.
- Do not touch the heat exchanger fins. These fins are sharp and could result in cutting injuries.
- Do not position objects, which could be damaged by humidity, under the appliance. Condensate can form if the level of humidity exceeds 80%; the drain outlet is blocked or the filter is dirty.
- After a long use, check the unit stand and fitting for damage. If damaged, the unit may fall and result in injury.
- To prevent the lack of oxygen, ventilate the environment adequately if the appliance is used along with appliances fitted with burner.
- Organise the drain pipe in a way to ensure regular condensate draining. Incomplete drainage can cause damage to the building, furniture, etc. due to humidity.
- Do not touch the internal components of the electric box.
Do not remove the front panel. Some parts inside are dangerous to touch, and a machine trouble may happen.
- Never expose little children, plants or animals directly to the air flow.
Adverse influence to little children, animals and plants may result.
-
Do not allow a child to mount on the outdoor unit or avoid placing any object on it.
Falling or tumbling may result in injury. -
Never press the button of the remote controller with a hard, pointed object.
-
Do not use the appliance if insecticide gas has just been sprayed in the room or in the presence of burning incenses, chemical vapours or oily residues.
-
In case of replacement of parts, use only original OLIMPIA SPLENDID parts.
-
If the unit is unused for a long period, or no-one uses the climate-controlled room, it is recommended to disconnect the electric power supply in order to prevent accidents.
-
Do not use liquid or corrosive detergents to clean the unit, do not spray water or other liquids onto the unit, since they could damage the plastic components or even cause electric shocks.
-
Do not allow the appliance to function for long periods if humidity is high and there are doors and windows open.
The humidity could condensate and wet or damage the furnishings.
-
Clean the appliance with a damp cloth; do not use abrasive products or materials. See the appropriate paragraph for the filters cleaning.
-
Do not use the appliance in environments subject to significant temperature changes as condensation could form inside the appliance itself.
-
Do not use the appliance if the filters are not positioned correctly.
24 Do not position equipment that produces naked flames in points exposed to air currents or underneath the appliance.
25. Disassembly, repair or reconversion performed by an unauthorized person could cause heavy damages and will cancel the manufacturer warranty.
26. Do not use the appliance if it breaks or malfunctions, if the electric power supply cable is damaged or if there is any type of damage whatsoever. Switch the appliance off, disconnect the electric power supply and have it checked by qualified professional staff.
0.5 - HAZARDOUS ZONES
- The fan coil must not be installed in environments with the presence of inflammable gases, explosive gases, in very humid environments (laundries, greenhouses, etc.), or in places with other machines that generate a strong heat source, in proximity of a sources of salt water or sulphurous water.
• DO NOT use gas, gasoline or other inflammable liquids near to the fan coil.
- Only use supplied components (see paragraph 1.1). The use of non-standard parts may cause water leaks, electric shocks, fires and injuries or damages to things.
- Do not install the appliance in areas characterised by brackish air (near to the coast, etc.).
If electrical appliances are disposed of in landfills or dumps, substances can leak into the groundwater and get into the food chain, damaging your health and well-being
haza
0.6 - PROPER USE
- The fan coil must only be used to heat, cool, dehumidify and filter (by choice) with the exclusive purpose of making the room temperature comfortable.
• This appliance is only intended for a domestic use or similar, not for commercial or industrial use.
- An improper use of the appliance with possible damages caused to people, things or animals releases OLIMPIA SPLENDID from any responsibility.
- This appliance is not intended to be run via an external timer or with a separate remote control system (use the remote control supplied only).
This product must be used exclusively according to the specifications indicated in this manual. Use different to that specified, could cause serious injuries.
THE MANUFACTURER IS NOT LIABLE FOR INJURY/DAMAGE TO PERSONS/OBJECTS DERIVING FROM FAILURE TO COMPLY WITH THE REGULATIONS CONTAINED IN THIS MANUAL.
SPOSAL
This symbol on the product or its packaging indicates that the appliance cannot be treated as normal domestic trash, but must be handed in at a collection point for recycling electric and electronic appliances.
Your contribution to the correct disposal of this product protects the environment and the health of your fellow men. Health and the environment are endangered by incorrect disposal.
Further information about the recycling of this product can be obtained from your local town hall, your refuse collection service, or in the store at which you bought the product.
This regulation is valid only in EU member states.
EN - 9
1 - DESCRIPTION OF THE APPLIANCE
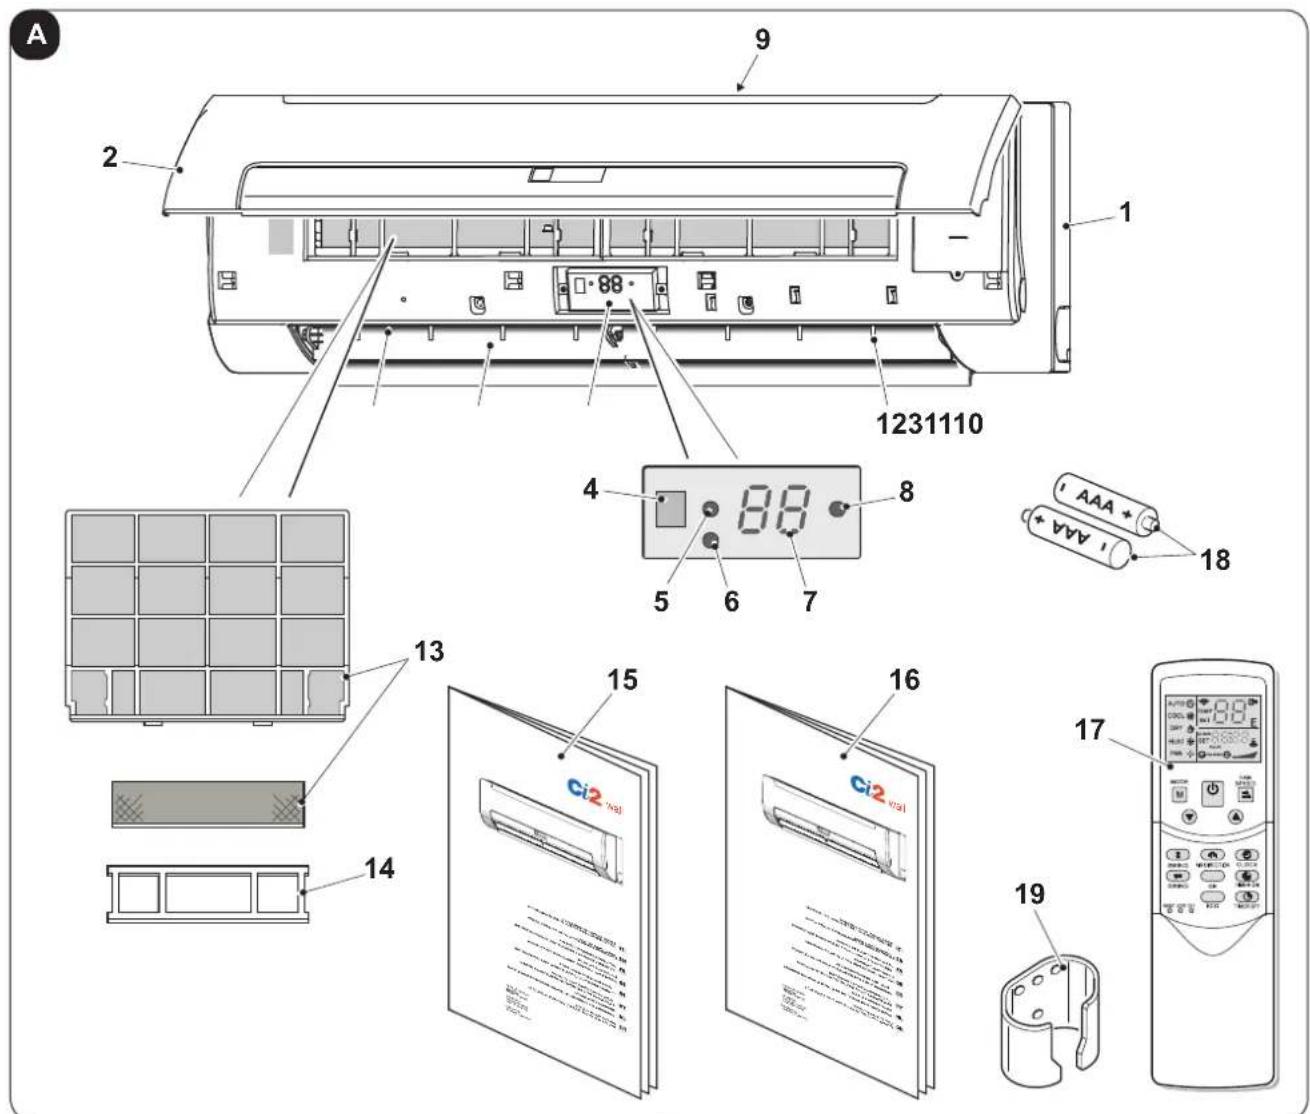
1.1 - IDENTIFICATION OF THE MAIN COMPONENTS (Fig.A)
- Body of appliance
- Front panel
- Display
- Remote control IR receiver
- Operating LED
- Switch-on/off and operating mode selection key
- Temperature display
- Timer LED
- Air inlet
- Air outlet
-
Horizontal air flaps
-
Vertical air flaps
- Air filters
- Filter support frame
- Use and maintenance manual (+ warranty)
- Installation manual
- Remote control
- Battery for remote control quantity 2 - AAA type x 1.5V
- Remote control support (to fix the support, see the appliance assembly manual)
EN - 10
2 - CORRECT USE OF THE APPLIANCE
2.1 - WARNINGS

A failure to respect what follows may cause damages to the appliance.
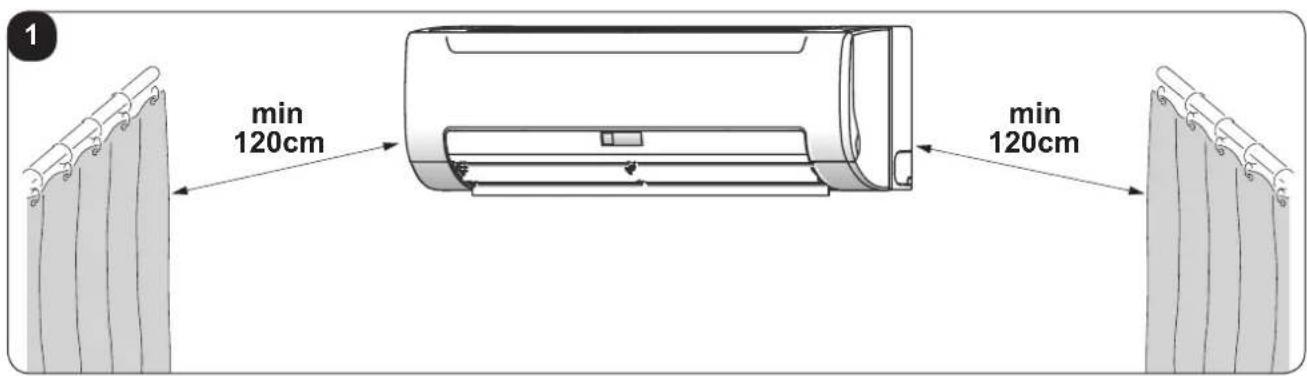
a. Make sure that curtains or other objects do not obstruct the air suction filters.
b. The appliance must always be used paying attention that there are no obstructions for the intake and outlet of air.
c. The appliance must not be used in laundry rooms.
d. The appliance must never be used in the presence of hazardous materials, vapours or liquids.
e. If the appliance is used frequently, clean the air filters at least every two weeks.
2.2 - OPERATING CONDITIONS
For safe and effective operation, use the appliance at the following temperatures.
| Mode External | temperature Room temperature | Water inlet temperature | |
| Cooling 21°C | ~43°C 17°C | ~32°C 3°C | ~20°C |
| Heating mode (not available in cooling only models) | -5°C~24°C 0°C | ~30°C 30°C | ~70°C |

NOTE:
- If the appliance is not used within the values indicated, operating anomalies may occur.
- IT IS normal that condensate forms on the surface of the appliance when the level of humidity in the room is high; in this case, close doors and windows.
- Operating pressure of the hydraulic system: Max: 1.6 MPa - Min: 0.15 MPa
3 - USE OF THE APPLIANCE
The appliance operating modes can be selected only using the remote control supplied. The reception of the selected function is confirmed by the emission of a "beep" by the buzzer.
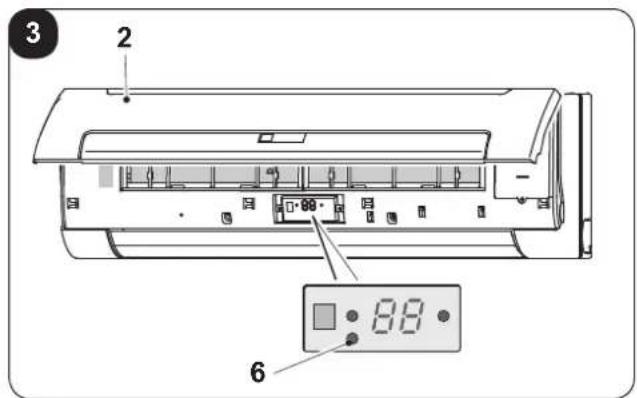
If the remote control does not work or is not momentarily available, the appliance can be switched on and off by opening the front panel (2) and pressing the key (6) (Fig.3).
As well as switching the appliance on and off, with this key it is possible only to select two operating modes; "AUTOMATIC" (AUTO) and "FORCED COOLING (COOL)".
Press the key one or more times as follows:
$$
\text { ON / AUTOMATIC } > \text { FORCED COOLING } > \text { OFF } > \dots $$
• AUTOMATIC (AUTO)
The operating LED (5) switches on and the appliance starts in AUTOMATIC mode. The remote control is active and operates on the basis of the signal received.
• FORCED COOLING (COOL)
The operating LED (5) flashes and the appliance operates in automatic cooling mode for 30 minutes with the fan at high speed, before passing AUTOMATIC mode.
The remote control is disabled.
• OFF
The operating indicator light (5) switches off. The appliance is OFF, while the remote control is enabled.
3.1 - RECOMMENDATIONS FOR ENERGY SAVING
Below find simple recommendations for reducing consumption:
- Always and constantly keep the filters clean (see maintenance and cleaning chapter). ■ A dirty air filter will reduce cooling or heating efficiency, please clean it once two weeks.
- Keep doors and windows closed. If the doors and windows remain open, air will flow out of your room causing a decrease in the cooling or heating effect.
- Do not let sun rays penetrate freely into the room (we recommend using curtains or lowering blinds or closing the shutters).
- Do not obstruct the air flow path (input and output) of the appliance; this, in addition to obtaining a non-optimal yield, also affects the correct operation of the appliance and the possibility of irreparable damages to the appliance itself.
- Never place objects near the air inlet or the air outlet of the unit. It may cause deterioration in the effect or stop the operation.
- Adjust the air flow louver properly and avoid direct air flow to room inhabitants.
- Adjust the room temperature properly for a comfortable environment. Avoid excessive heating or cooling.
- Ventilate often. Extended use requires special attention to ventilation.
- Never place objects near the air inlet or the air outlet of the unit. It may cause deterioration in the effect or stop the operation.
- Set the timer.
- If you don't plan to use the unit for a long time, please take the batteries from the remote controller. When the power is on, some energy will be consumed, even if the air conditioner isn't in operation. So please disconnect the power to save energy.
- Keep the indoor unit and remote controller at least 1 m away from televisions, radios, stereos, and other similar equipment. Failing to do so may cause static or distorted pictures.
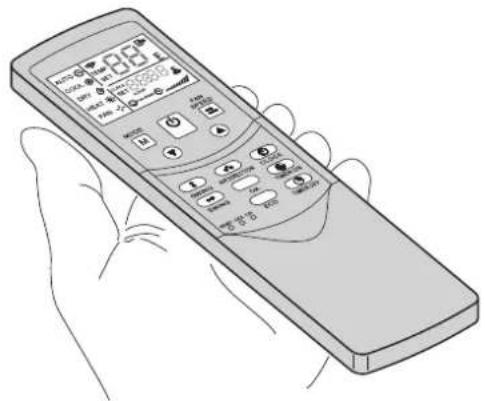
3.2 - REMOTE CONTROL KEYS (Fig. B)
B
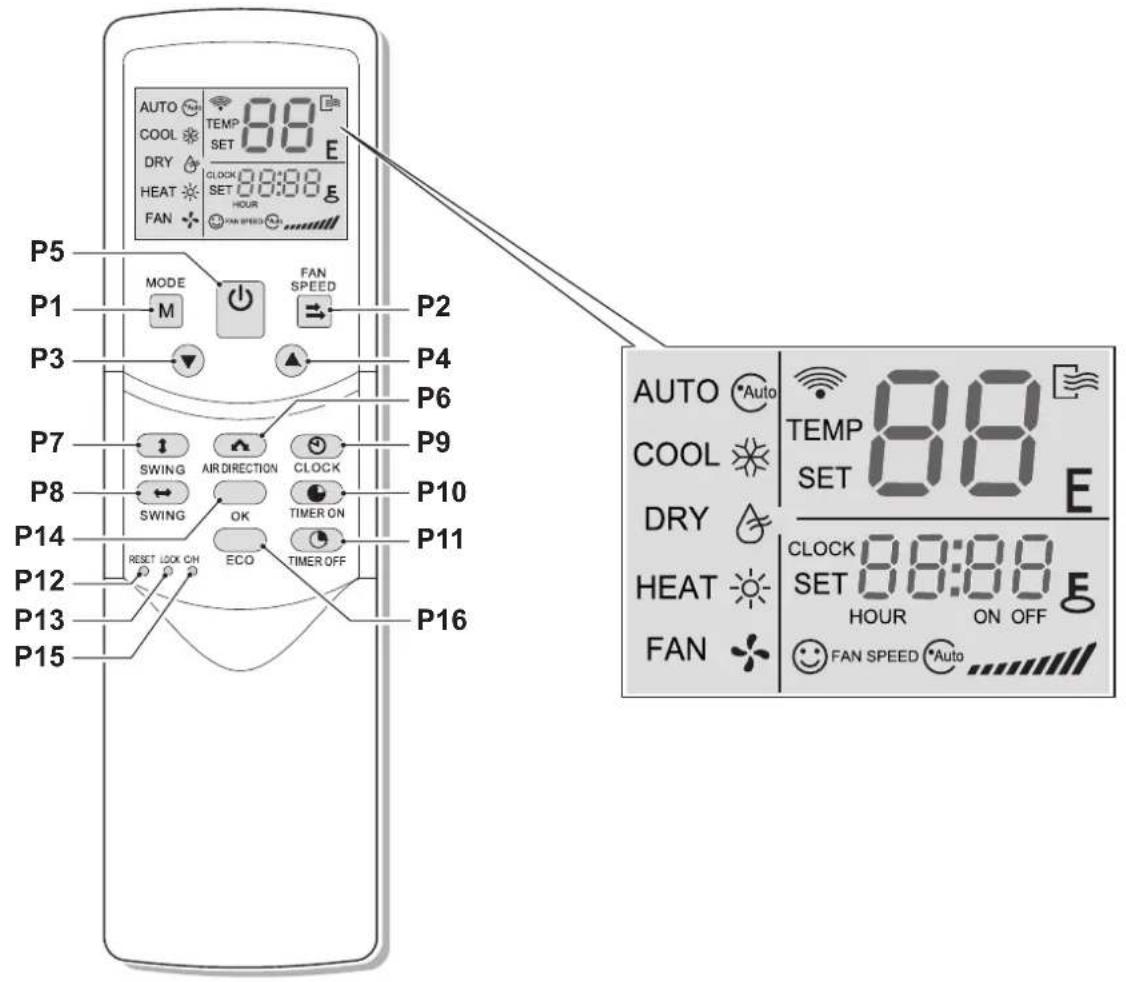
• P1. MODE KEY:
AUTO (Automatic) >
> COOL (Cooling) >
> DRY (Dehumidification) >
> HEAT (Heating) >
> FAN (Ventilation) > ...
NOTE:
The heating mode (HEAT) is not available in the "cooling only" appliances.
• P2. FAN SPEED KEY:
AUTO (Automatic) >
> LOW (minimum) >
> MED (medium) >
> HIGH (maximum) > ...
• P3. TEMPERATURE SET reduction KEY
Decrease the set temp. Keeping pressing will decrease the temp with 1^ C per 0.5s.
• P4. Increase TEMPERATURE set KEY
Increase the set temp. Keeping pressing will increase the temp with 1^ C per 0.5s.
• P5. ON/OFF KEY (Appliance stand-by)
Switches the appliance on/off.
• P6. AIR DIRECTION KEY (Air direction)
Activate swing function of air deflector. Once pressing, air deflector will turn 6C. For normal operation and better cooling and heating effect, deflector will not turn to the degree which is the state of deflector when the unit is turned off. (Only available when remote controller is used with corresponding unit.)
• P7. VERTICAL SWING KEY
Activate or turn off wind vertical swing function. (Only available when remote controller is used with corresponding unit.)
• P8. HORIZONTAL SWING KEY
Activate or turn off wind horizontal swingfunction. (Only available when remote controller is used with corresponding unit.)
• P9. CLOCK KEY
Display the current time. (12: 00 is displayed when resetting or electrifying for the first time.)
Press CLOCK for 5s, icon indicating hour will flash with 0.5s.
Press it again, icon indicating minute will flash with 0.5s.
P3 and P4 are used to adjust the figure.
Setting or modification is effective only by pressing OK button to make confirmation.
• P10. TIMER ON KEY (Switch-on timer)
For time ON setting. Once pressing this button, the time will increase by 0.5 hour. When the settime exceeds 10 hours, pressing the button will increase the time by 1 hour. Adjusting the figure to 0.00, will cancel time ON setting.
• P11. TIMER OFF KEY (Switch-off timer)
For time OFF setting. Once pressing this button, the time will increase by 0.5 hour. When the set time exceeds 10 hours, pressing the button will increase the time by 1 hour. Adjust the figure to 0.00, will cancel-time ON setting.
• P12. RESET KEY (Reset - internal key)
Press this button with a needle of 1mm to cancel the current setting and reset remote controller.
• P13. LOCK KEY (Lock- internal key)
Press this button with a needle of 1mm to lock or unlock the current setting.
• P14. OK KEY
(Confirms setting and modification of the time)
Used to confirm the time setting and modification.
• P15. COOL/HEAT KEY
(Cooling/Heating)
(inner located), press this button with a needle of 1mm to shift mode between COOL only and COOL&HEAT. During setting, back lightwill be lightened. Factory default modeisCOOL&HEAT.
• P16. ECO KEY
Activate or turn off economic operation mode. It is suggested to turn on this function when sleeping. (Only available when remote controller is used with corresponding unit.)
EN - 14
3.3 - REMOTE CONTROL DISPLAY (Fig.C)
C
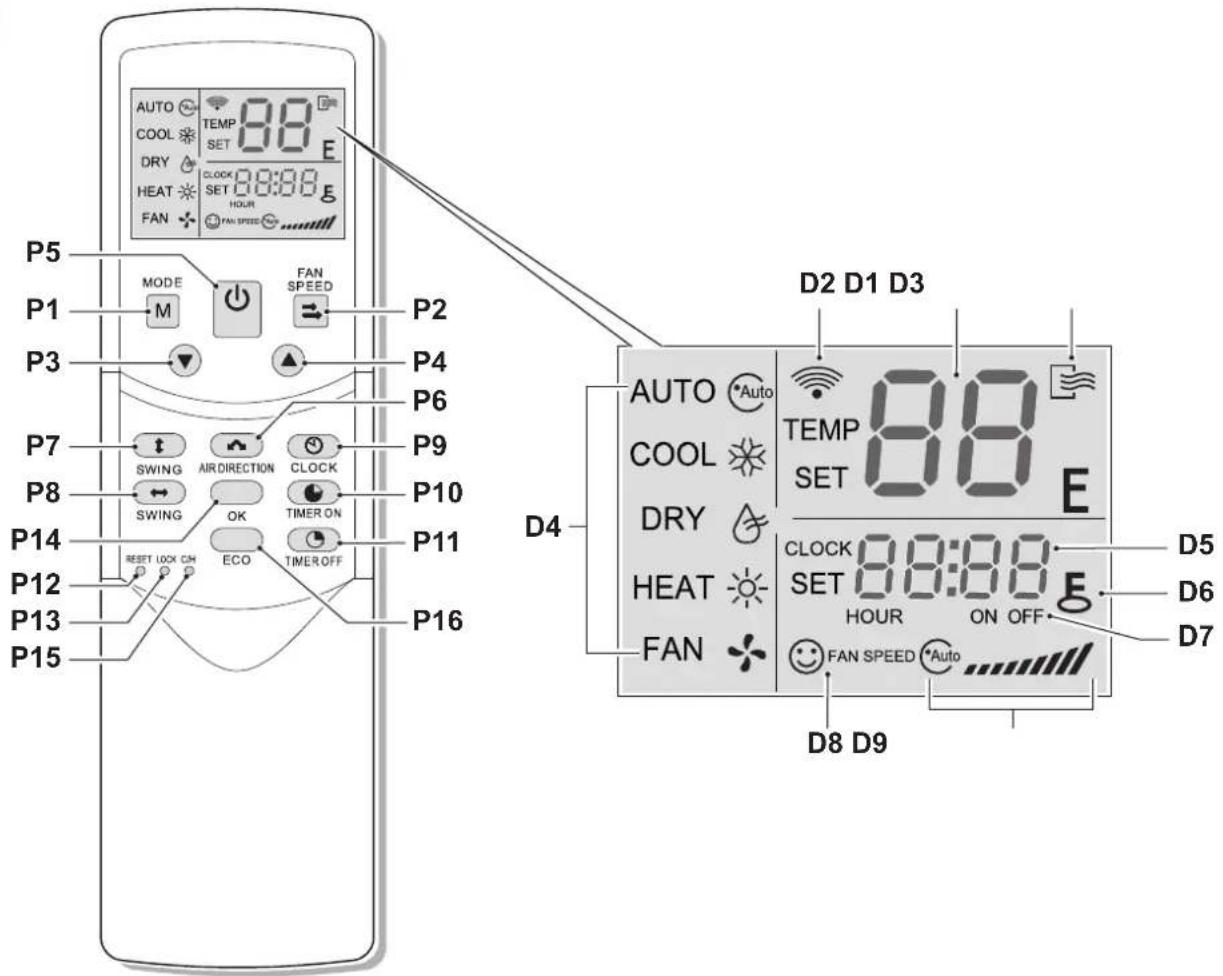
• D1. TEMP:
Display the set temperature. No display in this area if the unit is on FAN mode.
• D2. TRANSMITTING DISPLAY:
The icon will flash once when the signal is sent by remote controller.
• D3. ON/OFF:
Icon is displayed when the remote controller is turned on, or vice versa.
• D4. RUNNING MODE:
Press MODE to display current running mode. (HEAT function is invalid for cool only type unit.)
• D5. TIME:
Display the current set time.
• D6. LOCK:
The icon will be lightened or off when pressing LOCK.
In locked state, all the buttons are ineffective except button LOCK.
• D7. TIME ON/OFF:
In the state of time ON, icon ON will be lightened, which is the same to the state of time OFF. Setting timer ON and OFF simultaneously, both icons ON and OFF are displayed.
• D8. FAN SPEED:
Press FAN SPEED to display the current wind speed.
The default state is high fan speed for the unit without medium fan speed.
• D9. ECONOMIC OPERATION:
This icon will be lightened or off when pressing ECO button.
NOTE:
All the above icons will be displayed only when the remote controller is electrified for the first time or reset.
3.4 - USE OF THE REMOTE CONTROL
The remote control supplied with the fan coil is the instrument that will allow you to use the appliance in the most comfortable way possible.
It should be handled with care and in particular:
- Keep it dry (do not clean it with water or leave it outdoors in bad weather).
- Avoid dropping or bumping it.
- Keep it out of direct sunlight.

- The remote control operates by means of an infrared beam.
- During use, there must not be any obstacle between the remote control and the air-conditioner.
- If other appliances in the room have remote controls (TV, stereo, etc...), there may be interference.
- Electronic and fluorescent lights may also interfere with transmissions between remote control and air-conditioner.
- Remove the batteries in case of prolonged disuse of the remote control.
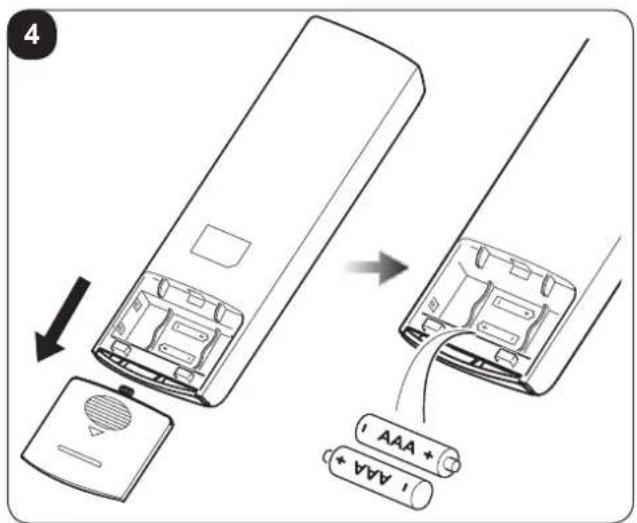
3.4.a - Insertion of batteries
To insert the batteries correctly:
a. Remove the batteries compartment cover (figure 14).
b. Insert the batteries into the relevant compartment (figure 4).

Check the polarity indicated on the bottom of the compartment.
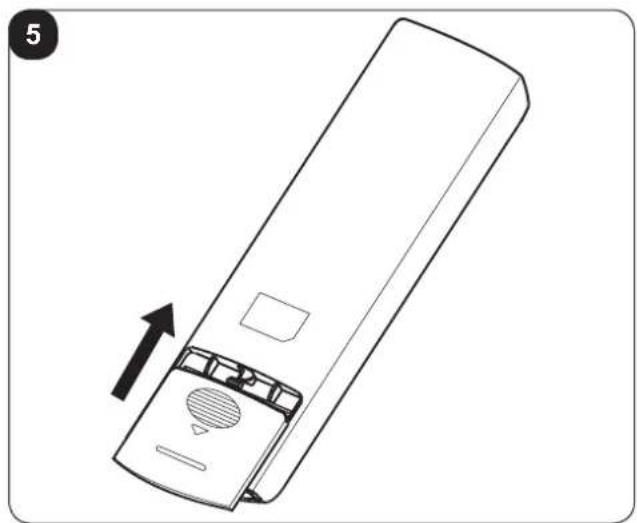
c. Close the compartment correctly (figure 5).
3.4.b - Replacement of batteries
The average life-span of the batteries, with normal use, is approx. six months.
Replace the batteries when the "beep" for reception of the command from the appliance is no longer heard.

Always use new batteries.
The use of old or different batteries could generate malfunctioning of the remote control.
The remote control uses two dry alkaline 1.5V batteries (AAA.) (Fig.4).

When replacing batteries, replace both and dispose of the dead batteries in the appropriate collection centres and as required by law.
EN - 16

OLIMPIA SPLENDID
- If the remote control is not used for several weeks or longer, remove the batteries. Any leaks from the batteries could damage the remote control.

Do not re-charge or disassemble the batteries. Do not throw the batteries into the fire. I can burn and explode.

If the battery liquid falls onto the skin or clothes, wash well with clean water. Do not use the remote control with batteries that have leaked.
The chemical products contained in the batteries can cause burns or other risks to health.
3.4.c - Location of the remote control
- Keep the remote control in a position from which the signal can reach the receiver (4) of the appliance (maximum distance is approx. 8 metres - with charged batteries) (figure 6). The presence of obstacles (furniture, curtains, walls, etc.) between the remote control and the appliance reduces the remote control range.
3.5 - USE OF THE APPLIANCE
3.5.a - AUTO mode (Automatic)
When the appliance is switched on, the operating LED (5) on the unit flashes.
a. Press the MODE key (P1) to select AUTO mode.
b. Adjust the temperature with the ▲ and ▼ keys. The adjustment range is 17°C\~30°C.
c. By pressing the ON/OFF key (P5), LED (5) of the appliance switches on. The appliance operates in AUTO mode and the fan speed is set at AUTO, without the possibility of adjustment.
d. In AUTO mode, the ECO function is also active.
3.5.b - COOL / HEAT / FAN mode
a. Press the MODE key (P1) to select the "COOL, HEAT or FAN mode.
b. Adjust the temperature with the ▲ and ▼ keys. The adjustment range is 17°C\~30°C.
c. Press the FAN SPEED key (P2) to select the AUTO (automatic) > LOW > MED (medium) > HIGH option > ...
d. By pressing the ON/OFF key (P5), LED (5) of the appliance switches on. The appliance functions in the way set.
d. Interrupt operation using the ON/OFF key (P5).

In ventilation mode, the temperature cannot be adjusted and the ECO function is not active. Therefore, passage 2 is omitted.
EN - 17
3.5.c - DRY mode (dehumidification)
a. Press the MODE key (P1) to select "DRY" mode.
b. Adjust the temperature with the ▲ and ▼ keys. The adjustment range is 17°C\~30°C.
c. By pressing the ON/OFF key (P5), LED (5) on the appliance switches on. The appliance functions in the dehumidification mode.
d. Switch the appliance off using the ON/OFF key (P5).
e. In dehumidification mode, the ECO and FAN SPEED functions are not available.
3.5.d - Using the timer
The switch-on and switch-off timers are respectively used to switch the appliance on and off and pre-set times.
3.5.d.a - Switch-on timer
a. By pressing the TIMER ON key (P10), the SET, HOUR and ON icons on the remote control, switch on.
b. Press the key again to adjust the time.
c. The value increases by 0.5 hours every time the key is pressed. After 10 hours, the value increases by 1 hour every time it is pressed.
d. Half a second after setting, the remote control will send the switch-on command to the appliance.
3.5.d.b - Switch-off timer
a. By pressing the TIMER OFF key (P10), the SET, HOUR and ON icons on the remote control, switch on.
b. Press the key again to adjust the time.
c. The value increases by 0.5 hours every time the key is pressed. After 10 hours, the value increases by 1 hour every time it is pressed.
d. Half a second after setting, the remote control will send the switch-off command to the appliance.
3.5.d.c - Combined setting of the switch-on timer and the switch-off timer
a. Set the switch-on timer following steps 1 and 2 described in paragraph "3.5.d.a".
b. Set the switch-off timer following steps 1 and 2 described in paragraph "3.5.d.b".
c. If both times set do not exceed 10 hours, the switch-off timer will activate 0.5 hours after the switch-on timer. If both times set exceed 10 hours, the switch-off timer will activate 1 hour after the switch-on timer.
d. Half a second after setting, the remote control will send the switch-on command to the appliance.
3.5.d.d - Modifying the timer
Press the corresponding key and adjust the switch-on and switch-off timer.
By setting the value at 0,00, the timer is deactivated.

The time set on the timer has relative value based on the remote control clock.
The clock cannot be adjusted when the switch-on timer or switch-off timer is active.
EN - 18

OLIMPIA
SPLENDID
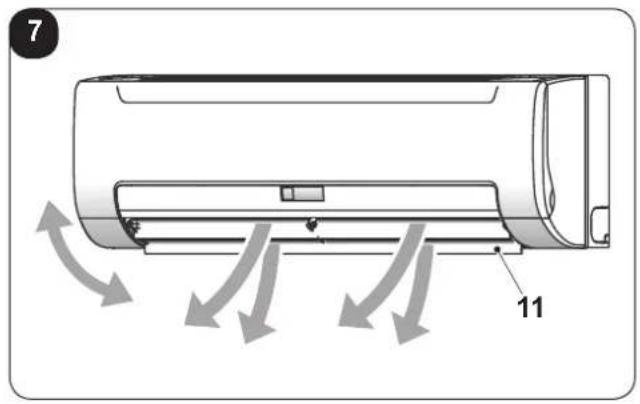
3.5.e - Adjusting the direction of the air flow
The ventilation flap can be adjusted while the appliance is running in order to change the direction of air flow and make the temperature in the room more natural and uniform; meaning it is more comfortable.
a. Adjust the horizontal flap (11) using the remote control (key P8). (Fig.7)
b. Open the horizontal flap (11), and then manually adjust the vertical flap (12). (Fig.8)
c. If desired, start the vertical swing of the flaps by pressing the key (P7). Press it again to stop the swing in the desired position.
3.6 - RESETTING ALL REMOTE CONTROL FUNCTIONS (IF PRESENT)
By pressing the key P12, all remote control settings are reset.
In this way, all settings are annulled and the remote control goes to the default status.
Furthermore, by pressing key P12 all indications possible appear on the display, making it possible to verify the integrity of the display itself.
3.7 - LOCK SETTINGS
Press the LOCK key (P13) to lock and unlock the current settings.
3.8 - CHANGE MODE
Press the COOL/HEAT key (P15) to pass from the cooling only mode to heat pump mode. The back-lighting switches on during setting. The pre-defined mode for factory setting is heat pump.
3.9 - AUTORESTART
In case a black-out occurs, the appliance stores the former function mode and start up again when re-powered by recovering all previous settings.
4 - MAINTENANCE AND CLEANING

Always make sure the appliance has been disconnected electrically before proceeding with any maintenance or cleaning intervention.

Do not touch the metal parts of the appliance when you remove the filter. We is a risk of injury due to the sharp metal edges.

Do not use water to clean the internal parts of the air conditioner. Closure to water can ruin the isolation, with the risk of electric shocks.
4.1 - CLEANING
4.1.a - Cleaning the appliance and the remote control
a. Use a dry cloth to clean the appliance and the remote control.
b. It is possible to use a cloth moistened with cold water to clean the appliance in case it's very dirty.

Do not use a chemically treated or antistatic cloth to clean the appliance.

Do not use gasoline, solvent, polish or similar solvents. The products could cause the breakage or deformation of the plastic surface.
4.1.b - Cleaning the suction filter
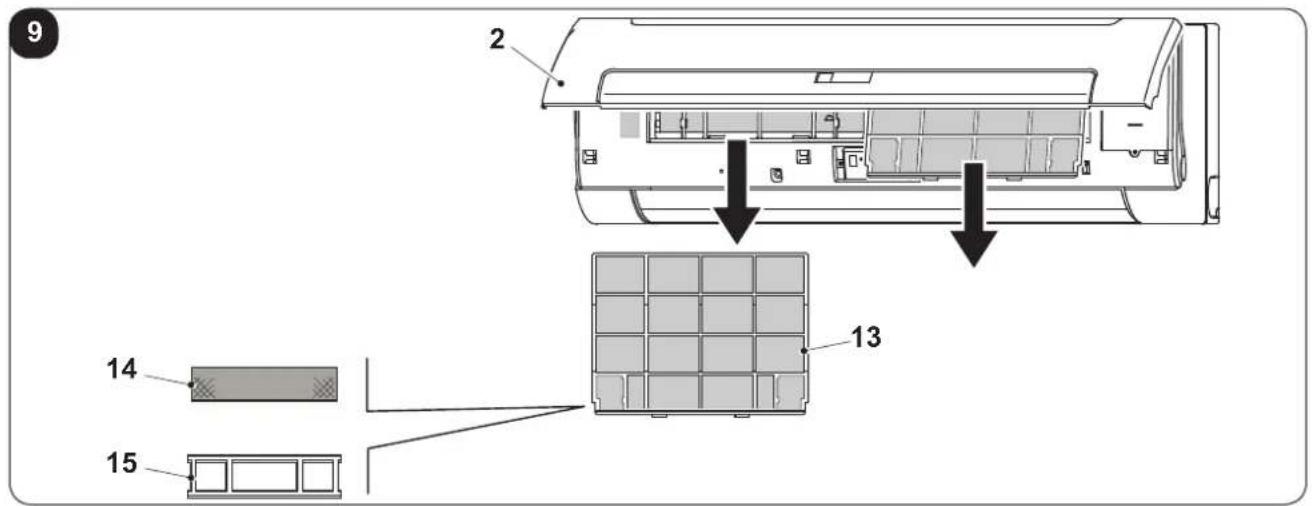
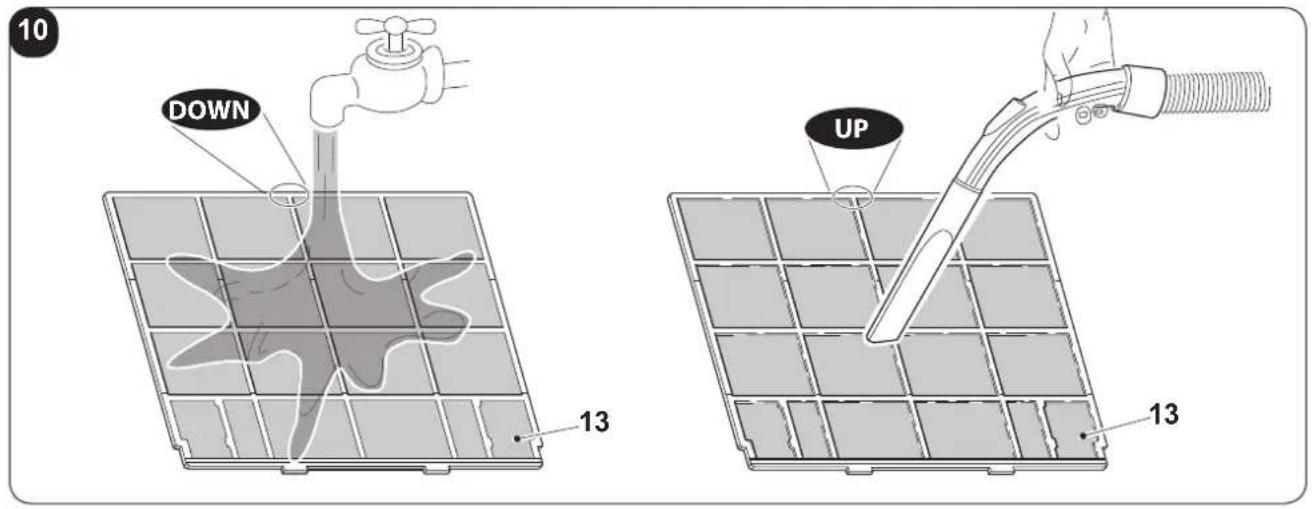
In order to guarantee effective indoor air filtration and good working order of your appliance, it is essential to periodically clean the air filters (13) every 2 weeks (in conditions of frequent use) (Fig.9).
Operate as follows:
a. Open the front panel (2) and then slide the filters out (13) (Fig.9).
b. The filters(13) must be washed using a jet of water facing in the direction opposite to that of the accumulation of dust or cleaned using a suction device (Fig.10).
c. If the dirt is particularly difficult to remove (such as grease or deposits of other types) the filters must be previously immersed in a solution of water and neutral detergent.
d. Before re-introducing the filters, it is good practice to shake then to eliminate the water accumulating during washing.

If the filters (13) are damaged, replace them.
e. Make sure that the filters (13) are completely dry.
f. Re-position the filters (13) correctly in the relative seats.
g. Suck possible fluff from the grille (Fig. 20).

Do not use the appliance without the filter (13).
EN - 20
4.2 - MAINTENANCE
If you do not intend to use the appliance for a long period of time, work as follows:
a. Activate the fan only mode for a few hours (approximately 8÷10 hours) to dry the interior of the appliance.
b. Stop the air appliance and disconnect the power supply.
c. Clean the air filter.
d. Remove the batteries from the remote control.
Checks before resuming use of the air conditioner:
a. Clean the filters after a long period of inactivity of the air conditioner.
b. Check that the air outlet or inlet are not obstructed (especially after a long period of inactivity of the air conditioner).
4.3 - SYMPTOMS THAT DO NOT INDICATE APPLIANCE MALFUNCTIONING
SYMPTOM 1: The appliance does not work
a. The appliance does not start immediately when the ON/OFF key is pressed on the remote control.
The operating LED switches on, the system is in normal conditions. The appliance starts 3 minutes after switch-on to prevent over-loading the compressor motor.
b. If the operating LED and the "PRE-DEF indicator (model with heat pump) or the ventilation indicator (cooling only model) switch on, it means that heating mode has been selected. If the compressor does not activate when the appliance is switched on, it is possible that the "anti cold air" protection is activated because the outlet temperature is too low.
SYMPTOM 2: Passage to ventilation mode during operation in cooling mode
a. To prevent the internal evaporator from freezing, the system will automatically pass to ventilation mode, and then go back to cooling mode shortly afterwards.
b. When the indoor temperature drops below the temperature set, the compressor stops and the appliance passes to ventilation mode; when the temperature rises, the compressor resumes. This takes place in the same way in heating mode.
SYMPTOM 3: White mist escaping from the appliance
Symptom 3.1
If the cooling function is started in a room with high humidity level an the inside of the appliance is very contaminated, the distribution of the temperature is not regular. In this case, it will be necessary to clean the inside of the appliance.
Contact your dealer for additional details regarding cleaning the appliance.
This operation requires a qualified professional.
Symptom 3.2
If the system passes from defrosting mode to heating mode, the humidity generated by defrosting is expelled as a vapour.
EN - 21
SYMPTOM 4: Noise during cooling
a. The appliance emits a low and continuous noise, like hissing, in cooling mode or when stopping.
This noise is caused by operation of the drain pump (optional accessory).
b. The appliance emits a squealing noise, like a squeak, when the system stops after operation in heating mode.
This noise is caused by the expansion and contraction of the plastic parts due to temperature changes.
SYMPTOM 5: Dust escaping from the appliance
a. This occurs when the appliance is used for the first time after a long period of time and depends on the accumulation of dust inside the appliance
SYMPTOM 6: THE appliance gives off odours
a. The appliance can absorb the odour of rooms, furniture, cigarettes, etc. and return them to the environment.
4.4 - ERROR CODES
During the appliance functioning, a few anomalies which stop its functioning could appear. In these cases, some error codes appear on the control panel.
• EE Malfunctioning of the DC motor
• E3 Malfunctioning of the evaporation sensor T2
• E2 Malfunctioning of the evaporation sensor T1
• E8 Malfunctioning of the water level alarm
• E7 EEPROM communication error
In these cases:
a. electrically disconnect the appliance
b. wait a few minutes
c. connect the plug to the power socket
d. restart the appliance.

If the inconvenience persists and the error code doesn't turn off, electrically disconnect the appliance and refer to an Assistance Centre.
5 - TECHNICAL DATA
For the technical data, please consult the data plate applied to the product (Fig.2).
| Model LGW 1200 DC Model LGW 1200 DC | |
| Cooling capacity (sensible) | Prated, c - 2,15 kW Prated, c - 3,18 kW |
| Cooling capacity (latent) | Prated, c - 0,55 kW Prated, c - 0,63 kW |
| Heating capacity Prated, h - 2,94 kW | Prated, h - 4,3 kW |
| Total electric power input Pelec - 0,0 | 13 kW Pelec - 0,034 kW |
| Sound power level (per speed setting, if applicable) | LWA - 44/42/39 dB LWA - 57/51/47 dB |
6 - TROUBLESHOOTING
If one of the following anomalies occurs, switch the appliance off, disconnect it from the electric power supply and contact your dealer.
a. The operating LED flashes rapidly (two times per second) and continues even if the unit is switched off and back on again.
b. The remote control does not receive the signal or the key does not operate correctly.
c. A safety device, such as a fuse or switch, intervenes frequently.
d. The appliance has a water leak.
e. Other malfunctioning.
7 - INCONVENIENCES AND POSSIBLE REMEDIES
Consult the following points before requesting assistance or repairs.
| MALFUNCTIONING• The appliance does not start | CAUSE• Electric current failure.• Switch is off.• Switch fuse probably blown.• Remote control batteries discharged or remote control broken | WHAT MUST BE DONE?• Wait for the electric current to reset.• Switch the unit on.• Replace the fuse.• Replace the batteries or examine the remote control. |
| • The air circulates regularly, but cooling is insufficient | • Temperature not set correctly | • Set the correct temperature. |
| • Cooling not very effective | • Accumulation of dirt in the appliance heat exchanger coil• Air filter dirty• Obstruction of the appliance inlet• Doors and windows open• Exposure to direct sunlight• Too many heat sources• Outdoor temperature too high | • Clean the heat exchange coil.• Clean the filter.• Eliminate the impurities to free the air flow.• Close doors and windows.• Protect from solar rays via curtains.• Reduce the heat sources.• The conditioner cooling capacity lowers (normal). |
| • Heating not very effective | • Outdoor temperature lower than 7°C• Doors and windows partially open | • Use a heating device.• Close doors and windows. |
| • Impossible to modify the fan speed | • Control that the MODE indicated on the display is AUTO (automatic)• Protection against hot air in cooling mode• Protection against cold air in heating mode | • If automatic mode is selected, the conditioner automatically adjusts the fan speed.• Lower the inlet temperature in cooling mode; increase the inlet temperature in heating mode. |
| • The remote control signal is not transmitted, even if the ON/OFF key is pressed | • Verify that the batteries of the remote control are not discharged | • The electric current is cut off. |
| • The TEMP indicator does not switch on | • Control that the MODE indicated on the display is FAN (ventilation) | • In ventilation mode, the temperature cannot be set. |
| • The indication on the display disappears after a certain period of time | • Check that the appliance stops when the display shows the TIMER OFF indication (switch-off timer) | • The conditioner will switch off at the time set. |
| • The TIMER ON indicator switches off after a certain period of time | • Check that the appliance starts when the display shows the TIMER ON indication (switch-on timer) | • The conditioner will switch on automatically at the time set and the relative indicator will switch off. |
| • The appliance does not emit any sound, not even when pressing the ON/OFF key (P5) | • Check that the remote control signal transmitter is aimed correctly towards the appliance infra-red receiver when the ON/OFF key (P5) is pressed. | • Aim the remote control signal transmitter directly towards the appliance infra-red receiver and then press the ON/OFF key twice (P5). |
Do not try to repair the appliance by yourself.
If the problem has not been solved, please contact your local retailer or the closest assistance service. Supply detailed information about the malfunction and the equipment version.
EN - 24
TABLE DES MATIÈRES GÉNÉRALE
0 -MISES EN GARDE 2
0.1 - INFORMATIONS GÉNÉRALES 2
0.2 - SYMBOLOGIE 2
0.2.1 - Pictogrammes rédactionnels....2
0.3 - MISES EN GARDE GÉNÉRALES ....4
0.4 - INFORMATIONS IMPORTANTES RELATIVES À LA SÉCURITÉ 5
0.5 - ZONES À RISQUE....8
0.6 - UTILISATION PRÉVUE....9
1 -DESCRIPTION DE L'APPAREIL 10
1.1 - IDENTIFICATION DES PARTIES PRINCIPALES....10
2.1 - MISES EN GARDE 11
2.2 - CONDITIONS OPÉRATIONNELLES....11
natural_image
Line drawing of a hand holding a remote control with a digital display (no text or symbols on the device itself)
natural_image
Line drawing of a hand holding a remote control with a digital display (no text or symbols on the device itself)


- INDICE GENERALE
- -AVVERTENZE 3
- -DESCRIPTION OF THE APPLIANCE 10
- INFORMATION RESERVED FOR THE "INSTALLATION TECHNICIAN"
- - CORRECT USE OF THE APPLIANCE 11
- SECTION FOR THE TECHNICIAN AND USER
- - USE OF THE APPLIANCE....12
- - MAINTENANCE AND CLEANING 20
- - TECHNICAL DATA....23
- - TROUBLESHOOTING 23
- - INCONVENIENCES AND POSSIBLE REMEDIES 24
- ILLUSTRATIONS
- MAIN INDEX
- - WARNINGS
- - GENERAL INFORMATION
- - SYMBOLS
- - Editorial pictograms
- Service
- Index
- Raised hand
- GENERIC DANGER
- DANGER DUE TO HEAT
- DO NOT COVER
- ATTENTION
- - GENERAL WARNINGS
- - IMPORTANT SAFETY INFORMATION
- WARNING
- CAUTION
- - HAZARDOUS ZONES
- - PROPER USE
- SPOSAL
- - DESCRIPTION OF THE APPLIANCE
- - IDENTIFICATION OF THE MAIN COMPONENTS (Fig.A)
- - CORRECT USE OF THE APPLIANCE
- - WARNINGS
- A failure to respect what follows may cause damages to the appliance.
- - OPERATING CONDITIONS
- NOTE:
- - USE OF THE APPLIANCE
- • AUTOMATIC (AUTO)
- • FORCED COOLING (COOL)
- • OFF
- - RECOMMENDATIONS FOR ENERGY SAVING
- - REMOTE CONTROL KEYS (Fig. B)
- • P1. MODE KEY:
- • P2. FAN SPEED KEY:
- • P3. TEMPERATURE SET reduction KEY
- • P4. Increase TEMPERATURE set KEY
- • P5. ON/OFF KEY (Appliance stand-by)
- • P6. AIR DIRECTION KEY (Air direction)
- • P7. VERTICAL SWING KEY
- • P8. HORIZONTAL SWING KEY
- • P9. CLOCK KEY
- • P10. TIMER ON KEY (Switch-on timer)
- • P11. TIMER OFF KEY (Switch-off timer)
- • P12. RESET KEY (Reset - internal key)
- • P13. LOCK KEY (Lock- internal key)
- • P14. OK KEY
- • P15. COOL/HEAT KEY
- • P16. ECO KEY
- - REMOTE CONTROL DISPLAY (Fig.C)
- • D1. TEMP:
- • D2. TRANSMITTING DISPLAY:
- • D3. ON/OFF:
- • D4. RUNNING MODE:
- • D5. TIME:
- • D6. LOCK:
- • D7. TIME ON/OFF:
- • D8. FAN SPEED:
- • D9. ECONOMIC OPERATION:
- - USE OF THE REMOTE CONTROL
- 3.4.a - Insertion of batteries
- 3.4.b - Replacement of batteries
- 3.4.c - Location of the remote control
- - USE OF THE APPLIANCE
- 3.5.a - AUTO mode (Automatic)
- 3.5.b - COOL / HEAT / FAN mode
- 3.5.c - DRY mode (dehumidification)
- 3.5.d - Using the timer
- 3.5.d.a - Switch-on timer
- 3.5.d.b - Switch-off timer
- 3.5.d.c - Combined setting of the switch-on timer and the switch-off timer
- 3.5.d.d - Modifying the timer
- 3.5.e - Adjusting the direction of the air flow
- - RESETTING ALL REMOTE CONTROL FUNCTIONS (IF PRESENT)
- - LOCK SETTINGS
- - CHANGE MODE
- - AUTORESTART
- - MAINTENANCE AND CLEANING
- - CLEANING
- 4.1.a - Cleaning the appliance and the remote control
- 4.1.b - Cleaning the suction filter
- Operate as follows:
- - MAINTENANCE
- - SYMPTOMS THAT DO NOT INDICATE APPLIANCE MALFUNCTIONING
- SYMPTOM 1: The appliance does not work
- SYMPTOM 2: Passage to ventilation mode during operation in cooling mode
- SYMPTOM 3: White mist escaping from the appliance
- Symptom 3.1
- Symptom 3.2
- SYMPTOM 4: Noise during cooling
- SYMPTOM 5: Dust escaping from the appliance
- SYMPTOM 6: THE appliance gives off odours
- - ERROR CODES
- - TECHNICAL DATA
- - TROUBLESHOOTING
- - INCONVENIENCES AND POSSIBLE REMEDIES
- TABLE DES MATIÈRES GÉNÉRALE
- -MISES EN GARDE 2
- -DESCRIPTION DE L'APPAREIL 10
Brand : OLIMPIA SPLENDID
Model : Ci2 Wall
Category : Air-conditioner