
SS-12035 - Fridge Sogo - Free user manual and instructions
Find the device manual for free SS-12035 Sogo in PDF.

| Product type | Ice maker |
| Brand | Sogo |
| Model | SS-12035 |
| Dimensions (W x D x H) | 33.5 x 25.7 x 32.6 cm |
| Net weight | 7.60 kg |
| Power supply | 220-240 V ~ 50/60 Hz |
| Rated power | 120 W / 0.8 A |
| Ice production | 10-12 kg / 24 h |
| Number of ice cubes per cycle | 9 pieces |
| Ice basket capacity | 0.8 kg |
| Water tank capacity | 1.8 L |
| Cycle duration | 7 to 15 minutes |
| Refrigerant | R600a (flammable) |
| Blowing gas | C5H10 (flammable) |
| Climate class | SN/N/ST/T (from 10 °C to 43 °C) |
| Indicator lights | On/Off, Water tank empty, Ice basket full |
| Maintenance and cleaning | Weekly cleaning recommended with warm water and vinegar |
| Safety | Grounding, automatic stop if water tank empty or ice basket full, do not use extension cord |
| Repairability | Do not disassemble, contact authorized after-sales service |
| Spare parts | Accessories supplied: ice basket, ice scoop, filter |
| General information | Indoor domestic use only, do not use outdoors |
Frequently Asked Questions - SS-12035 Sogo
User questions about SS-12035 Sogo
0 question about this device. Answer the ones you know or ask your own.
Ask a new question about this device
Download the instructions for your Fridge in PDF format for free! Find your manual SS-12035 - Sogo and take your electronic device back in hand. On this page are published all the documents necessary for the use of your device. SS-12035 by Sogo.
USER MANUAL SS-12035 Sogo
natural_image
Exterior view of a modern stainless steel milk carton with black lid and ventilation slots (no visible text or symbols)
FABRICADOR DE HIELO
ICE MAKER
MACHINE À GLAÇONS
FAZEDOR DE GÉLO
EISMASCHINE
FABBRICATORE DI GHIACCIO
Caution: please read and preserve these important instructions
natural_image
Pure diagram of a U-shaped pipe or channel with directional arrows indicating flow or movement (no text or symbols)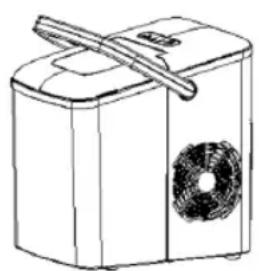
natural_image
Line drawing of a small kitchen appliance with a fan and lid (no text or symbols)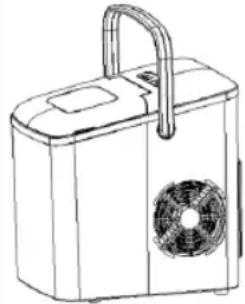
natural_image
Line drawing of a portable electronic device with a fan and handle (no text or symbols)natural_image
Technical line drawing of a rectangular HVAC unit with a central fan and side panel (no text or symbols)Mesa de trabajo
natural_image
Technical line drawing of a mechanical component with labeled part 'Ta' (no other text or symbols)
natural_image
Technical line drawing of a mechanical component with no visible text or symbolsThank you for choosing our Ice maker. In order to let the product work better for you, please read all the instructions carefully before using it.
IMPORTANT:
Always read the instruction book carefully before using.
This manual can be downloaded from our web page www.sogo.com
Keep these instructions for future reference.

READ ALL INSTRUCTIONS BEFORE USE.
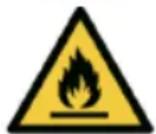
Warning: Risk of fire/flammable materials.
To reduce the risk of fire, explosion, electric shock, or injury when using your ice maker, follow these important safety instructions:
SAFETY INSTRUCTIONS FOR THE USER
- Do not remove any safety, warning or product information labels from your ice maker.
- Before plugging in ice maker to wall outlet always check, if the voltage power corresponds to the one shown in the rating plate.
- This product is intended for indoor, non-industrial, non-commercial; household use only. Do not use the item outdoors or for any other purpose.
- Misuse or improper handling may cause problems in the appliance and cause injury to
the user.
- Do not use or store the appliance outdoors.
- Do not connect the ice maker with direct water supply system.
- For compression type appliances which use flammable refrigerants, instructions shall include information regarding to the installation, handling and servicing.
- For compression type appliances that use flammable refrigerants shall additionally include the substance of the warnings list below:
- WARNING: Keep ventilation openings, in the appliance enclosure or in the built-in structure, clear of obstruction.
- WARNING: Do not use mechanical devices or other means to accelerate the defrosting process, other than those recommended by the manufacturer.
- WARNING: Do not damage the refrigerant circuit.
- WARNING: Do not use electrical appliances inside the food storage compartments of the appliance, unless they are of the type recommended by the manufacturer.
- WARNING: appliances which use flammable insulation blowing gases, instruction shall include information regarding disposal of the appliance
- WARNING: Do not store explosive substances such as aerosol cans with a flammable propellant in this appliance.
- WARNING: when positioning the appliance, ensure the supply cord is not trapped or
damaged.
- WARNING: Never use the ice maker when there is flammable gas leakage.
- WARNING: Never store or use gas and other flammable articles near the ice maker to avoid any fire.
- WARNING: Do not locate multiple portable socket-outlets or portable power supplies at the rear of the appliance.
- The appliance is not to be used by persons with reduced physical, sensory or mental capabilities or lack of experience and knowledge unless they have been given supervision or instruction.
- This appliance can be used by children aged from 8 years and above and persons with reduced physical, sensory or mental capabilities or lack of experience and knowledge, if they have been given supervision or instruction concerning use of the appliance in a safe way and understand the hazards involved
• Children being supervised not to play with the appliance - Cleaning and user maintenance shall not be made by children without supervision.
- Keep the appliance and its cord out of reach of children less than 8 years.
- Close supervision is necessary when any appliance is used by or near children.
• Children aged from 3 to 8 years are allowed to load and unload refrigerating appliances. - Never use accessories that are not recommended by the manufacturer.
- The use of attachment not recommended or sold by manufacturer may cause fire, electric shock or injury.
- Never immerse the appliance or the plug-in water or any other liquid. In the event of the appliance falling in water, disconnect immediately from the mains supply and take it to an authorized service agent for repair before using.
- This appliance is intended to be used in household and similar applications such as a. Staff kitchen areas in shops, offices and other working environments; b. Farm houses and by clients in hotels, motels and other residential type environments;
c. Bed and breakfast type environments; d. Catering and similar non-retail applications.
- Do not use the appliance if the cable or plug is damaged. Should the cord be damaged, it just be replaced only by the manufacturer, its service agent or similarly qualified persons in order to avoid a hazard.
- When the power cord is damaged, do not touch the AC power cord with your hands to avoid danger.
- Do not place or operate the appliance and its power cord on or near hot surfaces, like Stove, Gas Burners and Induction plates.
- Do not let cord hang over edge of table or counter.
- Place power cord in such a way that it cannot be pulled on by children or cause a tripping hazard.
- Place power cord in such a way that it is not in contact with hot surfaces.
- Do not touch the evaporator when using the ice maker or making ice to avoid being suffer from frostbite.
- To disconnect, turn any control to “OFF”, then remove plug from wall outlet.
- Do not plug or unplug product with wet hands.
- Always remove the plug from the power socket when the appliance is not in use. Do not leave the appliance unattended when switched on.
- Unplug the product before cleaning, maintaining and when not in use.
- Unplug the ice maker before moving it to avoid damaging the refrigerating system.
- Do not use with water that is microbiologically unsafe or of unknown quality.
- Do not clean your ice maker with any flammable fluids. The fumes may create a fire hazard or explosion.
- Do not overturn the ice maker. If the ice maker is overturned accidentally, make it stand steadily for 2 hours before power it on again.
- If the ice maker is brought in from outside in wintertime, do not use for a few hours, allowing the unit to warm up to the room temperature before operating.
Special Instructions
- Plug the ice maker into an exclusive grounded power outlet. No other appliance should be plugged into the same outlet. Be sure that the plug is fully inserted into the receptacle.
- This appliance must be grounded. It is equipped with a power cord having a grounding plug. The plug must be plugged into an outlet that is properly installed and grounded.
- Avoid the use of an extension cord because it may overheat and cause a risk of fire. However, if it is necessary to use an extension cord:
- Use only extension cord with grounding plug.
- The marked rating of an extension cord must be equal to or greater than the rating of this appliance.
- It should be positioned such that it does not drape over the counter or tabletop where it can be pulled on by children intentionally.
Safe disposal instructions
- This Appliance uses flammable insulation blowing gases, therefore for safe disposal, please follow instructions given below:
- Follow the local regulations rules regarding disposal of the appliance which uses flammable refrigerant and blowing gas.
- Do not throw the appliance as normal garbage and take it to the nearest authorized local disposal Centre.
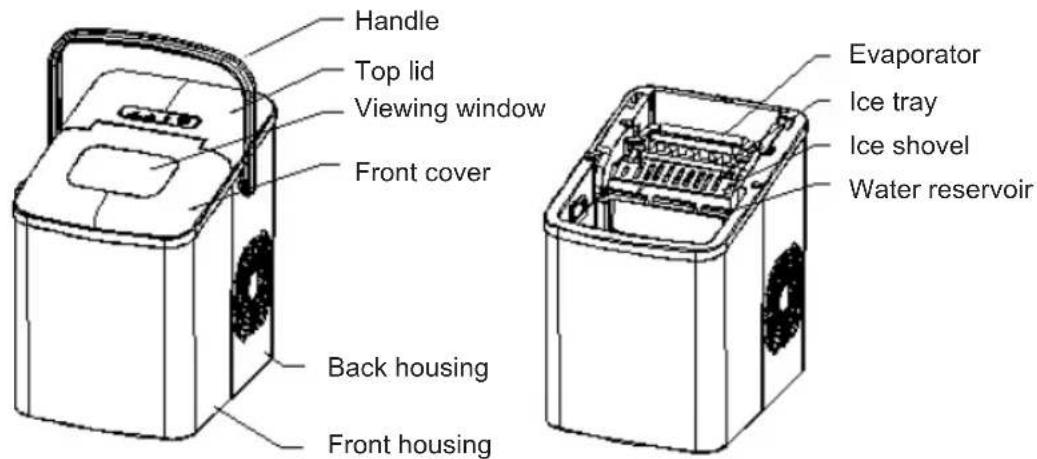
KNOW YOUR ICE MAKER
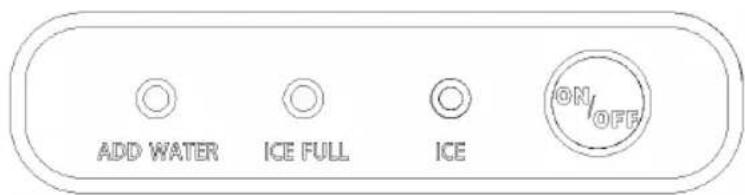
| Key (with indicator) Function | |
| ENCENDIDO / APAGADO Start or stop the appliance;Long press for cleaning; | |
| ICE Standby mode: “ICE” indicator blinks;Cleaning condition: “ICE” indicator blinks quicker;Working condition: “ICE” indicator lights solidly. | |
| ICE FULL “ICE FULL” indicator lights up when the ice basket is full. | |
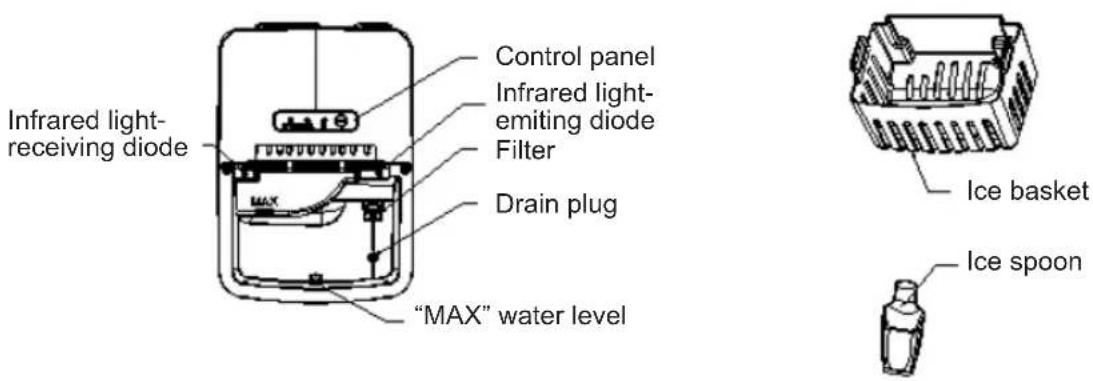
| ADD WATER “ADD WATER” indicator lights up when the water reservoir is lack of water. |
BEFORE FIRST USE
-
Unpack the appliance, then check and make sure that all the accessories including ice basket and ice scoop etc. are complete. Please contact with the client service department if any accessories are missing.
-
Please follow the steps as below to install the handle well in position.
1) Grasp both sides of the handle shown in arrows with hands and pull them outwards (see Fig.1).
2) Make the handle align with the holes at the housing and release the hands when the handle has been inserted into the holes of housing (see Fig.2).
3) Pull and make the handle be upright, then pull both sides of the handle outwards by following the operation of Step 1). Check and make sure that the handle shall be positioned well at the holes of housing.
4) Grasp the center of handle and lift it upwards (see Fig.3), check and make sure that handle has been inserted well in the holes of housing.

natural_image
Three technical line drawings of household appliances: a U-shaped tube, a cylindrical box with fans, and a rectangular device with a handle (no text or symbols)-
Please ensure to place the ice maker on a stable table or platform to in a even level position to avoid any malfunction.
-
The incline angle of the ice maker cabinet should not exceed 45^ during transportation or use. Do not turn the ice maker upside down. Doing so might harm the compressor or refrigerating system of ice maker to operate correctly. Please allow time for the fluids in the compressor to settle down after the ice maker is moved or transported. Before using the ice maker for the first time, please wait for 2 hours after the unit has been leveled and positioned in the proper place.
-
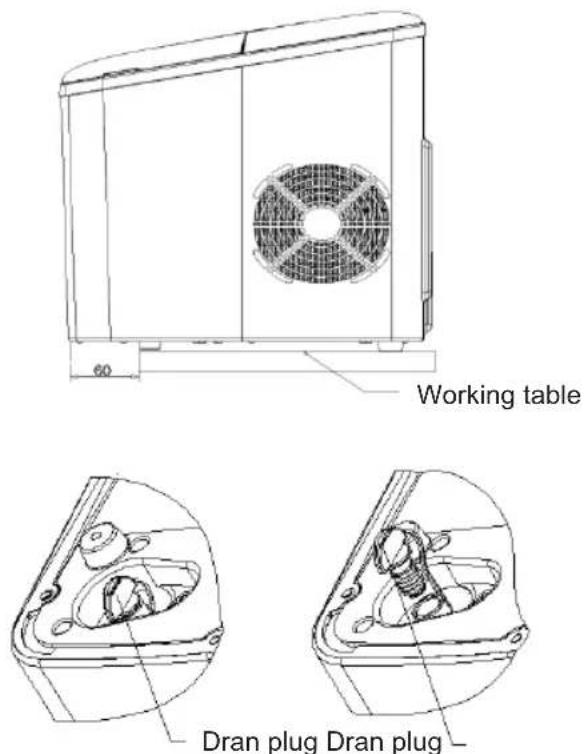
The appliance must be placed on a dry and level surface with sufficient ventilation, far from heat sources such as ovens, heaters and corrosive gases. Leave about a 6-inch (15cm) of space on all sides of the ice maker for proper ventilation.
-
Do not fill the water reservoir with hot water. This may damage the ice maker. It is best to fill the water reservoir with water of room temperature or lower.
-
Do not use the appliance at a very cold environment (lower than 5°C).
-
Clean the appliance by following the operation of "CLEANING AND MAINTENANCE" before operate.
USING YOUR ICE MAKER
-
Ensure that the drain plug at the bottom of water reservoir is closed well.
-
Plug the ice maker into the wall outlet, the "ICE" indicator blinks.
NOTE: Please make sure the ice maker be rested for 30 minutes before plugging in if it has been moved.
-
Open the top lid and remove the ice basket.
-
Fill the water reservoir with drinking water.
NOTE: Do not fill above the MAX water level mark.
-
Replace the ice basket and close the top lid.
-
Press "ON/OFF" key, and the "ICE "indicator lights solidly.
-
The ice-making cycle will last approximately 7-15 minutes, depending on the ambient temperature and water temperature.
-
The ice-making cycle starts with water being pumped into the ice tray situated below the evaporator. Over the next 7-15 minutes ice forms on the evaporator. Once this has completed, the ice tray tilt backwards and the remaining water in the ice tray is drained back into the water reservoir. The ice cubes are then dropped from the evaporator and pushed forward into the ice basket by the ice shovel. The ice tray will automatically move back into position under the evaporator and start the next cycle.
-
The "ICE FULL" indicator will light up when the ice basket is full and then the ice maker will stop the ice-making cycle automatically. Gently remove the ice from the ice basket with the ice scoop. About 7.5 seconds later, the ice maker will restart its ice making function automatically.
-
The "ADD WATER" indicator will light up when the water reservoir has lack of water and the ice-making cycle will stop automatically. At that time, remove the ice basket and add water to the water reservoir, and then press "ON/OFF" key again to restart the ice-making cycle. The appliance will
start working automatically after about 20 minutes if the operator forgets to restart the appliance after refilling the water.
- When you have got your desired amount of ice, stop the ice making cycle by pressing the "ON/OFF" key and unplug the unit from the wall outlet.
- Open the top lid and transfer the ice to a freezer.
- Allow the ice maker to reach room temperature.
- It is Suggested to replace the water once in a week. Please take out the water from water reservoir if the ice maker is not being used for a long time.
CLEANING AND MAINTENANCE
To keep your ice fresh and ice maker works smoothly, it is recommended to clean the ice maker once in a week.
- Stop the ice-making cycle by pressing the "ON/OFF" key, unplug the ice maker from the wall outlet and allow it to warm up to room temperature.
- If residual water is found in the ice tray, gently push the ice tray back so that all water drains into the water reservoir.
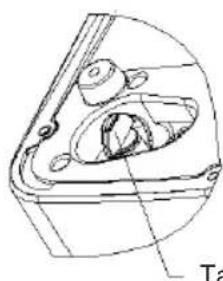
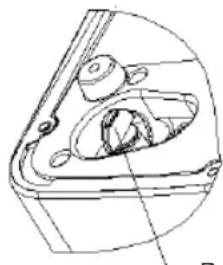
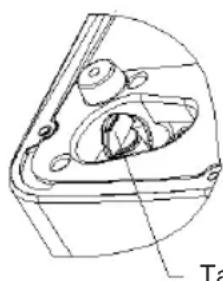
- Move the appliance forward to a place 60mm away from the working table and open the drain plug to drain out excess water (see Fig.4, Fig.5 and Fig.6).
- Remove the ice basket.
- Clean the ice maker interior with a soft cloth soaked with warm water and vinegar, then rinse with clean water and then drain all the water.
- Replace the drain plug well in position. Wash the ice basket and ice scoop in warm soapy water. Rinse and dry.
- Clean the exterior of the ice maker with a soft damp cloth. Use a mild dishwashing soap, if necessary. NOTE:
1) Do not use organic solvent, boiled water, detergent, strong acidic and strong alkaline liquids for cleaning.
2) Do not clean the evaporator. Please empty the water reservoir and dry it for storage if the ice maker is not being used for a long time.
| Problem Possible causes Solution | ||
| “ADD WATER” indicator turns on | 1. Low water level or lack of water2. The water screen at the bottom of water reservoir is blocked.3. Pump malfunction. | 1. Stop making ice, refill water and then press “ON/OFF” key to restart ice-making cycle.2. Do cleaning3. Send it to the authorized department for repair. |
| “ICE FULL” indicator lights up | 1. Ice basket is full and the infrared light is blocked by the ice.2. Infrared light-emitting diode & light-receiving diode do not work | 1. Remove the ice from ice basket.2a. Wipe up the foreign objects on the infrared light-emitting diode & light-receiving diode and restart the ice maker.2b. Call Customer Service if the infrared light-emitting diode & light-receiving diode still cannot work after wiping up the foreign objects on them and restarting the ice maker. |
| The ice collects together. | Making ice takes too much time. Stop making ice and restart the ice-making cycle after the ice melts. | |
| The water in the water reservoir is of too low temperature. | Fill the water reservoir with water ranges between 81°C and 25°C. | |
| The ice-making cycle seems normal but no ice is produced | The ambient temperature or water temperature is too high. | Start the ice-making cycle at a environment with an ambient temperature less than 32°C and fill the water reservoir with some cold water. |
| Refrigerating system leaks Call customer service | ||
| Refrigerating system blocks Call customer service | ||
| Poor ice-making result | 1. Poor heat dissipation.2. The water temperature is too high.3. The ambient temperature is too high. | 1. Leave a 6-inch space on all sides of the ice maker for proper ventilation.2. Fill the water reservoir with water ranges between 8°C and 28°C.3. Operate the ice maker at a environment with an ambient temperature between 10°C and 32°C. |
TECHNICAL SPECIFICATIONS
| Features Specifications | |
| Ice shape Bullet shape | |
| Ice making capacity 10-12kg / 24h | |
| No.of ice cubes in each cycle 9 pcs | |
| Ice bin storage capacity 0.8kg | |
| Wáter tank capacity 1.8L | |
| Refrigeration system Compressor air cooling | |
| Refrigerant R600a | |
| Blowing gas C | _5H_10 |
| Climate SN/N/ST/T | |
| Product weight | 7.60kg |
| Product dimensions 33.5x 25.7x 32.6 cm | |
| Voltage | 220 - 240V |
| Frequency | 50-60Hz |
| Power and Rated input Voltage | 120W / 0.8A |
natural_image
Technical line drawing of a rectangular HVAC unit with a circular fan and side panel, dimensioned 60 (no text or symbols)Table de travail
natural_image
Technical line drawing of a mechanical component with no visible text or symbolsBouchon de vidange
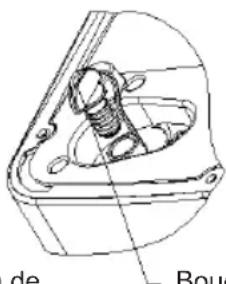
Bouchon de vidange
natural_image
Technical line drawing of a dual-panel air conditioner unit with fan and vent, dimensioned 60 (no text or symbols)Mesa de trabalho

natural_image
Technical line drawing of a mechanical component with labeled parts (no readable text or symbols)Tampão de
drenagem

Tampão de drenagem
natural_image
Pure diagram of a U-shaped pipe or channel with directional arrows indicating flow or movement (no text or symbols)
natural_image
Line drawing of a microwave oven with a fan and handle (no text or symbols)
natural_image
Line drawing of a portable electronic device with a fan and handle (no text or symbols)natural_image
Pure diagram of a U-shaped pipe or channel with directional arrows indicating flow or movement (no text or symbols)
natural_image
Line drawing of a small kitchen appliance with a fan and lid (no text or symbols)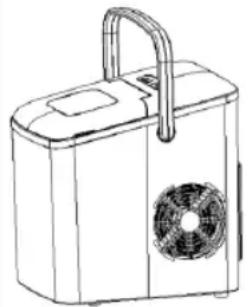
natural_image
Line drawing of a portable electronic device with a handle and fan (no text or symbols)natural_image
Technical line drawing of a rectangular HVAC unit with a circular fan and side panel (no text or symbols)Tavolo da lavoro
natural_image
Technical line drawing of a mechanical component with labeled part 'Ta' (no other text or symbols)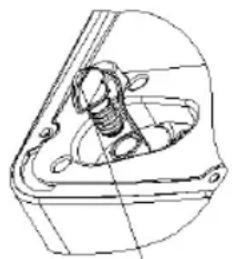
natural_image
Technical line drawing of a mechanical component with no visible text or symbolsDECLARATION OF CONFORMITY
This device complies with Low Voltage Directive 2014/35/EC, Electromagnetic Compatibility Directive 2014/30/EU, Directive 2015/863/EU on the restriction of the use of certain hazardous substances in electrical and electronic equipment and Directive 2009/125/EC on the eco-design requirements applicable to energy-related products.
DÉCLARATION DE CONFORMITÉ
This symbol means that in case you wish to dispose of the product once its working life has ended, take it to an authorised waste agent for the selective collection of waste electrical and electronic equipment (WEEE).

Imported by:
Sanysan Appliances S.L, NIF: B98753056, C/ Barcas 2, 2 46002 Valencia, Spain Product made in P.R.C. – Designed by SOGO based on the European Quality Standards Customer Service: www.sogosat.com / sogosat@sogosat.com / 0034 902 222 161


- IMPORTANT:
- READ ALL INSTRUCTIONS BEFORE USE.
- Warning: Risk of fire/flammable materials.
- SAFETY INSTRUCTIONS FOR THE USER
- Special Instructions
- Safe disposal instructions
- KNOW YOUR ICE MAKER
- BEFORE FIRST USE
- USING YOUR ICE MAKER
- CLEANING AND MAINTENANCE
- DECLARATION OF CONFORMITY
- DÉCLARATION DE CONFORMITÉ
- Imported by:
Brand : Sogo
Model : SS-12035
Category : Fridge