
SS-13025 - Vacuum Sealer Sogo - Free user manual and instructions
Find the device manual for free SS-13025 Sogo in PDF.

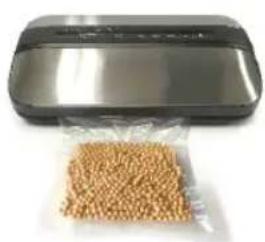
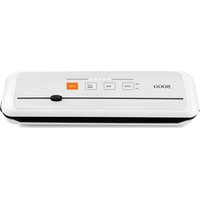
| Product type | Vacuum sealer |
| Brand | Sogo |
| Model | SS-13025 |
| Power supply | 220-240 V, 50-60 Hz |
| Suction power | Up to 0.85 bar |
| Suction modes | Normal and Gentle (for fragile foods) |
| Sealing modes | Dry and Moist |
| Functions | Vacuum/Seal, Seal only, Marinate, Canister suction, Stop |
| Sealing bar type | 3 mm bar for perfect seal |
| Roll compartment | Yes, with built-in cutter |
| Compatible accessories | Vacuum bags, rolls, canisters, wine stopper |
| Maintenance and cleaning | Wipe exterior with damp cloth and mild soap; clean vacuum chamber with paper towel; do not immerse |
| Safety | Automatic shut-off, 40-second cooling interval recommended, do not use if cord damaged |
| Intended use | Indoor household use only |
| Recommended storage temperature | Refrigerator (5±3°C), freezer (-18±2°C), room temperature (25±2°C) |
| Compliance | European directives (low voltage, EMC, RoHS, ecodesign) |
| Importer | Sanysan Appliances S.L., Valencia, Spain |
| Manufacturing | People's Republic of China |
| After-sales service | www.sogosat.com / sogosat@sogosat.com / 0034902222161 |
Frequently Asked Questions - SS-13025 Sogo
User questions about SS-13025 Sogo
0 question about this device. Answer the ones you know or ask your own.
Ask a new question about this device
Download the instructions for your Vacuum Sealer in PDF format for free! Find your manual SS-13025 - Sogo and take your electronic device back in hand. On this page are published all the documents necessary for the use of your device. SS-13025 by Sogo.
USER MANUAL SS-13025 Sogo
This instruction manual can also be downloaded from our website www.sogo.es
IMPORTANT SAFEGUARDS
When using this electrical appliance, safety precautions should always be observed, including the following:
READ ALL INSTRUCTIONS
- Carefully read all of the instructions before using this appliance and save for future reference.
- Before plugging cord into wall outlet, or disconnecting, make sure that the cover of the machine is in unlocked condition, and unplug from outlet when not in use or before cleaning.
- This appliance is not a toy, when used by or near children, close attention is necessary, and store this appliance to a safe place, out of the reach of children.
- Do not use any bags or attachments not recommended or appointed, and don't use this appliance for other purpose except its intended use.
- Stop using the machine immediately if the cord is damaged and have it replaced by a professional.
- Keep away from moving parts.
- Do not contact the hot sealing element located on edge of the top housing of this machine. It is hot and may get burn.
- Do not try to repair this appliance by yourself.
- Don't use the appliance if it has fallen or appeared to be damaged.
- Avoid to do the following: pull or carry by the cord, use cord as a handle, close a door on cord,
or pull cord around sharp edges or corners. Do not operate appliance over cord or cord / plug is wet.
- Keep away from hot gas, heated oven, electric burner or any other hot surfaces. Do not use this appliance on wet or hot surface or near a heat source.
- It's better not to use an extension cord with this unit. However, if one is used, it must have a rating equal to or exceeding the rating of this appliance.
- When disconnect, to avoid any injury, please unplug by grasp the plug, not the cord.
- Before plugging appliance in or operating, make sure your hands are dry and safe to do the actions.
- When it In "ON" or working position, always be on a stable surface, such as table or counter.
- It's no need to use any lubricant, such as lubricating oils or water, on this appliance.
- Do not immerse any part of this appliance, power cord or plug in water or any other liquid.
- Do not use this appliance outdoors or on a wet surface, it's recommended for household, indoor use only.
- This appliance can't be used by children aged from 8 years and above and persons with reduced physical, sensory or mental capabilities or lack of experience and knowledge if they have been given supervision or instruction concerning use of the appliance in a safe way and understand the hazards involved.
- Children should be supervised to ensure that they do not play with the appliance.
- If the supply cord is damaged, It must be replaced by the manufacturer, its service agent
or similarly, qualified persons in order to avoid a hazard.
- Cleaning and user maintenance shall not be made by children without supervision.
- Please check if the local power supply voltage matches the voltage indicated on this appliance before use.
- Do not operate the appliance with a damaged power cord or plug. Do not operate the appliance if there's any malfunctions or damage of the product. If the cord or the appliance is damaged, it must be returned to an authorized service center.
- To disconnect the power, unplug the power cord from the electrical outlet. Do not disconnect by pulling on the power cord.
- If the supply cord is damaged, it must be replaced by the manufacturer, or it's service agent or similarly qualified person in order to avoid a hazard.
- Do not use an extension cord with the appliance.
- When the appliance is not in use or need to be clean, please unplug cord from the power outlet first.
- Do not use the appliance on wet or hot surfaces, or near a power source.
- Use only accessories or attachments recommended by the manufacture.
- Use the appliance only for it's intended use. Don't use the product outside the work area.
- Close supervision is required when children use the appliance. Do not play with the appliance as a toy.
- Intervals for 40 seconds is recommended every time after seal.
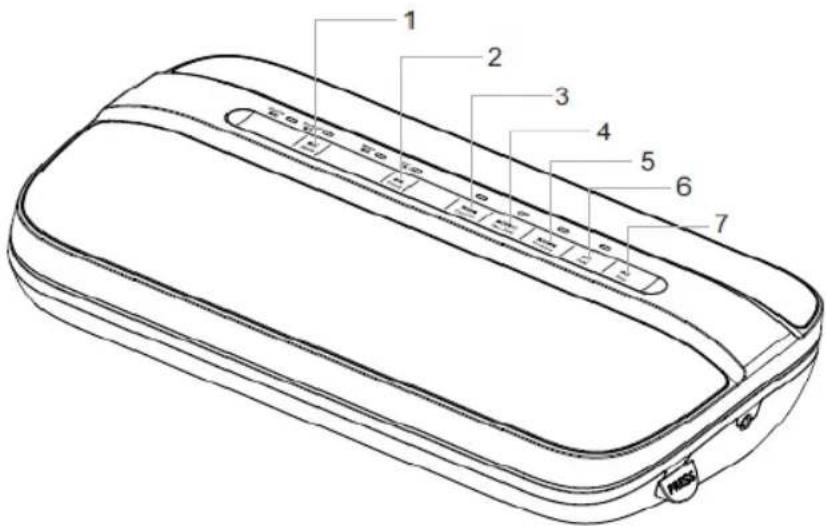
1-"Mode" button: it has two setting mode (Normal and Gentle). The default mode is Normal. When the food is crumbly, you can press the button, then the vacuum mode is changed to Gentle. You can manually control the degree of vacuum by pressing "Seal" button at any time, the food will be sealed automatically. (Note: if the power is interrupted, this setting will return to a pre-set standard mode).
2- "Food" button: it has two setting mode (Dry and Moist). The default mode is Dry, when you press the button, it changes to Moist mode. You can choose the model according to the food type. (Note: intervals for 40 seconds are recommended each time, if the power is interrupted, this setting will return to a pre-set standard mode)
3-"Canister" button (with LED): Press this button, the appliance begins to vacuum package the canister until the process is completed. (Note: This function is used together with the canister)
4-"Vac/Seal" button: Press this bottom to vacuum and seal bag (intervals for 40 seconds is recommended each time)
5- "Marinate" button (with LED): Press this button, the appliance can marinate the food by vacuum cycles, you can get great flavour in shortest time. (Note: This function is used together with the canister)
6- "Seal" button (with LED): Press this button to seal bag (intervals for 40 seconds is recommended each time)
7- "Stop" button: allow user to stop working anytime
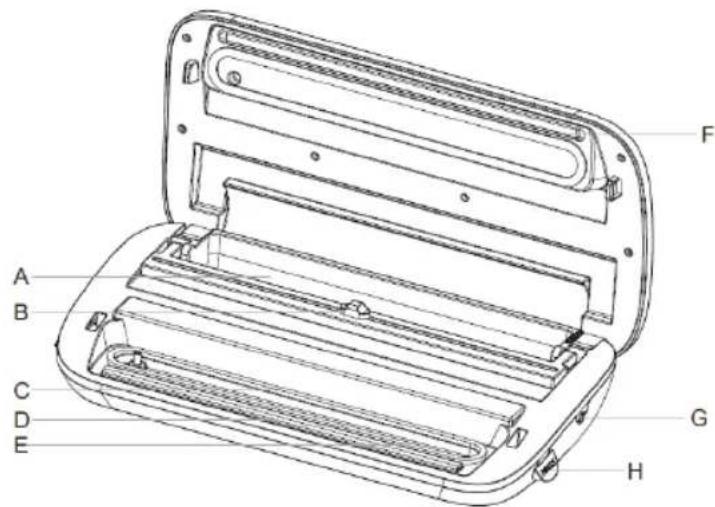
| A Roll | Chamber Chamber for | putting the rolls. |
| B Cutter cut the bag to any size | you want | |
| C Gasket To ensure the vacuum chamber will be without any air inside and prevent air leaking | ||
| D Rubber Lip Ensure the sealing will be 100% smooth | ||
| E Vacuum Chamber Opening | side of the Vacuum bags have to put inside the chamber when vacuuming | |
| F Sealing Bar 3mm sealing bar | can achieve better sealing | |
| G Canister Hole When v | cuuming the canister, wine stopper or other attachments, connect the tube to this hole, please keep the hole open when using this function | |
| H Release button Press this button open the lid, and take out the vacuum bags | ||
OPERATINGINSTRUCTION
1.
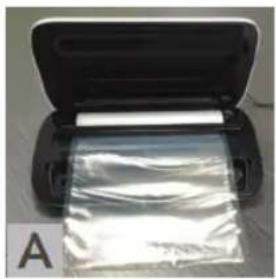
Open the lid, pull out suitable length of roll, move the cutter from one side to the other side, then the required roll will come out (no need to cut if you use vacuum bags
2.
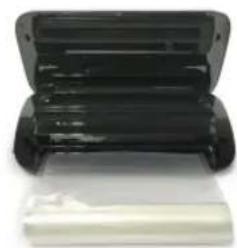
Put the opening side of the bags into the vacuum chamber, please be sure not cover the air suction hole.
3.

Press down the lid with two hands, locking is done when you hear a sound, then vacuum can start.
4.
After vacuum, press the release buttons on both sides, and open the lid, then take out the sealed bags with food inside.
SEAL VACUUM BAGS AND VACUUM CANISTER SEAL PLASTIC BAGS
- Plug the appliance in and switch it on.
- Insert the opening of the bag into the vacuum chamber as the above pictures.
- Press down the latches of two sides at the same time until two click sounds heard.
- Press the "Seal" button and you will find the LED will light, When the Led light disappears, the seal is done.
- Press "Release Button to open the appliance, then take out the sealed bag
PRESERVATION WITH VACUUM BAG
- Plug the appliance in and switch it on.
- Put the items that you want to preserve inside the bag.
- Clean and straighten the opening of the bag, make sure there are no wrinkle on the opening.
- Insert the opening of the bag into the vacuum chamber as the above pictures
- Press down the latches of two sides at the same time until two click sounds heard.
- Press the "Vacuum/Seal" button and the LED will light, then the bag will be automatically vacuumed and sealed. When the LED light disappears, the process is completed.
- Press the release buttons at two sides, then take out the sealed items.
Note: If the food is wet, pleas choose Moist mode.
PRESERVATION WITH VACUUM CANISTERS
- Put the items inside the canister and cover it with lid, insert one end of the hose into the Suck Air Hole on the appliance, then insert the other end into the hole on the top of the canister lid.
- Press "Canister" button, it begins to draw the air from the canister and create tight seal. You can press "Stop" button to stop working anytime. When the vacuum process is completed, the appliance will automatically stop.
- Unplug one end of the hose from the canister first, then unplug the other end from the appliance.
- When the stored items expire or need to be removed from the canister, please press down the button in the centre of the canister lid to deflate air, then open the canister in a few seconds
TIPS ON USING CANISTER
Please remove the lid before you put the canister in microwave oven. Place the canister in refrigerator for better preservation
HELPFUL HINTS
- Do not overfull the bags, leave enough length at the opening of the bag so that it can be placed in the vacuum chamber easily.
- Ensure that the opening the bag is not wet. A wet bag may be difficult to melt and seal tightly.
- Vacuum seal cannot completely replace the refrigeration and freeze; Perishable foods still need to be refrigerated or frozen.
- Make the opening of plastic bags clean and flat, no foreign objects or folds allowed, otherwise it will cause difficulty or leak during seal.
- To prevent wrinkles in a seal when vacuum sealing bulky items, gently stretch bag flat while inserting into the vacuum chamber and hold it until the pump begins to work.
- When you are vacuum sealing items with sharp edges (dry spaghetti, silverware etc.), protect the bag from punctures by wrapping item in soft cushioning material, such as tissue paper, you may need a canister or container instead of a bag.
- When using accessories, remember to leave 2.5CM(1-inch) of space at top of canister or container.
- Pre-freeze fruits and blanch vegetables before vacuum sealing for the best results.
- Intervals for 40 seconds after seal or vacuum is recommended.
- If you are unsure whether your bag was sealed properly, reseal the bag.
TIPS ON VACUUM SEALING WITH ACCESSORIES
Please pay attention to the following points before using accessories including canister, container and wine stopper etc.
- Make sure to leave at least 2.5cm (1 inch) space between objects and edge.
- Wipe the edge of the jar, container or bottle to make sure it is clean and dry.
- Put the lid on the canister or container, or insert the wine stopper into the bottle.
- Turn the knob to vacuum the canister/ container with a large knob on the lid, when the process is completed, turn the knob off, then remove the hose.
CARE AND CLEANING
- Always unplug the unit before cleaning.
- Don't immerse the appliance in water on other liquid for cleaning.
- Do not use abrasive cleaners to clean, because it is easy to scratch the surface of the appliance.
- Wipe the outside of the appliance with a damp cloth or sponge with mild soap if necessary.
- To clean the vacuum chamber, wipe away any food or liquid with a tissue paper.
- Dry thoroughly before using again.
TROUBLESHOOTING
Nothing happens when you try to vacuum package:
- Check if the power cord is tightly plugged into electrical outlet.
- Check if the power cord is damaged.
- Check if electrical outlet is working by plugging in another appliance.
- Make sure the latches are in the locked position.
- Make sure bag is placed correctly inside Vacuum Chamber.
- Allow the appliance to cool for 40 seconds before using it again.
Note: To prevent overheating of the appliance, allow the appliance to cool for 40 seconds before using it again and keep the cover open
AIR IS STILL IN THE BAG AFTER
- Make sure the opening of the bag is placed entirely inside Vacuum Chamber.
- Examine the bag if it leaks. Seal bag with air, then immerse it in water and apply pressure, Bubbles indicate a leak, use a new bag if bubbles appear.
- If you use a Bag with customized size, check the seal of bag. A wrinkle in the bag along the seal may cause leakage and allow air to re-enter, just cut bag and reseal.
- Do not attempt to make your own side seams for a Bag, the bags are manufactured with special side seams, which are sealed all the way to the outer edge. Making your own side seams may cause leakage and allow air to re-enter.
- Please not seal the food with high temperature. According to the principle of thermal expansion and contraction, please not seal the food with high temperature, otherwise the food will become smaller when cool down, so it looks like air leaking.
- There is still air inside the bags with vegetables or fruit after vacuum After Vacuum, please put the sealed bags into refrigerator, otherwise air release will happen due to photosynthesis, so cannot achieve vacuum result.
- Please not seal the fermented food Fermented food is not suitable for vacuum packing, because fermented food will release air itself.
AIR WAS REMOVEDFROM THE BAG, BUT NOW AIR HAS RE-ENTERED
- Examine seal of bag. A wrinkle along the seal may cause leakage and allow air to enter, simply cut bag and reseal.
- Sometimes moisture or food material (such as juices, grease, crumbs, powders, etc.) along seal prevents bag from sealing properly. Cut bag, wipe top inside of bag and reseal.
- If you vacuum package sharp food items, bag may have been punctured, use a new bag if there is a hole. Cover sharp food items with a soft cushioning material, such as a tissue paper, and reseal.
- If there's air still in the bag, fermentation or the release of natural gases from inside the foods may have occurred, when this happens, food may have begun to spoil and should be discarded.
THE BAG MELTS:
If the bag melts, rubber lip may have become too hot, always wait at least 5 minutes for appliance to cool down before you vacuum package another item.
STORAGE GUIDE AND TECHNICAL DATA
| In the fridge (5±3°C) No vacuum Vacuum Preservation | |
| Red Meat 3-4 days 8-9 days | |
| White Meat 2-3 days 6-8 days | |
| Fish 1-3 days 4-5 days | |
| Cooked Meat 3-5 days 10-15 days | |
| Soft Cheese 5-7 days 20 days | |
| Hard/Se mi Hard Cheese 1-5 days 60 days | |
| Fruits 5-7 days 1 4-20 days | |
| Vegetables 1-3 days 7-10 days | |
| Soup 2-3 days 8-10 days | |
| Pasta /Rice leftover er 2-3 days 6-8 days | |
| Cream Desserts 2-3 days 8 days | |
| Room Temperature (25±2°C) No vacuum Vaccum Preservation | |
| Fresh Bread 1-2 days 8-10 days | |
| Biscuits | 4-6 months |
| Uncook ed Pasta/Rice | 5-6 months |
| Flour | 4-6 months |
| Dry Fruits 3-4 months | 12 months |
| Ground Coffee | 2-3 months |
| Loose Tea | 5-6 months |
| Milk Tea | 1-2 months |
| In the Freezer (-18±2°C) | No vacuum Vaccum Preservation |
| Meat | 4-6 months |
| Fish 3-4 months | 10-12 months |
| Vegetables 8-10 months | 8-24 months |
TECHNICAL DATA
Rated Voltage: 220-240V
Rated Frequency: 50-60Hz
Rated Power: 120W
Sealing Time:6~10 Seconds
VAC/Sealing Time: 10~20 Seconds
Vacuum Power: up to 0.85 bar
DECLARATION OF CONFORMITY
This device complies with Low Voltage Directive 2014/35/EC, Electromagnetic Compatibility Directive 2014/30/EU, Directive 2015/863/UE on the restriction of the use of certain hazardous substances in electrical and electronic equipment and Directive 2009/125/EC on the eco-design requirements applicable to energy-related products.
This symbol means that in case you wish to dispose of the product once its working life has ended, take it to an authorised waste agent for the selective collection of waste electrical and electronic equipment (WEEE).

Imported by:
Sanysan Appliances S.L, NIF: B98753056, C/ Barcas 2, 2
46002 Valencia, Spain Product made in P.R.C. -Designed by SOGO based on the European Quality Standards
Customer Service: www.sogosat.com / sogosat@sogosat.com/0034902222161

- IMPORTANT SAFEGUARDS
- READ ALL INSTRUCTIONS
- OPERATINGINSTRUCTION
- SEAL VACUUM BAGS AND VACUUM CANISTER SEAL PLASTIC BAGS
- PRESERVATION WITH VACUUM BAG
- PRESERVATION WITH VACUUM CANISTERS
- TIPS ON USING CANISTER
- HELPFUL HINTS
- TIPS ON VACUUM SEALING WITH ACCESSORIES
- CARE AND CLEANING
- TROUBLESHOOTING
- AIR IS STILL IN THE BAG AFTER
- AIR WAS REMOVEDFROM THE BAG, BUT NOW AIR HAS RE-ENTERED
- THE BAG MELTS:
- TECHNICAL DATA
- DECLARATION OF CONFORMITY
- Imported by:
Brand : Sogo
Model : SS-13025
Category : Vacuum Sealer