
SE 5.100 - Vacuum Cleaner Kärcher - Free user manual and instructions
Find the device manual for free SE 5.100 Kärcher in PDF.

| Product type | Spray extraction vacuum cleaner (carpet cleaner) |
| Brand | Kärcher |
| Model | SE 5.100 |
| Rated voltage | 220-240 V ~ 50-60 Hz |
| Rated power | 1200 W |
| Maximum power | 1400 W |
| Weight (without accessories) | 7.1 kg |
| Sound pressure level | 77 dB(A) |
| Fresh water tank capacity | Approx. 1 L (fill to MAX mark) |
| Dirty water tank capacity | Approx. 1 L (automatic shut-off when full) |
| Main functions | Wet cleaning of carpets, hard floors and upholstery; dry and wet vacuuming |
| Cleaning technology | Spray detergent solution + simultaneous vacuuming |
| Included accessories | Wash nozzle for carpets with hard floor soleplate, reversible floor nozzle (carpet/hard floor), crevice nozzle, brush nozzle for cushions, wet/dry vacuum adapter, filter bag, detergent RM 519 (100 ml) |
| Filtration | Flat pleated filter (washable) |
| Safety | Automatic shut-off if dirty water tank full; pump thermal circuit breaker; splash protection on extension |
| Maintenance | Regular cleaning of flat filter, spray nozzle and clean water tank sieve |
| Recommended spare parts | Filter set (5 pcs) ref. 6.904-143.0, flat filter ref. 6.414-498.0, furniture wash nozzle ref. 2.885-018.0 |
Frequently Asked Questions - SE 5.100 Kärcher
User questions about SE 5.100 Kärcher
0 question about this device. Answer the ones you know or ask your own.
Ask a new question about this device
Download the instructions for your Vacuum Cleaner in PDF format for free! Find your manual SE 5.100 - Kärcher and take your electronic device back in hand. On this page are published all the documents necessary for the use of your device. SE 5.100 by Kärcher.
USER MANUAL SE 5.100 Kärcher
natural_image
Line drawing of a vacuum cleaner (no text or symbols present)Deutsch 5
English 12
Français 18
Italiano 25
Nederlands 32
Español 38
Português 44
Dansk 50
Norsk 56
Svenska 62
Suomi 68
Ελληνικά 74
Türkçe 81
Русский 87
Magyar 94
Čeština 100
Slovenščina 106
Polski 112
Românește 119
Slovenčina 125
Hrvatski 131
Srpski 137
Български 143
Eesti 150
Latviešu 156
Lietuviškai 162
Українська 168
Қазақша 175
Register and win! www.kaercher.com/register-and-win
EAC
59652160 05/15
1
natural_image
Technical diagram of a mechanical component with three downward arrows indicating force or movement (no text or symbols present)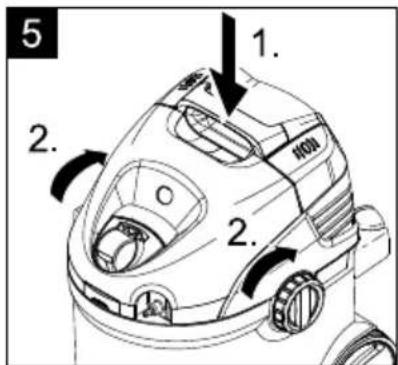


natural_image
Technical line drawing of a mechanical component with an arrow pointing to a detail (no text or symbols present)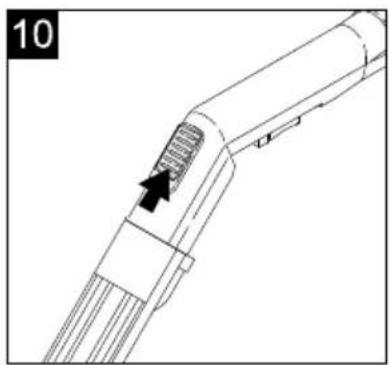
natural_image
Technical line drawing of a mechanical component with a black arrow indicating a feature (no text or symbols present)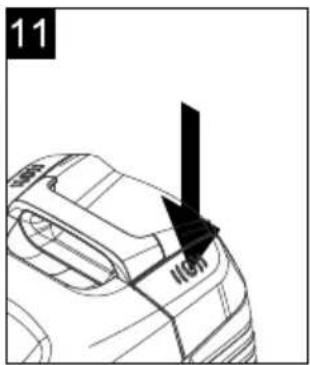
natural_image
Technical line drawing of a mechanical component with an arrow indicating direction (no text or symbols)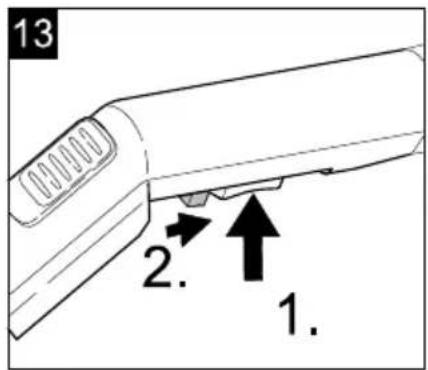
natural_image
Mechanical assembly diagram showing a lever and pin assembly (no text or symbols)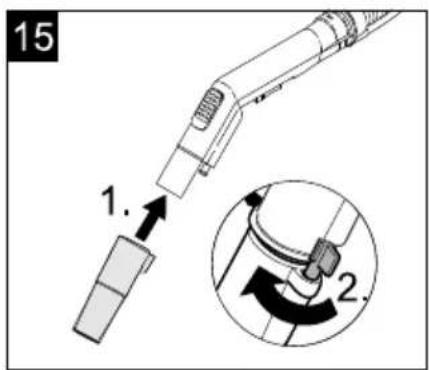

natural_image
Diagram of a layered structure with a curved top layer and scattered debris at the base (no text or symbols)Inhaltsverzeichnis
Description of the Appliance EN 8
Operation EN 8
Care and maintenance EN 10
Troubleshooting EN 10
Technical specifications EN 10
Special accessories EN 10
General notes
Dear Customer,
Please read and comply with these original instructions prior to the initial operation of your appliance and store them for
later use or subsequent owners.
Proper use
This appliance has been designed for use in private households and is not intended for commercial use.
- By purchasing this appliance you have become the owner of a spray extraction appliance for maintenance or basic cleaning of carpeting with a deep cleaning effect.
- With a hard floor attachment for the washing nozzle (in the scope of delivery) hard floors can also be cleaned.
- With the relevant accessories (in the scope of delivery) it can also be used as a multi-purpose vacuum cleaner.
Environmental protection

The packaging material can be recycled. Please do not place the packaging into the ordinary refuse for disposal, but arrange for the proper recycling.
Old appliances contain valuable materials that can be recycled. Please arrange for the proper recycling of old appliances. Please dispose your old appliances using appropriate collection systems.
Disposing the filters and filter bags
Filters and filter bags are made from environment-friendly materials.
They can therefore be disposed off through the normal household garbage provided you have not sucked in substances that are not permitted to be thrown into household garbage.
Notes about the ingredients (REACH)
You will find current information about the ingredients at:
www.kaercher.com/REACH
Warranty
The terms of the guarantee applicable in each country have been published by our respective national distributors. We will repair possible faults on your unit free of charge within the warranty period, insofar as the faults are caused by material defects or defective workmanship. Guarantee claims should be addressed to your dealer or the nearest authorized customer service centre, and supported by documentary evidence of purchase.
Customer Service
Our KÄRCHER branch will be pleased to help you further in the case of questions or faults.
(See address on the reverse)
Ordering spare parts and special attachments
Always use original spare parts and accessories permitted by the manufacturer so that the safety of the machine remains intact.
You can procure the spare parts and the attachments from your dealer or your KÄRCHER branch office.
Safety instructions
Apart from the notes contained herein the general safety provisions and rules for the prevention of accidents of the legislator must be observed.
Any use of the machine in contravention with the following instructions will lead to warranty claims being rendered void.
⚠️DANGER
- Only connect the appliance to properly earthed sockets.
- The appliance may only be connected to alternating current. The voltage must correspond with the type plate on the appliance.
- Never touch the mains plug and the socket with wet hands.
- Do not pull the plug from the socket by pulling on the connecting cable.
-
Turn off the appliance and remove the mains plug prior to any care and maintenance work.
– Repair works may only be performed by the authorised customer service. -
Check the power cord with mains plug for damage before every use. To avoid risks, arrange immediately the exchange by an authorized customer service or a skilled electrician, if the power cord is damaged.
- To avoid accidents due to electrical faults we recommend the use of sockets with a line-side current-limiting circuit breaker (max. 30 mA nominal tripping current).
- Only use a splash proof extension cable with a minimum section of 3 × 1 ~mm^2 .
- If couplings of the power cord or extension cable are replace the splash protection and the mechanical tightness must be ensured.
- Please switch off the machine first using the main switch before disconnecting the machine from the mains.
- Immediately switch off the appliance or pull the mains plug in case of formation of foam or fluid escape!
⚠ WARNING
- This appliance is not intended for use by persons with limited physical, sensory or mental capacities or lacking experience and/or skills, unless such persons are accompanied and supervised by a person in charge of their safety or they have received precise instructions on the use of this
appliance and have under- stood the resulting risks.
- Children must not play with this appliance.
– Supervise children to prevent them from playing with the appliance. - Cleaning and user maintenance must not be performed by children without supervision.
- Keep packaging film away from children - risk of suffocation!
- Switch the appliance off after every use and prior to every cleaning/maintenance procedure.
- Risk of fire. Do not vacuum up any burning or glowing objects.
- The appliance must provide of a stable ground.
- The operator must use the appliance properly. He must consider the local conditions and must pay attention to third parties, in particular children, when working with the appliance.
- Check the faultless condition of the appliance and the accessories before using it. Otherwise, the appliance must not be used.
-
Never dip the machine, the cable or the plugs in water or other liquids.
-
It is not allowed to use the appliance in hazardous locations. If the appliance is used in hazardous areas the corresponding safety provisions must be observed.
- Protect the appliance against external weather, humidity and heat sources.
- Should the appliance fall down, it must be check by an authorised after sales service as internal disturbances could be present, which constrain the safety of the product.
- Do not suck in toxic substances.
- Do not use the machine to vacuum clean plaster of Paris, cement, etc. that can harden on coming into contact with water and can thus hamper the functioning of the machine.
- Always place the machine in a horizontal position during operation.
- Only use cleaners recommended by the manufacturer and comply with their application, disposal and warning guidelines.
- Do not use abrasives, glass or universal cleaners! Never immerse the appliance in water.
Certain materials may produce explosive vapours or mixtures when agitated by the suction air! Never vacuum up the following materials:
- Explosive or combustible gases, liquids and dust particles (reactive dust particles)
- Reactive metal dust particles (such as aluminium, magnesium, zinc) in combination with highly alkaline or acidic detergents
- Undiluted, strong acids and alkalies
- Organic solvents (such as petrol, paint thinners, acetone, heating oil).
- In addition, these substances may cause the appliance materials to corrode.
Symbols in the operating instructions
⚠️DANGER
Immediate danger that can cause severe injury or even death.
⚠ WARNING
Possible hazardous situation that could lead to severe injury or even death.
△CAUTION
Possible hazardous situation that could lead to mild injury to persons or damage to property. ATTENTION
Pointer to a possibly dangerous situation, which can lead to property damage.
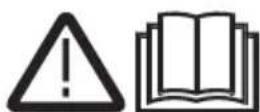
Description of the Appliance
Illustrations on fold-out page!
When unpacking the product, make sure that no accessories are missing and that none of the package contents have been damaged. If you detect any transport damages please contact your dealer.
Illustration 1
1 Container
2 Connection spray hose
3 Filter flap release button
4 Connection for suction hose of the wash vacuum cleaner
5 Filter dedusting
6 Appliance head
7 Carrying handle
8 Button for vacuuming
9 Spray button
10 Holder for spray suction pipes
11 Container release
12 Flat fold filter *
13 Dirt water reservoir, detachable *
14 Fresh water reservoir, detachable *
15 Spray/suction hose
16 Handle
17 Surrounding air separator
18 Spray lever
19 Lock key for spray mist
20 Lock lever
21 Spray / suction tubes 2 x 0.5 m
22 Washing nozzle for carpet cleaning, with hard floor attachment
23 Carpet cleaner RM 519 (100 ml)
Additional vacuuming accessories
24 Attachment for wet/dry vacuuming
25 Switchable floor nozzle for carpets and hard floors
26 Crevice nozzle
27 Upholstery nozzle
28 Filter bag
29 Washer nozzle for cleaning upholstery **
* already installed in the appliance
** SE 5.100 Plus
Operation
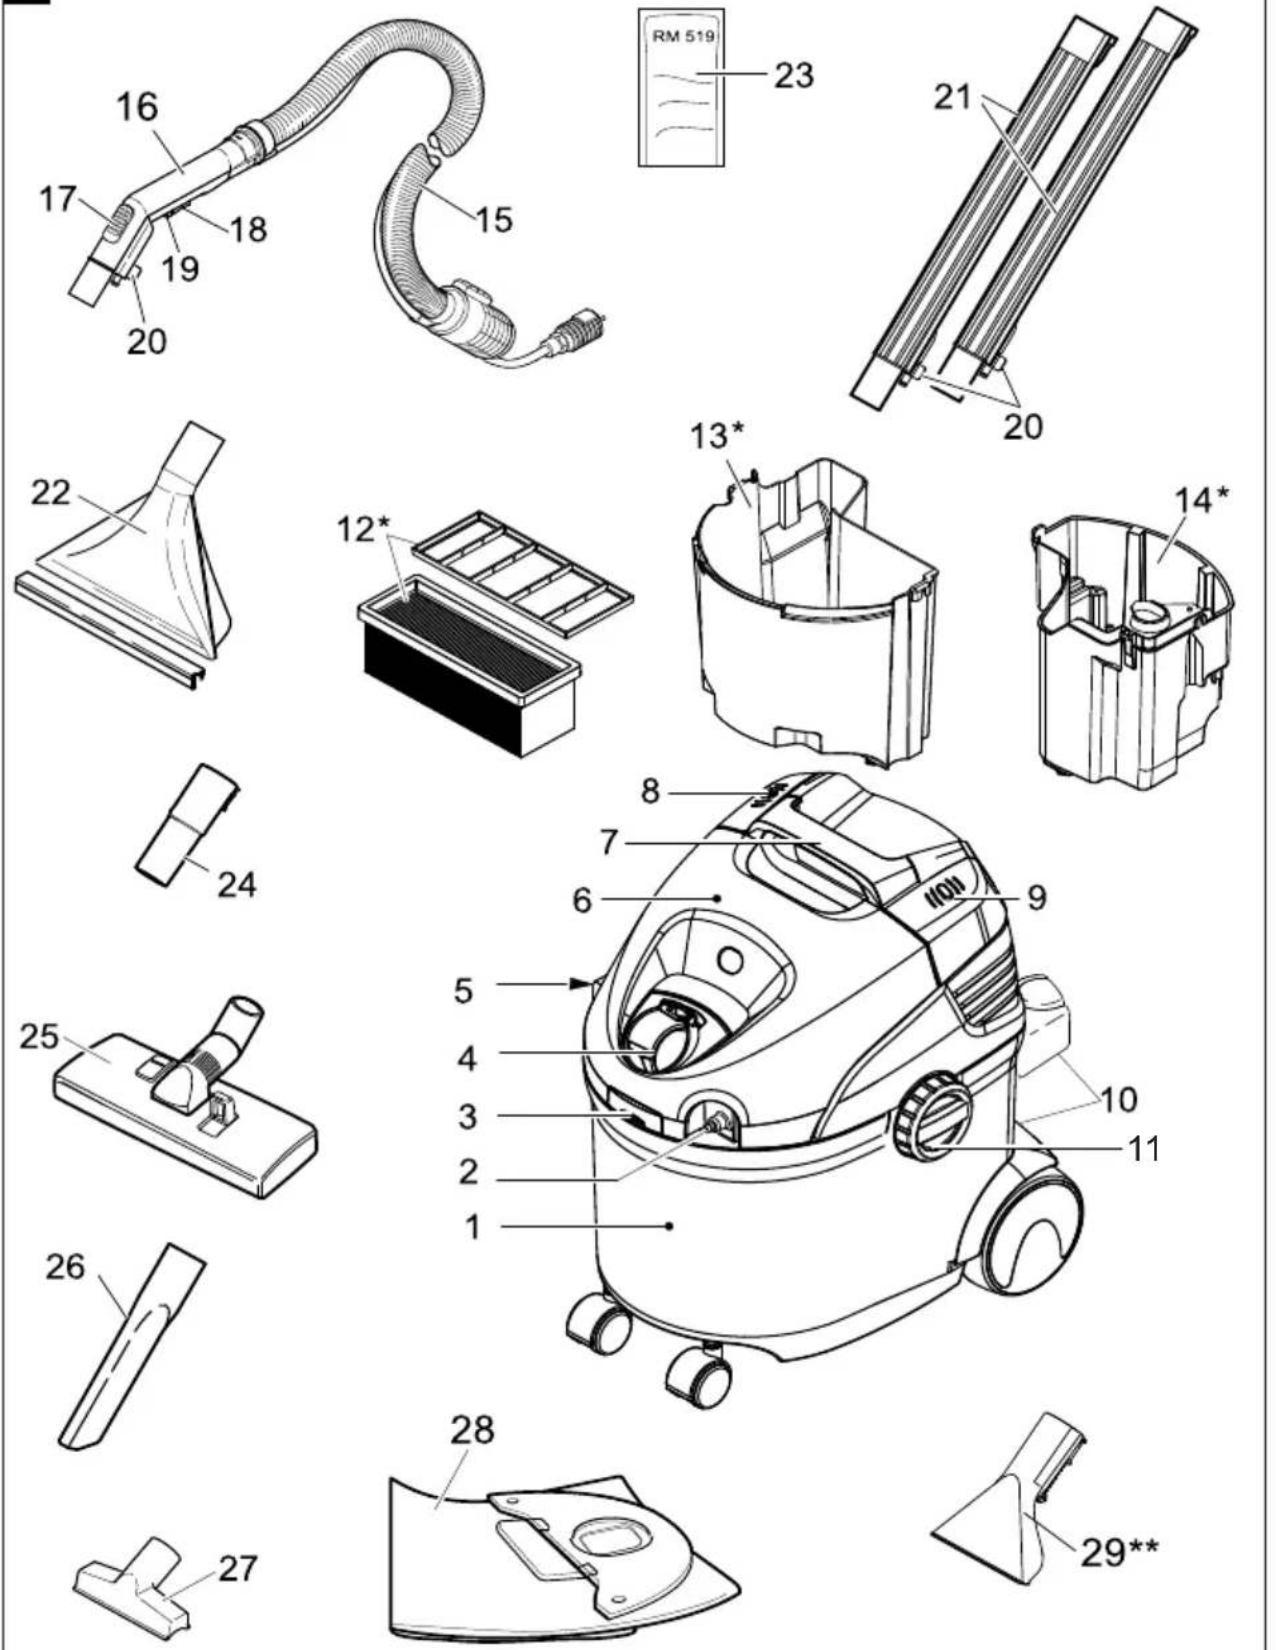
Before Startup
Illustration 2
→ Turn both releases in the direction of the arrow, remove the appliance head and take accessories out of the container.
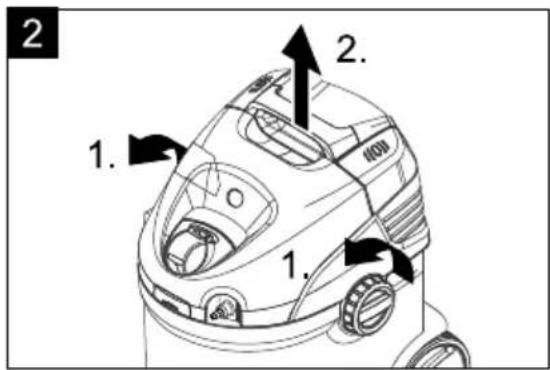
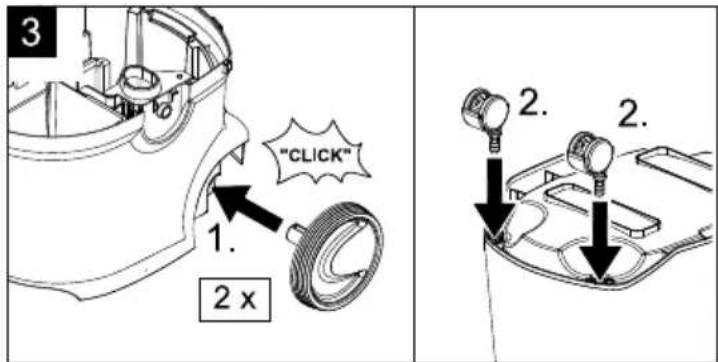
Illustration 3
→ Mount wheels and steering rollers.
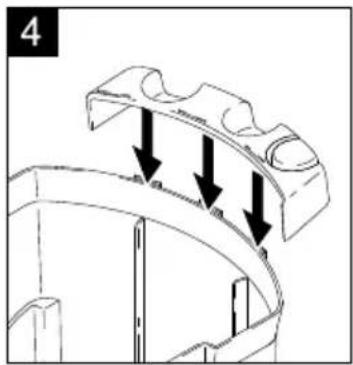
Illustration 4
→ Attach the accessories holder.
Start up
→ Wet cleaning
(see chapter "Fill wet cleaning/fresh water reservoir")
→ Dry vacuum cleaning
(see chapter "Dry vacuuming")
→ Vacuuming up moist dirt/water
(see chapter "Vacuuming up moist dirt/water")
Illustration 5
→ Insert and lock the appliance head.
Illustration 6
→ Attach the suction hose and the spray hose to the connectors on the appliance.
Note:
Press the suction hose tightly into the connection so that it locks into place.
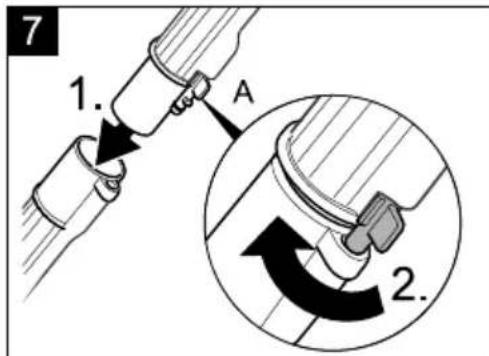
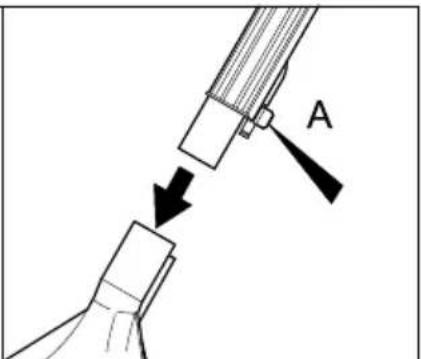
Illustration 7
→ Connect the spray/suction pipes and attach to the handle. Center the locking lever when attaching it, turn clockwise to lock.
→ Attach the washing nozzle to the spray suction pipes and secure it by means of the locking lever.
The appliance is now prepared for wet cleaning.
Wet cleaning carpets/hard floors/upholstery
ATTENTION
Check the object to be cleaned prior to using the appliance in an inconspicuous place for colour fastness and water resistance.
Do not clean water-sensitive floor coverings such as wood floors (the moisture could penetrate and damage the floor).
Note
Warm water (max. 50°C) will increase the cleaning effect.
Only use detergent pump while operating. Avoid dry runs as well as unnecessary pressure buildup (dynamic pressure) as much as possible.
If there is a risk of overheating, the thermal protection switch shuts off the detergent pump. After cooling down (20 - 30 min), the pump is ready for use again.
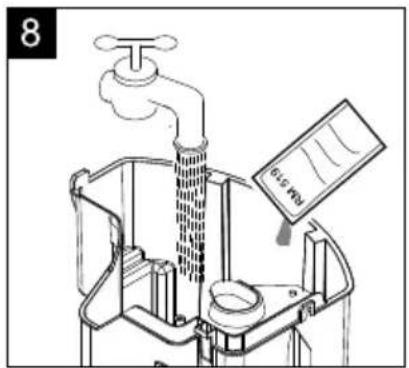
Fill the fresh water reservoir
Illustration 8
You can remove the water reservoir to fill it.
Add 100 - 200 ml of the carpet cleaner RM 519 (volume depends on degree of soiling) into the fresh water tank, top up with tap water, do not overfill (observe MAX marking).
Wet cleaning of carpeted floors
→ Use washing nozzle for carpet cleaning.
→ Work without hard floor attachment.
Please only use the carpet cleaner RM 519.
Wet cleaning of hard floors
Do not clean laminate or parquet floors!
→ Use washing nozzle for carpet cleaning.
→ Slide the hard floor attachment onto the washing nozzle from the side.
The squeegee points towards the front, the brush strip towards the back.
Wet cleaning of upholstery
→ Use washing nozzle for upholstery cleaning.
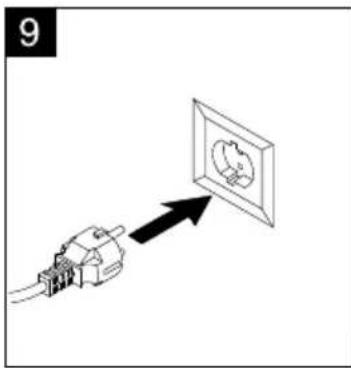
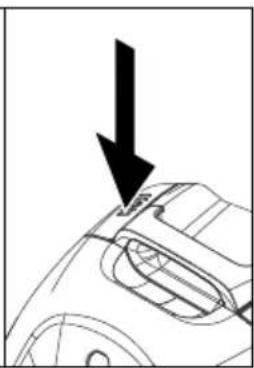
Start working
Illustration 9
→ Insert the mains plug into the socket.
→ Press the switch for vacuuming, suction turbine is running.
Illustration 10
→ Close fully the surrounding air separator at the handle.
Illustration 11
→ Press the switch for spraying, the detergent pump is ready.
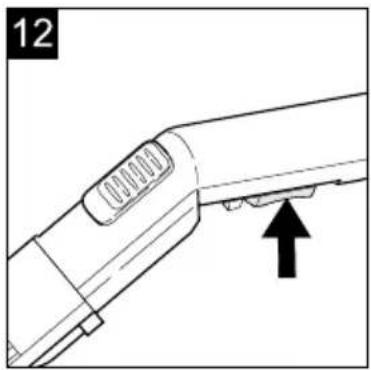
Illustration 12
→ Use the lever on the spray handle to spray on detergent solution.
Illustration 13
→ For continuous spray, the spray lever can be locked; for this, activate the spray lever and pull the locking key toward the rear.
→ Run across the surface to be cleaned in overlapping paths. Pull the nozzle backwards (do not push).
Empty the wastewater reservoir during operation
→ Once the wastewater container is full, the appliance switches off automatically.
Note: Once the appliance shuts off, switch off the appliance, because the suction turbine will otherwise start running again once you open the appliance.
→ Release and remove the appliance head.
→ Remove the wastewater container and empty it.
End wet cleaning process
→ Rinse the spray tubes in the appliance as follows: Fill the fresh water container with approx. 1 litre of clear water.
Hold the nozzle above the drain, and switch on the spraying pump until the clear water has been consumed.
Cleaning tips/mode of operation
- Always work from the light to the shade (from the window to the door).
- Always work from the cleaned to the uncleaned surface.
– Carpets with jute backing can shrink and colours may fade if too much water is used. - Brush high-fiber rugs in the direction of the weave after cleaning (using a fiber brush or a scrubber).
- Impregnating the fabric using the detergent Care Tex RM 762 after wet cleaning prevents a quick resoiling of the textile surface.
- Do not step on cleaned surfaces until they have dried and do not place furniture on them to avoid pressure spots or rust stains.
Cleaning methods
With light to normal contamination (regular cleaning):
→ Turn on suction and spraying.
→ Spray and simultaneously suction off detergent solution in one work cycle.
→ Switch off the spray switch and suction off the remaining cleaning solution.
→ After cleaning the carpets, reclean them using clear, warm water and waterproof if needed.
Heavy soiling or stains (basic cleaning):
→ Switch on the spray.
→ Apply detergent solution and allow to react for 5 minutes (vacuuming is switched off).
→ Clean the surface just like you would with light/normal soiling.
→ After cleaning the carpets, reclean them using clear, warm water and waterproof if needed.
Dry vacuum cleaning
ATTENTION
Container and accessories must be dry, otherwise dirt may adhere.
→ Remove the wastewater and fresh water containers.
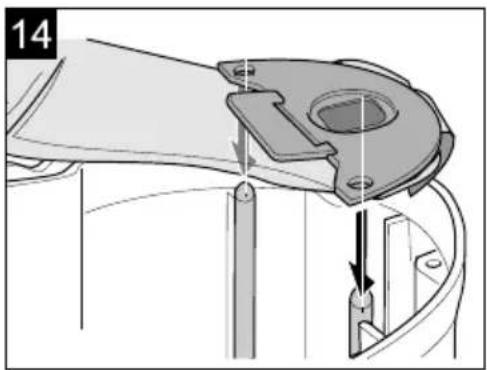
Illustration 14
→ Recommendation: Insert the filter bag for vacuuming.
Illustration 15
→ Use the adapter for wet/dry vacuuming Attach the adapter to the handle, turn the locking handle to secure it.
→ Select the desired accessories and attach to the spray/suction pipes or directly to the attachment.
→ Switch on the vacuum process.
Note: Do not switch on the spray.
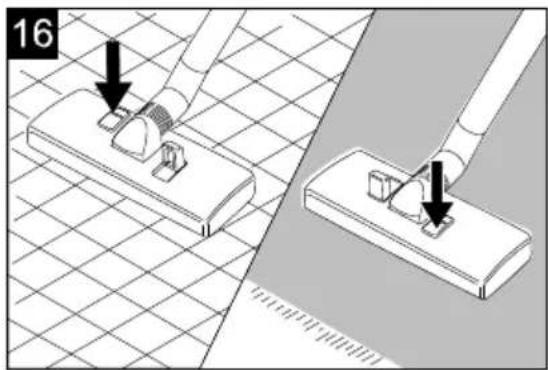
Vacuuming of hard floors
Illustration 16
→ Use your foot to press the reversing switch of the floor nozzle. The brush strips at the bottom of the floor nozzle are extended.
Vacuuming carpeted floors
Illustration 16
→ Use your foot to press the reversing switch of the floor nozzle. The brush strips at the bottom of the floor nozzle are retracted.
→ Use the surrounding air separator to adapt the suction force.
Note:
Close the surrounding air separator again after use!
Vacuuming up moist dirt/water
ATTENTION
Do not use a filter bag!
→ Remove the fresh and waste water containers, vacuum the wet dirt/water directly into the container.
→ Use washing nozzle to vacuum up wet dirt/water.
→ Once the wastewater container is full, the appliance switches off automatically.
Note: Once the appliance shuts off, switch it off using the vacuum button, because the suction turbine will otherwise start running again once you open the appliance.
If you use a crevice nozzle:
→ Attach and secure the adapter for wet/dry vacuuming. Install the crevice nozzle directly to the adapter.
→ Switch on the vacuum process.
Finish operation
→ Turn off the appliance.
→ Drain the full container.
→ Rinse the reservoir thoroughly with clear water.
→ Separate handle, spray suction pipes and washing nozzle, in order to do so, open the locking lever (central position).
→ Flush the accessories separately under running water and let air dry.
→ Leave the appliance open to let it dry.
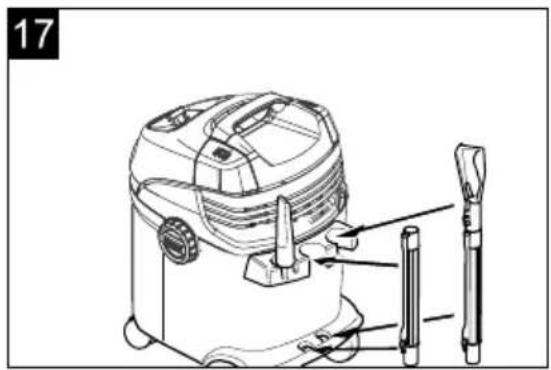
Illustration 17
→ Accessories storage: Suction hose, suction pipes and accessories can be comfortably stored on the appliance.
→ Storing the appliance. Store the appliance in a dry room.
Care and maintenance
Clean the spray nozzle
With an uneven spray jet.
Illustration 18
→ Loosen nozzle attachment and pull out, clean or replace spray nozzle.
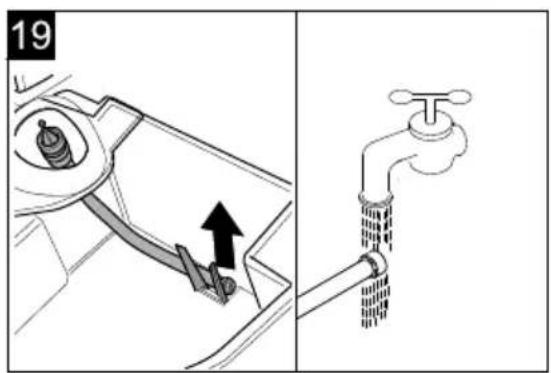
Clean the sieve in the fresh water reservoir
1 x year or as needed.
Illustration 19
→ Clean sieve.
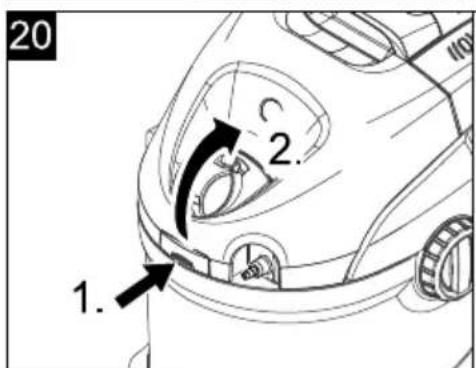
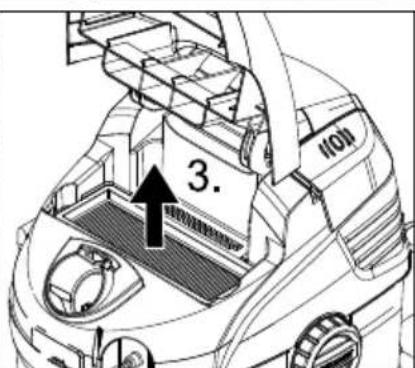
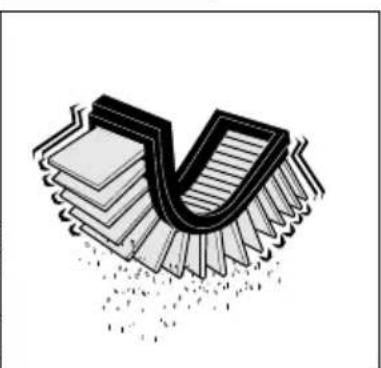
Clean flat fold filter
For heavy contamination:
Illustration 20
→ Unlock and open the cover, remove flat fold filter, remove grid and brush off filter.
Troubleshooting
No water exiting from nozzle
→ Fill up fresh water reservoir.
→ Sieve in the fresh water container clogged.
→ Thermal protection switch has switched off the pump as it was overheated. Switch off appliance and let it cool down (approx. 20 - 30 min).
→ Detergent pump defective, contact customer service.
Spray stream uneven
→ Clean the spray nozzle of the washing nozzle.
Insufficient vacuum performance
→ Close the surrounding air separator at the handle.
→ Accessories, suction hose or suction tubes are clogged, please remove the obstruction.
→ Filter bag is full: Insert new filter bag.
→ Flat fold filter is contaminated, use filter cleaning mechanism, remove the flat fold filter if heavily soiled and clean it (see chapter "Cleaning flat fold filter").
Detergent pump noisy
→ Fill up fresh water reservoir.
Strong foam generation in the container
→ Use the correct detergent from KÄRCHER. Order no. 6.295-771.0 carpet cleaner RM 519.
Appliance is not running
→ Plug in the mains plug.
Technical specifications
| Voltage1~50-60 Hz | 220 - 240 V |
| Output P_nom | 1200 W |
| Output P_max | 1400 W |
| Mains fuse (slow-blow) 10 A | |
| Sound pressure level (EN 60704-2-1) | 77 dB(A) |
| Weight (without accessories) 7,1 kg | |
Subject to technical modifications!
Special accessories
| Order No. | |
| Filter set (5 pc.) 6.904-143.0 | |
| Flat fold filter 6.414-498.0 | |
| Washer nozzle for cleaning upholstery | 2.885-018.0 |
| Carpet cleaner RM 519 (1 l bottle) International 6.295-771.0 | |
| Textile waterproofing-agent Care Tex RM 762 (0.5 l bottle) International 6.295-769.0 |
Table des matières
www.kaercher.com/REACH
Garantie
www.kaercher.com/REACH
Garanzia
www.kaercher.com/REACH
Garantía
www.kaercher.com/REACH
Garantia
www.kaercher.com/REACH
Garanti
www.kaercher.com/REACH
Garanti
→ Anbefaling: Bruk filterposen for suging.
Figur 15
www.kaercher.com/REACH
Garanti
www.kaercher.com/REACH
Takuu
www.kaercher.com/REACH
Εγγύηση
www.kaercher.com/REACH
Гарантия
www.kaercher.com/REACH
Garancia
www.kaercher.com/REACH
Záruka
www.kaercher.com/REACH
Garancija
Mult stimate client,

www.kaercher.com/REACH
www.kaercher.com/REACH
Záruka
www.kaercher.com/REACH
Jamstvo
Poseban pribor SR 10
Opšte napomene
Poštovani kupče,
Pre prve upotrebe Vašeg uređaja pročitajte ove originalno uputstvo za rad, postupajte prema njemu i sačuvajte ga za
kasniju upotrebu ili za sledećeg vlasnika.
Namensko korišćenje
www.kaercher.com/REACH
Garancija
U svakoj zemlji važe uslovi garancije koje je objavila naša prodajna služba. U garantnom roku besplatno otklanjamo sve smetnje na uređaju ako se radi o grešci materijala ili proizvodnim manama. U slučaju ostvarivanja garantnih prava obratite se svom prodavcu ili ovlašćenoj servisnoj službi; priložite pribor i originalni račun.
Servisna služba
www.kaercher.com/REACH
Гаранция
www.kaercher.com/REACH
Garantii
www.kaercher.com/REACH
Garantija
www.kaercher.com/REACH
Гарантія
www.kaercher.com/REACH
Кепілдеме
natural_image
Icon showing a gear and wrench inside a square frame (no text or symbols)http://www.kaercher.com/dealersearch

71364 Winnenden (Germany)
Tel.: +49 7195 14-0
Fax: +49 7195 14-2212


