SS-13500 - Sharpener Sogo - Free user manual and instructions
Find the device manual for free SS-13500 Sogo in PDF.

User questions about SS-13500 Sogo
0 question about this device. Answer the ones you know or ask your own.
Ask a new question about this device
Download the instructions for your Sharpener in PDF format for free! Find your manual SS-13500 - Sogo and take your electronic device back in hand. On this page are published all the documents necessary for the use of your device. SS-13500 by Sogo.
USER MANUAL SS-13500 Sogo
This instruction manual can also be downloaded from our web page www.sogo.es
IMPORTANT
Read this instruction booklet carefully.
IMPORTANT PRECAUTIONS
To reduce the risk of personal injury or property damage when using electrical appliances, safety precautions should always be followed, including the following:
- Read all instructions before using the knife sharpener.
- To avoid the risk of electric shock, do not enter the knife sharpener in water or other liquids.
- It is necessary to supervise carefully when the appliance is used by or near children.
- Unplug the appliance from the power outlet when you are not using it, to remove parts or before cleaning.
- Avoid contact with moving parts.
- Do not use any device with the cord or plug damaged, or in case of malfunction, or if has been dropped or damaged in any way. Return the appliance to the Department of repairs of the factory or provided to any authorized repair center for provided for review, repair or adjustment electrically or mechanically.
- The use of attachments not recommended or sold by the manufacturer of the device can result in fire, electric shock or
personal injury.
- Do not use outdoors.
- Do not allow the cable hang over the edge of the table or touch hot surfaces.
- Use the knife sharpener only with the purposes for which it is designed.
SAVE THESE INSTRUCTIONS
This product has been designed only for domestic use.

STEP 1 - SHARPENING ACCURACY -
Start sharpening and creates a border with a cutting edge with an angle of precision. Slowly draw the knife towards you through both blade guide slots in Stage 1 (Fig. 1) three times, alternating between the two slots. The knife's cutting edge should be kept parallel with the table or counter top (Fig 1), except when sharpening the tip of the blade. To do this, lift the handle of the knife slightly as the curved portion of the sheet goes through the guides. To pass the knife through the blade guide slots, use approximately one second for every two inches of blade. For example, to sharpen a knife with a blade of 6 inches, it should take approximately three second to for each pass.
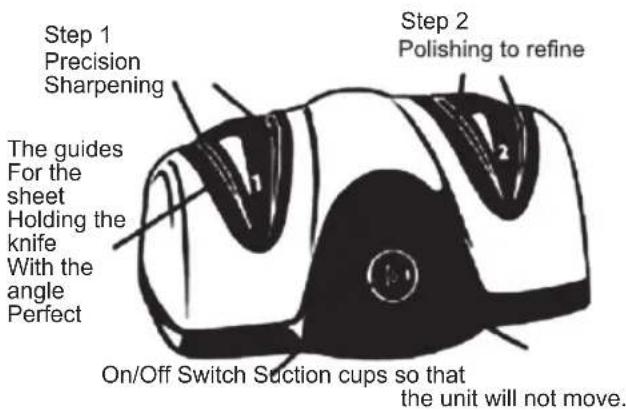
STEP 2 - POLISHING TO REFINE
Completes the process of sharpening the knife polishing until you achieve an edge as sharp as a razor. Slowly pull the knife toward you through the two guide slots in the Step 2 (Fig 1) three times, alternating between the two slots. Each pass will last approximately three seconds or more, depending on as before, the length of the blade of the knife. Complete the process of polishing with a quick stroll (about 1 second) through the two slots of the Step 2.
Before using the knife to cut food, always clean the knife with a damp cloth. If the knife doesn't cut food with ease, repeat Steps 1 and 2.
The electric knife sharpener can be used with knives of alloy, carbon or stainless steel. It is designed to sharpen kitchen knives and the majority of sporting knives. Do not attempt to sharpen scissors,
electrical knives or other serrated knives that cannot be entered freely between the guides.
USE
- To obtain the best possible results, moisten the suction units of the knife sharpener and place the unit on a stable surface. Only connect the cable to a polarized outlet. As a security measure, this appliance is equipped with a polarized plug (one pin is larger than the other). This plug can only be inserted one way into the wall socket. If the plug does not you can enter, turn it upside down. If it still does not fit, contact a qualified electrician. Do not attempt to avoid this security feature. Turn the unit on by pressing the vertical bar of the on/off switch.
- You will notice that at the base of each set of slots there is a number, as shown above. The side with the number 1 is the Step 1 and the side with the number 2 is the Step 2. Each step has two slots, one for each side to sharpen the blade of the knife. When using the knife sharpener for the first time with their knives, start with Step 1 - precision ground.
CAUTION:
Do not run your fingers along the edge of the knife to check the sharpness. To avoid injury, handle the knives with much care.
Never insert the tip of the knife in the guide slot first and push the rest of the knife. This could damage the knife sharpener and a knife.
Before using the knife with food, clean the blade of the same with a damp cloth to remove the metal residue that might have been there after the sharpening process.
QUESTIONS AND ANSWERS
- How often should sharpen the knives?
Grind the knives before each use if you want to maintain a razor sharp edge. After extensive use, if you have polished the knife and it no longer slices food with ease, run the knife through both Stage 1 and Stage 2. - How can I check if a knife is sharp?
Use it to cut food. If the knife doesn't cut food with ease, it will be nedd more sharpeness. Repeat Steps 1 and 2.
The knife is not sharp yet and already I have repeated the process twice. What am I doing wrong?
Although it is unusual, it's sometimes necessary to repeat Steps 1 and 2 several times. This can occur during the
sharpening process of knives that have not been sharpened properly before. It can also occur when sharpening knives of tempered steel, sheets are have very hard, as some hunting knives.
- For this type of sharpening knives with the sharpener, simply repeat steps 1 and 2 until the knife cut food with ease. According to the state of the blade of the knife, you may need to repeat the process many times. (In extreme cases, up to 10 or more times). The extension of the process will only be necessary the first time you use the sharpener with this type of knife. You can then sharpen the knives in the normal way.
- Sometimes the sharpening wheels will stop when I am passing the knife between the guides of the sheet. Why is this?
The sharpener is designed to require very little effort to move the sheet between the guides. If pressure is applied down too strong when you pass the knife through the guides, the sharpening wheels will be stopped.
- How do I get an edge on the knife uniform? To achieve a uniform edge, make sure to hold the blade of the knife in position parallel to the table or work surface while sharpening. When sharpening the blade tip, leave the handle of the knife slightly as the curved portion of the sheet goes through the guides.
- Sometimes I see sparks when sharpened knives. Why is this?
Knives with high carbon content (usually high quality knives) sometimes produce sparks when it comes into contact with the sharpening wheel. This is normal.
- Can I sharpen knives teeth with the electric knife sharpener?
Yes, with the exception of the electrical jagged knives or knives serrated on both sides. - For sharpening knives serrated non-electric, use only the slots of the Step 2 and sharpen only the smoother side of the blade of the knife (the side without the cutouts). Pass the knife through the slots to exercise a very slight pressure.
Note: Every time you sharpen the knife is removes a portion of the teeth. After a long period of time, it is possible that the teeth of the knife has disappeared completely and the result is a knife of general use.
CLEANING AND CARE
The outer surface of the knife sharpener can be cleaned with a damp cloth. Do not use abrasives. Never immerse the sharpener in water or other liquids. Do not use any type of lubrication with the knife sharpener "Ever Sharp".
The sharpener has two special enclosures in the bottom of the unit to collect metal chips of the knives. Occasionally these receptacles must be drained by removing the red plastic plugs on the bottom of the unit and agitation by removing it from the metal chips that accumulate inside. This should be done approximately once a year under normal conditions of use.
TECHNICAL SPECIFICATION
Voltage / Frequency: 230V 50Hz
Power Consumption: 40W
PERGUNTAS E RESPOSTAS
DECLARATION OF CONFORMITY
This device complies with EU Low Voltage Directive 2014/35/EC.
Electromagnetic Compatibility Directive 2014/30/EU. Directive 2015/863/EU on the restriction of the use of certain hazardous substances in electrical. Directive 2009/125/EC on the eco-design requirements applicable to energy-related products.

This symbol on the product or on the packaging indicates that this product can't be disposed as normal rubbish or household waste. All the electrical, electronic equipment's and battery-operated units must recycle in proper manner and according to the local municipal laws. You can recycle them by taking them to government authorized disposal centres or specialized bins which you can find in any nearby big super markets, electronics or electro domestics products stores or malls who have these types of facilities available.
Designed by: SOGO based on European quality standards
Imported by: Sanysan Appliances S.L., NIF: B98753056, C/ Barcas 2, 2, 46002 Valencia, Spain
Product manufactured in CHINA After-sales service: www.sogosat.com sogosat@sogosat.com / 0034 902 222 161