
Slow JSam 78275 - Juicer UNOLD - Free user manual and instructions
Find the device manual for free Slow JSam 78275 UNOLD in PDF.

| Product type | Slow juicer (masticating juicer) |
| Brand | Unold |
| Model | Slow JSam 78275 |
| Dimensions (L x W x H) | Approx. 19.0 x 17.8 x 39.8 cm |
| Weight | Approx. 2.8 kg |
| Power cord length | Approx. 95 cm |
| Power supply | 220-240 V, 50 Hz (alternating current) |
| Continuous operation time | 20 minutes (intermittent operation, then cooling) |
| Protection class | II (double insulation) |
| Rotation speed | 60 rpm |
| Main functions | On (ON), Off (OFF), Reverse (REV) for unblocking |
| Included accessories | Juice jug, pulp container, pusher, cleaning brush, user manual with recipes |
| Maintenance and cleaning | Removable parts washable in warm water (max 40°C) with mild detergent; wipe motor unit with damp cloth; do not wash in dishwasher; brush provided for the strainer |
| Safety | Automatic overheating protection; switch with on/off and reverse; lockable lid; do not insert fingers or objects into the chute |
| Spare parts and repairability | Repair by UNOLD after-sales service; 24-month manufacturer warranty (domestic use) |
| General information | Hard fruits and vegetables compatible; not suitable for large quantities of leafy greens; complete disassembly for cleaning; cold press preserving vitamins |
Frequently Asked Questions - Slow JSam 78275 UNOLD
User questions about Slow JSam 78275 UNOLD
0 question about this device. Answer the ones you know or ask your own.
Ask a new question about this device
Download the instructions for your Juicer in PDF format for free! Find your manual Slow JSam 78275 - UNOLD and take your electronic device back in hand. On this page are published all the documents necessary for the use of your device. Slow JSam 78275 by UNOLD.
USER MANUAL Slow JSam 78275 UNOLD
natural_image
Product photo of a UNOLD brand juice maker with orange juice being poured into glass cups (no text or symbols visible)Bedienungsanleitung
Instructions for use | Notice d'utilisation Gebruiksaanwijzing | Istruzioni per l'uso Instrucciones de uso | Instrukcja obsługi
Modell 78275
INHALTSVERZEICHNIS
Instructions for use Model 78275
Technical Specifications......27
Explanation of symbols....27
Important Safeguards....27
Before first use....30
Assembly 31
Preparing produce 32
Preparing juice....32
Disassembly....34
Cleaning and care....34
Recipe ideas 36
Use of pomace 39
Guarantee Conditions....42
Waste Disposal / Environmental Protection 42
Service 26
1 Plunger
2 Mug lid with filter
3 Mug with chute and filter
4 Juicer screw
5 Pressing cup
6 | Juice outlet (right), pomace outlet (left)
7 Motor block
8 Juice mug
9 Pomace collection container
FR Page 43
natural_image
Line drawings of various kitchen utensils including a brush, thermometer, measuring cup, measuring stand, blender, and instant cream (no text or labels)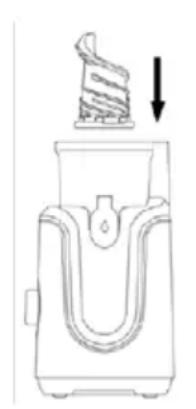
natural_image
Diagram of a mechanical component with a spiral component and an arrow indicating direction (no text or symbols)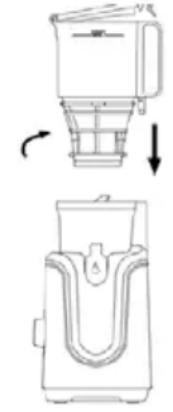
natural_image
Technical line drawing of a blender with top and side views showing internal components (no text or symbols)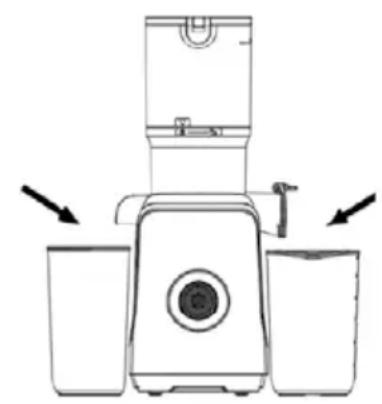
natural_image
Line drawing of a three-wheeled blender with water drop arrows (no text or symbols)natural_image
Line drawing of a cylindrical water tank with a side pipe and lid (no text or symbols)geschlossen
natural_image
Line drawing of a cylindrical container with lid and side arm, no text or symbols presentoffen
REINIGEN UND PFLEGEN
Zwischenreinigung
natural_image
Technical line drawing of a mechanical component with no visible text or symbols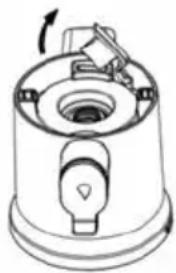
natural_image
Technical line drawing of a mechanical device with no visible text or symbolsnatural_image
Three identical line drawings of a mechanical device with no text or symbolsREZEPTIDEEN
Power: 200 W, 220–240 V\~, 50–60 Hz

Dimensions: Approx. 19.0 x 17.8 x 39.8 cm (LxWxH)
Power cord: Approx. 95 cm
Weight: Approx. 2.8 kg
Short operating time: 20 minutes / Protection class: II
Features: ON/OFF switch with brief reverse operation, vitamin-protecting juice yield due to slow turning, vertical juice extraction auger, including insert for frozen food can be completely dismantled, 60 rpm
Accessories: Juice container, pomace container, tamper, cleaning brush, operating instructions with recipes
Equipment features, technology, colours and design are subject to change without notice. Errors and omissions excepted notice
EXPLANATION OF SYMBOLS

This symbol denotes a possible hazard which could cause injury or damage to the appliance.
IMPORTANT SAFEGUARDS
Please read the following instructions and keep them on hand for later reference.
Instructions for persons in the household
-
This appliance can be used by children 8 years and older, as well as by persons with reduced physical, sensory or mental abilities or with lack of experience and/or knowledge, if they are supervised or if they have been instructed with regard to safe use of the appliance and have understood the dangers that can result from use of the appliance.
-
Children must not play with the appliance.
-
Children are not allowed to perform cleaning and user maintenance, unless they are 8 years of age or older and are supervised.
-
Keep the appliance and the power cord out of the reach of children under 8 years of age.
- Electrical safety
- Connect the appliance only to an AC power supply with voltage as specified on the rating plate.
- Do not connect the appliance to an extension cord.
- Only use the appliance indoors.
- This appliance must not be operated with an external timer or a remote control system.
- After use, before cleaning or if there are faults during operation, always unplug the mains plug.
- The power cord must be protected against moisture.
- Never immerse the appliance in liquids.
- Motor block and power cord must always be kept away from water.
- The motor block is not dishwasher safe.
- The appliance is intended for household use only, or for similar areas of use, such as,
■ in kitchenettes in businesses, offices or other workplaces,
■ in agricultural enterprises,
■ for use by guests in hotels, motels or other lodgings,
■ in private guest houses or holiday homes.
Electrical safety
- For safety reasons, never place or operate the appliance on or in the vicinity of hot surfaces.
- Carefully and completely unwind the power cord before use.
- Ensure that the power cord does not hang over the edge of the counter top or table, since this can cause accidents, for example if small children pull on the cord.
-
Unplug the mains plug from the electrical outlet after use and before cleaning. Never leave the appliance unattended when the mains plug is plugged in.
-
Check the plug and the power cord regularly for wear or damage. If the power cord or other parts are damaged, send the appliance to our customer service department for inspection and repair. Unauthorised repairs can result in serious risks for the user and void the warranty.
Information on set-up and use of the appliance
- Never touch the appliance or power cord with wet hands.
- For safety reasons, never place the appliance on hot surfaces, a metal tray or a wet substrate. Do not place the appliance or power cord near open flames during operation.
- Always use the slow juicer on a level, uncluttered surface.
- Do not operate or store the slow juicer outdoors.
- Use the appliance only after it has been properly assembled.
- Do not switch on the appliance if the feed hopper is loose.
- Only use the included tamper to fill the appliance. For safety reasons, ensure that hands, hair, articles of clothing or other utensils do not get into the feed shaft of the slow juicer.
- The motor must come to a complete standstill before you can take off the moving parts.
- To avoid damage, do not use the appliance with accessories of other manufacturers or brands.
- Do not operate the appliance if the micro sieve is damaged!
- The appliance must only be used to extract juice from fruit/vegetables or soy beans.
- Do not switch on the appliance if the feed hopper has not been properly mounted or if it is loose.
-
Do not turn the appliance upside down or take it apart if it is in operation.
-
If the juice extractor auger jams due to produce residues, and no longer turns, switch to “REV” for 2 to 3 seconds to remove the jam.
- Always lift the appliance with both hands.
- The short operating time is 20 minutes, this means that after 20 minutes the appliance must be switched off so that it can cool down.

Warning: Only use the included tamper to fill the appliance. For safety reasons, ensure that hands, hair, articles of clothing or other utensils do not get into the feed shaft of the slow juicer.
The motor must come to a complete standstill before you can take off the moving parts.
The manufacturer will not be liable in the event of incorrect assembly, improper or incorrect use or if repairs are carried out by unauthorized third parties.
BEFORE FIRST USE

natural_image
Line drawings of various kitchen utensils including a brush, thermometer, measuring cup, measuring stand, blender, and instant cream (no text or labels)- Prior to assembly, make sure that you are installing the appliance in a flat and dry location.
- Remove all packaging materials and any transport guards and stickers (not the type plate or the serial number!). Keep the packaging material away from children. Choking hazard! If necessary, dispose of the packaging material according to the applicable statutory waste disposal regulations. Tip: Keep the packaging material in case you wish to return the appliance for repairs at a later time.
- Inspect the appliance for damage. If there is visible damage, do not operate the appliance; instead, contact our Customer Service department.
- Clean all parts with a damp cloth, as described in "Cleaning and care".
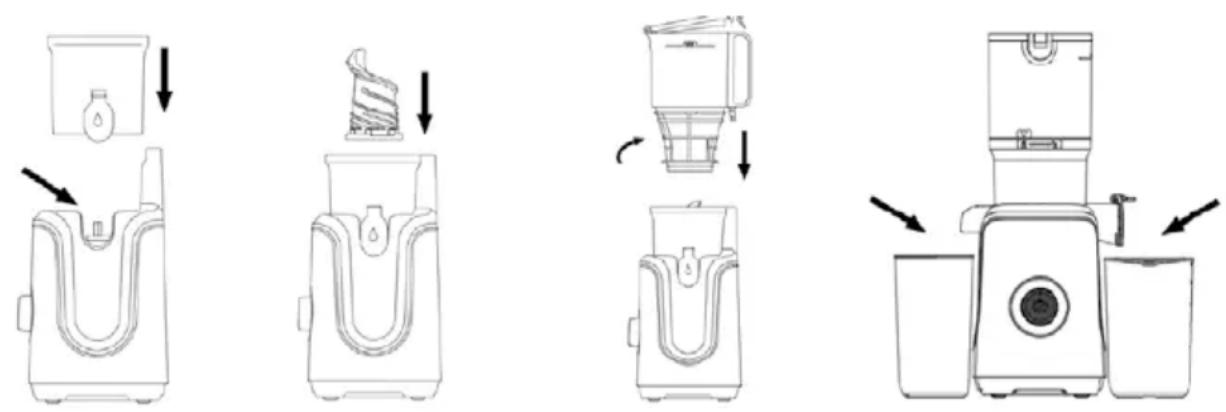
ASSEMBLY
- Use the motor block on a stable and level surface. Make sure that the appliance is switched off.
- Place the pressing cup on the motor block. Make sure the round opening of the cup is centred exactly above the axis of the motor block.
- Proceed by inserting the juicer screw into the pressing cup. The axis at the bottom end must be inserted snugly into the opening of the pressing cup. Make sure the screw is not seated in the wrong direction in the opening. If it can no longer be turned completely, the screw has been inserted correctly.
- Important: The mug with filter cannot be locked and unlocked unless the lid is open. Open the lid by pressing the tab under the jug handle slightly outwards - the lid will now pop open.
- Position the mug with filter on top of the pressing cup by aligning the symbol ▼ with the symbo ⚙ before turning the mug with filter clockwise until it audibly locks into place. When you hear a click and the symbol ▼ points to the symbol ⚙, the mug with filter has been fitted correctly.
- If you are unable to effortlessly lock the mug with filter into place, do not use force, but take the juicer screw out one more time and insert it again.
- Place the juice mug and the pomace container under the juice outlet and the pomace outlet opening, respectively. Make sure that both containers are positioned correctly to avoid spills.
- Following the last filling, let the appliance run for another approx. 30 seconds to allow for easier cleaning.
- Notice: If the appliance overheats, the overheat protector shuts off the appliance automatically. The appliance can be switched back on again after approx. 10 minutes.
PREPARING PRODUCE
- Use only fresh fruits and vegetables.
- Wash the fruit or vegetables carefully and dry them thoroughly.
- If you wish to extract juice from fruit with a hard skin, you must first remove the peel. This is the case with pineapple, for example.
- Fruit with an inedible skin, such as citrus fruit, also must be peeled first.
- Please peel oranges before extracting the juice; otherwise, the juice may be bitter.
- If you wish to extract juice from berries, add 14 of an apple with the peel to approx. 200 g of berries.
- Remove any large pits (such as those in cherries, plums, nectarines, peaches) as well as leaves and stems. Grapes and red currants do not have to have the seeds removed.
- Cut the fruit or vegetables into pieces that will fit into the filling shaft.
- Additional tips and suggestions are provided in the chapter "Recipe ideas".
PREPARING JUICE

Warning: Never reach into the chute with your fingers or foreign objects while the Slow Juicer is in operation. Risk of injury!
- Prepare the produce as described in the chapter, "Preparing produce".
- Check to make sure that the appliance has been assembled correctly, as described in the chapter “Assembly”. For safe work, ensure that a free area of 10 cm is available around the appliance.
- Remove the sealing cap on the juice outlet of the bowl. The sealing cap is used to prevent juice from dripping out and it can be used (i.e. the outlet can be closed) for each work pause.
- Put the prepared pieces of fruit and vegetables into the feed shaft. Simply drop the pieces of food in and let the Slow Juicer do the rest. You do not
have to press down on the food. The included plunger is merely used to push down any food that has become stuck in the chute.
- Ensure that hard objects, such as rock fragments do not get into the slow juicer.
- Close the lid of the appliance. The tamper can be inserted through the lid opening if required.
- The slow juicer has three switch settings:
■ ON: With this setting the appliance is switched on.
■ REV - Reverse, this button is only used if the juice extractor auger jams due to produce residues.
■ OFF = : This switches the appliance off.
- Place the ON/Off switch of the appliance in the "ON" position.
- The juice flows into the transparent collection container, the pomace is ejected into the black collection container through the pomace outlet.
- Ensure that you do not overfill the two containers. If a container is full, switch off the appliance. Empty the respective container, place it under the outlet, switch on the appliance and continue extracting juice.
- If pieces of fruit or vegetables get jammed and cannot be loosened with the tamper, switch the appliance off, switch it briefly to “REV”, so that reverse operation is activated. This should loosen the jammed produce residues. If not, switch off the appliance. Unplug the appliance from the power supply and take it apart to remove the piece of fruit or vegetable that is causing the block. Then reassemble the appliance and continue processing.
- By the way, you can use the pomace. Ideas in this regard are provided in the recipe section of the instructions.
- Please note: After 20 minutes of continuous operation the appliance must be switched off so that it can cool down. After a few minutes you can continue extracting juice.
- If you want to remove residues from the juice, let the juice run through the slow juicer a second time.
- If you want to extract different juices one after the other, you can easily clean the appliance: Ensure that the collection containers are properly placed. Switch on the appliance and pour 0.5 l of cold water into the feed shaft. The water cleans the appliance and flows out of the juice outlet. See the chapter, “Cleaning and care”, point, “Intermediate cleaning” in this regard.
-
Seal the juice outlet of the bowl with sealing cap when you have finished making juice.
-
Turn the ON/OFF switch of the appliance to the "OFF" position and unplug the mains plug from the electrical outlet.
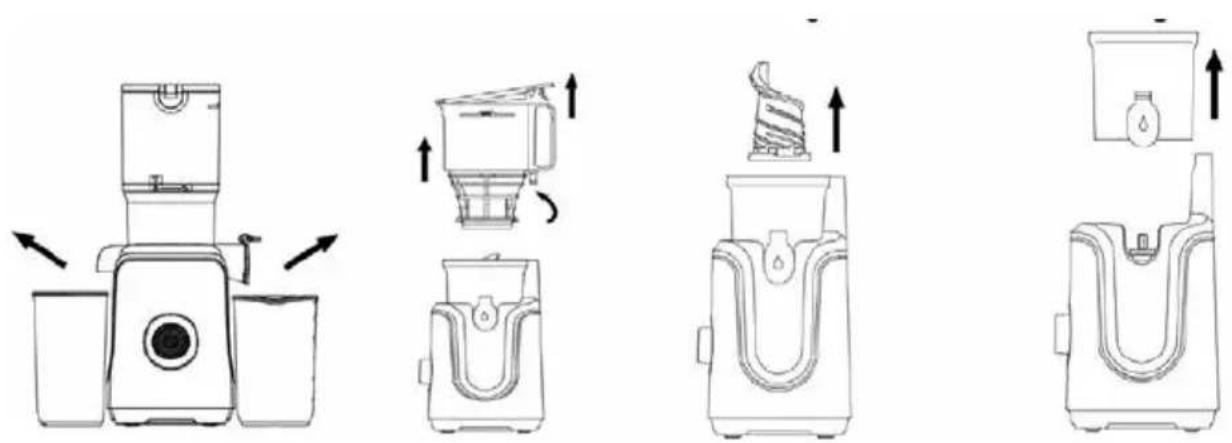
DISASSEMBLY
-
Important: Before disassembling it, switch off the appliance with a press of the ON/OFF button and disconnect the power plug.
-
To disassemble the appliance, proceed in reverse order from assembly:
-
Remove juice mug and pomace collection container.
-
The mug with filter cannot be locked and unlocked unless the lid is open. Open the lid by pressing the tab under the jug handle slightly outwards - the lid will now pop open.
-
Unlock the mug with filter by slightly turning it clockwise. The arrow ▼ and the symbol ⓞ must line up on top of each other.
-
Next, lift the pressing cup with the juicer screw vertically up and off. This makes it easier to remove the juicer screw from the pressing cup.
CLEANING AND CARE
Intermediate cleaning
-
Intermediate cleaning makes it possible for you to enjoy fresh juice or smoothies without an after-taste of the previous pressing.
-
Consequently the slow juicer does not need to be taken apart and cleaned after each use. During the day it suffices, after ending the pressing process, to place a sufficiently large container under the juice outlet and then pour 0.5 l cold water into the feed hopper, while the appliance is running.
Basic cleaning

Switch off the appliance by placing the ON/OFF switch in the "OFF/O" position. Unplug the plug from the electrical outlet.
- Disassemble the appliance as described in the section "Disassembly".
- Use only water with a temperature below 40^ C for cleaning.
- Clean all removable parts in warm water with a little dishwashing detergent added. You can use the provided brush to more easily clean the sieve.
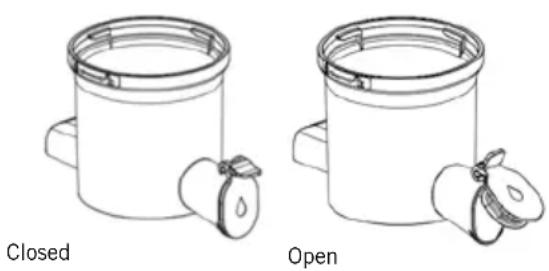
- On the pomace outlet of the bowl there is a white drip stop element. This can be flipped out of the outlet so that the outlet can be easily cleaned.
- The individual parts (but not the motor block!) of the appliance are dishwasher safe.
- Never immerse the motor block in water! Only wipe off the motor block with a damp cloth, and then dry it.
- Never use any abrasive scouring agents, steel wool, metal objects, hot cleaning agents or disinfectants.
- The appliance and power plug must be completely dry before the appliance can be operated again.
- Wooden skewers (barbecue skewers) are ideal for removing small pomace residues on the pomace discharge.
- Discolouration on the plastic parts is unavoidable, however most of it can be removed with vegetable oil. Simply apply a few drops of oil on a damp cloth and rub off the washed and dried parts with the cloth.
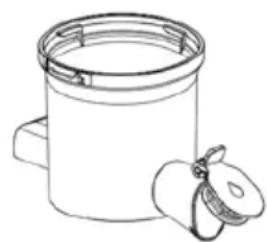
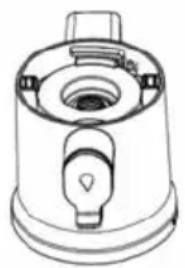
- If remnants of food have accumulated in the juice cup, flip up the silicone valve as shown in the illustration and clean the juice cup under running water.
- Afterwards, press on the silicone valve to close it tightly again. The valve should seal the opening of the juice outlet as juice may otherwise flow into the pomace collection container.
natural_image
Technical line drawing of a mechanical component with no visible text or symbols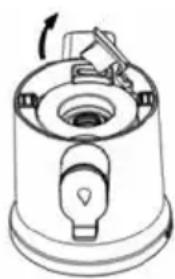
natural_image
Technical line drawing of a mechanical device with a knob and handle (no text or symbols)-
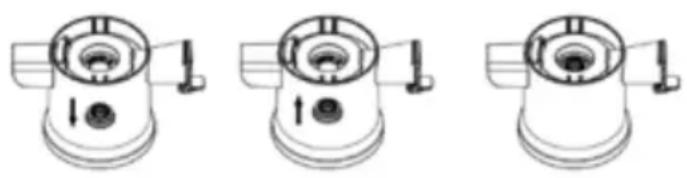
To clean the seal in the centre of the juice cup, proceed as follows:
-
Flip the pressing cup over, push the seal out by pressing with your thumb from the bottom to the inside and clean it under running water.
- Finish by fitting the seal back into the opening, making sure to set it into the inside of the pressing cup with the flat side first (see illustration). Ensure that the seal is seated properly to prevent any juice from spilling accidentally.
natural_image
Three identical line drawings of a mechanical device with ports and mounting brackets (no text or symbols)- When completely dry, store the assembled slow juicer in a dry, safe place so that it is protected from dust, impact, heat and moisture.
RECIPE IDEAS
Unlike conventional juice extractors, your new slow juicer does not work with centrifugal force. Through the innovative juice extractor auger, produce is pressed out gently in two phases. Minimal heat is produced so that vitamins, minerals and enzymes remain intact. With conventional juice extractors, due to friction heat, often layers occur in the juice produced - with the slow juicer you obtain uniform natural juice or smoothies that contain pulp, even the problem of foam formation is no longer present with the slow juicer. Even hard fruit and vegetables can be easily processed. However large quantities of leafy vegetables should not be introduced into the appliance. Many vitamins can only be extracted after adding a little grease, consequently you can add 1 teaspoon of sweet cream or 2 drops of cold-pressed oil per glass of juice. In addition to enjoying the prepared juices or smoothies fresh, they can also be processed for soups and jellies! For example, try mixing juice with some egg white or cold-soluble gelatin and process it in the Unold® ice cream machine to make a delicious and refreshing, low-calorie sorbet. You can use the following types of fruit and vegetables without peeling the ingredients: Apples, pears, all types of berries, grapes, carrots, de-stemmed tomatoes, broccoli, celery, red beets, potatoes, corn, cucumbers, quinces.
The following types of fruit and vegetables must be peeled beforehand: Melon, citrus fruit, grapefruit, pineapple, turnip cabbage, possibly kiwi (you can also wipe off the hairs with a brush and leave the peel on). For peppers the seeds must be removed because they become bitter. Caution: When pressing only
soft fruit or vegetables, we recommend that you clean the appliance after each pressing process. Give free rein to your imagination: You can extract juice from virtually every type of fruit or vegetable, enjoy the juices or smoothies or make them into ice cream, soups, etc.
Apple juice
Washed, unpeeled apples - quantity is entirely up to you
Cut the apples into eighths. Remove the cores and the stems. Extract juice from the apples in the slow juicer. Juice can be extracted from pears and similar fruits in the same manner.
Vegetable juice
Extract the juice of 12 kohlrabi, 1 carrot, 1 yellow bell pepper, 1 tomato.
This juice needs no extra seasoning, but you can add a splash of Tabasco sauce and a few drops of maple syrup to enhance the flavour.
Pina colada, non-alcoholic
1 pineapple (enough for 2 - 3 glasses), 50 ml sweet cream, 3 TBSP coconut syrup, crushed ice.
Peel pineapple, cut it in slices and extract the juice, pour juice into a pitcher, mix with cream, coconut syrup and ice; pour into glasses, decorate glasses with 14 pineapple slice and a cocktail cherry.
Apple jelly
Juice enough apples (not too ripe) until you have 800 ml of juice; mix juice with 1 kg canning sugar (1:1) and boil as specified in the instructions on the package to make jelly.
Multi-fruit jelly
Juice blackberries, currant berries, raspberries, strawberries, gooseberries and 2 apples, add 1 kg canning sugar (1:1) and boil as specified in the instructions on the package to make jelly. Naturally it is also possible with just one type of fruit.
Refreshing cold cucumber soup
1 salad cucumber, 14 I buttermilk, 1 clove garlic, 1 onion, salt, pepper, fresh dill Juice 34 of the cucumber with the onion and garlic. Finely dice the remaining cucumber and mix with the buttermilk. Season with salt and pepper and garnish with dill.
Cold fruit soup
12 Extract juice from fruits in season, for example mixed berries or apples, peaches, pears and apricots, to make 12 litre of juice.
Dilute this juice with 14 litre water; remove 3 TBSP of juice and mix with 1 TBSP corn starch. Heat the remaining juice with 2 TBSP sugar; stir in starch, briefly bring to a boil and then allow to cool. Garnish with a few berries or pieces of fruit before serving.
Cold tomato soup
Juice tomatoes with 1 onion and 1 clove garlic (to make approx. 34 l of juice). Season juice with freshly ground pepper, a dash of Tabasco sauce, salt and chopped basil and serve. Tip: with the Unold® ice cream machine you can use the juice to make a refreshing tomato sorbet in the twinkling of an eye.
Soy milk
Soy beverages are easily digestible and contain many worthwhile substances.
Preparing
Wash the soy beans and let them soften in water for at least 12 hours.
Shake off the beans and put them into a pot with water, (one part water to one part soy beans). You can add salt to taste. Bring the mixture to a boil and simmer for two to three minutes. Leave for 30 minutes and shake off. Collect the boiled water. The precooked soy beans can be kept in the refrigerator for a maximum of 4 days, however you can also freeze portions of the soy beans and store them for up to four weeks in the freezer.
Pressing
Mix the cooked beans with fresh water, (one part water to one part soy beans). Alternatively you can also use the cooking water of the beans; this gives you a heartier flavour.
Always add a spoonful of soy beans with the same amount of water to the juicer, until you have the desired amount of soy milk. If necessary run the mixture through the slow juicer several times to remove any residues.
You can also add carrots, apples, or celery to the soy beans in this manner. Give your imagination free rein and try soy milk with your favourite fruit or vegetables. If you mix fruit or vegetables with soy, after making the juice let a little water run through the appliance to remove any residues.
Almond milk
Is outstanding for people with lactose intolerance
Wash the almonds and let them soften in water for at least 8 hours. Shake off the almonds, however keep the softening water, it can be used when pressing. Bring fresh water to a boil and pour it over the almonds. Now you can easily rub the skin off of the almonds with your fingers, (ideally between thumb and index finger).
Now proceed as described for making “soy milk” and press the almonds.
When all the almonds have run through the slow juicer, place a large piece of gauze over a bowl. Pour the almond milk into the bowl and press out the gauze. Thus any residues are retained and you have wonderful, pure almond milk. You can enhance it with vanilla or honey, for example.
Do not store the milk for too long, consume it as quickly as possible.
USE OF POMACE
When you remove residues, such as stems or cores from the pomace you use it without concern. For example, together with the juice you can make jelly or jam, prepare a pesto or enhance sauces. Pomace residues are wonderful for baking cookies or fruit/vegetable muffins. Simply substitute the pomace for the amount of fruit specified in the recipe. You can also make veggie burgers. Simply use the appropriate quantity of vegetable pomace instead of the vegetable specified in your preferred recipe. Depending on the recipe you may have to adjust the amount of liquids because pomace is either wetter or dryer depending on the produce from which the juice was extracted. Several spoonfuls of pomace pep up any granola, simply pour your favourite granola over a few spoonfuls of pomace. You can even make parfaits: Add a little pomace to your favourite recipe.
Please note: The more solid the pressed material, (e.g. juicy apples or carrots), the dryer the pomace will be. The softer the pressed material, the wetter the pomace will be (e.g. tomatoes, grapes or berries).
Do you bake your own bread? With the UNOLD Backmeister this is very easy. For example, for 500 g of flour you can simply substitute 100 g of flour with 100 g of carrot pomace.
Vegetable muffins
For 4 persons
500 g mixed pomace, 200 g flour, 3 eggs, 100 ml milk, 1½ tsp salt, 200 g mozzarella (grated), 1 TBSP dried basil, ½ jalapeño pepper, finely chopped without seeds (alternatively a few splashes of Tabasco), 100 g boiled ham cut in strips, 1 TBSP oil, 1 package baking powder
Mix all ingredients to form a dough. Fill the dough into greased muffin tin (muffin diameter approx. 4 cm) and bake at 160^ C for 25 minutes. If you use a tin with larger muffin diameters the baking time is extended accordingly. You can also spread out the dough on a greased baking sheet and bake at 160^ C for about 25 minutes.
Rüblitorte (carrot cake)
Ingredients for a springform pan with a diameter of 26 cm
Even the famous Swiss Rüblitorte (carrot cake) can be made from carrot pomace. 1 egg yoke, 200 g sugar, 1 pinch salt, 1 pinch ground cloves, 3 pinches cinnamon, 2 TBSP cherry brandy
Whip these ingredients to form a foamy egg yolk cream.
250 g carrot pomace, 100 g ground almonds, 50 g bread crumbs, 50 g flour, mix 1 heaping tsp baking powder into the egg yolk cream.
Beat 7 egg whites and 100 g sugar until stiff and fold into the dough. Preheat oven to 160^ C, pour the dough into the springform pan, which has been greased and strewn with bread crumbs beforehand. Bake 50-60 minutes at 160^ C.
Allow to cool, sprinkle with powdered sugar or brush on a white glaze and decorate with marzipan carrots (finished product).
Potato favourites
Potato pancakes (potato fritters)
For 4 persons
Peal 1 kg raw potatoes (mealy) and press out with the slow juicer.
Peel 1 onion, dice it, add it to the potato mixture.
Add 3 eggs, 200 q quark, and 1 tsp salt, stir all ingredients to a smooth mixture. Heat oil in a pan. Put the dough into the pan (1 TBSP per pancake) and spread it out with 2 spoons to form a thin pancake. Fry golden brown on both sides (approx. 3 minutes each side). Take it out of the pan and let it drip off on several paper towels. You can also press out 750 g of raw potatoes and press 250 g of
peeled, boiled potatoes through a potato ricer and add to the potato pomace. All other ingredients remain as described. If you want, add 2 finely chopped garlic cloves to the dough, or 1 TPSP fresh, chopped marjoram, 1 tsp dried marjoram, 2 TBSP chives or 2 TBSP finely diced raw ham.
Potato dumplings - half and half
For 4 persons
Preparation takes some time, however the dumplings taste better than the off-the-shelf products
Boil 500 g of potatoes boiled in their jackets, peel them and press them through the potato ricer. Let cool.
Peel 1 kg potatoes and press out with the slow juicer. Knead the raw and boiled potato mixture together with 4 TBSP semolina and 2 tsp salt.
The dough should no longer stick to your hands, i.e. if necessary add a little more semolina. Form into dumplings with a diameter of approx. 6 cm. Fill a large pot with salt water and bring the water to a slow boil. Stir 30 g of potato starch into a cup of cold water. Add the starch/water to the salt water. Wait until the water boils. Then place the dumplings in the water, ensure that the dumplings do not touch each other; if they do they will stick together. Important: The water should not be at fast boil; only a slow boil, otherwise the dumplings will break up. You can also fill the dumplings with cubes of white bread roasted in butter or lightly browned diced onions and bacon.
The authors have thoroughly considered and tested the recipes included in these operating instructions. Nevertheless, a guarantee cannot be accepted. The authors, respectively UNOLD AG and their assignees shall not be liable for personal injuries, material damages and financial loss.
GUARANTEE CONDITIONS
We grant a warranty of 24 months for this UNOLD brand appliance - 12 months for commercial use - from the date of purchase, covering damage that is demonstrably due to factory defects when used as intended. Within the warranty period, we will remedy material and manufacturing defects at our discretion by repair or exchange. Our warranty services apply exclusively to appliances sold in Germany and Austria. For other countries, please contact the responsible importer. Please send appliances for which you seek removal of defects, together with a copy of the machine-generated proof of purchase that shows the date of purchase along with a description of the fault, to our customer service department using suitable packaging. On our website https://unold.de/pages/rucksendungen, you can print out a return slip (only for return shipments from Germany and Austria). All types of damage attributable to wear and tear, improper handling and non-compliance with the maintenance and care instructions are excluded from the warranty. The warranty claim is void if repairs or interventions on the appliance are carried out by a third party. This manufacturer's warranty does not limit your statutory rights or your claims against the seller or dealer under the purchase contract in accordance with the provisions of the German Civil Code (BGB). Your statutory rights as a consumer, in particular your rights to warranty and the statutory claims for defects in accordance with Sections 437 et seqq. BGB, remain unaffected.
UNOLD AG, Mannheimer Straße 4, D-68766 Hockenheim
WASTE DISPOSAL / ENVIRONMENTAL PROTECTION
Our appliances are produced on a highquality level for a long lifetime. Regular maintenance and expert repairs by our after-sales service can extend the useful life of the appliance. If an appliance is defective and repair is not possible, we ask you to follow the following instructions for disposal. Do not dispose this appliance together with your standard household waste. There is a legal requirement to dispose of waste electrical and electronic equipment (WEEE) as well as batteries and accumulators separately from household waste. You can recognise this waste

equipment by the crossed-out wheeled bin symbol (WEEE symbol). Please bring this product to an approved collection point for recycling of electric and electronic products. By separate collection and disposal of waste products you help to protect natural resources and ensure, that the product is disposed in an adequate way to protect health and environment.
The instruction booklet is also available for download: www.unold.de
NOTICE D'UTILISATION MODÈLE 78275
SPÉCIFICATION TECHNIQUE
Puissance : 200 W, 220–240 V\~, 50–60 Hz
natural_image
Line drawings of various kitchen utensils including a brush, thermometer, measuring cup, grater, blender, and spiral (no text or labels)natural_image
Line drawings of two types of containers labeled 'Fermé' and 'Ouvert', showing different internal designs (no text or symbols on the containers themselves)NETTOYAGE ET ENTRETIEN
natural_image
Line drawing of a mechanical component with no visible text or symbols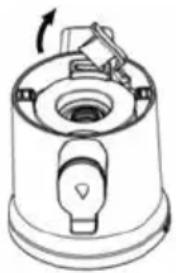
natural_image
Technical line drawing of a mechanical device with a rotating knob and handle (no text or symbols)natural_image
Three identical line drawings of a mechanical device with ports and mounting brackets (no text or symbols)CONDITIONS DE GARANTIE
natural_image
Line drawings of various kitchen utensils including a brush, measuring cup, grater, blender, and spiral (no text or labels)natural_image
Line drawings of a kitchen blender with five different views showing internal components and directional arrows (no text or symbols)REINIGEN EN ONDERHOUDEN
Tussenreiniging
natural_image
Technical line drawing of a mechanical component with no visible text or symbols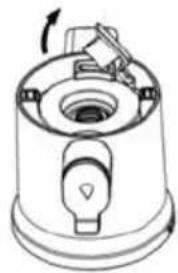
natural_image
Technical line drawing of a mechanical device with no visible text or symbolsMisure: circa 19,0 x 17,8 x 39,8 cm (LxPxA)
natural_image
Line drawings of two containers labeled 'Chiuso' and 'aperto', showing different internal compartments (no text or symbols on the containers themselves)CURA E PULIZIA
Pulizia intermedia
natural_image
Technical line drawing of a mechanical component with no visible text or symbols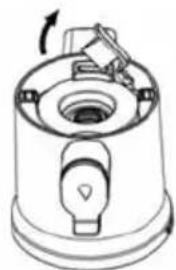
natural_image
Technical line drawing of a mechanical device with a rotating knob and housing (no text or symbols)natural_image
Three identical line drawings of a mechanical device with ports and mounting brackets (no text or symbols)natural_image
Line drawings of various kitchen utensils including a grater, measuring cup, stand mixer, and blender (no text or labels)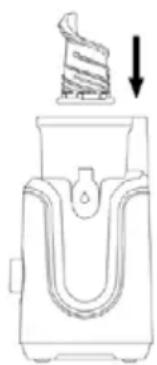
natural_image
Diagram of a U-shaped device with a spiral component above it, showing a downward arrow (no text or symbols)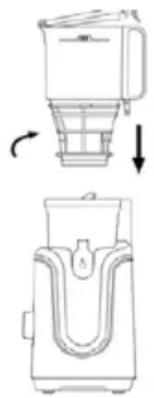
natural_image
Technical line drawing of a blender with three views: top shows top, middle shows front, bottom shows side (no text or symbols)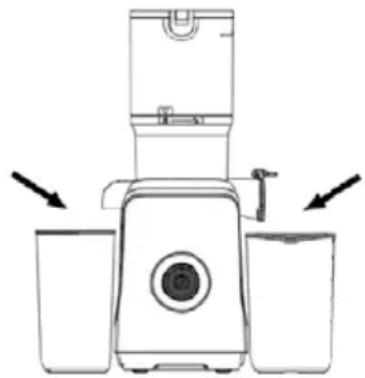
natural_image
Line drawing of a blender with three cups and a handle, no text or symbols presentnatural_image
Technical line drawing of a mechanical component with no visible text or symbols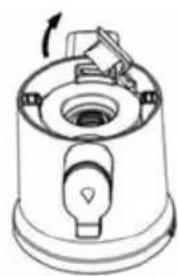
natural_image
Technical line drawing of a mechanical device with no visible text or symbolsnatural_image
Three identical line drawings of a mechanical device with ports and mounting brackets (no text or symbols)natural_image
Line drawings of various kitchen utensils including a grater, measuring cup, stand mixer, and blender (no text or labels)natural_image
Line drawings of two containers labeled 'Zamknięte' and 'otwarte', showing different internal designs (no text or symbols on the containers themselves)CZYSZCZENIE I PIELEGNACJA
natural_image
Technical line drawing of a mechanical component with no visible text or symbols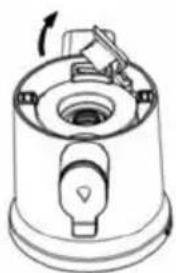
natural_image
Technical line drawing of a mechanical device with no visible text or symbolsnatural_image
Three identical line drawings of a mechanical device with ports and mounting brackets (no text or symbols)

- Bedienungsanleitung
- INHALTSVERZEICHNIS
- Instructions for use Model 78275
- FR Page 43
- REINIGEN UND PFLEGEN
- Zwischenreinigung
- REZEPTIDEEN
- EXPLANATION OF SYMBOLS
- IMPORTANT SAFEGUARDS
- Please read the following instructions and keep them on hand for later reference.
- Instructions for persons in the household
- Electrical safety
- Information on set-up and use of the appliance
- ASSEMBLY
- PREPARING PRODUCE
- PREPARING JUICE
- DISASSEMBLY
- CLEANING AND CARE
- Intermediate cleaning
- Basic cleaning
- Switch off the appliance by placing the ON/OFF switch in the "OFF/O" position. Unplug the plug from the electrical outlet.
- RECIPE IDEAS
- Apple juice
- Vegetable juice
- Pina colada, non-alcoholic
- Apple jelly
- Multi-fruit jelly
- Refreshing cold cucumber soup
- Cold fruit soup
- Cold tomato soup
- Soy milk
- Preparing
- Pressing
- Almond milk
- USE OF POMACE
- Vegetable muffins
- Rüblitorte (carrot cake)
- Potato favourites
- Potato pancakes (potato fritters)
- Potato dumplings - half and half
- GUARANTEE CONDITIONS
- WASTE DISPOSAL / ENVIRONMENTAL PROTECTION
- NOTICE D'UTILISATION MODÈLE 78275
- SPÉCIFICATION TECHNIQUE
- NETTOYAGE ET ENTRETIEN
- CONDITIONS DE GARANTIE
- REINIGEN EN ONDERHOUDEN
- Tussenreiniging
- CURA E PULIZIA
- Pulizia intermedia
Brand : UNOLD
Model : Slow JSam 78275
Category : Juicer