MRF29D9BST - Fridge MIDEA - Free user manual and instructions
Find the device manual for free MRF29D9BST MIDEA in PDF.

User questions about MRF29D9BST MIDEA
0 question about this device. Answer the ones you know or ask your own.
Ask a new question about this device
Download the instructions for your Fridge in PDF format for free! Find your manual MRF29D9BST - MIDEA and take your electronic device back in hand. On this page are published all the documents necessary for the use of your device. MRF29D9BST by MIDEA.
USER MANUAL MRF29D9BST MIDEA
natural_image
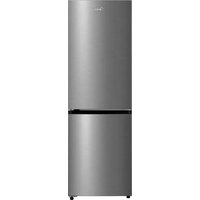
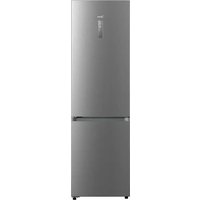
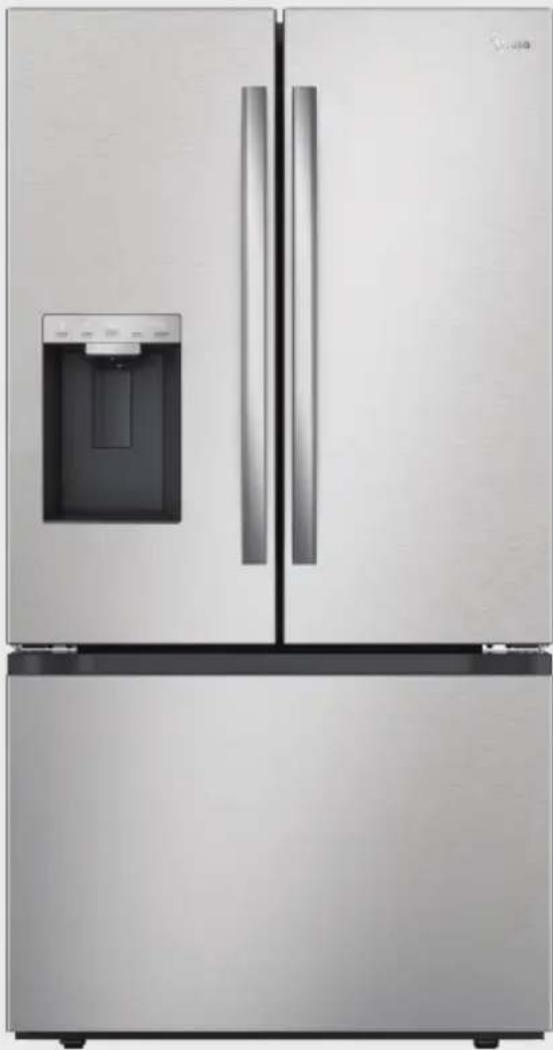
Exterior view of a modern stainless steel refrigerator with front door and side panels (no visible text or symbols)Refrigerator
FRENCH DOOR SERIES

SmartHome

Download the app & activate product
USER MANUAL
MRF29D9BST
Warning notices: Before using this product, please read this manual carefully and keep it for future reference. The design and specifications are subject to change without prior notice for product improvement. Consult with your dealer or manufacturer for details.
The diagram above is just for reference. Please take the appearance of the actual product as the standard.
THANK YOU LETTER
Thank you for choosing Midea! Before using your new Midea product, please read this manual thoroughly to ensure that you know how to operate the features and functions that your new appliance offers in a safe way.
CONTENTS
SPECIFICATIONS 04
PRODUCT OVERVIEW 05
PRODUCT INSTALLATION 06
OPERATION INSTRUCTIONS 14
CLEANING AND MAINTENANCE 26
TROUBLESHOOTING 32
CERTIFICATIONS 35
TRADEMARKS, COPYRIGHTS AND LEGAL STATEMENT-36
DISPOSAL AND RECYCLING 36
DATA PROTECTION NOTICE 36
LANGUAGES
EN English
FR French
ES Spanish
SPECIFICATIONS
| Product model MRF29D9BST | |
| Rated Voltage 115 V~, 60 Hz | |
| Rated Current 2.7A | |
| Storage Volume 818L (28.9cu.ft.) | |
| Defrosting Type Automatic | |
| Refrigerant and Amount R600a, 78g (2.75oz) | |
| Dimensions (W x D x H) 35.8 x 36.1 x 69.9in(910 x 917 x 1775mm) | |

| Wireless network module MWB-S-WB01 | |
| Standard IEEE 802.11b/g/n | |
| Antenna Type Printed PCB antenna | |
| Frequency Band 2400-2483.5 MHz | |
| Operating Temperature 0 °C - 85 °C /32 °F - 185 °F | |
| Operation Humidity | 10% - 85% |
| Maximum Transmission Power <20 dBm | |
| Power Input | DC 5V/500mA |
Features
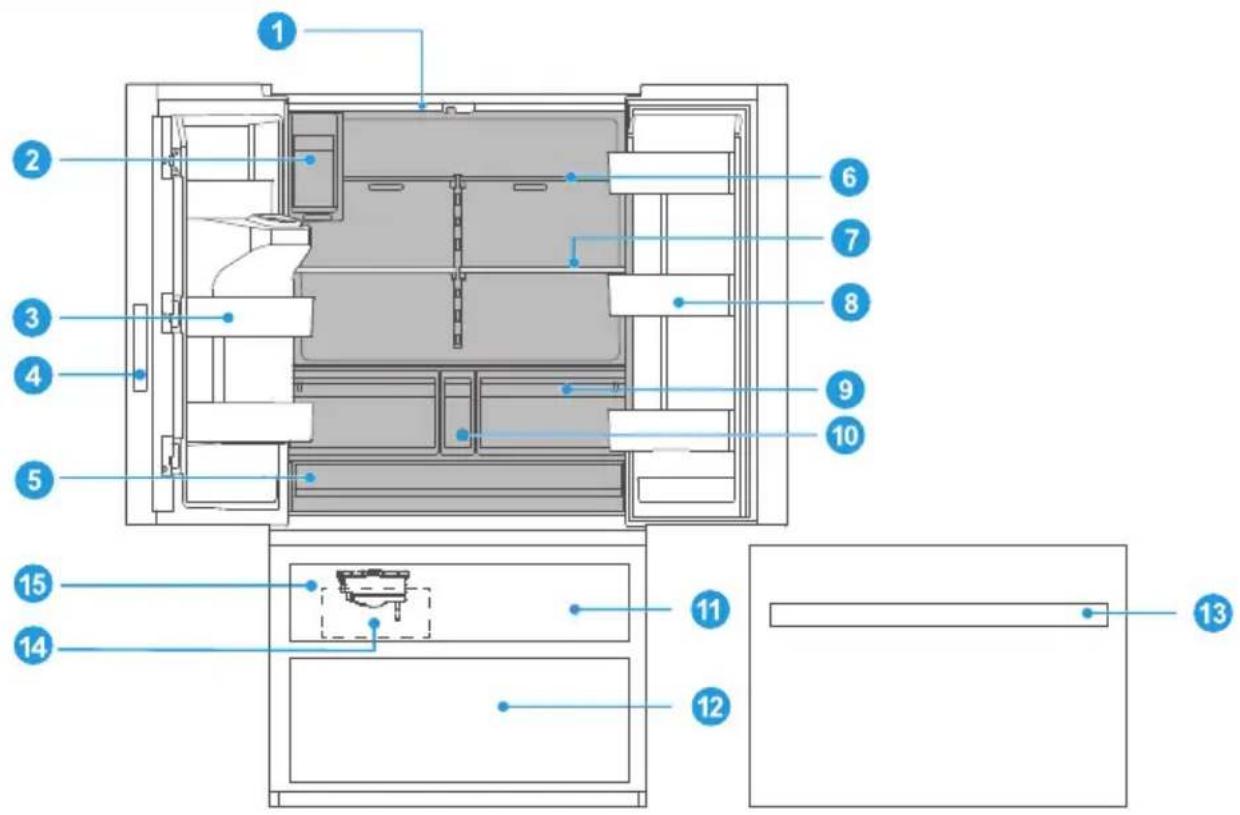
text_image
Technical diagram of a refrigerator interior with numbered components for identificationEN
1 LED Light 9 Crisper Drawer
2 Refrigerator Ice Maker
3 Door Bin
4 Control Panel
5 Large Drawer
6 Shelf 14 Ice Storage Box
7 Infinite Shelf 15 Freezer Ice Maker
8 Infinite Door Bin
10 Small Drawer
11 Upper Freezer Drawer
12 Lower Freezer Drawer
13 Freezer Tray

ATTENTION
The picture above is for reference only. The actual configuration will depend on the physical product or statement by the distributor.
PRODUCT INSTALLATION
Installation Instructions
Refrigerator Location
- Your refrigerator is designed to be free standing, and is not to be recessed or built in.
- Place the refrigerator in a well-ventilated location where the floor is flat and sturdy.
- Keep the refrigerator away from direct sunlight.
- Avoid locations exposing your refrigerator to high humidity and moisture.
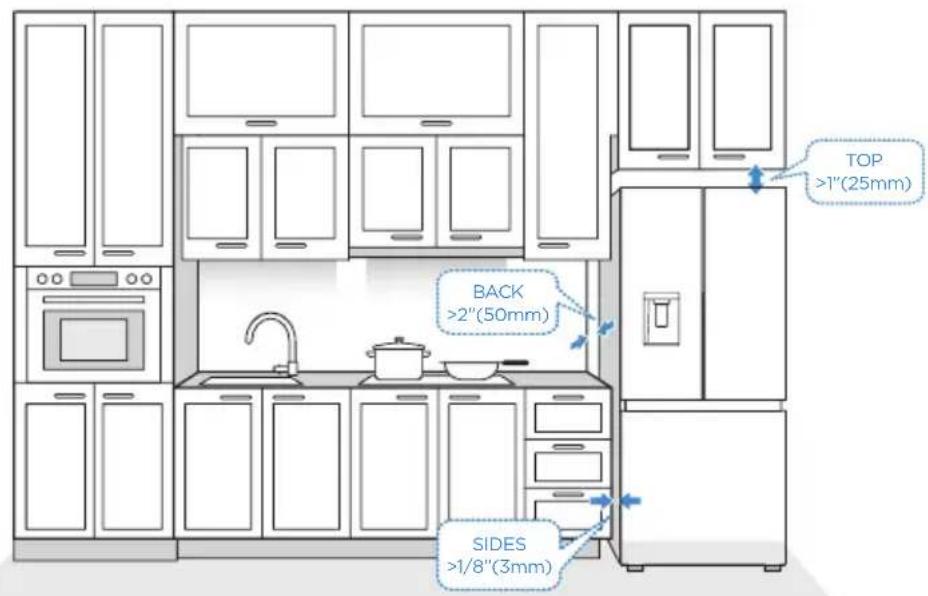
Clearances
- Clearances are shown below and recommended for ease of installation, proper air circulation, and plumbing/electrical connections.
- If the refrigerator is placed against a wall, ensure there is at least 2-3/8" (60mm) clearance to the wall. If equipped with a door handle, add the height of the handle to the required clearance.
text_image
TOP >1"(25mm) BACK >2"(50mm) SIDES >1/8"(3mm)Connecting to Power
• A 115 V AC, 60Hz, 15- or 20-amp electrical supply is required.
- The power cord is equipped with a 3-prong plug with grounding which mates with standard 3-prong wall outlet. The ground minimizes the possibility of electrical shock.

CAUTION
The refrigerator should be plugged into a dedicated electrical circuit rated to match the requirements of the refrigerator, 115 V AC, 60Hz, 15- or 20-amp
Never unplug the refrigerator by pulling on the power cord. Always grip the plug firmly and pull straight out from the outlet.
When positioning the refrigerator, ensure the power cord is not trapped or damaged.
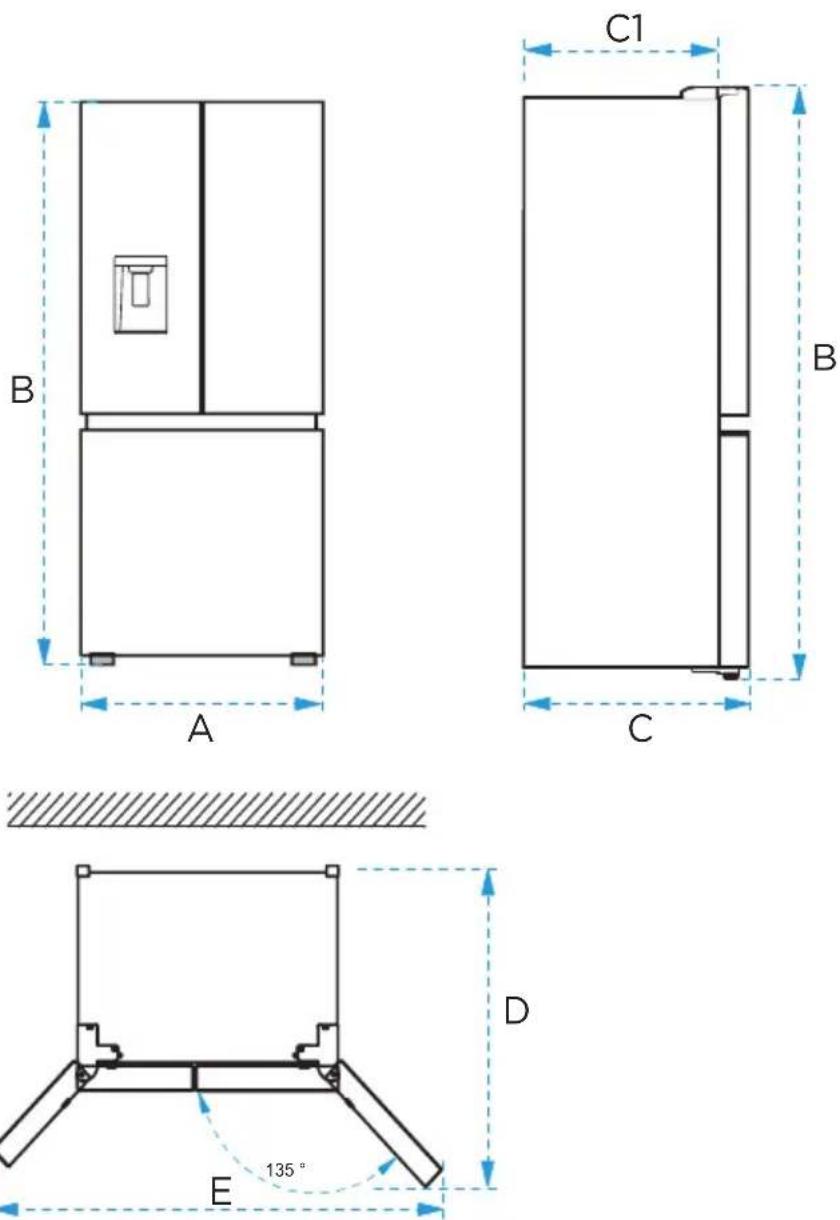
| Width | Overall Height | Depth | Depth(Only Cabinet) | Depth (doors open 135°) | Width (doors open 135°) |
| A B C C1 D E | |||||
| 35-13/16"(910mm) | 69 -7/8"(1775mm) | 33-15/16"(862mm) | 29-5/16"(745mm) | 44-3/8"(1127mm) | 62-13/16"(1596mm) |
Note: E is the dimension with handles; the dimension without handles is approximately 57-1/16" /1450mm.
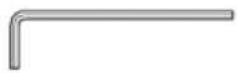
Adjustable Wrench 1/10" Allen (Hex) Wrench
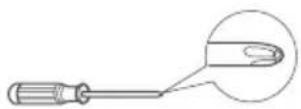
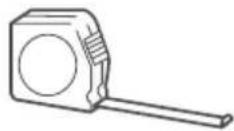
Phillips Screwdriver Tape Measure
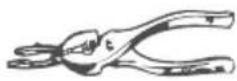

Pliers Level

Flat-head Screwdriver
Installing the Water Line
WARNING: Connect to potable water supply only.
Water line installation kits are available as an additional accessory from your dealer or at a local hardware store.
Installing the water line
- First, shut off the main water supply line and turn off the ice maker.
- Locate the nearest cold water supply valve.
- After connecting the water supply to the water valve, turn your main water supply back on and flush several gallons of water to clear the water supply line.
The minimum inlet water pressure: 276 KPa (40 psi).
The maximum inlet water pressure: 689 KPa (100 psi).
text_image
Cold water line Pipe clamp Shut-off valve Water line installation kitConnecting the water line to refrigerator
There are several items that you need to purchase to complete this connection. You will find these items sold as a kit at your local hardware store.
- First, close the main water supply and locate the nearest cold water line.
- Second, connect the water valve to the cold water line.
- Turn water valve on and check for any leakage.
- When moving the refrigerator, you can hang the power cord on the power cord hook.
text_image
Power cord hook Water line Water connectorConnecting the water line to a drinkable water source
- If your water line is not drinkable, add an external water filter.
- If you must repair or disassemble the water line, cut off the plastic tubing to make sure you get a snug, leak-free connection.

ATTENTION
New hose kits supplied with the appliance are to be used and old hose kits should not be reused.
text_image
Water connector Water lineInstalling the Door Handle
Precautions shall be taken to prevent the handle from falling and causing any personal injury.
text_image
Handle Bolt BoltSteps
- First, take the bolts for fixing the handle from the packing bag of the user manual and then fix them into the bolt hole of the refrigerator door with a Phillips screwdriver. See figure above.
- Place the handle on the door through the bolt and make sure the handle contacts the door surface.
- Secure the handle by fully tightening the handle screw with the supplied Allen wrench, then shake the handle to make sure that it is securely fastened.
Installing the Filter
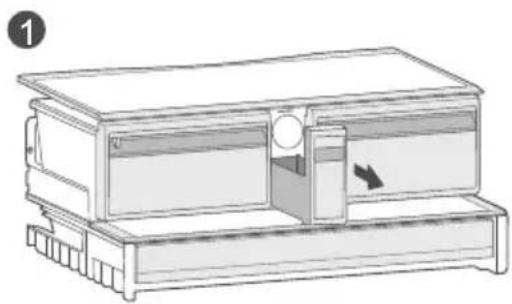
natural_image
Diagram of a mechanical device with a handle and internal components, no visible text or symbols- Pull out the small drawer in the middle.
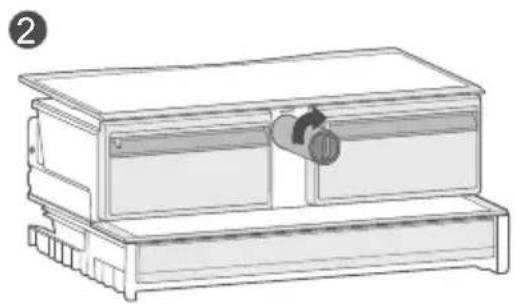
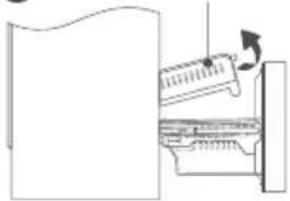
natural_image
Line drawing of a mechanical device with a cylindrical component inserted into a housing (no text or symbols)- Insert the filter into the filter compartment and turn 90^ clockwise to lock it in place.
To remove the filter for replacement:
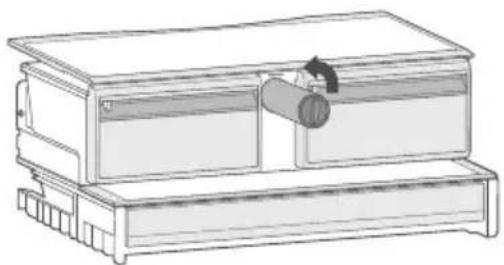
natural_image
Line drawing of a mechanical device with a cylindrical component inserted into a housing (no text or symbols)- Press the filter knob and turn 90° counterclockwise, the filter will disengage from the connector and the filter can be removed.
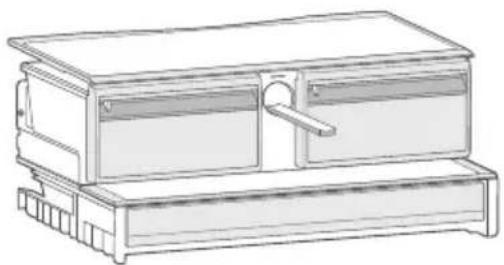
natural_image
Line drawing of a two-tiered electronic device with top and side panels (no text or symbols)- Check the water tray under the filter, take it out and dump the overflow water.
- Install the new filter following the instructions in "Installing the Filter".
Leveling Feet
To avoid vibration, the appliance must be leveled.
If required, adjust the leveling feet (located on both sides of the bottom front) to compensate for the uneven floor.
The front should be slightly higher than the rear to aid in door closing.
Leveling feet can be turned easily by tipping the cabinet slightly.
Turn the leveling feet counterclockwise to raise the unit, or clockwise to lower it.
Aligning the Doors
Tools to be provided by the user

Pliers
- Raise the lower door up to the level of the higher door.
- Using a pair of pliers, insert the supplied fastener ring into the gap between the hinge grommet and the lower hinge. The number of fasten rings you need to insert depends on the gap.

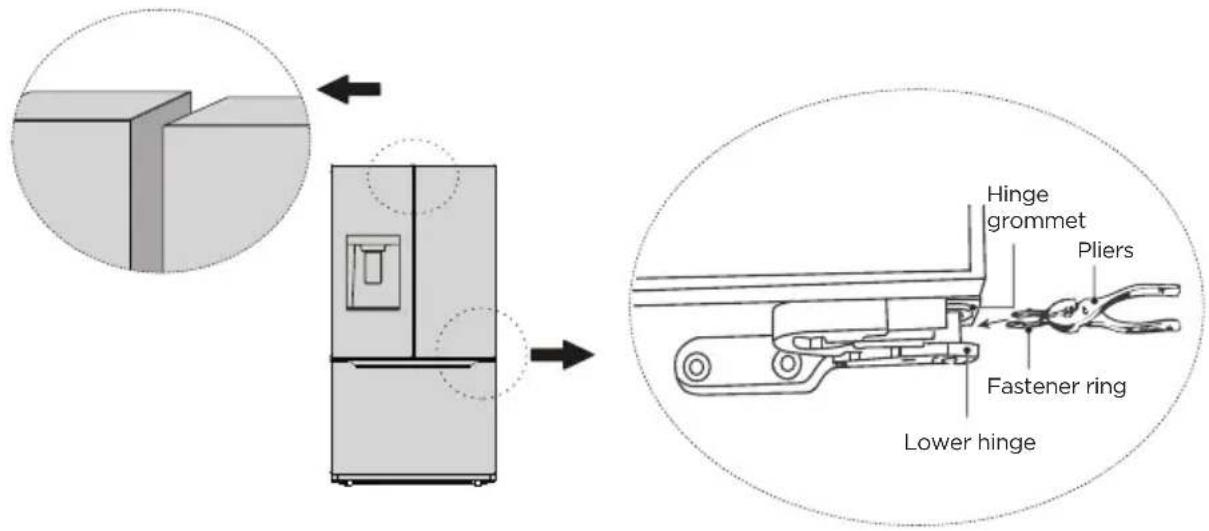
text_image
Hinge grommet Pliers Fastener ring Lower hingeMoving the Appliance
- Remove all items from the appliance.
- Pull the power plug out, insert and fix it into the power plug hook at the rear or on top of the appliance.
- Tape parts such as shelves and the door to prevent from falling off while moving the appliance.
- Move the appliance with more than two people carefully. When transporting the appliance over a long distance, keep the appliance upright.
- After installing the appliance, connect the power plug into a socket outlet to switch on the appliance.
Replacing the Light
Any replacement or maintenance of the LED lamps is intended to be made by the manufacturer, its service agent or similar qualified person.
Connecting the Appliance
After installing the appliance, connect the power plug into a socket outlet.
ATTENTION
After connecting the power supply cord (or plug) to the outlet, wait 2 or 3 hours before you put food into the appliance. If you add food before the appliance has cooled completely, your food may spoil.
Precautions before operation:
- Before making changes, the refrigerator must be disconnected from power.
- Precautions should be taken to prevent any personal injury.
Tips for Energy Saving
- Do not place the appliance near cookers, radiators or other heat sources. If the ambient temperature is high, the compressor will run more frequently and for longer, resulting in increased energy consumption.
- Ensure that there is sufficient ventilation at the base of the appliance, on the sides of the appliance and at the back of the appliance. Never cover ventilation openings.
- Please also observe the spacing dimensions in the chapter "Installation".
- The arrangement of drawers, shelves and racks as shown in the illustration offers the most efficient use of energy and should therefore be retained as far as possible. All drawers and shelves should remain in the appliance to keep the temperature stable and save energy.
- To obtain a larger storage space (e.g. for large refrigerated/frozen goods), the middle drawers can be removed. The top and bottom drawers and shelves should be removed last if necessary.
- An evenly filled refrigerator/freezer compartment contributes to optimal energy use. Therefore, avoid empty or half-empty compartments.
- Allow warm food to cool before placing it in the refrigerator/freezer. Food that has already cooled down increases energy efficiency.
- Allow frozen food to defrost in the refrigerator. The coldness of the frozen food reduces the energy consumption in the refrigerator compartment and thus increases the energy efficiency.
- Open the door only as briefly as necessary to minimise cold loss. Opening the door briefly and closing it properly reduces energy consumption.
- The door seals of your appliance must be perfectly intact so that the doors close properly and energy consumption is not increased unnecessarily.
OPERATION INSTRUCTIONS
Control Panel
The control panel is located on the right end of the left refrigerator door.
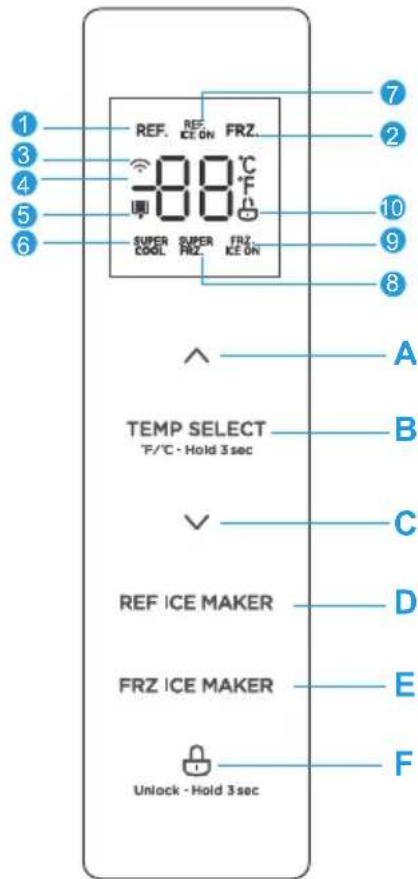
text_image
REF. REF. ICE ON FRZ. 88°C SUPER COOL SUPER FRZ. FRZ. ICE ON TEMP SELECT °F/°C - Hold 3 sec REF ICE MAKER FRZ ICE MAKER Unlock - Hold 3 sec| Icons Buttons | |||
| 1 | Refrigerator | A | Temperature + |
| 2 | Freezer | B | Temperature zone selection |
| 3 | Wireless network | C | Temperature - |
| 4 | Temperature display | D | Refrigerator ice maker on/off |
| 5 | Filter replacement reminder | E | Freezer ice maker on/off |
| 6 | Super cool | F | Lock/Unlock |
| 7 | Refrigerator ice maker on | ||
| 8 | Super freeze | ||
| 9 | Freezer ice maker on | ||
| 10 | Lock |

ATTENTION
The actual control panel may vary depending on the model.
Use and Functions
Display
- When the refrigerator is electrified, the display screen will totally display for 3 seconds, meanwhile the start-up bell rings, then the display screen enters the normal display of operation. (When powered on for the first time, the default set temperature of the refrigerator compartment and freezer compartment is 39^ / 0^ ).
- It will display the set temperature of both refrigerator and freezer compartments when there is no fault.
- Under normal circumstances, the display light will go out after 30 seconds in the locked state, button operation on display panel would wake up the display screen; if the door opening action wakes up the display screen, the display light would go out immediately when the door is closed; when the “fault code visible” type of fault occurs, the display screen lights up, and will go out after 30 seconds.
Lock/Unlock
- In the unlocked state, press and hold the ⏻ button for 3 seconds to enter the locked state and the buzzer sound rings.
- In the locked state, press and hold the ⏻ button for 3 seconds to enter the unlocked state and the buzzer sound rings.
- It will enter the locked state if there is no opening door action or button operation within 30 seconds.
- The alarm sound can be stopped by pressing any one button in locked state, but all other button operations need to be performed in unlocked state.
Refrigerator temperature setting
TEMP SELECT,
- Press the button to change the set temperature of refrigerator compartment.
Each time you press the or button, the set temperature increases or decreases by 1°F. The setting range of the refrigerator compartment is 1°C/34°F to 7°C/44°F. - The temperature setting will take effect after the display panel is locked.
Freezer temperature setting
TEMP SELECT
- Press the button to change the set temperature of freezer compartment. Each time you press the or button, the set temperature increases or decreases by 1°F. The setting range of the freezer compartment is -22°C/-7°F to -14°C/7°F.
- The temperature setting will take effect after the display panel is locked.
Mode setting
- After setting the minimum fridge temperature at 1^ C/34°F, continue to press the √ button once to enable the super cool function, and the SUPER COOL icon is on. If you want to manually exit the super cool mode, press the F/°C-Hold 3 sec button to change the set temperature of refrigerator compartment then press ↑ button to set the temperature.
- After setting the minimum freezer temperature at -22°C / -7°F, continue to press the √ button once to enable the super freeze function, and the SUPER FRZ. icon is on. If you want to manually exit the super freeze mode, press the °F/°C · Hold 3 sec button to change the set temperature of freezer compartment and then press 🔊 button to set the temperature.
- Press the button maker switch the fridge ice maker on/off. Correspondingly, press the button to switch the freezer ice maker on/off. When the ice maker function is switched on, the indicator icon of the ice maker will be on, otherwise it will be off.
Filter element time reset
- Press and hold ^ for 3 seconds to perform the "RESET FILTER" function. At this time, the filter's working data is cleared.
- Press and hold the button before 3 seconds to achieve Celsius and Fahrenheit conversion function.
Forcing AP mode
- Press and hold √ for 3 seconds to force the refrigerator's the wireless network module into AP mode, "AP" will appear in the temperature display area and the icon will flash. After the module enters AP mode successfully (the 🔊 icon lights steadily), it automatically exits AP mode and the temperature display area returns to normal temperature display.
Sabbath mode
- Press the REF ICE MAKER and simultaneously for 3 seconds to enter or exit the Sabbath mode.
- If the refrigerator is connected to the Internet, you can enter or exit the Sabbath mode through the corresponding function buttons in the Smart Home refrigerator control interface, and the APP can select the automatic exit time.
- When in Sabbath mode, the display will turn off after 6 seconds, the lamp will not light, and there will be no buzzer sound. The dispenser will only display the selected function in low brightness.
- When the APP terminal enters the Sabbath function, the APP terminal may send a command to turn off the ice maker function at the same time.
Activating/deactivating the door prompt tone
- Press ∨ and ∧ simultaneously for 3 seconds to activate/deactivate the door opening prompt sound.

ATTENTION
If the door is not closed after power-on, the APP or machine will give an alarm, call three times after exceeding 2 minutes, and then add one alarm every 1 minute. Close the door to stop the alarm.

ATTENTION
The super freeze function is designed to maintain the nutritional value of the food in the freezer. It can freeze the food in the shortest time. If a large amount of food is frozen at one time, it is recommended that the user turn on the super freeze function and put the food in. At this time, the freezing speed of the freezer compartment is increased, which can quickly freeze the food, effectively lock the nutrition of the food, and facilitate storage.
Fault indication
- When the following tips appear on the display screen, it indicates a problem with the refrigerator. Although the refrigerator in the following fault case can still provide cooling/freezing functions, the user should contact maintenance personnel to ensure the normal use of refrigerator.
Fault Code Fault Description
| EH The humidity sensor fails | |
| F5 Refrigerating ice maker fails to turn over ice | |
| F4 The sensor at the bottom of refrigerating ice maker fails | |
| CC The defrosting sensor in ice making chamber fails | |
| C9 The temperature sensor in ice making chamber fails | |
| CA | The communication between main control board and ice making board fails |
| F6 The initialization of refrigerating ice maker fails | |
| E0 The initialization of freezer ice maker fails | |
| E1 The temperature sensor in the refrigerating chamber fails | |
| E2 The temperature sensor in the freezer chamber fails | |
| E5 The defrosting sensor in the freezer chamber fails | |
| E6 | The communication between display board and main control board fails |
| E7 The ambient temperature sensor fails | |
| EE The sensor at the bottom of freezer ice maker fails | |
| EP Freezer ice maker fails to turn over ice | |
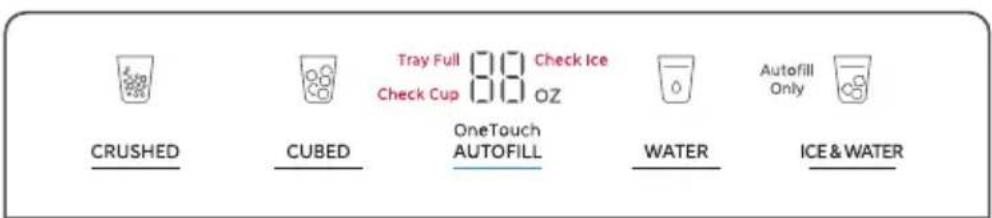
Water and Ice Dispenser
The water and ice dispenser is located on the outside of refrigerating chamber door. It offers a choice of cubed ice, crushed ice, cold water, or ice & water. It is recommended to keep the refrigerating chamber door closed when using the dispenser. (If ice or ice & water is dispensed either manually or automatically with the refrigerator door open, a buzzer will sound and the function icon will flash.)
| 1 | Touch screen display |
| 2 | Retractable dispenser chute |
| 3 | Paddle |
| 4 | Drip tray |
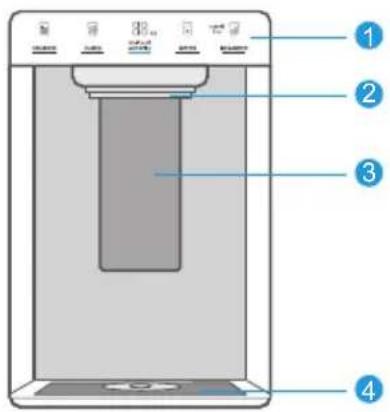
text_image
Diagram of a digital water dispenser with numbered labels pointing to key componentsApplicable cup size guidance
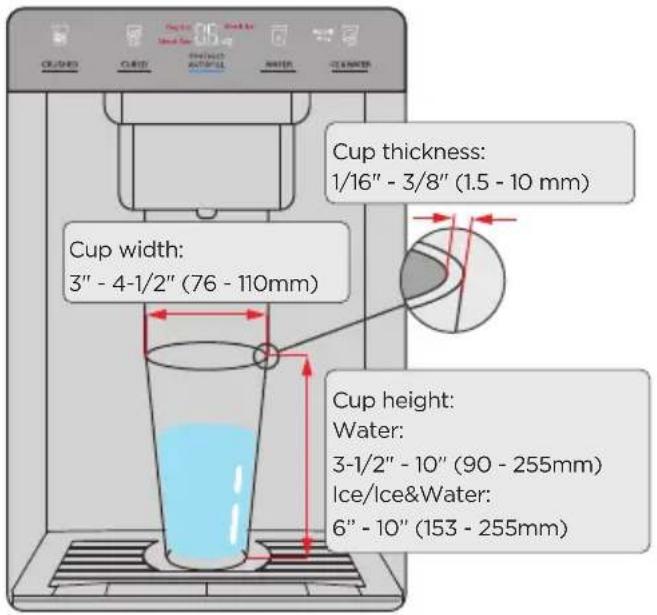
text_image
CUCLES CURD PRODUCTS AUTO/ULL WATER CUMBLOWER CUP thickness: 1/16" - 3/8" (1.5 - 10 mm) Cup width: 3" - 4-1/2" (76 - 110mm) Cup height: Water: 3-1/2" - 10" (90 - 255mm) Ice/Ice&Water: 6" - 10" (153 - 255mm)Display
text_image
CRUSHED CUBED Tray Full 3.0 Check Ice Check Cup 1.0 OZ OneTouch AUTOFILL WATER Autofill Only ICE & WATER- When powering on for the first time, the display shows the full screen for 3 seconds, followed by the normal operation display (the initial power-on defaults to the water dispenser function). If the dispenser chute is not in the top position when the power is on, it will rise and return to the top position.
- In the normal display, the icon of the currently selected function is lit; if there is a prompt, the
prompt icon flashes and the other function icons are off; the digital area is off, and the blue bar under the AUTOFILL button is always on.
- If there is an error, the error code is displayed in the digital area within 30 minutes of power-up.
Dispensing Water and Ice
Ice and/or water can be dispensed automatically or manually.
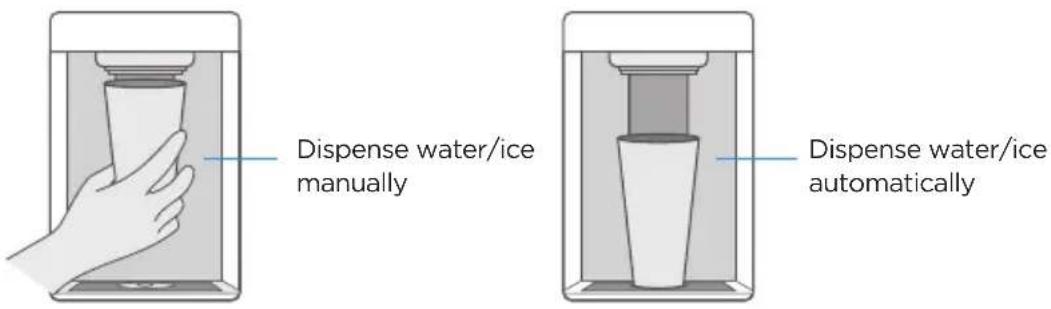
Dispense water/ice manually
Dispense water/ice automatically
- Dispensing cold water
text_image
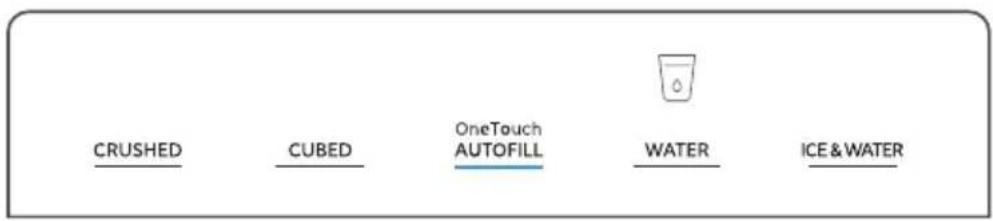
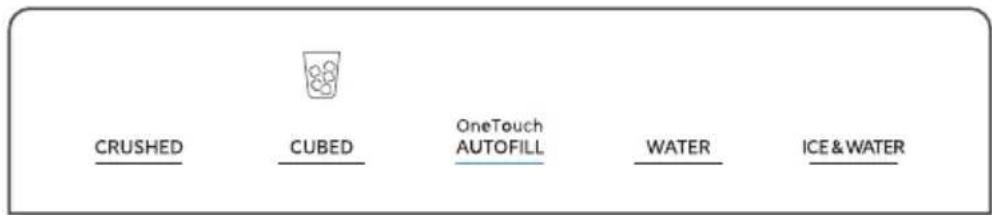
CRUSHED CUBED.OneTouch AUTOFILL WATER ICE & WATER- Touch the WATER button until the indicator icon lights up.
- Manual water dispensing: Press the cup against the dispenser paddle to dispense cold water. Release the paddle to stop dispensing.
- Automatic water dispensing: Place the cup in the center of the drip tray, press the AUTOFILL button once, the dispenser chute will automatically descend to a preset height and start dispensing water. Upon completion, the chute will ascend back to its initial position.
Note: While water or ice is being dispensed, you can press the AUTOFILL button to stop the process immediately and return the dispenser chute to its initial position.
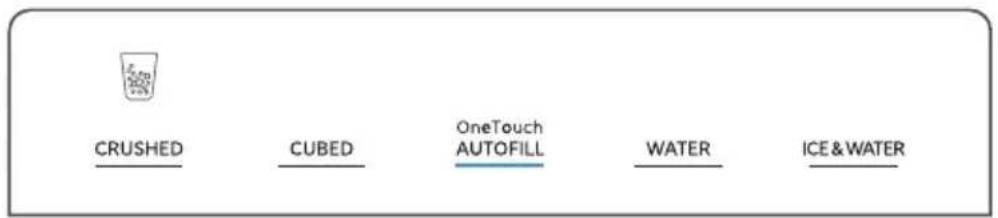
- Dispensing crushed ice
text_image
CRUSHED CUBED.OneTouch AUTOFILL WATER ICE & WATER- Touch the CRUSHED button until the indicator icon lights up.
- Manual ice dispensing: Hold the cup close to the dispenser spout to avoid ice spills. Press the cup against the dispenser paddle to dispense crushed ice. Release the paddle to stop dispensing.
• Automatic ice dispensing: Place the cup in the center of the drip tray, press the OneTouch AUTOFILL button once, the dispenser chute will automatically descend to the rim of the cup (if the cup is short, the chute will descend to the lowest level) and start dispensing crushed ice. Upon completion, the chute will ascend back to its initial position.
3. Dispensing ice cubes
text_image
CRUSHED CUBED.OneTouch AUTOFILL WATER ICE & WATER- Touch the CUBED button until the indicator icon lights up.
- Manual ice dispensing: Hold the cup close to the dispenser spout to avoid ice spills. Press the cup against the dispenser paddle to dispense ice cubes. Release the paddle to stop dispensing.
- Automatic ice dispensing: Place the cup in the center of the drip tray, press the AUTOFILL button once, the dispenser chute will automatically descend to the rim of the cup (if the cup is short, the chute will descend to the lowest level) and start dispensing ice cubes. Upon completion, the chute will ascend back to its initial position.
4. Dispensing ice & water
text_image
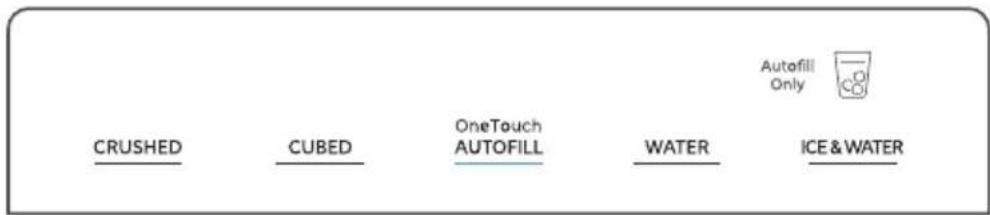
CRUSHED CUBED.OneTouch AUTOFILL WATER ICE & WATER Autofill Only- Touch the ICE & WATER button until the indicator icon Autofill Only lights up.
- The Ice & Water function is only available in automatic mode. OneTouch
- Place the cup in the center of the drip tray, press the AUTOFILL button once, the dispenser chute will automatically descend to the rim of the cup (if the cup is short, the chute will descend to the lowest level) and start dispensing ice cubes. When the set amount of ice cubes is dispensed (default is half the cup height, adjustable via the APP), cold water begins to flow. Upon completion, the chute will ascend back to its initial position.
Function switching
In automatic water dispensing mode, if you switch to CRUSHED, CUBED, or ICE & WATER function during water dispensing, the dispenser chute will first return to the top position and then descend to perform the appropriate function.
Cautions
- The amount of water displayed when dispensing water is an approximation and is not used as measurement data.
- When using the CRUSHED, CUBED, or ICE & WATER function, cups less than 160mm in height may cause the AutoFill function to not work. This is because ice cubes may fall out of a lower cup during AutoFill, creating a safety hazard if someone steps on them and slips.
- When using AutoFill, be careful not to put your hands or other objects between the cup and water spout to avoid interfering with detection and causing a malfunction. If the "Check Cup" prompt appears when attempting to use AutoFill, simply remove the cup from the dispenser and replace it after a few seconds. The AutoFill function will then return to normal use.
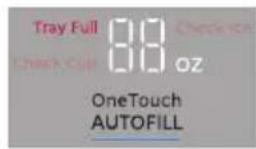
- When the "TRAY FULL" icon appears, the Auto Fill function is disabled. The water tray must be cleaned before the Auto Fill function can be used again. Manual ice and water function is not affected when the "TRAY FULL" icon is lit.
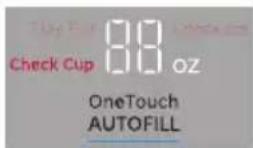
- If the cup is unstable or removed, the AutoFill function will stop and a "Check Cup" icon will appear.

- Ice dispensing will time out after 2 minutes, and the "Check Ice" icon will be displayed. Check to see if there is ice in the storage bin.
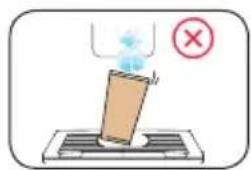
text_image
Diagram showing a device emitting a light with a red prohibition symbol, indicating no text or symbols present.• Light cups (paper or glass) may be knocked over by dispensing ice.
natural_image
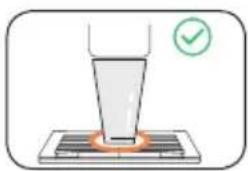
Illustration of a laboratory setup with a funnel and test tube, no text or symbols present- Place the cup in the center of the circle on the tray to reduce ice or water splashes and tip-over.
text_image
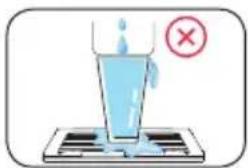
Diagram showing a glass of water being poured into a tray with a red 'X' symbol indicating incorrect condition.- Do not use the AutoFill function when the cup is nearly full of water or ice.
text_image
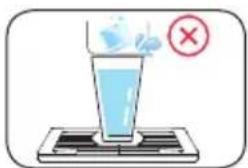
Diagram showing a glass being heated by a substance, with a red X mark indicating the chemical reaction.• Getting ice in a water-filled cup can cause splashing.
- Prolonged continuous water dispensing may trigger the water shutoff protection, but ice dispensing will not be affected.
- Keep sensors clean with a clean, damp cloth. Do not spray liquid or cleaners directly on the sensors.
- The ice chute can be manually pulled down for cleaning. It will automatically return to the position after 45 seconds.
- Do not leave the unit unattended while using the AutoFill function.
• After AutoFill is completed, the cup must be reseated before the next use. - Only use recommended size cup positioned properly to prevent ice spilling.
- For optimum results use a uniform container.
Error indication (water dispenser)
If the following message appears on the display, there is a problem with the AutoFill function. Although the AutoFill function can still provide ice & water dispensing function in the following error situations, the user should contact the maintenance personnel to ensure the normal use of the AutoFill function.
| Error Code Error Description | |
| P4 Spill sensor failure | |
| P6 Dispenser RX ice-making board communication error | |
| P7 Dispenser TX ice-making board communication error | |
| P8 Dispenser RX ultrasonic board communication error | |
| P9 Dispenser TX ultrasonic board communication error | |
| PA Dispenser upper limit switch failure | |
| Pb Dispenser lower limit switch failure | |
| PC Dispenser cup-pressing switch failure |
Ice Maker
How to use
- Connect the water line as per the installation instructions.
- The ice maker function is turned on by default. If you do not need ice, you need to manually turn off the ice maker.
- Collect ice cubes from the ice storage box.
Notes for use of ice maker:
Generally, the refrigerator takes about 7 hours to produce the first ice cubes after being powered on. After the first normal ice-making process, each ice making time is 100 min. (The ambient temperature is 21°C and the door is not opened or closed).
For large ice cubes, 100g ice can be made each time, about 10 ice cubes. For small ice cubes, 68g ice can be made each time, about 18 ice cubes.
For large ice cubes, it takes about 18-22 fills to reach full capacity, resulting in around 180-220 ice cubes. For small ice cubes, it takes about 26-31 fills to reach full capacity, resulting in around 450-530 ice cubes. It is normal for a few small ice cubes to adhere to each other.
The ice making time may be extended in the following situations:
Freezer chamber is not fully cooled at the beginning of use.
The temperature is low in winter or the ambient temperature is high in summer.
The door is opened and closed more times; or more food is put in at one time.
The space around the refrigerator is too narrow.
Notes for ice making:
The ice maker will continue to make ice before the ice detection rod touching the ice; when the ice detection rod touches the ice in the ice storage box, the ice making process stops.
The following situation may prevent the ice from being made even though there is water in the water line:
Foreign objects other than ice cubes in the ice storage box contact the detection rod.
Foreign objects other than ice cubes in the ice storage box cause collision or ice making to stop when the ice making grid is overturned.
Factors affecting the use of ice maker:
When using the ice maker, do not put anything other than ice cubes in the ice storage box. Putting something other than ice will cause collision damage or ice making to stop when the ice making grid is overturned. If you need to store other items in the ice storage box, please stop using the ice making function. When the ice making function is enabled again, remove other items from the ice storage box and clean the ice storage box. When putting other items into the ice storage box, please be careful with tall items to avoid jamming the ice maker. If not used for a long time, the ice cubes in the ice storage box and the ice maker should be discarded.
ATTENTION
- Please note that due to technical changes and differences in models, some of the illustrations in this manual may differ from your model.
Storing Food
Freezer Compartment
- The freezer compartment is designated for the storage of food frozen at very low temperature, long-term storage of frozen food, and for the production of ice.
- Use the shelves in the door of the freezer only for storing frozen food, not for storing hot food intended for freezing.
- Do not put fresh and frozen food next to each other. The frozen food may thaw.
- When freezing fresh food (such as meat, fish or chopped meat), cut them into parts that can be used at the same time.
- Storing frozen food: instructions are usually stated on the packages, which must be followed. If there is no information on the packaging, food should not be stored for longer than three months from the date of purchase.
- When purchasing frozen food, make sure that it was frozen at a suitable temperature and that the packaging is not damaged.
- Frozen food should be kept in suitable packages to retain the quality and should be returned to the freezer compartment as soon as possible.
- If a package of frozen food shows moisture or abnormal bulging, it is probable that it was stored at the wrong temperature and the content is spoiled.
- The storage period for frozen food depends on the room temperature, the thermostat setting, the frequency of opening the door of the freezer, the type of food and the time of transporting the product from the shop to the household. Always follow the instructions printed on the packaging and never exceed the maximum storage time stated on the package.
Refrigerator Compartment
To reduce moisture and subsequent ice build-up, never put liquid into the fridge compartment in unsealed containers. Frost tends to concentrate in the coolest parts of the evaporator. Storing uncovered liquids results in a more frequent need for defrosting.
Never put warm foods in the fridge compartment. These should first cool down at room temperature and then be placed so as to ensure adequate air circulation in the fridge compartment.
Foods or food containers should not touch the back wall of the fridge because they could freeze to the wall. Do not keep regularly opening the door of the refrigerator.
Meat and clean fish (packed in a package or plastic foil) can be placed in the fridge compartment, which can be used in 1-2 days.
Fruit and vegetables without packaging can be placed in the part designated for fresh fruit and vegetables
Recommended Temperature
The optimal temperature setting for food storage:
- Fridge: 4 °C (39 °F); Freezer: -18 °C (0 °F)

ATTENTION
The optimal temperature setting of each compartment depends on the ambient temperature. Above optimal temperature is based on the ambient temperature of 25^ C.
OPEN API
1. Demand response
- Get the current pattern POST /v1/api/plugin/ get Demand ResponseInfo.
- Accepts DAL signals POST /v1/api/plugin/demand Response/dal.
- Accepts TALR signals POST /v1/api/plugin/demand Response/dal.
2. Energy consumption report
- Get the energy statistics report POST /v1/api/plugin/get Energy Statistics Rep.
3. Delay defrosting
- Control switch interface POST /v1/api/plugin/switch Delay Defrost.
- Get the delay interval POST /v1/api/plugin/get Delay DefrostInfo.
- Added delay interval POST /v1/api/plugin/save Delay DefrostInfo.
- Remove the delay interval POST /v1/api/plugin/delete Delay DefrostInfo.
4. Refrigerator self-inspection
- Get refrigerator health status information POST /v1/api/plugin/get Fridge Current Heath.
5. Sabbath mode
- Set the Sabbath mode POST /v1/api/plugin/set Sabbath Mode.

ATTENTION
The application (SmartHome) interface (about the demand response interface) allows the user to operate according to the smart grid signal intervention mode.
CLEANING AND MAINTENANCE

CAUTION
Disconnect the appliance from the electrical supply before performing any routine maintenance. Allow at least 5 minutes before restarting the appliance, as frequent starting may damage the compressor.
Hold the plug, not the cable, when unplugging the appliance.
Do not scrape off frost and ice with sharp objects. Do not use sprays, electric heaters, hair dryers, steam cleaners or other sources of heat in order to avoid damage to the plastic parts.
Eliminate the dust on the back of the unit at least once in the year to avoid hazard by fire, as well as increased energy consumption.
Check the door gasket regularly to make sure there is no debris. Clean the door gasket with a soft cloth dampened with soapy water or diluted detergent.
The interior of the product should be cleaned regularly to avoid odor.
Use a soft cloth or sponge to clean the inside of the product, with two tablespoons of baking soda and a quart of warm water. Then rinse with water and wipe clean. After cleaning, open the door and let it dry naturally before turning on the power.
For areas that are difficult to clean in the product (such as narrow gaps or corners), it is recommended to wipe them regularly with a soft rag, soft brush, etc. and when necessary, combined with some auxiliary tools (such as thin sticks) to ensure no contaminants or bacteria accumulation in these areas.
Do not use soap, detergent, scrub powder, spray cleaner, etc., as these may cause odors in the interior of the product or contaminated food.
Wipe the outer surface of the product with a soft cloth dampened with soapy water, detergent, etc., and then wipe dry.
Do not use hard brushes, clean steel balls, wire brushes, abrasives (such as toothpastes), organic solvents (such as alcohol, acetone, isoamyl acetate, etc.), boiling water, acid or alkaline items, which may damage the fridge surface and interior. Boiling water and organic solvents such as benzene may deform or damage plastic parts.
natural_image
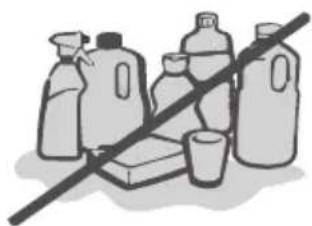
Illustration of various plastic containers and a crossed-out bottle, no text or symbols presentDo not rinse directly with water or other liquids during cleaning to avoid short circuits or affect electrical insulation after immersion.

ATTENTION
The appliance shall run continuously once it is started. Generally, the operation of the appliance shall not be interrupted; otherwise the service life may be impaired
Defrosting
The refrigerator is made based on the air-cooling principle and thus has an automatic defrosting function. Frost formed due to change of season or temperature may also be manually removed by disconnecting the appliance from power supply or by wiping with a dry towel.
CAUTION!
Only after the interior completely dry should the appliance be switched back on and plugged back into the mains socket.
Cleaning the Door Bins
- Using both hands, squeeze the tray in the direction of the arrows in the illustration and push it upwards to remove it.
• After washing the tray having been taken out, you can adjust its installing height to suit your requirements.
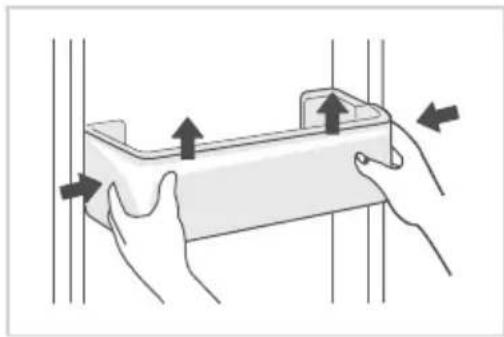
natural_image
Illustration of two hands holding a rectangular object with upward arrows indicating force or movement (no text or symbols)Removing the Infinite Door Bin
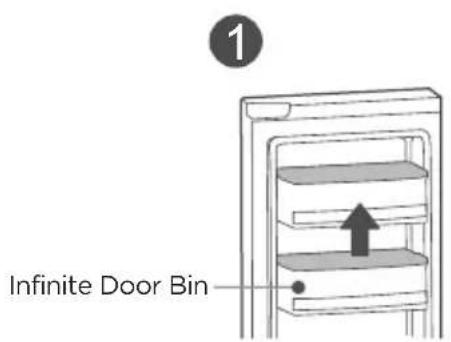
text_image
1 Infinite Door Bin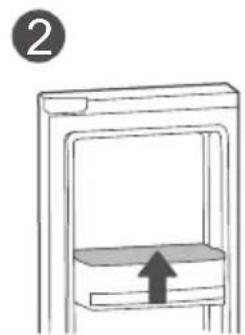
natural_image
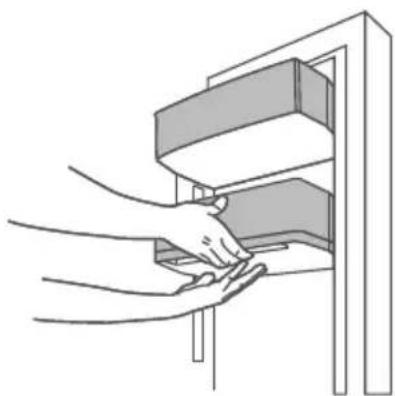
Simple line drawing of a mechanical component with an upward arrow, no text or symbols presentRemove the first layer of door bin, pull the handle backward, unlock the infinite door bin and take it down.

ATTENTION
• Usage: Use both hands to support the infinite door bin, squeeze and hold the trigger underneath.
- Adjust the bin to the desired height, and release the trigger to lock it in place. Always check that the bin is secure after moving.
natural_image
Line drawing of hands inserting a component into a cabinet (no text or symbols)Cleaning the Glass Shelves

text_image
Upper end of fixed leg Lower end of fixed leg SlotDisassemble the cantilever shelf as indicated by the arrows above:
- Hold the front edge of the shelf, and tilt the shelf inwards until the lower end of the fixed leg is separated from the slot of the support iron;
- Uplift the whole shelf until it cannot rise anymore;
- Take out the shelf horizontally.
When installing, first insert the upper end of the fixed leg into one of the upper slots on the support iron, and then insert the lower end of the fixed leg into the third slot on the lower part of the support iron.
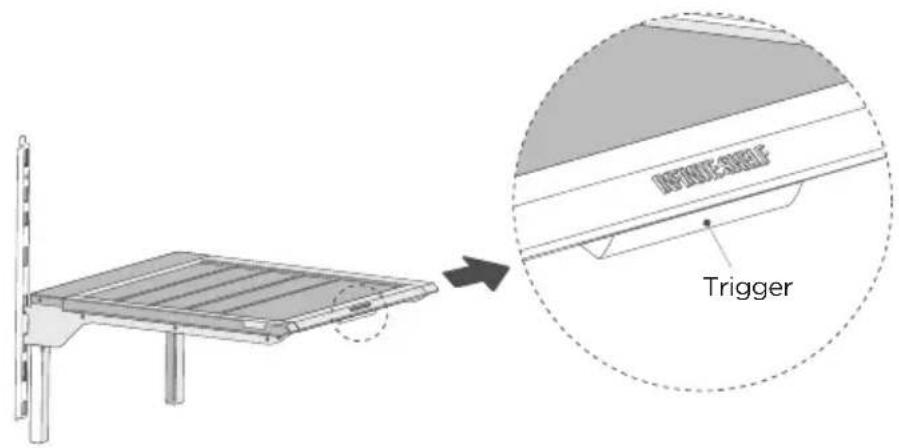
Adjusting the Infinite Shelf
text_image
Trigger- Press the trigger to unlock the shelf, push the shelf inward to the desired space, release the trigger and the shelf will be locked.
- You can pull the shelf out without pressing the trigger, but the shelf locking part will make a normal movement sound, don't worry! It is recommended to press the trigger to pull the shelf out for a smoother operation.
Cleaning the Ice Storage Box
- When you need to use a lot of ice, or the ice is not dispensed properly, or you need to clean the ice storage box, you can take the ice storage box out, but please put it back in time.
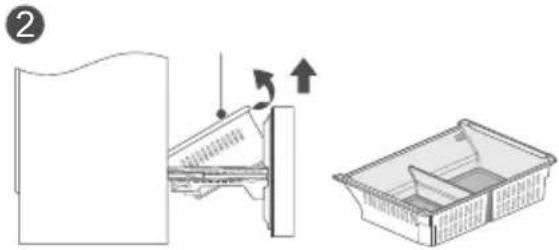
natural_image
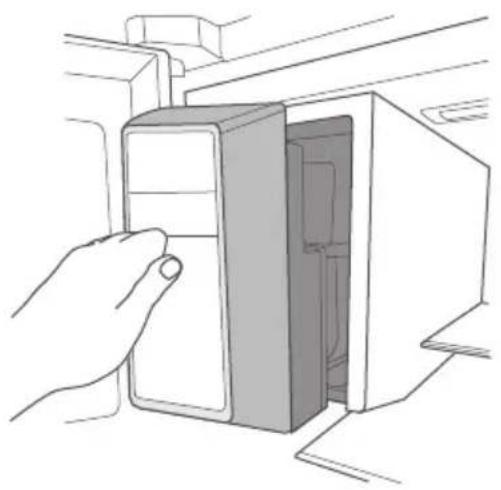
Line drawing of a hand inserting a device into a box (no text or symbols)- Hold the button of the ice storage box with your hand, press it gently, and then pull it out horizontally.
natural_image
Diagram of a device with a vertical panel and directional arrow (no text or symbols)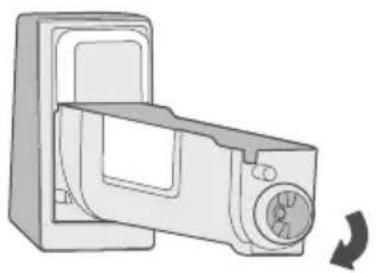
natural_image
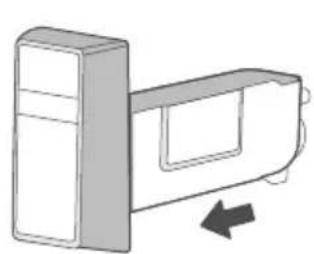
Illustration of a microwave oven with a rotary knob and a curved arrow indicating rotation (no text or symbols)• After cleaning, gently push the ice storage box back in.

ATTENTION
- If ice cubes fall into the ice making chamber when removing, clean it in time.
- If the ice cubes are not used for a long time, discard them in time.
- When you need to use a lot of ice cubes, or the ice is not dispensed properly, or you need to clean the ice storage box, you can take the ice storage box out and put it back in time.
- If the ice storage box cannot be installed in place, rotate the tail as illustrated to align it with the corresponding position in the ice tank.
Cleaning the Freezer Drawers
1 Upper freezer drawer Lower freezer drawer
natural_image
Diagram of a piano keyboard with an arrow indicating press direction (no text or symbols)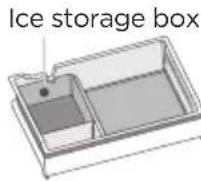
natural_image
Diagram showing a mechanical assembly with an arrow indicating motion, alongside a plastic basket (no text or symbols)Upper freezer drawer
- Open the freezer chamber door to the maximum length, lift the tail of the upper freezer drawer and take it out.
• The ice storage box can be removed for cleaning.
Lower freezer drawer
- Open the freezer chamber door to the maximum length, lift the end of the lower freezer drawer and lift it out.
ATTENTION
Note: Do not remove the lower freezer drawer unless necessary.
Cleaning the Dispenser Drip Tray
- Remove the drip tray cover.
- Remove the drip tray and discard the water.
- Wipe the bottom of the dispenser with a cloth to remove residual water.
- Refit the drip tray and cover.
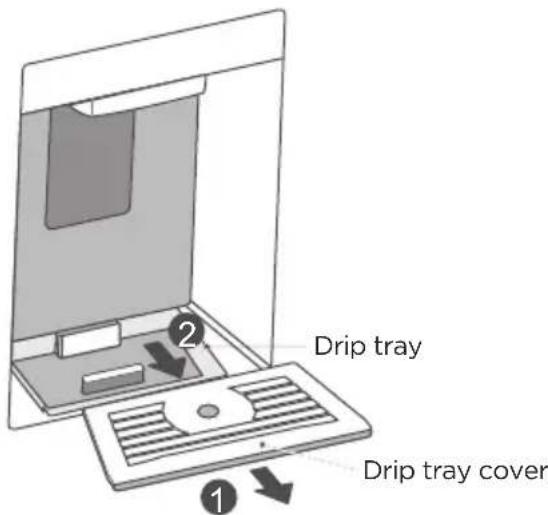
text_image
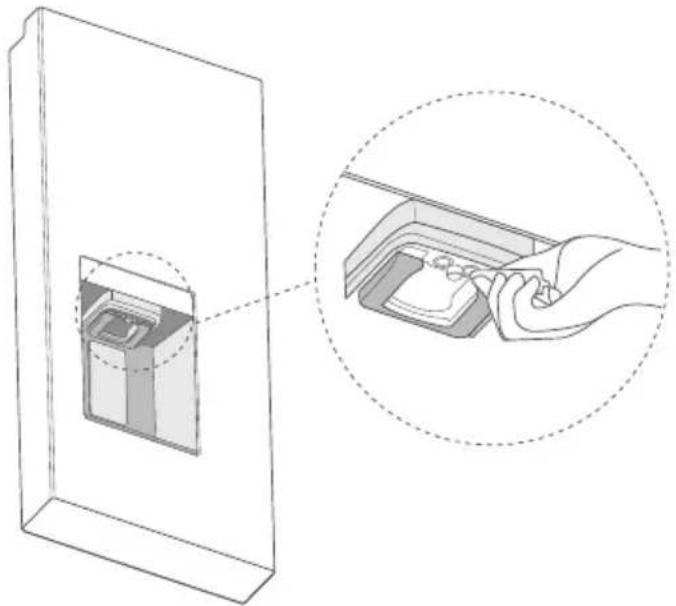
Drip tray Drip tray coverCleaning the Cup Detection Sensor
- Clean the sensor with a damp cloth to maintain the cup detection function. Do not spray cleaners directly on the sensor.
natural_image
Diagram showing a hand inserting a device into a container, with an inset close-up of the device (no text or symbols present)Stop Using
Power failure: In case of power failure, even if it is in summer, food inside the appliance can be kept for several hours; during the power failure, the times of door opening shall be reduced, and no more fresh food shall be put into the appliance.
Prolonged non-use: The appliance shall be unplugged and then cleaned; then the doors are left open to prevent odor.
Moving: Before moving the refrigerator, take all objects inside out, fix the glass partitions, vegetable holder, freezer drawers and etc. with tape, and tighten the leveling feet; close the doors and seal them with tape. During moving, the appliance shall not be laid upside down or horizontally, or be vibrated; the inclination during moving shall be no more than 45°.

ATTENTION
The appliance shall run continuously once it is started. Generally, the operation of the appliance shall not be interrupted; otherwise the service life may be impaired.
Food can be preserved for a couple of hours even in summer in case of power failure; it is recommended to reduce the frequency of opening door.
TROUBLESHOOTING
The following simple issues can be handled by the user. Please call the after-sales service department if the issues are not solved. Midea Customer Service In the U.S.A. or Canada, call 1-866-646-4332.
| Problem Possible Causes | |
| Refrigerator does not operate | • Refrigerator is unplugged. Push the plug completely into the outlet. |
| • Refrigerator is in Sabbath mode. Press REF ICE MAKER and LOCK for 3s to enter or exit the Sabbath mode. | |
| • The fuse is blown/circuit breaker is tripped. Replace fuse or reset the breaker. | |
| Refrigerator has odor | • Foods transmitting odor to refrigerator. Foods with strong odors should be tightly wrapped. Keep an open box of baking soda in the refrigerator; replace every three months. |
| • Check whether there is any spoiled food. | |
| • Interior needs cleaning. See Cleaning and Maintenance section. | |
| Motor operates for long periods or cycles on and off frequently | • Hot weather or frequent door openings. This is normal. |
| • Often occurs when large amounts of food are placed in refrigerator. This is normal. | |
| • Putting hot food inside a refrigerator will cause it to run longer because the added heat raises the internal temperature of the fridge, forcing the compressor to work harder to cool everything back down to the set temperature. | |
| • Door opened too often or too long. This is normal. | |
| Interior light does not work | • No power at outlet. Replace fuse or reset the breaker. |
| • Refrigerator is in Sabbath mode. | |
| • Press REF ICE MAKER and LOCK for 3s to enter or exit the Sabbath mode. | |
| • LED lights are out. Call Service. | |
| Door not closing properly | • Check to see if package is holding door open. |
| • Door gasket on hinge side is sticking or folded over. | |
| • The refrigerator is not leveled. Adjustable legs at the bottom front corners of the refrigerator should be set so the refrigerator is firmly positioned on the floor, and the front is raised just enough that the door closes easily. | |
| Problem Possible Causes | |
| Loud noises | The flow of refrigerant through the cooling coils may make a gurgling noise like boiling water. |
| Newer refrigerators sound different from older refrigerators. | |
| Modern refrigerators have more features and use newer technology. The new high efficiency compressor may run faster and longer than your old refrigerator and you may hear a high-pitched hum or pulsating sound while it is operating. | |
| The icemaker will make a loud noise when cubes are dropped into the ice storage bucket. A hum or click can be heard when the icemaker fills with water. This sound may be heard once or multiple times. | |
| The refrigerator is not leveled. Adjustable legs at the bottom front corners of the refrigerator should be set so the refrigerator is firmly positioned on the floor. | |
| Door gaskets not sealing | Door gasket on hinge side is dirty or folded over. Clean and unfold gasket. Apply paraffin wax to the face of the gasket. |
| Gently heat the gasket with a hair dryer, allowing the rubber to become more pliable and conform better to the door frame, effectively closing any gaps; however, be cautious not to overheat the gasket as this can damage it permanently. | |
| Defrost pan over flows | High humidity levels can lead to more condensation forming inside the refrigerator, filling the drain pan faster. |
| Doors left open, not closing properly, or gasket not sealing resulting in frosting due to entry of air and increased water due to defrosting. | |
| Refrigerator exterior case is warm | Your refrigerator has an automatic energy saver system that circulates warm liquid between the outer case and the inner case of the refrigerator to prevent condensation from building up on the outside of the refrigerator. The case can feel very warm, especially around the doors. |
| Surface condensation | From time to time, you may see condensation, sweat, or moisture form on the articulating mullion (flap) on the edge of the fresh-food door of your refrigerator. This usually happens during warmer times of the year and/or periods of high humidity. As warm air hits the cold surface, condensation can develop. |
| Abnormal noise | Buzz: The compressor may produce buzzing sounds during operation, particularly upon start or stop. This is normal. |
| A boiling, gurgling, or knocking sound can be heard when the unit is running. This is caused by the circulation of refrigerant. | |
| Not making ice cubes (only on models with an ice maker) | The ice making function is not turned on. Switch on the ice maker. |
| The appliance is not being supplied with water. Check whether the house water supply to the refrigerator is on. | |
| The house water supply line to the refrigerator is kinked. Repair kink. | |
| The refrigerator is not correctly installed to the house water supply. | |
| The water pressure is too low. Check the pressure of the house water supply, or whether the filter is clogged. | |
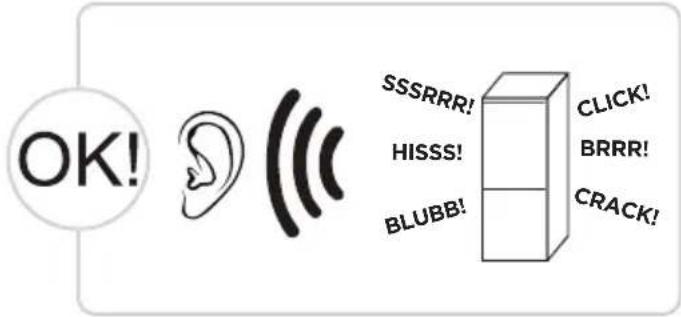
Hearing the sounds described below? There is no need to worry.
text_image
OK! SSSRRR! HISSS! BLUBB! CLICK! BRRR! CRACK!CLICK: Some electrical parts in the refrigerator, such as electric valve will make this noise when working. This is normal.
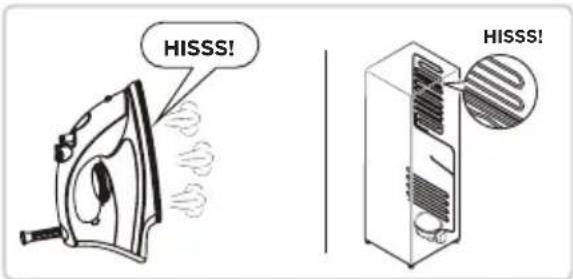
HISSS: When the refrigerant flows into the evaporator, it will make this noise. This is normal.
text_image
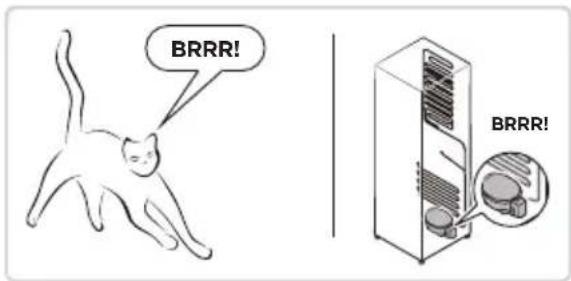
CLICK! CLICK!BRRR: The compressor will make this noise when working, and the buzzes are loud particularly upon start or stop. This is normal.
text_image
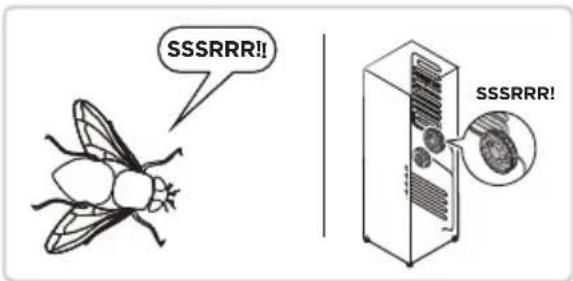
HISSS! HISSS!SSSRRR: The fan motor in the No Frost refrigerator will make this noise when working. This is normal.
text_image
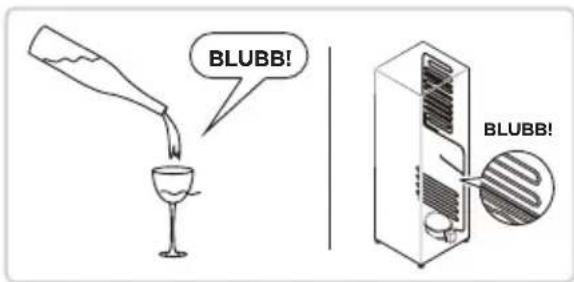
BRRR! BRRR!BLUBB: Refrigerant flowing through the pipes in the refrigerator will make this noise. This is normal.
text_image
SSSRRR!! SSSRRR!CRACK: Cracking sound or broken ice sound: the overall structure of the refrigerator, air duct frost will be with the thermal expansion and contraction of the expansion sound, these are also normal physical phenomenon.
text_image
BLUBB! BLUBB!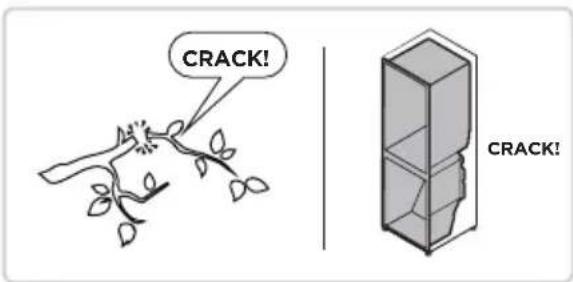
text_image
CRACK! CRACK!CERTIFICATIONS
Please note that changes or modifications of this product is not expressly approved by the party responsible for compliance could void the user's authority to operate the equipment.
This equipment complies with FCC's RF radiation exposure limits set forth for an uncontrolled environment.
The antenna(s) used for this transmitter must be installed and operated to provide a separation distance of at least 20 cm from all persons and must not be collocated or operating in conjunction with any otherantenna or transmitter. Installers must ensure that 20cm separation distance will be maintained between the device (excluding its handset) and users.
Federal Communications Commission (FCC) Compliance Statement for USA
This device complies with part 15 of the FCC rules. Operation is subject to the following two conditions: (1) This device may not cause harmful interference, and (2) this device must accept any interference received, including interference that may cause undesired operation.
Note: This equipment has been tested and found to comply with the limits for a Class B digital device, pursuant to part 15 of the FCC Rules. These limits are designed to provide reasonable protection against harmful interference in a residential installation. This equipment generates, uses and can radiate radio frequency energy and, if not installed and used in accordance with the instructions, may cause harmful interference to radio communications. However, there is no guarantee that interference will not occur in a particular installation. If this equipment does cause harmful interference to radio or television reception, which can be determined by turning the equipment off and on, the user is encouraged to try to correct the interference by one or more of the following measures:
- Reorient or relocate the receiving antenna.
- Increase the separation between the equipment and receiver.
- Connect the equipment into an outlet on a circuit different from that to which the receiver is connected.
- Consult the dealer or an experienced radio/TV technician for help.
This equipment complies with FCC radiation exposure limits set forth for an uncontrolled environment.
FCC Supplier's Declaration of Conformity
Product Name: Refrigerator
Model number: MRF29D9BST
Suppliers Name: Midea America Corp.
Suppliers Address (USA): 300 Kimball Dr. Parsippany, NJ 07054
Suppliers Website: http://midea.com/us
Contact Email/Telephone: 1-866-646-4332
Industry Canada (IC) Compliance Statement for Canada
This device complies with Industry Canada license-exempt RSS standard(s). Operation is subject to the following two conditions: (1) this device may not cause interference, and (2) this device must accept any interference, including interference that may cause undesired operation of the device.
CAN ICES-003(B)/NMB-003(B)
Midea is not responsible for any changes or modifications not expressly approved by Midea. Such modifications could void the user's authority to operate the equipment.
For model: MWB-S-WB01
FCC ID: 2ADQOMWB-SWB01
IC ID: 12575A-WB01

text_image
FCTRADEMARKS, COPYRIGHTS AND LEGAL STATEMENT

idea logo, word marks, trade name, trade dress and all versions thereof are valuable assets of Midea
Group and/or its affiliates (“Midea”), to which Midea owns trademarks, copyrights and other intellectual property rights, and all goodwill derived from using any part of an Midea trademark. Use of Midea trademark for commercial purposes without the prior written consent of Midea may constitute trademark infringement or unfair competition in violation of relevant laws.
This manual is created by Midea and Midea reserves all copyrights thereof. No entity or individual may use, duplicate, modify, distribute in whole or in part this manual, or bundle or sell with other products without the prior written consent of Midea.
All the described functions and instructions were up to date at the time of printing this manual. However, the actual product may vary due to improved functions and designs.
DISPOSAL AND RECYCLING
Important instructions for environment
This symbol indicates that this product shall not be disposed with other household wastes at the end of its service life. Used device must be returned to official collection point for recycling of electrical electronic devices. To find these collection systems please contact to your local authorities or retailer where the product was purchased. Each household performs important role in recovering and recycling of old appliance. Appropriate disposal of used appliance helps prevent potential negative consequences for the environment and human health.
Compliance with RoHS Directive
The product you have purchased complies with EU RoHS Directive (2011/65/EU). It does not contain harmful and prohibited materials specified in the Directive.
Package information
Packaging materials of the product are manufactured from recyclable materials in accordance with our National Environment Regulations. Do not dispose of the packaging materials together with the domestic or other wastes. Take them to the packaging material collection points designated by the local authorities.

DATA PROTECTION NOTICE
For the provision of the services agreed with the customer, we agree to comply without restriction with all stipulations of applicable data protection law, in line with agreed countries within which services to the customer will be delivered, as well as, where applicable, the EU General Data Protection Regulation (GDPR).
Generally, our data processing is to fulfil our obligation under contract with you and for product safety reasons, to safeguard your rights in connection with warranty and product registration questions. In some cases, but only if appropriate data protection is ensured, personal data might be transferred to recipients located outside of the European Economic Area.
Further information are provided on request. You can contact our Data Protection Officer via MideaDPO@midea.com. To exercise your rights such as right to object your personal date being processed for direct marketing purposes, please contact us via MideaDPO@midea.com. To find further information, please follow the QR Code.
natural_image
Exterior view of a modern stainless steel refrigerator with front door and side panels (no visible text or symbols)Réfrigérateur
SÉRIE PORTE FRANÇAISE

SmartHome
APERÇU DU PRODUIT 04
INSTALLATION DU PRODUIT----05
CONSIGNES D'UTILISATION 13
NETTOYAGE ET ENTRETIEN 25
DÉPANNAGE 31
CERTIFICATIONS 34
MARQUES, DROITS D'AUTEUR ET DÉCLARATION LÉGALE 35
MISE AU REBUT ET RECYCLAGE 35
AVIS DE PROTECTION DES DONNÉES 35
CARACTÉRISTIQUES
text_image
Technical diagram of a refrigerator interior with numbered components for identificationFR
INSTALLATION DU PRODUIT
natural_image
Diagram of a mechanical device with a handle and internal components, no visible text or symbolsnatural_image
Line drawing of a mechanical device with a cylindrical component inserted into a housing (no text or symbols)natural_image
Line drawing of a mechanical device with a cylindrical component inserted into a housing (no text or symbols)natural_image
Line drawing of a two-tiered electrical cabinet or enclosure unit (no text or symbols)text_image
Diagram of a digital water dispenser with numbered labels pointing to key componentsnatural_image
Illustration of a hand holding a cup inside a transparent container (no text or symbols)natural_image
Diagram of a mechanical component with a cylindrical base and a rectangular housing, showing no text or symbols.text_image
CRUSHED CUBED.OneTouch AUTOFILL WATER ICE & WATERtext_image
CRUSHED CUBED.OneTouch AUTOFILL WATER ICE & WATERtext_image
CRUSHED CUBED OneTouch AUTOFILL WATER ICE & WATERtext_image
Illustration showing a steaming cup with a warning symbol and a red X mark, likely indicating a hazard or rejection.natural_image
Illustration of a laboratory setup with a funnel and test tube, no text or symbols presenttext_image
Diagram showing a glass being heated with liquid, marked with a red X and a circle, indicating incorrect condition or error.text_image
Diagram showing a glass being heated by an alcohol lamp, with a red 'X' indicating the substance and a black circle symbolizing the experiment.natural_image
Illustration of various household items including milk bottles, a glass, and a cup with a diagonal line crossing through them (no text or symbols)natural_image
Illustration of two hands holding a rectangular object with upward arrows indicating force or movement (no text or symbols)natural_image
Simple line drawing of a mechanical component with an upward arrow, no text or symbols presentnatural_image
Line drawing of hands inserting a component into a cabinet (no text or symbols)natural_image
Line drawing of a hand inserting a device into a box (no text or symbols)natural_image
Diagram of a mechanical device with a vertical panel and directional arrow (no text or symbols)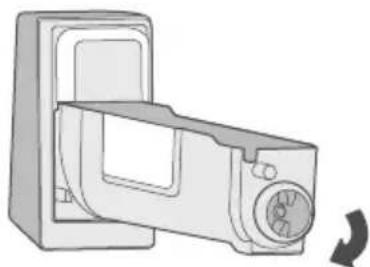
natural_image
Illustration of a microwave oven with a rotary knob and fan (no text or symbols)natural_image
Diagram showing a hand inserting a device into a container, with an inset close-up of the device (no text or symbols present)Arrêt d'utilisation
natural_image
Exterior view of a modern stainless steel refrigerator with front door and side panels (no visible text or symbols)Refrigerador
SERIE FRENCH DOOR

SmartHome
text_image
Technical diagram of a refrigerator interior with numbered components for identificationES
natural_image
Diagram of a mechanical device with a handle and internal components, no visible text or symbolsnatural_image
Line drawing of a mechanical device with a cylindrical component inserted into a housing (no text or symbols)natural_image
Line drawing of a mechanical device with a cylindrical component inserted into a housing (no text or symbols)natural_image
Line drawing of a two-tiered electrical cabinet or enclosure unit (no text or symbols)text_image
Diagram of a water dispenser with numbered parts labeled 1 to 4natural_image
Illustration of a hand holding a cup inside a water dispenser (no text or symbols)natural_image
Diagram of a mechanical press or clamping device with a cylindrical component inside a housing (no text or symbols visible)text_image
CRUSHED CUBED OneTouch AUTOFILL WATER ICE & WATERtext_image
Diagram showing a device with a blue smokestack emitting vapor, marked with a red 'X' symbol and a cross, indicating a warning or rejection.natural_image
Illustration of a laboratory setup with a funnel and test tube, no visible text or symbolstext_image
Diagram showing a glass of liquid being dropped with a crosshair and a red X symbol, indicating incorrect behavior.text_image
Illustration showing a glass of blue liquid being heated by a tray, with a red X symbol indicating no heating or rejection.natural_image
Illustration of various household items including milk bottles, a glass, and a crossed-out box (no text or symbols)natural_image
Illustration of two hands holding a rectangular object with upward arrows indicating force or movement (no text or symbols)natural_image
Simple line drawing of a mechanical component with an upward arrow, no text or symbols presentnatural_image
Line drawing of hands inserting a component into a cabinet (no text or symbols)natural_image
Line drawing of a hand inserting a device into a box (no text or symbols)natural_image
Diagram of a device with a right-handled handle and arrow indicating rotation (no text or symbols)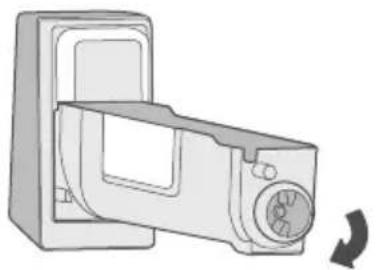
natural_image
Diagram of a microwave oven with a rotary knob and fan, showing internal structure (no text or symbols)natural_image
Diagram showing a hand inserting a device into a container, with an inset close-up of the device (no text or symbols present)make yourself at home