SHXPPTC20R - Heating SHX - Free user manual and instructions
Find the device manual for free SHXPPTC20R SHX in PDF.

| Product type | Ceramic fan heater tower |
| Brand | SHX |
| Model | SHXPPTC20R |
| Length x Depth x Height | 240 x 240 x 860 mm |
| Weight | 4 kg |
| Power supply | 220-240 V ~ 50/60 Hz |
| Maximum power | 2000 W |
| Heat levels | 3 (1000 W, 2000 W, fan only) |
| Oscillation | Yes |
| Thermostat range | 20 °C to 40 °C |
| Remote control | Yes (CR2025 battery included) |
| Timer | Up to 12 hours |
| ECO mode | Yes |
| LED light | Yes |
| Overheat protection | Yes (automatic shut-off in case of overheating) |
| Air filter | Removable filter at air intake |
| Usage | Indoor only, well-insulated rooms |
| Maintenance and cleaning | Clean with a damp cloth, do not immerse |
| Safety | Do not cover, minimum distance 1 m from flammable objects |
| Warranty | 2 years (conditions in manual) |
Frequently Asked Questions - SHXPPTC20R SHX
User questions about SHXPPTC20R SHX
0 question about this device. Answer the ones you know or ask your own.
Ask a new question about this device
Download the instructions for your Heating in PDF format for free! Find your manual SHXPPTC20R - SHX and take your electronic device back in hand. On this page are published all the documents necessary for the use of your device. SHXPPTC20R by SHX.
USER MANUAL SHXPPTC20R SHX
natural_image
Illustration of a vertical cylindrical device with textured surface and mounting base (no text or symbols)HERZLICHEN GLÜCKWUNSCH!

Current operating instructions and other languages
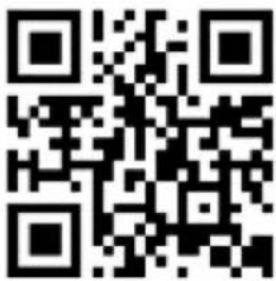
Download current user manuals in various languages via the link www.becool.at/downloads or scan the displayed QR code. Follow the instructions on the website.
DE
natural_image
Technical line drawing of a vertical cylindrical device with textured surface and side connectors (no text or symbols)
FÉLICITATIONS !
MERCI D'AVOIR CHOISI UN PRODUIT SHX.
flowchart
graph LR
    A["External cylindrical device"] --> B["Internal component with ring and nut"]
    B --> C["Internal structure with circular core and internal mesh"]
    C --> D["Internal component with outer casing and internal mesh"]
    D --> E["Final assembly with curved arrow"]
flowchart
graph TD
    A["Tube with capsule"] --> B["Oxidation"]
    B --> C["Iodine Ion"]
    D["Droplet with charge distribution"] --> E["Oxidation"]
    E --> F["Iodine Ion"]
    G["Tube with negative charge"] --> H["Oxidation"]
    H --> I["Iodine Ion"]
Télécommande
natural_image
Technical line drawing of a vertical cylindrical device with textured surface and side connectors (no text or symbols)CONGRATULAZIONI!
GRAZIE PER AVER SCELTO UN PRODOTTO SHX.

flowchart
graph TD
    A["Mouse"] --> B["Mouse Click"]
    B --> C["Mouse Release"]
    C --> D["Mouse"]

natural_image
Technical line drawing of a vertical cylindrical device with textured surface and side connectors (no text or symbols)GEFELICITEERD!
BEDANKT VOOR HET KIEZEN VAN EEN PRODUCT VAN SHX.

Afstandsbediening

natural_image
Technical line drawing of a vertical cylindrical device with textured surface and side connectors (no text or symbols)
¡ENHORABUENA!
GRACIAS POR ELEGIR UN PRODUCTO DE SHX.

flowchart
graph TD
    A["Top oval shape"] --> B["Step 1: Droplet with +"]
    B --> C["Step 2: Droplet with +"]
    C --> D["Step 3: Droplet with -"]
Mando a distancia

natural_image
Technical line drawing of a vertical cylindrical device with textured surface and side connectors (no text or symbols)GRATULUJEME!
DĚKUJEME, ŽE JSTE SI VYBRALI PRODUKT OD SPOLEČNOSTI SHX.


natural_image
Technical line drawing of a vertical cylindrical device with textured surface and side connectors (no text or symbols)GRATULUJEME!
ĐAKUJEME, ŽE STE SI VYBRALI PRODUKT OD SPOLOČNOSTI SHX.


natural_image
Technical line drawing of a vertical cylindrical device with textured surface and side connectors (no text or symbols)FELICITĂRI!
VĂ MULTUMIM CĂ AȚI ALES UN PRODUS DE LA SHX.

natural_image
Technical line drawing of a vertical cylindrical device with textured surface and side connectors (no text or symbols)GRATULACJE!
DZIĘKUJEMY ZA WYBRANIE PRODUKTU FIRMY SHX.

flowchart
graph TD
    A["Top capsule"] --> B["Arrow to I"]
    C["Cross"] --> D["Arrow to I"]
    E["Plus button"] --> F["Arrow to I"]
    G["Bottom capsule"] --> H["Arrow to I"]
natural_image
Technical line drawing of a vertical cylindrical device with textured surface and side connectors (no text or symbols)ČESTITAMO!
HVALA, KER STE IZBRALI IZDELEK PODJETJA SHX.


natural_image
Technical line drawing of a cylindrical device with textured surface and side connectors (no text or symbols)
ČESTITAMO!
HVALA VAM ŠTO STE ODABRALI SHX PROIZVOD.

daljinski upravljač

natural_image
Technical line drawing of a vertical cylindrical device with textured surface and side connectors (no text or symbols)CONGRATULATIONS!
THANK YOU FOR CHOOSING A PRODUCT FROM SHX.

This product is only suitable for well-insulated rooms or for occasional use.
EN
PLEASE READ THE OPERATING INSTRUCTIONS CAREFULLY BEFORE STARTING ASSEMBLY, INSTALLATION, OPERATION OR MAINTENANCE. PROTECT YOURSELF AND OTHERS BY FOLLOWING THE SAFETY INSTRUCTIONS. FAILURE TO FOLLOW THE INSTRUCTIONS COULD RESULT IN PERSONAL INJURY AND/OR PROPERTY DAMAGE AND/OR INVALIDATE THE WARRANTY!
Intended use
This appliance is intended exclusively for heating living spaces in households and must not be used for any other purpose.
IMPORTANT INFORMATION ON SAFETY, STANDARD AND ELECTRICAL CONNECTION
- Only use this appliance in accordance with the guidelines in the operating instructions. Any other use not recommended by the manufacturer could result in fire, electric shock or personal injury.
- This appliance is intended exclusively for heating living spaces in households and must not be used for any other purpose.
-
Remove the packaging and make sure that the appliance is not damaged. If in doubt, do not use the appliance and contact your dealer.
-
Before connecting to the mains, you must check that the type of current and mains voltage match the specifications on the appliance rating plate.
-
The electrical socket into which you connect the appliance must not be defective or loose and must be suitable for the required current load and, above all, reliably earthed.
-
Avoid using an extension cable, as this could overheat and cause a fire.
-
The appliance must not be installed directly under a wall socket. If in doubt, have your electrical installation checked by a qualified electrician.
-
It is prohibited to adapt or modify the properties of this appliance in any way whatsoever. Only use replacement parts and accessories recommended by the manufacturer (failure to do so may invalidate the warranty).
-
Do not use this heater if it shows visible signs of damage.
-
Do not operate the appliance unattended. If you leave the room, always switch off the appliance.
-
Do not use the device in small rooms where people are present who are unable to leave the room independently, unless they are constantly monitored.
-
Children must not play with the appliance. Children under the age of 3 must be kept away from the appliance unless they are constantly supervised.
-
Keep children away from the packaging material. Choking hazard if swallowed!
-
The appliance is not suitable for continuous and precision operation.
-
Do not use this heater if it has been dropped.
-
This appliance is only intended for use in dry indoor areas.
-
Do not use the appliance in the vicinity of water or high humidity, e.g. in a damp cellar, next to a swimming pool, bathtub or shower. Ensure that no water can penetrate the appliance.
-
Do not use the appliance in the direct vicinity of petrol, gas, oil, alcohol or other explosive and highly flammable liquids or gases.
-
To reduce the risk of fire, keep the air outlet of the appliance at least one metre away from all highly flammable materials such as, for example
a. pressurised vessels (e.g. spray containers)
b. Furniture
c. Textiles of any kind
-
Only use this heater on a horizontal and stable surface.
-
Never cover the appliance during operation and the cool-down phase.
-
Make sure that no objects touching the heating surface get between the appliance and the mounting wall.
-
Always switch off the appliance before disconnecting the mains plug.
-
Do not pull on the mains cable to disconnect the appliance from the mains. Always pull the plug to disconnect the mains cable.
-
Unplug the appliance when not in use, before cleaning or when maintenance is required. Cleaning and user maintenance must not be carried out by children without supervision.
-
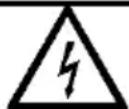
Do not touch the plug with wet hands to avoid electric shocks.
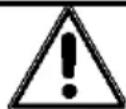
ATTENTION | RISK OF INJURYThe appliance becomes hot during operation!Never touch the appliance during operation→ this could lead to serious BURNS. |
ATTENTION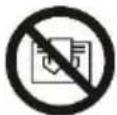 | FIRE HAZARDThe appliance must not be covered during operation! |
ATTENTION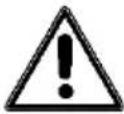 | SAFETY DISTANCEKeep a safe distance of at least one metre from easily flammable objects such as furniture, curtains, paper, etc.!LOCATIONAlways position the appliance so that the air can flow in and out unhindered.RISK OF BURNSThe appliance becomes very hot during use and can cause burns. Special care must be taken when children and vulnerable persons are present.RISK OF OVERHEATINGDo not heat rooms with a volume of less than 4m3 |
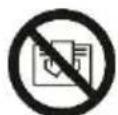
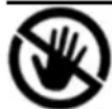
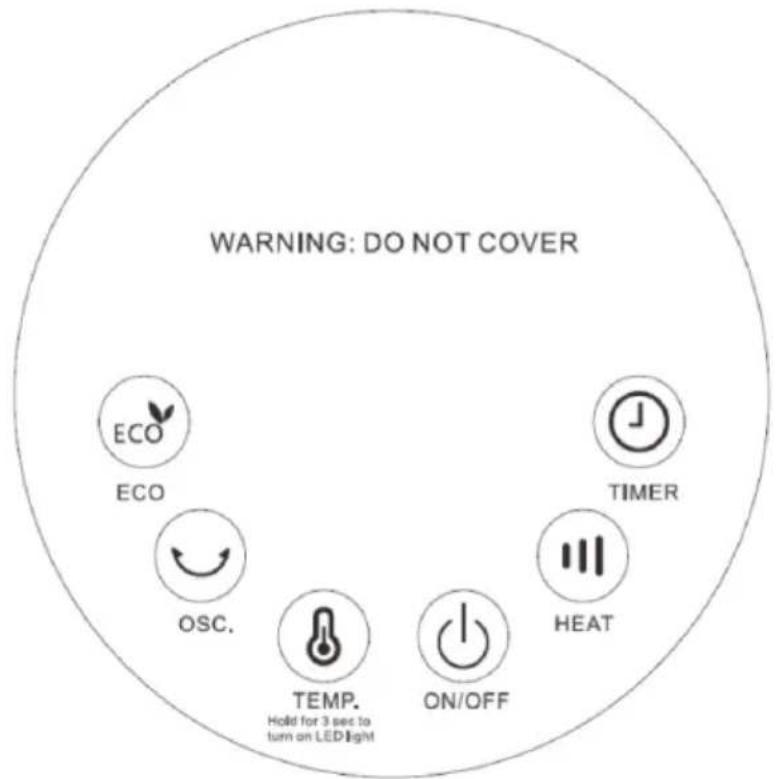
Symbols on the device
Symbol:
Significance:
Caution! Do not cover!
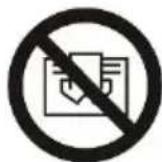
The symbol on the appliance indicates that it is not permitted to hang objects (e.g. towels, clothing, etc.) above the appliance or directly in front of it. The heater must not be covered in order to avoid overheating and the risk of fire!
Recycling, disposal, declaration of conformity
 | RECYCLINGThe packaging materials can be recycled. It is therefore recommended to dispose of them in sorted waste |
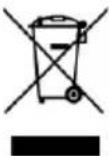 | DISPOSALThe "crossed-out wheelie bin" symbol requires the separate disposal of waste electrical and electronic equipment (WEEE). Electrical and electronic equipment may contain hazardous and environmentally harmful substances. Therefore, do not dispose of them in unsorted residual waste, but at a designated collection point for waste electrical and electronic equipment. This will help to protect resources and the environment. For further information, please contact your dealer or the local authorities. Directive 2012/19/EU |
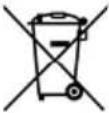 | BATTERY DISPOSALIn accordance with Legislative Decree 188 of 20 November 2008 implementing Directive 2006/66/EC on batteries, accumulators and related waste, the crossed-out wheeled bin symbol on the battery indicates that it is forbidden to dispose of used batteries in household waste.batteries and accumulators contain highly polluting substances. The user is obliged to dispose of used batteries at the collection points in the municipality or in the appropriate containers. The service is free of charge. In this way, the legal requirements are complied with and the environment is protected.These symbols can be found on batteries:Li = battery contains lithiumAl = battery contains alkaliMn = battery contains manganeseCR 2025 (Li); AA (Al, Mn); AAA (Al, Mn) |
 | DECLARATION OF CONFORMITYWe hereby confirm that this product complies with the essential requirements, regulations and directives of the EU. You can view the detailed declaration of conformity at any time under the following link:https://www.schuss-home.at/downloads |
Errors and technical changes excepted.
Scope of delivery
The scope of delivery includes:
• 1x tower fan heater
- 1x stand
- 1x remote control
• 1x operating instructions
Description of the device

1) Control panel
2) Air outlet
3) Ceramic heating element
4) LED lighting
5) Housing
6) Air outlet with air filter
7) Stand
Commissioning acceptance
Assembly and installation
- Remove the fan heater and all accessories from the packaging and remove all packaging materials.
- Check the appliance for possible damage.
- Unwind the mains cable and also check it for damage.

- Loosen the plastic screw from below as shown in (Fig. 1).
- Connect the two base parts together as shown in (Fig. 2).
- Then secure the base with the plastic screw as shown in (Fig. 3).
- Place the fan heater on a stable, level and heat-resistant surface so that it cannot tip over.
- Now plug the mains plug into a suitable socket.
ATTENTION
Please follow the instructions for setting up the appliance in the safety instructions very carefully.
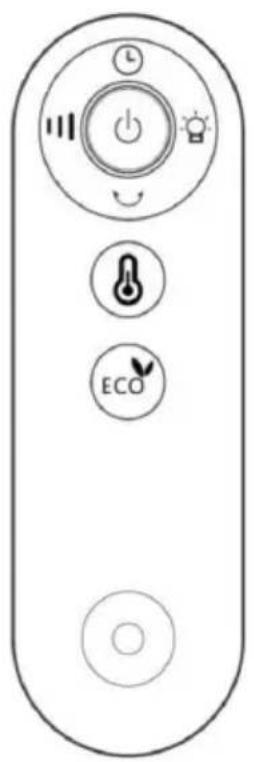
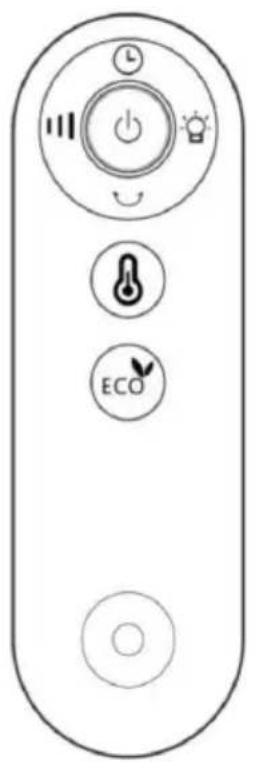
Description of the control panel and remote control
The functions of the fan heater can be set using the remote control or directly on the appliance using the buttons on the control panel.
When using the remote control, point it directly at the sensor on the housing to ensure proper function.
Prepare remote control
Please note the following instructions:
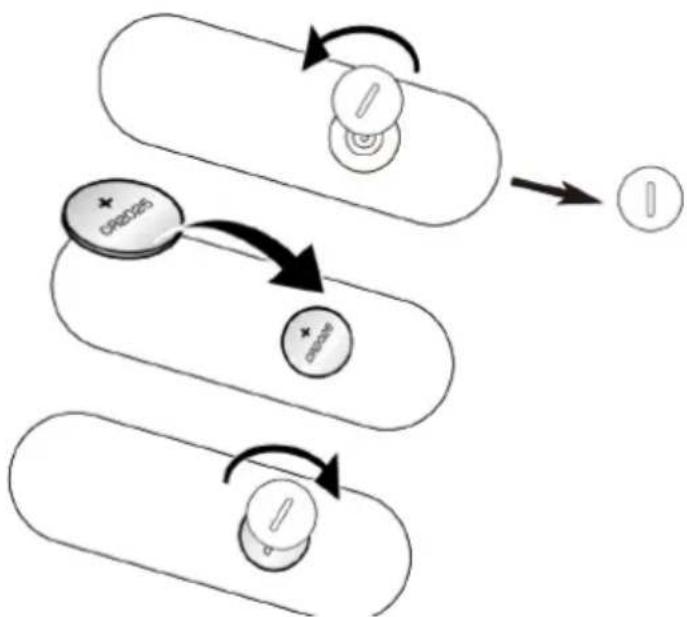
- To operate the remote control, please remove the plastic cover from the battery compartment.
- To change the battery, proceed as follows: Turn the battery holder on the back anti-clockwise, remove the old battery and then insert a new one:
flowchart
graph TD
    A["Top Left Rectangle"] --> B["Top Right Circle"]
    B --> C["Bottom Right Rectangle"]
    C --> D["Bottom Left Rectangle"]
    D --> E["Bottom Right Rectangle"]
    E --> F["Bottom Left Rectangle"]
    F --> G["Bottom Right Rectangle"]
    G --> H["Bottom Right Arrow"]
    H --> I["Bottom Left Arrow"]
    I --> J["Bottom Right Arrow"]
    J --> K["Bottom Left Arrow"]
- Please always pay attention to the polarity markings (+/-) on the battery and the battery holder:
- Then reinsert the battery holder fully into the remote control and turn the battery holder clockwise to close it
Functions:
Control panel
Remote control

The appliance emits a signal tone when the mains plug is plugged into the socket to indicate that it is ready for operation.
ON/OFF button : Press this button to start the fan heater in 'Low' mode. The room temperature is displayed on the digital screen. Press the button again to switch the fan heater off.
Heating button : Pressing this button activates the fan heater and cycles through the modes 'Low', 'High' and then 'Wind' mode with each subsequent press. The three modes change one after the other.
Timer button : Pressing this button activates the digital display and shows '0H'. Each further press increases the timer by 1 hour, up to a maximum of 12 hours (press thirteen times). The 14th press cancels the timer setting. For example, a timer setting of 5 hours first displays a flashing '5' for
three seconds before the countdown begins. Press the timer button again to return to the timer display.
Swivel button : Pressing this button activates the swivelling function of the fan heater. Press again to stop the swivelling movement.
Temperature button : The default temperature is 23^ C. Each press of the button increases the temperature by 1^ C and changes from 20^ C to 40^ C and back to 20^ C. The digital screen flashes for 5 seconds to indicate the new setting. After setting, the display returns to the room temperature.
LED light Press and hold the button on the control panel for 3
seconds or the button on the remote control to switch the LED light on.
Press and hold the button again for 3 seconds or the button on the remote control to switch it off.
ECO mode : Press this button to activate ECO mode, which is indicated by the LED lighting up. The heating stops when the room temperature exceeds 22°C and is reactivated in 'Low' mode when the temperature drops to 22°C or to 18°C in 'High' mode.
Automatic screen switch-off
The digital screen switches off automatically after 3 minutes of inactivity and is reactivated by pressing any button.
Note: The fan in the fan heater runs for a further 30 seconds to cool the product down after switching off (pressing the 'OFF' button).
Please note:
- If the set temperature is equal to or lower than the room temperature, the appliance automatically stops heating.
- If the set temperature is higher than the room temperature, the appliance will heat again.
Protective devices
The fan heater is equipped with a safety device that protects the appliance and eliminates the risk of fire.
Please note that the mechanisms are not an auto-stop or other comfort function. Always switch off the appliance, pull out the mains plug and wait until the fan heater has cooled down before moving, cleaning or storing the appliance.
Overheating protection
If there is any risk of overheating (e.g. the appliance is covered, mains overload, etc.), the indicator lamp lights up and the built-in overheating protection switches the appliance off.
As soon as the appliance cools down, it switches on again automatically and continues to run as before.
ATTENTION
One common cause of overheating is dust deposits or fluff in the appliance. You should therefore clean the appliance regularly and remove these deposits using a hoover.
Cleaning instructions
Before cleaning the appliance, switch off the fan heater, disconnect the mains plug and then wait until the appliance has cooled down completely.
Cleaning
Clean the appliance with a soft, moderately damp cloth and then wipe it with a dry cloth.
ATTENTION
- The fan heater must not be immersed in or come into contact with water or other liquids.
- Never use petrol, alcohol or solvents to clean the appliance - this could be dangerous.
- Do not spray insecticides or similar products on the fan heater.
- Do not use in damp rooms.
• DO NOT COVER - FIRE HAZARD!
Activities at the beginning/end of the season
Activities at the end of the season
- Switch off the appliance and disconnect the mains plug.
- Pack the device and store it in a cool, dry place.
Activities at the start of the season
- Check that the power supply cable is in order and that the earthing is functional.
- Follow the installation and safety instructions carefully.
TECHNICAL INFORMATION
| Technical information | |
| Item number | SHXPPTC20R |
| Input voltage | 220-240V~ |
| Frequency | 50-60Hz |
| Max. power | 2.000 W |
| Heating levels | 0 - 15 - 1000W - 2000W |
| Oscillating | Yes |
| Thermostat | 20-40°C |
| Remote control | CR2025 3V |
| Weight | 4 kg |
| Dimensions | 240 x 240 x 860 mm |
| Contact addresses for further information and service line: | Schuss Home Electronic GmbHScheringgasse 3, A-1140 ViennaService line: +43 (1) 97 0 21www.schuss-home.atFB-No.: 236974 t / FB-Court: Vienna |
Required information on electric individual room heaters
| Item number SHXPPTC20R | ||||||
| Specification | Symbol | Value | Unit | Specification | Unit | |
| Heat output | Only for electric storage single-room heaters: Type of heat supply control | |||||
| Nominal heat output | P_nom | 2,0 | kW | Manual control of the heat supply with integrated thermostat | No | |
| Minimum heat output (guide value) | P_min | 1,0 | kW | Manual control of the heat supply with feedback of the room and/or outside temperature | No | |
| Maximum continuous heat output | P_max,c | 2,0 | kW | Electronic control of the heat supply with feedback of the room and/or outside temperature | No | |
| Auxiliary power consumption | Heat output with fan support | No | ||||
| With Nominal heat output | el_max | N/A | kW | Type of heat output/room temperature control | ||
| With Minimum heat output | el_min | N/A | kW | Single-stage heat output, no room temperature control | No | |
| In the Ready state | el_sB | 0,00068 | kW | Two or more manually adjustable levels, no room temperature control | No | |
| Room temperature control with mechanical thermostat | No | |||||
| With electronic room temperature control | Yes | |||||
| Electronic room temperature control and time-of-day control | No | |||||
| Electronic room temperature control and weekday control | No | |||||
| Other control options | ||||||
| Room temperature control with presence detection | No | |||||
| Room temperature control with open window detection | No | |||||
| With remote control option (WiFi) | No | |||||
| With adaptive control of the heating start | No | |||||
| With operating time limit | Yes | |||||
| With black ball sensor | No | |||||
| Contact details: | Schuss Home Electronic GmbH Scheringgasse 3 - 1140 Vienna - Austria https://www.schuss-home.at/ | |||||
WARRANTY
With this quality product from SHX, you have made a decision in favour of innovation, durability and reliability. This SHX device is guaranteed for 2 years from the date of purchase in Austria and Germany!
If, contrary to expectations, service work on your device should nevertheless be necessary during this period, we hereby guarantee you a free repair (spare parts and labour) or (at Schuss's discretion) replacement of the product. If neither repair nor replacement is possible for economic reasons, we reserve the right to issue a time value credit note.
In any case, please contact the customer hotline as a first step (see instructions for use - "Contact addresses for further information and service line").
Please note that any repair work carried out by unauthorised workshops will immediately invalidate this warranty.
This guarantee does not cover
- Damage due to non-compliance with the operating instructions
- Repair or replacement of parts due to normal wear and tear
• Devices that are used - even partially - for commercial purposes
• Devices mechanically damaged by external influences (fall, impact, breakage, improper use, etc.) as well as signs of aesthetic wear and tear
• Devices that have been handled improperly
• Devices that have not been opened by our authorised service workshop
• Unfulfilled consumer expectations - Damage caused by force majeure, water, lightning, overvoltage
- Devices for which the type designation and/or serial number on the device has been changed, deleted, made illegible or removed
• Defects due to extraordinary soiling - services outside our authorised workshops, the transport costs to an authorised workshop or to us and back and the associated risks
We would like to emphasise that within the warranty period, a lump sum of € 60 (indexed based on CPI 2015, June 2020) will be charged in the event of operating errors or if no error is detected.
The provision of a warranty service (repair or replacement of the device) does not extend the absolute< warranty period of 2 years from the date of purchase.
The 2-year guarantee is only valid on presentation of the proof of purchase (must include the name and address of the dealer as well as the complete appliance designation) and the corresponding guarantee certificate, on which the appliance type and the serial number (visible on the box and on the back or bottom of the appliance) must be noted! Without the warranty certificate, only the statutory warranty applies!
We expressly point out that the statutory warranty rights are not affected by this guarantee and remain unaffected.
Schuss Home Electronic GmbH and its vicarious agents are only liable for damages in the event of gross negligence or wilful intent. Liability for loss of profit, expected but unrealised savings, consequential damage and damage arising from third-party claims is excluded.
You can find the contact address of the relevant service centre on our homepage www.schuss-home.at. Congratulations on your choice. We hope you enjoy using your SHX device!
ADDRESS
SHX Distribution
Schuss Home Electronic GmbH
A-1140 Vienna, Scheringgasse 3
Tel.: +43 (0)1/ 970 21
Type designation:
Serial number:......