DR 55 - Radio ALBRECHT - Free user manual and instructions
Find the device manual for free DR 55 ALBRECHT in PDF.


User questions about DR 55 ALBRECHT
0 question about this device. Answer the ones you know or ask your own.
Ask a new question about this device
Download the instructions for your Radio in PDF format for free! Find your manual DR 55 - ALBRECHT and take your electronic device back in hand. On this page are published all the documents necessary for the use of your device. DR 55 by ALBRECHT.
USER MANUAL DR 55 ALBRECHT
text_image
1 2 3 4 5 RTHK2 RTHK 2 - Best DJ and music 24 hours service. Micro SD TX DUB Radio Break news 6 7 8natural_image
Product assembly diagram showing a device with ear, connector, and clamped parts (no text or symbols)text_image
Diagram showing navigation path from a car's front panel to the rear, with a map device and directional arrows indicating navigation.natural_image
Simple line drawing of a trash bin with crossed x- and y-axes, no text or symbols present.- Scope of delivery ..... 19
- First use....19
- Controls and connections....20
- Installation 21
4.1. Mounting the bracket....21
4.2. Installing the DAB+ antenna 22
- Connecting the DR 55 to the car radio .....23
5.1. Setting the FM transmitter frequency 23
5.2. Connecting to the car radio via audio cable 23
- DAB+ station scan....24
- Favorites (station memory)....24
7.1. Saving favorites....24
7.2. Recalling favorites......24
- Main functions .....25
8.1. Volume 25
8.2. FM transmitter 25
8.3. Station following / Service Following (SF)......25
8.4. Display illumination 25
8.5. Language 25
8.6. Reset to factory settings 25
8.7. Software version 25
- Bluetooth mode .....26
9.1. Switch on Bluetooth mode 26
9.2. Pairing the phone 26
9.3. Telephone calls 26
9.4. Music playback from the phone 27
- SD player....27
- Specifications....28
- Troubleshooting....29
- Safety instructions....29
- Warranty and information on recycling 30
- CE declaration of conformity ....31
- EEAG and Recycling 31
- Service address....32
1. Scope of delivery
- Adhesive and ventilation slot bracket with mounting plate
- Active windscreen antenna with MCX connector
- 12 V - 24 V USB power adapter
- DR 55 main unit
An optional suction cup mount is available under article no. 27354 on www.albrecht-midland.de.
Note: Please do not use a power supplies from other manufacturers, as this may result in poor reception.
2. First use
- Attach the desired mounting to the DR 55 car radio adapter and your vehicle.
- Connect one end of the USB power cable to the USB power supply adapter. Plug the USB power supply into the cigarette lighter socket of your car.
- Connect the supplied antenna to the antenna input of the DR 55.
- Install the antenna (see page 22).
- Switch on the ignition, the Albrecht logo appears on the display. The device automatically searches for all receivable DAB+ stations and stores them in the device's station list until another DAB station search is performed. During the station scan, a bar indicates the progress of the scan.
- If the station scan is not performed automatically, press and hold the SCAN button.
- You can tune to the desired station by turning the rotary knob.
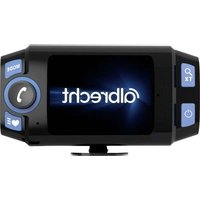
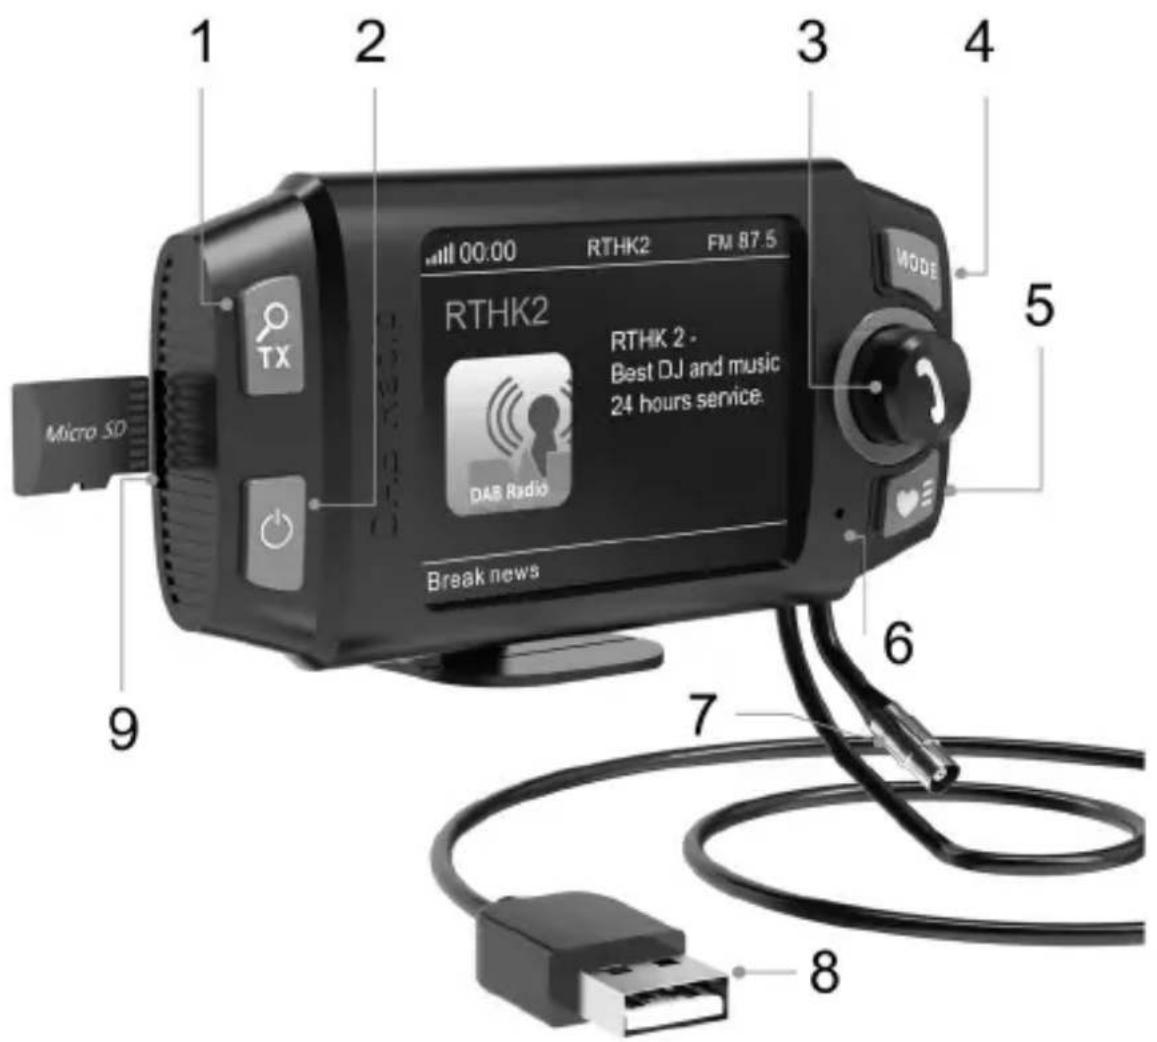
3. Controls and connections
text_image
1 2 3 4 5 RTHK2 RTHK 2 - Best DJ and music 24 hours service. Break news TX DAS Radio Micro SD 6 7 8| Label Function | ||
| 1 |  | Setting the FM transmission frequencyPress and hold to perform a DAB+ scan |
| 2 |  | Switch on/off |
| 3 |  | Turn to navigate in the menuPress to confirm the selectionPress to answer a phone call |
| 4 | MODE | Press to change the operating modePress and hold to call up the menu |
| 5 |  | Press to open the favourites listPress and hold to save a favourite |
| 6 | Mic Built-in microphone for hands-free function | |
| 7 | Antenna MCX socket for the DAB+ antenna | |
| 8 | USB USB plug for power supply | |
| 9 | Micro SD SD player slot for micro SD card | |
4. Installation
4.1. Mounting the bracket
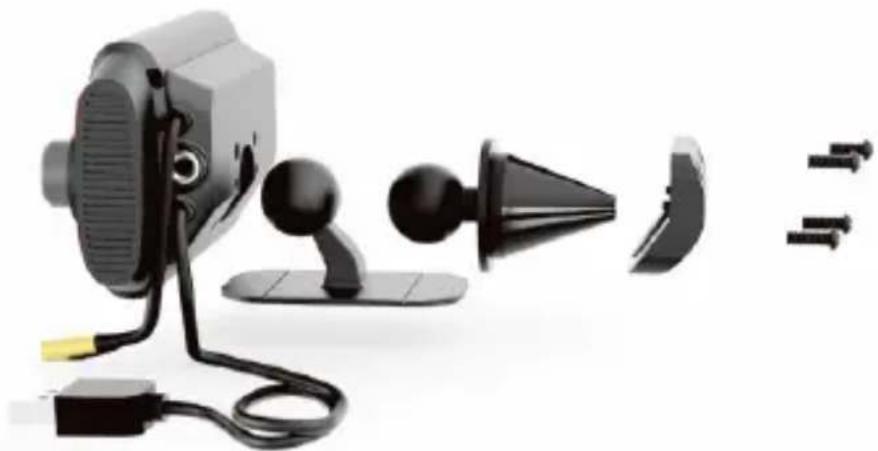
The DR 55 is supplied with an adhesive mount for attaching to the dashboard and a mount for ventilation slots.
First attach the desired bracket to the DR 55 by inserting the ball head and securing it with the mounting plate and the four screws.
Then insert the bracket into the ventilation slots of your vehicle or stick it to a suitable surface.
natural_image
Product assembly diagram showing a camera with attached earbuds and a conical connector, alongside a mechanical component with force arrows (no text or symbols)4.2. Installing the DAB+ antenna
text_image
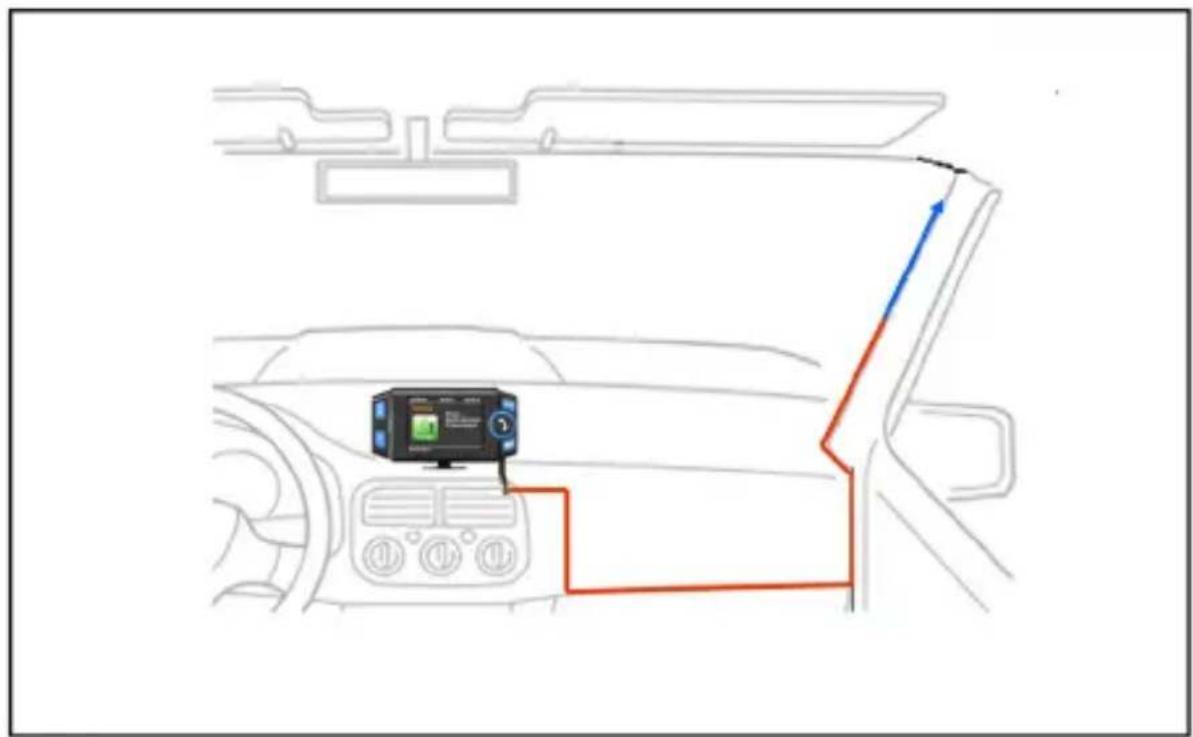
Diagram showing navigation path from a vehicle's front panel to the rear, with a GPS device and directional arrow indicating navigation.- Use a damp cloth to clean the windscreen.
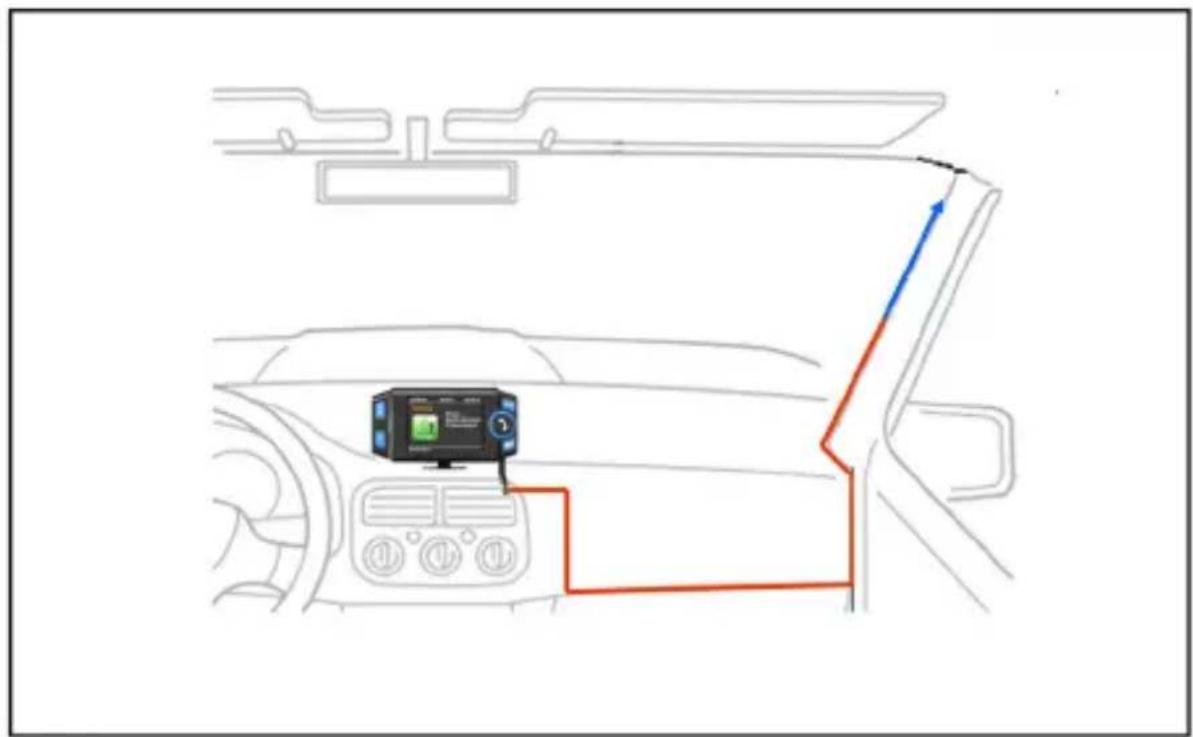
- The black L-shaped copper foil is the earth contact of the antenna and must be glued directly to the bodywork in the A-pillar (under the panelling). Caution: If your vehicle has side airbags in the A-pillar, have the installation carried out by a specialist workshop!
- Remove the protective adhesive film from the antenna amplifier and the foil antenna.
- Now stick on the foil antenna and the amplifier. Remove any air bubbles by gently pressing them out towards the edge.
- The antenna should be mounted vertically and not horizontally.
-
Lay the antenna cable along the A-pillar to the point where the DR 55 is to be mounted.
-
Do not mount the DAB antenna above heating wires, in a place where the driver's view is impaired or in a place where interference can occur due to metal vapour (sun protection) on the windscreen. This could have a detrimental effect on reception.
5. Connecting the DR 55 to the car radio
You can transmit the audio signal to your car radio either via the FM transmitter or alternatively with a 3.5 mm audio cable via the Aux output.
5.1. Setting the FM transmitter frequency
- Press the TX button and then turn the rotary knob until you have found a desired, free frequency.
- The transmission frequency is shown at the top right of the display.
- Turn your car radio to the same FM frequency to receive the signal from DR 55
Please note: "Free frequency" means that no FM station and no interference signals are transmitted on the selected frequency.
5.2. Connecting to the car radio via audio cable
- Plug a 3.5 mm jack cable into the AUX OUT socket of the DR 55 and into the Line In socket of your car radio.
6. DAB+ station scan
If you want to update the list of DAB+ radio stations, you can start the automatic station search by pressing and holding the 🔒 button.
Note: In normal use, you do not need to perform the DAB scan every time you use the DAB+ radio. Perform a new scan if you want to use the adapter in a different broadcasting area or if there are new stations.
7. Favorites (station memory)
7.1. Saving favorites
A total of 40 memory locations are available:
Select a DAB+ station. Press and hold the button and turn the rotary knob to select the desired memory location where you want to save the current station. Confirm your selection by pressing the rotary knob.
You can overwrite a memory location with a new station at any time.
7.2. Recalling favorites
In DAB mode, press the button to display the list of favourites. Select the desired favourite and confirm your selection by turning and pressing the rotary knob.
8. Main functions
Press and hold the MODE button for 2 seconds to access the main menu. Use the rotary knob to move through the menu and confirm your selection by pressing the rotary knob. If you want to return to a previous menu, press the MODE button briefly.
8.1. Volume
Select the volume at which the DR 55 transmits audio to your vehicle.
8.2. FM transmitter
Here you can switch off the FM transmitter if you want to use an AUX cable instead.
8.3. Station following / Service Following (SF)
The station following function automatically changes the reception frequency when a station leaves the reception area. The new station is determined by the previous station and cannot be influenced. Not all transmitters support this function.
8.4. Display illumination
Select whether and after what time the display switches off.
8.5. Language
Select the language for the user interface.
8.6. Reset to factory settings
Reset the device to factory settings here. In the event of errors or unusual behaviour, always reset the device first before contacting our service department.
Please note that all channel memories, settings and configurations will be lost when resetting to factory settings.
8.7. Software version
Here you can see the current software version of the device. Please include this with all service requests.
9. Bluetooth mode
To connect a telephone to the DR 55 via Bluetooth, both devices must be paired with each other. This process only needs to be carried out for the first connection. As soon as both devices are paired with each other, they will automatically reconnect whenever they are within range.
9.1. Switch on Bluetooth mode
Press the MODE button and select ‘Bluetooth’ using the rotary knob.
9.2. Pairing the phone
- Activate Bluetooth mode in the DR 55.
- Make sure that no phone is connected. The 'Disconnected' indicator flashes on the display.
- Switch on Bluetooth on your smartphone and search for Bluetooth devices.
- Select Albrecht DR 55 from the list.
- As soon as the connection is established, the 'Disconnected' indicator disappears from the display.
9.3. Telephone calls
For incoming telephone calls, a ring tone sounds and the caller's number is shown on the display.
- Accepting a call: Press the rotary knob while the phone is ringing
• End the call: Press the rotary knob during the call - Call the last number dialled: Press the rotary knob (no music playback active)
During the call, the call time is shown on the display.
9.4. Music playback from the phone
Smartphones connected to the device can play music via the DR 55. (Please read the manual for your smartphone for more information).
Press the rotary knob to play or pause the music playback. Turn the rotary knob to select the next or previous track.
10. SD player
Insert a micro SD card (max. 32 GB), with the contacts facing forwards, into the SD player card slot on the left-hand side of the DR 55.
Call up the SD player with the MODE button.
Press the rotary knob to play or pause the music playback.
11. Specifications
| 1 | Model: DR 55 |
| 2 | Supported radio format: DAB+, FM transmitter and DAB to DAB alternative frequency |
| 3 | DAB+ frequency: Band III (174.00 – 240.00 MHz) |
| 4 | FM transmission frequency: 87.5-108.0 MHz |
| 5 | Bluetooth: Version 5.0 |
| 6 | TX power BT / FM: < 20 dBm / < -42 dBm |
| 7 | Audio output: 3.5mm stereo socket |
| 8 | Antenna: MCX connector |
| 9 | USB power supply input voltage range: (12 V - 24 V) |
| 10 | Micro SD card: max. capacity 32 GB |
| 11 | Dimensions (WxHxD): 100 x 51 x 31 mm |
| 12 | Net weight: approx. 70g |
12. Troubleshooting
Poor DAB reception on some roads, part 1.
Since the DAB network has not yet been fully developed, this can lead to poor reception, especially in rural areas that have not yet been fully developed. Therefore, test the DR 55 adapter in a better-developed area before sending the device for repair due to poor reception.
Problem: Poor DAB reception, part 2.
Commercially available USB adapters without interference suppression are suitable for many purposes, but not for strong DAB receivers. Therefore, for the best possible reception, you should use the USB cable and the USB power supply supplied in the product contents and specifically designed for the DR 55 adapter.
Problem: Poor DAB reception, part 3.
Please check if the supplied DAB antenna has been installed exactly as described in the assembly instructions. Also check if the antenna is properly grounded. Other electronic devices that have no interference suppression (such as low-cost dashcams) can cause interference in the DAB reception, especially inside the vehicle.
13. Safety instructions
- Clean the device only with a dry cloth.
- Do not block any ventilation openings.
- Use only the accessories supplied by the manufacturer.
- Do not expose this radio to rain or moisture.
- Do not expose the radio to excessive heat.
14. Warranty and information on recycling
We are legally obligated to enclose for each device information on disposal and warranty, as well as an EU declaration of conformity with the instructions for use in different countries. You will find this information on the following pages.
2-year warranty from the date of purchase
The manufacturer/dealer provides a two-year warranty from the date of purchase for this product. This warranty covers all failures due to defective components or faulty functions within the warranty period, except for wear and tear such as empty batteries, scratches on the display, defective housing, defective antenna and defects due to external influences such as corrosion, overvoltage due to improper external power supply or the use of unsuitable accessories. Defects caused by improper use are also excluded from the warranty.
In the event of a warranty claim, please contact your dealer. The dealer will repair or replace the device or pass it on to an authorised service centre.
You can also contact our service partner directly. Please enclose your proof of purchase with the device and describe the malfunction as accurately as possible.
15. CE declaration of conformity
Standards and directives

text_image
C€Alan Electronics GmbH hereby declares that the radio device model DR 55 is in accordance with Regulation 2014/53/EU. The full text of the EU declaration of conformity can be found at the following Internet address:
http://service.alan-electronics.de/CE-Papiere/
16. EEAG and Recycling
natural_image
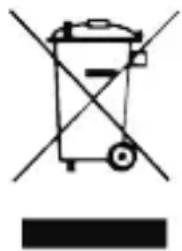
Simple line drawing of a trash bin with crossed lines indicating no waste or restriction (no text or symbols)European laws prohibit the disposal of old or defective electrical or electronic equipment via household waste. To dispose of the device, return it to a collection point in your municipality for recycling. This system is financed by the industry and ensures environmentally friendly disposal and recycling of valuable raw materials.
17. Service address
Technical hotline (for devices sold in Germany)
Call our service hotline +49 (0) 6103/9481 - 66 (normal rates on the German landline network) or send us an e-mail:
service@albrecht-midland.de
Please refer to Chapter 12, "Troubleshooting", before sending back the device.
There you will find some tips and tests. Alternatively, please contact our hotline.
Printing errors may occur.
The information in this manual is subject to change without notice.
albrecht
DR 55
text_image
1 2 3 4 5 RTHK2 RTHK 2- Best DJ and music 24 hours service. Break news TX DAB Radio Micro SD 6 7 84.1. Monter le support
natural_image
Product assembly diagram showing a device with connectors and a blade, alongside a separate view of a mechanical component (no text or symbols)4.2. Installation de l'antenne DAB+