Realimove MC3X - Action camera AGFAPHOTO - Free user manual and instructions
Find the device manual for free Realimove MC3X AGFAPHOTO in PDF.

| Product type | Sports camera |
| Brand | AgfaPhoto |
| Model | Realimove MC3X |
| Sensor | SONY 1/2.5" 8 MP CMOS |
| Maximum photo resolution | 20 megapixels (20M) |
| Maximum video resolution | 4K at 30 frames per second |
| Field of view | 120 degrees |
| Aperture | F/2.2 |
| Focal length | 3.0 mm |
| Compatible memory card | micro SDHC / micro SDXC (UHS-III), up to 512 GB |
| Battery | 1450 mAh, 7.6 V |
| Power supply | 5 V / 2 A (standard charger) |
| Charging time | Approximately 2.5 hours |
| Connections | USB 2.0, HDMI, WiFi 2.4 GHz (IEEE 802.11b/g/n) |
| Display | Yes (unspecified) |
| Tripod thread | 1/4 inch |
| Video formats | MP4 (H.264) |
| Photo formats | JPEG |
| Special features | Slow motion, time-lapse, loop recording, self-timer, burst, long exposure, WDR, LDC |
| Night vision | Infrared (IR) |
| Mobile app | OD Cam (Android 5.0+ / iOS 9.0+) |
| Operating temperature | 0 to 40 °C |
| Storage temperature | -20 to 60 °C |
| Compatible operating systems | Windows XP to 11, Mac OS X 10.5+, Android 5.0+, iOS 9.0+ |
Frequently Asked Questions - Realimove MC3X AGFAPHOTO
User questions about Realimove MC3X AGFAPHOTO
0 question about this device. Answer the ones you know or ask your own.
Ask a new question about this device
Download the instructions for your Action camera in PDF format for free! Find your manual Realimove MC3X - AGFAPHOTO and take your electronic device back in hand. On this page are published all the documents necessary for the use of your device. Realimove MC3X by AGFAPHOTO.
USER MANUAL Realimove MC3X AGFAPHOTO
natural_image
Digital camera module displaying a city street scene with pedestrians and vehicles, against a solid red background (no text or symbols visible)Mini Gimbal Camera
Realimove MC3X
User manual
Please carefully read the instruction manual before using this product. It contains important information, so keep it safe for future reference.
- Do not use the product in case it has any damage, or unusual conditions like smoke, abnormal sound, peculiar smell.
• To prevent shock, do not open the casing. There are no user serviceable parts inside. Servicing must be performed by a qualified technician.
- Avoid exposing the product to extreme temperatures, humidity, or strong vibrations. This can cause sensor damage, as well as malfunctioning of internal circuitry. There is also a risk of fire or electric shock.
- Do not use corrosive chemicals or solvents for cleaning.
- Do not disassemble, repair, or modify the product without authorization.
- Avoid long operation during charging.
- Keep magnetic objects away to prevent faults and data loss.
- Prevent dust or dirt from entering the slots and USB port.
- Keep out of reach of children to avoid suffocation hazards.
- Charge within 10°C to 35°C to avoid longer charging times or malfunctions.
- Do not heat, pull, or bend the USB cable to prevent fire or electric shock.
- Use a standard 5V/2A charger for recharging.
- Do not place the camera in confined spaces, like the carrying case, while it is charging.
- If the red indicator is off and charging doesn't work, check the USB connection, charger standards, or replace the battery.
- Do not place the space extrusion when the camera is charged, such as the camera's optional storage bag.
Memory Card:
- Compatible with micro SDXC and micro SDHC cards.
• Maximum capacity: 512GB [U3].
• Writing speed: 90MB/s.
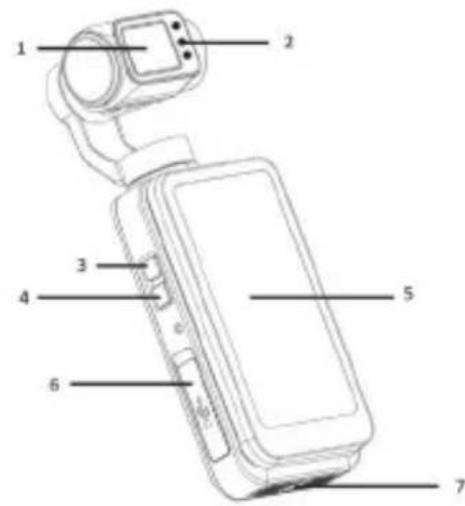
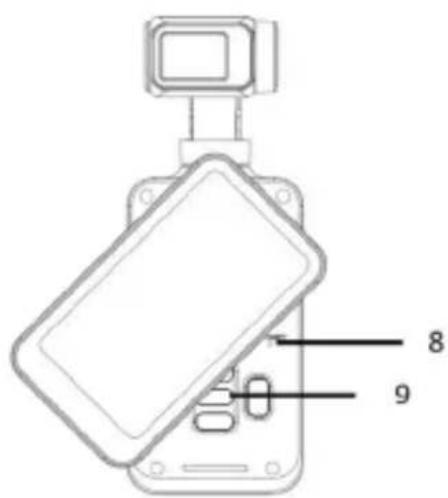
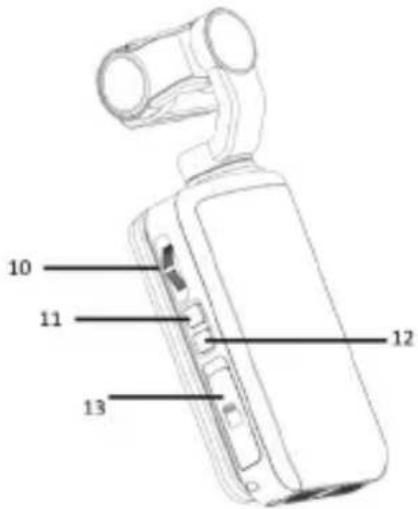
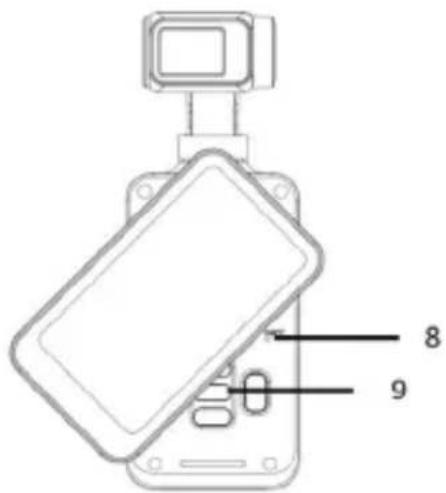
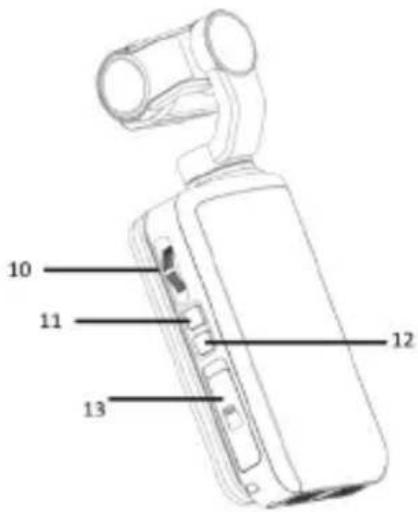
BUTTONS AND OPERATION OVERVIEW
1 Camera lens
2 IR lights
3 IR light button (Night vision)
4 AEL button (auto exposure lock)
5 Screen
6 USB port / External Microphone port
7 1/4 Tripod Socket
8 RST hole (Reset)
9 OK button [double click to rotate the lens 180°] / Four-way buttons
10 Wheel
11 Photo/Video button
12 Power/Mode button
13 HDMI interface / Memory card slot
Inserting/Removing a Memory Card
① Confirm the camera is switched off.
② Open the memory card slot and insert the card in the right direction until you hear a click sound.
To remove it, gently press the memory card edge to automatically eject and remove it.
When using a memory card on the camera for the first time, please format it directly on the camera.
Note: When formatting, all the files stored in the memory card will be deleted.
A U3 256GB memory card is recommended, and any memory card below U3 may not function properly.
EN
START USING
When the camera is on, press the power button once to show the different recording modes.
- Mode Menu
 | Standard Video | Records and saves videos in a HD/ SD format. |
 | Slow Motion | Records videos in a slow-motion rate format. |
 | Loop Recording | Records videos in segments and overwrites the oldest files when the memory card is full. |
 | Time-Lapse Video | Time-lapse mode speeds up long recordings into a short video. |
— | Standard Photo | Takes standard photos |
 | Self Timer | Delays the shutter, allowing time to join the shot. Perfect for group photos or selfies. |
 | Photo Burst | Burst mode quickly takes several photos in a row to capture fast action. |
 | Time-Lapse Photo | Takes photos at set intervals. |
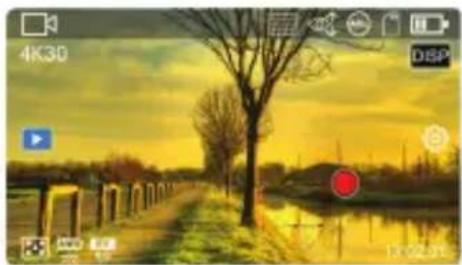
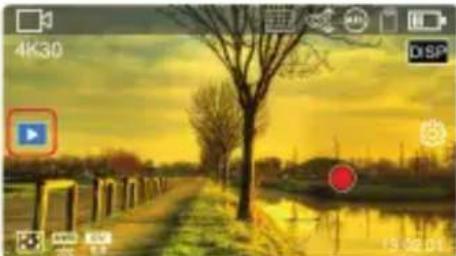
• Video Recording Operation
Press the [Video/Photo
Button [O] or click
[Screen Shooting]
to record video.

natural_image
Sunset over a rural path with bare trees and a red circular marker (no text or symbols)You can use the following buttons during the video process:
 | IR button | When the light environment is not visible, it can be auxiliary shooting after turning on. |
 | AEL button turn on/off the exposure lock. | |
 | Direction button | Zoom in/Zoom out. |
 | DISP button Screen display switching. | |
 | Power/Mode button | Recording pause. |
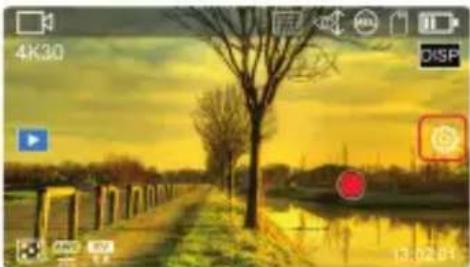
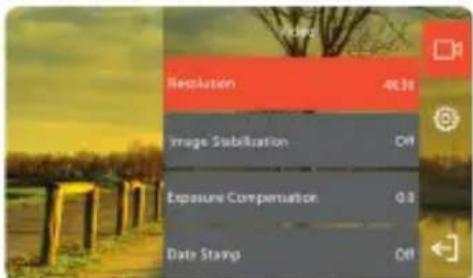
• Photo and Video settings
natural_image
Sunset over a rural path with bare trees and a lake, captured via camera interface (no text or symbols on the scene itself)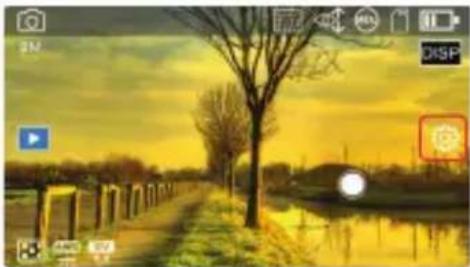
natural_image
Sunset over a rural path with bare trees and a lake, captured via camera interface (no text or symbols on the scene itself)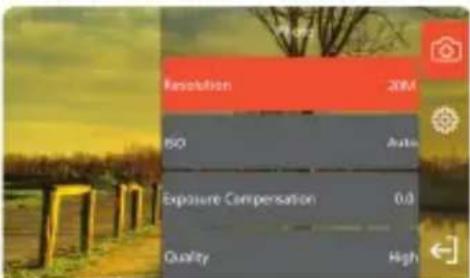
Tap once anywhere on the screen to show additional icons, then tap the [💡] icon on the right to display the mode settings, click [◀] to exit the settings.
EN
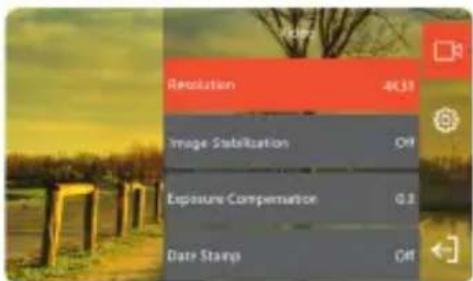
• Video mode settings
| Resolution | Select the resolution of the video. |
| Resolution And Rate | When using the slow-motion mode, select the resolution of the video and the multiple of the slow movement. |
| Video File Length | When using a Loop Record mode, select the length of the video for a period of time. |
| Interval | When using a Time-Lapse Video mode, select the time interval between each frame of the video. |
| Exposure Compensation | Adjust the exposure of the screen. |
| Pre-Record | Turn on/off 5 seconds pre-recording. |
| Metering | Select the method of metering. |
| White Balance | Select the method of White Balance. |
| WDR | Turn on/off Wide Dynamic Range. |
| LDC | Turn on/off Lens Distortion Correction |
Note: In low-light environments the (Exposure Compensation) function will not work.
Slow Motion and Time-Lapse Video mode recording process do not support video pausing.
- Photo mode settings
| Resolution | Select the resolution of the photo. |
| Self Timer | Select waiting time when selfie. |
| Photo Burst | Select the number of photos taken continuously. |
| Interval | Select the interval between each photo during the continuous shooting. |
| Duration | Select the duration of continuous shooting. |
| Photo Ratio | Set the proportion of photos. |
| ISO | Set the ISO sensitivity. |
| Exposure Compensation | Adjust the exposure of the screen. |
| Long Exposure | Set the exposure duration of the long exposure. |
| Metering | Select the method of metering. |
| White Balance | Select the method of white balance. |
| WDR | Wide dynamic range. |
| LDC | Lens distortion correction. |
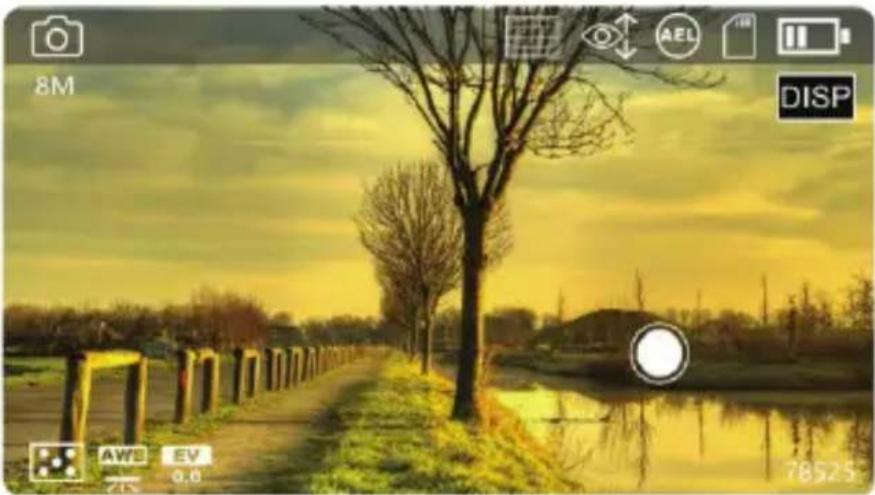
• Photo Shooting Operation
natural_image
Sunset over a calm river with bare trees and a distant bridge, captured via camera interface (no text or symbols on main scene)Press the Video/Photo Button [ ] or tap on the on-screen capture button [ ] to take pictures.
| IR button Turn on IR vision | ||
| AEL button | Turn on/off the exposure lock. | |
| Direction button Zoom | in/Zoom out. | |
| DISP button | Switch Screen Interface | |
EN
PLAYBACK
• Photo And Video PlayBack
natural_image
Sunset over a rural path with bare trees and a lake, captured in a camera interface (no text or symbols on the scene itself)
natural_image
Scenic sunset view of a tree-lined rural path beside a calm river, with no visible text or symbols.Tap anywhere on the screen to display additional icons. Then, tap the PLAY icon on the left side of the screen to enter playback mode. Use the arrows button or swipe the screen to browse files. Press the OK button or the play icon on the screen to play a video file.
| DISP | DISP Button | Shows file information |
| Direction button | Adjust volume of video playback. |
SYSTEM SETTINGS
Tap anywhere on the screen to show additional icons, then tap the [💡] icon to show the settings, click [◀] to exit the menu list.
| Wi-Fi | Turn on/off Wi-Fi. |
| Light Frequency | Set the frequency of light sources of the environment to avoid flicker in the light environment. |
| Auto Power Off | Set automatic shutdown time. |
| Screen Saver | Set the time before the automatic screen. |
| On-Screen Controls | Turn on/off the virtual buttons on the screen. |
| PTZ Mode | Select the PTZ mode of gimbal anti -shake. |
| PTZ Speed | Set the speed of the gimbal anti -shake PTZ mode. |
| Factory Reset | Restore all default settings values. |
CONNECTING TO THE COMPUTER
Before connecting, insert a memory card properly, press the Power/Mode Button [💡] to power on the camera and enter the standby status.
② Use the included USB cable to connect the camera and computer, and then the camera pops up the function list.
③ Select (MDSC) or (PC Camera).
Note: Exit any antivirus programs when connecting it to a computer to avoid killing the drive program for the camcorder.
MOBILE APPLICATION
For android and iOS users search (OD Cam) in Google Play store (Android) or App store (iOS) to download and install it.
3 Besides, the App can be downloaded by scanning the QR code below via a browser.


Note: For Android users, please select (Yes) for all possible questions like (Allow the App to obtain the permission).
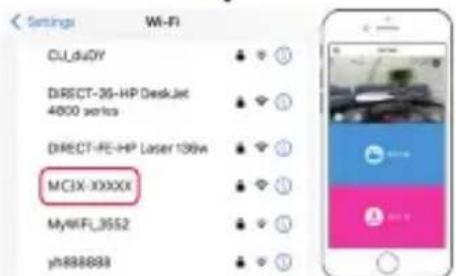
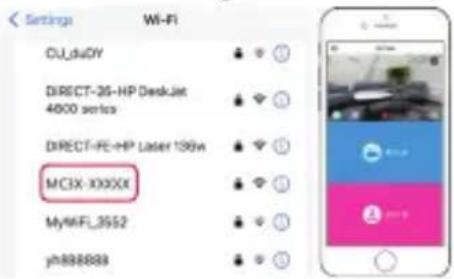
- Connect Wi-Fi
1 To connect to Wi-Fi, go to settings [💡] and select Wi-Fi.
2 Go into your smartphone settings and enable Wi-Fi.
3 Find the Wi-Fi name for the camera (Default name: MC3X-xxxx).
4 Enter the Wi-Fi password (Default password: 12345678) for a successful connection.
5 Open the OD Cam App and click the [Connecting device] to enter the main interface of the APP.
After connecting the device for the first time, please change the default Wi-Fi password on the camera to ensure the security of your device.
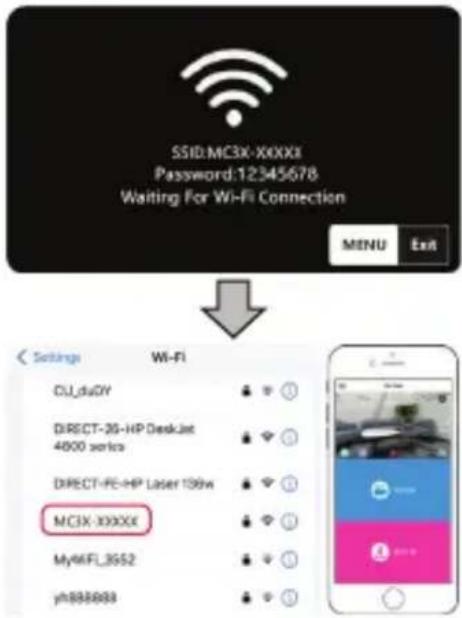
Note: The Wi-Fi function is point-to-point wireless connection within effective distance. The maximum distance is about 5m. Please use the function within the effective distance. Because of various phone brands or configurations, the process to enter the main interface may be slow or the connection may fail. Please try the connection process again.
In case of any failure to connect Wi-Fi:
1 Restart the camera and try the above connection steps again.
2 Confirm whether the Wi-Fi password is correct, and the default password is 12345678.
TECHNICAL SPECIFICATIONS
| Model | Agfaphoto Realimove MC3X |
| Sensor | SONY 1/2.5" 8MP CMOS sensor |
| Aperture and focal length | F/NO 2.2 f=3.0mm |
| FOV | 120° |
| Photographing distance | 30cm ~ INF |
| File format | Video: MP4 H.264 Photo: JPEG |
| Photo Resolution | 20M/14M/10M/8M/5M/3M/2M |
| Video Resolution | 4K30fps/2.7K60fps/2.7K30fps/1080P120fps/1080P60fps/1080P30fps/720P120fps/720P60fps/720P30fps |
| Memory medium | Micro SDHC memory card micro SDXC memory card UHS-III, 512GB (maximum) |
| USB | USB 2.0 |
| HDMI | Support |
| Battery | Capacity: 1450mAh Energy: 11.02Wh Named voltage: 7.6V |
| Computer OS | Windows XP/7/8/8.1/10/11/Mac OSX10.5 and above |
| Mobile OS | Android 5.0 and above; iOS 9.0 and above |
| Power input | DC5V/2A |
| Charging time | About 2.5 hours |
| Storage temperature | -20 ~ 60°C |
| Working temperature | -0 ~ 40°C |
| Frequencies Used | WiFi - 2,4 GHz IEEE 802.11b/g/n |
| Maximum power used | WiFi (2,4 G) : 16 dB |
MESURES DE PRÉCAUTION
natural_image
Sunset over a river with bare trees and distant buildings, captured via camera interface (no text or symbols on main scene)natural_image
Sunset over a rural path with bare trees and water, captured via camera interface (no text or symbols on the scene itself)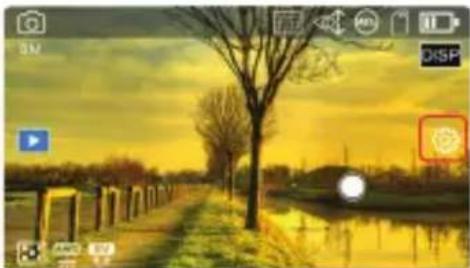
natural_image
Sunset over a canal with bare trees and a tree, captured via camera interface (no text or symbols on the scene itself)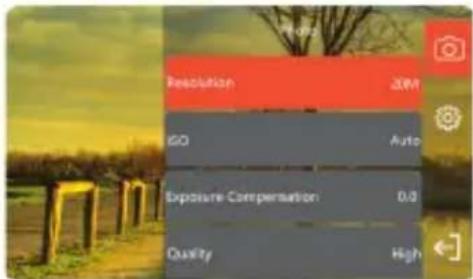
natural_image
Sunset over a rural path with bare trees and reflections, captured via camera interface (no text or symbols)natural_image
Sunset over a rural path with bare trees and a river, captured via camera interface (no text or symbols on the scene itself)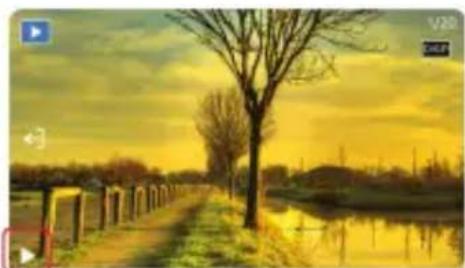
natural_image
Scenic sunset view of a rural path beside a calm water body with bare trees and distant hills (no text or symbols)natural_image
Sunset over a rural path with bare trees and a lake, captured in a video camera interface (no text or symbols on the scene itself)natural_image
Sunset over a rural path with bare trees and a lake, captured in a video camera interface (no text or symbols on the scene itself)
natural_image
Landscape photo of a tree-lined path beside a calm water body at sunset, with no visible text or symbols.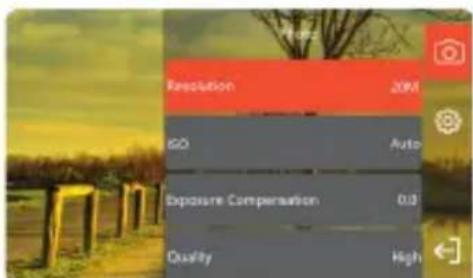

natural_image
Sunset over a rural path with bare trees and a calm water body, captured via camera interface (no text or symbols)natural_image
Scenic sunset landscape with a bare tree and waterway, no visible text or symbols
natural_image
Scenic sunset view of a tree-lined path beside a calm river, with no visible text or symbols


natural_image
Sunset over a calm river with bare trees and a red circular overlay (no text or symbols)natural_image
Sunset over a river with bare trees and distant buildings, captured via camera interface (no readable text or symbols)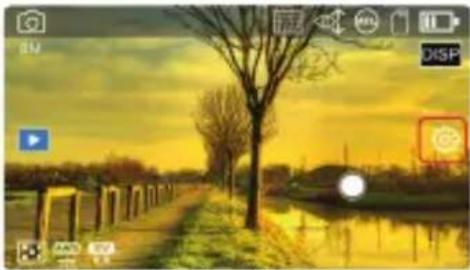
natural_image
Sunset over a canal with bare trees and a tree, captured via camera interface (no text or symbols on main scene)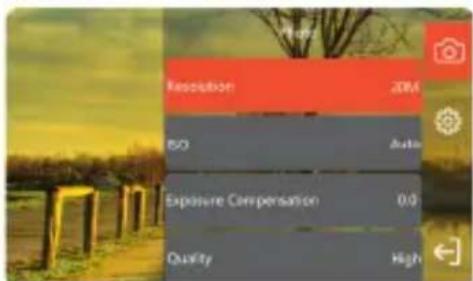
natural_image
Sunset over a rural path with bare trees and a calm water body, captured via camera interface (no text or symbols)natural_image
Sunset over a rural path with bare trees and a lake, captured via camera interface (no text or symbols on main scene)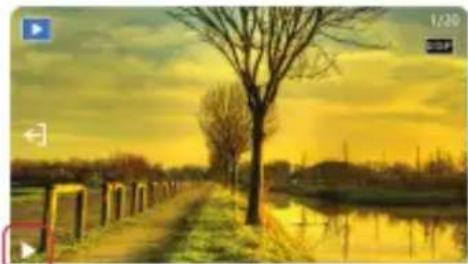
natural_image
Sunset over a calm river with bare trees and distant hills, no visible text or symbols
Notice of compliance for the European Union
Products bearing the CE mark comply with the applicable European directives and associated harmonised European standards.
Disposal of waste equipment by users in the European Union
This symbol means that according to local laws and regulations it is prohibited to dispose of this product with household waste Instead it is your responsibility to protect the environment and human health by handing over your used device to a designated collection point for the recycling of waste electrical and electronic equipment. For more information about where you can drop off your waste equipment for recycling please contact your local city office, your household waste disposal service or the shop where you purchased the product.

GT Company declares that the electric radio equipment of the type Digital camera/video camera complies with directive 2014/53/EU. The full text of the EU declaration of conformity is available at the following web address: www.agfaphoto-gtc.com
This device complies with part 15 of the FCC Rules. Operation is subject to the following two conditions:
- This device may not cause harmful interference, and
- This device must accept any interference received, including interference that may cause undesired operation.
Warranty : 2-year limited warranty / garantie limitée de deux ans / 2 Jahre eingeschränkte Garantie / Garantía limitada de 2 años / Garanzia limitata di 2 anni / Garantia limitada de 2 anos / 2-letnia ograniczona gwarancja / 2 év korlátozott garancia / 2letá omezená záruka / 2 jaar beperkte garantie / 2-летняя ограниченная гарантия / 2 års begrænset garanti / 2 vuoden rajoitettu takuu / 2 vuoden rajoitettu takuu / アフターサービス..
After sales service / Service après vente / Kundendienst / Servicio postventa /Assistenza post vendita / Értékesítés utáni szolgáltatás / Service na verkoop / Serviço pós venda / Serwis pogwarancyjny / Poprodejní servis / Послепродажное обслуживание / 2年保証:
aftersales@agfaphoto-gtc.com / +33 (0) 1 85 49 10 26
Made in China
Product manufactured for and distributed by GT Company:
UK Office : 1st floor gallery court 28 arcadia avenue, London, United kingdom, N3 2FG
USA Office : 1251 Avenue of the Americas, fl.3, 10020 New York
www.gtcompany.fr - info@gtcompany.fr
AgfaPhoto is used under license of Agfa-Gevaert NV. For this product a sub-license has been granted by AgfaPhoto Holding GmbH (www.agfaphoto.com). Neither Agfa-Gevaert NV nor AgfaPhoto Holding GmbH manufacture this product or provide any product warranty or support. For service, support and warranty information, contact the distributor or manufacturer.