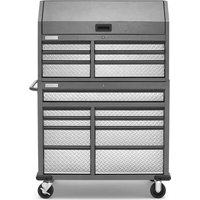
GATC4115JG - Wardrobe Gladiator - Free user manual and instructions
Find the device manual for free GATC4115JG Gladiator in PDF.


User questions about GATC4115JG Gladiator
0 question about this device. Answer the ones you know or ask your own.
Ask a new question about this device
Download the instructions for your Wardrobe in PDF format for free! Find your manual GATC4115JG - Gladiator and take your electronic device back in hand. On this page are published all the documents necessary for the use of your device. GATC4115JG by Gladiator.
USER MANUAL GATC4115JG Gladiator
Assembly Instructions
MODEL
GATC4115JG - Hammered Granite/Silver Tread
MODÈLE
ASSEMBLY INSTRUCTIONS......4
FINAL ASSEMBLY....6
POWER OUTLET WITH USB....7
MAGNETIC TOOL HOLDER 8
TOOL CHEST COMBO
MAINTENANCE......8
REGISTERING YOUR PRODUCT ...... 8
WARRANTY....8
SÉCURITÉ DE L'ENSEMBLE
COFFRE ET ARMOIRE MOBILE ..... 9
DIMENSIONS 10
CONDITIONS D'UTILISATION DE
L'ENSEMBLE COFFRE ET ARMOIRE ... 11
INSTRUCTIONS D'ASSEMBLAGE......11
ASSEMBLAGE FINAL 13
UTILISATION, ENLEVER ET
PRISE DE COURANT AVEC USB.....14
PORTE-OUTIL MAGNÉTIQUE ...... 15
MAINTENANCE DE L'ENSEMBLE
COFFRE ET ARMOIRE 15
ENREGISTREMENT DE VOTRE
PRODUIT 15
GARANTIE 15
www.gladiatorgarageworks.com
www.gladiatorgarageworks.ca
MOBILE TOOL CHEST COMBO SAFETY
Your safety and the safety of others are very important.
We have provided many important safety messages in this manual and on your appliance. Always read and obey all safety messages.

This is the safety alert symbol.
This symbol alerts you to potential hazards that can kill or hurt you and others.
All safety messages will follow the safety alert symbol and either the word "DANGER" or "WARNING."
These words mean:
! DANGER
You can be killed or seriously injured if you don't immediately follow instructions.
WARNING
You can be killed or seriously injured if you don't follow instructions.
All safety messages will tell you what the potential hazard is, tell you how to reduce the chance of injury, and tell you what can happen if the instructions are not followed.
DIMENSIONS
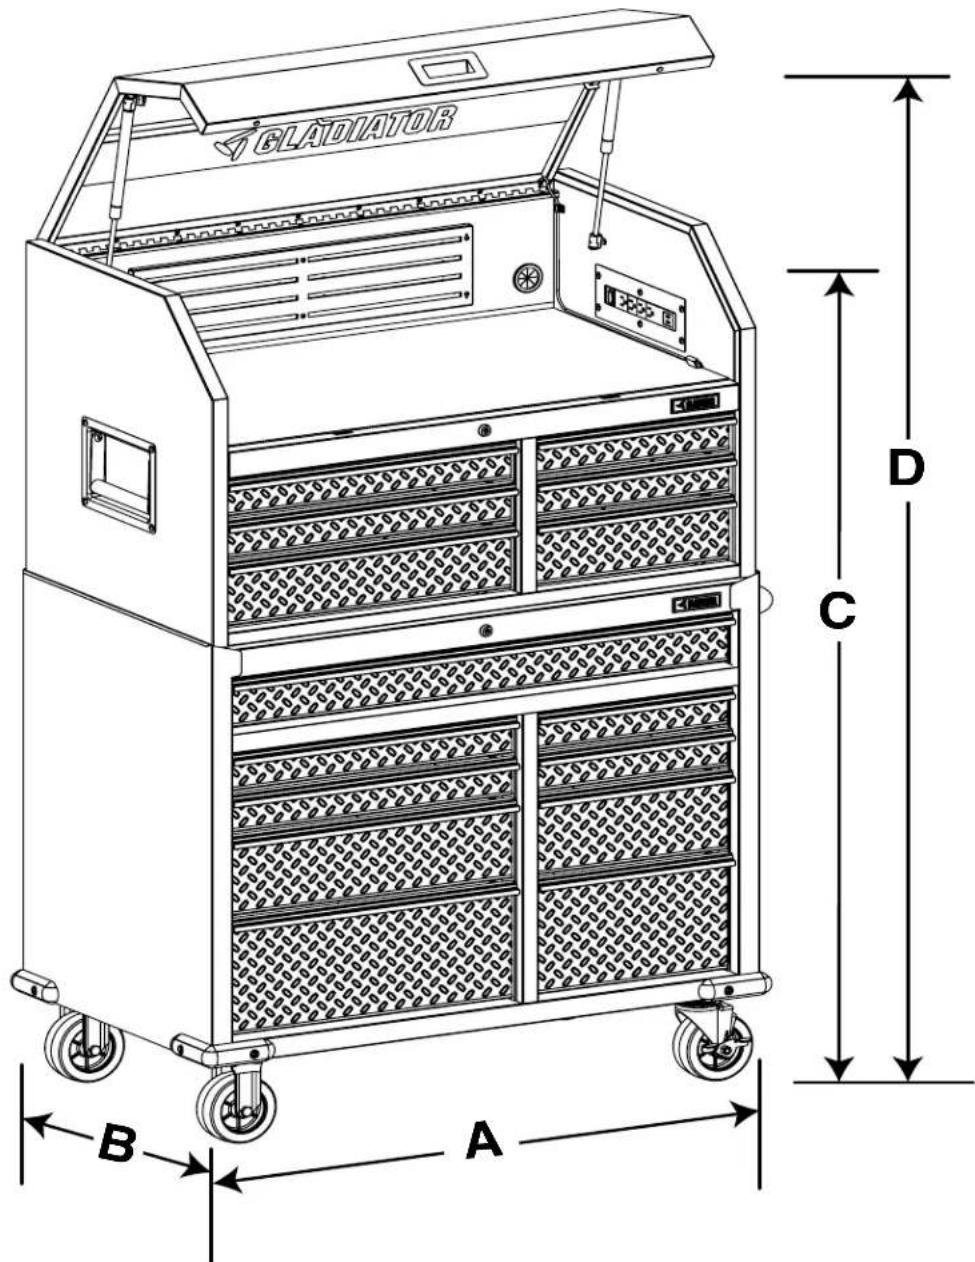
text_image
GLADIATOR D C B A| Model GATC4115JG | |
| A | 41" (104 cm) |
| B | 24.5" (62.3 cm) |
| C | 62.5" (159 cm) |
| D | 78" (198 cm) |
TOOL CHEST COMBO USE REQUIREMENTS
■Intended for garage use in a dry location.
■Use caster locks when not being moved.
■Maximum weight limit is 100 lbs (45 kg) for each drawer.
■Maximum weight limit is 1500 lbs (682 kg) for the storage combo.
WARNING

Tip Over Hazard
A child or adult can tip the tool chest and be killed.
Open only one drawer at a time.
Firmly close and lock drawers before moving the tool chest.
Tool chests are designed to fit together. Use tool chests as listed in your assembly instructions.
Failure to do so can result in serious injury or death.
ASSEMBLY INSTRUCTIONS
TOOLS AND PARTS
■Gather the required tools and parts before starting assembly. Parts are located inside tool cabinet drawer and inside tool chest upper tray.
TOOLS NEEDED
■Double-sided 10 mm / 12 mm wrench (included)
PARTS SUPPLIED
■Tool chest
■Tool cabinet
■Cabinet handle
■Fixed casters (2)
■Swivel casters (2)
■Drawer and tray liners (7 for chest / 9 for cabinet)
■Keys (2 for chest / 2 for cabinet)
■LED light / Cable / Mounts
■Bumpers (4)
■F1 - M6 - 1.00 x 15 hex-bolt (4)
■F2 - M8 - 1.25 x 25 hex-bolt (16)
■F4 - 6 mm washer (8)
■F5 - M6 hex-head bolt (8)
| F1 M6 - 1.00K 15 hex-bolt (4) | |
| F2 M8 - 1.25K 25 hex-bolt (16) | |
| F4 6 mm washer (8) | |
| F5 M6 hex-head bolt (8) | |
UNPACK THE TOOL CHEST COMBO
WARNING
Excessive Weight Hazard
Use two or more people to move, assemble or install cabinet.
Failure to do so can result in back or other injury.
■Remove the packaging from the Tool Chest Combo chest and cabinet. Parts are located inside the chest upper tray area and cabinet drawer. Verify contents. See "Parts Supplied."
■Set aside the outer cardboard package from the cabinet for use during assembly.
■After assembly, dispose of all packaging materials properly.
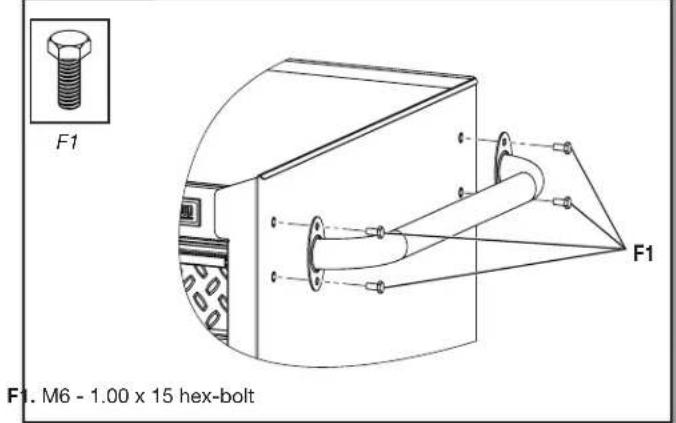
- Attach the Handle
text_image
F1 F1. M6 - 1.00 x 15 hex-boltPosition the handle over the threaded inserts on the right side of the cabinet. Attach handle with M6-1.00 x 15 hex-bolts (F1) (4) and tighten with 10 mm wrench (provided).
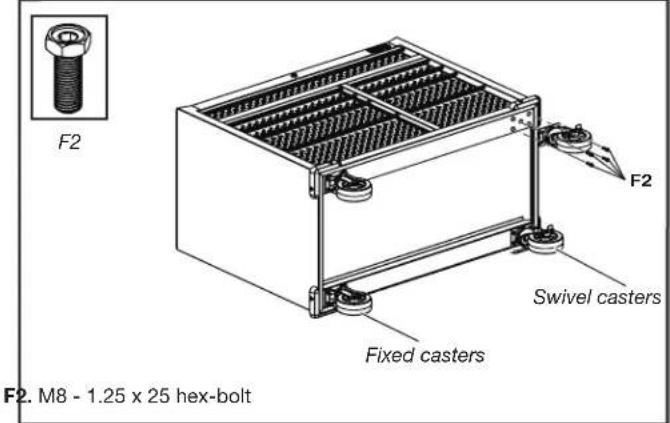
- Attach the Casters
text_image
F2 F2 Swivel casters Fixed casters F2. M8 - 1.25 x 25 hex-boltWARNING
Excessive Weight Hazard
Use two or more people to move, assemble or install cabinet.
Failure to do so can result in back or other injury.
Push in all the cabinet drawers fully and lock using the key. Using two or more people, lay the cabinet down on its back with the drawers facing upward. Protect the cabinet back finish by laying it down on the saved cardboard packaging material.
Attach the swivel casters to the cabinet, on the same side as the handle, using M8-1.25 x 25 hex-bolts (F2) (8) and tighten with the provided 12 mm wrench. Attach the fixed casters to the cabinet, on the opposite side as the handle, using M8-1.25 x 25 hex-bolts (F2) (8) and tighten with the provided 12 mm wrench.
FINAL ASSEMBLY
WARNING
Excessive Weight Hazard
Use two or more people to move, assemble or install cabinet.
Failure to do so can result in back or other injury.
Using two or more people, lift the cabinet up and onto the casters.
- Bumper Assembly
text_image
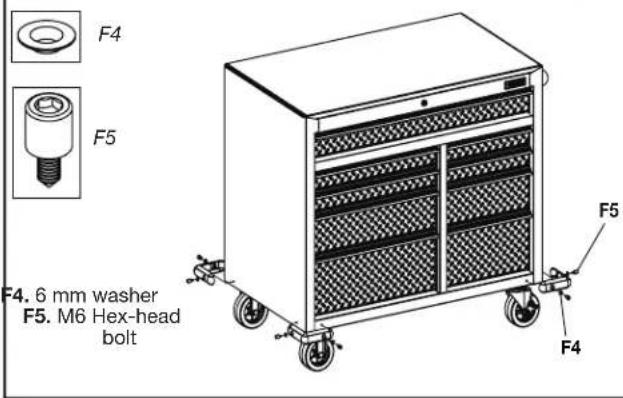
F4 F5 F4. 6 mm washer F5. M6 Hex-head bolt F5 F4Using 6 mm Hex-head bolts (F5) (8) and 6 mm washers (F4) (8), fasten a bumper to each corner of the cabinet. Completely tighten all the fasteners.
NOTE: To keep from stripping the bolts, do not overtighten.
- Use, Remove and Replace the Drawers
text_image
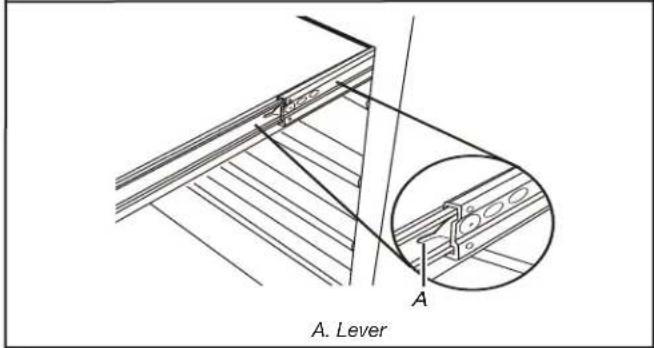
A. Lever ANOTE: The key locks the lid and all of the drawers. Use the drawer liners to avoid scratching or damaging the drawers.
REMOVING THE DRAWER
Unload the contents from the drawer. Slide out the drawer as far as it will go. Press the lever down on the right-hand track and lift the lever up on the left track to release the drawer. Pull the drawer out the rest of the way.
REPLACING THE DRAWER
Align the drawer guides with the receiving glides. Hold the receiving glides firmly and insert the drawer guide.
NOTE: It is normal for the drawer to close tightly the first time after it has been removed.
Push the drawer in completely.
- LED Light Assembly
text_image
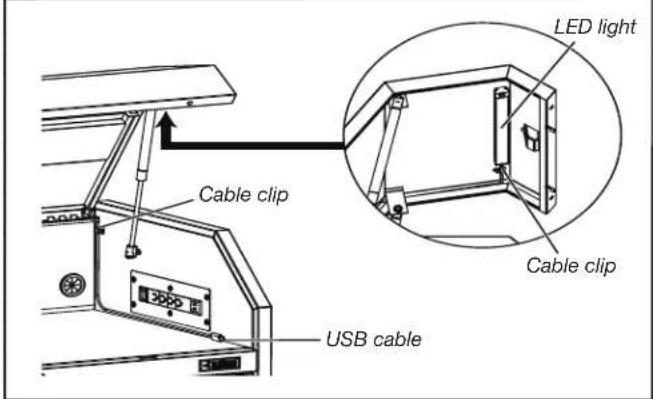
LED light Cable clip Cable clip USB cableThe included LED light is used to illuminate the upper chest tray area. The LED light is magnetic and may be positioned anywhere on the inside flat surface of the lid. The LED light is powered by the USB port on the powerstrip. Route the included USB cable as shown. The wire should be positioned behind the center lid support. Use the two self-adhesive cable clips to hold the USB cable in position as shown. After assembly, make sure the lid closes and the USB cable stays within the tray area and does not contact the hinge, lid opening, or any moving parts.
POWER OUTLET WITH USB
WARNING
Electrical Shock Hazard
Plug into a grounded 3 prong outlet.
Do not remove ground prong.
Do not use an adapter.
Do not use an extension cord.
Failure to follow these instructions can result in death, fire, or electrical shock.
■ The powerstrip cord is shipped inside the upper tray area and must be routed through the rubber grommet located on the rear of the tray area.
■ Open the tray lid, remove the power cord packaging material, and push the cord power plug through the grommet. Pull the cord through completely.
■ A second grommet is located in the back of the tray area and can be used to route additional cords if needed.
■ Always unplug power cord when moving or cleaning the tool storage combo.
■ Do not insert a cord through a hole without a grommet.
■ The powerstrip includes an On/Off switch that has an overload protector rated at 15 A. Do not overload the powerstrip.
■ The USB ports can be used to charge cell phones and power USB devices.
NOTE: This device complies with Part 15 of the FCC Rules. Operation is subject to the following two conditions:
- This device may not cause harmful interference.
- This device must accept any interference received, including interference that may cause undesired operation.
NOTE: This equipment has been tested and found to comply with the limits for a Class B digital device, pursuant to Part 15 of the FCC Rules.
These limits are designed to provide reasonable protection against harmful interference in a residential installation. This equipment generates, uses, and can radiate radio frequency energy, and if not installed and used in accordance with the instructions, may cause harmful interference to radio communications. However, there is no guarantee that interference will not occur in a particular installation. If this equipment does cause harmful interference to radio or television reception, which can be determined by turning the equipment off and on, the user is encouraged to try to correct the interference by one or more of the following measures:
■ Reorient or relocate the receiving antenna.
■ Increase the separation between the equipment and receiver.
■ Connect the equipment into an outlet on a circuit different from that to which the receiver is connected.
■ Consult the dealer or an experienced radio/TV technician for help.
MAGNETIC TOOL HOLDER
In the back of the upper tray area is a magnetic tool holder that can be used to hold small tools, that are most used, for easy access.
■ Always unplug and remove all cords before cleaning the tool combo.
■ The tool storage combo can be cleaned with a mild detergent and water.
■ The drawer slides and casters can be lubricated with high-quality bearing grease.
■ Remove any grease / oil with a nonflammable cleaner.
REGISTERING YOUR PRODUCT
There are many benefits to registering your product. Find out more and register your product online at:
www.gladiatorgarageworks.com.
Consumers in Canada can call 1-800-807-6777.
In U.S.A. call 1-866-342-4089.
WARRANTY
For warranty information:
In the U.S.A. call 1-866-342-4089 or visit our website at
www.gladiatorgarageworks.com
In Canada call 1-800-807-6777 or visit our website at
www.gladiatorgarageworks.ca
SÉCURITÉ DE L'ENSEMBLE COFFRE ET ARMOIRE MOBILE
natural_image
Technical line drawing of a mechanical assembly with labeled component F1 (no text or symbols beyond label)www.gladiatorgarageworks.com.
www.gladiatorgarageworks.com
www.gladiatorgarageworks.ca
SEGURIDAD DEL JUEGO DE GABINETE Y CAJA
natural_image
Technical line drawing of a mechanical device with labeled component F1 (no text or symbols beyond label)text_image
A.Palancawww.gladiatorgarageworks.com.
www.gladiatorgarageworks.com
www.gladiatorgarageworks.ca