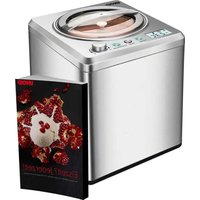
Eva 48826 - Ice machine UNOLD - Free user manual and instructions
Find the device manual for free Eva 48826 UNOLD in PDF.

User questions about Eva 48826 UNOLD
0 question about this device. Answer the ones you know or ask your own.
Ask a new question about this device
Download the instructions for your Ice machine in PDF format for free! Find your manual Eva 48826 - UNOLD and take your electronic device back in hand. On this page are published all the documents necessary for the use of your device. Eva 48826 by UNOLD.
USER MANUAL Eva 48826 UNOLD
natural_image
Exterior view of a modern kitchen appliance with a circular top and control knob (no text or symbols visible)Bedienungsanleitung
Instructions for use Model 48826
Introduction......28
Technical Specifications....28
Explanation of symbols....28
For your safety....29
Preparing the appliance for operation .....32
Description of display and buttons......32
Operating the appliance ....34
Cleaning and maintenance ....37
Recipes: General information 38
Recipes 39
Making yoghurt....46
Guarantee Conditions....47
Waste Disposal/Environmental Protection ...47
Service 27
text_image
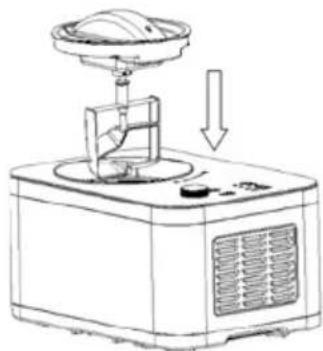
Labeled diagram of a microwave oven with five numbered parts for assembly or maintenance reference.IHRE NEUE EISMASCHINE
DE Ab Seite 6
1 Drive unit/motor
2 Transparent lid
3 Stirrer/mixer
4 Ice cream container
5 Compressor housing
ES Página 100
natural_image
Technical line drawing of a mechanical device with a dome-shaped top component and a circular base (no text or symbols)
natural_image
Technical line drawing of a mechanical device with a dome top and base structure, showing no text or symbols.Abb. 2
natural_image
Line drawing of a microwave oven with a lid and cooling unit, showing airflow direction (no text or symbols)Abb. 3
Thank you for choosing a product from Unold. Please read the operating instructions carefully. They will quickly familiarise you with your new ice cream maker (hereinafter also referred to as „appliance“). Please ensure that the operating instructions are read and understood by everyone who uses, cleans or services the appliance. Do not, under any circumstances, give the appliance to someone else without also giving them the operating instructions.
If you have any questions that are not fully answered in the operating instructions, or if there are technical problems, please contact our customer service organisation or your retailer.
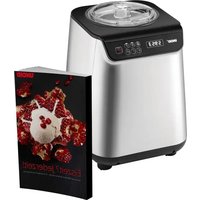
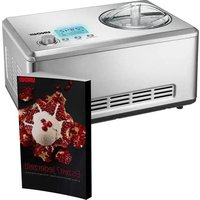
TECHNICAL SPECIFICATIONS
Power: 120 W, 220 V\~, 50 Hz
Capacity: 1,500 ml
Max. fill quantity: 1,000 ml
Size: approx. 38 x 27 x 24.2 cm (W/D/H)
Weight: approx. 9.3 kg
Cord length: approx. 120 cm
Features: Fully automatic, self-cooling compressor for continuous chilling, menu button for three functions: Mix & Freeze, Mix, Freeze, including yoghurt preparation feature, removable stainless steel ice cream container, timer adjustable from 5 to 60 minutes
Accessories: Instruction manual with recipes
Features, technology, colours and design subject to modification; errors excepted
Refrigerant: R600a
EXPLANATION OF SYMBOLS

This symbol denotes a possible hazard which could cause injury or damage to the appliance.

Caution: risk of fire. This symbol indicates a possible fire hazard.
FOR YOUR SAFETY
Please read the following instructions and keep them on hand for later reference.
- This appliance can be used by children 8 years and older, as well as by persons with reduced physical, sensory or mental abilities or with lack of experience and/or knowledge, if they are supervised or if they have been instructed with regard to safe use of the appliance and have understood the dangers that can result from use of the appliance.
- Children must not play with the appliance.
- Children are not allowed to perform cleaning and user maintenance, unless they are 8 years of age or older and are supervised.
- Keep the appliance and the power cord out of the reach of children under 8 years of age.
- Connect the appliance to alternating current only, in accordance with the rating plate.
- Appliances are not intended to be operated by means of an external timer or separate remote-control system.
- After use, before cleaning and in case of defaults always unplug the appliance.
- Do not immerse the motor block, the power cord and the plug into water – risk of short circuit.
- Do not clean any parts of the appliance in the dishwasher, but only in warm soapy water.
- Children between the ages of 3 and 8 are allowed to fill and empty cooling appliances.
- For electrical safety reasons do not, under any circumstances, place multiple socket outlets or power supply units directly behind the appliance.
- Do not place the appliance or power cord near open flames or other heat sources during operation.
- When the appliance is in operation do not take the motor and the lid off of the appliance under any circumstances.
- Only use the appliance indoors.
-
Place the appliance on a free and flat surface.
-
Never put the appliance or the cable on hot surfaces nor operate it near an open gas flame.
- This appliance is intended for domestic and similar use such as:
■ staff kitchen areas in shops, offices and other working environments;
■ agricultural enterprises;
■ by clients in hotels, motels and other accommodation facilities;
■ bed and breakfast accommodations and holiday homes.
- Unwind the power cord completely.
- Make sure, that the power cord does not hang over the edge of the working top.
- Do not exceed the maximum filling quantity (max. 3/4 of the ice cream bowl volume), as the ice cream will expand during freezing.
- Always fill the ingredients into the removable ice cream bowl, but never directly into the recess of the compressor housing.
- Do not hold any tools, cutlery or fingers into the jug while it is operated - Risk of injuries.
- Only use the appliance when properly assembled.
- During operation, the ventilation slots of the compressor housing as well as of the motor block must be free and uncovered. Maintain a distance of at least 8 cm from other objects.
- Never use the device without the ice cream bowl!
- Do not use the appliance with accessories of other machines or brands.
- Do not use any sharp objects to take out the ice cream. Only use plastic or wooden spoons or spatulas.
- Check the plug and power cord regularly for wear and damage. In case of a fault, please send the appliance for inspection/repair to our after sales service. Inadequate repair may constitute a risk for the user and result in the loss of guarantee.
- Warning: fill with foodstuff only.
- Caution! Please note the following information to avoid contamination of the ingredients used: If you frequently remove the lid of the appliance while preparing ice cream, the temperature in the appliance will rise. This may affect the shelf
life of the ingredients. Regularly and thoroughly clean all parts of the appliance that come into contact with food.

Never place hand in machine when in operation – risk of injury!
After unpacking, please do not operate the appliance for at least two hours. The coolant in the appliance has to first settle, to prevent damage to the compressor.
Make sure that the appliance is not tilted more than 45^ , otherwise the compressor may be damaged.

Warning: Do not store explosive substances such as aerosol cans with a flammable propellant in this appliance.
Warning: Keep ventilation openings, in the appliance enclosure or in the built-in structure, clear of obstruction
Warning: Do not use mechanical devices or other means to accelerate the defrosting process, other than those recommended by the manufacturer. Warning: Do not damage the refrigerant circuit. Warning: Do not use electrical appliances inside the food storage compartments of the appliance, unless they are of the type recommended by the manufacturer.
The refrigerant isobutene (R600a) is contained within the refrigerant circuit of the appliance, a natural gas with a high level of environmental compatibility, which is nevertheless flammable.
During transportation and installation of the appliance, ensure that none of the components of the refrigerant circuit becomes damaged. The refrigerant (R600a) is flammable.
If the refrigerant circuit should be damaged:
■ Avoid opening flames and sources of ignition.
■ Thoroughly ventilate the room in which the appliance is situated.
The manufacturer will not be liable in the event of incorrect assembly, improper or incorrect use or if repairs are carried out by unauthorized third parties.
PREPARING THE APPLIANCE FOR OPERATION
- Remove all packaging materials and the transport safeguards, if present. Keep packaging materials away from children – danger of suffocation! Dispose of packaging materials in accordance with local regulations.
- Check the appliance for damage. If the appliance shows visible signs of damage, do not operate it. Contact our customer service organisation instead.
- Place the appliance on a solid, level and dry work surface.
- After unpacking, please leave the appliance at its final location for at least 2 minutes without the lid on, before operating it. The coolant in the appliance must first settle (move downward), otherwise the compressor can be damaged.
- Before using the appliance for the first time, all removable parts, except the drive unit (1) and the compressor housing (5), must be rinsed out with warm water.
- Wipe off the housing and the aperture for the ice cream container with a damp cloth that has been well wrung out to remove excess water.
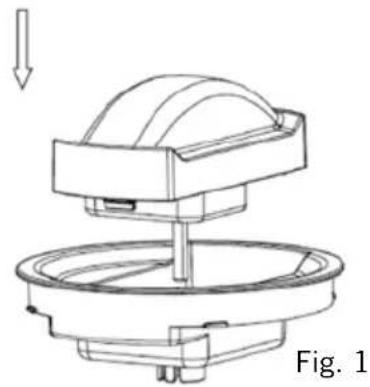
DESCRIPTION OF DISPLAY AND BUTTONS
flowchart
graph TD
    A["1"] --> B["2"]
    B --> C["3"]
    C --> D["4"]
    D --> E["5"]
    E --> F["6"]
    F --> G["POWER"]
    G --> H["MENU"]
    H --> I["7"]
    I --> J["8"]
    J --> K["9"]
    K --> L["10"]
| 1 Time indicator Indicates the remaining preparation time | ||
| 2 Indicator lamp “Cooling” | Is lit when the "Cooling" program has been selected. If the ice cream does not yet have the desired consistency when the program is complete, you can use this program to let it freeze longer for between 5 and 60 minutes. The default is 10 minutes. | |
| 3 Indicator lamp “Mixing” | Is lit when the „Mixing“ program has been selected. If you wish the ingredients to be mixed evenly before the program starts, select this program before making ice cream. The run time can be selected between 5 and 60 minutes; the default is 30 minutes. | |
| 4 Indicator lamp “Ice Cream” | Is lit when the "Ice Cream" program has been selected. Program for regular ice cream preparation, which progresses by mixing the ice cream mass before freezing it. The run time can be selected between 5 and 60 minutes; the default is 60 minutes. | |
| 5 Indicator lamp “Yoghurt” | Is lit when the "Yoghurt" program has been selected. The run time can be selected between 4 and 24 hours; the default is 12 hours. | |
| 6 “Power” button Switches the appliance on and off. | ||
| 7 Button “Menu” | Use this button to select between the four preparation options: Cooling, Ice Cream, Mixing, and Yoghurt. | |
| 8 Rotary control Time “-” Reduce run time | ||
| 9 Start/Pause Start and pause the programs | ||
| 10 Rotary control Time “+” Increase run time | ||
OPERATING THE APPLIANCE
Making ice cream
- Prepare the ingredients for the ice cream as stated in the recipe. When you are processing ice cream masses that require prior cooking, this should be
done a day in advance, so the mass has time to cool thoroughly.
-
Cool down the prepared ice cream mass or the required ingredients to a refrigerator temperature of approx. 6–8 °C.
-
Fruit should be puréed just before adding it to the mixture, and fruit in chunks should only be added shortly before the end of the mixing process.
-
Use alcohol sparingly, adding it near the end of the cooling time, since alcohol extends the time required for freezing.
-
Place the refrigerated ingredients in the removable ice cream container. Do not fill the ice cream container past the 3 14 mark, since ice cream needs room to expand as it freezes. However, we recommend filling the ice cream container at least half full to achieve even freezing of the mixture.
-
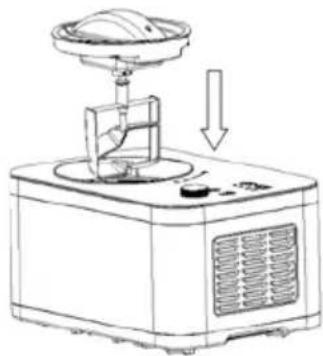
Place the removable ice cream container in the recess of the compressor housing. Fold down the ice container handle; otherwise, the lid cannot be closed.
-
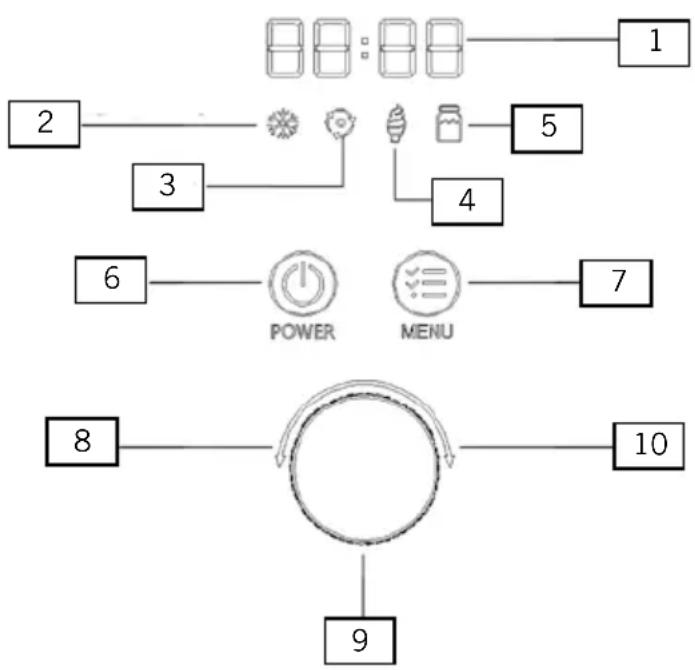
Proceed by placing the motor on the transparent lid so that the drive pin fits into the opening of the mixer (Fig. 1). Make sure the power supply is properly plugged in at the compressor housing.
-
Insert the mixer into the drive pin.
-
Place the transparent lid together with the mixer at a slight offset and tighten these parts clockwise (bayonet closure). Pay attention to the symbols on the
natural_image
Technical line drawing of a mechanical device with a dome-shaped top component and a circular base, labeled Fig. 1 (no text or symbols on the diagram itself)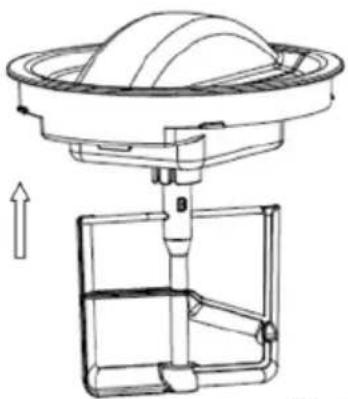
natural_image
Technical line drawing of a mechanical device with a dome-shaped top and a side-mounted base (no text or symbols)Fig. 2
natural_image
Line drawing of a kitchen appliance with a lid and cooling unit, showing airflow direction (no text or symbols)Fig. 3
appliance. Turn the lid towards “☐”. The appliance will not work unless the lid has been properly placed (Figs. 2 and 3).
- Plug the appliance into an electrical outlet (220 V\~, 50 Hz). The display lights up briefly and turns off again.
- Press the "Power" button to switch the appliance on.
- You can now select the desired program using the "Menu" button:
| Icon Program | |
 | Ice Cream (mix and freeze) |
 | Mixing (mix) |
 | Cooling (freeze) |
 | Yoghurt |
- You can then use the rotary control to adjust the desired run time, if necessary. You reduce the respective run time by turning the rotary control to the left. You increase the respective run time by turning the rotary control to the right.
- Finish by pressing the rotary control to start the corresponding program.
- The appliance starts mixing and cooling the ingredients, which is indicated by the indicator lamp of the selected program.
- The programs can be interrupted at any time with another press of the rotary control. As soon as you press the rotary control again, the appliance will resume operation.
- You can abort the selected program by pressing and holding the rotary control.
- After the corresponding program run time has elapsed, the appliance is automatically switched off with a repeated audible signal.
-
If the ice cream is not removed after the beep sounds, the automatic cooling function switches on for a maximum of 60 minutes, unless another button is pressed during this time. The display shows “Cool”. After the 60 minutes have elapsed, the appliance will switch off completely.
-
Notice: The ice cream maker is designed so that the motor stops once the ice cream achieves a certain consistency, to prevent damage to the motor. This is not a sign that the appliance is defective. If necessary, you can then, for example, let the ice cream mass freeze again.
- Important: There are two silver-coloured pins on the motor. If condensation produces water droplets, wipe them off with a cloth. This is the only way to ensure current contact with the motor and that the motor will stop when wet.
Removing the ice cream
- Before removing the ice cream, switch off the appliance by pressing the "Power" button and then disconnecting the power plug from the electrical outlet.
- Unlock the lid by turning it to “☐” and remove the lid along with the mixer and the motor.
- Remove the ice cream container from the appliance.
- Transfer the ice cream to a suitable container. To prevent damage to the ice cream container, do not use any sharp or pointed objects; use only a plastic or wooden spoon. We recommend a silicone spatula.
- If desired, you can make more ice cream directly afterwards. Start the process again from no. 1.
- Tip: If you are making fruit-flavoured ice cream or sorbet, remove the ice cream container as soon as the ice cream is done. Then transfer the ice cream to a suitable container and place it in the freezer for no more than 15 minutes until the ice cream is frozen through. Otherwise, this ice cream will be frozen on the outside, but may be too soft on the inside.
Making yoghurt
- When set to this function, the appliance heats the filled mass to the temperature necessary for the production of yoghurt and then keeps the mass warm accordingly.
- Refer to the recipe section for information on making yoghurt.
- Fill the ingredients into the ice container and insert the ice container into the appliance as described under “Making ice cream”. Make sure that the lid has been placed properly, as the appliance will otherwise not turn on.
- Press the "Power" button to switch the appliance on.
-
Now, select the yoghurt program using the "Menu" button.
-
The pre-set time is 8 hours. The rotary control allows you to adjust this time between 4 and 24 hours.
- We recommend a preparation time of about 5 to 6 hours for the use of preheated milk, and approx. 8 to 9 hours for cold milk.
- Finish by pressing the rotary control to start making yoghurt.
- After the set time has elapsed, the appliance will switch off.
- Disconnect the plug from the power socket.
- Unlock the lid and remove the lid along with the mixer and the motor.
- Remove the ice cream container from the appliance.
- Carefully fill the finished yoghurt into portion-size jars or one large jar, close the jars well and put the yoghurt in the refrigerator for 12 hours.
Compressor protection feature
- After completing the programs “Ice Cream” or “Cooling”, the compressor needs a rest time of 3 minutes before the program can be started again. If the power plug is pulled, there is no need for this pause, and the appliance can be switched on again immediately - but we do recommend against it to avoid damage to the compressor.
CLEANING AND MAINTENANCE

Before cleaning it, always switch off the appliance and disconnect the plug from the power socket
- Never clean the appliance with water or under running water or other liquids. Take special care to prevent water contact with the motor or compressor.
- Never use scratching or abrasive cleaners.
- The removable parts (except the motor) can be washed in warm water with a mild washing-up liquid. These parts (except the ice cream container) are not dishwasher-safe. The ice cream container can be cleaned using a gentle cleaning program in the upper rack of the dishwasher.
- Wipe off the compressor housing and the motor with a damp cloth.
- Dry all parts with a soft cloth before assembly.
- Important: Before you use the ice cream maker again, please ensure that all parts are perfectly clean and dry, to ensure maximum hygiene.
RECIPES: GENERAL INFORMATION
In the following you find some general information for the preparation of ice cream as well as some basic recipes. You will find a lot of good cooking books in good bookstores. Please adapt the quantities always to the maximum filling quantity of the ice bowl. The ice cream smells best when it is fresh. Homemade ice cream does not contain any conserving agents and is thus provided for immediate use. If you want to store the ice cream for some time, you should add 20 g ice cream base which avoids the formation of big ice crystals. In Germany the ice base (Eisbasis) is available under the following address in Germany:
Hobbybäcker-Versand - Inge Pinzer
Am Mühlholz 6 – D-89287 Bellenberg
Tel. 07306/925900
Fax 07306/925905
Only use ripe fruits for fruit ice cream.
Fruit pieces or berries should be added at the end of the freezing procedure. You can replace milk by cream or cream by milk.
The more cream is used, the softer the ice cream will be.
Sugar can be replaced by honey, syrup or sweetener (not in case of soft ice cream). Milk can be replaced by soy drink.
If you want hard ice cream, put the mass for about 15–30 minutes into the freezer before filling it into the ice cream bowl, or just select a longer freezing time. The ingredients must be well cooled before filling them into the ice cream bowl. The cooler the ingredients, the shorter the preparation time (approx 30 minutes). Ice will lose taste and quality if stored too long.
To conserve the ice cream for a certain time, do not leave it in the removable bowl of the ice machine, but fill it into an adequate freezing box with lid.
Ice cream can be stored for a short time in the freezer.
Use the homemade ice cream within one week.

Only use very fresh eggs.
Melted ice cream should be used immediately and should not be frozen again.
CREAM ICE
Cream ice is made of milk, cream, egg yolk, sugar and other ingredients. It becomes smooth and soft by being stirred constantly during freezing.
Basic recipe vanilla ice cream
200 ml milk, 250 ml cream, 1 vanilla pod, 1 pinch of salt, 3 egg yolk, 3 tblsp sugar
Heat milk and cream, slit the vanilla pod and add the pulp to the milk, as well as the salt. Beat egg yolk with sugar and add slowly the warm milk. Cool the ice cream mass for about 24 hrs in the refrigerator, then prepare ice cream in the ice cream maker.TIPP: For children add some chocolate chips or jelly bears at the end of the freezing process.
Quick vanilla ice cream
100 ml milk, 300 ml cream, 1 egg, 3 tblsp sugar, 1–2 tsp vanilla sugar Mix all ingredients and prepare ice cream in the ice cream maker.
Basic recipe chocolate ice cream
12 bar each of plain and milk chocolate, 250 ml cream, 50 ml milk, 1 egg Heat chocolate with milk and cream and cool for about 24 hrs in the refrigerator. Then add the egg and prepare ice cream in the ice cream maker.
Quick chocolate ice
150 ml chocolate syrup, 1 egg, 150 ml cream, 150 ml milk Mix all ingredients and prepare ice cream in the ice cream maker.
Mocha ice cream
Prepare vanilla ice cream according to the basic recipe, but add 2–3 tblsp of granulated mocha or espresso powder to the hot milk. At the end of freezing add 1–2 tblsp of coffee liqueur.
Walnut ice cream
Caramelize 50 g of sugar in a pan, add 50 g of chopped walnuts and mix it with the caramel. Let the caramel cool down on an oiled plate.
Prepare vanilla ice cream according to the basic recipe, add the chopped caramelized walnuts at the end of the freezing process. TIPP: Replace walnuts by pumpkin seeds and season the ice cream with 1 tsp of pumpkin seed oil.
Amaretto ice cream
Prepare vanilla ice cream according to the basic recipe. Add the crumbs of 100 g amaretti (almond macaroons) with 2–3 tblsp of amaretto liqueur at the end of the freezing process.
SOFT ICE CREAM
Basic recipe soft ice cream
300 ml cream, 65 g honey, 2 egg yolk, 1 egg, 1 pinch of salt
Mix all ingredients and prepare ice cream in the ice cream maker. Sesaon to taste with liqueur, chocolate chips etc.
Vanilla soft ice
300 ml cream, 12 sliced vanilla pod, 65 g honey, 1 egg yolk, 1 egg, 1 pinch of salt
Cook cream, vanilla pod and honey the day before and let it cool down. Mix all ingredients and prepare ice cream in the ice cream maker.
Chocolate soft ice
300 ml cream, 30 g milk chocolate, 30 g dark chocolate, 1 egg yolk, 1 egg, 1 pinch of salt
Heat cream and chocolate the day before and let it cool down in the refrigerator. Add eggs and salt immediately before the ice preparation.
Raspberry soft ice
300 ml cream, 12 tsp vanilla sugar, 65 g honey, 1 egg yolk, 1 egg, 1 pinch of salt, 150 ml mashed raspberries
Mix cream, vanilla sugar and honey. Add mashed raspberries, eggs and salt immediately before the ice preparation.
FRUIT ICE CREAM
Fruit ice cream consists mainly of mashed fruits with sugar, cream or yoghurt and evtl. some eggwhite. To have a smooth fruit ice cream, it has to be stirred during freezing, which is achieved best in a ice cream maker.
Basic recipe
250 g mashed fruits, 1 tblsp lemon juice, 75 g sugar, 1 tblsp eggwhite, 125 ml cream
Mix mashed fruits with sugar and lemon juice. Beat eggwhite and cream and add it to the mashed fruits. Mix all ingredients and prepare ice cream in the ice
cream maker. If canned fruits are used, it might not be necessary to add additional sugar.
Basic recipe strawberry ice cream
300 g strawberries, 2 tblsp sugar, 250 ml sweet cream, 30 ml milk
Mix the mashed strawberries with all ingredients and prepare ice cream in the ice cream maker.
Yoghurt fruit ice cream
250 g mashed fruits (strawberries, raspberries, cherries etc.), 1 dash of sweetener, 250 ml natural yoghurt, 2 tblsp of cream
Prepare ice cream as described above.
Quick Yoghurt fruit ice
Just prepare ice cream of 600 ml fruity yoghurt (4,5% grease).
Mango coconut ice cream
1 ripe mango, 1 cup of natural yoghurt, 150 ml coconut milk, 2 tblsp sugar, 2 tblsp grated coconut
Peel and mash the mango, mix it with the other ingredients and prepare ice cream in the ice cream maker.
SHERBET
Sherbet can be made from nearly all sorts of fruits or fruit juice, e.g. from raspberries, apricots, peaches. melons, kiwis etc. A sherbet must be stirred constantly during freezing to avoid the formation of big ice crystals. Sherbets don't necessarily have to be sweet. Just try a tomato or a campari orange sherbet as starter of a dinner. A special delight is a bowl of sherbet served in a glass of champagne.
Basic recipe
500–600 ml mashed fruits / fruit juice, 50–100 g sugar (depending on the type of fruit), 1–2 tblsp eggwhite.
Mix all ingredients and prepare ice cream in the ice cream maker.
The sherbet can be seasoned with 1 tblsp liqueur, brandy, etc.
If canned fruits are used, it is not necessary to add sugar.
Strawberry sherbet
300 g strawberries, 1 tsp lemon juice, 1 tblsp eggwhite, 3 tblsp sugar, 750 ml apple juice
Mix all ingredients and prepare a sherbet in the ice cream maker.
Campari orange sherbet
500 ml orange juice, 100 ml Campari, 1–2 tblsp eggwhite, sugar to taste
Mix all ingredients and prepare a sherbet in the ice cream maker.
Cassis sherbet
500 ml mashed black currants, juice of one lemon, 50 g sugar, 2 cl Crème de Cassis, 1 eggwhite
Pass the mashed black currants through a sieve, mix them with all ingredients and prepare a sherbet in the ice cream maker.
Elder flower sherbet
500 ml water, 200 g icing sugar, 8–10 elder-flowers, 1 lemon, 1 egg-white Boil sugar with water and take it from the stove. Add the rinsed elder flowers to season the sugar water for at least 30 minutes. Pass through a sieve and let the syrup cool down. Mix the cooled syrup with the eggwhite and prepare a sherbet in the ice cream maker. Serve with fruits of the season (red currants, strawberries) and fried elder flowers.
Champagne basil sherbet
1 bunch of basil leafs, 100 g sugar, 200 ml dry white wine, 100 ml champagne, juice of 1 lemon, 1 eggwhite,
Mash the washed basil leafs with 100 ml white wine and leave for at least 30 min. Boil sugar with the remaining wine. Pass the mashed basil through a fine sieve and add it to the cooled syrup. Mix all ingredients and prepare a sherbet in the ice cream maker. TIPP: If prepared without basil it's also a delicious dessert.
PARFAIT
The basis of a parfait consists of egg yolk and sugar, beaten in a bain-marie and then mixed and frozen with other ingredients and cream to get a very creamy ice cream.
Apple Calvados Parfait
300 g apple, 1 lemon, 2 tblsp Calvados or apple brandy, 1 egg, 1 egg yolk, 60 g sugar, 200 ml cream
Peel and cube the apple, mix it with the lemon juice. Take 1 teaspoon aside and cook and mash the remaining apple in a small amount of water. Beat eggs and sugar in a bain-marie. Add the mashed apple to the cooled egg mass. Beat the cream and add it also. Prepare ice cream in the ice cream maker. At the end of freezing, add the apple cubes and the apple brandy.
Serve with black current or blackberry sauce.
Praliné Parfait
40 g sugar, 60 ml water, 2 egg yolk, 1 tsp vanilla sugar, 1 pinch of grated orange peels, 60 g plain chocolate, 50 g nougat, 1 tblsp cocoa liqueur or rum, 200 ml cream
Boil sugar with water, beat the egg with the cooled sugar water, the vanilla sugar and the orange peels. Melt chocolate and nougat and add to the eggs, add liqueur or rum. Add the beaten cream. Mix all ingredients and prepare ice cream in the ice cream maker.
STEVIA RECIPES
You can replace sugar with stevia. In this case always replace approx. 1/10 of the specified sugar weight with stevia (for example, instead of 100 g of sugar, use 10 g of stevia).
We have provided several recipe suggestions for you here. However please note that chocolate ice cream cannot be produced, because fat and sugar come from the bar of chocolate. Likewise, vanilla ice cream cannot be produced because in this case the sugar functions as an indispensable flavour carrier.

Only use very fresh eggs.
Consume the ice cream within one week. Consume thawed ice cream immediately, do not refreeze it.
Kiwi ice cream
5 ripe kiwis, 10 g stevia, 2 TBSP apple sauce, 250 ml apple juice, 2 egg whites 1 TBSP lemon juice
Peel the kiwis, cut them into pieces and put them in a high bowl. Add stevia, apple sauce and apple juice. Puree with the hand mixer. Beat egg whites and lemon juice until creamy, and blend with the kiwi mixture. Pour into the ice cream maker and freeze for approx. 40 minutes.
Sour cherry sorbet
250 g sour cherries (from the jar, drained), 1 TBSP lemon juice, 5 g stevia, 250 ml apple juice, 1 envelopes of gelatine that dissolves in cold liquids. Pour all the ingredients into a high bowl and puree with the hand mixer. Pour into the ice cream maker and freeze for approx. 40 minutes.
Iced tomato cream
(As an appetiser or intermediate course on hot days)
125 ml tomato juice, 125 ml tomato puree (finished product), 200 g sour cream, 100 g sweet cream, 1/2 TBSP salt, 2 pinches stevia, 2 TBSP lemon juice, 1/2 TBSP finely chopped parsley, 1/2 TBSP chopped chives, 1 envelopes of gelatine that dissolves in cold liquids, black pepper and Tobasco sauce to taste
Pour all the ingredients into a high bowl and puree with the hand mixer. Pour into the ice cream maker and freeze for approx. 40 minutes.
Tip: You can also add between 1 TBSP and 2 TBSP of balsamic vinegar (depending on the prepared quantity) and finely chopped basil leaves. In this case leave out the Tabasco sauce, parsley and chives.
Cucumber ice cream
1 cucumber, 2 TBSP lemon juice, 1 TBSP sunflower oil, 1 TBSP olive oil, 1 envelopes “Dill” spice blend for cucumber salad (or 2 TBSP finely chopped dill), 3 g stevia, 1 envelopes of gelatine that dissolves in cold liquids, 2 egg whites, salt and pepper to taste
Peel cucumbers and cut them in half, scoop out the seeds, cut in large pieces and put them in a high bowl. Puree with the hand mixer. Add all the other ingredients, except the egg whites, and mix. Add a pinch of salt to the egg whites and beat until creamy, then fold into the cucumber puree with a whisk. Pour into the ice cream maker and freeze for 30 to 40 minutes.
Buttermilk ice cream
200 ml buttermilk, 100 ml milk, 100 ml cream, 2 egg yolks, 10 g stevia, 1/2 TBSP lemon zest
Preparation variant 1
Only select this variant if you are sure you are using very fresh eggs. Pour all the ingredients into a high bowl and puree with the hand mixer. Pour into the ice cream maker and freeze for approx. 40 minutes.
Preparation variant 2
Beat egg yolks and stevia in a double boiler until creamy. Bring milk and cream to boil and stir it into the egg yolk/stevia mixture and let cool. Ideally prepare this mixture on the day before. When the egg yolk/stevia mixture (with the added milk and cream) has completely cooled, mix in the buttermilk (do not add the buttermilk before the mixture has cooled, otherwise the buttermilk will curdle). Pour into the ice cream maker and freeze for approx. 40 minutes.
Strawberry ice cream
250 g strawberries, 10 g stevia, 100 ml milk, 100 ml cream, 1 TBSP lemon juice
Pour all the ingredients into a high bowl and puree with the hand mixer. Pour into the ice cream maker and freeze for approx. 40 minutes. Tip: Add either 1 to 2 TBSP balsam or 1 to 2 EL finely chopped fresh mint leaves or basil leaves.
You can also use blueberries or raspberries instead of strawberries.
MAKING YOGHURT
Making your own fresh plain yoghurt requires only a handful of ingredients. If you wish, you can also use lactose-free milk or goat's milk for making yoghurt. The higher the fat content of the milk you use, the creamier your yoghurt becomes. Basically, you have to make sure that the milk you use and the yoghurt have the same fat content. This will give you the best possible outcome. Also, there is no need to buy new yoghurt for every preparation - you can make new yoghurt several times from the yoghurt you prepare yourself.
We recommend the use of homogenized cow's milk: If you use other types of milk, the milk should be heated to approx. 90°C before you start making yoghurt and then cooled down to approx. 40°C.
To create a starter culture, please do not use liquid, flavoured or fruit yoghurt.
Yoghurt made from milk
For 500 ml of milk you need 100 ml of probiotic yoghurt or, alternatively, 3 probiotic capsules that are stirred into the milk. Thoroughly mix the milk with the yoghurt or the probiotic capsules and pour the mixture into the ice cream container. Start the yoghurt program.
Carefully fill the finished yoghurt into portion-size jars or one large jar, close the jars well and put the yoghurt in the refrigerator for 12 hours.
Always store 200 g of yoghurt. As described above, you will then be able to use this stored yoghurt to make a new batch of yoghurt.
GUARANTEE CONDITIONS
We grant a warranty of 24 months for this UNOLD brand appliance - 12 months for commercial use - from the date of purchase, covering damage that is demonstrably due to factory defects when used as intended. Within the warranty period, we will remedy material and manufacturing defects at our discretion by repair or exchange. Our warranty services apply exclusively to appliances sold in Germany and Austria. For other countries, please contact the responsible importer. Please send appliances for which you seek removal of defects, together with a copy of the machine-generated proof of purchase that shows the date of purchase along with a description of the fault, to our customer service department using suitable packaging. On our website https://unold.de/pages/rucksendungen, you can print out a return slip (only for return shipments from Germany and Austria). All types of damage attributable to wear and tear, improper handling and non-compliance with the maintenance and care instructions are excluded from the warranty. The warranty claim is void if repairs or interventions on the appliance are carried out by a third party. This manufacturer's warranty does not limit your statutory rights or your claims against the seller or dealer under the purchase contract in accordance with the provisions of the German Civil Code (BGB). Your statutory rights as a consumer, in particular your rights to warranty and the statutory claims for defects in accordance with Sections 437 et seqq. BGB, remain unaffected.
UNOLD AG, Mannheimer Straße 4, D-68766 Hockenheim
WASTE DISPOSAL / ENVIRONMENTAL PROTECTION
Our appliances are produced on a highquality level for a long lifetime. Regular maintenance and expert repairs by our after-sales service can extend the useful life of the appliance. If an appliance is defective and repair is not possible, we ask you to follow the following instructions for disposal. Do not dispose this appliance together with your standard household waste. There is a legal requirement to dispose of waste electrical and electronic equipment (WEEE) as well as batteries and accumulators separately from household waste. You can recognise this waste equipment by the crossed-out wheeled bin symbol (WEEE symbol). Please bring this product to an approved collection point for recycling of electric and electronic products. By separate collection and disposal of waste products you help to protect natural resources and ensure, that the product is disposed in an adequate way to protect health and environment.
The instruction booklet is also available for download: www.unold.de
The authors have thoroughly considered and tested the recipes included in these operating instructions. Nevertheless, a guarantee cannot be accepted. The authors, respectively UNOLD AG and their assignees shall not be liable for personal injuries, material damages and financial loss.
NOTICE D'UTILISATION MODÈLE 48826
AVANT-PROPOS
natural_image
Technical line drawing of a mechanical assembly with a dome-shaped component and a circular base, labeled Fig. 1 (no text or symbols on the diagram itself)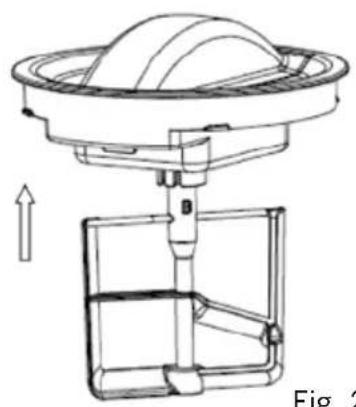
natural_image
Technical line drawing of a mechanical device with a dome-shaped top and a base, showing an upward arrow (no text or symbols)Fig. 2

natural_image
Line drawing of a microwave oven with a lid and cooling unit, showing airflow direction (no text or symbols)Fig. 3
CONDITIONS DE GARANTIE
natural_image
Technical line drawing of a mechanical device with a dome-shaped top component and a base plate (no text or symbols)
natural_image
Technical line drawing of a mechanical device with a dome-shaped top and a side-mounted base (no text or symbols)Afb. 2

natural_image
Line drawing of a microwave oven with a lid and cooling unit, showing airflow direction (no text or symbols)Afb. 3
natural_image
Technical line drawing of a mechanical device with a dome-shaped top component and a circular base (no text or symbols)Fig. 1
natural_image
Technical line drawing of a mechanical device with a dome-shaped top and a base structure, showing no text or symbols.Fig. 2
natural_image
Line drawing of a microwave oven with a lid and cooling unit, showing airflow direction (no text or symbols)Fig. 3
natural_image
Technical line drawing of a mechanical device with a dome-shaped top component and a circular base, labeled Fig. 1 (no text or symbols on the diagram itself)
natural_image
Technical line drawing of a mechanical device with a dome-shaped top component and a side view showing internal components (no text or symbols)Fig. 2

natural_image
Line drawing of a microwave oven with a lid and cooling unit, showing airflow direction (no text or symbols)Fig. 3
natural_image
Technical line drawing of a mechanical assembly with a dome-shaped component and a base plate (no text or symbols)
natural_image
Technical line drawing of a mechanical device with a dome-shaped top and a base, showing internal components and an upward arrow (no text or symbols)
natural_image
Line drawing of a microwave oven with a lid and cooling unit, showing airflow direction (no text or symbols)rys. 3