Eco-Light II - Medical walker Vermeiren - Free user manual and instructions
Find the device manual for free Eco-Light II Vermeiren in PDF.

User questions about Eco-Light II Vermeiren
0 question about this device. Answer the ones you know or ask your own.
Ask a new question about this device
Download the instructions for your Medical walker in PDF format for free! Find your manual Eco-Light II - Vermeiren and take your electronic device back in hand. On this page are published all the documents necessary for the use of your device. Eco-Light II by Vermeiren.
USER MANUAL Eco-Light II Vermeiren
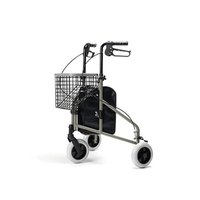
natural_image
Modern mobility walker with black and gray wheels, featuring a basket and handle (no text or symbols visible)
text_image
VERMEIRENContents
Preface
4
1. Your product 5
2. Before use 6
2.1. Intended use and indications 6
2.2. Safety instructions and applicable risks 7
2.3. Symbols on the rollator 8
2.4. Upon delivery 9
2.5. Shipping and storage 9
3. Assembly/Disassembly and adjustments 10
3.1. Assembly 10
3.2. Height adjustments 11
3.3. Adjusting the brakes 12
4. Using your rollator 12
4.1. Brake system 12
4.2. Folding/Unfolding 13
4.3. Sitting down, standing up and walking 14
5. Maintenance 15
5.1. Cleaning 15
5.2. Disinfection 15
5.3. Inspection / Service / Repairs 16
5.4. Expected lifespan 16
5.5. Reuse 17
5.6. Disposal at end of life 17
5.7. Warranty 17
6. Technical specifications 18
Preface
Congratulations! You are now owner of a Vermeiren rollator!
Thank you for your trust in the products of Vermeiren. To support you on the use of this rollator and its operating options, this manual is offered. Please read it carefully; it will help you to get familiar with the operation, capabilities and limitations of your rollator.
If you still have questions after reading this manual, do not hesitate to contact your specialist dealer. He/she will be glad to help you.
Important note
To ensure your safety, and to prolong the lifetime of your product, please take good care of it and have it checked and serviced on a regular basis.
This manual reflects the latest product developments. Vermeiren has the right to implement changes to this type of product without any obligation to adapt or replace similar products previously delivered.
Pictures of the product are used to clarify the instructions. Details of the depicted product may deviate from your product.
Information available
On our website http://www.vermeiren.com/ you will always find the most recent version of the following information. Please consult this website regularly for possible updates.
Visually impaired people can download the electronic version of this manual and have it read out by means of a text-to-speech software application.
 | User manualFor user and specialist dealer |
 | Service manual for rollatorsFor specialist dealer |
 | EC declaration of conformity |
1. Your product

text_image
Labeled diagram of a stroller with numbered parts for identification and assembly reference.- Handgrips
- Brake lever
- Backrest
- Seat
- Basket
- Front wheels
- Rear wheels
- Brake cable
- Tipping aid
-
Reflectors
-
Walking stick holder
- Identification plate
2. Before use
2.1. Intended use and indications
• This product is a medical device.
- Indications and contraindications: The rollator is meant as support of the leg function during walking and daily activities. Do not use the rollator if you have other physical limitations that may cause unsafe use of your rollator, like a weak arm, balance disorders, impaired vision, limb loss, ...
- The rollator is designed and produced solely to be used as walking aid for one person with a maximum weight of 120 kg.
- The rollator will compensate the lack of adequate support by the legs by leaning on, or moving with, the rollator with usage of the upper limbs or chest. The rollator will provide better stability, support and safety during walking.
- The rollator can be used indoors and outdoors.
- It is not intended for transport of goods and/or more people than the user. It is also not intended to be used as a transport aid while sitting down.
- It should only be used on surfaces where all four wheels are touching the ground. Do not use the rollator on rocky, bumpy or sandy terrain, or places with a steep inclination. The rollator may become unstable. Look for flat, stable areas, and bevelled kerbs to walk with your rollator.
- The warranty on this product is based on normal use and maintenance as described in this manual. Damage to your product caused by improper use or lack of maintenance will cause the warranty to lapse.
- Please check all technical details and limits of your rollator in §6..
2.2. Safety instructions and applicable risks
EN
CAUTION
Risk of injuries
- Please read and follow the instructions in this manual. Otherwise you may get injured, or your product may get damaged.
Keep the following general warnings in mind during use:
- Check that no stones or other objects block the wheels of the rollator.
- Make sure that both brake levers are in parking mode before you use the rollator as aid to stand up. When you are standing comfortable and stable, you can unlock the parking brakes.
- While walking, keep both hands on the handgrips.
- Be aware that some parts of your rollator may get very hot or cold due to ambient temperature, solar radiation, heating devices, etc. Be careful when touching.
- Before every use, check that the height adjustments are firmly secured, see §3.2..
- Do not hold the handgrips with wet hands. If you do so, you can lose your grip and lose your balance.
- Do not proceed with your rollator into traffic. Always stay on the pavement.
• Take note of the instructions for care and service. The manufacturer is not liable for damage caused by improper servicing / care.
Any serious incident [MDR (EU) 2017/745 §2 (65)] that has occurred in relation to the device should be reported to the manufacturer and the competent authority of the Member State in which the user and/or patient is established.
Be aware that your rollator may interfere with some types of anti-theft systems, depending on the settings used. This may cause the shop's alarm to go off.
2.3. Symbols on the rollator
i Identification plate is located on the left rear leg at the inner side of the base frame
 | Maximum weight of the user in kg |
 | Type designation |
 | Catalogue number |
 | Serial number |
| [XXXH] | Medical device |
 | Manufacturer |
 | Date of manufacture |
 | Declaration of conformity |
 | Attention: important information |
 | It is advised to read the manual |
 | Do not use as a transport aid while sitting down. |
2.4. Upon delivery
Unpack your product and verify if the delivery is complete. The following items should be included:
- Base frame with seat, 4 wheels, backrest;
- Handgrips with brakes
- Basket
- Manual
Verify your product for transport damage. If you find any damages after delivery, contact the transporter.
2.5. Shipping and storage
The shipping and storage of the rollator should happen according to the technical specifications in §6.. Make sure that the rollator is stored dry.
Provide sufficient covering or packaging to protect the rollator from rust and foreign bodies (e.g. salt water, sea air, sand, dust).
Make sure no objects are stored on or against the rollator to prevent damage.
If the packaging of your product has been damaged, (unintentionally) opened, or affected by environmental conditions (moisture, heat,...) upon delivery, check the device integrity of your product. When in doubt, contact your specialist dealer.
3. Assembly/Disassembly and adjustments
3.1. Assembly
- Slide the handgrips in the front frame.
- If needed, adjust the cables connected to the brakes.
- Adjust the handgrips to the desired height (see §3.2.).
3.1.1. Mounting the basket
CAUTION
Risk of falling or tipping over
- Do not overload the basket.
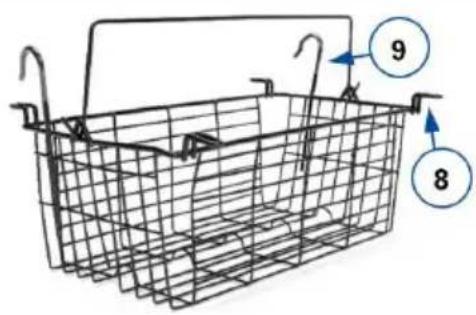
text_image
9 8The maximum carrying weight of the shopping basket can be found in §6..
The shopping basket can be mounted in two ways:
- Under the seat, by placing the 4 clips (8) on the horizontal tubes on which the seat rests.
- In front, by resting the basket on the lower horizontal tube and mounting the 2 large hooks (9) to the upper horizontal tube.
3.2. Height adjustments
EN
CAUTION
Risk of falling or tipping over
- Firmly fix the handgrips before using the rollator.
- Do not exceed the minimum or maximum adjustment as indicated on the handgrips. Your rollator will not be stable anymore.
CAUTION
Risk of damage
- Don't pull the handgrips too high to prevent damage to the brake cable.
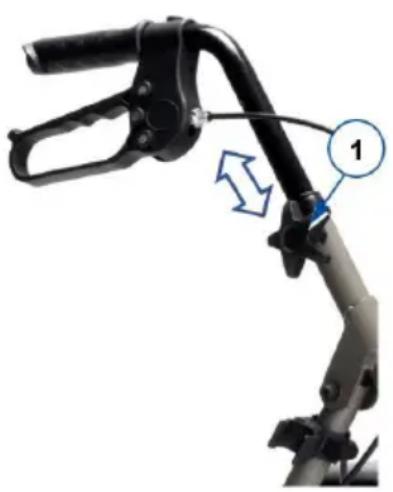
The rollator can be altered in height by adjusting the handgrips:
- Put your rollator in parking mode, see §4.1..
- Loosen and remove the star button (1).
- Remove the bolt from the tube.
- Adjust the handle to the desired height (7 positions, steps of 25 mm).
When standing straight, the handgrips should be as high as your wrists. Leave your arms hanging loose.
- Place the bolt back in the hole of the tube.
-
Place the star button (1) on the bolt. Retighten firmly by hand.
-
Repeat for the second handgrip. Make sure that both handgrips are well secured, and that they are set to the same height.
natural_image
Mechanical lever diagram with labeled component '1' and directional arrow (no text or symbols beyond label)3.3. Adjusting the brakes
The force of the brakes can be adjusted by loosening/tightening the screw (14) on the back of the brake lever.

natural_image
Close-up of a black mechanical clamp or tool with a blue arrow pointing to a small component labeled '14' (no text or symbols on the clamp itself)4. Using your rollator
4.1. Brake system
CAUTION
Risk of falling
- Check the working of the brakes to ensure your safety. The condition of the brakes is influenced by wear, oil and other contamination of the rear wheels and braking mechanism.
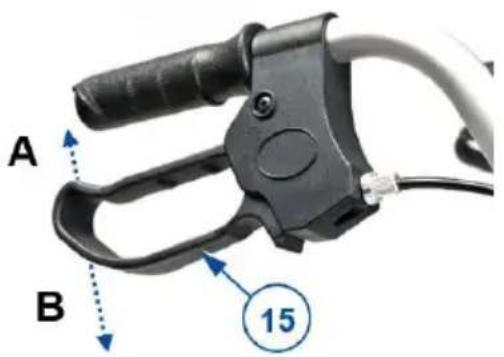
The rollator is equipped with brakes, operated by two brake levers (15). The brake levers operate in two modes: running brakes and parking brakes.
CAUTION
Risk of damage
- Do not push the rollator too hard while using the running brakes. This may cause damage to the tyres or brakes.
To use the running brakes, pull both brake levers (15) simultaneously upwards [A] in a squeezing motion. To stop braking, release the brake levers.
To use the parking brakes, push both brake levers (15) downwards in locked position [B]. Always use both parking brakes simultaneously. To end the parking mode, pull both brake levers simultaneously upwards.
text_image
A B 154.2. Folding/Unfolding
CAUTION
Risk of entrapment
- Keep fingers, buckles, jewellery and clothes away from the folding mechanism.
CAUTION
Risk of falling
- Check that the rollator is completely open and that the frame is locked.

text_image
Diagram showing two different types of mobility strollers with numbered parts and directional arrows indicating movement or change.4.2.1. Unfolding the rollator
- Push both brake levers down to parking position, see §4.1..
- Place the rollator with four wheels on the ground while holding the frame tubes.
- Pull the front (18) and rear (19) frame tubes apart, and push the bars of the folding mechanism (20) as far down as possible. Prevent your fingers from being trapped in the mechanism!
- Place the shopping basket. Lift the seat upwards if necessary.
- Fold down the seat.
- Turn the backrest down, if it is up.
- Adjust the rollator to the desired height (see §3.2.).
4.2.2. Folding the rollator
- Stand behind the rollator.
- Push both brake levers down to parking position, see §4.1..
- Fold the seat upward.
- Remove the shopping basket.
- Pull the brace (20) upward to close the frame a bit.
- Close the frame completely by pushing front and rear frame tubes together.
- If necessary, turn the backrest upwards.
4.3. Sitting down, standing up and walking
CAUTION
Risk of falling
- Make sure that both brake levers are in parking position before sitting down, see §4.1.. Keep the brake levers in this position until you start walking again. Keep your feet between the rear wheels.
- Do not propel the rollator while seated.
- Push both brake levers down to parking position.
- Check whether the backrest and seat are turned down and secured into place.
- While leaning on the handgrips, turn around and sit down on the seat.
-
To stand up again, lean on the handgrips and turn around.
-
Pull both brake levers up and use the running brakes.
- Release the brake levers and step forward with the rollator close to your body.
5. Maintenance
i Regular care ensures that your rollator is preserved in a perfectly functional condition. For the maintenance manual, refer to the Vermeiren website: www.vermeiren.com.
5.1. Cleaning
Use a soft, damp cloth and lukewarm water with a mild household soap to clean the rollator. Avoid soaking. Do not use abrasive cleaning agents to clean.
5.2. Disinfection
CAUTION
Risk of damage
- Disinfections may only be undertaken by trained persons. Consult your specialist dealer.
Use a soft, damp cloth and lukewarm water with a mild household disinfectant to clean the rollator.
5.3. Inspection / Service / Repairs
Before you resume use of the rollator, it should be inspected on the following points:
- Completeness.
- Folding mechanism: functioning well.
- Bolts and nuts: tightly fastened.
- Brakes: functioning well.
- Wheels (stability, tracking, fixing screws).
- In case of regular contact with wires, hair or other residues, the wheels may get blocked. Check regularly that the wheels rotate freely and that they are in good condition.
• Frame (deformation, stability, connections). - Handgrips (safe locking of height adjustment system, good support of handgrips).
- Seat and backrest (wear or damage)
Your rollator is constructed of aluminium and plastic components. We recommend to have your product inspected at least once a year, but the service frequency depends on the frequency and intensity of use. Consult your specialist dealer to make an agreement on service frequency.
Repairs and replacements may only be undertaken by trained persons, and only genuine replacement parts of Vermeiren should be used.
Do not hesitate to use the services offered by your specialist dealer. He/she will be glad to assist you regarding any service and repairs.
5.4. Expected lifespan
The expected service life of your rollator is 5 years. The lifespan of the rollator is influenced by its use, storage, maintenance, service and cleaning.
5.5. Reuse
Before each reuse, have the rollator disinfected, inspected and serviced according to the instructions in §5.2. and §5.3.
5.6. Disposal at end of life
At end of life, you need to dispose your rollator according to the local environmental legislation. The best way to do so, is to disassemble the rollator to facilitate the transport of recyclable parts.
5.7. Warranty
The warranty on this product is subject to the general terms and conditions of each country.
6. Technical specifications
The technical details below are only valid for this rollator, at standard settings and optimal ambient conditions. Take these details into account during use.
| Brand Vermeiren | |
| Product group Rollator | |
| Type Eco-Light II | |
| Description Dimensions | |
| Maximum user weight 120 kg | |
| Maximum basket load 5 kg | |
| Overall length 695 mm | |
| Folded length 350 - 400 mm | |
| Overall width 615 mm | |
| Folded width 615 mm | |
| Overall height 800 - 930 mm | |
| Folded height 920 mm | |
| Handgrip height 800 - 930 mm | |
| Recommended body height 1650 - 1950 mm | |
| Distance between handgrips | 445 mm |
| Seat height | 560 mm |
| Seat width | 355 mm |
| Seat depth | 305 mm |
| Total mass- without basket | 7,5 kg6,9 kg |
| Wheel diameter | 200 mm |
| Brakes | Running & parking brakes |
| Turning width | 900 mm |
| Use temperature | +5°C - +41°C |
| Storage and use humidity | 30% - 70% |
| We reserve the right to introduce technical changes. Measurement tolerance +- 15 mm / 1,5 kg / 1,5° | |
Table des matières
FR
Préface
20
1. Votre produit 21
text_image
Labeled diagram of a stroller with numbered parts for identification and assembly reference.natural_image
Mechanical lever mechanism with labeled component '1' and directional arrow (no text or symbols beyond label)natural_image
Close-up of a black mechanical clamp or tool with a blue arrow pointing to a numbered component (14), no visible text or symbols on the object itself.text_image
Diagram showing two different stroller models with numbered parts and directional arrows indicating motion or change.text_image
Labeled diagram of a baby stroller with numbered parts for identification and assembly reference.natural_image
Mechanical linkage component with labeled parts (no text or symbols visible)3.3. De remmen afstellen
natural_image
Close-up of a black mechanical clamp or tool with a blue arrow pointing to a numbered component (14), no visible text or symbols on the object itself.text_image
Diagram showing two different types of mobility strollers with numbered parts and directional arrows indicating movement or change.text_image
Diagram of a stroller with numbered parts for identification and labelingnatural_image
Mechanical linkage device with labeled component '1' and directional arrow (no text or symbols beyond label)natural_image
Close-up of a black mechanical clamp or tool with a numbered annotation (14) pointing to a cable or wire attachment point (no text or symbols on the clamp itself)text_image
Diagram showing two different types of mobility strollers with numbered parts and directional arrows indicating movement or rotation.text_image
Labeled diagram of a stroller with numbered parts for identification and assembly reference.natural_image
Mechanical linkage component with labeled parts (no text or symbols visible)natural_image
Close-up of a black mechanical clamp or tool with a blue arrow pointing to a numbered component (14), no visible text or symbols on the object itself.text_image
Diagram showing two different stroller models with numbered parts and directional arrows indicating motion or change.text_image
Diagram of a stroller with numbered parts for identification and assembly reference.natural_image
Mechanical linkage component with labeled parts (no text or symbols visible)ES
natural_image
Close-up of a black mechanical clamp or tool with a blue arrow pointing to a numbered component (14), no visible text or symbols on the object itself.4. Uso del andador
text_image
Diagram showing two different types of mobility strollers with numbered parts and directional arrows indicating movement or change.4.2.1. Despliegue del andador
text_image
Diagram of a stroller with numbered parts for identification and labelingnatural_image
Mechanical lever mechanism with labeled component '1' and directional arrow (no text or symbols beyond label)natural_image
Close-up of a black mechanical clamp or tool with a blue arrow pointing to a numbered component (14), no visible text or symbols on the object itself.text_image
Diagram showing two different stroller models with numbered parts and directional arrows indicating motion or change.
text_image
Diagram showing two different types of mobility strollers with numbered parts and directional arrows indicating motion or movement.text_image
Diagram of a stroller with numbered parts for identification and labelingnatural_image
Mechanical lever mechanism with labeled component '1' and directional arrow (no text or symbols beyond label)3.3. Seřízení brzd
natural_image
Close-up of a black mechanical clamp or tool with a blue arrow pointing to a small component labeled '14' (no text or symbols on the clamp itself)4. Použití chodítka
4.1. Brzdový systém
POZOR
Nebezpečí pádu
text_image
Diagram showing two different stroller models with numbered parts and directional arrows indicating motion or change.Service registration form
This product (name): ....
was inspected (I), serviced (S), repaired (R) or disinfected (D):
| By (stamp):Kind of work: I / S / R / DDate: | By (stamp):Kind of work: I / S / R / DDate: | By (stamp):Kind of work: I / S / R / DDate: |
| By (stamp):Kind of work: I / S / R / DDate: | By (stamp):Kind of work: I / S / R / DDate: | By (stamp):Kind of work: I / S / R / DDate: |
| By (stamp):Kind of work: I / S / R / DDate: | By (stamp):Kind of work: I / S / R / DDate: | By (stamp):Kind of world: I / S / R / DDate: |
| By (stamp):Kind of work: I / S / R / DDate: | By (stamp):Kind of work: I / S / R / DDate: | By (stamp):Kind of work: I / S / R / DDate: |
| By (stamp):Kind of work: I / S / R / DDate: | By (stamp):Kind of work: I / S /R / DDate: | By (stamp):Kind of work: I / S / R / DDate: |
| By (stamp):Kind of work: I / S / R / DDate: | By (stamp):Kind of work: I / S / R / DDate: | By (stamp):Kind of work: I / S / R / DDate: |
VERMEIREN GROUP
Vermeirenplein 1/15
2920 Kalmthout
Belgium
www.vermeiren.com
Version: D, 2025-11
Basic UDI-DI: 5415174102606EcoLightIILH
All rights reserved, including translation.