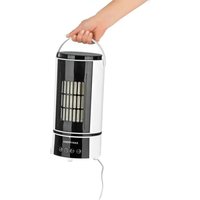
04370 - Fan EasyMaxx - Free user manual and instructions
Find the device manual for free 04370 EasyMaxx in PDF.


| Product Type | Fan with supplementary heating and humidification functions |
| Brand | EasyMaxx |
| Model | 04370 |
| Power Supply | 220 – 240 V ~ 50 Hz |
| Heating Power | max. 800 W |
| Cooling Power | max. 12 W |
| Water Tank Capacity | 700 ml |
| Protection Class | II |
| Remote Control | Yes, with AAA 1.5 V batteries (not included), range approx. 5 m |
| Number of Speeds | 4 levels (variable intensity depending on mode) |
| Rotation (Oscillation) | Yes |
| Timer | 2h, 4h, 6h, 8h |
| Operating Modes | Cooling (with humidification) and Heating |
| Lamella Frame | Removable, to be moistened for cooling mode |
| Safety | Safety switch in case of tilt >45° |
| Maintenance | Dust, wipe with a damp cloth, replace the lamella frame every 3 to 6 months |
| Dimensions (approx.) | Not specified in the manual |
| Weight (approx.) | Not specified in the manual |
| Warranty | According to manufacturer's conditions |
Frequently Asked Questions - 04370 EasyMaxx
User questions about 04370 EasyMaxx
0 question about this device. Answer the ones you know or ask your own.
Ask a new question about this device
Download the instructions for your Fan in PDF format for free! Find your manual 04370 - EasyMaxx and take your electronic device back in hand. On this page are published all the documents necessary for the use of your device. 04370 by EasyMaxx.
USER MANUAL 04370 EasyMaxx
natural_image
Interior scene with a white armchair and open storage unit, featuring a digital air conditioner and bookshelf (no visible text or symbols)04370
DE
Gebrauchsanleitung
ab Seite 3
EN
Instruction manual
starting on page 17
FR
Mode d'emploi
natural_image
Diagram of a curved road with an arrow indicating direction, no text or symbols presentnatural_image
Technical line drawing of a cylindrical device with internal compartments and a curved top panel (no text or symbols)Safety Instructions 18
Items Supplied 21
Device Overview 22
Overview of Functions 23
Before Initial Use 24
Inserting / Changing Batteries in the Remote Control 24
Moistening the Lamella Insert and Filling the Water Tank 24
Use 25
Cleaning and Storage 26
Troubleshooting 26
Technical Data 27
Disposal 27
Explanation of the Symbols


Danger symbols: These symbols indicate risks of injury (e. g. from electricity or fire). Read through the associated safety instructions carefully and follow them.
Do not cover the device during operation!

Caution: hot surfaces!

Protection class II

Read instructions before use!

Supplementary information
Explanation of the Signal Words
DANGER Warns of serious injuries and danger to life.
WARNING Warns of possible serious injuries and danger to life.
CAUTION Warns of slight to moderate injuries.
NOTICE Warns of damage to property.
Dear Customer,
We are delighted that you have chosen this heating / cooling device.
Before using the device for the first time, please read the operating instructions carefully and keep them for future reference. If the device is given to someone else, it should always be accompanied by these operating instructions. They are an integral part of the device.
The manufacturer and importer do not accept any liability if the information in these operating instructions is not complied with.
If you have any questions about the device and about spare parts / accessories, please contact the customer service department via our website: www.dspro.de/kontakt
Intended Use
- The device is intended to be used for supplementary heating as well as cooling and humidifi cation of rooms.
- The device is only suitable for well-insulated rooms or occasional use.
- The device is not a substitute for a heating or air-conditioning system.
- The device is for personal domestic use only and is not intended for commercial applications.
- The device should only be used as described in the operating instructions. Any other use is deemed to be improper.
- The warranty does not cover faults caused by incorrect handling, damage, calcification or repair attempts. This also applies to normal wear and tear.
Safety Instructions
■ Beware of burns! Parts of the device can become very hot and cause burns if touched. Special care must be taken in the presence of children or vulnerable persons.
This device may be used by children aged 8 and over and by people with reduced physical, sensory or mental abilities or a lack of experience and / or knowledge if they are supervised or have received instruction on how to use the device safely and have understood the dangers resulting from failure to comply with the relevant safety precautions.
■ Children must not play with the device.
- Cleaning and user maintenance may not be performed by children, unless they are supervised.
■ Children under three years of age must be kept away from the device, unless they are under constant supervision.
Children aged between three and eight may only ever switch the device on and off if they are supervised or have received instruction on how to use the device safely and have understood the dangers resulting from failure to comply with the relevant safety precautions, provided that the device is positioned or installed in its normal place of use.
■ Connection as well as regulation, cleaning and user maintenance may not be carried out by children aged between three and eight.

WARNING – DO NOT COVER: To prevent the device from overheating, it must not be covered.
- The device must not be set up directly beneath a wall socket.
- Do not use this device in the immediate vicinity of a bath, a shower or a swimming pool.
■ WARNING: This device is not equipped with a facility to regulate the room temperature. The devicemust not be used in small rooms inhabited by people who are unable to leave the room without help, unless constant supervision is guaranteed. - The device is not designed to be operated with an external timer or a separate remote control system.
- The device must always be disconnected from the mains power when it is left unattended, during the insertion or removal of the water tank, and before changing the lamella insert.
- Do not make any modifications to the device. Also do not replace the mains cable yourself. If the device or the connecting cable of the device are damaged, they must be replaced by the manufacturer, customer service department or a similarly qualified person (e.g. specialist workshop) in order to avoid any hazards.

DANGER – Risk of Electric Shock
■ Use and store the device only in closed spaces.
- Do not use the device in rooms with high humidity.
- Never immerse the device and the connecting cable in water or other liquids and ensure that they cannot fall into water or become wet.
- Should the device fall into water, switch off the power supply immediately. Do not attempt to pull it out of the water while it is still connected to the mains power! Have the device checked in a specialist workshop before using it again.
- Never touch the device and the connecting cable with wet hands when these components are connected to the mains power.

WARNING – Danger of Injury
■ Danger of suffocation! Keep children and animals away from the packaging material.
- Danger of tripping! Make sure that the connected mains cable does not present a trip hazard.
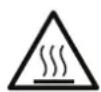
CAUTION: Hot surfaces! The device may become hot during use. Only the operating panel and the handle may be touched! Allow the device to cool down after it has been switched off.
- Danger of strangulation! Make sure that the mains cable is always kept out of the reach of small children and animals.
■ Danger of burns from battery acid!
- Batteries can be deadly if swallowed. Keep batteries and the device out of the reach of small children and animals. If a battery is swallowed, seek medical assistance immediately.
- If a battery leaks, avoid physical contact with the battery acid, and wear protective gloves if necessary. If you touch battery acid, rinse the affected areas with abundant clear water straight away and seek medical assistance immediately.
■ The device must not be moved during use.

WARNING – Danger of Fire
- Do not use the device in rooms containing easily ignitable dust or poisonous and explosive fumes.
- Do not use the device together with or in the immediate vicinity of air fresheners or similar products.
- Do not connect the device along with other devices (with a high wattage) to a multiple socket in order to prevent overloading and a possible short circuit (fire).
- Do not use the device in conjunction with extension cables.
- Do not use the device in the vicinity of highly flammable materials (curtains, textiles, etc.). Do not place any combustible materials (e. g. cardboard, paper or plastic) on the device.
- Do not insert any objects into the openings of the device.
- Do not place the device on a deep-pile carpet when it is heating.
In the event of a fire: Do not extinguish with water! Smother the flames with a fireproof blanket or a suitable fire extinguisher.
NOTICE – Risk of Damage to Material and Property
- Only connect the device to a socket with safety contacts that is properly installed and matches the technical data of the device. The socket must also be readily accessible after connection so that the connection to the mains can quickly be isolated.
21 EN
- Lay the mains cable in such a way that it does not become squashed or bent and does not come into contact with hot surfaces (also applies to the hot surfaces of the device!).
- Switch off the device and pull the mains plug out of the plug socket if an error occurs during operation, when there is a power cut or before a thunderstorm.
■ Always switch off the device first before the mains plug is pulled out of the plug socket.
■ Never pull or carry the device by the mains cable. When you pull it out of the socket, always pull on the mains plug and never the mains cable! - Protect the device from other heat sources, naked flames, sub-zero temperatures, persistent moisture, wet conditions and impacts.
■ Use only original spare parts from the manufacturer in order to guarantee that there is no interference that may prevent the device from working and to avoid damage. - Do not lay or place any heavy objects on the device.
NOTICE – Risk of Damage to Material and Property from Batteries
- Use only the battery type specified in the “Technical Data”.
Take batteries out of the device when they are dead or if you will not be using the device for a prolonged period. This will prevent any damage if a battery leaks. - Do not use the device if a battery has leaked. Remove a leaking battery from the battery compartment immediately.
■ Always replace all batteries together. Do not use batteries of different types or brands, or batteries with different capacities.
Items Supplied
Check the items supplied for completeness and transport damage. If you find any damage to the device or the connecting cable, do not (!) use the device, but contact our customer service department.
- Main device
- Water tank
- Lamella insert
- Remote control
- Operating Instructions

You need two 1.5 V batteries of the AAA type for the remote control. These are not included in the scope of supply.
Device Overview
Front Back
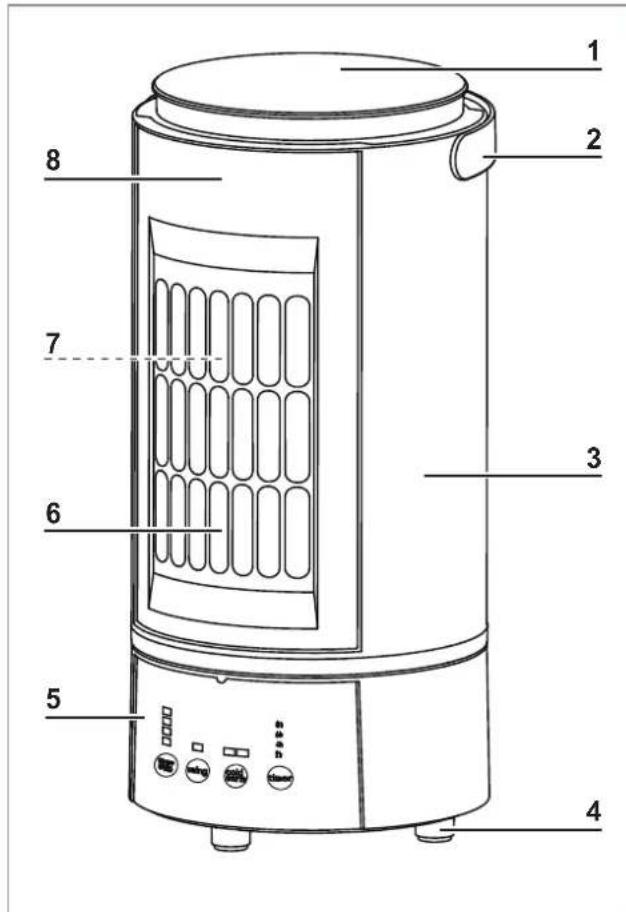
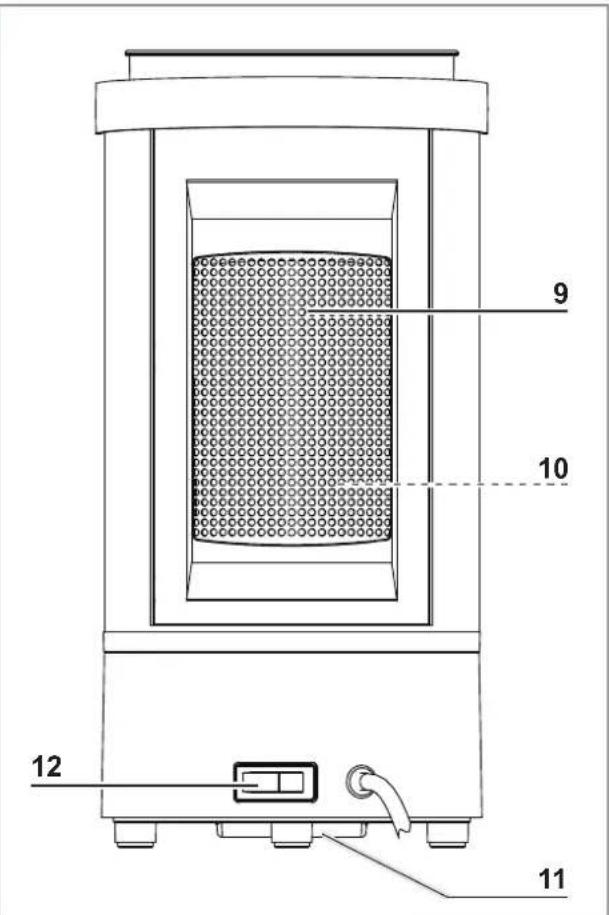
1 Water tank
2 Carrying handle
3 Housing
4 Base
5 Control panel
6 Cold-air outlet
7 Lamella insert (under the cover)
8 Cold-air cover (removable)
9 Warm-air outlet
10 Heating elements
11 Air intake
12 On / Off switch
Control panel
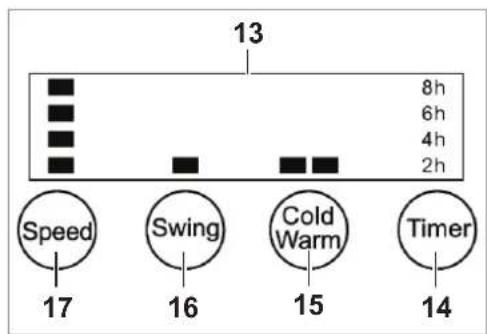
13 Display
14 Timer button
15 Cold / Warm button
16 Swing button
17 Speed button
Overview of Functions
| Button Function Display* | ||
| Speed (17) | Switching On / Off | On: 1st bar lights upStand-by: 1st bar fl ashes |
| Setting the Speed / Intensity(4 levels) | Level 1: 1st bar lights upLevel 2: 2nd bar lights upLevel 3: 3rd bar lights upLevel 4: 4th bar lights up | |
| Swing (16) Switching Rotation On / Off | On: bar lights upOff: bar is not lit up | |
| Cold Warm (15) | Setting the mode(Cooling / Heating) | Cooling: blue bar lights upHeating: red bar lights up |
| Timer (14) | Setting the timer(2H, 4H, 6H, 8H) | depending on the setting, the number lights up |
| * The information in this column refers to the display above the corresponding button. | ||
- By pressing a button several times, the respective function can be switched on and off, or the user can switch between the various setting options of the function. This results in the following options or sequences for the functions:
- Speed: Level 1 (On) - Level 2 - Level 3 - Level 4 - Standby
- Swing: On - Off
- Cold Warm: Cold - Warm
- Timer: 2H - 4H - 6H - 8H - Off
- Depending on operating mode, the levels which can be set with the Speed button refer to either the intensity or the speed:
| Level | Heating mode | Cooling mode |
| 1 | 8 seconds of heating, 8 seconds pause | low speed |
| 2 | 8 seconds of heating, 6 seconds pause | lower medium speed |
| 3 | 8 seconds of heating, 4 seconds pause | upper medium speed |
| 4 | continuous heating | high speed |
- As an alternative to the buttons on the control panel (5), the device can be controlled using the buttons of the same name on the remote control.
PLEASE NOTE: Only the speed can be controlled with the Speed button on the remote control, which means that the sequence is changed as follows: Level 1 (On) – Level 2 – Level 3 – Level 4. Press the Standby button on the remote control to put the device into standby.

Pressing the Standby button puts the device into standby without first going through the various phases.
- The buttons on the control panel and the remote control only work if the device has been turned on using the On/Off switch (12). PLEASE NOTE: After the calibration process (see the "Use" chapter) the device can only be started via the Speed button on the remote control.
- The device is equipped with a safety switch that automatically puts the device into standby if the device is tilted more than 45^ ( ± 10^ ).
Before Initial Use
- Before using the device, remove all packaging materials and any labels that may be on the device and are used for protection during transportation or for advertising. Never remove the rating plate and any possible warnings!
- Insert batteries into the remote control (see the “Inserting / Changing Batteries in the Remote Control” chapter).
Inserting / Changing Batteries in the Remote Control
Before inserting the batteries, check whether the contacts in the remote control and on the batteries are clean, and clean them if necessary.
-
Slide open the battery compartment cover in the direction of the arrow and remove it.
-
Remove the used batteries if necessary and insert two new batteries (1.5 V, AAA type). Pay attention to the correct polarity (+ / -).
-
Place the battery compartment cover back on the battery compartment and turn it counter to the direction of the arrow to shut it.
Replace the batteries when the power of the remote control starts to wane.
Moistening the Lamella Insert and Filling the Water Tank
- Pull the water tank (1) up out of the device.
natural_image
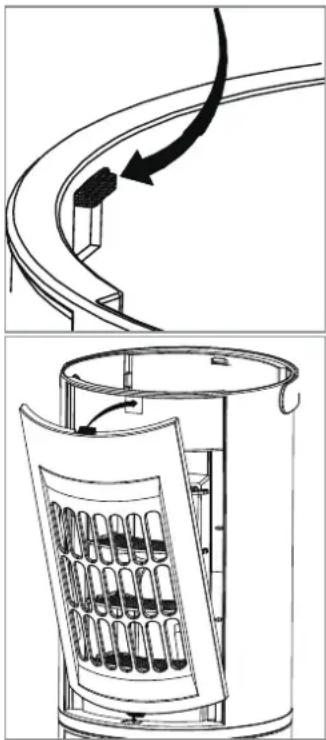
Diagram showing a curved conveyor belt system and its internal storage unit with multiple test tubes (no text or symbols)- Press down the catch of the cold-air cover (8) on the inner edge of the device. The cold-air cover separates from the housing (3).
- Remove the cold-air cover from the front of the device.
- Remove the lamella insert (7) from the device.
- Immerse the lamella insert in cold water.
- Shake off excess water and place the lamella insert back into the device.
- Insert the cold-air cover into the housing and press it firmly into place at the top. Make sure that the latch is locked into the corresponding recess. The cold-air cover must engage audibly.
- Unscrew the valve at the lower end of the water tank.
- Fill the water tank with max. 700 ml cold tap water.
- Tighten the valve of the water tank again.
- Insert the water tank into the device and press down slightly. The blades on the water tank must be flush with the edge of the housing.
Use

PLEASE NOTE!!
■ WARNING – Danger of Fire!!
- Keep combustible materials away from the device. Furnishings such as upholstered furniture or curtains should be a minimum of 30~cm away. - Do not leave the device unattended, so that you can intervene immediately in the event of any faults.
Some items of furniture have coatings which might affect the rubber feet of the device. If necessary, a mat should therefore be placed under the device.
- Do not cover the device during operation. Do not hang any laundry or similar items over the device to dry.
The device can be used for additional heating as well as for cooling and humidifying the air. If the device is to be used for cooling, the lamella insert (7) must be moistened and the water tank filled before use (see the “Moistening the Lamella Insert and Filling the Water Tank” chapter).
- Always place the device on a dry, flat, solid, heat and moisture-resistant surface with clear space of at least 30 cm above it and on all sides.
- Insert the mains plug into a properly installed socket that is easily accessible.
- Move the On/Off switch (12) to position I. The whole of the display (13) lights up briefly.
The calibration procedure for aligning the device then begins. The upper part of the device rotates to determine its current position and finally returns to the starting position. The cold air outlet (6) is located at the front, above the control panel (5). During this procedure, the four bars above the Speed button (17) light up one after the other. When the first bar flashes, the process is completed and the device is in standby mode.
- Press the Speed button to switch the device on. The fan begins to operate at Level 1. The 1st bar lights up constantly.

The device is in the pre-set cooling mode (blue bar). Rotation and timer are both deactivated.
- Press the Cold Warm (15) button to switch to the heating mode. The red bar lights up and the upper part of the device rotates 180^ on its own axis until the warm air outlet (9) points forward. The heating process does not start until the upper part has rotated completely.

When switching from heating to cooling mode, the heating stops and the device remains in the same position to cool down for about 15 seconds. The upper part of the device then rotates to the cooling position.
- If necessary, set the speed level, rotation and timer (see the "Function Overview" chapter). PLEASE NOTE: If you have set the timer, the device automatically switches to stand-by after the set time elapses.
- Press the Speed button several times to switch off the device.
- When you have finished using the device you set the On/Off switch to O and pull the mains plug out of the socket.
Cleaning and Storage

PLEASE NOTE!!
- Do not use any caustic or abrasive cleaning agents for cleaning. These can damage the surface.
- Dust down the device if necessary or wipe it down with a damp cloth if necessary. Then wipe it dry with a dry cloth.
- Keep the device ready to operate. Regularly (every 3 to 6 months) or as required you should change the lamella insert (7) (see the “Moistening the Lamella Insert and Filling the Water Tank” chapter).
- Remove any residual water from the water tank (1) if the device is not to be used for a period of time or before stowing it away.
- When not in use, the device should be stored in a clean, dry place which is protected from dust and is not accessible to children and animals.
Troubleshooting
If the device does not work properly, check whether you are able to rectify the problem yourself. If the problem cannot be solved with the steps that are listed, contact the customer service department.

Do not attempt to repair an electrical device yourself!
| Problem Possible cause Fix | ||
| The device does not work. | The mains plug is not inserted correctly in the socket. | Correct the fi t of the mains plug. |
| The socket is defective. Try another socket. | ||
| No mains voltage is present. | Check the fuse of the mains connection. | |
| The On / Off switch (12) is in position O. | Move the On / Off switch to position I. | |
| The device has been tilted more than 45° (± 10°) and the safety switch has been activated, which automatically puts the device into standby. | Place the device on a level and fi rm surface. | |
| The fuse in the fuse box is triggered. | Too many devices connected to the same circuit. | Reduce the number of devices in the circuit. |
| The air in the cooling mode is not cold. | The lamella insert (7) is too dry. | Moisten the lamella insert. |
| The water tank (1) is empty. Fill | the water tank. | |
| The remote control does not work. | The batteries are empty. Change the batteries. | |
| There is an obstruction between the remote control and the sensor in the device (control panel). | Remove any obstructions or point the remote control at the sensor from another position. | |
| The distance between the remote control and the unit is too great. | Reduce the distance. | |
| During use, an unpleasant smell is detected. | The device is being used for the first time. | There are production residues in / on the device. This is normal and will not occur again later. Make sure that the room is well ventilated! |
Technical Data
Article number: 04370
ID of instructions: Z 04370 M DS V1 1118
Device
Model number: TS-20914
Power supply: 220 - 240 V \~ 50 Hz
Power:
Heating: max. 800 W
Cooling: max. 12 W
Capacity of water tank: max. 700 ml
Protection class: II
Remote Control
Power supply: 3 V (2 x 1.5 V battery, AAA type)
Range: approx. 5 m

Disposal


Dispose of the packaging material in an environmentally friendly manner so that it can be recycled.
This device is governed by the European Directive 2012/19/EU on waste electrical and electronic equipment (WEEE). Do not dispose of the device as normal domestic waste, but rather in an environmentally friendly manner via an officially approved waste disposal company.
Batteries should be removed prior to disposal of the device and disposed of separately from the device at suitable collection points.
Customer Service / Importer:
Tel.: +49 38851 314650 (Calls to German landlines are subject to charges. The cost varies depending on the service provider.)
All rights reserved.
| Model designation(s): TS-20914 | |||||
| Indication Symbol Value Unit Indication Unit | |||||
| Heat output | Only in the case of electric storage space heaters: type of heat supply control (please select one option) | ||||
| Rated heat output | P_nom | 0.8 kW | manual control of the heat supply with integrated thermostat | ||
| Min. heat output (guide value) | P_min | N / A kW | manual control of the heat supply with feedback on the room and/or outdoor temperature | ||
| Max. continuous heat output | P_max,c | 0.749 kW | electronic control of the heat supply with feedback on the room and/or outdoor temperature | ||
| Auxiliary electricity consumption | heat supply with fan support | ||||
| With rated heat output | el_max | N / A kW | Type of heat output / room temperature control (please select one option) | ||
| With min. heat output | el_min | N / A kW | single-level heat output, no room temperature control | ||
| In standby mode | el_SB | 0.00047 kW | two or more manually adjustable levels, no room temperature control | ||
| room temperature control with mechanical thermostat | |||||
| with electronic room temperature control | |||||
| electronic room temperature control and day timer | [yes / no] | ||
| electronic room temperature control and weekday timer | [yes / no] | ||
| Other control options (multiple responses possible) | |||
| room temperature control with presence detection | [yes / no] | ||
| room temperature control with detection of open window | [yes / no] | ||
| with remote control option | [yes / no] | ||
| with adaptive control of the heating start | [yes / no] | ||
| with operating time control | [yes / no] | ||
| with black bulb sensor | [yes / no] | ||
| Contact data | DS Produkte GmbHAm Heisterbusch 1, 19258 Gallin, Germany | ||
Contenu
natural_image
Diagram of a curved road with an arrow indicating direction, no text or symbols presentnatural_image
Technical line drawing of a cylindrical device with internal compartments and a curved top panel (no text or symbols)WAARSCHUWING – Verwondingsgevaar
WAARSCHUWING – Brandgevaar
natural_image
Diagram of a curved road with an arrow indicating direction, no text or symbols presentnatural_image
Technical line drawing of a cylindrical device with internal compartments and a curved top panel (no text or symbols)■ WAARSCHUWING – Brandgevaar!
- Explanation of the Symbols
- Explanation of the Signal Words
- Intended Use
- Safety Instructions
- DANGER – Risk of Electric Shock
- WARNING – Danger of Injury
- WARNING – Danger of Fire
- NOTICE – Risk of Damage to Material and Property
- EN
- NOTICE – Risk of Damage to Material and Property from Batteries
- Items Supplied
- Device Overview
- Overview of Functions
- Before Initial Use
- Inserting / Changing Batteries in the Remote Control
- Moistening the Lamella Insert and Filling the Water Tank
- Use
- PLEASE NOTE!!
- ■ WARNING – Danger of Fire!!
- Cleaning and Storage
- Troubleshooting
- Technical Data
- Device
- Remote Control
- Disposal
- Customer Service / Importer:
- Contenu
- WAARSCHUWING – Verwondingsgevaar
- WAARSCHUWING – Brandgevaar
Brand : EasyMaxx
Model : 04370
Category : Fan