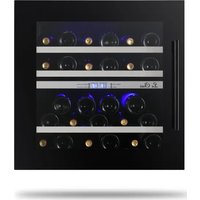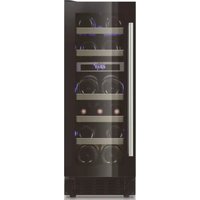
LBN160/1 - Wine cellar LE CHAI - Free user manual and instructions
Find the device manual for free LBN160/1 LE CHAI in PDF.


User questions about LBN160/1 LE CHAI
0 question about this device. Answer the ones you know or ask your own.
Ask a new question about this device
Download the instructions for your Wine cellar in PDF format for free! Find your manual LBN160/1 - LE CHAI and take your electronic device back in hand. On this page are published all the documents necessary for the use of your device. LBN160/1 by LE CHAI.
USER MANUAL LBN160/1 LE CHAI
| Modèle | Site web | QR-code |
| LM78/1 | https //eprel.ec.europa/qr/1938044 |  |
| LMN78/1 | https //eprel.ec.europa/qr/1938061 |  |
| LB160/1 | https //eprel.ec.europa/qr/1939583 |  |
| LBN160/1 | https //eprel.ec.europa/qr/1939731 |  |
| LB340/1 | https //eprel.ec.europa/qr/1939738 |  |
| LBN340/1 | https //eprel.ec.europa/qr/1939744 |  |
| LB720V/1 https //eprel.ec.europa/qr/1940161 |  |
| LBN720V/1 https //eprel.ec.europa/qr/1940177 |  |
| LBN458PO/1 https //eprel.ec.europa/qr/1940648 |  |
| LBN458POP/1 https //eprel.ec.europa/qr/ 1940632 |  |
| LBN240POV/1 https //eprel.ec.europa/qr/1940238 |  |
| LBN240POVP/1 https //eprel.ec.europa/qr/ 1940386 |  |
| LBN460POV/1 https //eprel.ec.europa/qr/1940624 |  |
| LBN460POVP/1 https //eprel.ec.europa/qr/1940614 |  |
text_image
Technical diagram of a refrigerator internal structure with numbered labels pointing to different compartmentstext_image
Technical diagram of a refrigerator with numbered parts for identificationtext_image
Technical diagram of an open refrigerator with numbered labels pointing to different compartmentstext_image
Technical diagram of a refrigerator with numbered components for identificationtext_image
Technical diagram of a refrigerator internal structure with numbered labels pointing to different compartments and parts.text_image
Technical diagram of a refrigerator internal structure with numbered labels pointing to different compartmentstext_image
Technical diagram of a refrigerator internal structure with numbered labels pointing to different compartmentsnatural_image
Technical line drawing of a mechanical component with flanges and mounting holes (no text or symbols)natural_image
Simple line drawing of a rolling object with an arrow indicating rotational motion (no text or symbols)bar
| Item | Value | |---|---| | Wine 1 | 387.2 | | Wine 2 | 496.2 | | Wine 3 | 822 | | Wine 4 | 389.9 | | Wine 5 | 476 | | Wine 6 | 765 | | Wine 7 | 429.7 | | Wine 8 | 516.5 | | Wine 9 | 76.4 | | Wine 10 | 474 | | Wine 11 | 566.3 | | Wine 12 | 78.1 | | Wine 13 | 183.1 | | Wine 14 | 153.7 | | Wine 15 | 168.7 | The chart displays a single data series with values for each wine bottle. The values are explicitly labeled on each bottle label above the bars.natural_image
Line drawing of a multi-level refrigerator with circular compartments and control panel (no text or symbols)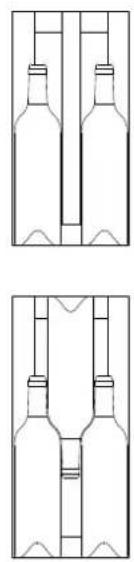
natural_image
Two identical line drawings of bottles with internal structures, no text or symbols present.
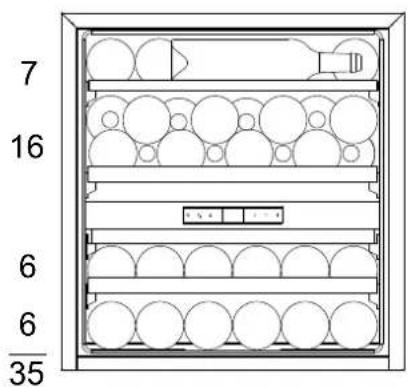
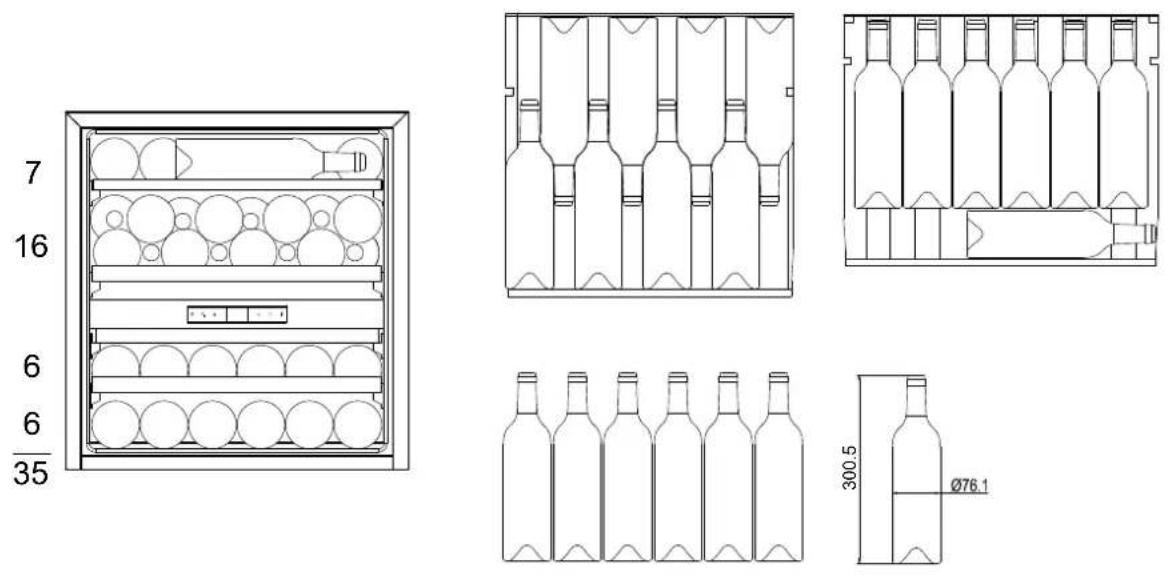
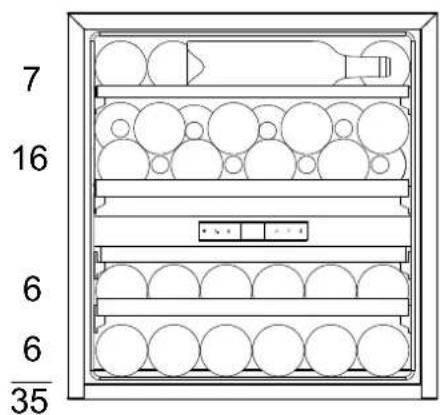
LB340/1 / LBN340/1 :35 bouteilles Max
text_image
7 16 6 6 35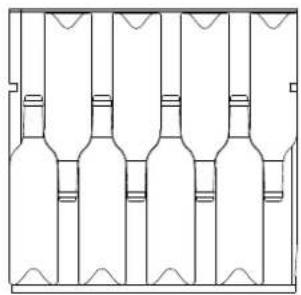
natural_image
Pure line drawing of six identical bottles arranged in a row, no text or symbols present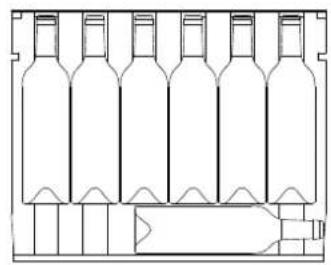
natural_image
Line drawing of a multi-volume wine bottle structure with no text or symbols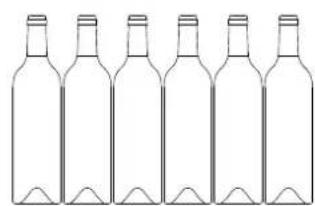
natural_image
Line drawing of six empty wine bottles arranged in a row (no text or symbols)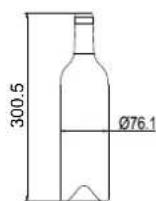
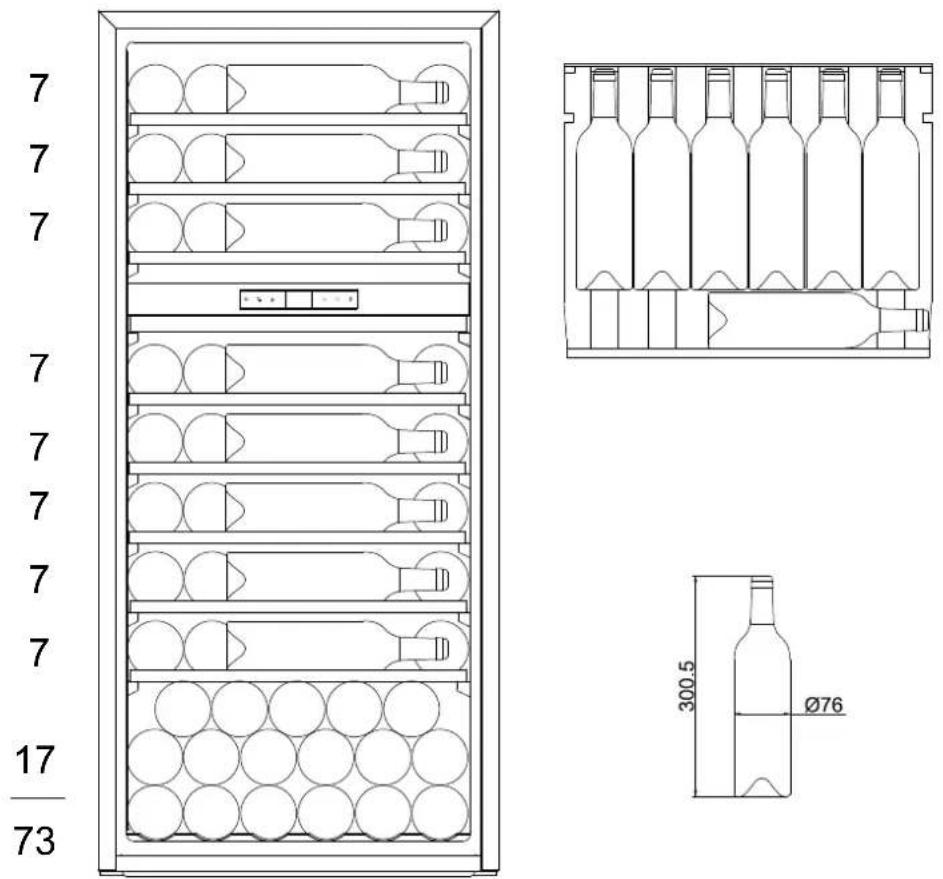
LB720V/1 / LBN720V/1 :73 bouteilles Max
text_image
Technical diagram showing four steps of a mechanical assembly with numbered components and directional arrows indicating motion.text_image
Technical diagram showing two views of a door frame assembly with numbered components and directional arrows indicating assembly steps.text_image
Technical diagram showing two views of a cabinet or enclosure with numbered components and directional arrows indicating assembly or installation.text_image
Technical diagram showing three labeled mechanical components (①, ②, ③) in a structural assembly, with arrows indicating movement or assembly.text_image
W ≥82mm ≥52mm 18mm H FRONT VIEW 8-Ø2.5mm,7mm Deep REAR VIEWtext_image
Technical diagram showing four views of a window frame with labeled components and dimension linesLBN240POVP/1 & LBN460POVP/1
| A | B | C | D | E |
| 455mm | 155mm | 150mm | 51.5mm | 46.5mm |
| 595mm | 157.5mm | 152.5mm | 54mm | 49mm |
| 715mm | 169.5mm | 169.5mm | 66mm | 66mm |
| 885mm | 155mm | 155mm | 51.5mm | 51.5mm |
| 1234mm | 155mm | 155mm | 51.5mm | 51.5mm |
| 1784mm | 155.5mm | 155.5mm | 52mm | 52mm |
text_image
Technical diagram of a door frame assembly with numbered components and dimension annotationsGARANTIE
LB160/1 & LBN160/1 - 16 botellas max
LB340/1 & LBN340/1 - 35 botellas max
LB720V/1 & LBN720V/1 - 73 botellas max
LBN458PO/1 & LBN458POP/1 - 45 botellas max
LBN240POV/1 & LBN240POVP/1 - 26 botellas max
LBN460POV/1 & LBN460POVP/1 - 50 botellas max
ÍNDICE
| Modelo | Site web | QR-code |
| LM78/1 | https //eprel.ec.europa/qr/1938044 |  |
| LMN78/1 | https //eprel.ec.europa/qr/1938061 |  |
| LB160/1 | https //eprel.ec.europa/qr/1939583 |  |
| LBN160/1 | https //eprel.ec.europa/qr/1939731 |  |
| LB340/1 | https //eprel.ec.europa/qr/1939738 |  |
| LBN340/1 | https //eprel.ec.europa/qr/1939744 |  |
| LB720V/1 https //eprel.ec.europa/qr/1940161 |  |
| LBN720V/1 https //eprel.ec.europa/qr/1940177 |  |
| LBN458PO/1 https //eprel.ec.europa/qr/1940648 |  |
| LBN458POP/1 https //eprel.ec.europa/qr/ 1940632 |  |
| LBN240POV/1 https //eprel.ec.europa/qr/1940238 |  |
| LBN240POVP/1 https //eprel.ec.europa/qr/ 1940386 |  |
| LBN460POV/1 https //eprel.ec.europa/qr/1940624 |  |
| LBN460POVP/1 https //eprel.ec.europa/qr/1940614 |  |
text_image
Technical diagram of a refrigerator internal structure with numbered componentstext_image
Technical diagram of a refrigerator internal structure with numbered labels pointing to different compartmentstext_image
Technical diagram of an open refrigerator with numbered labels pointing to internal compartments and storage areas.text_image
Technical diagram of a refrigerator internal structure with numbered labels pointing to different compartments and ports.text_image
Technical diagram of a refrigerator with numbered components for identificationnatural_image
Technical line drawing of two mechanical components with flanges and mounting holes (no text or symbols)natural_image
Simple line drawing of a rolling wheel with an arrow indicating rotational motion (no text or symbols)CARGA
bar
| Item | Value | |---|---| | Wine 1 | 387.2 | | Wine 2 | 496.2 | | Wine 3 | 822 | | Wine 4 | 389.9 | | Wine 5 | 476 | | Wine 6 | 765 | | Wine 7 | 429.7 | | Wine 8 | 516.5 | | Wine 9 | 764 | | Wine 10 | 474 | | Wine 11 | 566.3 | | Wine 12 | 78.1 | | Wine 13 | 183.1 | | Wine 14 | 153.7 | The chart displays a single data series with values for each wine bottle. The total values are explicitly labeled above each bar.LB160/1 / LBN160/1 :16 botellas Max
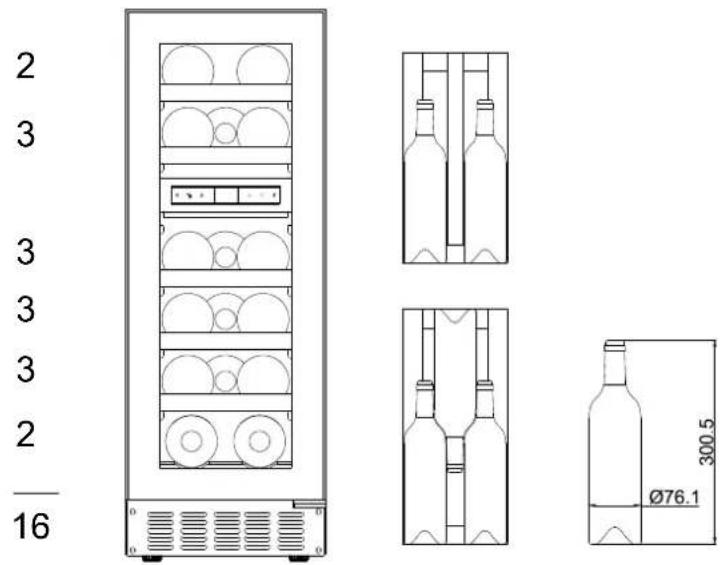
text_image
2 3 3 3 3 2 16 300.5 Ø76.1LB340/1 / LBN340/1 :35 botellas Max
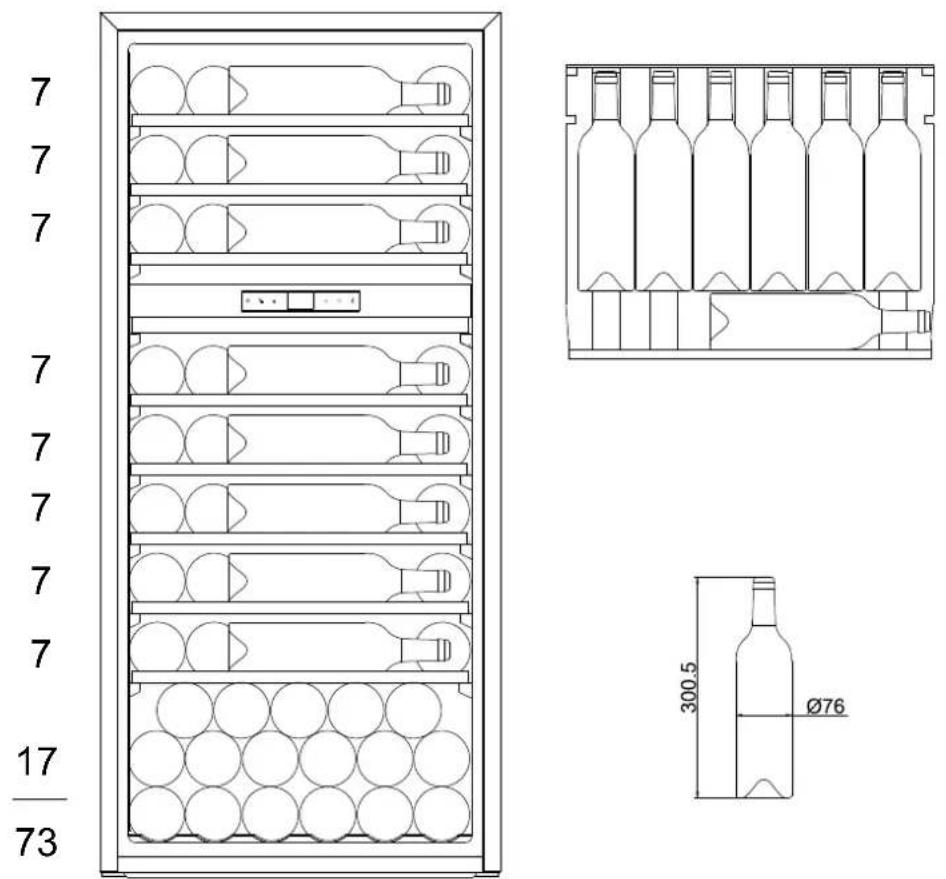
LB720V/1 / LBN720V/1 :73 botellas Max
LBN240POV/1 / LBN240POVP/1 : 26 botellas Max
text_image
7 7 12 7 17 50 300.5 Ø76.1UTILIZACIÓN
text_image
Technical diagram showing exploded and assembled views of a device with numbered components and directional arrows indicating assembly or movement.text_image
Technical diagram showing six labeled mechanical assembly steps with numbered components and directional arrows indicating movement or force.text_image
Technical diagram showing two views of a door frame assembly with numbered components and directional arrows indicating assembly steps.text_image
Technical diagram showing two views of a cabinet or enclosure with numbered components and directional arrows indicating assembly or installation.text_image
Technical diagram showing three labeled mechanical components (①, ②, ③) in a structural assembly, with directional arrows indicating movement.text_image
W ≥82mm ≥52mm 18mm H Vista frontal 8-Ø2.5mm,7mm Profundo Vista traseraNOTA:
text_image
Technical diagram showing four views of a window frame with labeled components and dimension linesLBN240POVP/1 and LBN460POVP/1
text_image
A B C D E 455mm 155mm 150mm 51.5mm 46.5mm 595mm 157.5mm 152.5mm 54mm 49mm 715mm 169.5mm 169.5mm 66mm 66mm 885mm 155mm 155mm 51.5mm 51.5mm 1234mm 155mm 155mm 51.5mm 51.5mm 1784mm 155.5mm 155.5mm 52mm 52mm SECTION A-A SCALE 1:2 SECTION B-B SCALE 1:2 SECTION A- B R4mm ≥75mm R5mm R4mm ≥90mm R4mm ≥90mm R4mm R4mm R4mm R4mm R4mm R4mm R4mm R4mm R4mm R4mm R4mm R4mm R4mm R4mm R4mm R4mm R4mm R4mm R4mm R4mm R4mm R4mm R4mm R4mm R4mm R8-Ø3.2mm,7mm Deep REAR VIEW FRONT VIEWNOTA:
text_image
Technical diagram of a door frame assembly with numbered components and dimension linesGARANTIA
Installation Page 85
| Modell | website | QR-code |
| LM78/1 | https //eprel.ec.europa/qr/1938044 |  |
| LMN78/1 | https //eprel.ec.europa/qr/1938061 |  |
| LB160/1 | https //eprel.ec.europa/qr/1939583 |  |
| LBN160/1 | https //eprel.ec.europa/qr/1939731 |  |
| LB340/1 | https //eprel.ec.europa/qr/1939738 |  |
| LBN340/1 | https //eprel.ec.europa/qr/1939744 |  |
| LB720V/1 https //eprel.ec.europa/qr/1940161 |  |
| LBN720V/1 https //eprel.ec.europa/qr/1940177 |  |
| LBN458PO/1 https //eprel.ec.europa/qr/1940648 |  |
| LBN458POP/1 https //eprel.ec.europa/qr/ 1940632 |  |
| LBN240POV/1 https //eprel.ec.europa/qr/1940238 |  |
| LBN240POVP/1 https //eprel.ec.europa/qr/ 1940386 |  |
| LBN460POV/1 https //eprel.ec.europa/qr/1940624 |  |
| LBN460POVP/1 https //eprel.ec.europa/qr/1940614 |  |
text_image
Technical diagram of a refrigerator internal structure with numbered labels pointing to different compartmentstext_image
Diagram of a refrigerator internal structure with numbered labels pointing to different compartmentstext_image
Technical diagram of a refrigerator with numbered components for identificationtext_image
Technical diagram of a refrigerator with numbered components for identificationtext_image
Technical diagram of a refrigerator internal structure with numbered labels pointing to different compartmentsnatural_image
Technical line drawing of two parallel slatted metal brackets with mounting holes (no text or symbols)natural_image
Simple line drawing of a circular object on a rectangular base with an angular arrow indicating motion (no text or symbols)bar
| Item | Value | |---|---| | Wine 1 | 387.2 | | Wine 2 | 496.2 | | Wine 3 | 822 | | Wine 4 | 389.9 | | Wine 5 | 476 | | Wine 6 | 765 | | Wine 7 | 429.7 | | Wine 8 | 516.5 | | Wine 9 | 764 | | Wine 10 | 474 | | Wine 11 | 566.3 | | Wine 12 | 78.1 | | Wine 13 | 183.1 | | Wine 14 | 153.7 | | Wine 15 | 168.7 | The chart displays the total values for each wine bottle and its corresponding size (e.g., Wine 1 has a value of 387.2). The labels above the bars indicate specific wine types or categories.natural_image
Front view of a vertical rack-mounted refrigerator with multiple circular compartments and ventilation grilles (no text or symbols visible)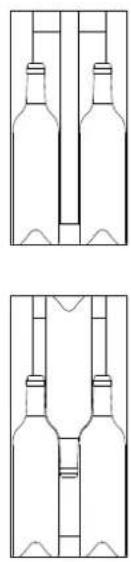
natural_image
Two identical line drawings of wine bottles arranged in a V-shape, with no text or symbols present.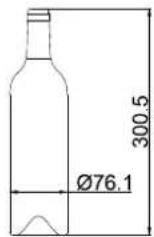
LB340/1 / LBN340/1 :35 Flaschen Max
text_image
7 16 6 6 35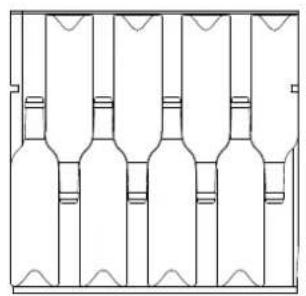
natural_image
Pure line drawing of a multi-volume bottle structure without any text, numbers, or symbols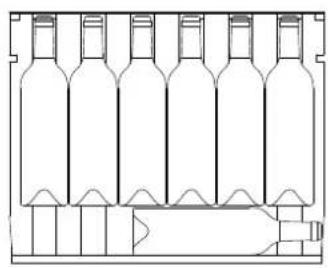
natural_image
Line drawing of a multi-volume wine bottle structure with no text or symbols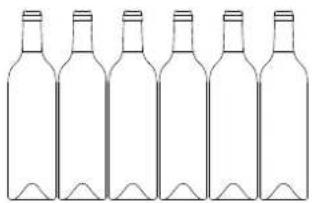
natural_image
Line drawing of six empty wine bottles arranged in a row (no text or symbols)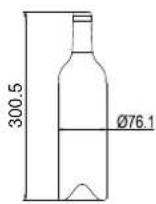
LB720V/1 / LBN720V/1 :73 Flaschen Max
LBN458PO/1 / LBN458POP/1 : 45 Flaschen Max
LBN240POV/1 / LBN240POVP/1 : 26 Flaschen Max
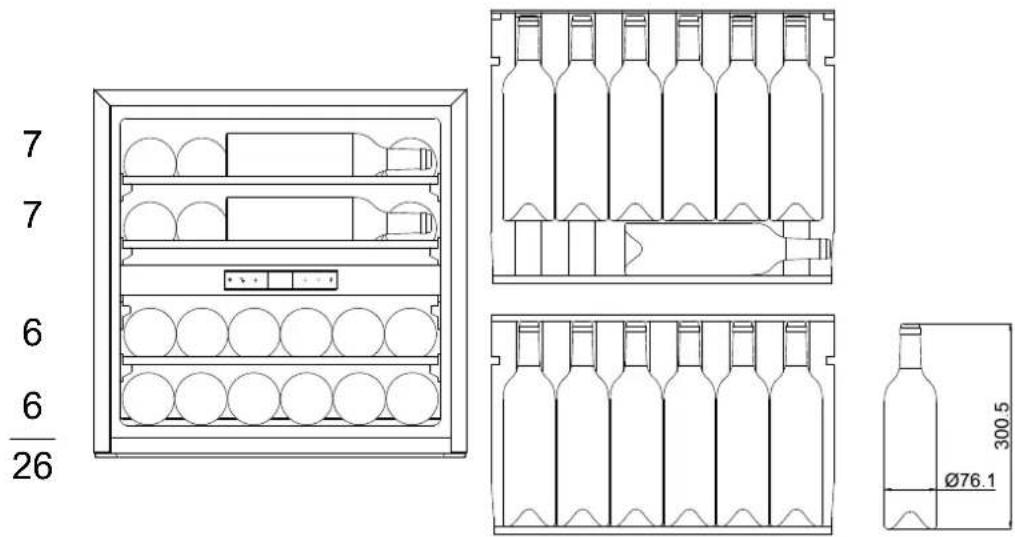
text_image
7 7 6 6 26 300.5 Ø76.1LBN460POV/1 / LBN460POVP/1 : 50 Flaschen Max
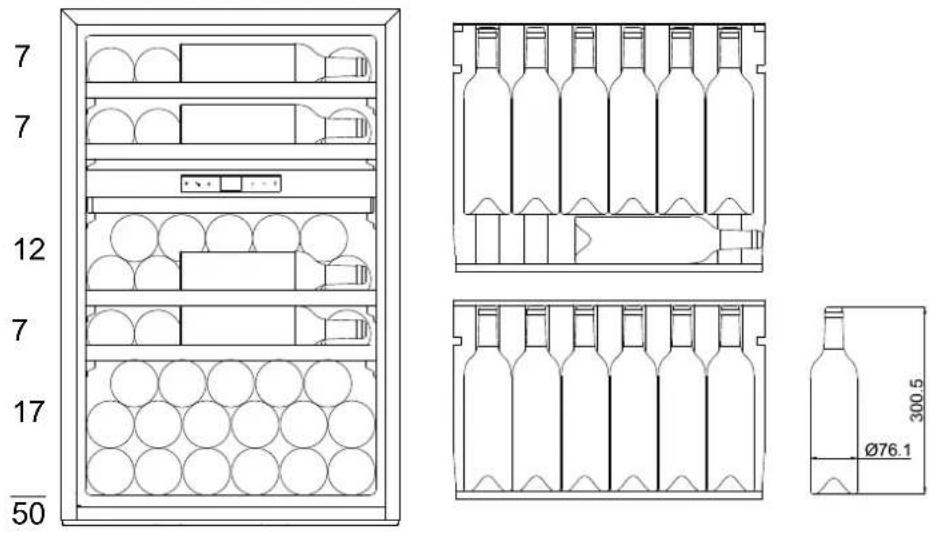
text_image
7 7 12 7 17 50 300.5 Ø76.1text_image
Technical diagram showing exploded view of a device with numbered components and directional arrows indicating assembly or movement.text_image
Technical diagram showing six-step assembly of a mechanical component with labeled parts and directional arrows indicating motion.text_image
Technical diagram showing two views of a door frame assembly with numbered components and directional arrows indicating assembly steps.text_image
Technical diagram showing two views of a cabinet with numbered components and directional arrows indicating assembly or installation.text_image
Technical diagram showing three labeled mechanical components (①, ②, ③) in a structural assembly, with arrows indicating movement or assembly.text_image
W ≥82mm ≥52mm Bagudvendt
text_image
18mm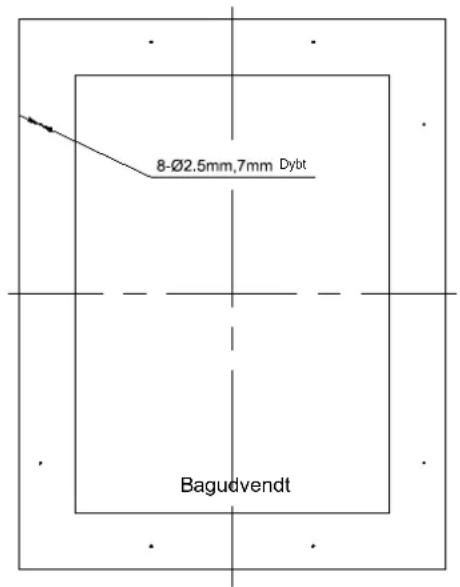
text_image
8-Ø2.5mm,7mm Dybt BagudvendtHINWEIS:
text_image
Technical diagram showing four views of a window frame with numbered labels and dimension linesLBN240POVP/1 and LBN460POVP/1
text_image
A B C D E 455mm 155mm 150mm 51.5mm 46.5mm 595mm 157.5mm 152.5mm 54mm 49mm 715mm 169.5mm 169.5mm 66mm 66mm 885mm 155mm 155mm 51.5mm 51.5mm 1234mm 155mm 155mm 51.5mm 51.5mm 1784mm 155.5mm 155.5mm 52mm 52mm SECTION A-A SCALE 1:2 SECTION B-B SCALE 1:2 FRONT VIEWHINWEIS:
text_image
Technical diagram of a door frame assembly with numbered components and dashed alignment linesGARANTIE
BUILT-IN WINE PRESERVATION CABINET
LM78/1 & LMN78/1 - 7 bottles max
LB160/1 & LBN160/1 - 16 bottles max
LB340/1 & LBN340/1 - 35 bottles max
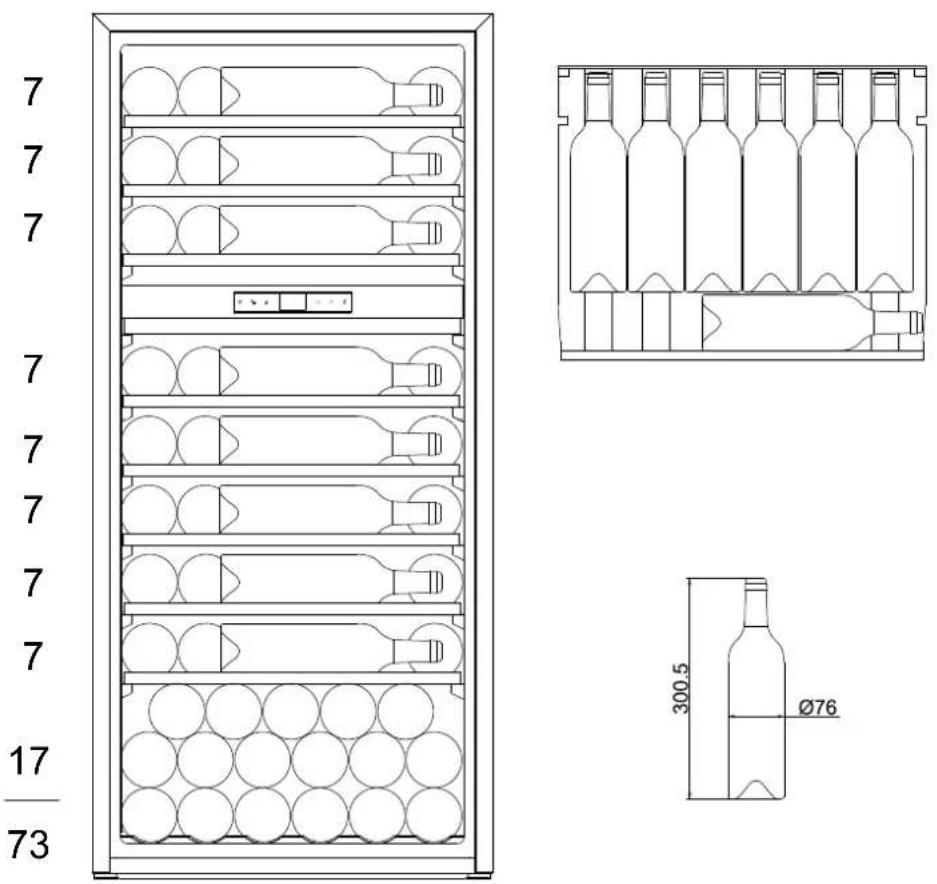
LB720V/1 & LBN720V/1 - 73 bottles max
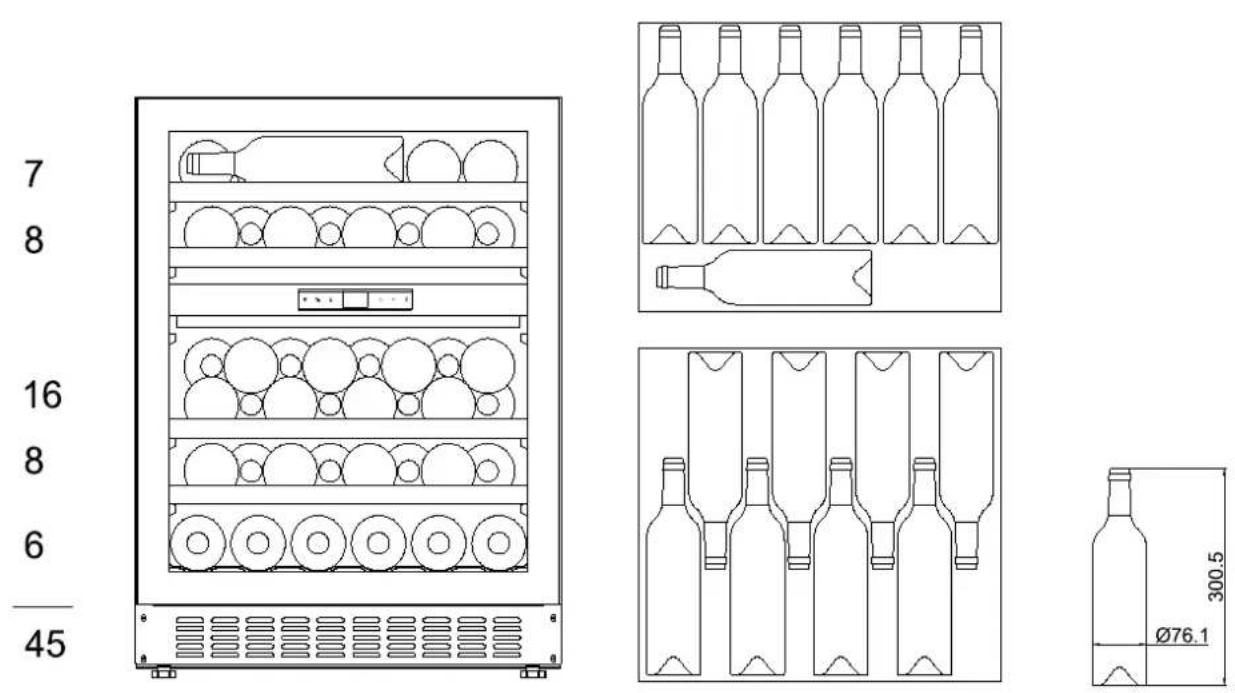
LBN458PO/1 & LBN458POP/1 - 45 bottles max
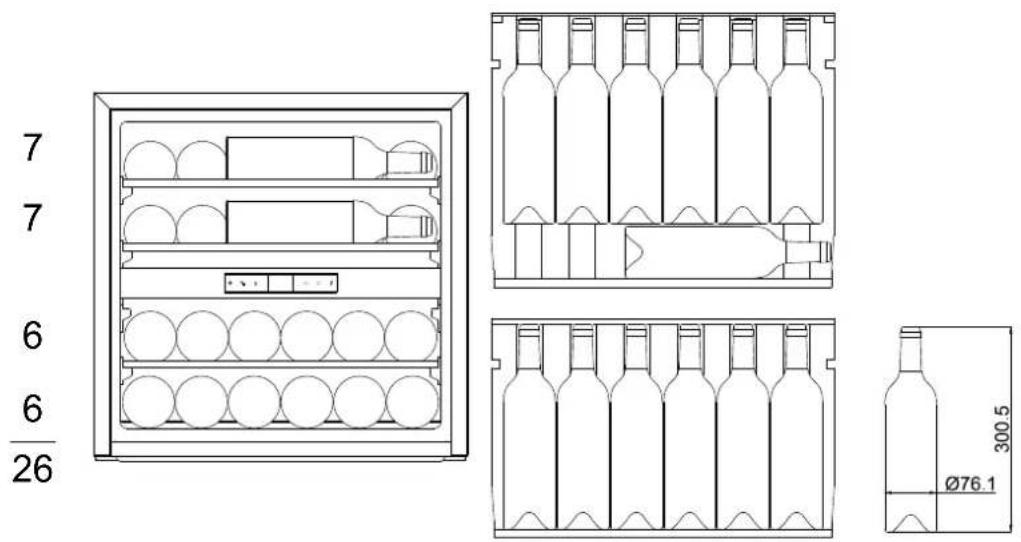
LBN240POV/1 & LBN240POVP/1 - 26 bottles max.
LBN460POV/1 & LBN460POVP/1 - 50 bottles max
TABLE OF CONTENTS
Introducing the wine cabinet
Important warnings and tips
Setting up the cabinet
Specific information
Usage
Care of your cabinet
Troubleshooting
Changing door opening side
Glass overlay door guide
Guarantee
Page 113
Page 118
Page 122
Page 125
Page 131
Page 136
Page 137
Page 137
Page 141
Page 144
This device complies with European Directive requirements:
2014/35/EU pertaining to electrical safety
2014/30/EU pertaining to electromagnetic compatibility

TECHNICAL AND ENERGY CHARACTERISTICS
| Brand: LE CHAI | ModelsLM78/1 / LMN78(7 bottles Max) | ModelsLB160/1 / LBN160/1(16 bottles Max) | ModelsLB340/1 / LBN340/1(35 bottles Max) | ModelsLB720V/1 / LBN720V/1(73 bottles max) |
| Voltage/Frequency 220-240V~ 50Hz | ||||
| Size (L*W*H) (mm) | 148x570x880 295x615x | 820 590x608x595 590 | x 595 x 1234 | |
| Weight | 19 kg 29 kg | 40 kg 68 kg | ||
| Defrosting No-Frost | ||||
| Climate class | ST : This device is designed for use at ambient temperatures between 16°C and 38°C | |||
| Installation type Built-in | ||||
| Brand: LE CHAI | ModelsLBN458PO/1 /LBN458POP/1(45 bottles Max) | ModelsLBN240POV/1 /LBN240POVP/1(26 bottles max) | ModelsLBN460POV/1LBN460POVP/1(50 bottles max) |
| Voltage/Frequency | 220-240V~ 50Hz | ||
| Size (L*W*H) (mm) 5 | 95x556x880 | 595 x 559 x 595 | 595 x 559 x 885 |
| Weight | 53 kg | 41 kg | 52 kg |
| Defrosting No-Frost | |||
| Climate class | ST: This device is designed for use at ambient temperatures between 16°C et 38°C | ||
| Installation type | Built-in | ||
The cabinet is exclusively designed for storing wine.
The product information fiche according to regulation 2019/2016 / EU is available via
| Model | Website | QR-code |
| LM78/1 | https //eprel.ec.europa/qr/1938044 |  |
| LMN78/1 | https //eprel.ec.europa/qr/1938061 |  |
| LB160/1 | https //eprel.ec.europa/qr/1939583 |  |
| LBN160/1 | https //eprel.ec.europa/qr/1939731 |  |
| LB340/1 | https //eprel.ec.europa/qr/1939738 |  |
| LBN340/1 | https //eprel.ec.europa/qr/1939744 |  |
| LB720V/1 https //eprel.ec.europa/qr/1940161 |  |
| LBN720V/1 https //eprel.ec.europa/qr/1940177 |  |
| LBN458PO/1 https //eprel.ec.europa/qr/1940648 |  |
| LBN458POP/1 https //eprel.ec.europa/qr/ 1940632 |  |
| LBN240POV/1 https //eprel.ec.europa/qr/1940238 |  |
| LBN240POVP/1 https //eprel.ec.europa/qr/ 1940386 |  |
| LBN460POV/1 https //eprel.ec.europa/qr/1940624 |  |
| LBN460POVP/1 https //eprel.ec.europa/qr/1940614 |  |
INTRODUCING THE WINE CABINET
LM78/1 / LMN78/1
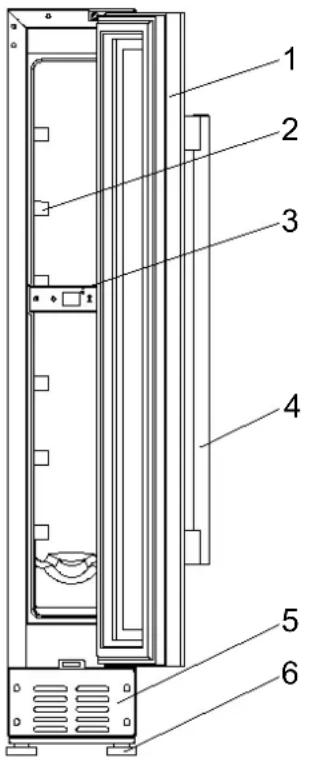
text_image
Technical diagram of a refrigerator internal structure with numbered labels pointing to different compartments1 - Glass door
2 – Shelves
3 - Control Panel
4 - Handle
5 – Ventilation
6 - Legs
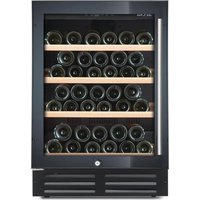
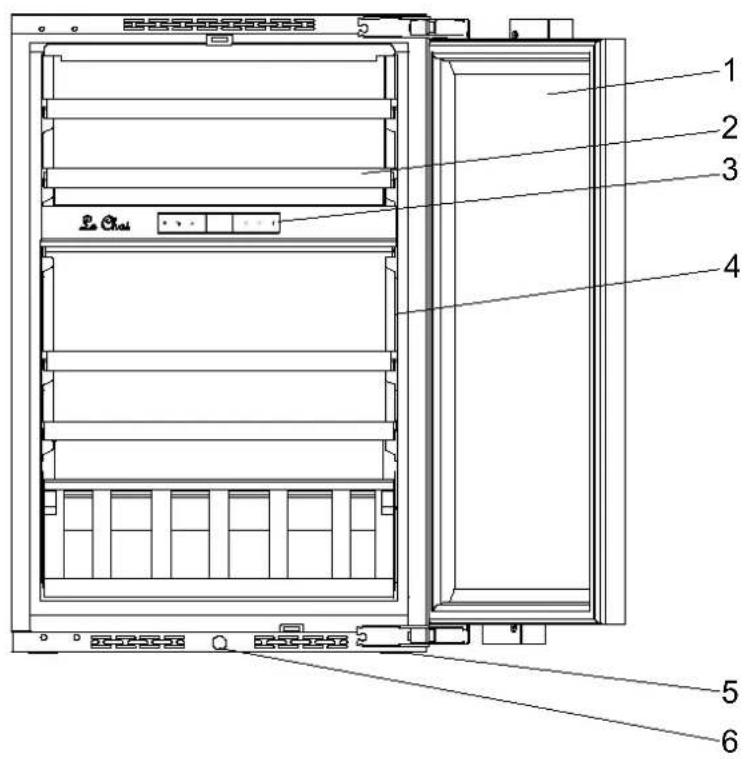
LB160/1 / LBN160/1
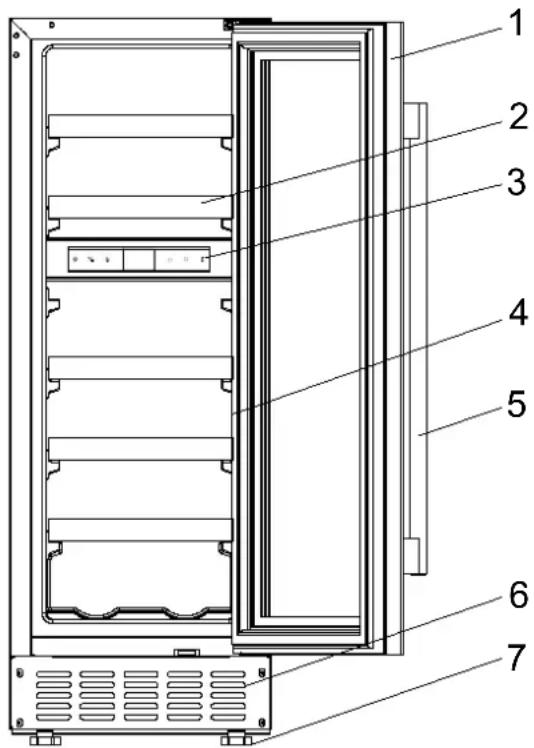
text_image
Technical diagram of a refrigerator with numbered parts for identification1 - Glass door
2 - Shelves
3 - Control Panel
4 – Lights
5 - Handle
6 – Ventilation
7 - Legs
INTRODUCING THE WINE CABINET
LB340/1 / LBN340/1
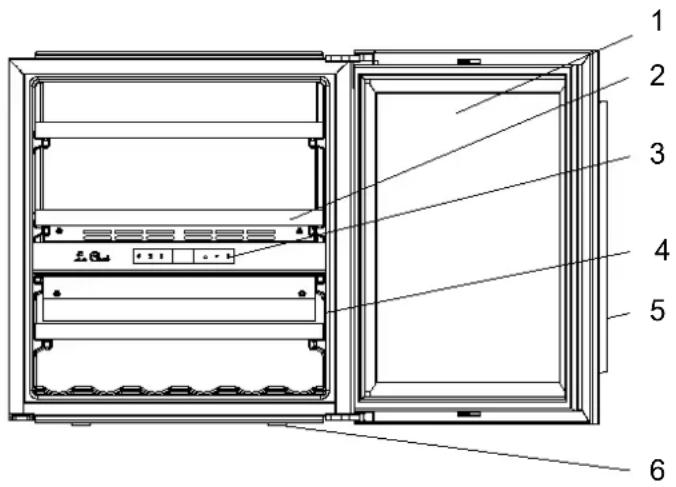
text_image
Technical diagram of a refrigerator with numbered components for identification1 - Glass door
2 – Shelves
3 - Control Panel
4 - Lights
5 - Handle
6 - Legs
LB720V/1 / LBN720V/1
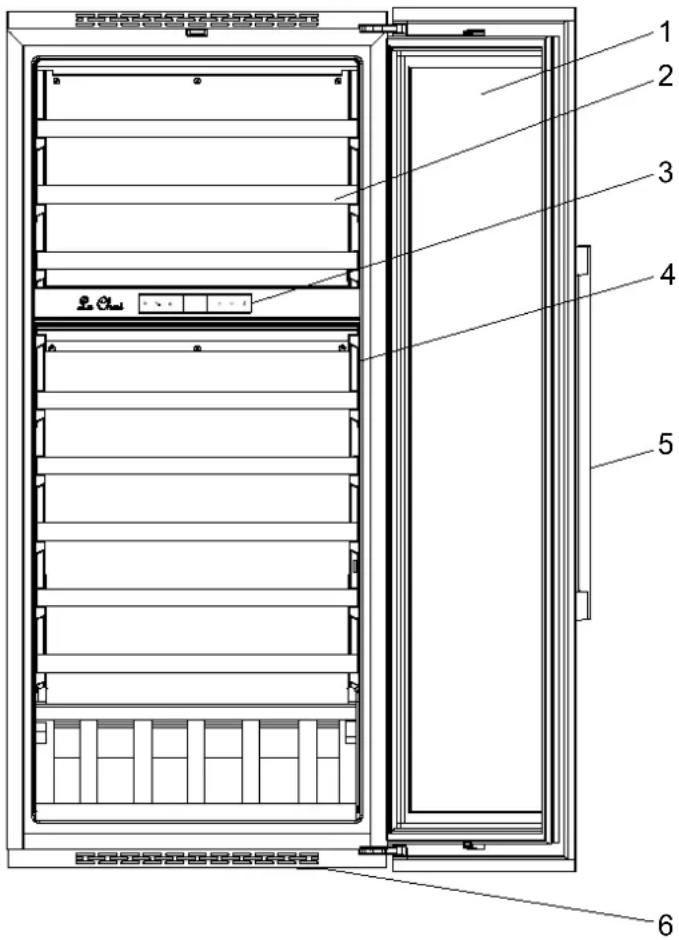
text_image
Technical diagram of a refrigerator with numbered components for identification1 - Glass door
2 – Shelves
3 - Control Panel
4 – Lights
5 - Handle
6 – Ventilation
INTRODUCING THE WINE CABINET
LBN458PO/1
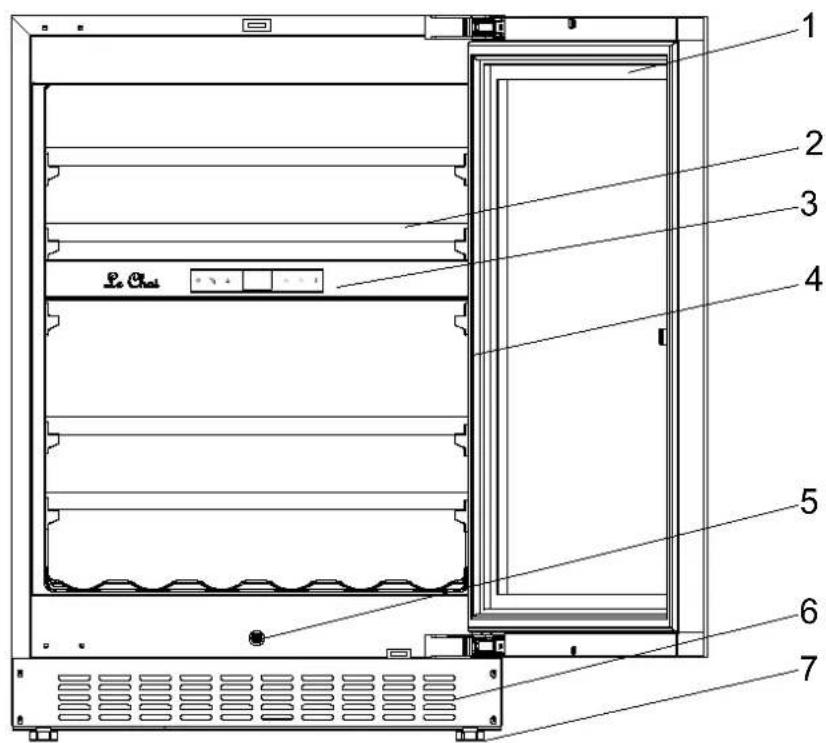
text_image
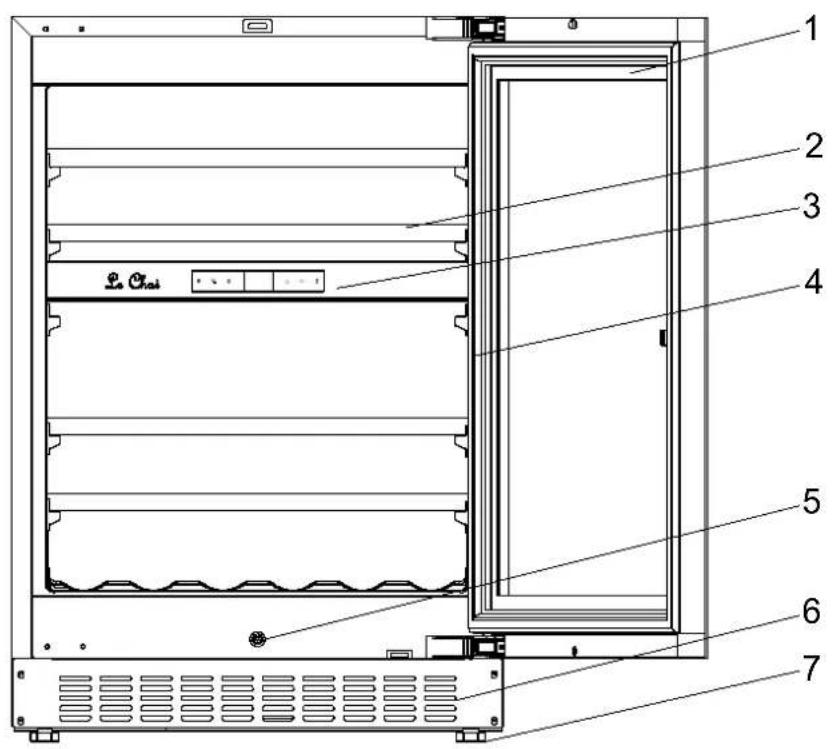
1 2 3 4 5 6 7 Le Chai1 - Glass door
2 - Shelves
3 – Control Panel
4 - Lights
5 - Push rod
6 – Ventilation
7 - Legs
LBN458POP/1
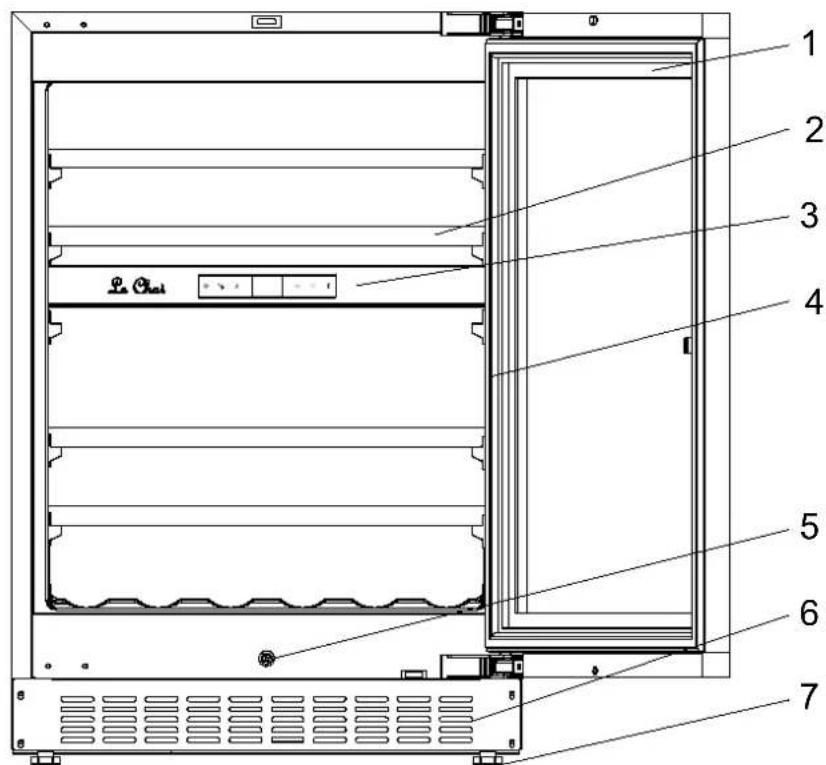
text_image
Technical diagram of a refrigerator internal structure with numbered labels pointing to different compartments and parts.1 - Glass door
2 - Shelves
3 – Control Panel
4 – Lights
5 - Push rod
6 – Ventilation
7 - Legs
INTRODUCING THE WINE CABINET
LBN240POV/1
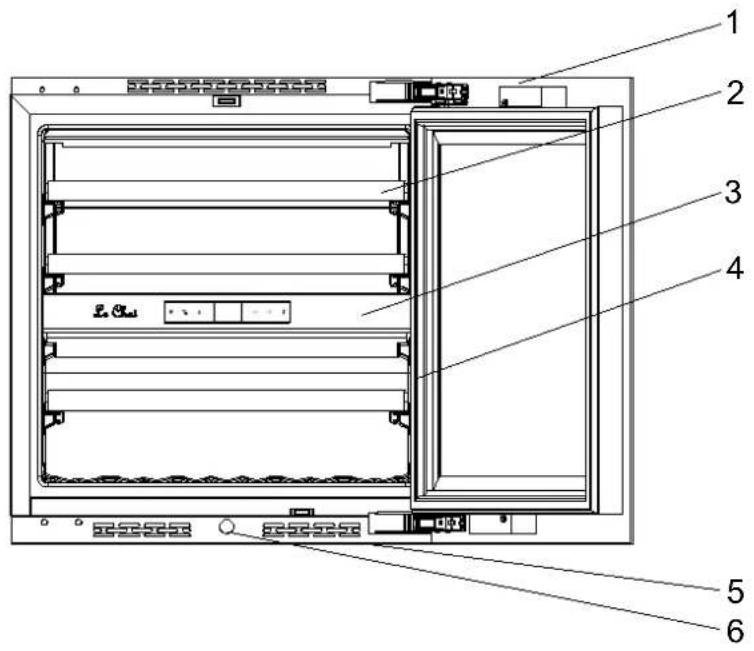
text_image
Technical diagram of an internal rack or refrigerator with numbered labels pointing to different components.1 - Glass door
2 - Shelves
3 - Control Panel
4 – Lights
5 – Ventilation
6 - Push rod
LBN240POVP/1
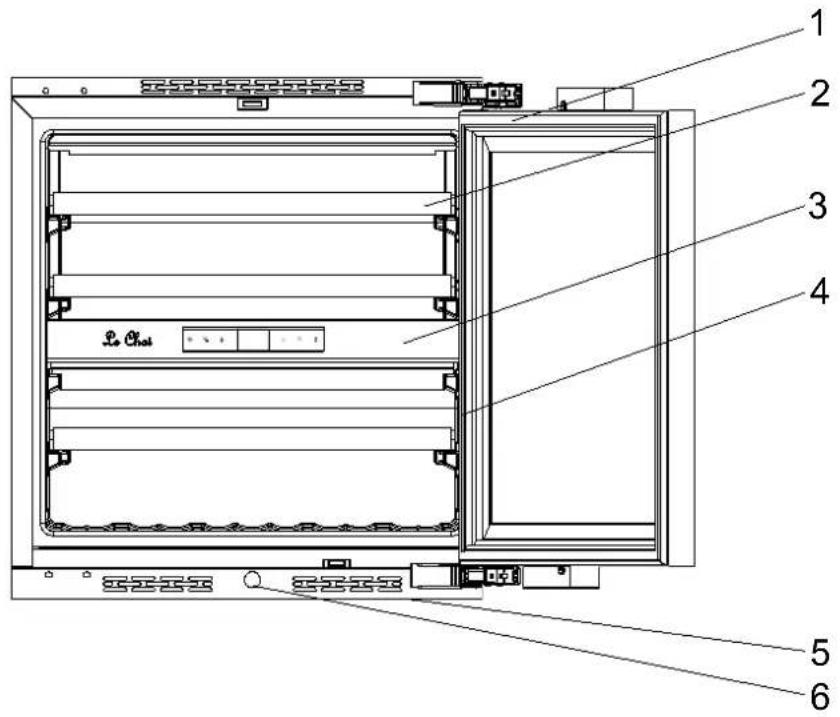
text_image
1 2 3 4 5 61 - Glass door
2 - Shelves
3 - Control Panel
4 – Lights
5 – Ventilation
6 - Push rod
INTRODUCING THE WINE CABINET
LBN460POV/1
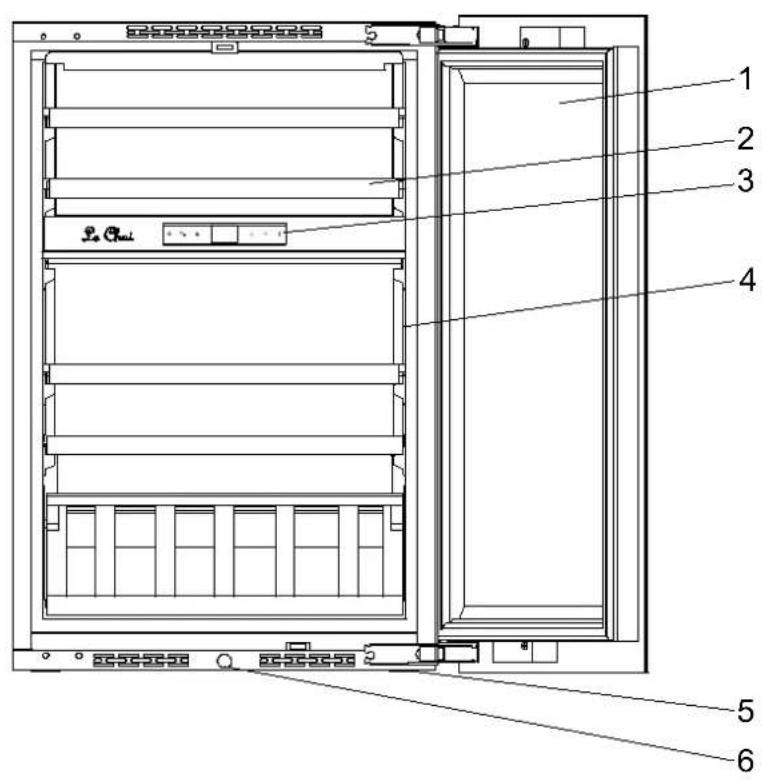
text_image
1 2 3 4 5 61 - Glass door
2 - Shelves
3 - Control Panel
4 - Lights
5 – Ventilation
6 - Push rod
LBN460POVP/1
text_image
1 2 3 4 5 61 - Glass door
2 - Shelves
3 - Control Panel
4 - Lights
5 – Ventilation
6 - Push rod
IMPORTANT WARNINGS AND TIPS
Please conserve this user manual with your cabinet – you may need to consult it. If the cabinet is transferred to another person, please ensure that the user manual accompanies it, so that the new user may know how the cabinet operates. These warnings are both for your safety and that of other people. Therefore we advise that you read them carefully before setting up and operating your refrigerator.
This device is destined exclusively for home use, and is intended for the storage of foodstuffs or special beverages at a storage temperature higher than that of a fresh foodstuffs storage compartment.
It is not intended in any way for the storage of fresh foodstuffs. Do not use it for commercial or industrial purposes or for any usage other than that for which it is designed.
If the device has a lighting system and the lamp is replaceable by the user, refer to the information on its replacement method in the following paragraph of this manual.
This appliance is intended for the storage of particular food or drink at a storage temperature higher than that of a fresh food storage compartment. In any case, it is not intended to keep food fresh. Do not use it for commercial or industrial purposes or for any purpose other than that for which it was designed.
Safety
- This device may be used by children aged 8 years and older and by people with reduced physical, sensory or mental capacity, on condition they have received supervision or instruction concerning use of the device in all safety, and that they understand the risks.
• Children should not be allowed to play with the device.
- Children aged from 3 to 8 years are allowed to load and unload refrigerating appliances.
- Always disconnect the device's electricity supply before cleaning it; before defrosting it, before changing the illuminating lamp; before moving the device or before cleaning the floor underneath it. Cleaning and care by the user should not be done by children unless under supervision.
- WARNING: Do not damage the refrigeration circuit.
- WARNING: Do not use electrical equipment inside the foodstuffs storage compartment, unless it is of a type recommended by the manufacturer.
- WARNING: Do not use mechanical tools or other means to speed up defrosting, unless they are recommended by the manufacturer.
- WARNING: Keep the cabinet's ventilation openings clear in the enclosure or the built-in space around the cabinet.
- WARNING: Do not locate multiple portable socket-outlets or portable power supplies at the rear of the appliance.
- WARNING: When positioning the appliance, ensure the supply cord is not trapped or damaged.
- Do not connect the device to a power supply without overload protection (protected by an electrical fuse).
- Never use power-strips or extension cords to connect the device to the mains.
- This device is not destined for use with an outside timer or remote control system or any device that switches it on automatically.
- Do not use the device to store explosive substances such as aerosols that contain flammable propulsion gas.
- After installing the cabinet, ensure that it is not resting on the power cord.
- If the power cord is damaged, it must be replaced by the manufacturer, by customer care service, or by similarly qualified personnel in order to prevent electrical hazards.
- The device is heavy; be careful when moving it.
- If your cabinet was laid down in a horizontal position during transportation, wait 48 hours before operating it.
- In the event of accidental liquid spillage (broken bottles or other) on electrical components (motor or other), immediately unplug the device from the mains.
- Ensure that you put your cabinet in a place that can support its weight when loaded (1 bottle containing 75 cl weighs approximately 1.3 kg).
- Your cabinet must be placed on a level surface. If you have placed it on a rug or on carpeting, insert a support beneath it.
- Opening the door for long periods can cause a significant increase of the temperature in the compartments of the appliance.
- Clean regularly surfaces that can come in contact with food and accessible drainage systems.
- If the refrigerating appliance is left empty for long periods, switch off, defrost, clean, dry, and leave the door open to prevent mould developing within the appliance.
- This refrigeration appliance is not suitable for freezing foodstuffs.
Servicing – repairs
- It is dangerous to modify or attempt to modify the characteristics of the device.
- If it breaks down, do not try to repair the device yourself. Repairs made by unqualified personnel can cause damage. Contact your dealer's Customer Care Service.
Refrigerant

Warning; Risk of fire / flammable materials.
The refrigerant gas contained in this device is isobutane (R 600a), it is low-polluting but is
flammable.
- When transporting and installing the device, take care not to damage any part of the refrigerating circuit.
-Do not use a pointed or sharp edged tool to defrost the device.
-Do not use any electrical devices inside the cabinet.
If the refrigerating circuit is damaged:
- Do not allow any open flame near the device.
- Avoid sparks – do not switch on any electrical appliances or lamps nearby.
- Immediately ventilate the room.
Disposal
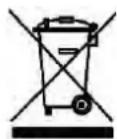
This device carries the selective waste sorting symbol for electrical and electronic equipment disposal. This means that the product must be picked up by a selective collection system in compliance with European Directive 2012/19 EU so that it will either be recycled or dismantled in an environment-friendly way.
For more information please contact your local or regional government.
Electronic products that are not properly and selectively recycled are potentially dangerous for the environment and for human health because they contain dangerous substances.
This device contains flammable foaming agents. When the refrigerator reaches the end of its life cycle, it must be disposed of in a suitable place, where refrigerators can be recycled. For this purpose please contact your town hall or municipality. Under no circumstances must the refrigerator be disposed of in public areas.
SETTING UP THE CABINET
If this device, which uses magnetic door closing, replaces a device equipped with a spring close system, we advise you to destroy the spring closing system before disposing of the old devi will prevent children from locking themselves inside it and endangering their lives.
Location
Place your cabinet well away from heat sources (heater, cooker, direct sunlight). For proper operation the device, the ambient room temperature should be between +16°C and -80°C ST. Outside these limits, the device will not operate properly.
- Ensure that air can circulate freely behind the device: do not place it too close to a wall, in avoid noise from vibration. Ensure that air can circulate freely all around the device. Insufficient ventilation will lead to poor operation and increased energy consumption.
Leave at least 3 cm of empty space between the back of the wine cellar and the wall (Does r self-ventilated models).
- The device must be installed in such a way that the electric plug is accessible. A the cabinet, make sure that it is not resting on the power cord.
- Level the device by using the 4 adjustable feet.
Built-in
Below the built-in dimensions to use before installing in the best condition this appliance
LM78/1 / LMN78/1
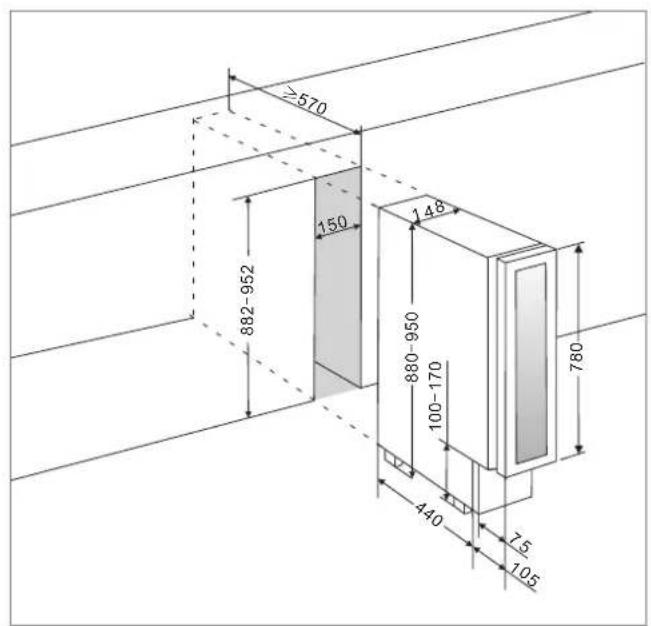
text_image
≥570 150 882-952 148 880-950 100-170 780 440 7.5 105LB160/1 / LBN160/1
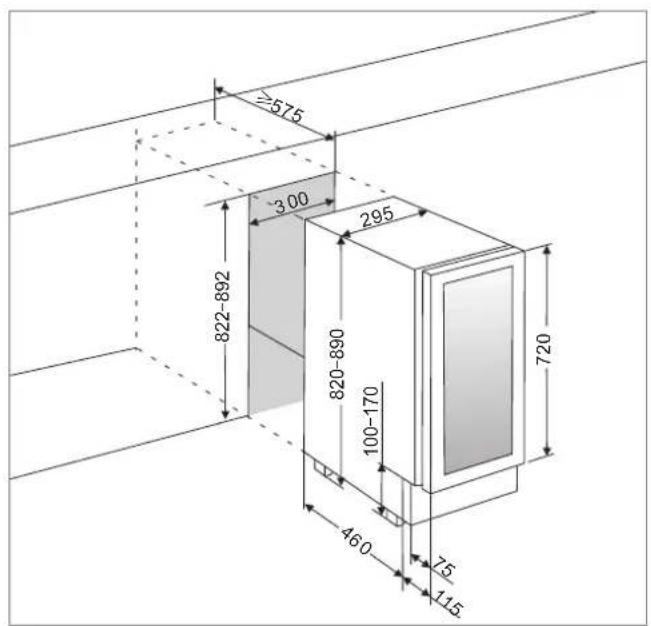
text_image
≥575 300 295 822-892 820-890 100-170 460 75 115 720LB340/1 / LBN340/1
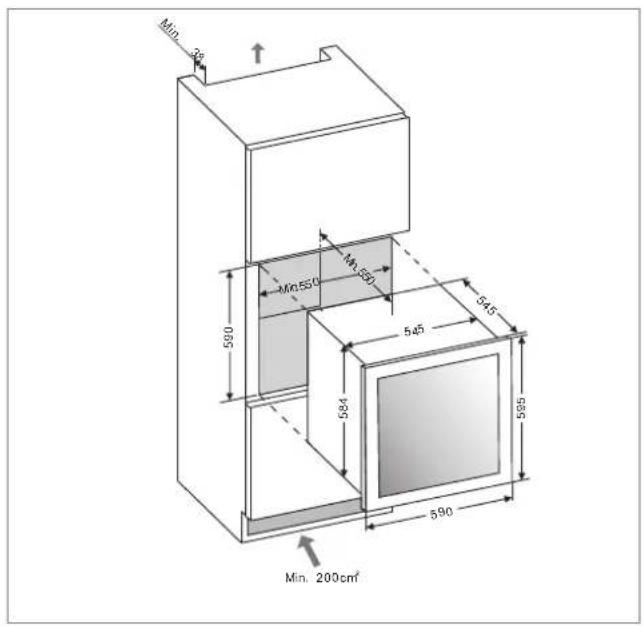
text_image
Min. 38 590 Mn:550 Mn:570 545 545 584 585 590 Min. 200cm²LB720V/1 / LBN720V/1
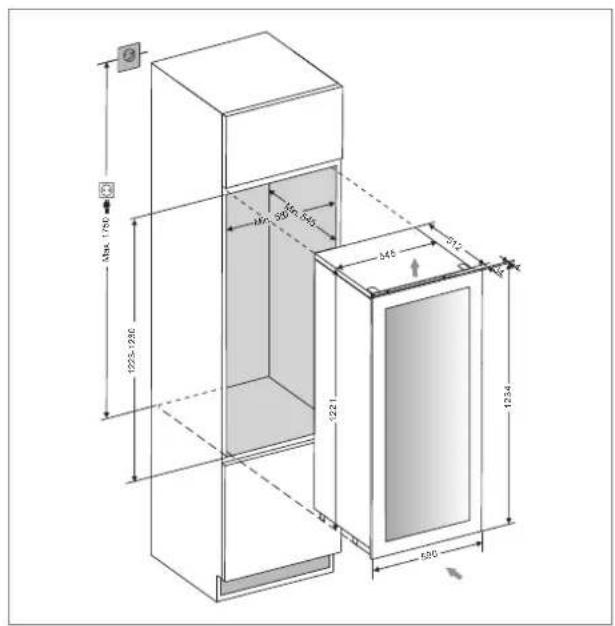
text_image
1225-1280 46 39 545 345 572 1221 1234 595LBN458PO/1
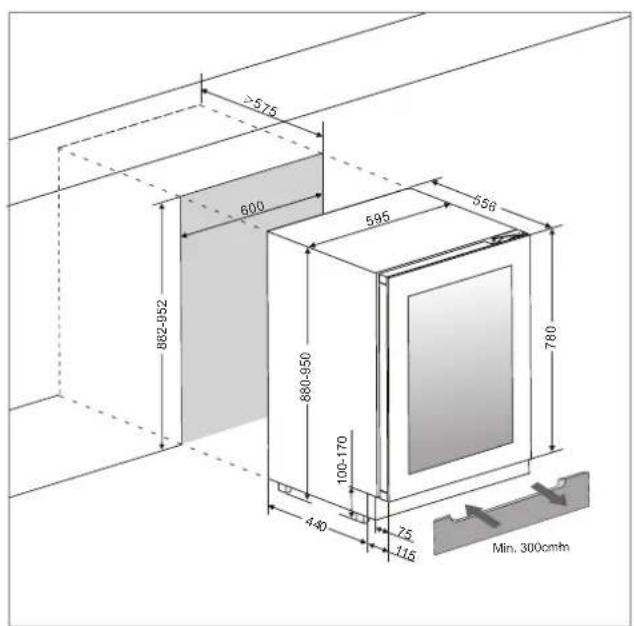
text_image
≥575 600 882-952 595 656 880-950 100-170 440 75 115 780 Min. 300cmLBN240POV/1
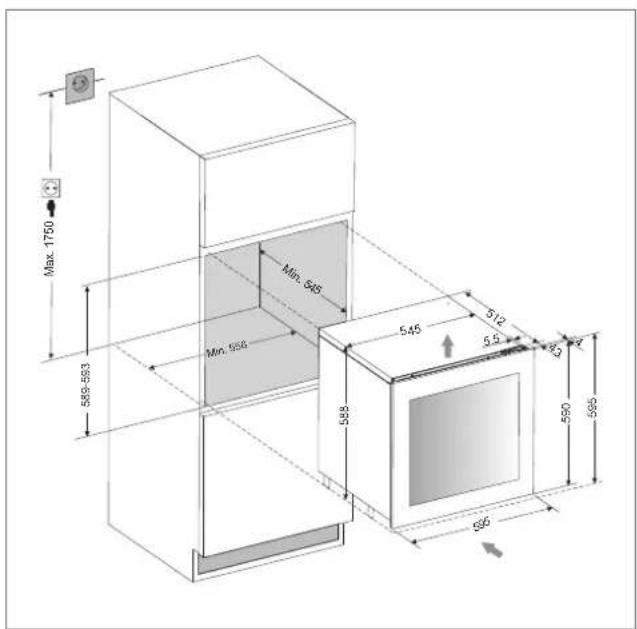
text_image
Max 1750 Min. 545 Min. 556 545 512 5.5 5.3 590 595 588 626LBN460POV/1
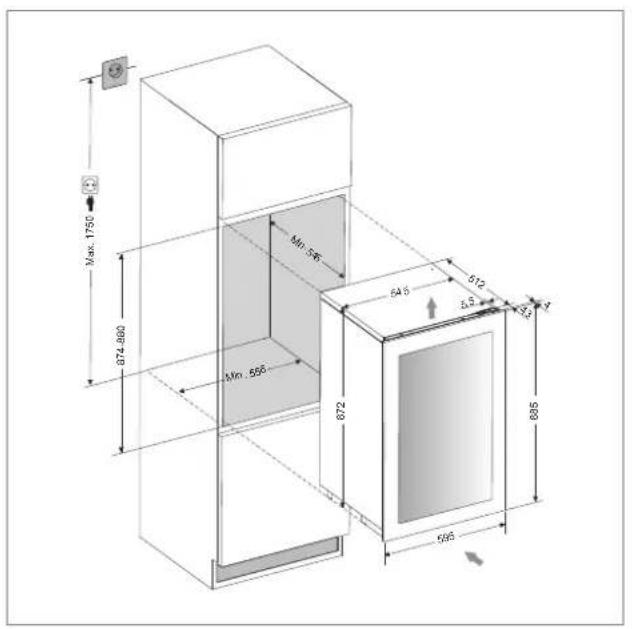
text_image
Max. 1750 674.860 Min. 555 672 645 612 Δ5 3.3 695 695LBN240POVP/1
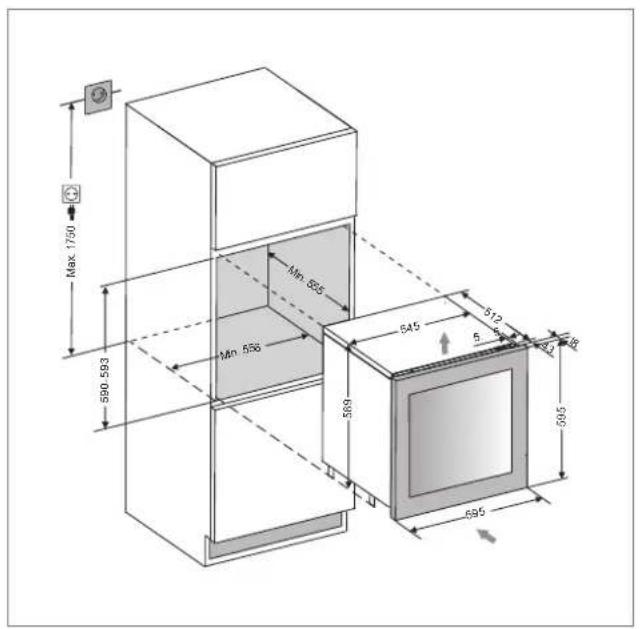
text_image
Max 1790 590 593 Min 593 Min 596 589 545 512 5 48 43 395 595LBN460POVP/1
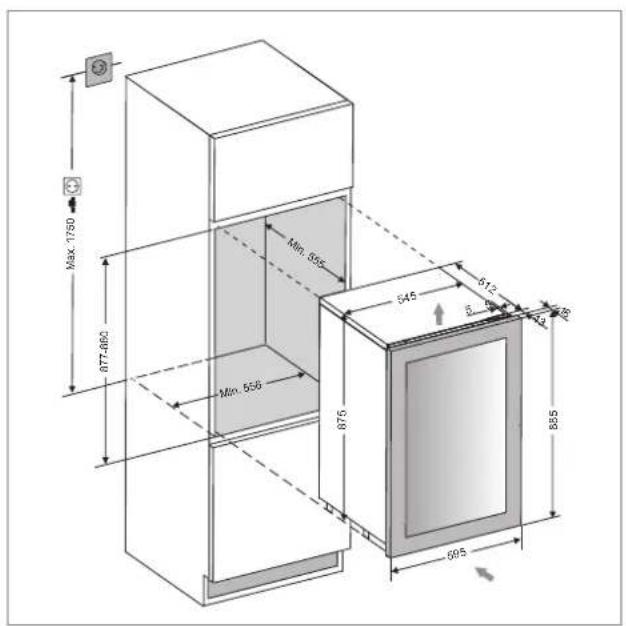
text_image
MAX. 1750 877-860 Min. 555 545 612 30 Min. 555 875 695 885LBN458POP/1
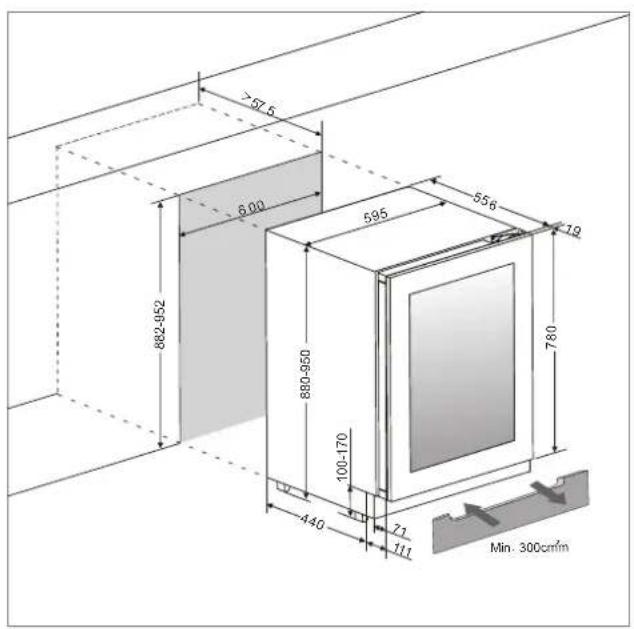
text_image
≥57.5 6.00 882-952 595 556 79 880-950 100-170 440 71 111 780 Min. 300cm/inConnecting the power supply
Your cabinet is designed for operation with 230 V single-phase.
It must be connected to a wall socket equipped with earthing and protected by a 10 A fuse in compliance with the standard NF C15-100 and in compliance with your electricity supplier's prescriptions.
SPECIFIC INFORMATION
-We recommend that you install your wine cabinet in a temperate room.
- If the inside light remains on, please note that the inside temperature will be higher.
- Temperature inside the wine cabinet may vary depending on the type and the number of bottles contained.
- In order to keep your wines at a stable temperature, avoid leaving the door open for long periods.
-Do not install your wine cabinet close to a heat source; avoid direct sunlight. - In order to guarantee your safety, and to prevent your wine being spoilt, do not place the cabinet in humid locations.
- Do not store perishable foodstuffs inside your wine cabinet.
-The wine cabinet is not designed for use in a garage, outside, or in the open air.
-The following (approximate) temperatures are recommended for wine drinking:
| ○Great Bordeaux wines – Red | 16 – 17°C |
| ○Great Burgundy wines – Red | 15 – 16°C |
| ○Great vintages dry white wines | 14 – 16°C |
| ○Red wines, fruity wines, young wines | 11 – 12°C |
| ○ Rosé wines from Provence, early-to-market wines | 10 – 12°C |
| ○Dry white wines and local red wines | 10 – 12°C |
| ○Local white wines | 8 – 10°C |
| ○Champagnes | 7 – 8°C |
| ○Liqueur wines | 6°C |
-Temperature stability is of the greatest importance when storing wine.
-Exposure to light, vibrations, temperature variations or humidity can spoil the wine.
The cooling system
According to specialists, the ideal temperature for wine storage is around 12 ^ , in the range of 10 ^ to 14 ^ . Do not confuse with the operating temperature, which varies depending on the specificity of each type of wine from 5 to 18 ^ .
It is especially important to avoid sudden temperature changes. Designed by specialists, for wine lovers, this device, unlike the single refrigerator, electronically ensures constant average temperature control.
The anti-vibration system:
The compressor is equipped with special shock (silent-blocks) and the inner tank is isolated from the body by a thick layer of polyurethane foam. These features can prevent the transmission of vibrations to the wines.
The humidification system:
This device is equipped with a tray (depending on model) which maintains the correct level of humidity. If the humidity is too low, fill the tank level to 34 of its capacity. Check the water level time to time and add water if necessary. Make sure the tank always contains water.
The tray is placed on the shelf under the fan at the bottom to provide a minimum humidity.
Be careful to control the water level if you store your wines for a long time and you do not dedicate the unit to their implementation at operating temperature only (with rapid rotations of your bottles).
The UV system:
The light accelerates aging of your wines. In full doors cellars, the wines are naturally immune subject of course limited openings). This model glass door was subject of a particular treatment, which filters harmful ultraviolet rays; the wines are perfectly safe.
Defrost:
This product does not produce frost (No-Frost). There is no frost or ice; so, no operation is required to remove it.
Shelves
To prevent damage to the door seal, make sure the door is open before pulling the shelves to install or remove the bottles.
For easier access to the contents of shelves you need to slide the shelf outward about 1/3 however they are designed with a stop on each side to prevent the bottles from falling.
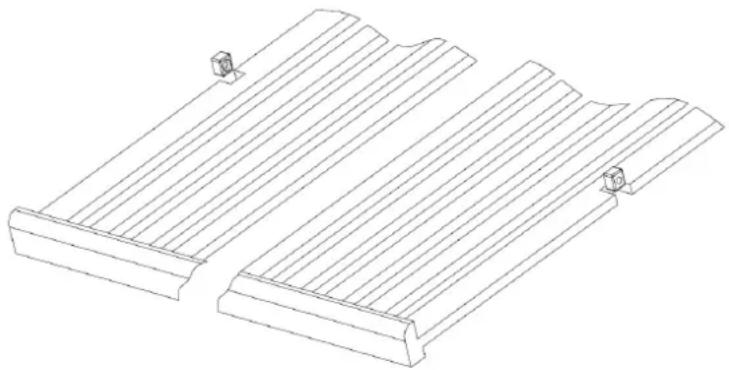
To remove or position the shelves, move the shelf to the position where the notch of the wooden shelf is exactly under the plastic rack stop and then lift it up and out.
natural_image
Technical line drawing of a mechanical component with flanges and mounting holes (no text or symbols)DOOR OPENING MECHANISM (PUSH-AND-OPEN DOOR FUNCTION) (on some models)
The push-and-open door function (if your model supplied with it) is activated when the unit is powered. To open the door, push the door slightly inwards on the top left position for the right hinge model (the top right position for the left hinge model) and then release it again. The unit will beep once to confirm the action. The door will be opened approx.2\~7cm by the push rod. Then the door can be fully open manually. The push rod will return to its initial position after 3 seconds automatically. And the unit will beep once again and it is ready for next opening action.
NOTE:
- The door will close again automatically after approx. 3 seconds if it has not been fully opened manually for models with automatic door closing function.
- Do not block the door or hold on it while it is opening. If the door is blocked or held during opening, the door opening mechanism and the door will be damaged. The loud and repeated cracking noises will be heard.
- Do not push the push rod in or hold on to it during closing. If the push rod is blocked during closing, it will no longer be able to reach its initial position. In the initial position, the push rod is flush with the front of control panel. In order to set the push rod back in its initial position, disconnect the appliance from the mains, wait for approx. 10 seconds and plug it back in again. The push rod will return to its initial position.
- The system is not triggered immediately after the door is closed. Allow 3 seconds and try again. This is not a system failure.
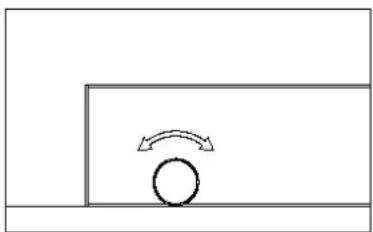
The door on the unit is sensitive to pressure. The pressure sensitivity to open the door is possible to adjust as following steps:
- Open the door.
- Rotate the screw on the top middle of door counterclockwise to increase the sensitivity and clockwise to decrease the sensitivity.
- Close the door and check if it is correctly adjusted. Rotating the screw counterclockwise too much can cause the door to open automatically even without pushing or just closing the door hard. In reverse rotating the screw clockwise too much can cause the door not to open even with heavy pushing.
natural_image
Simple line drawing of a circular object with an arrow indicating upward motion, no text or symbols presentLOADING
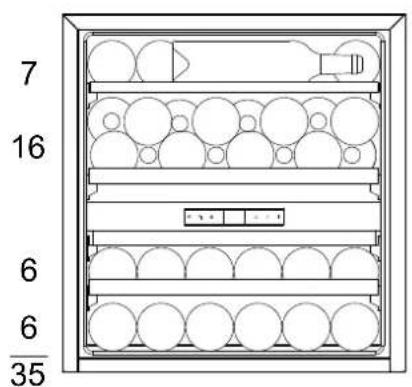
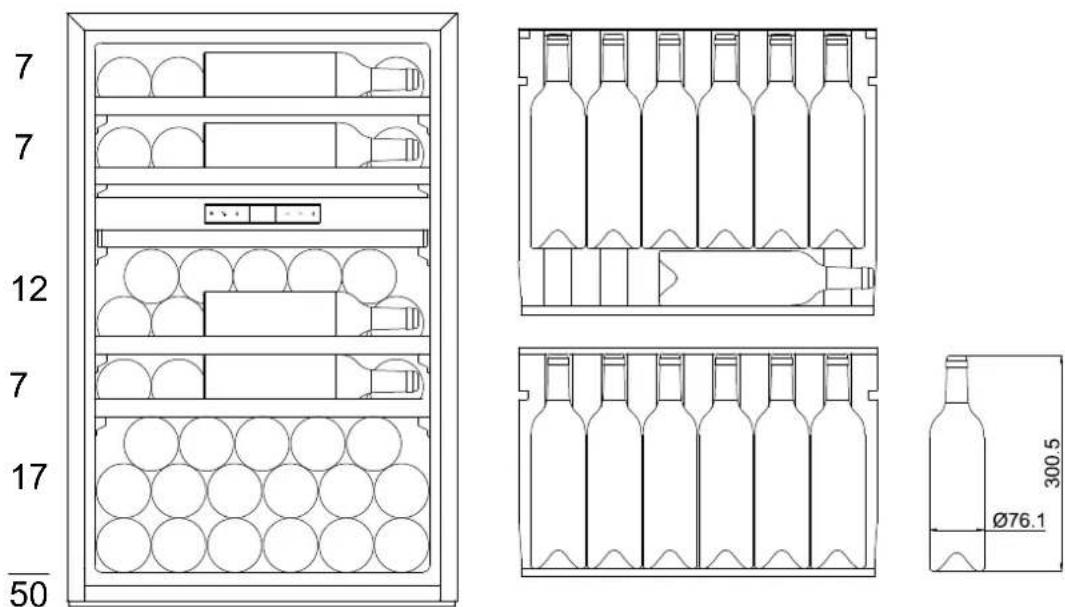
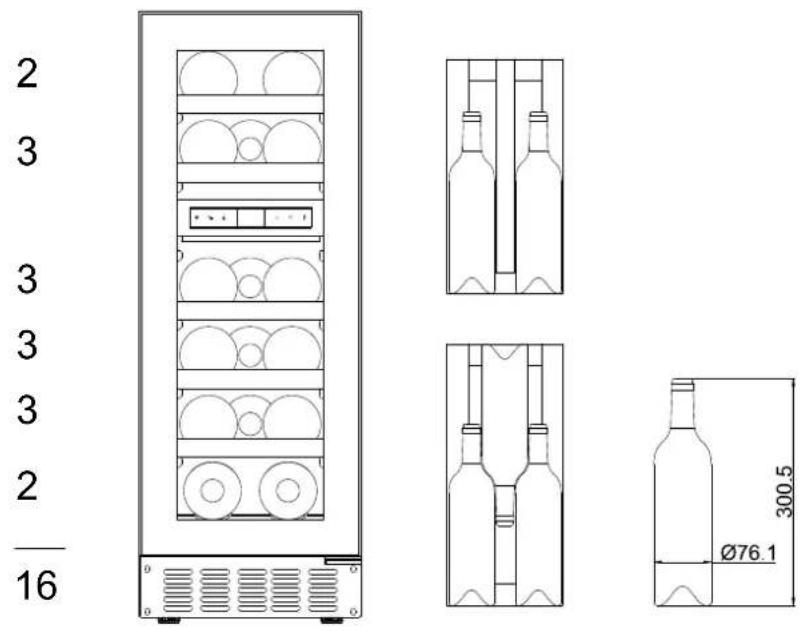
The maximum number of bottles that can be loaded into the cabinet are for information only; this information is not contractual; it provides a means for rapidly estimating the size of the device.
The information comes from tests carried out using standard bottles; in reality, in extreme conditions it would be possible to load a greater number of bottles without racks, but a "diverse wine cellar" is used in many different ways; the daily use of a wine cabinet means that it must carry fewer bottles. Therefore you will probably load fewer bottles then the given maximum numbers.
How to load and care for your wine cabinet:
bar
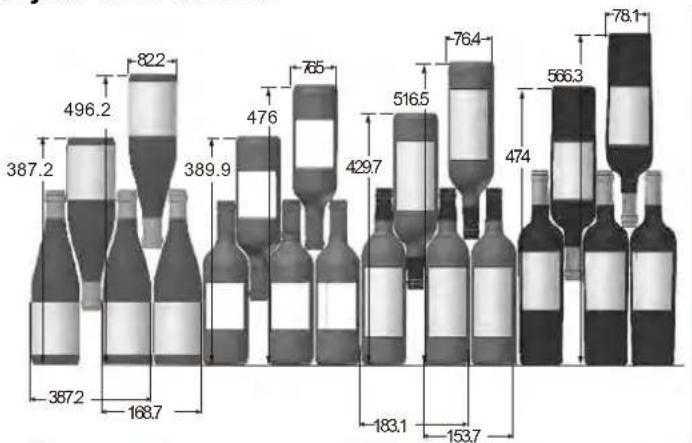
| Item | Value | |---|---| | Wine 1 | 387.2 | | Wine 2 | 496.2 | | Wine 3 | 822 | | Wine 4 | 389.9 | | Wine 5 | 476 | | Wine 6 | 765 | | Wine 7 | 429.7 | | Wine 8 | 516.5 | | Wine 9 | 764 | | Wine 10 | 474 | | Wine 11 | 566.3 | | Wine 12 | 78.1 | | Wine 13 | 183.1 | | Wine 14 | 153.7 | The chart displays a single data series with values for each wine bottle. The values are explicitly labeled on each bottle label above the bars.Here we see 4 types of 75 cl bottles, Burgundy and Bordeaux, of different sizes.
There are many other types, with various volumes and of all shapes.
Note the different ways they are stored depending on the height and diameter of the bottles as well as the interleaving method used.
For better conservation and avoid food waste
To avoid spoiling the wine, it is important that the temperature remains stable in the cavity, avoid frequently opening the door and blocking the interior vents.
To avoid the appearance of mold, please avoid having too much humidity in the cavity.
Loading for Max capacities
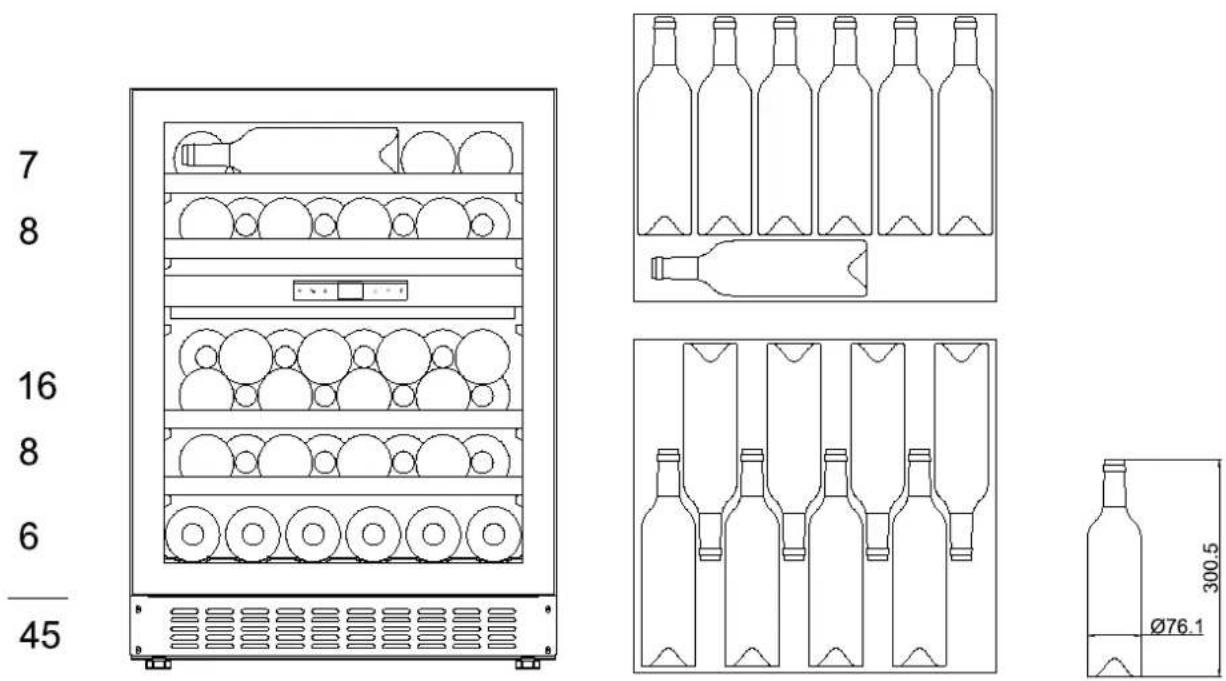
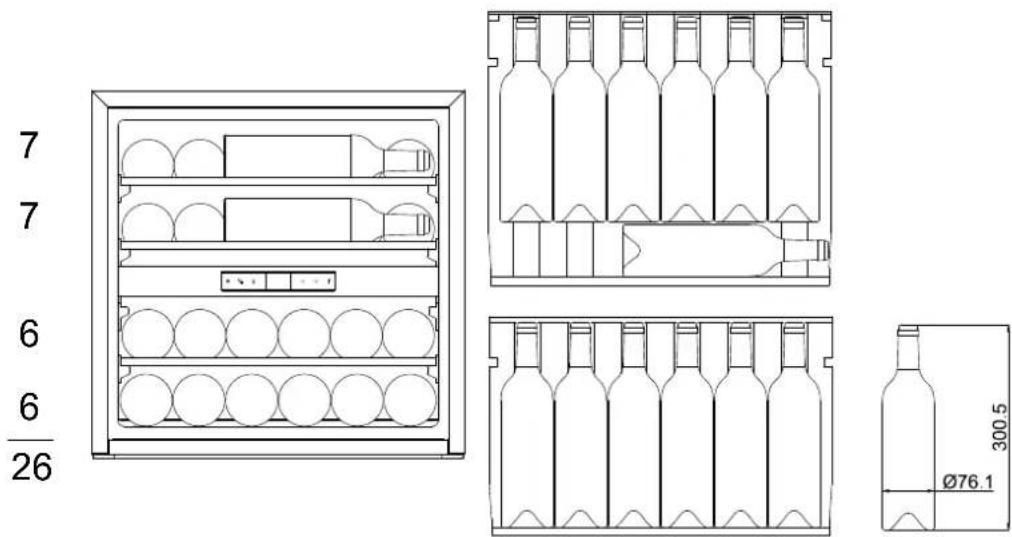
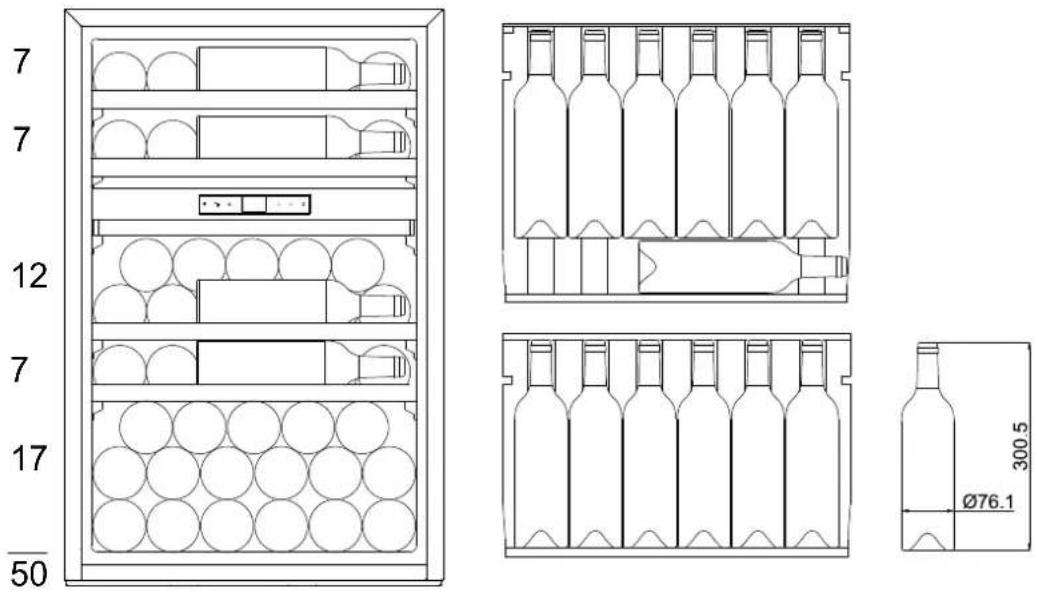
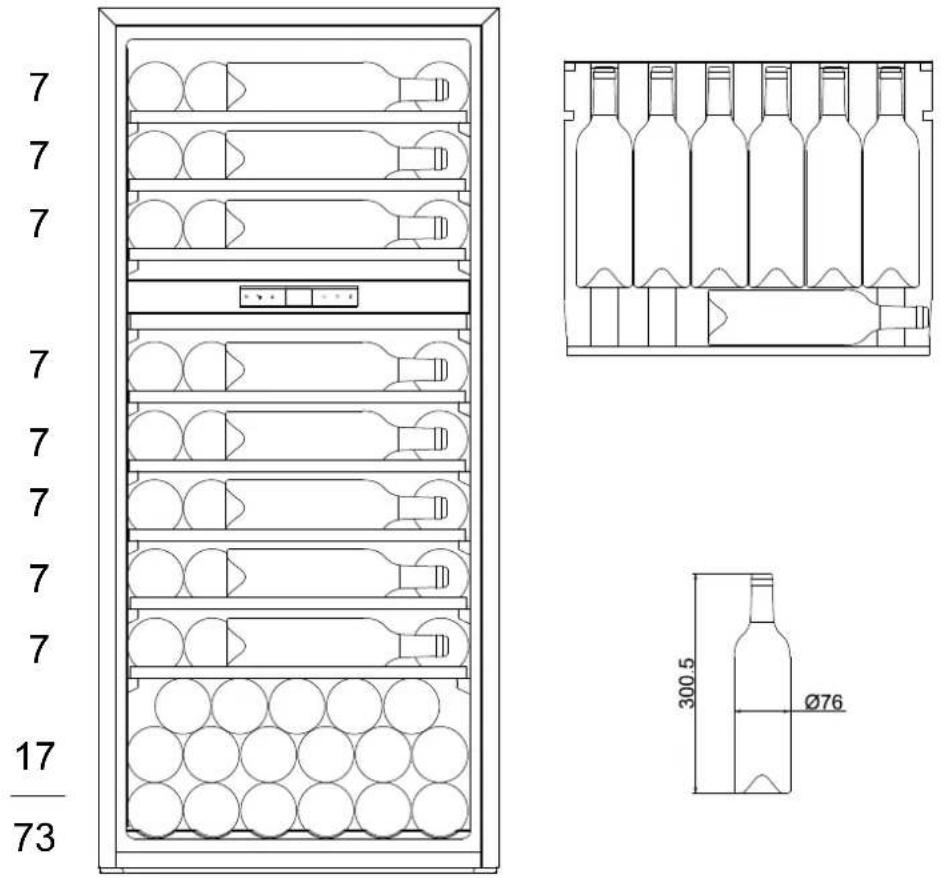
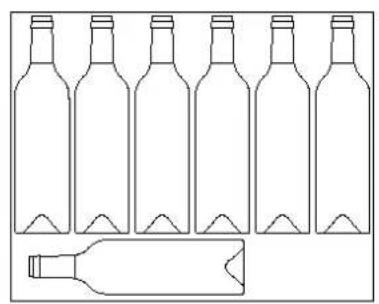
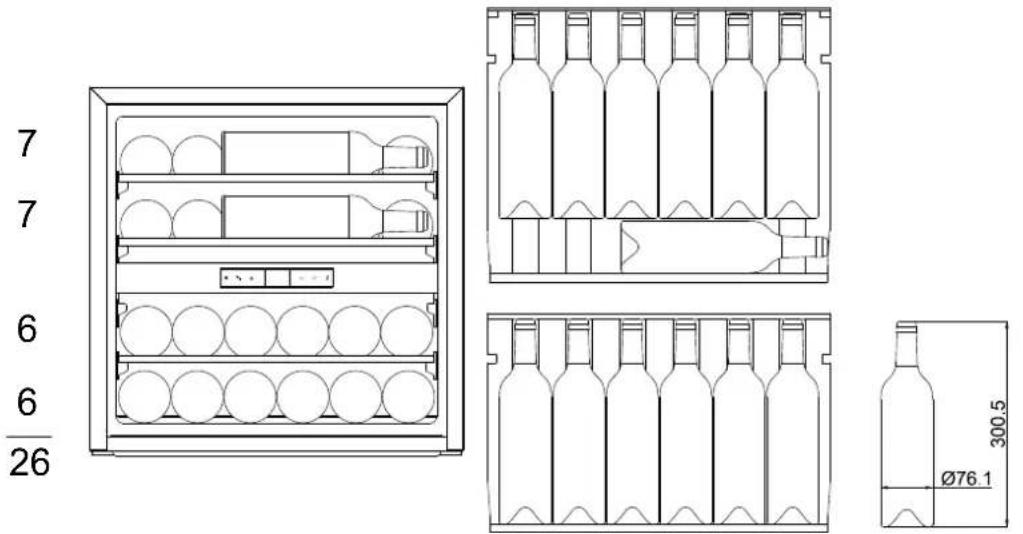
The maximum number of stored bottles is based on standard Bordeaux bottles containing 0.75 L.
LM78/1 / LMN78/1
Max capacity is 7 bottles, 1 per floor, it is recommended to put the cap at the bottom of the device.
LB160/1 / LBN160/1 :16 bottles Max
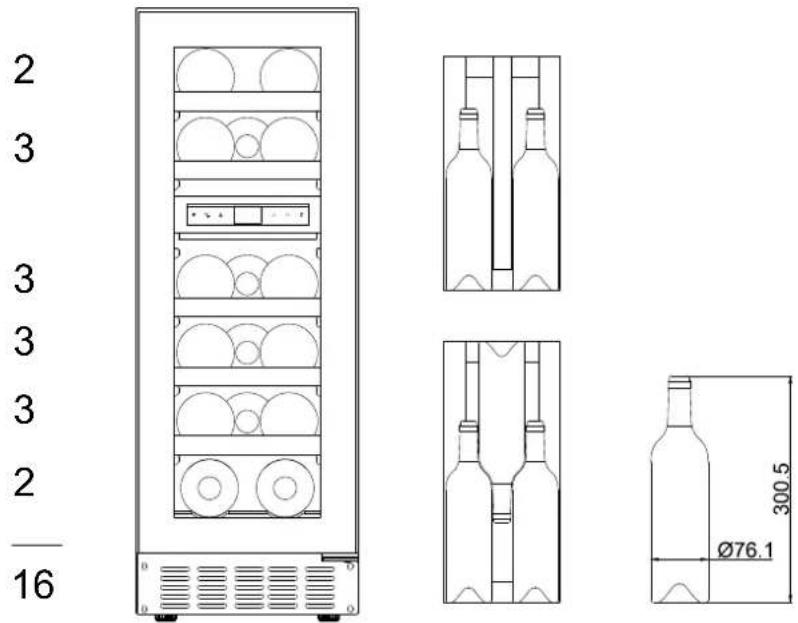
LB340/1 / LBN340/1 :35 bottles Max
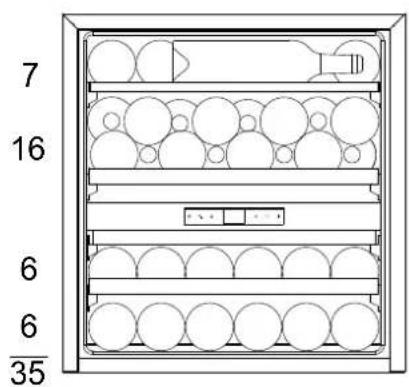
text_image
7 16 6 6 35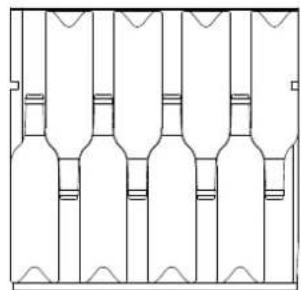
natural_image
Pure architectural floor plan lines without any text, numbers, or symbols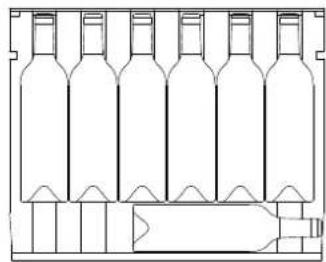
natural_image
Line drawing of a wine bottle rack with multiple bottles and a plastic bag (no text or symbols)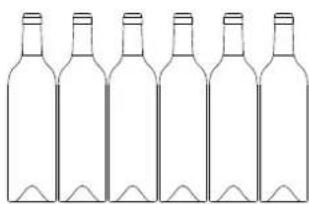
natural_image
Line drawing of six empty wine bottles arranged in a row (no text or symbols)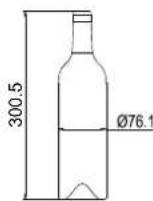
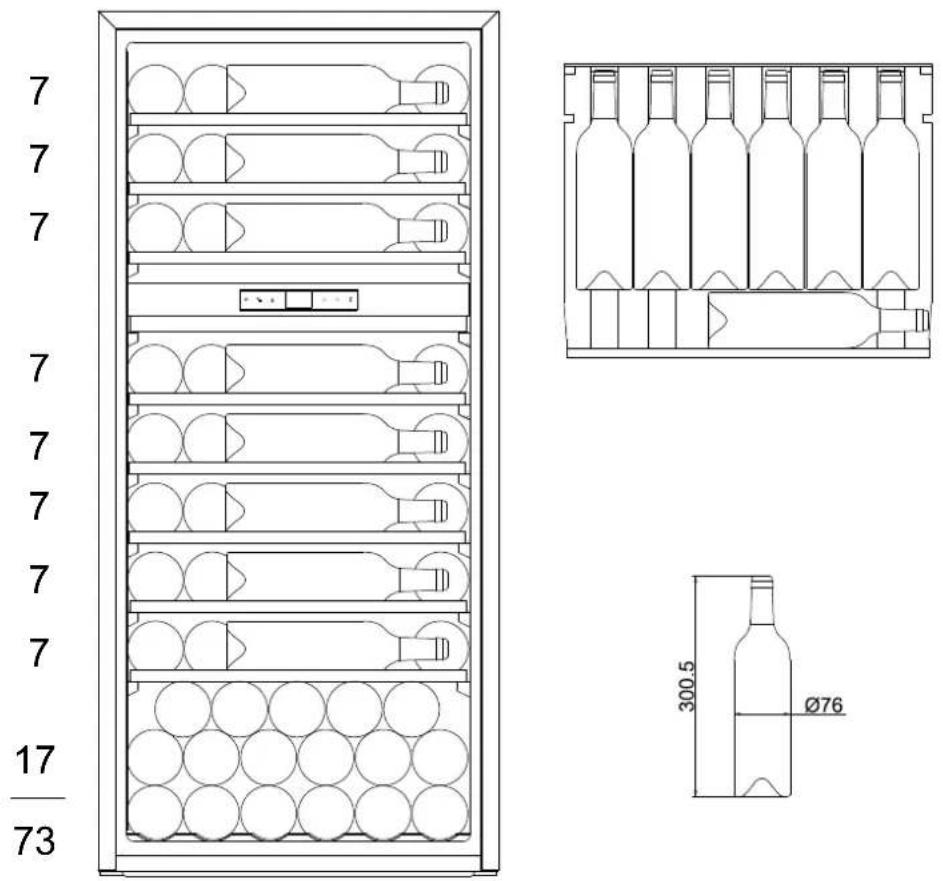
LB720V/1 / LBN720V/1 :73 bottles Max
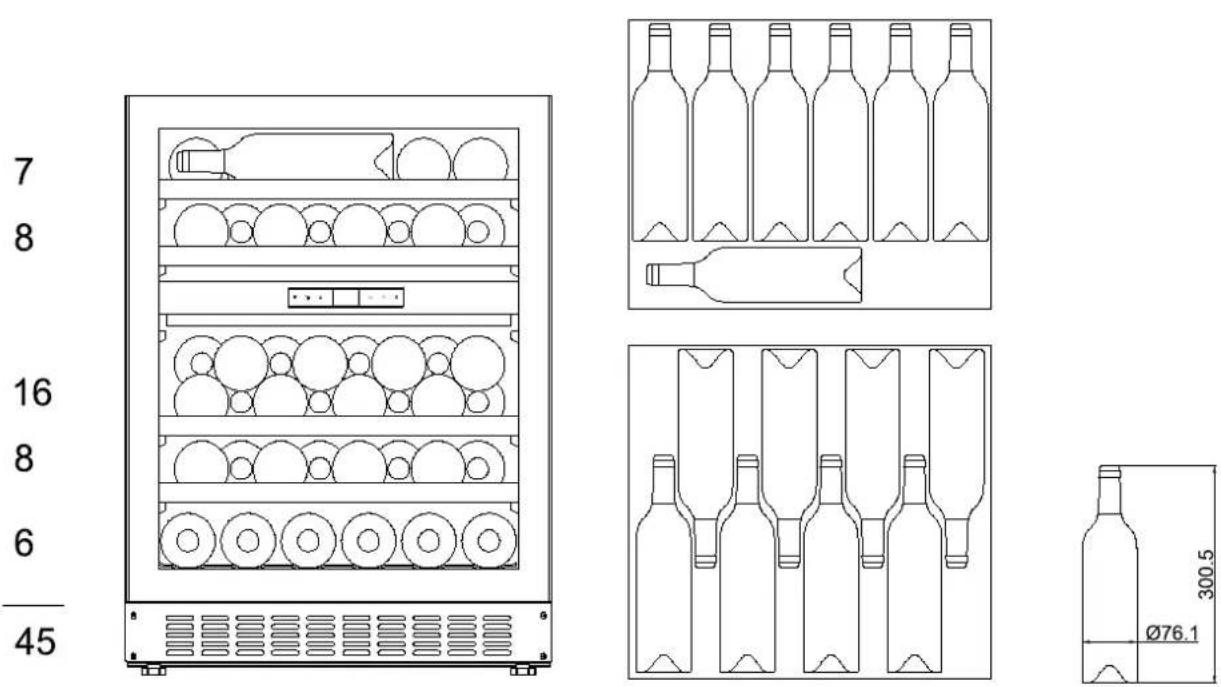
LBN458PO/1 / LBN458POP/1 : 45 bottles Max

natural_image
Line drawing of six empty bottles with a separate bottle outline (no text or symbols)LBN240POV/1 / LBN240POVP/1: 26 bottles Max
LBN460POV/1 / LBN460POVP/1: 50 bottles Max
USAGE
Starting up the device
Once the wine cabinet is properly installed, we advise that you clean the inside using warm water with a low concentration of dish washing liquid. Do not use abrasives or scouring powder; they may scratch the surface finish.
USAGE
CAUTION! Wine cabinets are intended only for storing and preserving wine.
IMPORTANT: Your wine cabinet is ideally suitable for holding Bordeaux type bottles of 0.75 L capacity. It can contain larger bottles; however care must be taken that they do not prevent the door from closing properly.
- When closing the door ensure that it does not touch any of the bottles.
- If you load several bottles at a time, it will take longer before the cabinet reaches the desired temperature.
- In order to avoid damaging the door seal, ensure that the door is fully open before moving the racks along the compartment rails.
Adjusting the temperature
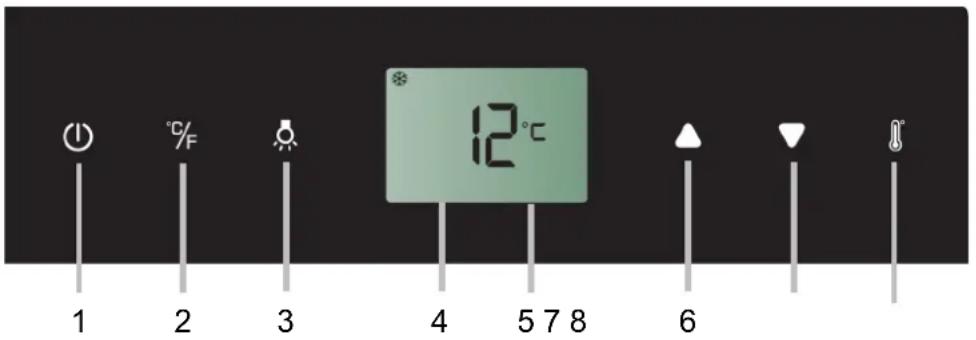
text_image
1 2 3 4 5 7 8 6 12°CDual zone control panel
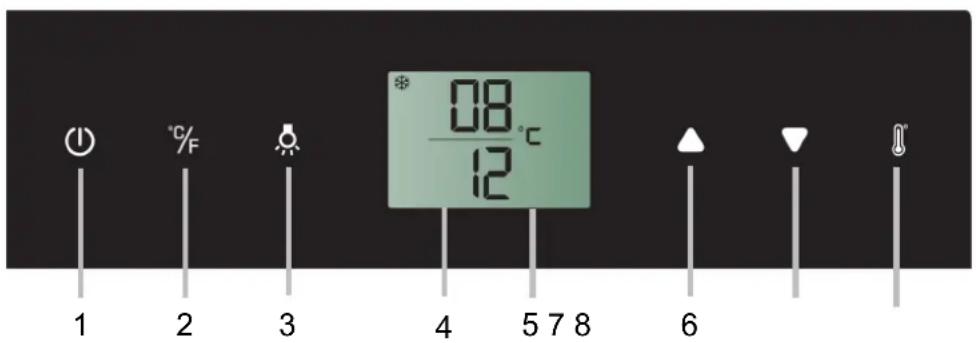
text_image
08 /°C 1 2 3 4 5 7 8 6- ON/OFF button
- °C/°F selector
- Light button
-
LCD screen
-
Temperature display
- and 7. Temperature setting
- Setting selector
Single zone control panel without TriColor Light button
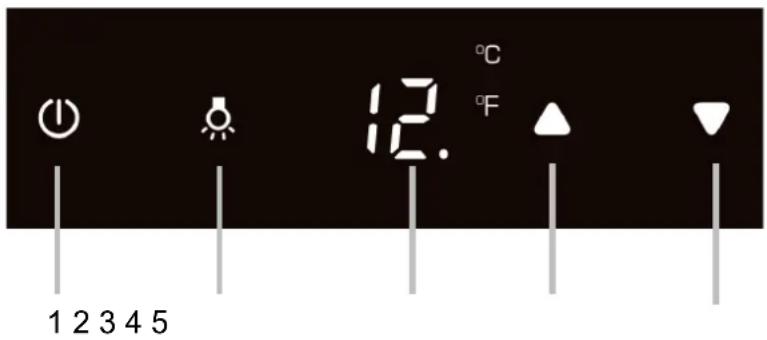
text_image
1 2 3 4 5 12. °C °F- ON/OFF button
-
Light button
-
Temperature display
- & 5. Temperature setting
POWER ⏻ - To turn the appliance off, lightly touch and hold the ⏻ key for 5 seconds until temperature display goes out. To turn the appliance on, lightly touch and hold the ⏻ key for 1 second until temperature display lights up.
NOTE: Touching any key once can switch off the audible alarm when the alarm is on.
°F/°C SELECTOR %F - Set the temperature to be displayed in degree Fahrenheit or degree Celsius.
LIGHT 🔒 - To turn the interior light on/off, lightly touch and hold the 🔒 key for 5 seconds.
UP▲- Used to increase (warm) the set temperature by 1°C/1°F.
DOWN ▼- Used to decrease (cool) the set temperature by 1°C/1°F.
Setting Selector ⚙️- Select the temperature you want to set.
Symbols in the Display
| ☐B | Temperature or Error code display for upper/left zone. |
| 12 | Temperature or Error code display for lower/right zone. |
| ※ | Compressor is ON |
| ○ | Heater is ON |
| A | Defrosting mode |
| ∞ | Dynamic Climate mode |
| DEMO | Eco Demo mode |
| ☀ | The interior light is in Showcase mode |
| ⚠️ | Warning |
| 💡 | Audible tones signal |
| 💡 | Child lock is activated |
Multi-key Function
To perform the multi-key function, lightly touch and hold the first key, then touch the rest key for at least 5 seconds and then release all the keys.
Child Lock
(Only for models with outside controls) If in 2 minutes or longer without touching any key, the child lock will be activated automatically. To remove the lock, press the UP and DOWN keys at the same time for at least 5 seconds until the symbol 🔒 is go out.
Setting the Temperature Control
- The unit has two separate temperature zones. The temperature of both zones can be set between 5°C and 20°C (41°F and 68°F). It can be used as a wine maturing cabinet or a wine serving cabinet. For maturing wine, the recommended temperature setting ranges of both zones should be between 11°C and 14°C (52°F and 57°F). For serving wine, the recommended temperature setting range of UPPER/LEFT zone should be between 5°C and 10°C (41°F and 50°F) which is ideal for serving champagne & white wine and the recommended temperature setting range of LOWER/RIGHT zone should be between 15°C and 20°C (58°F and 68°F) which is ideal for serving red wine.
- When the unit is plugged in for the first time, the unit will power up automatically to the preset defaults. The preset temperature at the factory for UPPER/LEFT temperature zone is 8°C (46°F) and for LOWER/RIGHT temperature zone is 12°C (54°F).
-
Touch the Setting Selector ⚪ until the temperature you want to set is flashing. Then you can use the UP and DOWN keys to set the internal temperature as required. When you touch either key at the first time, the display will show the last temperature set previously.
-
IMPORTANT: For non-twin wine conditioning system, the temperature set for the LOWER temperature zone must always be just as high as or higher than that in the UPPER temperature zone.
- The temperature will increase 1°C/1°F if you touch the UP key once, or the temperature will decrease 1°C/1°F if you touch the DOWN key once. The display flashes while you make the setting.
- The set temperature will temporarily flash in the display for 5 seconds after the temperature has been set. Then the display shows the current inner temperature again.
- To view the set temperature at any time, touch the Setting Selector ⚫ key, the set temperature will temporarily flash in the display for 5 seconds. Then the display shows the current inner temperature again.
SETTINGS MODE
Certain settings on the wine cellar can only be selected in settings mode.
Touch and hold the UP key for 5 seconds to enter and leave Settings mode. The appliance will leave Settings mode automatically after approximately one minute.
°F/°C Selection
◆ Lightly touch and hold the UP key for 5 seconds to enter Settings mode.
Use the UP and DOWN keys to select the temperature display setting in Fahrenheit or Celsius degree.
◆ Touch and hold the UP key for 5 seconds to confirm the selection.
Display Brightness
- Lightly touch and hold the UP key for 5 seconds to enter Settings mode and then touch the POWER key once.
- Use the UP and DOWN keys to select the brightness of the display when the door is close. When the door is open, the display brightness returns to its normal level.
d0: off
d1: dimmest setting (default)
d2: medium setting
d3: brightest setting
- Touch and hold the UP key for 5 seconds to confirm the selection.
Interior Lighting Brightness
- Lightly touch and hold the UP key for 5 seconds to enter Settings mode and then touch the POWER key twice.
- Use the UP and DOWN keys to select the brightness of the interior lighting when the door is close. When the door is open, the interior lighting returns to its normal level.
L0: off when the door is close or open
L1: dimmest setting
L2: medium setting
L3: brightest setting (default)
- Touch and hold the UP key for 5 seconds to confirm the selection.
Fan Mode
- Lightly touch and hold the UP key for 5 seconds to enter Settings mode and then touch the POWER key three (3) times.
- Use the UP and DOWN keys to select the fan mode.
F0: Silent mode - Energy saving mode (default)
F1: DynaClima mode - half time
F2: DynaClima mode - full time
- Touch and hold the UP key for 5 seconds to confirm the selection.
Audible Tones
- Lightly touch and hold the UP key for 5 seconds to enter Settings mode and then touch the POWER key four (4) times.
- Use the UP and DOWN keys to select the audible tones.
S0: sensor tone ON, alarm tone OFF
S1: sensor tone ON, alarm tone ON (default)
S2: sensor tone OFF, alarm tone OFF
S3: sensor tone OFF, alarm tone ON
- Touch and hold the UP key for 5 seconds to confirm the selection.
TEMPERATURE MEMORY FUNCTION
In the event of a power interruption (power surge, breaker switch, etc.), the unit remembers the previous temperature settings. When the power is recovered, the cabinet temperature will go back the same setting temperature as before the power interruption.
TEMPERATURE ALARM
An audible alarm will sound if the temperature in one of the zones rises or falls outside the temperature range. The relevant temperature display will flash at the same time. The temperature the appliance is set at determines the temperature the appliance recognizes as being too warm or too cool. The audible alarm will sound and the temperature display will flash:
- When you switch the appliance on, if the temperature inside the appliance is very different from the temperature set.
- When there has been a lengthy interruption to the power supply.
- When too many items have been put into the unit at one time. Or too much ambient air flowed in when rearranging and removing storage items.
- When the door is not been closed tightly.
- The appliance is faulty.
The audible alarm will be automatically silenced and the temperature display stops flashing when the set temperature is reached again. However, if the noise disturbs you, you can switch the audible alarm off before this if you wish by pressing the POWER key once. The alarm will stop. The relevant temperature display continues to flash until the set temperature has been reached. The display then lights up constantly, and the alarm system is fully active again.
DOOR ALARM
If the door has been left open for more than 60 seconds, the audible alarm will sound. Closing the door or pressing the POWER key once can switch off the audible alarm.
INTERIOR LIGHT / TriColor
The interior light makes it easy to view your wine labels and enhances the display of your collection. Touching and holding the LIGHT mark for 5 seconds toggles between 2 modes of operation for the internal lights: functional (default) mode and showcase mode. If you are in functional (default) mode, the lights will turn on only when the door is open. If you are in showcase mode, the lights will be on whether or not the door is open. The unit is equipped with a LED light fitting system. To change the LED light fitting pls contact the service department.
NOTE: Please use only the original LED light fittings provided by the manufacturer.
Select the color of the interior lighting orange, white and blue by touching the LIGHT key. Touch the LIGHT key to switch between single color mode and dynamic color mode. In dynamic color mode, the interior lighting will start to cycle through the 3 available colors. Touching the LIGHT key once when the desired color is on, your interior light will be changed to that color. To return to dynamic color mode, touch the LIGHT key again.
DYNAMIC COOLING / SILENT MODE
The appliance has two different running modes. In Silent mode once the required temperature is reached, the appliance will run without the fan. In Dynamic Cooling mode the fan cycles on and off to circulate the air even after the required temperature is reached. This ensures consistent humidity and temperature distribution in the wine cellar, creating perfect conditions for long term storage.
Using the dynamic mode increases the level of noise in operation
Note
- If the unit is unplugged, power lost, or turned off, you must wait 3 to 5 minutes before restarting the unit. If you attempt to restart before this time delay, the Wine cooler will not start.
- When you use the Wine cooler for the first time or restart the Wine cooler after having been shut off for a long time, there could be a few degrees variance between the temperature you select and the one indicated on the LED readout. This is normal and it is due to the length of the activation time. Once the Wine cooler is running for a few hours everything will be back to normal.
CARE OF YOUR CABINET
DEFROSTING
Defrosting of your wine cabinet is fully automatic. It requires no action on your part.
During operation, you may notice condensation drops forming on the rear inside wall of the cabinet. They will be eliminated during automatic defrosting.
CLEANING
Before any cleaning, unplug the device from the mains.
Never use abrasives or a scraper sponge when cleaning the inside or the outside of your wine cabinet.
- Remove all accessories (racks, etc.). Wash them using lukewarm water to which has been added a gentle unscented detergent (dish washing liquid for example); rinse with bleach water and carefully dry off.
- Wash the inside walls in the same way; pay particular attention to the rack supports
- Wash the door seal as well as under the seal.
- Plug the wine cabinet into the mains.
From time to time, dust off the condenser under the device; accumulated dust may reduce the efficiency of your wine cabinet.
In the event of a prolonged absence, empty and clean out the device; maintain the door slightly open during the period of non-use.
REPLACING THE ILLUMINATING LAMP
The device uses light emitting diodes (LEDs). This type of diode cannot be changed by the user. The life cycle of the LEDs is long enough so that they do not need to be changed. If however, in spite of the care taken by the manufacturer, the LEDs do fail, please contact your Customer Care Service for any repair.
TROUBLESHOOTING
You can resolve many of the problems that may arise without having to call Customer Care Service. Please try the suggestions below.
| PROBLEM POSSIBLE CAUSE | |
| No operation | Check your installation's power supplyCheck your circuit breakerA fuse has blown |
| Not cold enough | Check the setting temperatureAmbient temperature requires readjustment of the temperaturesThe door is open too oftenThe door is not closed properlyThe door seal is not air-tightThere is not enough space around the device |
| No interior lightNo display on the LCD screen | Contact your Customer Care Service |
| There appears to be a loud noise | Check the device levellingVerify that a piece of paper or part of the packaging has not remained stuck in the device. |
| The door does not close properly | Check the device levellingThe seal is in poor repairThe feet have "moved" |
| The light (LED) does not come on | The control panel is not workingPrinted circuit problemMains plug problemContact your Customer Care Service |
| LED display error | Poor displayThe temperature value is not shownContact your Customer Care Service |
| The fans are not working | Control Panel to be replaced by your Customer Care Service |
CHANGING DOOR OPENING SIDE
This appliance has reversible doors but is delivered with a right hinged door. The left hand hinge kit comes with the unit (in the box), should you wish to reverse the hinge on your unit.
For your safety, please unplug appliance before doing this operation.
⚠ WARNING : Use extreme caution with the articulated hinges. The hinge is self-closing and many pinch points exist prior to built-in installation.
text_image
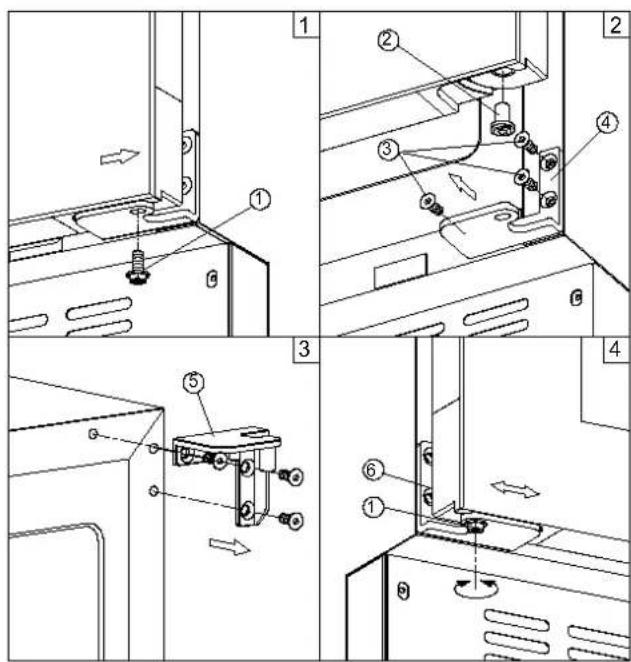
Technical diagram showing exploded and assembled views of a mechanical assembly with numbered components and directional arrows indicating motion.- Unscrew the lock screw (1) then gently lift and slide the door outward the right to release it. Be careful to hold the door firmly after removing the screw. (Fig. 1)
- Gently pull down to remove the door from the right top hinge and place it on a padded surface to avoid the risk of damage. Transfer the door pin (2) to the opposite of door. (Fig. 2)
- Remove the right bottom hinge (4) and the right top hinge (5). (Fig. 2 & 3)
- Pop out the cover caps on the left side of cabinet and use them to cover the screw holes on the right side.
- Screw the alternative left top hinge, included in the fittings, on the left side of cabinet.
- Screw the alternative left bottom hinge (6), included in the fittings, on the left side of cabinet.
- Rotate the door 180^ and relocate the door to the designated position. Lift and slide the door inward from the left and secure the door pin (2) with lock screw (1). (Fig. 4)
- Recheck and adjust the door alignment by loosening the lock screw (1) and moving the door. Tighten the screw (1) after the door is levelled. (Fig. 4)
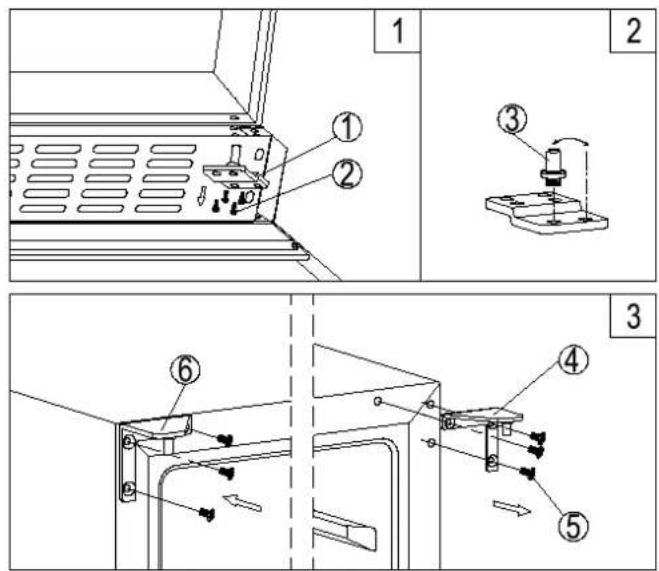
- Remove the bottom hinge (1) by unscrewing the four lock screws (2). Be careful to hold the glass door firmly after removing the screws. (Fig. 1)
- Gently pull down to remove the glass door from the right top hinge and place it on a padded surface to avoid the risk of damage. Then remove the right top hinge (4). (Fig. 3)
- Unscrew and transfer the hinge pin (3) of the bottom hinge to the opposite side. (Fig. 2)
- Pop out the cover caps on the left side of cabinet and use them to cover the screw holes on the right hand side.
- Screw the alternative left top hinge (6), included in the fittings, on the left hand side of cabinet. (Fig. 3)
- Rotate the door 180^ and relocate the door to the designated position. Then screw the bottom hinge assembly on the left designated position and tighten it after the door is leveled.
LB340/1 and LBN340/1
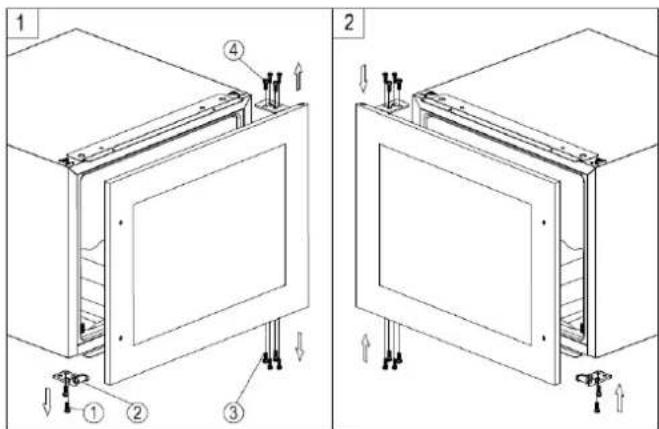
- Remove the glass door by unscrewing the eight lock screws 3 and 4. Be careful to hold the glass door firmly after removing the screws and place it on a padded surface to avoid the risk of damage.
- Unscrew and transfer the door supporter 2 to the opposite side.
- Rotate the glass door 180^ and refit the glass door to the opposite side. Then screw and tighten it after the door is leveled.
text_image
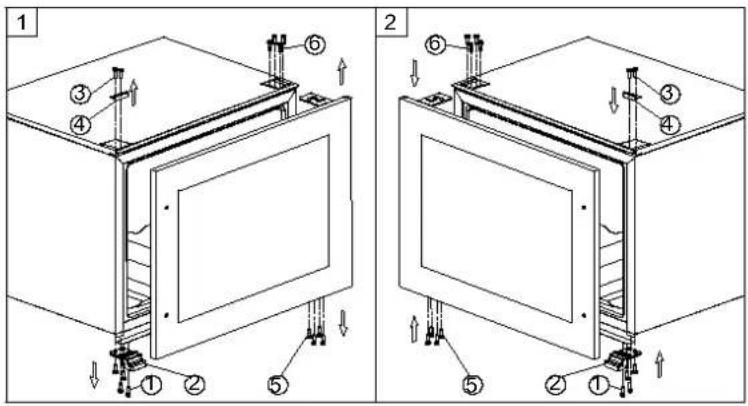
Technical diagram showing two views of a cabinet or enclosure with numbered components and directional arrows indicating assembly or installation.- Remove the glass door by unscrewing the eight locking screws (5) and (6). Be sure to hold the glass door firmly after removing the screws and place it on a padded surface to avoid possible damage.
- Loosen the screws (1) and (3) then transfer the door bracket (2) and the decorative cover (4) to the opposite side.
- Rotate the glass door 180^ and replace the glass door on the opposite side. Then screw and tighten it once the door is leveled.
LBN240POV/1, LBN240POVP/1, LBN460POV/1, LBN460POVP/1, LBN458PO/1 and LBN458POP/1
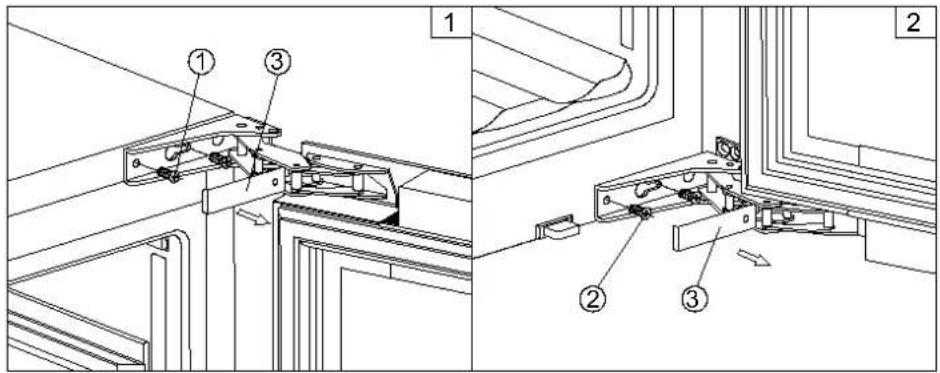
text_image
Technical diagram showing three labeled mechanical components (①, ②, ③) in a structural assembly layout.- Remove the cover cap (3) and then remove the glass door by unscrewing the four screws (1) and (2). Be careful to hold the glass door firmly after removing the screws and place it on a padded surface to avoid the risk of damage.
- Pop out the cover caps on the left side of cabinet and use them to cover the screw holes on the right hand side.
- Rotate the glass door 180^ and refit the glass door to the opposite side. Then screw and tighten it after the door is leveled.
GLASS OVERLAY DOOR GUIDE
LBN458POP/1
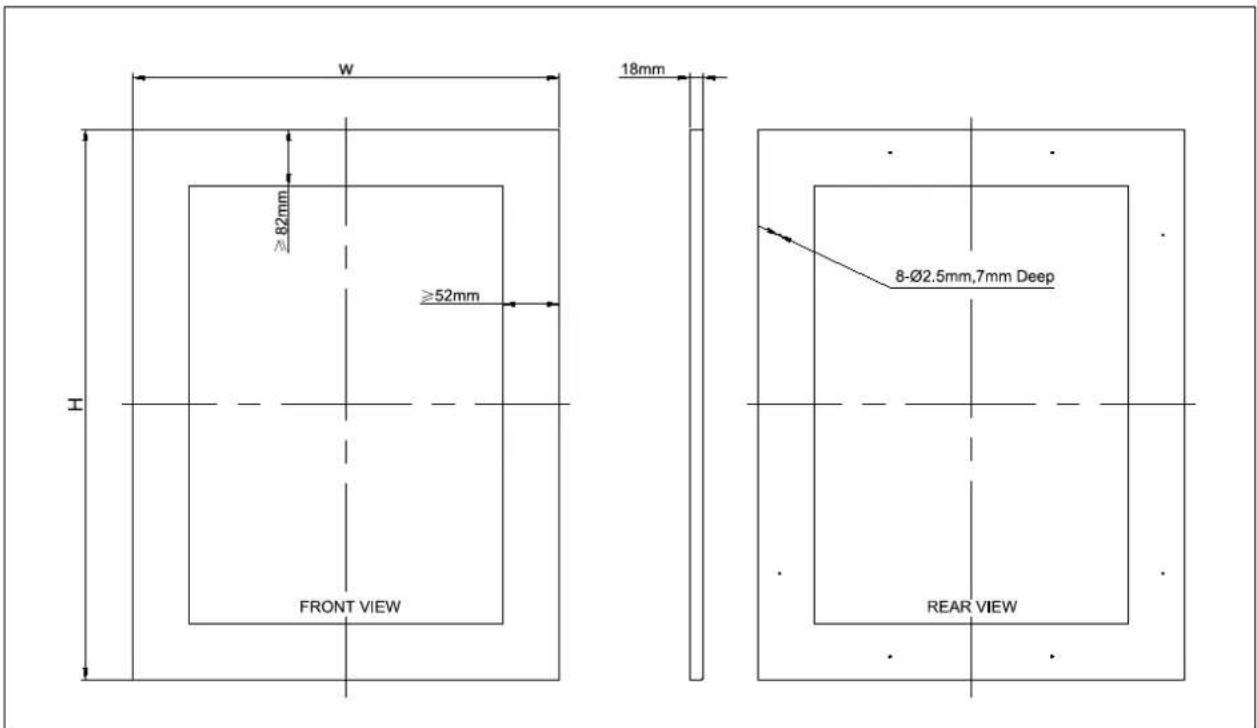
1. Door Panel Preparation
Depending on the wine cellar model prepare the overlay panel to the dimensions shown below. Then attach the handle to the overlay panel by using the flat head screws and drive the screws flush with the panel if needed.
text_image
W ≥82mm ≥52mm 18mm FRONT VIEW 8-Ø2.5mm,7mm Deep REAR VIEWNOTE:
- H = Height of door + 2mm, W = Width of door + 4mm.
- Weight of the overlay panel should not exceed 10 kilograms.
- It is important to ensure that all drilled holes are drilled to the correct depth in order to avoid splits in the wood when hardware is installed.
- Drill the handle installation holes in the overlay panel according to the handle you are planning to use.
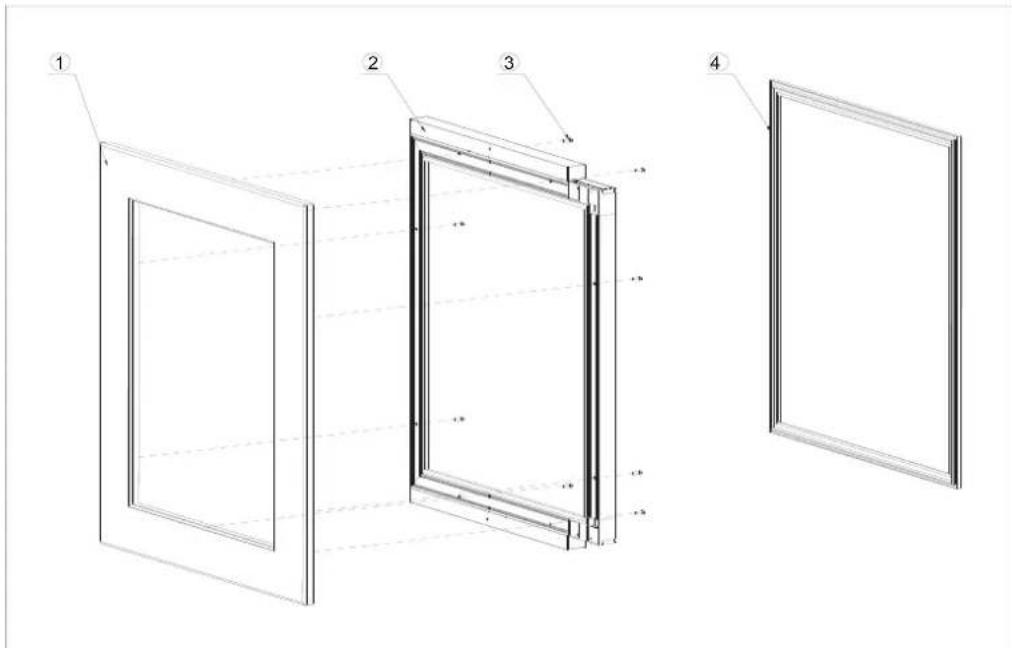
2. Door Panel Installation
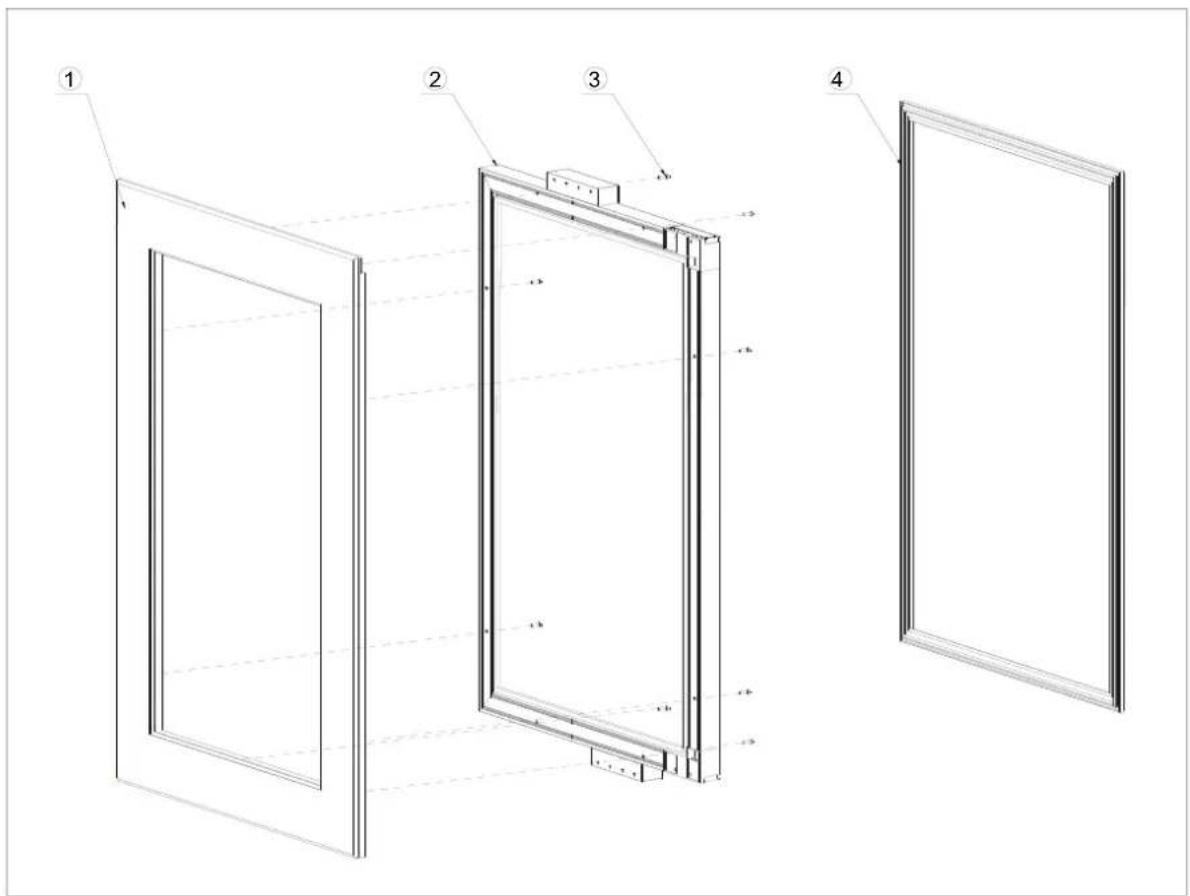
- Remove the door gasket (4) completely from glass door (2). Start in a corner and pull outward. This may take some force. Set gasket down on a flat surface for later installation.
- Attach the wood overlay panel (1) on the glass door (2) by using the eight wood screws ST4x30 Type AB Philips (3).
• Install the wood overlay glass door on the unit as normal.
text_image
Technical diagram showing four views of a window frame with labeled components and dimension linesLBN240POVP/1 and LBN460POVP/1
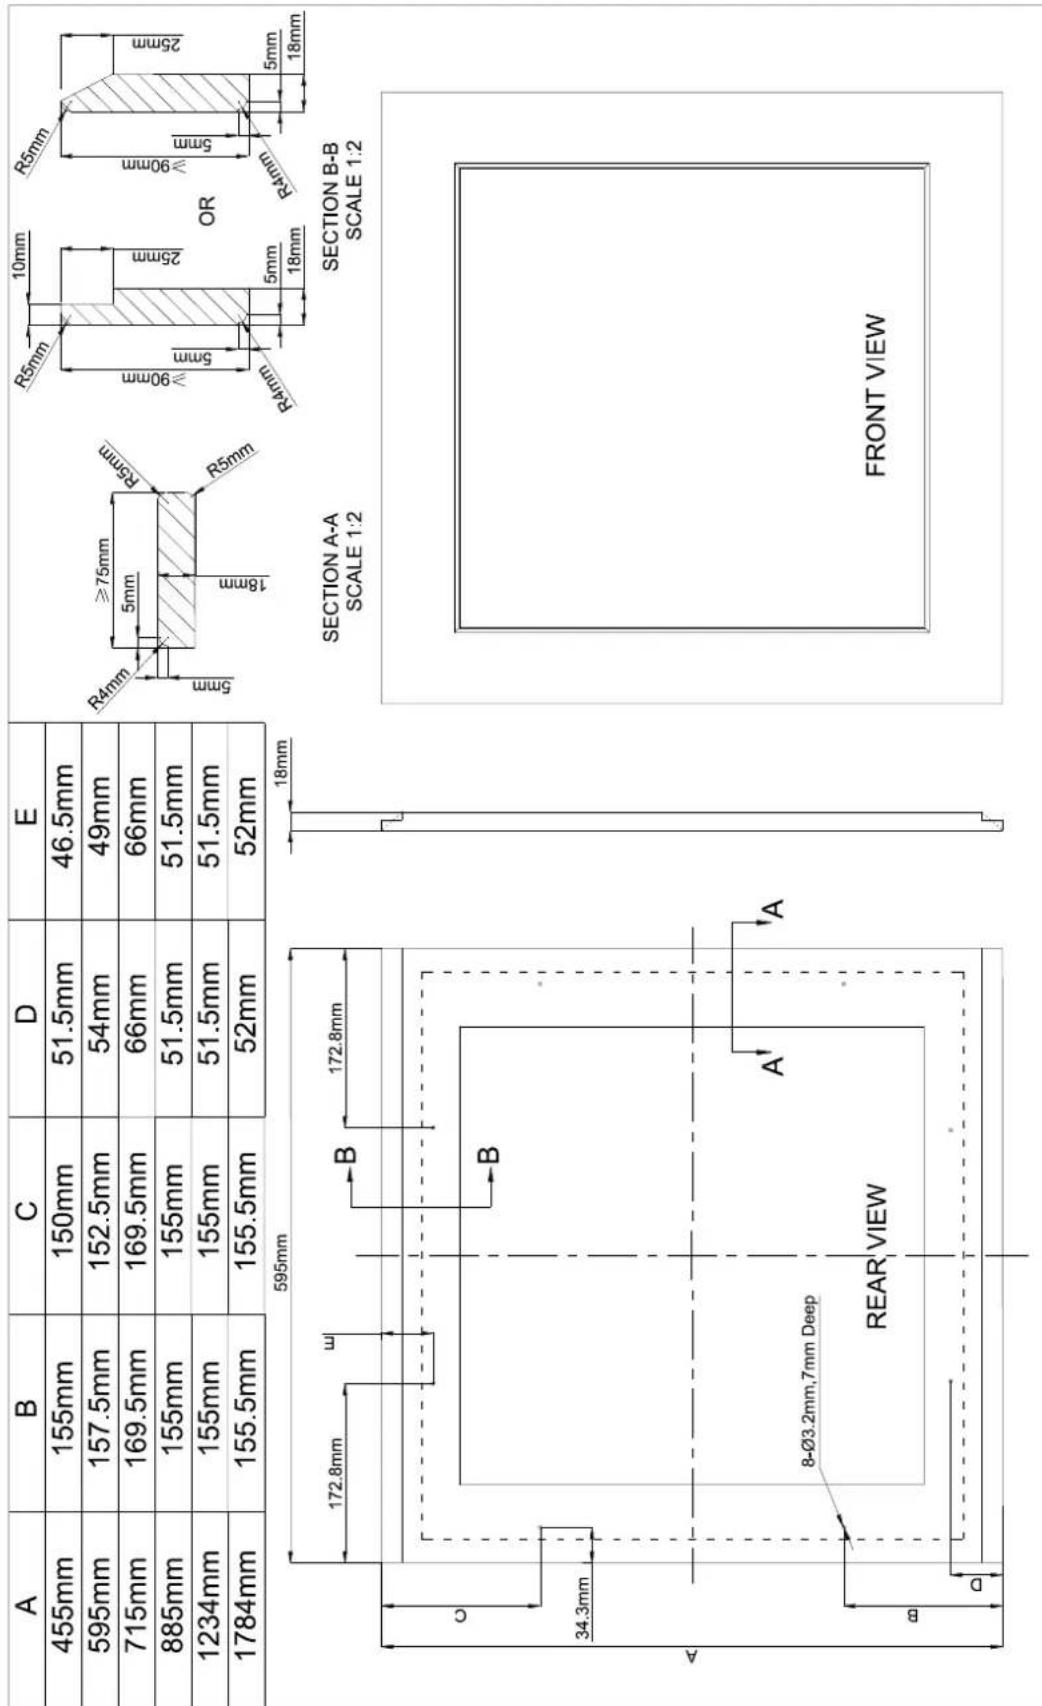
1. Door Panel Preparation
Depending on the wine cellar model prepare the overlay panel to the dimensions shown below. Then attach the handle to the overlay panel by using the flat head screws and drive the screws flush with the panel if needed.
text_image
A B C D E 455mm 155mm 150mm 51.5mm 46.5mm 595mm 157.5mm 152.5mm 54mm 49mm 715mm 169.5mm 169.5mm 66mm 66mm 885mm 155mm 155mm 51.5mm 51.5mm 1234mm 155mm 155mm 51.5mm 51.5mm 1784mm 155.5mm 155.5mm 52mm 52mm SECTION A-A SCALE 1:2 SECTION B-B SCALE 1:2 SECTION A- B 172.8mm 172.8mm SECTION B- B R4mm ≥75mm R5mm R4mm ≥90mm R4mm ≥90mm R4mm ≥90mm R4mm ≤75mm ≤75mm ≤75mm ≤75mm ≤75mm ≤75mm ≤75mm ≤75mm ≤75mm ≤75mm ≤75mm ≤75mm ≤75mm ≤75mm ≤75mm ≤75mm ≤75mm ≤75mm ≤75mm ≤75mm ≤72.8mm 34.3mm 8-Ø3.2mm,7mm Deep REAR VIEW A' A' A' FRONT VIEWNOTE:
1. Weight of the overlay panel should not exceed 10 kilograms.
2. It is important to ensure that all drilled holes are drilled to the correct depth in order to avoid splits in the wood when hardware is installed.
- Drill the handle installation holes in the overlay panel according to the handle you are planning to use.
2. Door Panel Installation
- Remove the door gasket (4) completely from glass door (2). Start in a corner and pull outward. This may take some force. Set gasket down on a flat surface for later installation.
- Attach the wood overlay panel (1) on the glass door (2) by using the eight wood screws ST4x32 Type AB Philips (3).
• Install the wood overlay glass door on the unit as normal.
text_image
Technical diagram of a door frame assembly with numbered components and dimension annotationsGUARANTEE
Repairs and spare parts available
The manufacturer's warranty is applicable for this device for a period of 5 years.
In the event of a malfunction during this period, any request for support must be made to the after-sales service of your dealer.
Outside the warranty period, any information regarding professional repair services or ordering original spare parts may be obtained by contacting your dealer.
In accordance with the Ecodesign Regulation, spare parts will be available for at least 7 years from the date of purchase of your device.
Le Chai
GEBRUIKSHANDLEIDING
INBOUWBARE WIJNKAST
LM78/1 & LMN78/1 - 7 flessen max
LB160/1 & LBN160/1 – 16 flessen max
LB340/1 & LBN340/1 - 35 flessen max
LB720V/1 & LBN720V/1 - 73 flessen max
LBN458PO/1 & LBN458POP/1 - 45 flessen max
LBN240POV/1 / LBN240POVP/1 - 26 flessen max
LBN460POV/1 / LBN460POVP/1 - 50 flessen max
INHOUD
| Model | website | QR-code |
| LM78/1 | https //eprel.ec.europa/qr/1938044 |  |
| LMN78/1 | https //eprel.ec.europa/qr/1938061 |  |
| LB160/1 | https //eprel.ec.europa/qr/1939583 |  |
| LBN160/1 | https //eprel.ec.europa/qr/1939731 |  |
| LB340/1 | https //eprel.ec.europa/qr/1939738 |  |
| LBN340/1 | https //eprel.ec.europa/qr/1939744 |  |
| LB720V/1 https //eprel.ec.europa/qr/1940161 |  |
| LBN720V/1 https //eprel.ec.europa/qr/1940177 |  |
| LBN458PO/1 https //eprel.ec.europa/qr/1940648 |  |
| LBN458POP/1 https //eprel.ec.europa/qr/ 1940632 |  |
| LBN240POV/1 https //eprel.ec.europa/qr/1940238 |  |
| LBN240POVP/1 https //eprel.ec.europa/qr/ 1940386 |  |
| LBN460POV/1 https //eprel.ec.europa/qr/1940624 |  |
| LBN460POVP/1 https //eprel.ec.europa/qr/1940614 |  |
PRESENTATIE VAN HET TOESTEL
LM78/1 / LMN78/1
text_image
Technical diagram of a refrigerator internal structure with numbered componentstext_image
Technical diagram of a refrigerator with numbered parts for identificationtext_image
Technical diagram of a refrigerator with numbered components for identificationtext_image
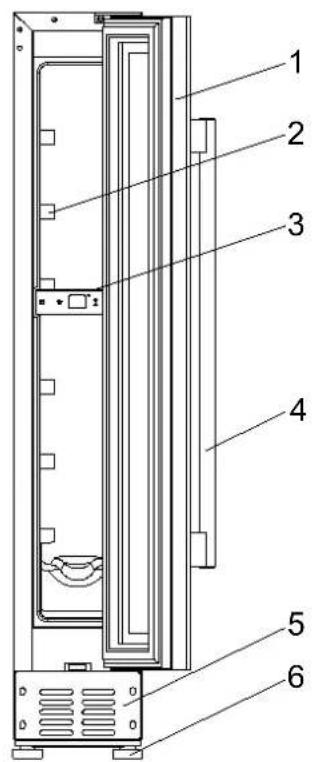
Technical diagram of a refrigerator with numbered components for identification1 – Glazen deur
2 - Rekjes
3 – Bedieningspaneel
4 – Licht
5 – Handgreep
6 – Ventilatie
PRESENTATIE VAN HET TOESTEL
LBN458PO/1
text_image
1 2 3 4 5 6 7text_image
Technical diagram of a refrigerator internal structure with numbered labels pointing to different compartments and parts.text_image
Technical diagram of a refrigerator internal structure with numbered labels pointing to different compartments or parts.text_image
Technical diagram of an internal refrigerator with numbered labels pointing to different compartments and panel layouts.natural_image
Technical line drawing of two rectangular metal profiles with fluted bases and mounting holes (no text or symbols)"PUSH TO OPEN" AUTOMATISCH DEUR OPENINGSSYSTEEM (op sommige modellen)
natural_image
Simple line drawing of a ball rolling down an inclined plane with an arrow indicating rotation (no text or symbols)bar
| Item | Value | |---|---| | Wine 1 | 387.2 | | Wine 2 | 496.2 | | Wine 3 | 822 | | Wine 4 | 389.9 | | Wine 5 | 476 | | Wine 6 | 765 | | Wine 7 | 516.5 | | Wine 8 | 764 | | Wine 9 | 474 | | Wine 10 | 566.3 | | Wine 11 | 78.1 | | Wine 12 | 183.1 | | Wine 13 | 153.7 | | Wine 14 | 168.7 | The chart displays a single data series with values for each wine bottle. The values are explicitly labeled on each bottle label above the corresponding bars.LB160/1 / LBN160/1 :16 flessen Max
LB340/1 / LBN340/1 :35 flessen Max
text_image
7 16 6 6 35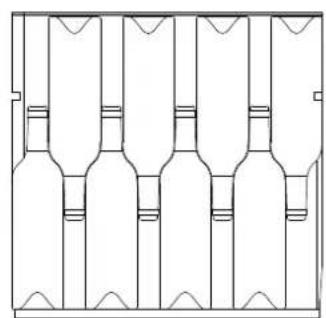
natural_image
Pure architectural line drawing of a multi-story building facade with no text, numbers, or symbols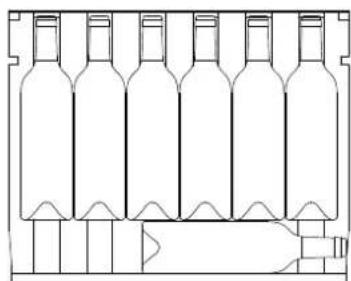
natural_image
Line drawing of a multi-volume wine bottle structure with no text or symbols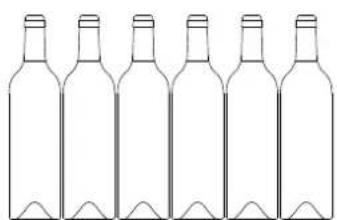
natural_image
Line drawing of six empty wine bottles arranged in a row (no text or symbols)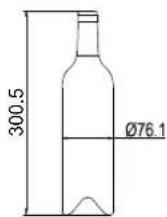
LB720V/1 / LBN720V/1 :73 flessen Max
LBN458PO/1 / LBN458POP/1 : 45 flessen Max
LBN240POV/1 / LBN240POVP/1: 26 flessen Max
text_image
7 7 6 6 26 300.5 Ø76.1LBN460POV/1 / LBN460POVP/1 : 50 flessen Max
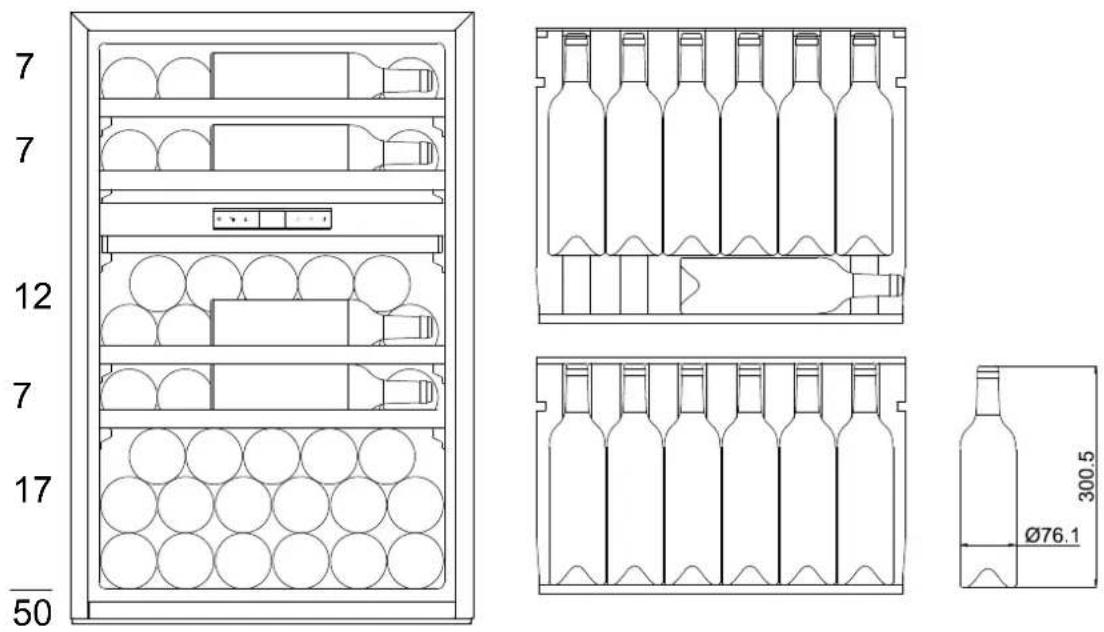
text_image
7 7 12 7 17 50 300.5 Ø76.1GEBRUIK
Ingebruikname
S0: sensortoon AAN, alarmtoon UIT
S1: sensortoon AAN, alarmtoon AAN (standaard)
S2: sensortoon UIT, alarmtoon UIT
S3: sensortoon UIT, alarmtoon AAN