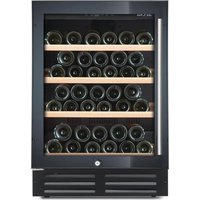
PRO 42E - Wine cellar LE CHAI - Free user manual and instructions
Find the device manual for free PRO 42E LE CHAI in PDF.


| Product type | Wine cellar |
| Brand | LE CHAI |
| Model | PRO 42E |
| Capacity (bottles) | 42 bottles (0.75 L standard) |
| Usable volume | 138 L |
| Dimensions (W x D x H) | 595 x 570 x 870 mm |
| Weight | 44 kg |
| Power supply | 220-240 V ~ 50 Hz |
| Energy efficiency class | B |
| Annual energy consumption | 193 kWh/year |
| Climate class | N (ambient temperature 16-32 °C) |
| Noise emissions | 42 dB(A) |
| Installation type | Freestanding or built-in |
| Temperature range | 5 °C to 22 °C |
| Defrost | Automatic (No-Frost) |
| Lighting | Interior LED (not user-replaceable) |
| Anti-vibration system | Silent-blocks and polyurethane foam |
| UV protection system | Treated glass door filtering UV |
| Number of shelves | Multiple shelves with stop |
| Lock | Yes |
| Adjustable feet | 2 adjustable feet |
| Door reversibility | Yes (changeable from right to left) |
| Refrigerant | Isobutane (R600a) |
| Supplied accessories | Handle, specific seals, key for lock |
Frequently Asked Questions - PRO 42E LE CHAI
User questions about PRO 42E LE CHAI
0 question about this device. Answer the ones you know or ask your own.
Ask a new question about this device
Download the instructions for your Wine cellar in PDF format for free! Find your manual PRO 42E - LE CHAI and take your electronic device back in hand. On this page are published all the documents necessary for the use of your device. PRO 42E by LE CHAI.
USER MANUAL PRO 42E LE CHAI
BUILT IN SERVICE WINE CABINET
PRO42E - 42 Bottles
TABLE OF CONTENTS
Introducing the wine cabinet Page 19
Important warnings and tips Page 20
Setting up the cabinet Page 24
Specific information Page 25
Usage Page 27
Care of your cabinet Page 28
Troubleshooting Page 29
Changing door opening side
Terms of Warranty & After-Sales Service Page 31
TECHNICAL AND ENERGY CHARACTERISTICS
| Brand: LE CHAI Refrigeration device class: Household: 2 | Model PRO42E (42 bottles) |
| Foodstuffs | \( {220}\mathrm{\;V} - {240}\mathrm{\;V} \sim {50}\mathrm{\;{Hz}} \) |
| Size (L*W*H) (mm) | 595x570x870 |
| Weight | 44 kg |
| Energy efficiency class | Class B |
| Yearly energy consumption (AEc) | Consumption \( {193}\mathrm{\;{kW}} \) per year calculated on the basis of 24 hours usage under standardised test conditions. Real energy consumption depends on usage conditions and where the cabinet is located. |
| Utilisation compartment volume | 138 L |
| Defrosting | No-Frost |
| Climate class | Climate class N This device is designed for use at ambient temperatures between \( {16}^{ \circ }\mathrm{C} \) and \( {32}^{ \circ }\mathrm{C} \) |
| Acoustic emissions into air | 42 dB(A) re 1pW |
| Installation type | Free standing or recessed mounted |
The cabinet is exclusively designed for storing wine.
Real energy consumption depends on installation and usage conditions.
This device complies with European Directive requirements:
2014/35/UE pertaining to electrical safety
2014/30/UE pertaining to electromagnetic compatibility
INTRODUCING THE WINE CABINET
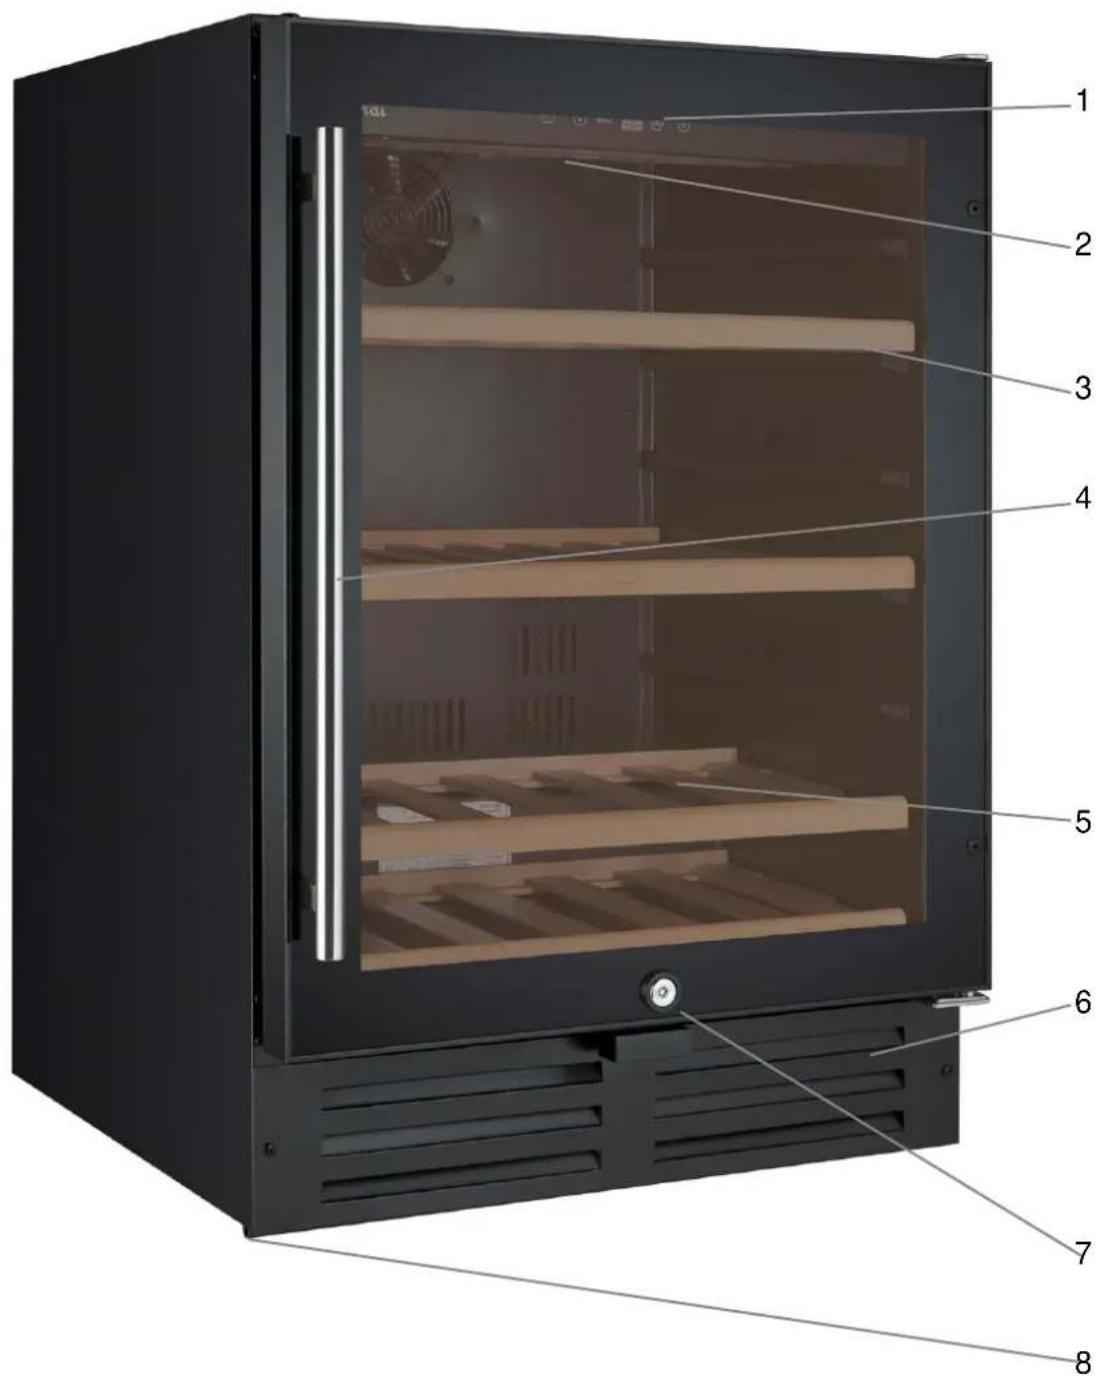
1 - Control Panel
2-Lamp
3 - Glass door
4 - Handle
5-Racks
6-Ventilation
7-Lock
8-Adjustable feet
IMPORTANT WARNINGS AND TIPS
Please conserve this user manual with your cabinet - you may need to consult it. If the cabinet is transferred to another person, please ensure that the user manual accompanies it, so that the new user may know how the cabinet operates. These warnings are both for your safety and that of other people. Therefore we advise that you read them carefully before setting up and operating your refrigerator.
This device is destined exclusively for home use, and is intended for the storage of foodstuffs or special beverages at a storage temperature higher than that of a fresh foodstuffs storage compartment.
It is not intended in any way for the storage of fresh foodstuffs. Do not use it for commercial or industrial purposes or for any usage other than that for which it is designed.
If the device has a lighting system and the lamp is replaceable by the user, refer to the information on its replacement method in the following paragraph of this manual.
Safety
- This device may be used by children aged 8 years and older and by people with reduced physical, sensory or mental capacity, on condition they have received supervision or instruction concerning use of the device in all safety, and that they understand the risks.
- Children should not be allowed to play with the device.
- Children aged from 3 to 8 years are allowed to load and unload refrigerating appliances.
- Always disconnect the device's electricity supply before cleaning it; before defrosting it, before changing the
illuminating lamp; before moving the device or before cleaning the floor underneath it. Cleaning and care by the user should not be done by children unless under supervision.
- WARNING: Do not damage the refrigeration circuit.
- WARNING: Do not use electrical equipment inside the foodstuffs storage compartment, unless it is of a type recommended by the manufacturer.
- WARNING: Do not use mechanical tools or other means to speed up defrosting, unless they are recommended by the manufacturer.
- WARNING: Keep the cabinet's ventilation openings clear in the enclosure or the built-in space around the cabinet.
- WARNING: Do not locate multiple portable socket-outlets or portable power supplies at the rear of the appliance.
- WARNING: When positioning the appliance, ensure the supply cord is not trapped or damaged.
- Do not connect the device to a power supply without overload protection (protected by an electrical fuse).
- Never use power-strips or extension cords to connect the device to the mains.
- This device is not destined for use with an outside timer or remote control system or any device that switches it on automatically.
- Do not use the device to store explosive substances such as aerosols that contain flammable propulsion gas.
- After installing the cabinet, ensure that it is not resting on the power cord.
- If the power cord is damaged, it must be replaced by the manufacturer, by customer care service, or by similarly qualified personnel in order to prevent electrical hazards.
- The device is heavy; be careful when moving it.
-
If your cabinet was laid down in a horizontal position during transportation, wait 48 hours before operating it.
-
In the event of accidental liquid spillage (broken bottles or other) on electrical components (motor or other), immediately unplug the device from the mains.
- Ensure that you put your cabinet in a place that can support its weight when loaded (1 bottle containing 75 cl weighs approximately 1.3kg ).
- Your cabinet must be placed on a level surface. If you have placed it on a rug or on carpeting, insert a support beneath it.
- Opening the door for long periods can cause a significant increase of the temperature in the compartments of the appliance.
- Clean regularly surfaces that can come in contact with food and accessible drainage systems.
- If the refrigerating appliance is left empty for long periods, switch off, defrost, clean, dry, and leave the door open to prevent mould developing within the appliance.
Servicing - repairs
- It is dangerous to modify or attempt to modify the characteristics of the device.
- If it breaks down, do not try to repair the device yourself. Repairs made by unqualified personnel can cause damage. Contact your dealer's Customer Care Service.
Refrigerant

Warning; Risk of fire / flammable materials.
The refrigerant gas contained in this device is isobutane (R 600a), it is low-polluting but is
flammable.
- When transporting and installing the device, take care not to damage any part of the refrigerating circuit.
- Do not use a pointed or sharp edged tool to defrost the device.
- Do not use any electrical devices inside the cabinet.
If the refrigerating circuit is damaged:
- Do not allow any open flame near the device.
- Avoid sparks – do not switch on any electrical appliances or lamps nearby.
- Immediately ventilate the room.
Disposal
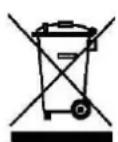
This device carries the selective waste sorting symbol for electrical and electronic equipment disposal. This means that the product must be picked up by a selective collection system in compliance with European Directive 2012/19 EU so that it will either be recycled or dismantled in an environment-friendly way.
For more information please contact your local or regional government.
Electronic products that are not properly and selectively recycled are potentially dangerous for the environment and for human health because they contain dangerous substances.
This device contains flammable foaming agents. When the refrigerator reaches the end of its life cycle, it must be disposed of in a suitable place, where refrigerators can be recycled. For this purpose please contact your town hall or municipality. Under no circumstances must the refrigerator be disposed of in public areas.
SETTING UP THE CABINET
If this device, which uses magnetic door closing, replaces a device equipped with a spring closing system, we advise you to destroy the spring closing system before disposing of the old device. This will prevent children from locking themselves inside it and endangering their lives.
Location
Place your cabinet well away from heat sources (heater, cooker, direct sunlight). For proper operation of the device, the ambient room temperature should be between +16^ and +32^ (class N). Outside these limits, the device will not operate properly.
- Ensure that air can circulate freely behind the device: do not place it too close to a wall, in order to avoid noise from vibration. Ensure that air can circulate freely all around the device. Insufficient ventilation will lead to poor operation and increased energy consumption.
Leave at least 2 cm between the walls and the wine cabinet and 3 cm minimum between the rear of the wine cabinet and the wall. Leave at least 10 cm free space above the device.
-
The device must be installed in such a way that the electric plug is accessible. After installing the cabinet, make sure that it is not resting on the power cord.
-
Level the device by using the 2 adjustable feet.
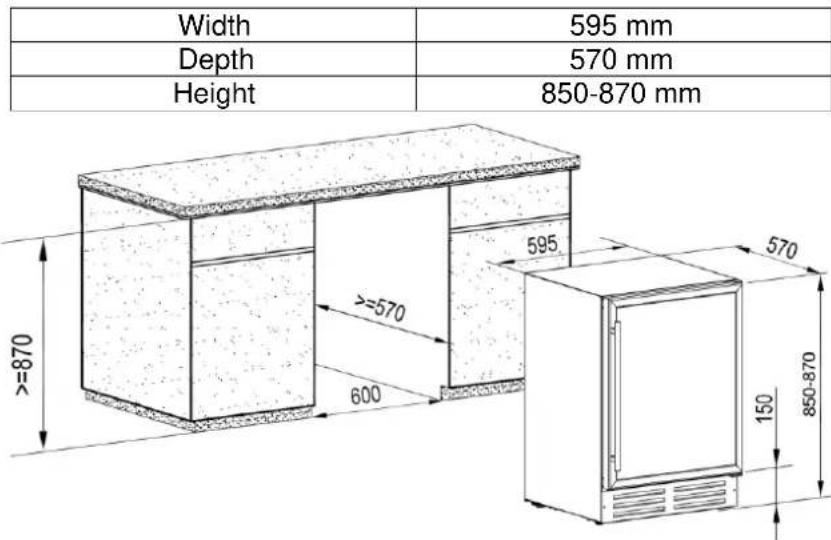
Recessed mounting
This device can be freestanding or built-in under a work surface. In the latter case, the size of the device must be taken into account:
Connecting the power supply
Your cabinet is designed for operation with 230 V single-phase.
It must be connected to a wall socket equipped with earthing and protected by a 10 A fuse in compliance with the local standard and in compliance with your electricity supplier's prescriptions.
Important Note:
During installation of the handle on the glass door, it is mandatory to use the specific gaskets supplied and screw without forcing.
Failure to comply with these requirements may result in breakage of the glass and will not be supported by the manufacturer's warranty.
SPECIFIC INFORMATION
- We recommend that you install your wine cabinet in a temperate room.
If the inside light remains on, please note that the inside temperature will be higher. - Temperature inside the wine cabinet may vary depending on the type and the number of bottles contained.
In order to keep your wines at a stable temperature, avoid leaving the door open for long periods. - Do not install your wine cabinet close to a heat source; avoid direct sunlight.
In order to guarantee your safety, and to prevent your wine being spoilt, do not place the cabinet in humid locations. - Do not store perishable foodstuffs inside your wine cabinet.
- The wine cabinet is not designed for use in a garage, outside, or in the open air.
- The following (approximate) temperatures are recommended for wine drinking:
Great Bordeaux wines - Red 16-17°C
Great Burgundy wines - Red 15-16°C
Great vintages dry white wines 14-16°C
Red wines, fruity wines, young wines 11-12°C
Rose wines from Provence, early-to-market wines 10-12°C
Dry white wines and local red wines 10-12°C
O Local white wines 8 - 10^
Champagnes 7-8°C
Liqueur wines 6^
- Temperature stability is of the greatest importance when storing wine.
- Exposure to light, vibrations, temperature variations or humidity can spoil the wine.
If the refrigerating circuit is damaged:
According to experts, the ideal preservation temperatures for wine are around 12^ , between 10^ to 14^ . This should not be confused with the service temperature, which varies from 5^ to 18^ depending on the specifics of each type of wine.
It is important above all to avoid sudden temperature changes. Designed by specialists for wine lovers, this device, unlike a simple refrigerator, provides electronic control of the constant mean temperature.
The anti-vibration system:
The compressor is equipped with special shock absorbers (silent-blocks) and the inner-liner is isolated from the frame by a thick polyurethane foam layer. These characteristics prevent vibrations from reaching the wines.
The anti-UV system:
Light accelerates the ageing of your wines. In wine cabinets with solid doors, wines are naturally protected, on condition that the door is not opened too often. This model with a glass door has been specially treated in order to filter out harmful ultra-violet rays; therefore the wines are fully protected.
Defrosting:
This product does not generate frost (No-Frost). Therefore no frosting or icing will take place, and no operations are required to eliminate them.
Racks
In order to avoid damaging the door seal, ensure that the door is fully open before moving the racks along the compartment rails when loading or unloading bottles.
For easier access to the contents of the racks, you need to slide the rack outwards approximately one third of the way; each rack has a carriage stop on either side to prevent the bottles from falling.
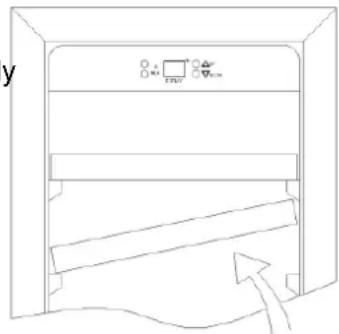
To remove or position the racks, tilt the rack as shown in the diagram and pull or push as required. LOADING
The maximum number of bottles that can be loaded into the cabinet are for information only; this information is not contractual; it provides a means for rapidly estimating the size of the device.
The information comes from tests carried out using standard bottles; in reality, in extreme conditions it would be possible to load a greater number of bottles without racks, but a "diverse wine cellar" is used in many different ways; the daily use of a wine cabinet means that it must carry fewer bottles. Therefore you will probably load fewer bottles then the given maximum numbers.
How to load and care for your wine cabinet:
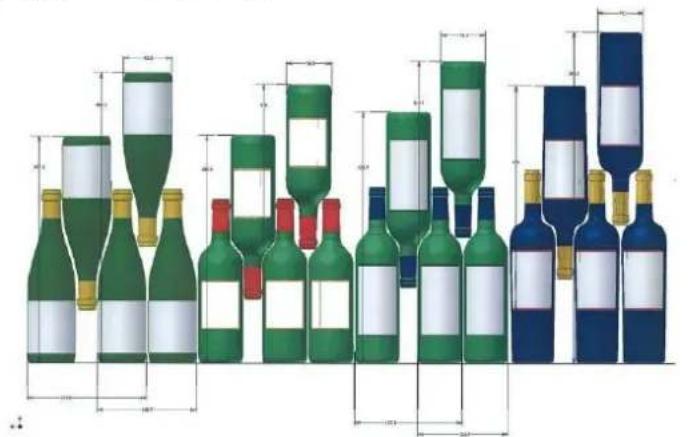
Here we see 4 types of 75 cl bottles, Burgundy and Bordeaux, of different sizes.
There are many other types, with various volumes and of all shapes.
Note the different ways they are stored depending on the height and diameter of the bottles as well as the interleaving method used.
Loading for maximum capacity
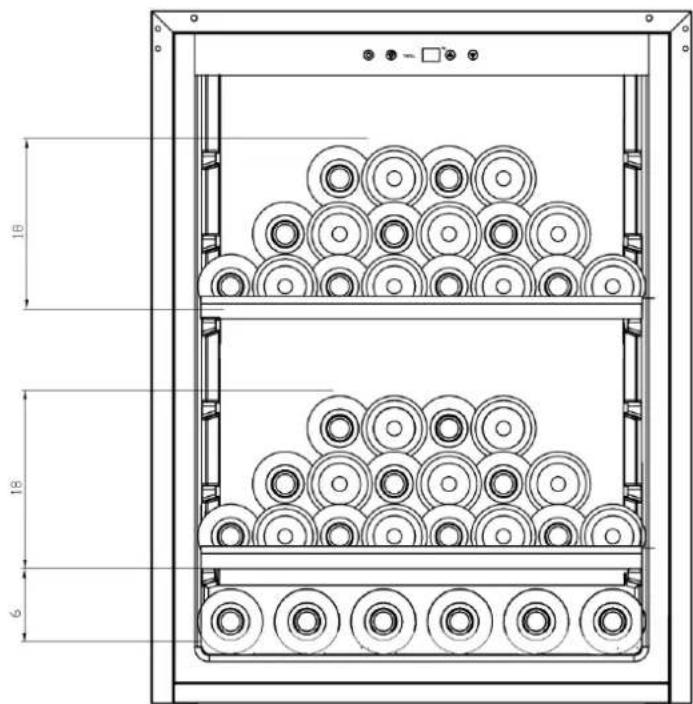
The maximum number of stored bottles is based on standard Bordeaux bottles containing 0.75 L.
USAGE
Starting up the device
Once the wine cabinet is properly installed, we advise that you clean the inside using warm water with a low concentration of dishwashing liquid. Do not use abrasives or scouring powder; they may scratch the surface finish.
USAGE
CAUTION! Wine cabinets are intended only for storing and preserving wine.
IMPORTANT: Your wine cabinet is ideally suitable for holding Bordeaux type bottles of 0.75 L capacity. It can contain larger bottles; however care must be taken that they do not prevent the door from closing properly.
- When closing the door ensure that it does not touch any of the bottles.
If you load several bottles at a time, it will take longer before the cabinet reaches the desired temperature.
In order to avoid damaging the door seal, ensure that the door is fully open before moving the racks along the compartment rails.
Adjusting the temperature
Control Panel C2188CBE
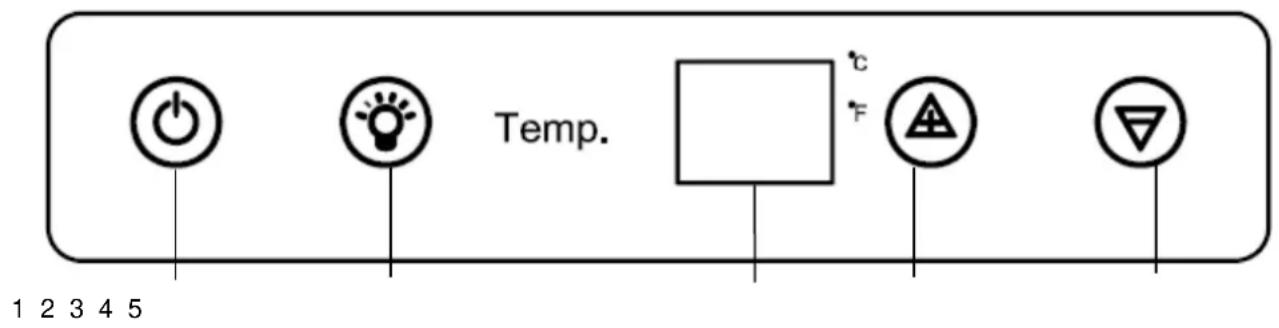
1-Stop/start button
2-Lamp button
3 - Display screen
4 - Button for raising temperature
5 - Button for lowering temperature
To switch the wine cabinet on or off, either press button 1.
In order to change the temperature unit, simultaneously press both temperature adjustment buttons. The screen will show the selected temperature unit (^ or ^)
The temperature can be adjusted 1^ at a time; adjust the temperature using buttons or to the right of the temperature indicator.
The wine cabinet's temperature range is between 5^ and 22^ .
To switch the wine cabinet on or off, either press button 2.

The LED light is appropriate for wine preservation. Nevertheless it is advisable to switch the light off during normal operation.
NOTE: the temperature display shows the temperature inside the wine cabinet. When you increase or lower the temperature, the temperature display will show the desired temperature. After a few moments, the temperature display will switch to the real temperature inside the cabinet.
NOTE: when first operating the wine, or switching it on after a long period of non-use, the inside temperature will not immediately be the temperature shown on the temperature indicator; it will take a few hours before the wine cabinet reaches an evenly distributed temperature.
In order to avoid excessive condensation when the ambient temperature is greater than 28^ , do not set the temperature below 7^ .
IMPORTANT: after unplugging or switching off the device, or after a power outage, it is imperative to wait for 5 min before switching back on. If not, the wine cabinet will not switch on.
CARE OF YOUR CABINET
DEFROSTING
This product does not generate frost (No-Frost). Therefore no frosting or icing will take place, and no operations are required to eliminate them.
CLEANING
Before any cleaning, unplug the device from the mains.
Never use abrasives or a scraper sponge when cleaning the inside or the outside of your wine cabinet.
- Remove all accessories (racks etc). Wash them using lukewarm water to which has been added a gentle unscented detergent (dishwashing liquid for example); rinse with bleach water and carefully dry off.
- Wash the inside walls in the same way; pay particular attention to the rack supports
- Wash the door seal as well as under the seal.
- Plug the wine cabinet to the mains.
From time to time dust off the condenser behind the device; accumulated dust may reduce the efficiency of your wine cabinet.
In the event of a prolonged absence, empty and clean out the device; maintain the door slightly open during the period of non-use.
TROUBLESHOOTING
You can resolve many of the problems that may arise without having to call Customer Care Service. Please try the suggestions below.
| PROBLEM | POSSIBLE CAUSE |
| No operation | ·Check your installation's power supply ·Check your circuit breaker ·A fuse has blown |
| Not cold enough | ·Check the setting temperature Ambient temperature requires readjustment of the temperatures ·The door is open too often ·The door is not closed properly ·The door seal is not air-tight ·There is not enough space around the device |
| No interior light No display on the LCD screen | ·Contact your Customer Care Service |
| There appears to be a loud noise | ·Check the device levelling ·Verify that a piece of paper or part of the packaging has not remained stuck in the device. |
| The door does not close properly | ·Check the device levelling ·The seal is in poor repair ·The feet have "moved" |
| The light (LED) does not come on | ·The control panel is not working ·Printed circuit problem ·Mains plug problem ·Contact your Customer Care Service |
| LED display error | ·Poor display ·The temperature value is not shown ·Contact your Customer Care Service |
| The fans are not working | ·Control Panel to be replaced by your Customer Care Service |
REPLACING THE ILLUMINATING LAMP
The device uses light emitting diodes (LEDs). This type of diode cannot be changed by the user. The life cycle of the LEDs is long enough so that they do not need to be changed. If however, in spite of the care taken by the manufacturer, the LEDs do fail, please contact your Customer Care Service for any repair.
CHANGING DOOR OPENING SIDE
You can change the door opening side of your device by moving the hinges. When remounting, make sure that the door is properly aligned with the body and that the seal closes properly.
Please do not forget that changing the door opening side must be done while the appliance is unplugged.
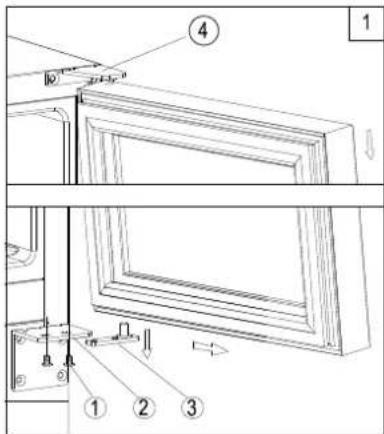
① Lockup screw
② Lower door hinge
③ Door pivot assembly
④ Right upper door hinge
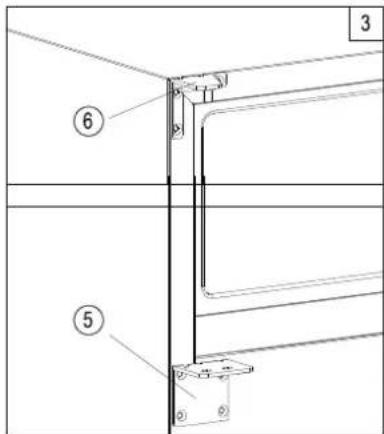
⑤ Lower door hinge (the same for the left and right)
⑥ Left upper door hinge
Note: unused components should be preserved for future use.
- Open the glass door and fasten two lockup screws ① , and support the door pivot towards the glass door. After taking out the screws, be careful to support the glass door. (as shown in Figure 1)
- Pull the glass down downwards and remove it, and place the glass door onto the soft gasket to prevent any scratch to the glass surface.
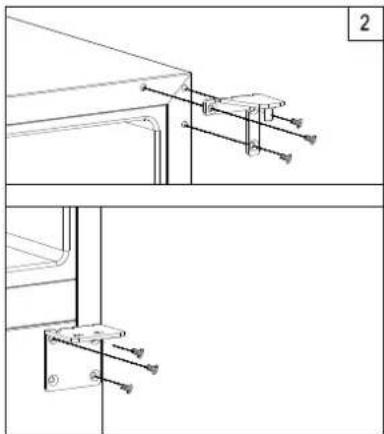
- Remove 3 screws from the right side of the door bottom, and 3 screws from the right side of the door top. (as shown in Figure 2)
- Remove the hinge for the right upper door ④ . Take out the hinge for the left upper door hinge ⑥ from the plastic bag of installation instructions, and install it at the left specific position. Then, accordingly mount the upper door shaft assembly. (as shown in Figure 3)
- Remove the door pivot ③ from the right lower hinge ③ , and then insert it in the door pivot at the left lower part of the door front.
- Turn the glass door at 180^ , and then mount it back at its specific location, and lock up the screw ① using two screws to connect the door pivot ③ assembly and the glass door, and fasten the screws before door leveling.
Terms of Warranty & After-Sales Service
ARTICLE 1 - INSTALLATION - COMMISSIONING THE APPLIANCE
Unless otherwise agreed between the seller and buyer, the latter remains responsible for having the appliance installed and commissioned. Only a certified professional is authorized to install and connect the appliance in line with industry standards, current regulations and the manufacturer's recommendations, particularly those stated in the operating manual and maintenance instructions. If the buyer decides to commission the appliance himself/herself, this is at the buyer's own risk. In the event of an obvious defect or if there is no operating manual or maintenance instructions, the buyer must have the seller or delivery person confirm this in writing when the appliance is delivered or commissioned.
ARTICLE 2 - MANUFACTURER'S WARRANTY
Appliance number: Stated on the invoice
Period: Stated on the warranty document
Commencement: ......... Date of purchase or delivery
The manufacturer's warranty is described below.
ARTICLE 3 - TERMS OF THE MANUFACTURER'S WARRANTY & PURCHASED SERVICES
This warranty only applies to repairs carried out by a repairer acting at the express request of SIDEPAR.
A. COVERED DEFECTS: Cover only applies to defects and resulting damage due to an electrical, electromagnetic, electronic or mechanical event concerning the appliance.
B. REGION: This warranty applies solely to appliances sold and installed in Metropolitan France, Monaco and Corsica.
C. TRANSFER OF WARRANTY: This warranty is tied to the appliance and is automatically transferred to the new user for the remaining warranty period in the event of transfer, death, donation, etc.
D. EXCUSED DEFECTS: This warranty does not cover:
- the replacement of worn parts (such as lightbulbs, extractor fan filters, belts, fuses, door hinges, etc.)
- the replacement of glass, plastic and rubber parts
- breakdowns due to accessories (such as drainage or supply pipes, power cords, etc.)
- breakdowns due to parts other than those recommended by SIDEPAR
- unjustified work (appliance functioning correctly)
Also excluded under this warranty are faults and resulting damage due to:
- work done by a repairer not acting at the express request of SIDEPAR
- failure to follow the instructions given in the manufacturer's operating manual and maintenance instructions, or any handling error or failure to maintain the appliance
- use that does not comply with that for which the appliance was designed, including professional or collective use
- any external cause
Call-out, labor and transport costs incurred in carrying out repairs not covered by this warranty are to be paid by the buyer.
THE MANUFACTURER'S WARRANTY DOES NOT EXCLUDE THE BUYER'S LEGAL CONSUMER RIGHTS
ARTICLE 4 - DISPUTES
In the event of a dispute about this warranty, the buyer may seek an amicable resolution before starting any legal proceedings, and may request help from a consumer association, trade organization in that domain or any other assistance provider of the buyer's choice.
The period of the manufacturer's warranty is not interrupted by the buyer seeking an amicable resolution.
In general and subject to court rulings, respecting the terms of the manufacturer's warranty implies that:
- the buyer honors his/her financial commitment to the seller
- the buyer uses the appliance in a correct manner
- no third party unaccredited or unsolicited by SIDEPAR carries out any repairs to the appliance (except in the event of a force majeur event and with the approval of SIDEPAR)
Le Chai
GEBRUIKSAANWIJZING
WIJNKLIMAATKAST INBOUWMODEL
PRO42E - 42 flesson
INHOUD
- BUILT IN SERVICE WINE CABINET
- TABLE OF CONTENTS
- TECHNICAL AND ENERGY CHARACTERISTICS
- INTRODUCING THE WINE CABINET
- IMPORTANT WARNINGS AND TIPS
- Safety
- Servicing - repairs
- Refrigerant
- Disposal
- SETTING UP THE CABINET
- Location
- Recessed mounting
- Connecting the power supply
- Important Note:
- SPECIFIC INFORMATION
- If the refrigerating circuit is damaged:
- The anti-vibration system:
- The anti-UV system:
- Defrosting:
- Racks
- To remove or position the racks, tilt the rack as shown in the diagram and pull or push as required. LOADING
- How to load and care for your wine cabinet:
- Loading for maximum capacity
- USAGE
- Starting up the device
- Adjusting the temperature
- Control Panel C2188CBE
- CARE OF YOUR CABINET
- DEFROSTING
- CLEANING
- TROUBLESHOOTING
- REPLACING THE ILLUMINATING LAMP
- CHANGING DOOR OPENING SIDE
- Terms of Warranty & After-Sales Service
- ARTICLE 1 - INSTALLATION - COMMISSIONING THE APPLIANCE
- ARTICLE 2 - MANUFACTURER'S WARRANTY
- ARTICLE 3 - TERMS OF THE MANUFACTURER'S WARRANTY & PURCHASED SERVICES
- ARTICLE 4 - DISPUTES
- Le Chai
- GEBRUIKSAANWIJZING
- WIJNKLIMAATKAST INBOUWMODEL
- INHOUD
Brand : LE CHAI
Model : PRO 42E
Category : Wine cellar