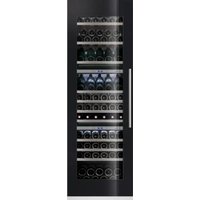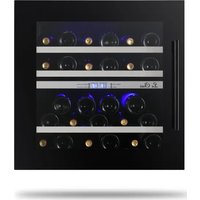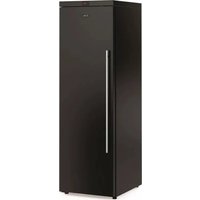
LMV1950DC - Wine cellar LE CHAI - Free user manual and instructions
Find the device manual for free LMV1950DC LE CHAI in PDF.


User questions about LMV1950DC LE CHAI
0 question about this device. Answer the ones you know or ask your own.
Ask a new question about this device
Download the instructions for your Wine cellar in PDF format for free! Find your manual LMV1950DC - LE CHAI and take your electronic device back in hand. On this page are published all the documents necessary for the use of your device. LMV1950DC by LE CHAI.
USER MANUAL LMV1950DC LE CHAI
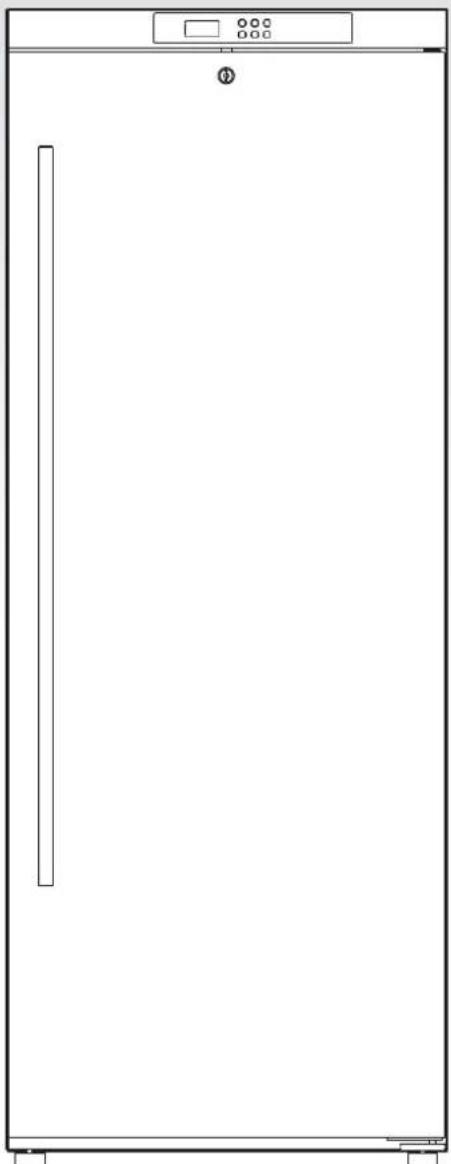
natural_image
Front view of a white stainless steel refrigerator with control panel and door (no visible text or symbols)SOMMAIRE
text_image
A D C K E G F L B I J M H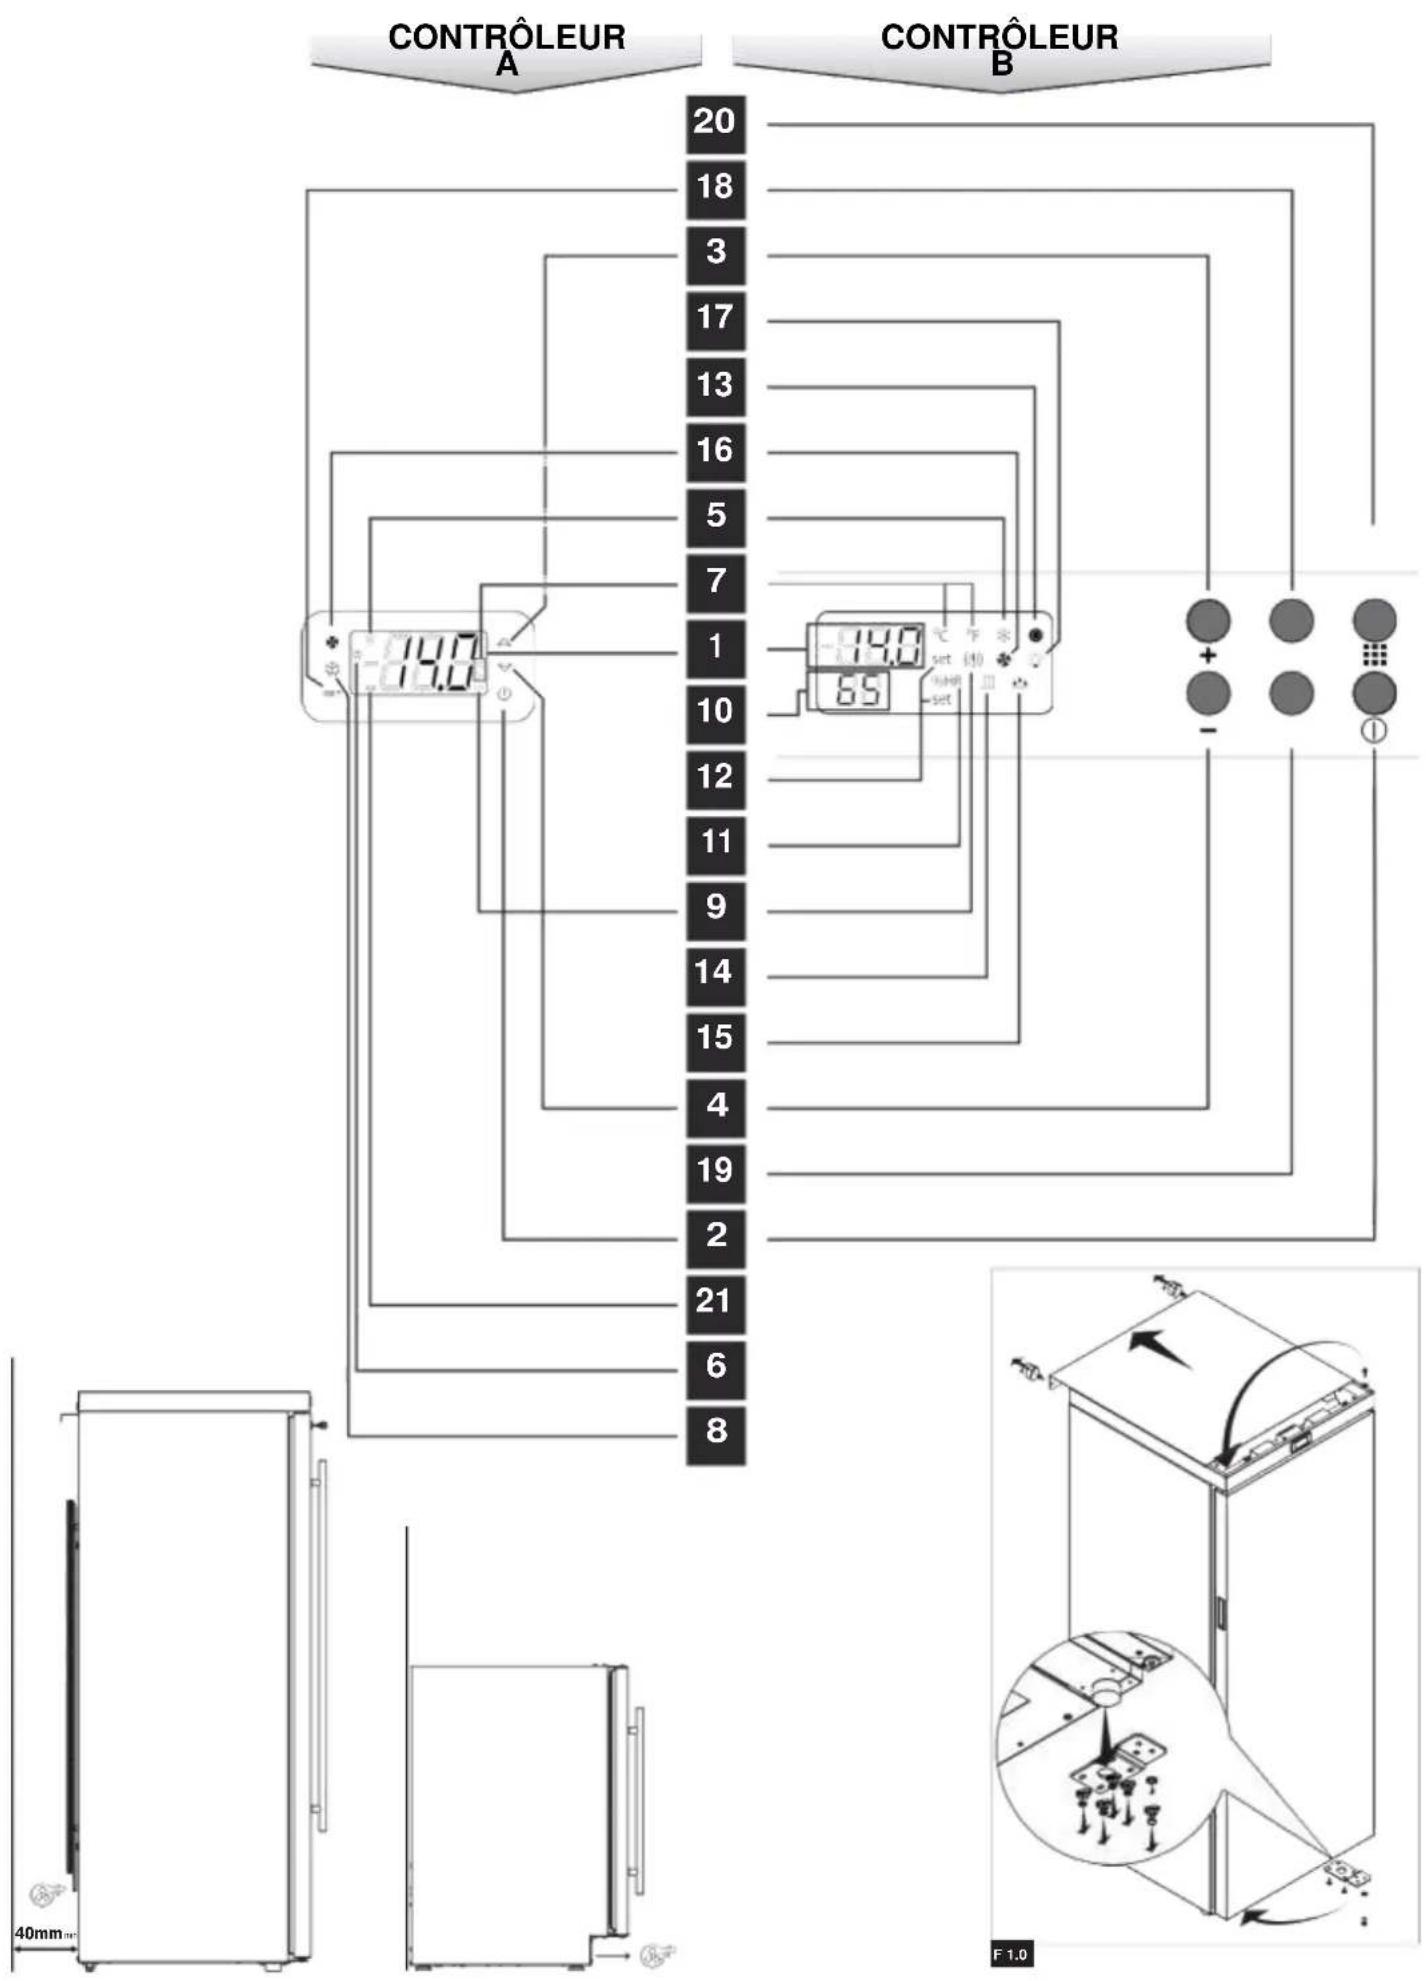
text_image
CONTROLEUR A 20 18 3 17 13 16 5 7 1 10 12 11 9 14 15 4 19 2 21 6 8 CONTROLEUR B 14.0 set (t) set F 1.09 FR
text_image
A B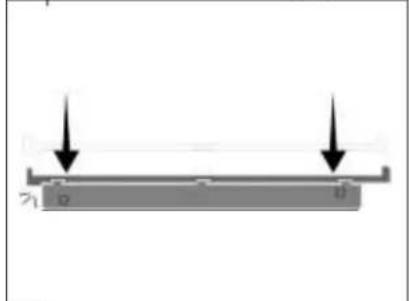
natural_image
Simple diagram showing two downward arrows pointing to a horizontal bar with labeled points (no text or symbols beyond basic labels)A 1.2
text_image
Max 150 mB1.0
natural_image
Technical line drawing of a mechanical assembly with a vertical dimension arrow (no text or symbols)C 1.0
natural_image
Diagram showing two mechanical components with an arrow indicating direction (no text or symbols)D 1.0
natural_image
Technical diagram of a structural support frame with directional arrows indicating force or movement (no text or symbols)E 1.0
INSTALLATION
natural_image
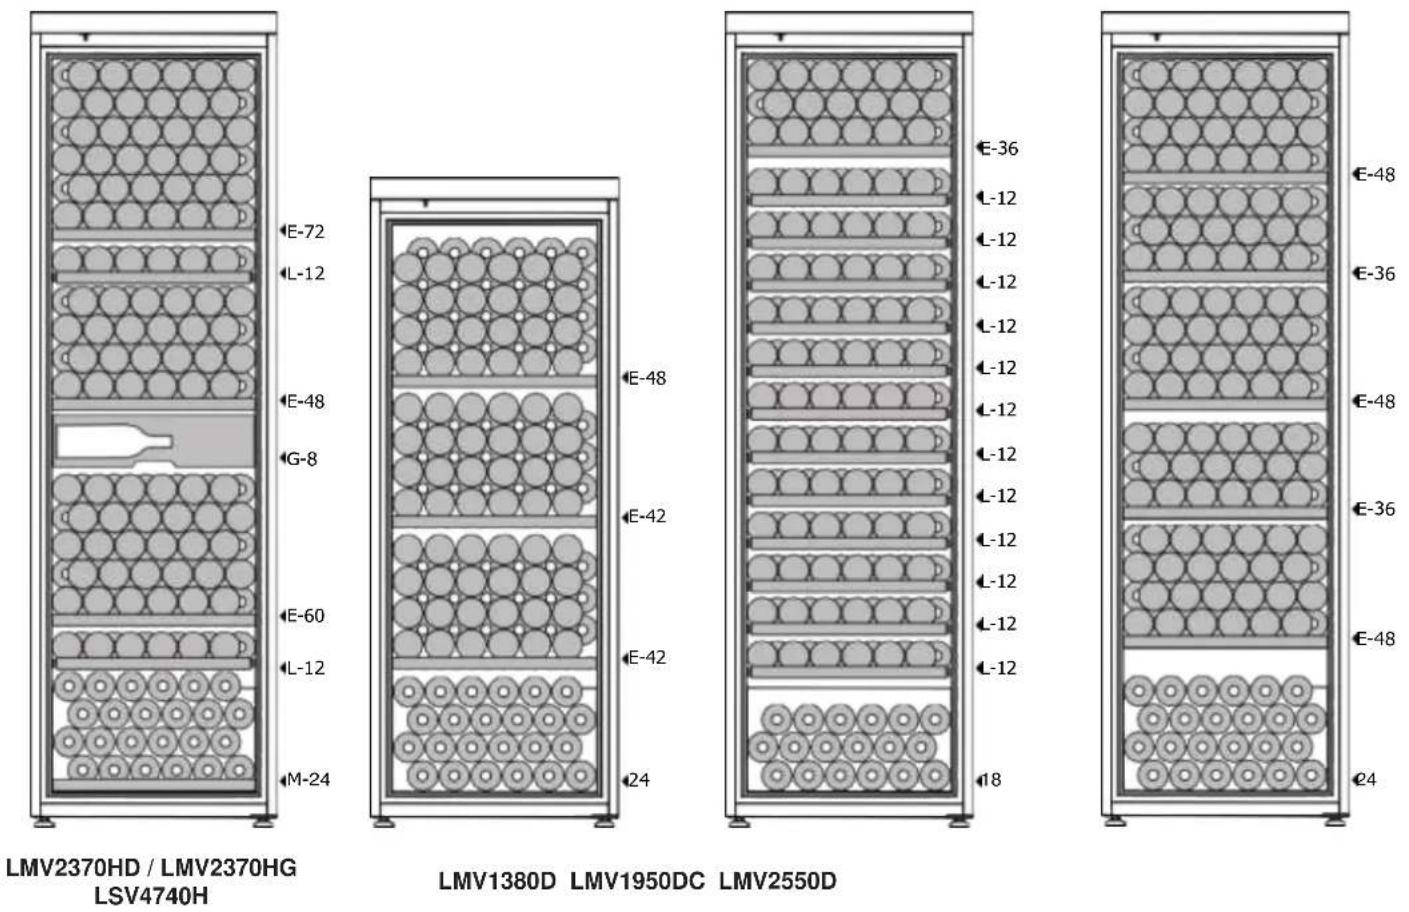
Four identical line drawings of bottles with different internal compartments, arranged in a row (no text or symbols)| MODÉLE | LMV2370HDLMV2370HG | LSV4740H | LMV1380D | LMV1950DC | LMV2550D |
| Clayettes fixe (E) | 3 | 3+3 | 3 | 1 | 5 |
| Clayettes Coulissante (L) | 2 | 2+2 | - | 12 | - |
| Tiroir (G) | 1 | 1+1 | - | - | - |
| Clayette au fond (M) | 1 | 1+1 | - | - | - |
| Capacité des bouteilles | 236 | 236+236 | 156 | 198 | 240 |
natural_image
Pure diagram of six identical bottle-shaped structures without any text, numbers, or symbols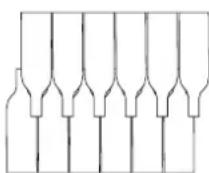
Disposition alternative
text_image
€-36 €-48 €-12 €-48 €-36 €-12 €-24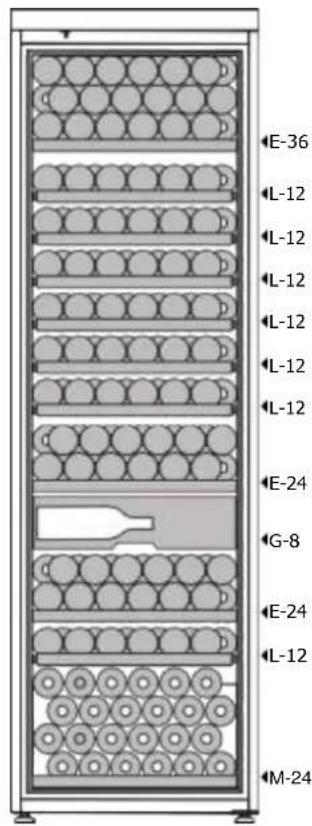
text_image
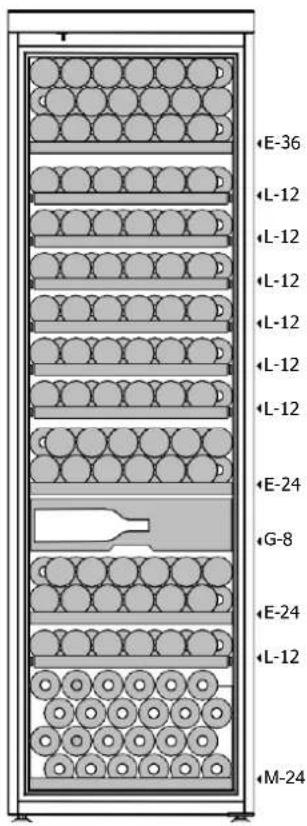
E-36 L-12 L-12 L-12 L-12 L-12 L-12 E-24 G-8 E-24 L-12 M-24Installation clayettes fixes (A1.2)
natural_image
Front view of a white stainless steel refrigerator with control panel and door (no visible text or symbols)LMV2370HD/LMV2370HG - 236 bottles
LSV4740H - 472 bottles
LMV1950DC - 198 bottles
LMV1380D - 156 bottles
LMV2550D - 240 bottles
CONTENTS
| Technical and energy features | Page 2 |
| Important warnings and tips | Page 3 |
| Introduction to the appliance | Page 8 |
| Installation | Page 11 |
| Using the appliance | Page 12 |
| Saving energy | Page 15 |
| Maintaining the appliance | Page 16 |
| Problems and solutions | Page 17 |
| Customer services | Page 18 |
| Technical data | Page 18 |
TECHNICAL AND ECONOMIC CHARACTERISTICS
This appliance is intended for wine storage only.
| CATEGORY OF HOUSEHOLD REFRIGERATION APPLIANCE: 2 | LMV2370HD LMV2370HG | LSV4740H | LMV1380D | LMV1950DC | LMV2550D |
| Power supply | 220-240V~ 50Hz | 220-240V~ 50Hz | 220-240V~ 50Hz | 220-240V~ 50Hz | 220-240V~ 50Hz |
| Dimension (mm) - W x D x H | 600 x 770 x 196094 | 600 x 770 x 196094 | 600 x 670 x 1560 | 600 x 770 x 1960 | 600 x 770 x 1960 |
| Weight (kg) | 94 | 188 | 72 94 94 | ||
| Defrosting | Automatic | Automatic | Automatic | Automatic | Automatic |
| Climate class | SN: This appliance is designed for use in an ambient temperature range of 10°C to 32°C | ||||
| Installation type | Free-standing | Free-standing | Free-standing | Free-standing | Free-standing |
| The product information sheet according to Regulation 2019/2016/EU is available via the QR-code |  |  |  |  |  |
 | |||||
The actual energy consumption depends on the conditions of installation and use of the appliance.
The maximum storage number is based on standard 0.75 litre Bordeaux bottles in accordance with EN62552.
The LSV 4740 H is a combination of two LMV2370Hs placed side by side, so the technical and energy characteristics are equivalent to twice the data noted above.
This device complies with the requirements of the European Directives: 2014/35/EU on electrical safety
2014/30/EU on electromagnetic compatibility
It is very important that this manual is kept with the appliance for future reference. If this appliance is to be transferred to another person, make sure that the instruction manual accompanies the appliance so that the new user can be informed of its operation. These warnings are given for your safety and the safety of others. Please read them carefully before installing and using your appliance
For information on installation, handling, maintenance and disposal of the appliance, please refer to the following sections of the manual.
If the appliance has a lighting system and the lamp is user-replaceable, refer to the information on the replacement method in the next paragraph of this manual.
This appliance is intended for use in domestic (home)applications but not in similar applications such as:
- kitchen areas for staff in shops, offices and other business environments
- farms and guest use of hotels, motels and other residential environments
- bed and breakfast type environments
- catering and similar applications including retail
This appliance is intended for the storage of particular foodstuffs or beverages at a higher storage temperature than a fresh food storage compartment. Under no circumstances is it intended for storing fresh foodstuffs. Do not use it for commercial or industrial purposes or for any purpose other than that for which it was designed.
Safety
- This appliance may be used by children of at least 8 years of age and by persons with reduced physical, sensory or mental capabilities or lacking experience or knowledge, if they are properly supervised or if they have been given instructions on the safe use of the appliance and are aware of the risks involved.
- Children must not play with the appliance.
- Children under 3 years of age should be kept away unless they are under continuous supervision.
- Cleaning and maintenance by the user must not be carried out by unsupervised children.
- Children aged 3 to 8 years are allowed to load and unload refrigeration appliances.
•Always unplug the appliance from the mains before cleaning, defrosting, changing the light bulb, moving the appliance or cleaning the floor under the appliance. - CAUTION: Do not damage the refrigeration circuit.
- CAUTION: Do not use electrical appliances inside the food storage compartment unless they are of the type recommended by the manufacturer.
- CAUTION: Do not use mechanical devices or other means to accelerate the defrosting process other than those recommended by the manufacturer.
- CAUTION: Ensure that ventilation openings in the appliance cabinet or in the mounting structure are kept clear
-
This refrigeration appliance is not intended for use as an integrated appliance
-
Do not connect the appliance to an outlet that is not protected against overload (fuse).
- Never use multiple sockets or extension cords to connect the appliance.
- WARNING: Do not place mobile multi-socket outlets or portable power supplies on the back of the unit
- This appliance is not intended to be operated by means of an external timer or by a separate remote-control system or any other device that switches the appliance on automatically.
- Do not store explosive substances such as aerosols containing flammable propellants in this appliance.
- WARNING: When positioning the appliance, make sure that the power cord is not pinched or damaged.
- After installation, check that it is not resting on the power cable.
- If the power cable is damaged, it must be replaced by the manufacturer, its service department or similarly qualified persons to avoid a hazard.
- This appliance is heavy; take care when moving it.
- If your appliance has been lying down during transport, wait 48 hours before putting it into operation.
- Make sure that the place where your appliance is placed can support the weight of the appliance when loaded (One 75cl bottle is approximately equal to 1.3kg).
- The bulb is intended for use in this appliance only.
- The bulb is not suitable for lighting a room in a domestic setting.
-
The loading of the compartments indicated in the instructions and the product must be respected.
-
This refrigeration appliance is not suitable for freezing foodstuffs.
- Prolonged opening of the door can lead to a significant increase in temperature in the appliance compartments.
- Regularly clean accessible surfaces and drainage systems.
- If the refrigeration appliance remains empty for a long time, turn it off, defrost, clean and dry it, and leave the door open to prevent the growth of mould inside the appliance.
Service - repairs
- It is dangerous to modify or attempt to modify the features of this appliance.
- In the event of a breakdown, do not attempt to repair the appliance yourself. Repairs by unqualified personnel may cause damage. Contact your dealer's after-sales department.
- In the event of a breakdown, do not attempt to repair the appliance yourself. Repairs by unqualified personnel may cause damage.
- In the event of a breakdown, contact your dealer's after-sales department. The manufacturer offers a minimum warranty from the date of purchase. The actual duration is shown on your purchase invoice. The availability of parts for the repair of the appliance is also available from your dealer.
Refrigerant

DANGER: Fire hazard/Flammable materials.
The refrigerant gas contained in the circuit of this appliance is isobutane (R 600a), a low-polluting but flammable gas.
- When transporting and installing the appliance, care must be taken not to damage any part of the refrigeration system
- Do not use sharp or pointed tools to defrost the appliance.
- Do not use any electrical appliances inside the appliance. If the refrigeration system is damaged:
- Do not use flames near the appliance.
- Avoid sparks - do not light electrical appliances or lamps.
- Ventilate the room immediately
Disposal
This appliance is marked with the symbol for the selective sorting of waste electrical and electronic equipment. This means that this product must be taken to a selective collection system in accordance with EU Directive 2012/19/EU so that it can either be recycled or dismantled to reduce any impact on
the environment.
For more information, you can contact your local or regional authority. Electronic products that have not been selectively sorted are potentially dangerous for the environment and human health due to the presence of hazardous substances
This appliance contains flammable foaming agents. At the end of the product's life, it should be disposed of in an appropriate place capable of recycling refrigerators. To do this, contact your local town hall. Under no circumstances should you dispose of this appliance on the public highway.
OVERVIEW OF THE APPLIANCE
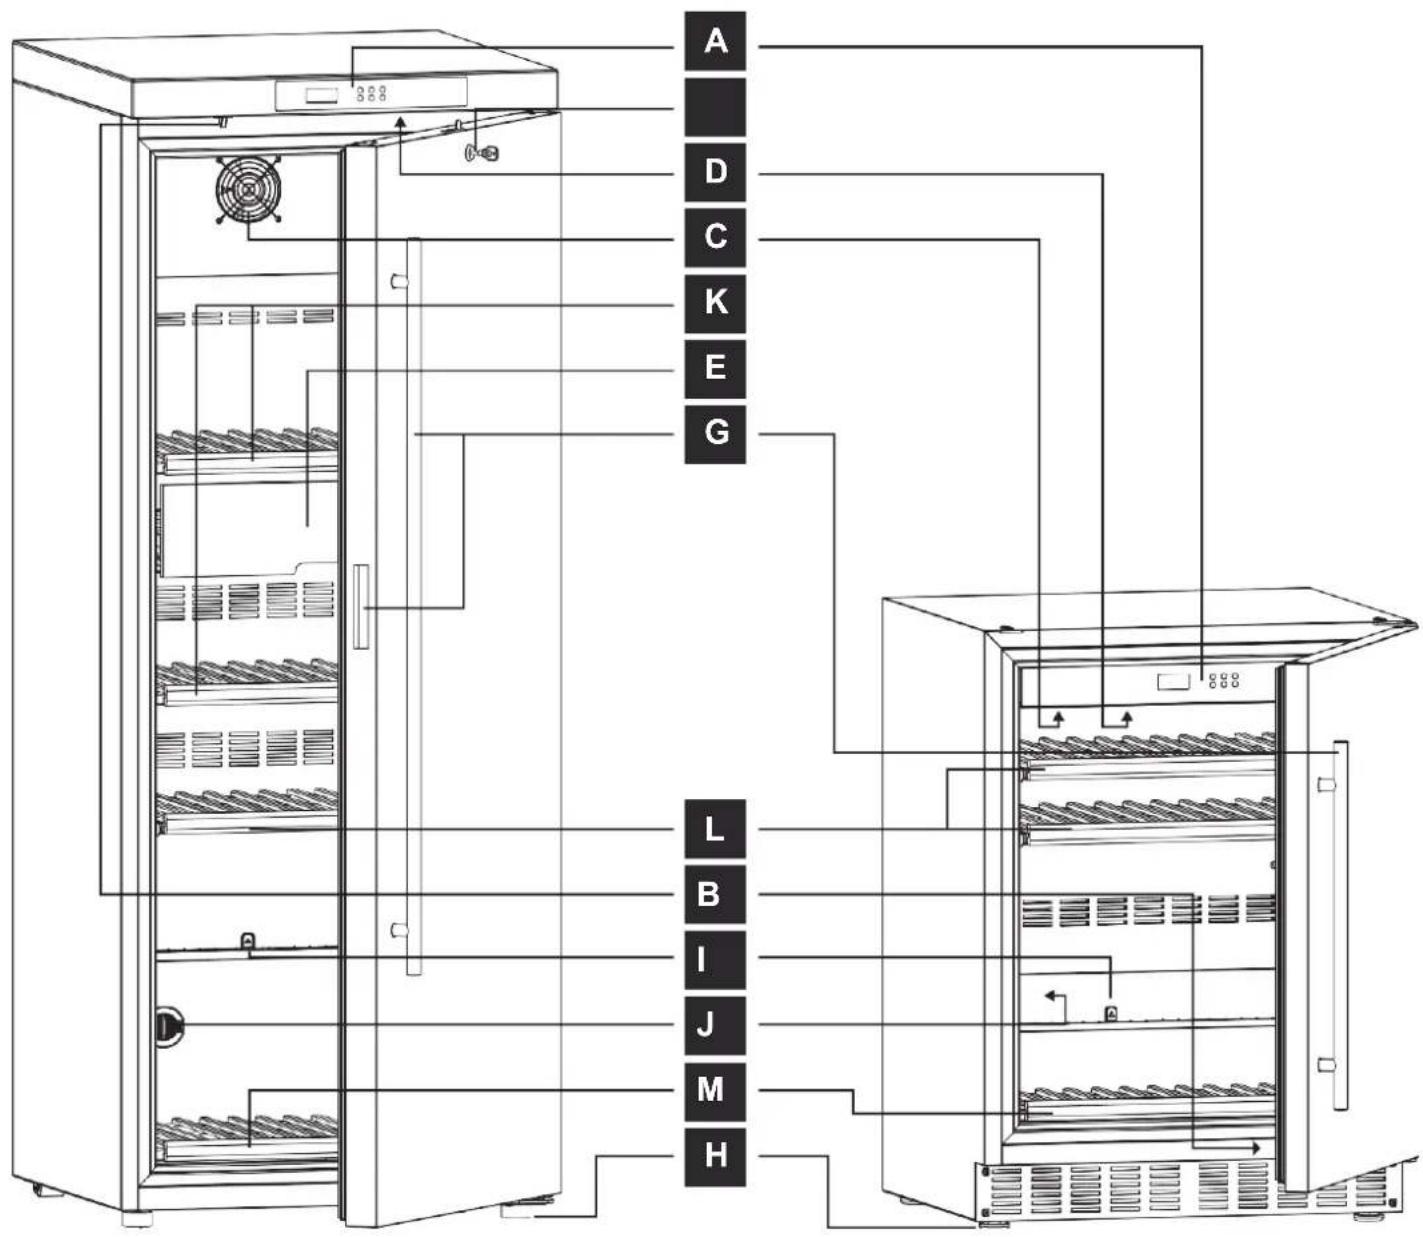
A - Controller
Depending on the model, you can control the temperature or the temperature + humidity.
B - Switch
C - LED light
D - Door lock
E - Fixed racks
F - Handle
G - Drawer *
H - Adjustable feet/castors
I - Water discharge opening
J - Carbon filter
K - Fan
Depending on the model.
L - Sliding racks*
M - Bottom rack
* Not present in all models.
text_image
A D C K E G L B I J M H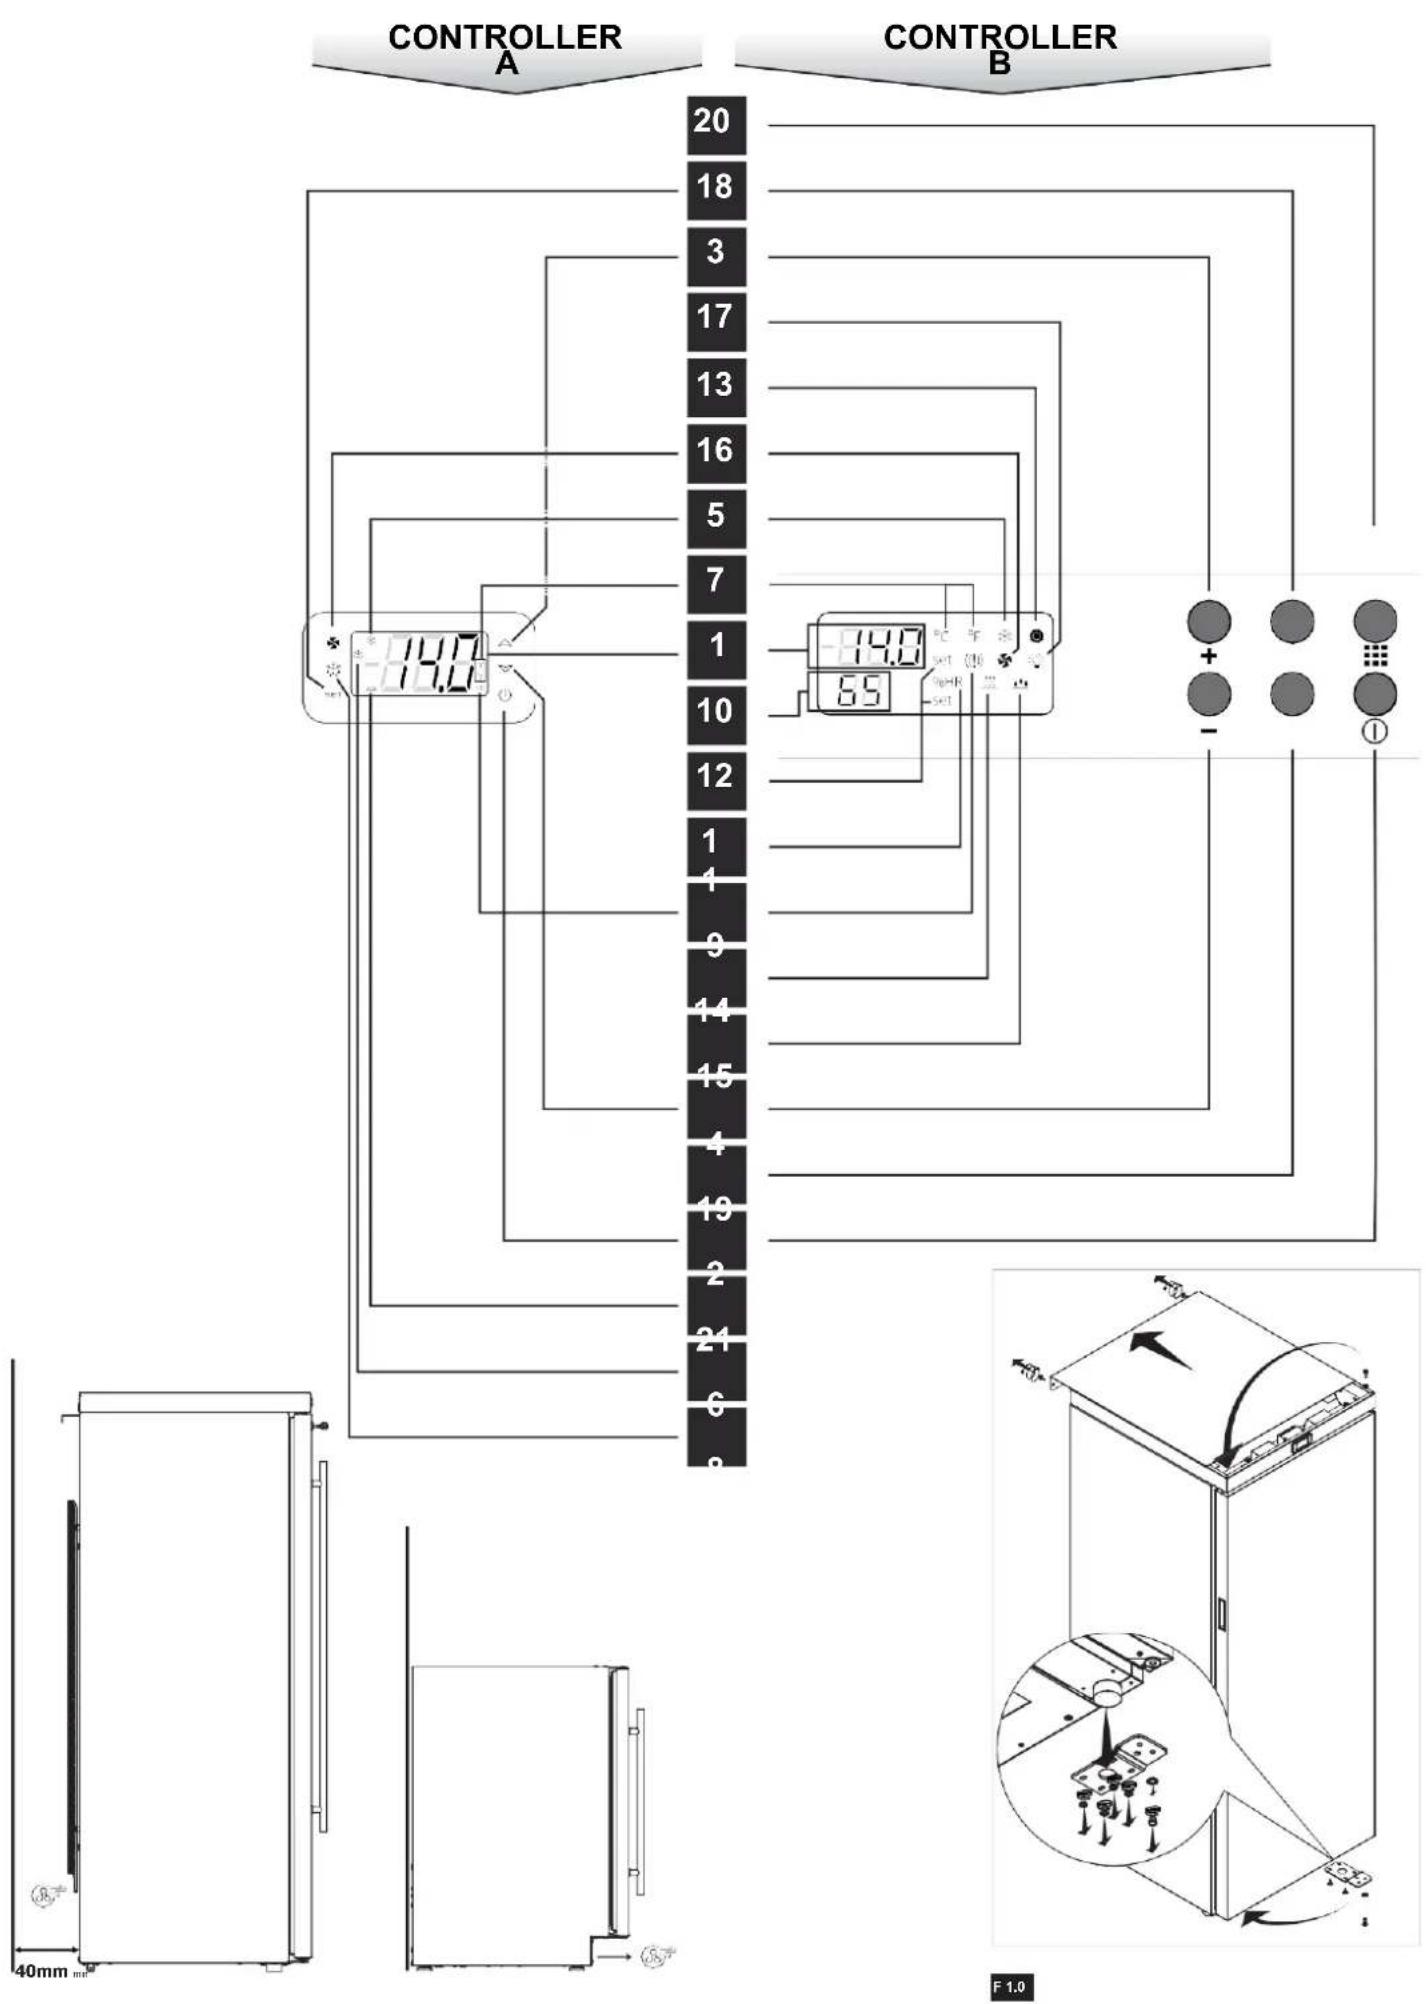
text_image
CONTROLLER A 20 18 3 17 13 16 5 7 1 10 12 1 4 9 14 15 4 19 2 21 6 8 CONTROLLER B 14.0 8.5 + - + - + - + - + - + - + - + - + - + - + - + - + - + - + - + - + - + - + - + - + - + - + - + - + - + - + - + - + - + - + - + - + - + - + - + - + - + - + - + - + - + - + - + - + - + - + - + - + - + - + -9 EN
text_image
Diagram showing a mechanical setup with labeled components A and B, including a circular component and directional arrows indicating motion or force.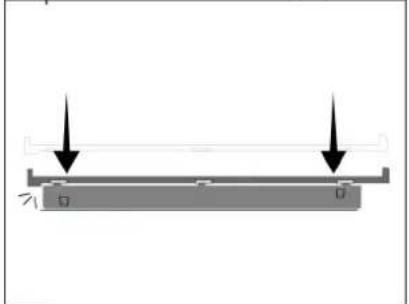
natural_image
Pure diagram of a mechanical or structural component with two downward arrows indicating direction (no text or symbols)A 1.2
text_image
Max 150B 1.0
natural_image
Technical diagram showing a mechanical assembly with a vertical double-headed arrow indicating direction (no text or symbols present)C 1.0
natural_image
Simple line drawing of two mechanical components with an arrow indicating direction (no text or symbols)D 1.0
natural_image
Technical diagram of a mechanical assembly with directional arrows indicating movement or force (no text or symbols present)E 1.0
INSTALLATION
To ensure that the appliance works properly and to reduce energy consumption, it is important that the appliance is installed correctly.
This refrigeration appliance is not designed for use as a built-in appliance. It must be installed in accordance with the conditions contained in the user manual.
To avoid a risk due to instability of the appliance, it must be fixed in accordance with the instructions.
This appliance is exclusively intended for the preservation of wine.
General terms and conditions
Do not place your appliance in a room subject to flooding. Avoid splashing water on the control panel and the back of the appliance.
Ventilation
The compressor and condenser produce heat and therefore need to be ventilated correctly.
Rooms without any ventilation are not suitable for the installation and use of this appliance.
Therefore it should be installed in a room with an opening (window or French window) that allows the recirculation of an appropriate amount of air.
For proper ventilation, leave at least 10 cm (4 inches) of space around the appliance and any adjacent furniture or walls.
Room temperature and humidity
The ambient temperature must be in accordance with the climate class of the appliance, look on the rating plate (inside the appliance) for the climate class of your wine cabinet and compare it with the following ranges:
Cleaning
Before connecting the power cable, clean the compartments and accessories with water and a mild detergent solution.
Electrical connection and earthing
Before making the electrical connection, make sure that the voltage indicated on the rating plate inside the appliance corresponds to the mains power rating in your home and that the socket is equipped with a standard earth connection in accordance with safety standards. If the plug is not equipped with an earth wire, the manufacturer declines all responsibility for any
Do not use multiple sockets or adapters.
Place the appliance so that you can easily access the socket to which it is connected.
Sufficient power
The electrical outlet must be able to absorb the load of the maximum power of the appliance, which is indicated on the rating plate inside the appliance.
Connection to the network
Your appliance is designed to operate at 230 volts single phase. It should be connected to a wall socket equipped with an earth contact and protected by a 10A fuse in accordance with the NF C15-100 standard and the requirements of your electricity supplier.
Before connecting the appliance, follow the installation instructions (see "Installation").
The appliance must not be plugged in immediately after transport.
| Symbol | Climate class | Minimum ambient temperature | Maximum ambient temperature |
| SN | Expanded temperate | +10 | +32°C |
| N | Temperate | +16 | +32°C |
| ST | Semi-tropical | +16 | +38°C |
| T | Tropical | +16 | +43°C |
Note: This appliance is designed to work properly even in a room temperature of 0^ C.
The relative humidity of the room should be between 50% and 75%, outside this range the unit will do its best to bring the internal humidity to the required set point, but depending on the load and the temperature set point, the required values may not be reached.
Heat
Avoid placing the appliance in a place where it is exposed to direct sunlight or near an electric cooker or similar.
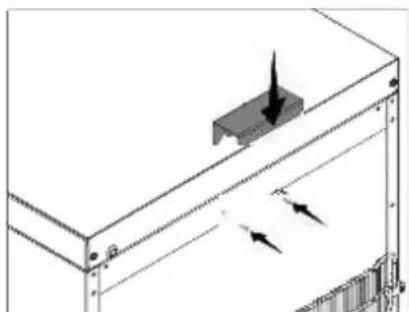
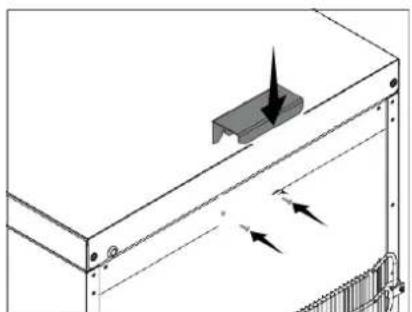
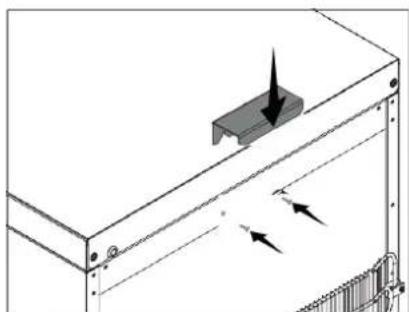
Stop (E1.0)
Before putting the appliance in position, you must install the supplied stop on the upper rear part of the appliance, loosen the two screws, slide the stop in and tighten it completely.
Levelling the appliance
Your appliance should be installed on a flat, stable and vibration-free surface.
Place your wine cabinet in position, then adjust the front legs (by screwing or unscrewing them) to bring it level. The use of a spirit level is recommended.
Two hours is the minimum recommended time for the compressor oil to return to its original position.
Door reversibility (F 1.0)
If you need to change the door's opening direction, follow the instructions in the "Door reversibility" section.
Not possible in all models.
Installation and use of racks
Remove all packing materials, check that the brackets are fully inserted and that the racks are in position. If you have to move or insert new racks, damage and/or injury may result from the use of the appliance.
see the "Moving or adding racks section and illustrations A1.0, A1.1, and A1.2.
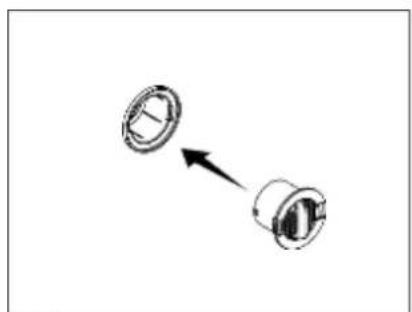
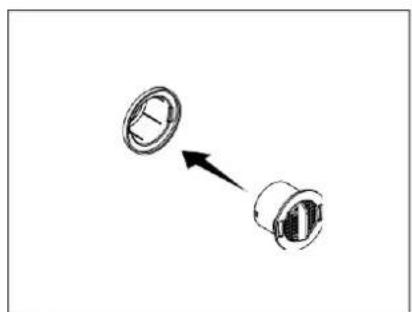
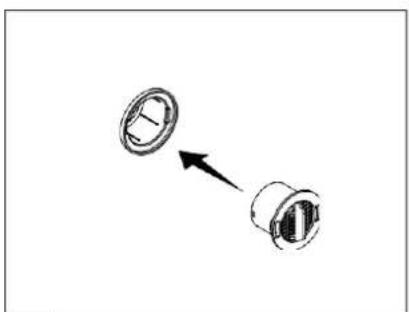
Checking the installation of the carbon filter (D1.0)
Check that the charcoal filter is aligned and fully inserted in its position.
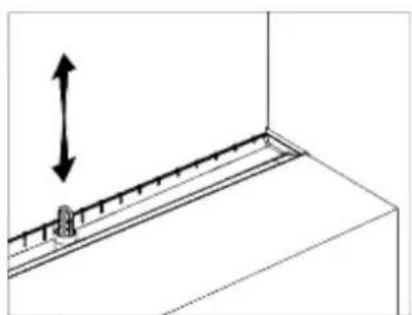
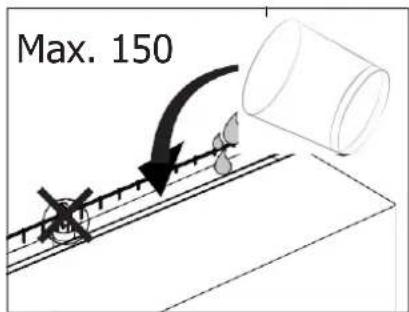
Checking water drainage (C1.0)
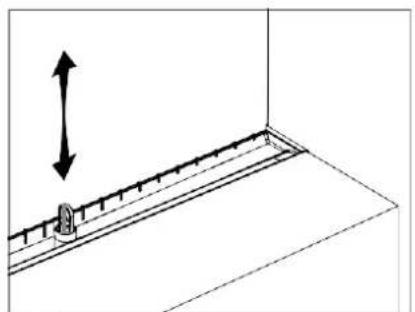
The water drain hole is equipped with a cleaning device, check if it is in its position.
Loading of bottles
The maximum permissible weight per rack must be observed. Bottles must not touch the rear wall of the cabinet or the inside of the door when it is closed.
The weight should be loaded as evenly as possible, avoiding concentrating the load in one place.
Sliding racks should not be loaded with more than two rows of bottles, the top row should be loaded in such a way that pulling the rack forward does not cause the bottles to collapse.
Never take out more than one sliding rack at a time.
USE OF THE APPLIANCE
Start your appliance
Plug in the power cable and wait a few seconds for the controller to start up (the display will show a line of scores). After start-up, it will display the actual internal temperature and humidity in the cabinet. In this case, press the on/off button (18) to turn it ON. Set controller 2 to the desired temperature if different from the default value of 12^ C, see "Controller setting".
Control panel, controller
1 - Internal temperature display 2 -
On/Off button
Press to start or stop the appliance
3 - Increase button
4 - Decrease button
15 - Humidifying in
progress 16 - Fan indicator
If the fan is running
17 - LED indicator
On if the light is on
18 - Adjusts the internal
temperature 19 - Adjusts the
internal humidity
20 - Charcoal filter knob 21 -
Resistor
Displayed if the resistor is heating
Setting the temperature
The default temperature setpoint is 12^ C. You can adjust the temperature inside your cabinet within a range of 5 and 20^ C. It is not possible to set a temperature outside this range.
Press the temperature setting button (18). The temperature value and the setting warning (12) will start flashing where the setpoint value is displayed.
Adjust the setpoint temperature to the desired value using the control buttons (3) or (4). Confirm your choice by pressing the button (18).
Controller A: After waiting 10 seconds, the normal display returns. Press and hold the SET button (12) for more than 2 seconds. The setpoint value is displayed and the °C or °F LED flashes. Change the setpoint value with the buttons (16) or (17) within 10 seconds. To store the new value of the setpoint
5 - Compressor indicator
Lights up if the compressor is running, flashes if the "short cycle" delay is active.
6 - Defrost active.
7 - Temperature unit 8 -
Manual defrost
9 - Error/alarm indicator
Lights up if an alarm sounds.
10 - Internal relative humidity display
11 - Humidity unit
12 - Configuration indicator
Temperature/humidity.
13 - Resistance indicator Lights
up if the resistor is active. 14 -
Dehumidification in progress
value, press the SET button again or wait for 10s.
Controller B: If the setpoint is not changed within 30 seconds after pressing the setting button (18), the controller returns to the originally stored value and the warning light (12) goes out. If the setpoint is changed but not confirmed, after 30 seconds the controller will assume the new setpoint and return to the temperature display mode.
Setting the temperature (therefore for Controller B)
Note: the values read on the controller are the actual temperature and humidity inside the unit, so it is necessary to wait until the new internal conditions are effective.
This appliance is designed as an ageing and maturing cabinet and can also be used as a service appliance. All you need to do is set the internal temperature to suit your needs, a white wine should generally be served between 6 and 10°C, reds between 15 and 18°C.
You must consider that this appliance is an ageing cabinet, so the temperature change inside is slow. The time required to reach the new setpoints, depending on the internal load and temperature conditions, can be significant.
EFFICIENT USE OF THE APPLIANCE
- It is recommended that your wine cabinet is installed in a temperate room.
- If the internal light is left on, please note that the temperature inside will be higher.
- The temperature inside the wine cabinet can fluctuate depending on the type and number of bottles stored.
- To keep your wines at a stable temperature, avoid leaving the door open for too long.
- Do not install your wine cabinet near a heat source and avoid direct sunlight.
- To ensure your safety and to avoid spoiling the wine, do not place your cabinet in damp areas.
- Do not store perishable foodstuffs in this wine cabinet.
- The wine cabinet is not designed to be used in a garage, outdoors or in the open air.
- The following temperatures (approximate) are recommended for drinking the wine:
Vintage Bordeaux wines - Reds 16 - 17°C
Vintage Burgundy wines - Reds 15 - 16°C
Vintage dry white wines 14 - 16°C Light, fruity,
young reds 11 - 12°C
Provence rosés, Nouveau wines 10 - 12°C
Dry whites and red vins de pays 10 - 12°C
White vins de pays 8 - 10°C
Champagne 7 - 8°C Vins
liquoreux (sweet wines)
6^ C
- Temperature stability is most important when it comes to storing wine.
- Exposure to light, vibration or variations in temperature and humidity can spoil the wine.
The air conditioning system
According to specialists, the ideal temperature for storing wines is around 12^ C, within a range of 10^ to 14
^ C. Not to be confused with the serving temperature, which varies, according to the specific character of each type of wine, from 5 to 18 ^ C.
It is especially important to avoid sudden temperature changes.
Designed by specialists, for wine connoisseurs, this appliance, unlike the simple refrigerator, ensures electronic control of a constant average temperature.
The anti-vibration system
The compressor is equipped with special dampers (silent blocks) and the inner tank is insulated from the bodywork by a thick layer of polyurethane foam. These features prevent the transmission of vibrations to the wine.
The humidification system:
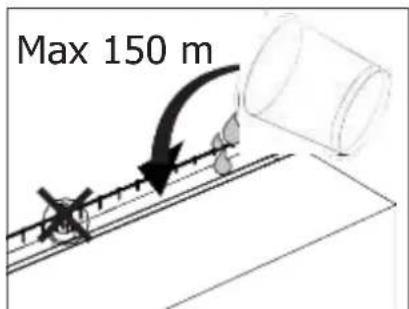
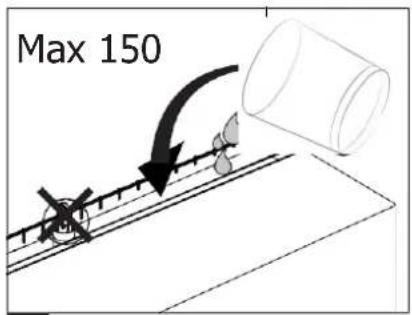
This appliance is equipped with a tank that maintains the correct level of humidity. If the humidity is too low, fill the tank to 34 of its capacity (B1.0). Check the water level from time to time and add water if necessary. The way the cabinet works means that the tank will always be filled with defrost water.
However, make sure that there is always water in the tank.
How to fill and maintain your wine cabinet
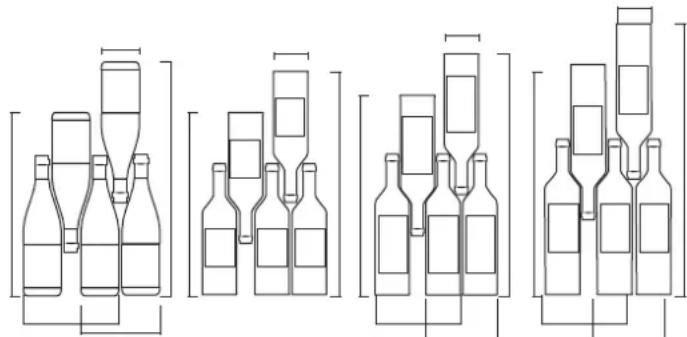
Here we see 4 types of 75 cl bottles, Burgundy and Bordeaux, of different sizes.
There are many other bottles of all shapes and sizes.
You will note the differences in storage depending on bottle height, diameter and method of crossing.
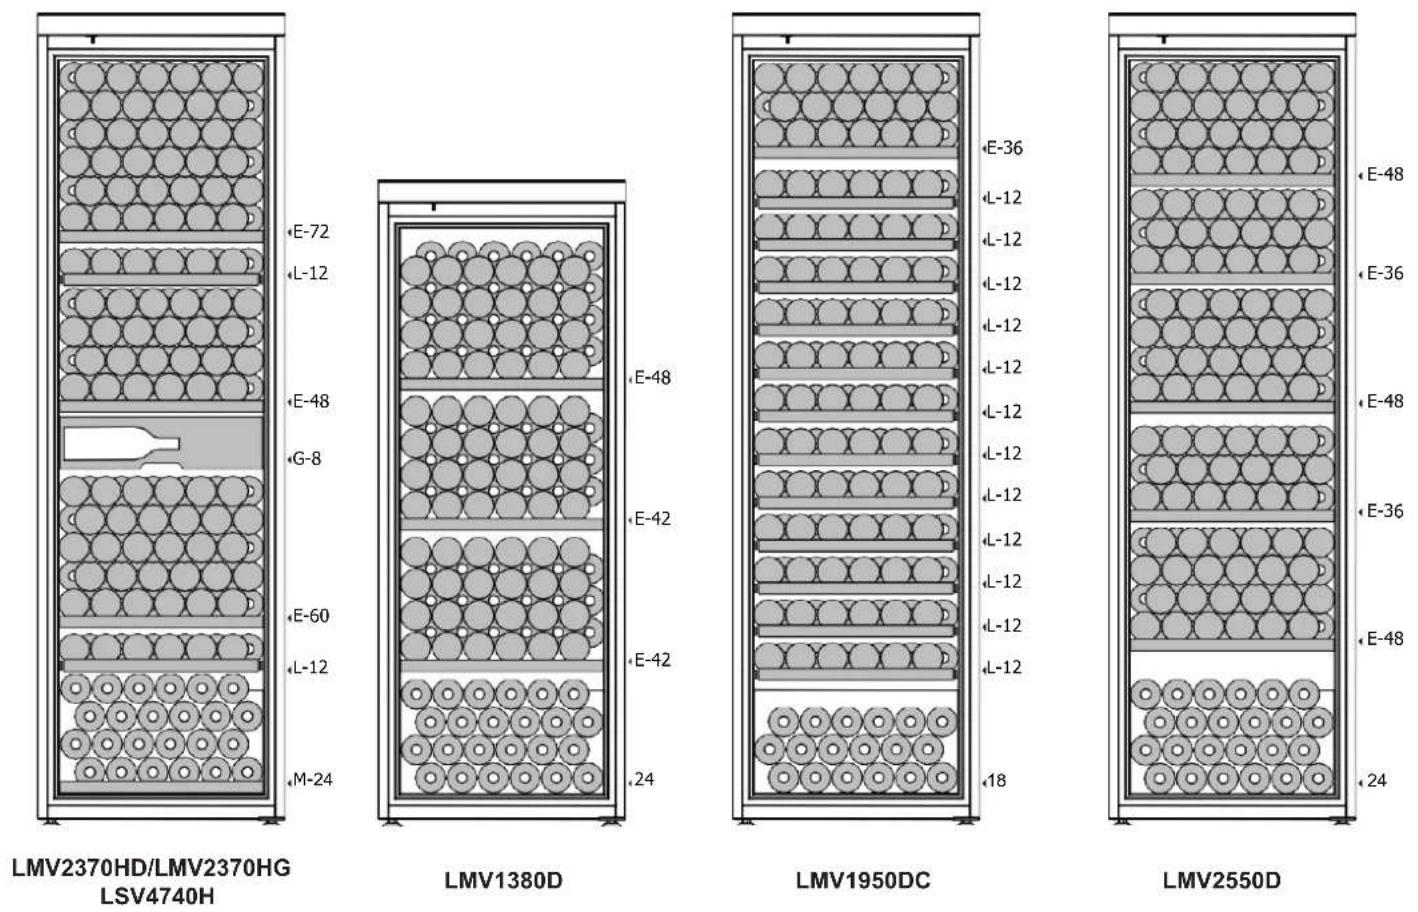
Loading cabinets
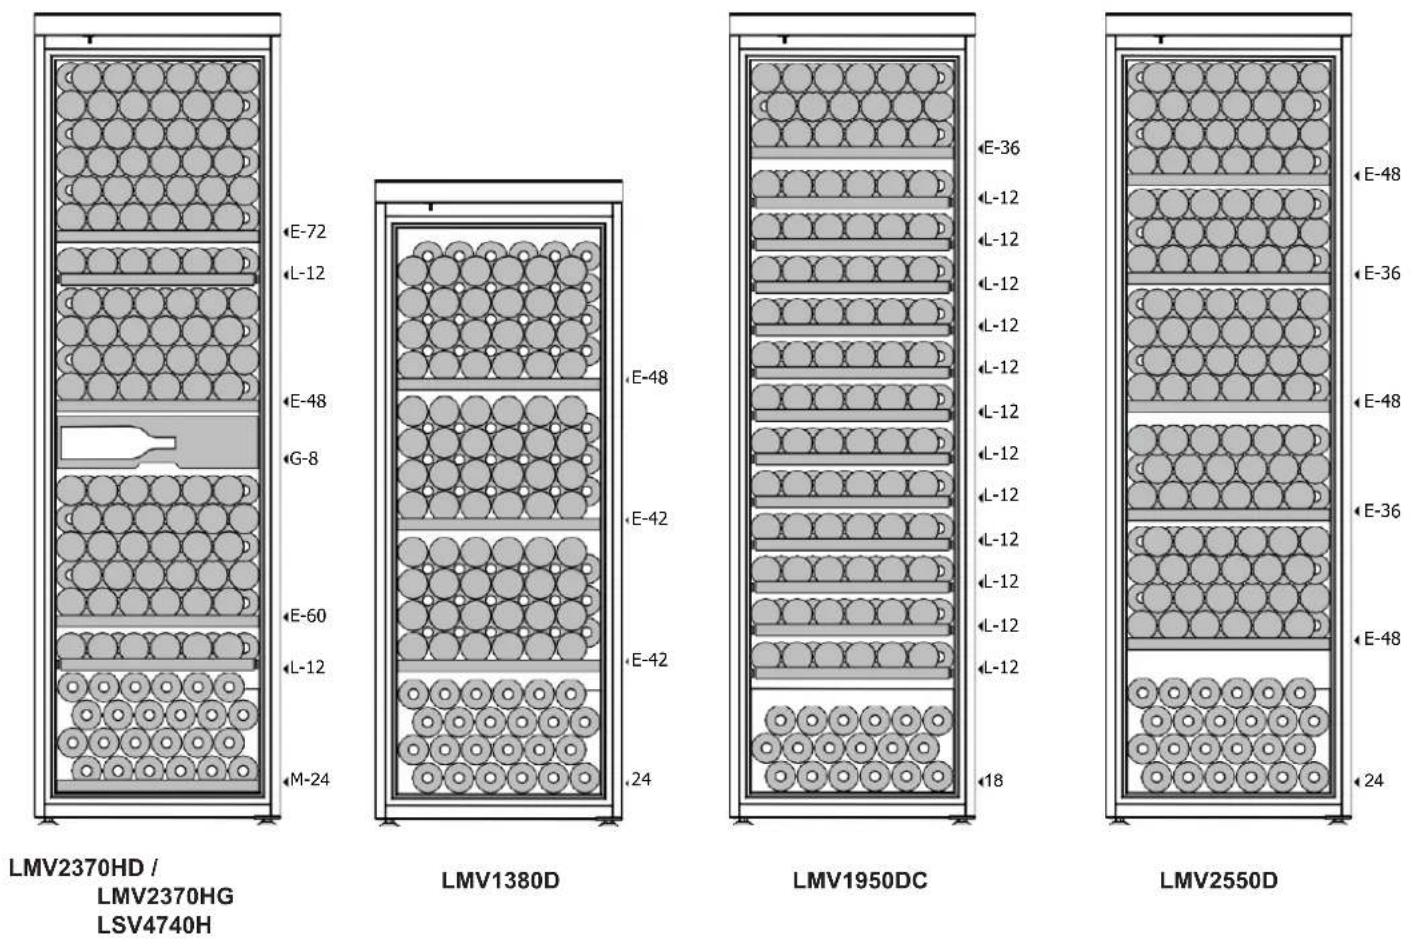
In the following drawings, you have an example of the standard layout that will allow, with the racks provided and the standard bottle size, to reach the stated capacity of your cabinet.
natural_image
Four identical line drawings of bottles with different internal shapes, arranged in a row (no text or symbols)| MODEL | LMV2370H D LMV2370H G | LSV4740H | LMV1380D | LMV1950DC | LMV2550D |
| Fixed racks (E) | 3 | 3+3 | 3 | 1 | 5 |
| Sliding racks (L) | 2 | 2+2 | - | 12 | - |
| Drawer (G) | 1 | 1+1 | - | - | - |
| Bottom rack (M) | 1 | 1+1 - | - | - | |
| Bottlecapacity | 236 | 236+236 | 156 | 198 | 240 |
The maximum storage number is based on standard 0.75 litre Bordeaux bottles in accordance with EN62552.
natural_image
Pure diagram of six identical bottle-shaped structures without any text, numbers, or symbols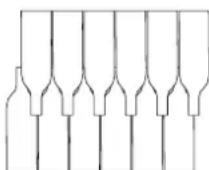
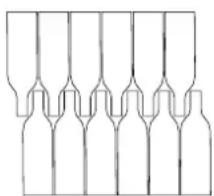
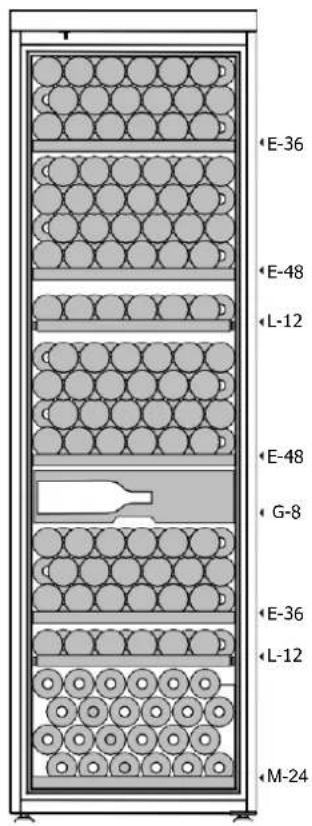
Alternative arrangement
Additional racks (fixed or sliding) can be purchased from your dealer or after-sales centre to increase the flexibility of your appliance.
text_image
E-36 E-48 L-12 E-48 G-8 E-36 L-12 M-24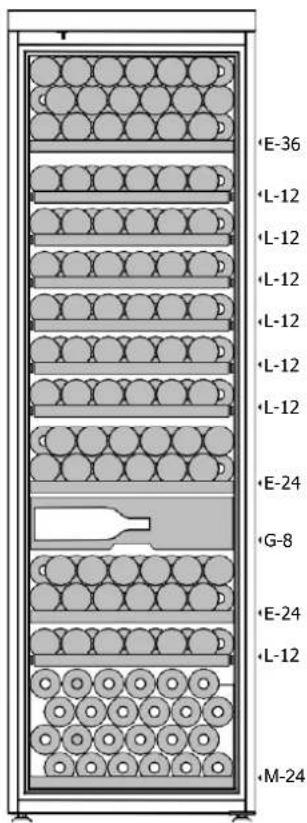
text_image
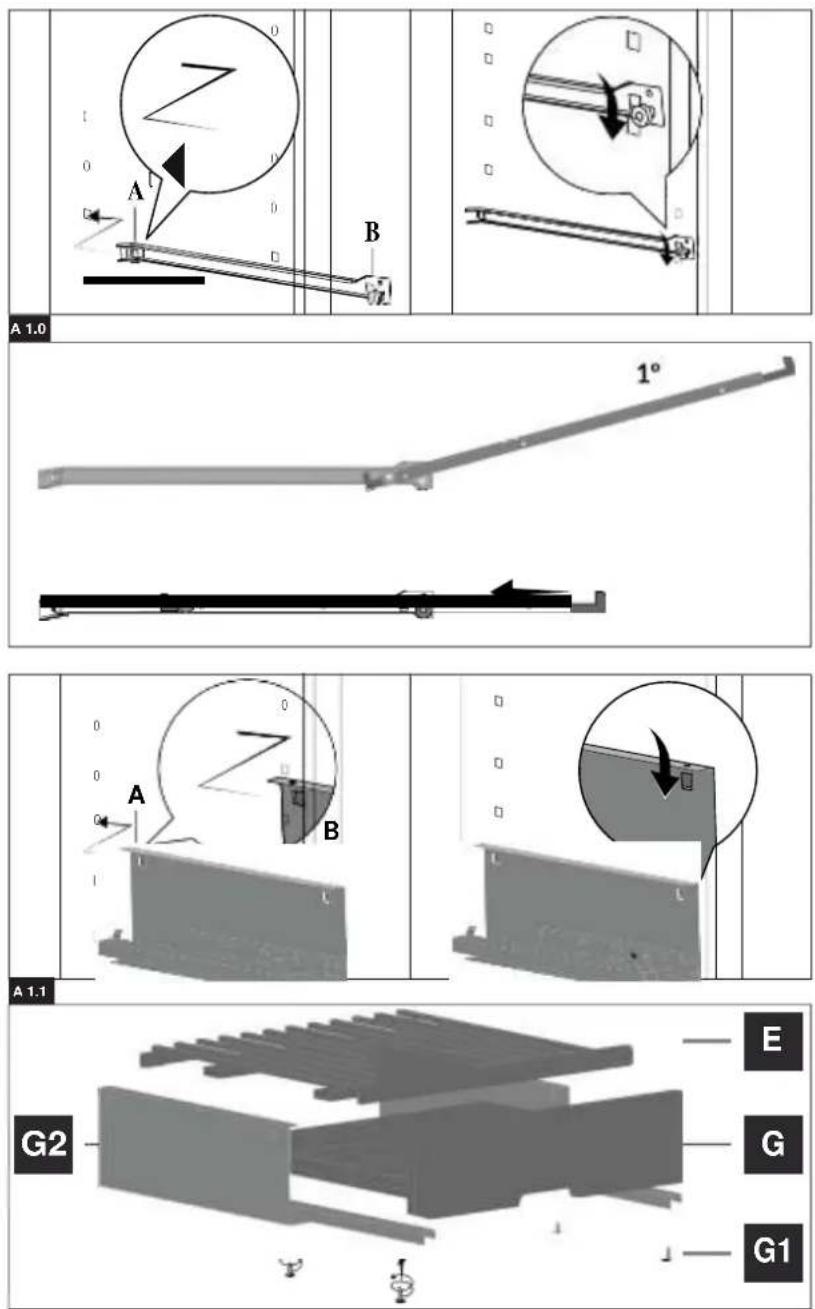
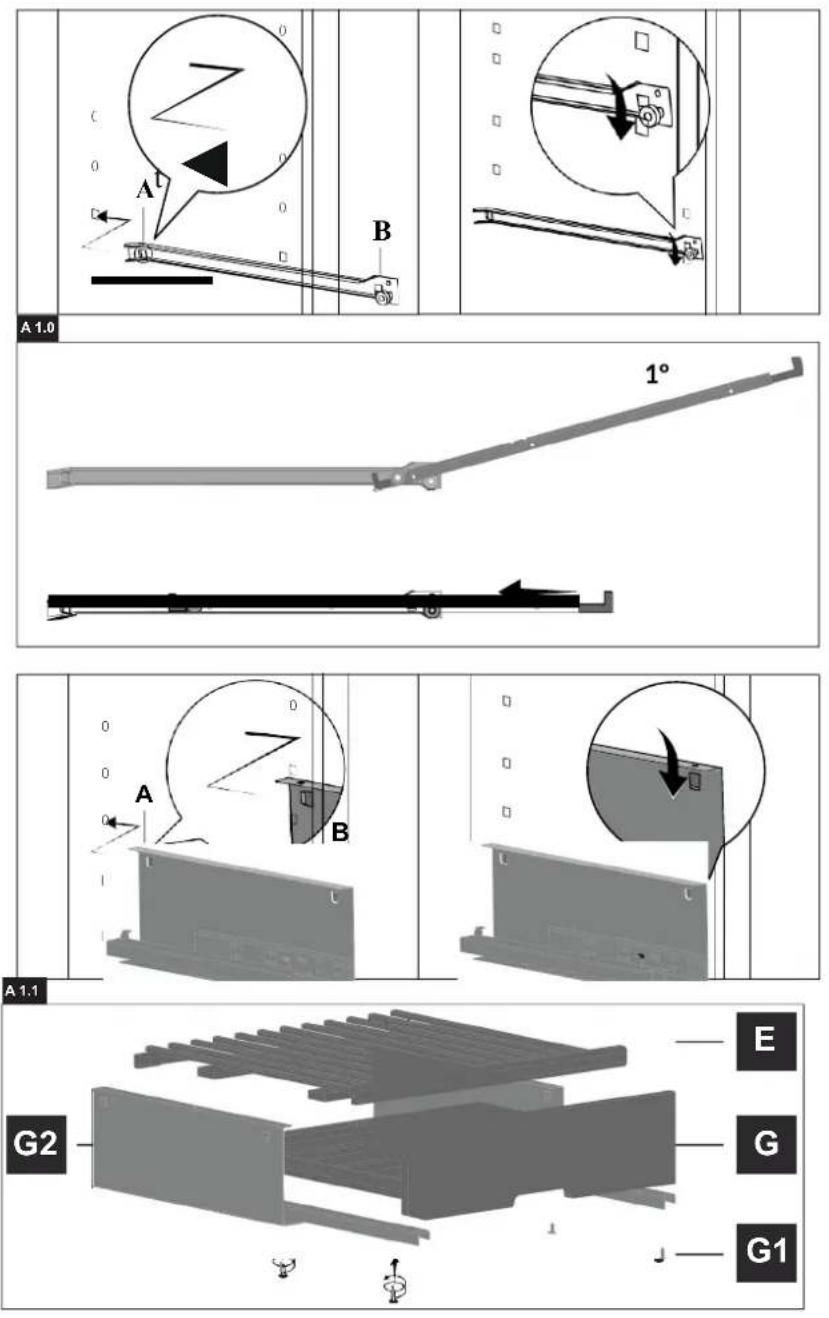
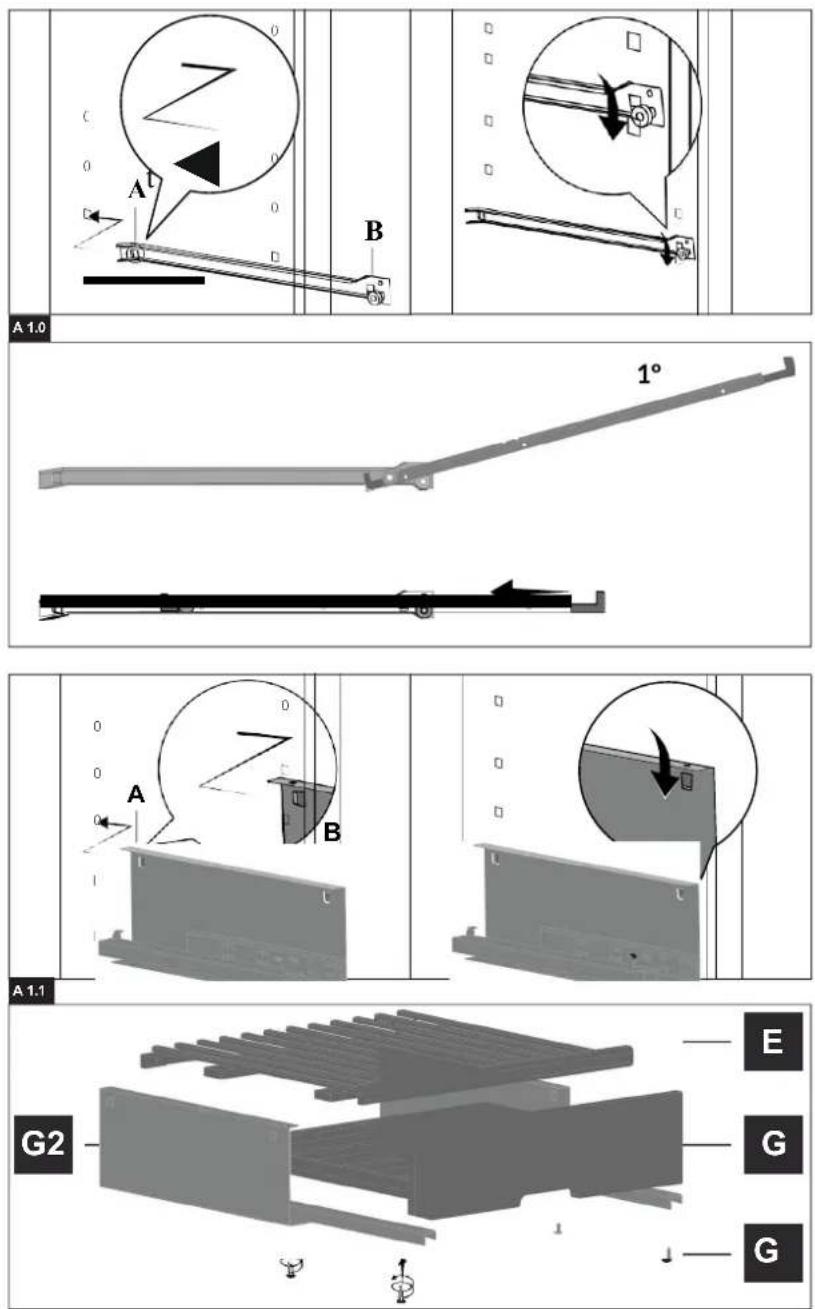
E-36 L-12 L-12 L-12 L-12 L-12 L-12 E-24 G-8 E-24 L-12 M-24Open the drawer completely and unscrew the two fixing screws (G1). Pull the drawer forward to release it from the runners.
Removing the drawer brackets (A1.1)
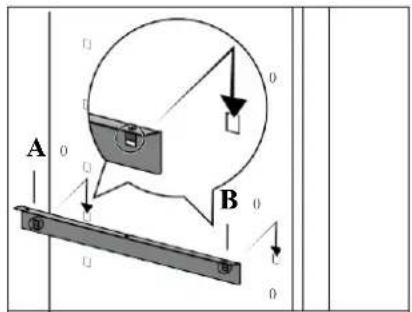
Pull the bracket (B) upwards to remove the front clip from the side wall, pull the bracket towards you to remove the rear clip (A).
Repeat the operation with the bracket on the other side.
Inserting drawer brackets (A1.1)
Note: pay attention to the positioning, on the right or on the left, of the brackets.
Align the rear clip with the desired hole, push backwards (A) so that the clip fits completely into the slot.
Align the front clip with the desired slot and push down (B) to fit the clip fully into the slot.
Make sure that the rack is stable with the side wall.
Inserting a drawer(A1.1)
Position the drawer on the runners, push the drawer in.
Pull out the drawer and the movable runners, fit the fixing screws at
the front (E)
Make sure that the brackets have the vibration dampers installed, put the fixed rack (G1) above the dampers, slide backwards so that it fits.
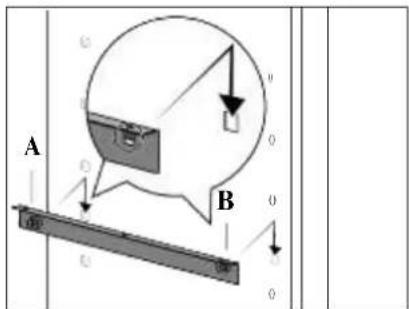
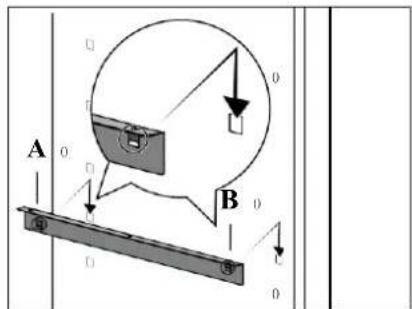
Inserting a fixed shelf bracket (A1.2)
Note: pay attention to the positioning, on the right or on the left, of the brackets.
Align the rear clip with the desired hole, push down to fit the clip fully into the slot (A).
Align the front clip with the desired slot and push down to fit the clip fully into the slot (B).
Make sure that the rack is stable with the side wall.
Inserting a sliding rail (A1.0)
Align the rear clip with the desired hole, push backwards so that the clip fits completely into the slot (A).
Align the front clip with the desired slot and push down to fit the clip fully into the slot (B).
Make sure that the rail is stable with the side wall.
Removing a sliding rail (A1.0)
Pull the front bracket upwards to remove the front clip from the side wall, pull the bracket towards you to remove the rear clip.
Inserting a sliding rack (A1.0)
With the rack tilted (1°), insert it over the rack wheels and slide into the rails (2°).
Removing a drawer(A1.1)
Remove the bottles from the drawer and also from the rack above.
Remove the rack (E) from the top of the drawer.
Inserting a fixed shelf bracket (A1.2)
Note: pay attention to the positioning, on the right or on the left, of the brackets.
Align the rear clip with the desired hole, push down to fit the clip fully into the slot (A).
Align the front clip with the desired slot and push down to fit the clip fully into the slot (B).
Make sure that the rack is stable with the side wall.
Removing fixed brackets (A1.1)
Pull the front of the bracket (B) upwards to remove the front clip from the side wall, pull the back of the bracket (A) towards you to remove the bottom clip.
Installing fixed racks (A1.2)
Place the rack on top of the brackets (1), slide backwards so that it fits (2).
Maximum weight supported per type of rack.
Caution: Do not exceed the weight indicated in the table below, to avoid breakage of the wooden shelves.
| Fixed racks (E) | 86 kg |
| Sliding racks (L) | 15 kg |
| Drawer (G) | 12 kg |
SAVING ENERGY
Install the appliance correctly
The appliance should be installed away from sources of heat or direct sunlight, in a well-ventilated room.
Close the doors
Open your appliance only when strictly necessary - every time you open the door, more cold air will be lost. The motor will have to work harder and consume energy in order to restore the correct temperature.
Set the temperature and humidity\*
Observe the recommended ranges, a very high set temperature or internal humidity value will increase energy consumption.
* Not present in all models.
Respecting the environment
Your appliance does not use any CFC or HCFC gases, the foam insulation and the refrigerant are harmless to the ozone layer and do not contribute to the greenhouse effect.
Unpacking
The packaging material is made entirely from recyclable materials. After unpacking, select and take all unnecessary materials to the recycling point.
Check the door seals
Keep the door seals clean and flexible so that they fit tightly against the door to ensure that no cold air is lost.
This appliance is marked with the symbol for the selective sorting of waste electrical and electronic equipment. This means that this product must be taken to a selective collection system in accordance with EU Directive 2012/19/EU so that it can either be recycled or dismantled to reduce any impact on the environment.
For more information, please contact your local or regional authority.
Electronic products that have not been selectively sorted are potentially dangerous for the environment and human health due to the presence of hazardous substances
This refrigerator contains flammable foaming agents. At the end of the refrigerator's life, it should be disposed of in an appropriate place capable of recycling refrigerators. To do this, contact your local town hall. Under no circumstances should you dispose of this refrigerator on the public highway.
MAINTENANCE OF THE APPLIANCE
Before doing any cleaning, disconnect the appliance from the electricity (by removing the plug or turning off the main switch in your home).
Defrosting
WARNING: Do not damage the refrigeration system.
The interior of the appliance should be cleaned regularly. Use a soft cloth and a mild detergent and water solution. Do not use abrasive products, acetone-based thinners or alcohol-based products.
Remove all accessories (shelves, drawers, etc.). Wash with warm water and a mild, odourless detergent (e.g. dishwashing liquid), rinse with water containing bleach and dry thoroughly.
Wash the inside walls in the same way; pay particular attention to the rack brackets.
Wash the door seal and also clean under the seal.
After cleaning the interior, rinse well with clean water and dry thoroughly. When the appliance is cleaned, reconnect your machine following the instructions in the "Installation" section.
Cleaning the condenser
It is recommended that the rear grille (condenser) be cleaned once a year. You can use a vacuum cleaner or a soft brush. This keeps energy consumption low.
Prolonged period of inactivity
If the appliance is not used for long periods of time, it is advisable to unplug it and leave the door open to prevent the formation of bad odours or mould. Check that the drainage system (I) is clean. If necessary, remove the water with a sponge and clean the hole with the brush provided.
Replacing the carbon filter
In order to maintain adequate air quality, the charcoal filter (J)
should be replaced once a year. Remove the old filter from the holder and insert the new one, taking care to align it with the fittings.
You can purchase new filters from your dealer. The default period of use is 365 days.
Controller B displays the message "FIL" during filter replacement. If this happens, press any button on the controller to stop the audible alarm, change the filter as indicated and press the filter button (17) to reset. You can change it by pressing the filter button (17) for 3 seconds, pressing the button to increase (13) or decrease (14) the number of days (Controller B). Press the filter button again (17) again to exit settings mode. Selecting zero value (zero days) will disable the filter function.
Replacing the light bulb
This appliance consists of LEDs (C) of energy efficiency class F for appliances with controller A and energy efficiency class E for appliances with controller B. This type of diode cannot be changed by the consumer. The life of these LEDs is sufficiently long that no changes need to be made. If, however, despite all the care taken in the manufacture of this appliance, the LEDs are defective, please contact your After Sales Service if any intervention is needed.
This appliance is not designed for use as a built-in appliance
PROBLEMS AND SOLUTIONS
LED light (C) does not light up with the door open Check if:
- The power cable is not inserted in the socket or not inserted enough to make contact;
• There is no power in the house.
The wine cabinet is not cooling properly or the compressor is running continuously
Check if:
- The door is closed properly or the seal is damaged;
• The door is opened too frequently;
• The installation conditions are met.
The appliance makes too much noise
Check if:
• The appliance is levelled properly;
- The appliance has been installed between furniture that vibrates and makes noise;
- The installation conditions are met.
• The thermostat is on the right setting;
- The internal fan is free and unobstructed;
- This is the noise made by the refrigerant, which occurs even when the compressor is switched off (this is not a fault).
The inner rear wall of the appliance is covered with frost or water droplets.
Check if:
- This is the normal operation of the device.
There is water in the lower inner part of the appliance
Check if:
• The drain hole is not blocked.
A certain amount of water is normally present in the water drain, which will ensure good moisture control in the appliance.
If, despite all these checks, the appliance still does not work and the problem persists, contact your nearest service centre, indicating: type of fault, model (Mod.) and the Serial Number of the appliance (SN) available on the data plate on the back of the appliance.
Never use unauthorised technicians and always reject spare parts that are not original.
Only for controller B
Check the table codes and corresponding actions:
Controller B will display an alarm or warning code if something is not as expected.
This message will appear alternately with the internal temperature until the alarm conditions stop.
The alarm can be switched off by pressing any key.
Please refer to the table below to understand the meaning of the code and what action to take when it arises.
| CODE | CAUSE | ACTION |
| dA Door | open warning | Close the door or, if you need to have the door open for a loading/unloading operation, stop the alarm by pressing any button. When you have finished, make sure you close the door and the LED light should go out. |
| FIL | Carbon filter change | Change the carbon filter and reset the counter by pressing the filter button (20). See "Appliance Maintenance" for more details.Even if this message appears, the appliance continues to operate normally. |
| HA | High temperature alarm | This message appears if the controller is not able to bring the internal temperature to the setpoint.Check that the appliance is installed correctly and that the climatic conditions in the room are as specified (see "Installation section).If there has been a setpoint change, a large load change or a long door opening, press any key to stop the alarm and allow the cabinet to stabilise.If you are unable to resolve the problem, contact your local after-sales centre. |
| LA | Low temperature alarm | |
| HHA | High humidity alarm | This message appears if the controller is not able to bring the internal humidity to the setpoint.Check that the appliance is installed correctly and that the climatic conditions in the room are as specified (see "Installation section).If there has been a setpoint change, a large load change or a long door opening, press any key to stop the alarm and allow the cabinet to stabilise.If you are unable to resolve the problem, contact your local after-sales centre. |
| LHA | Low humidity alarm | |
| P1 | Thermostat sensor failure | Contact your after-sales service, with this fault your appliance will stop working. |
| P3 | Humidity sensor failure | Contact your after-sales service, with this fault your appliance will stop controlling the humidity. |
CUSTOMER SERVICES
You can solve many problems yourself by consulting the "troubleshooting" information. If this is not the case and you are not able to repair the appliance yourself or if your appliance needs to be repaired, contact customer service.
For safety reasons, repairs to the appliance may only be carried out by trained specialist personnel. The warranty claim shall become null and void if repairs or interventions have been carried out by persons not authorised by us for this purpose or if our appliances have been fitted with spare parts, supplementary parts or accessories that were not original parts and have subsequently led to a defect.
Original functional spare parts according to the corresponding eco-design order can be obtained from customer services for a period of at least 7 years, starting from the date your appliance was placed on the market in the European Economic Area. To request them, simply contact customer services, indicating the part required and providing the part number and serial number of the appliance on the data label on the back of the appliance.
Some spare parts are reserved for assembly by accredited professionals and may not be sold to third parties.
WARRANTY\*
Repairs and spare parts available
The manufacturer's warranty applies to this appliance for a period of 3 years.
In the event of a malfunction during this period, all claims must be made to your dealer's after-sales department.
Outside the warranty period, information on professional repair services or ordering original spare parts can be obtained by contacting your dealer
In accordance with eco-design regulations, spare parts will be available for at least 7 years from the date of purchase of your appliance.
TECHNICAL DATA
Technical information can be found on the rating plate on the back of the appliance and on the energy label ^1 .
The QR code ^1 on the energy label supplied with the appliance provides a web link to information about the appliance's performance in the EU EPREL database ^1 .
To find the product data in the European database (EPREL) ^1 , simply scan the QR code on the top right of the energy label supplied with the appliance and the link to the application will open.
Keep the energy label ^1 for reference along with the
user manual and all other documents supplied with this appliance.
You can find more information using the link https://eprel.ec.europa.eu/ ^1 .
^1 Applies only to countries in the European Economic Area
Le Chai
WIJNKAST VOOR RIJPING
GEBRUIKSAANWIJZING
LMV2370HD / LMV2370HG - 236 flessen
LSV4740H - 472 flessen
LMV1950DC - 198 flessen
LMV1380D - 156 flessen
LMV2550D - 240 flessen
natural_image
Front view of a simple white refrigerator with control panel and door (no text or symbols visible)INHOUDSOPGAVE
I - Opening waterafvoer J -
Koolstofffilter
K - Ventilator
text_image
A D C K E G L B I J M H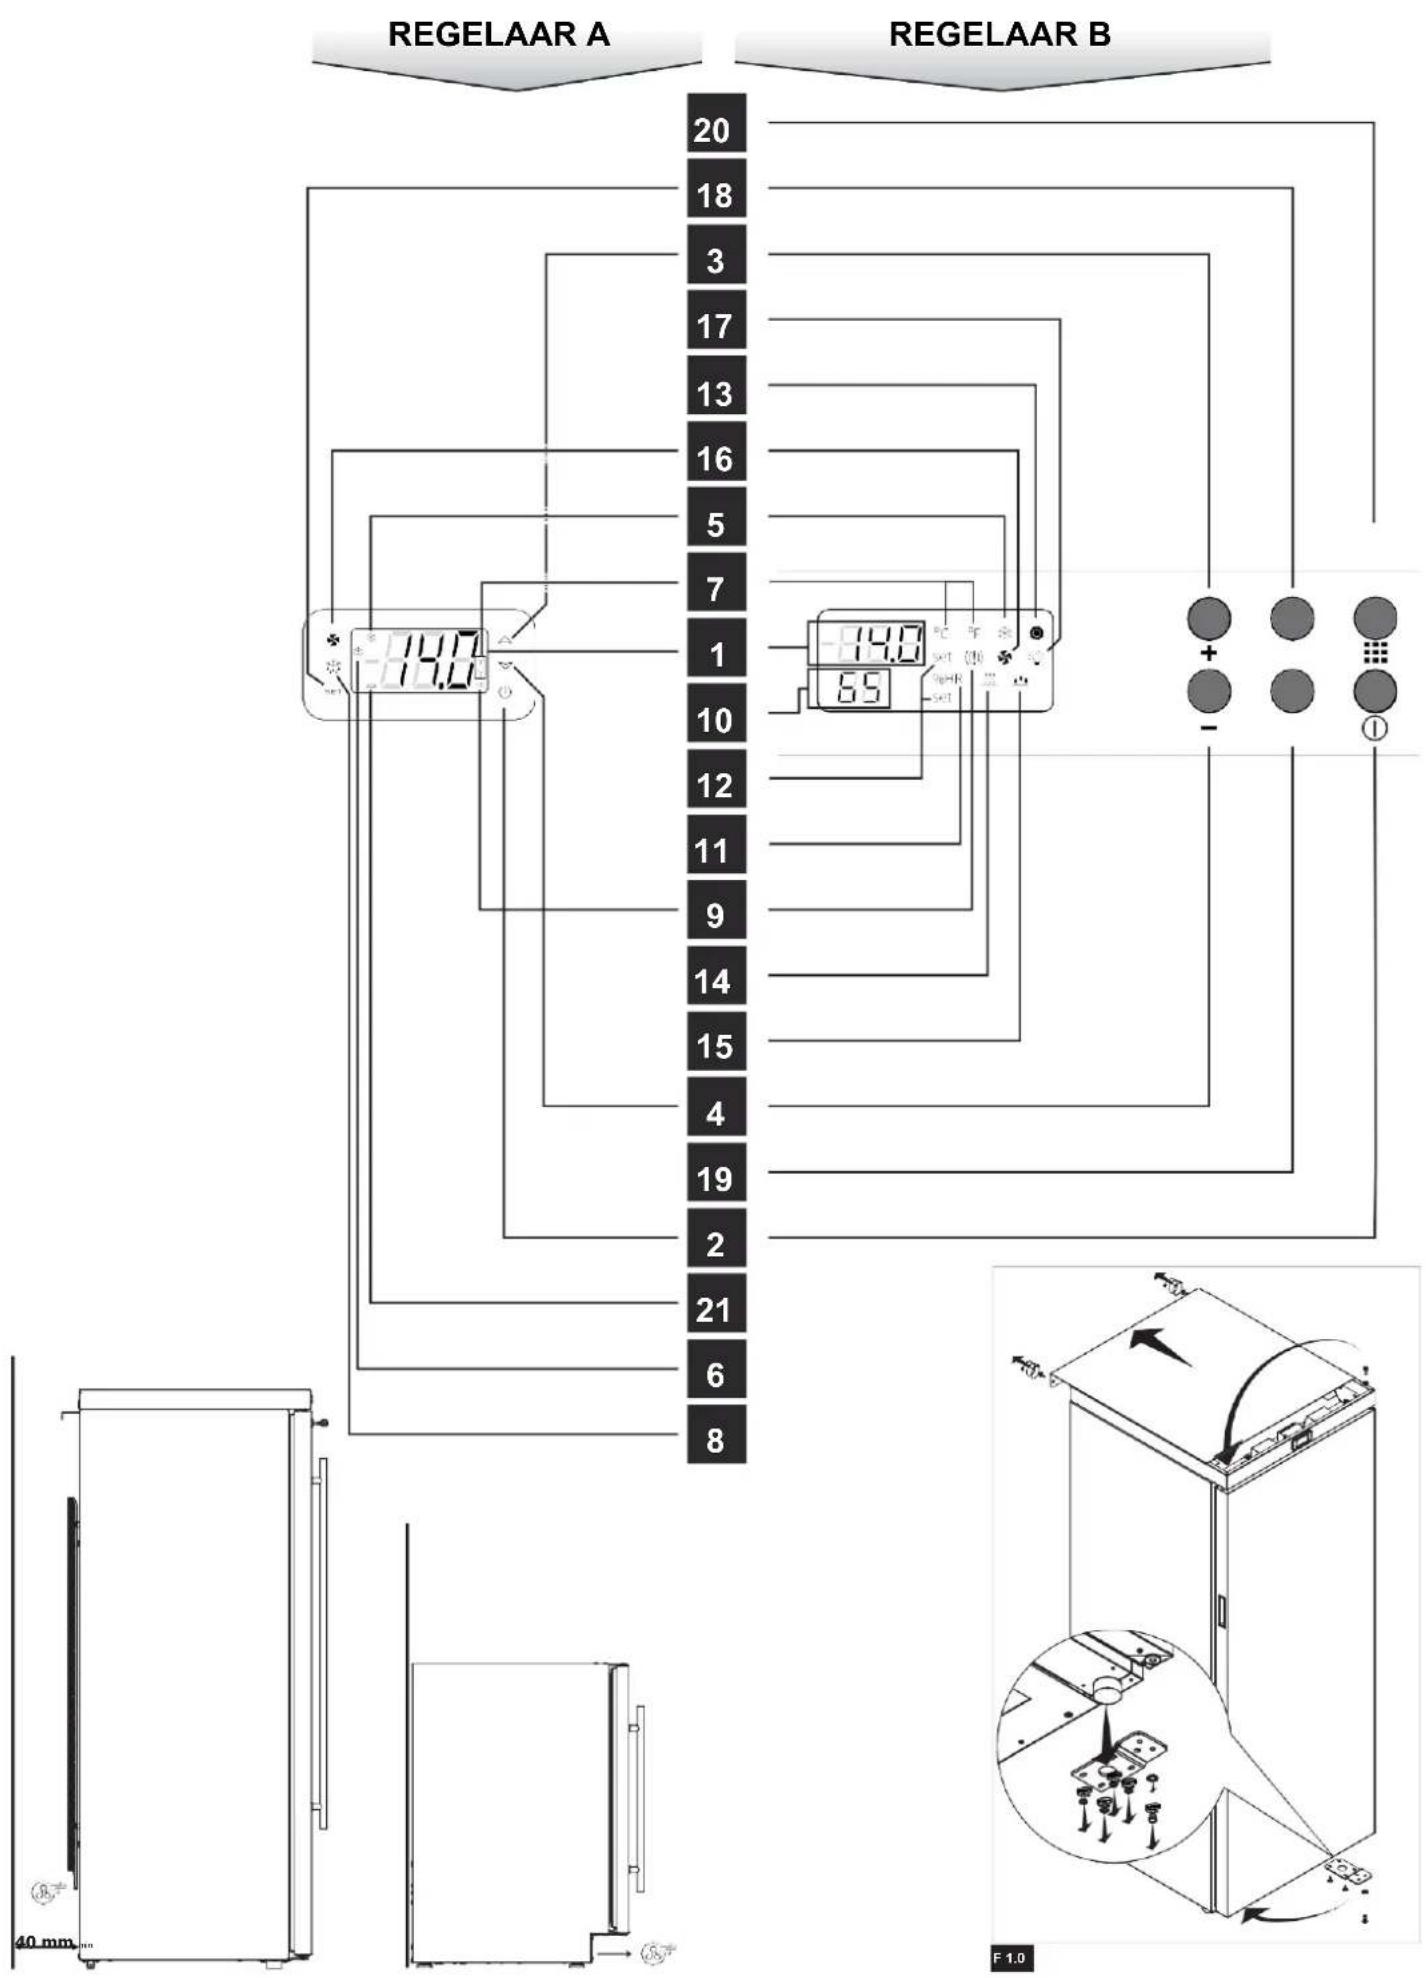
text_image
REGELAAR A REGELAAR B 14.0 65 14.0 20 18 3 17 13 16 5 7 1 10 12 11 9 14 15 4 21 6 8 40 mm F 109 NL
text_image
A B 0 0 0 0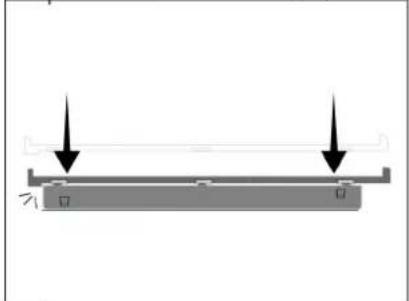
natural_image
Pure diagram of a mechanical or structural component with two downward arrows indicating force or direction (no text or symbols)A 1.2
text_image
Max. 150B 1.0

natural_image
Technical line drawing of a mechanical assembly with a vertical double-headed arrow indicating upward motion (no text or symbols)C 1.0
natural_image
Simple line drawing of two circular objects with an arrow pointing from one to the other (no text or symbols)D 1.0
natural_image
Technical diagram of a mechanical assembly with arrows indicating force or movement (no text or symbols present)E 1.0
IINSTALLATIE
natural_image
Diagram of four identical bottles with different internal structures, no text or symbols present| MODEL | LMV2370HDLMV2370HG | LSV4740H | LMV1380D | LMV1950DC | LMV2550D |
| Vaste rekken (E) | 3 | 3+3 | 3 | 1 | 5 |
| Schuifrekken (L) | 2 | 2+2 | - | 12 | - |
| Lade (G) | 1 | 1+1 - | - | - | |
| Rek onderaan (M) | 1 | 1+1 | - | - | - |
| Capaciteit flessen | 236 | 236+236 | 156 | 198 | 240 |
natural_image
Pure diagram of six identical bottle-shaped structures without any text, numbers, or symbols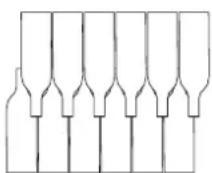
text_image
E-36 E-48 L-12 E-48 G-8 E-36 L-12 M-24