
Series 9 Pro 9376cc - Razor BRAUN - Free user manual and instructions
Find the device manual for free Series 9 Pro 9376cc BRAUN in PDF.
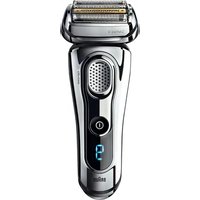


| Product type | Electric shaver |
| Brand | Braun |
| Model | Series 9 Pro 9376cc |
| Battery life | Up to 50 minutes |
| Charging time | 1 hour |
| Power source | Cordless, rechargeable battery |
| Cleaning station | Clean&Charge included |
| Integrated trimmer | Yes, for long hairs |
| Foil and cutter block | Ref. 92S/92B |
| Cleaning cartridge | Ref. CCR |
| Display | LED display (charging, cleaning, lock) |
| Travel lock | Yes |
| Washable under water | Yes |
| Use in shower | Yes |
| Warranty | 2 years |
| Included accessories | Travel pouch, cable, Clean&Charge station, cartridge |
Frequently Asked Questions - Series 9 Pro 9376cc BRAUN
User questions about Series 9 Pro 9376cc BRAUN
0 question about this device. Answer the ones you know or ask your own.
Ask a new question about this device
Download the instructions for your Razor in PDF format for free! Find your manual Series 9 Pro 9376cc - BRAUN and take your electronic device back in hand. On this page are published all the documents necessary for the use of your device. Series 9 Pro 9376cc by BRAUN.
USER MANUAL Series 9 Pro 9376cc BRAUN
(Sharecall charged at local rates)
www.service.braun.com
English
Our products are designed to meet the highest standards of quality, functionality and design. Thank you for your trust in Braun's quality, and we hope you enjoy your new Braun shaver.
Read these instructions completely, they contain safety information. Keep them for future reference.
Warning
Your appliance is provided with a special cord set, which has an integrated Safety Extra Low Voltage power supply. Do not exchange or tamper with any part of it, otherwise there is risk of an electric shock. Only use the special cord set provided with your appliance.
If the appliance is marked 492, you can use it with any Braun power supply coded 492-XXXX.

This appliance is suitable for cleaning under running water and use in a bath or shower.
For safety reasons it can only be operated cordless.
Do not shave with a damaged foil or cord.
This appliance can be used by children aged from 8 years and above and persons with reduced physical, sensory or mental capabilities or lack of experience and knowledge if they have been given supervision or instruction concerning the safe use of the appliance and understand the hazards involved. Children shall not play with the appliance. Cleaning and user maintenance shall not be made by children unless they are older than 8 years and supervised.
Clean&Charge Station
To prevent the cleaning fluid from leaking, ensure that the Clean&Charge Station is placed on a flat surface. When a cleaning cartridge is installed,
do not tip, move suddenly or transport the station in any way as cleaning fluid might spill out of the cartridge. Do not place the station inside a mirror cabinet, nor place it on a polished or lacquered surface.
The cleaning cartridge contains a highly flammable liquid so keep it away from sources of ignition. Do not expose to direct sunlight and cigarette smoking nor store it over a radiator.
Do not refill the cartridge and use only original Braun refill cartridges.
Shaver
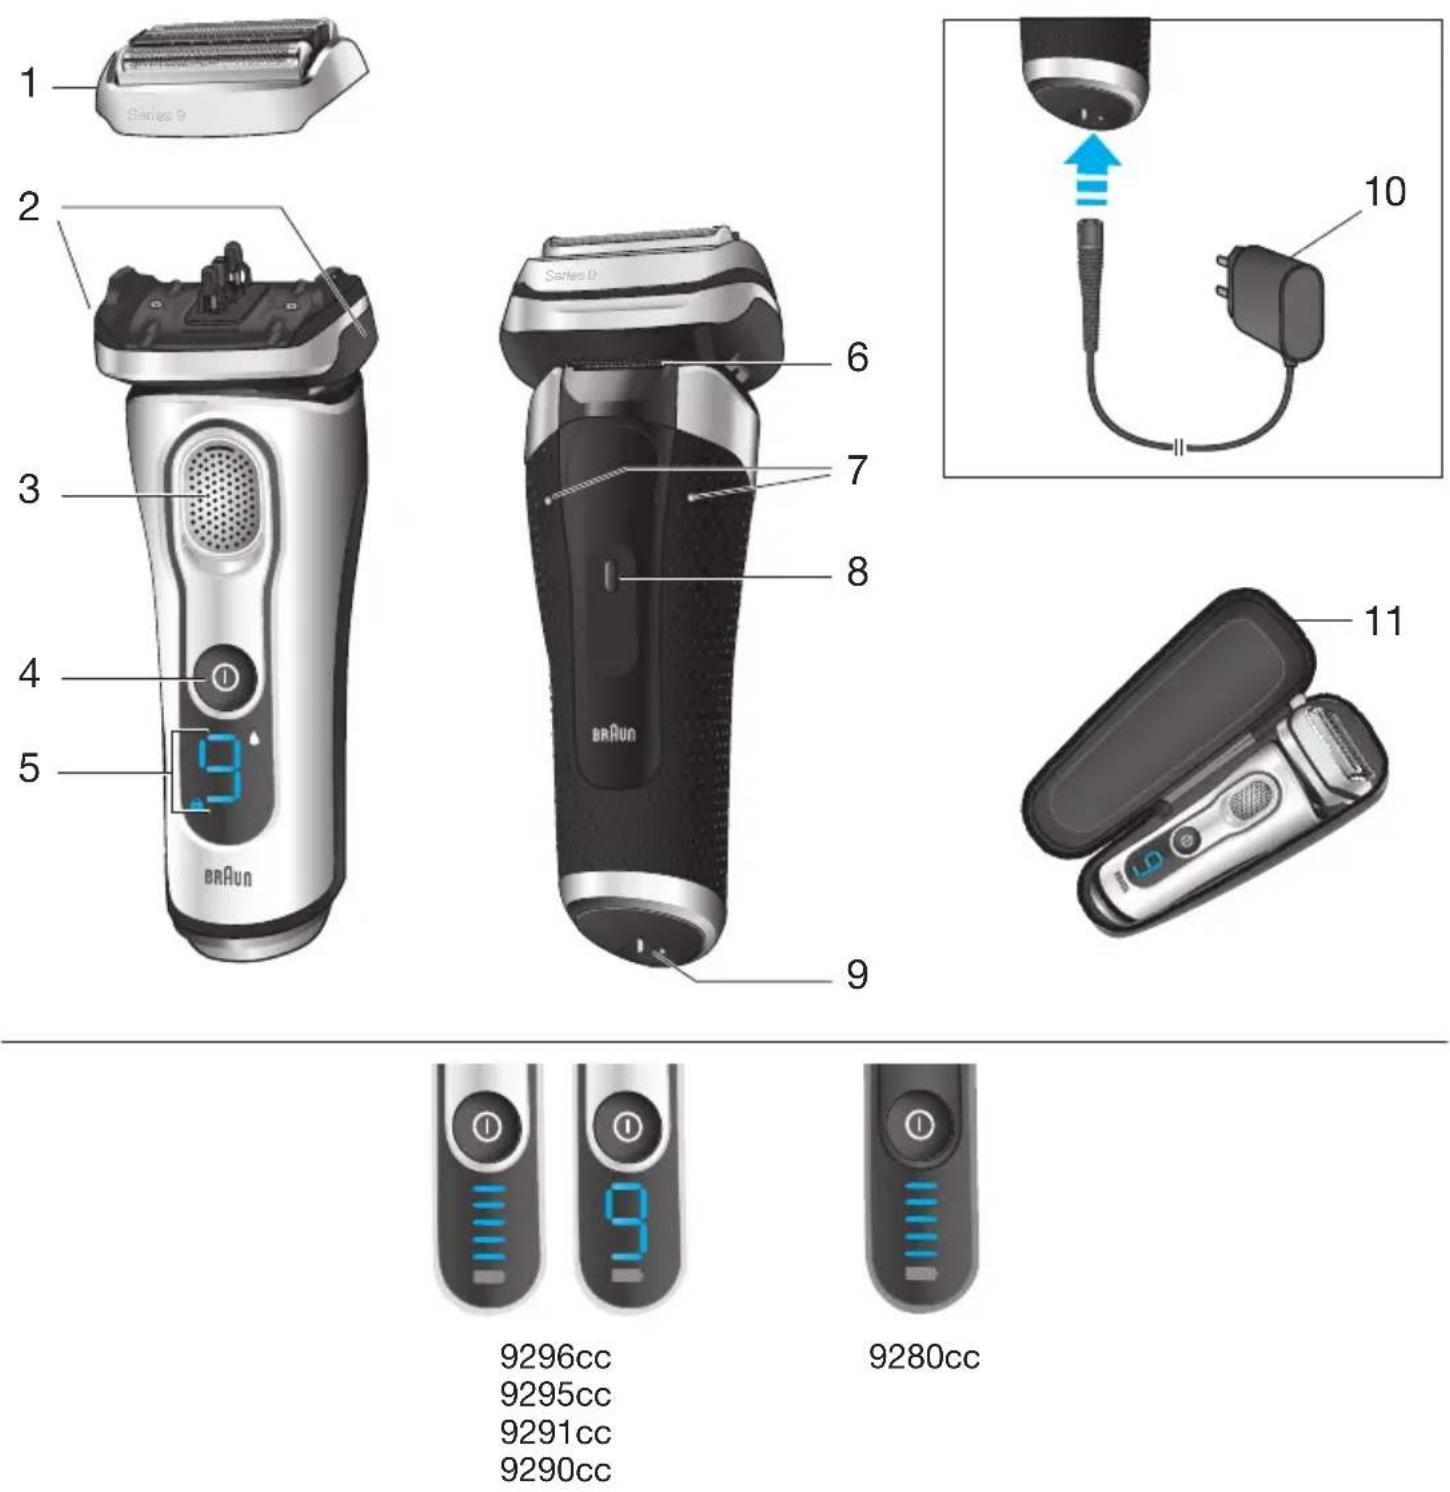
1 Foil & Cutter cassette 2 Cassette release buttons 3 MultiHeadLock switch 4 On/off switch 5 Shaver display (design can differ) 6 Long hair trimmer 7 Shaver-to-station contacts 8 Release button for long hair trimmer 9 Shaver power socket 10 Special cord set (design can differ) 11 Travel case
First use and Charging
Connect the shaver to an electrical outlet by snapping the special cord set (10) into the power socket (9) or for cc models via the Clean&Charge Station (see Chapter «Clean&Charge Station»).
Charging and basic operating information
- When charging for the first time, charge continuously for 1 hour.
- A full charge provides up to 50 minutes of cordless shaving time. This may vary according to your beard growth and environmental temperature.
- Recommended ambient temperature for charging is 5°C to 35°C. The battery may not charge properly or at all under extreme low or high temperatures.
- Recommended ambient temperature for shaving is 15°C to 35°C.
- Do not expose the appliance to temperatures higher than 50°C for extended periods of time.
- When the shaver is connected to an electrical outlet, it may take some minutes until the display illuminates.
Shaver display
Charge status
The shaver display (5) shows the charge status of the battery when connected to an electrical outlet:
- During charging the respective battery segment will blink.
- When fully charged all battery segments will light up for a few seconds then the display turns off.
Low charge
The low-charge light flashes red when the battery is running low. You should be able to finish your shave. With switching off the shaver a beep sound reminds of the low charge status.
The last 9 minutes of remaining shaving time are displayed in digits (depending on your model / display).
Cleaning status
The cleaning indicator lights up when the shaver needs to be cleaned in the Clean&Charge Station.
Travel lock
The lock symbol lights up when the shaver has been locked to avoid unintended starting of the motor (e.g. for storing in a suitcase).
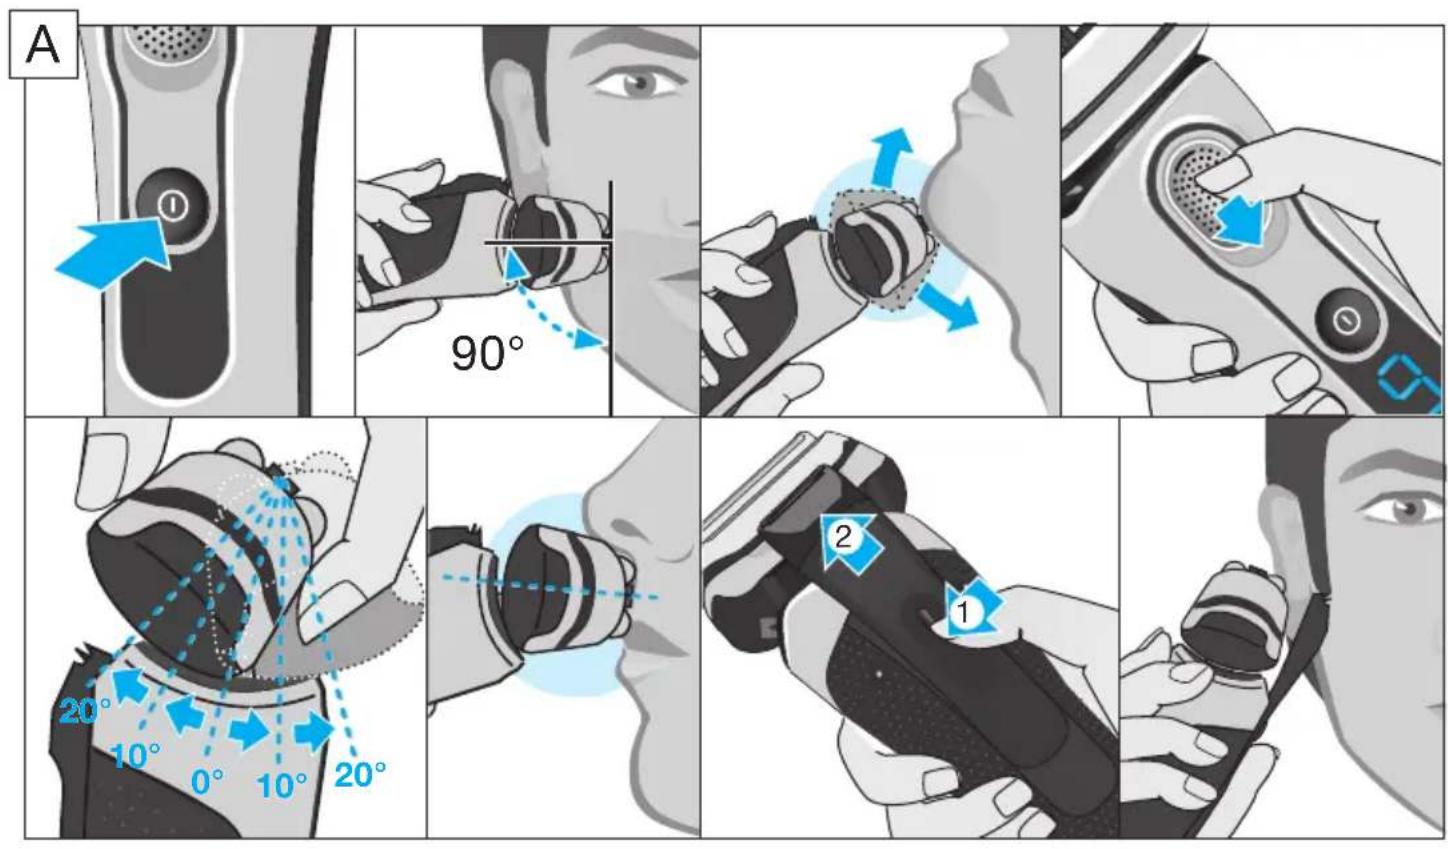
Using the shaver (see fig. A)
Press the on/off switch (4) to operate the shaver.
Tips for a perfect dry shave
- Always shave before washing your face.
- At all times, hold the shaver at the right angle (90°) to your skin.
- Stretch your skin and shave against the direction of your beard growth.
MultiHeadLock switch (head lock)
To shave hard-to-reach areas (e.g. under the nose) slide the MultiHeadLock switch (3) down to lock the shaver head. The shaver head can be locked in five positions. To change position, move the shaver head with your thumb and forefinger back or forth. It will automatically click into the next position.
For automatic cleaning in the Clean&Charge Station the head lock should be released.
Long hair trimmer
To trim sideburns, moustache or beard press the release button (8) and slide the long hair trimmer (6) upwards.
Travel lock
- Activation: By pressing the on/off switch (4) for 3 seconds the shaver is locked. This is confirmed by a beep sound and the lock symbol in the display. Afterwards the display turns off.
- Deactivation: By pressing the on/off switch for 3 seconds the shaver is unlocked again.
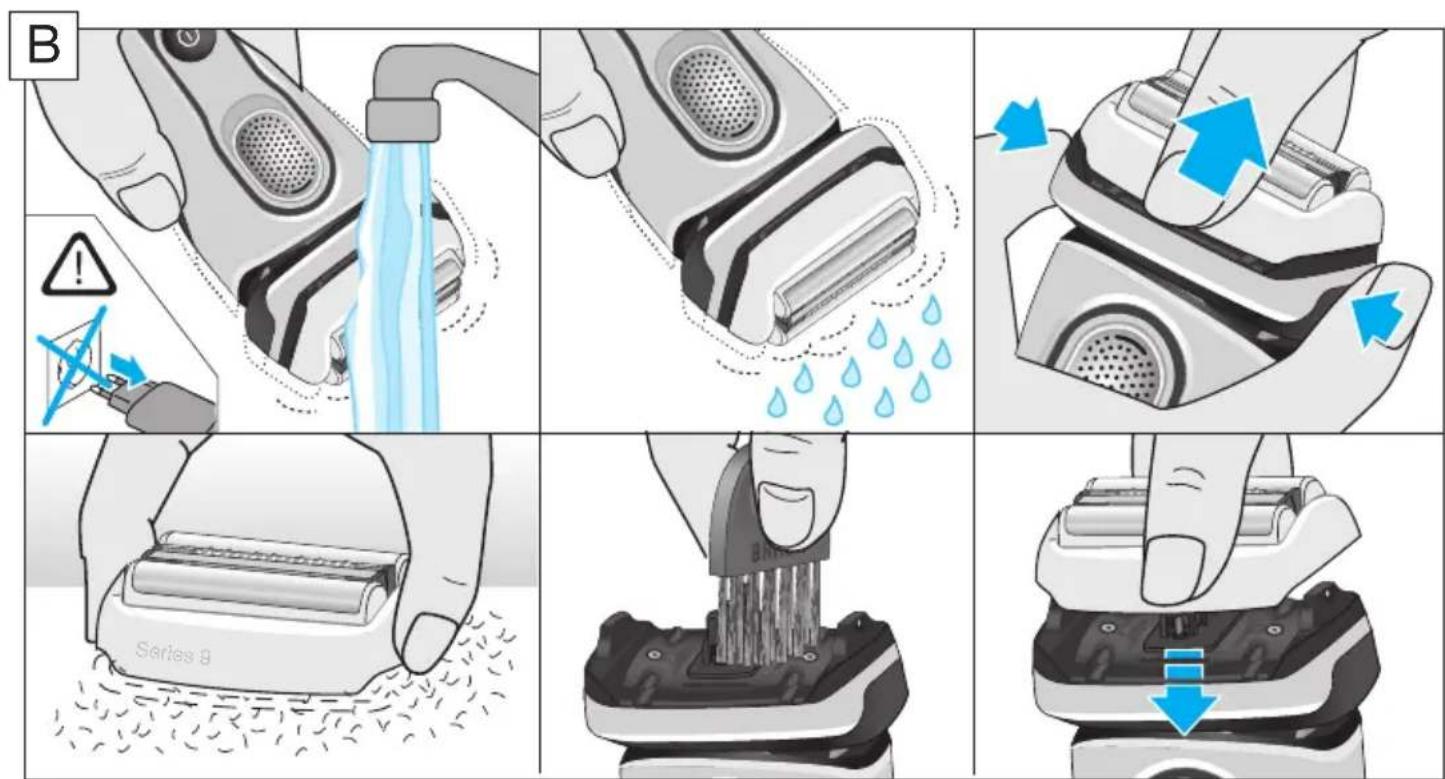
Manual cleaning of the shaver (see fig. B/C)
Cleaning under running water
- Switch on the shaver (cordless) and rinse the shaver head under hot running water until all residues have been removed. You may use liquid soap without abrasive substances. Rinse off all foam and let the shaver run for a few more seconds.
- Next, switch off the shaver, press the release buttons (2) to remove the Foil & Cutter cassette (1) and let it dry completely.
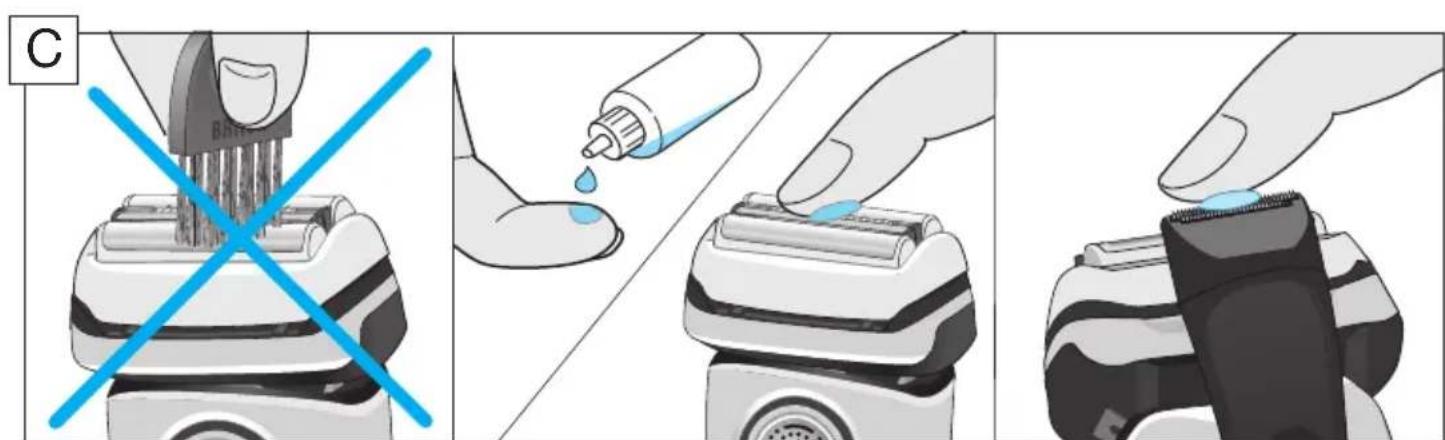
- If you regularly clean the shaver under water, then apply once a week a drop of light machine oil on top of the Foil & Cutter cassette.
The shaver should be cleaned after each foam usage.
Cleaning with a brush
- Switch off the shaver. Remove the Foil & Cutter cassette (1) and tap it out on a flat surface. Using the brush, clean the inner area of the pivoting head. Do not clean the cassette with the brush as this may damage it!
The Foil & Cutter cassette can be attached either way. There is no impact on the shaving performance.
Clean&Charge Station
The Clean&Charge Station has been developed for cleaning, charging, lubricating, disinfecting, drying and storing your Braun shaver.
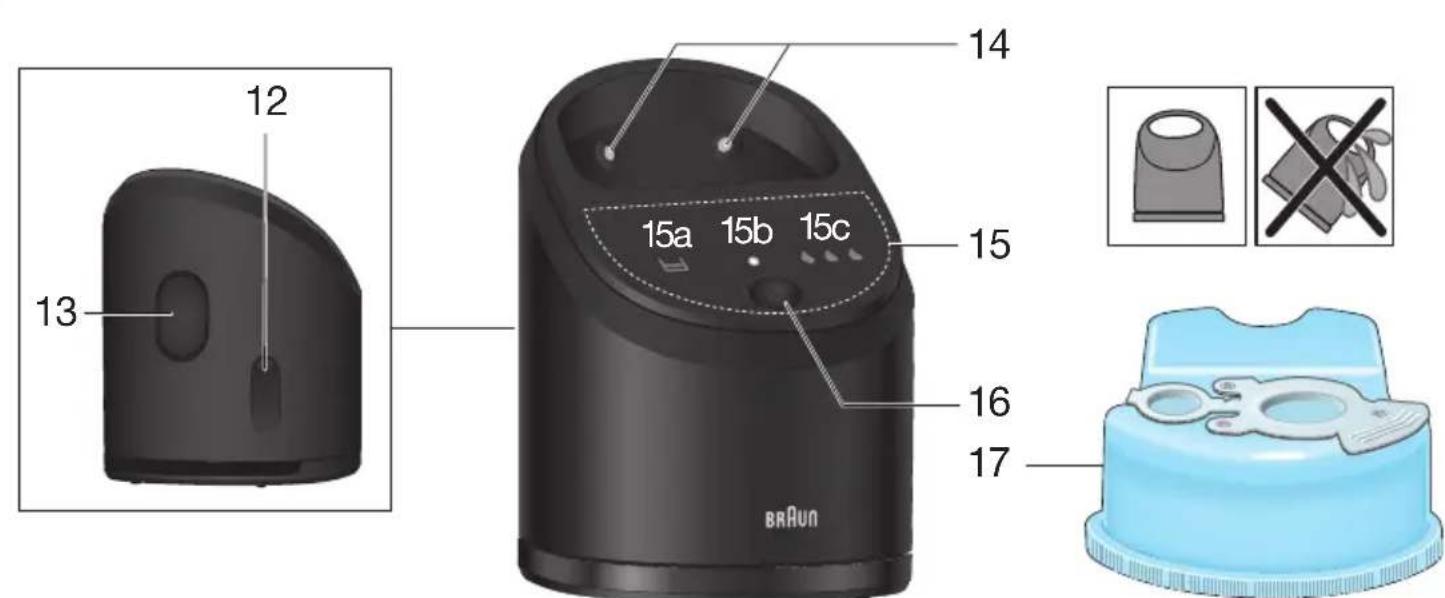
12 Station power socket 13 Lift button for cartridge exchange 14 Station-to-shaver contacts 15 Clean&Charge Station display 15a Level indicator 15b Status light 15c Cleaning program indicator 16 Start button 17 Cleaning cartridge
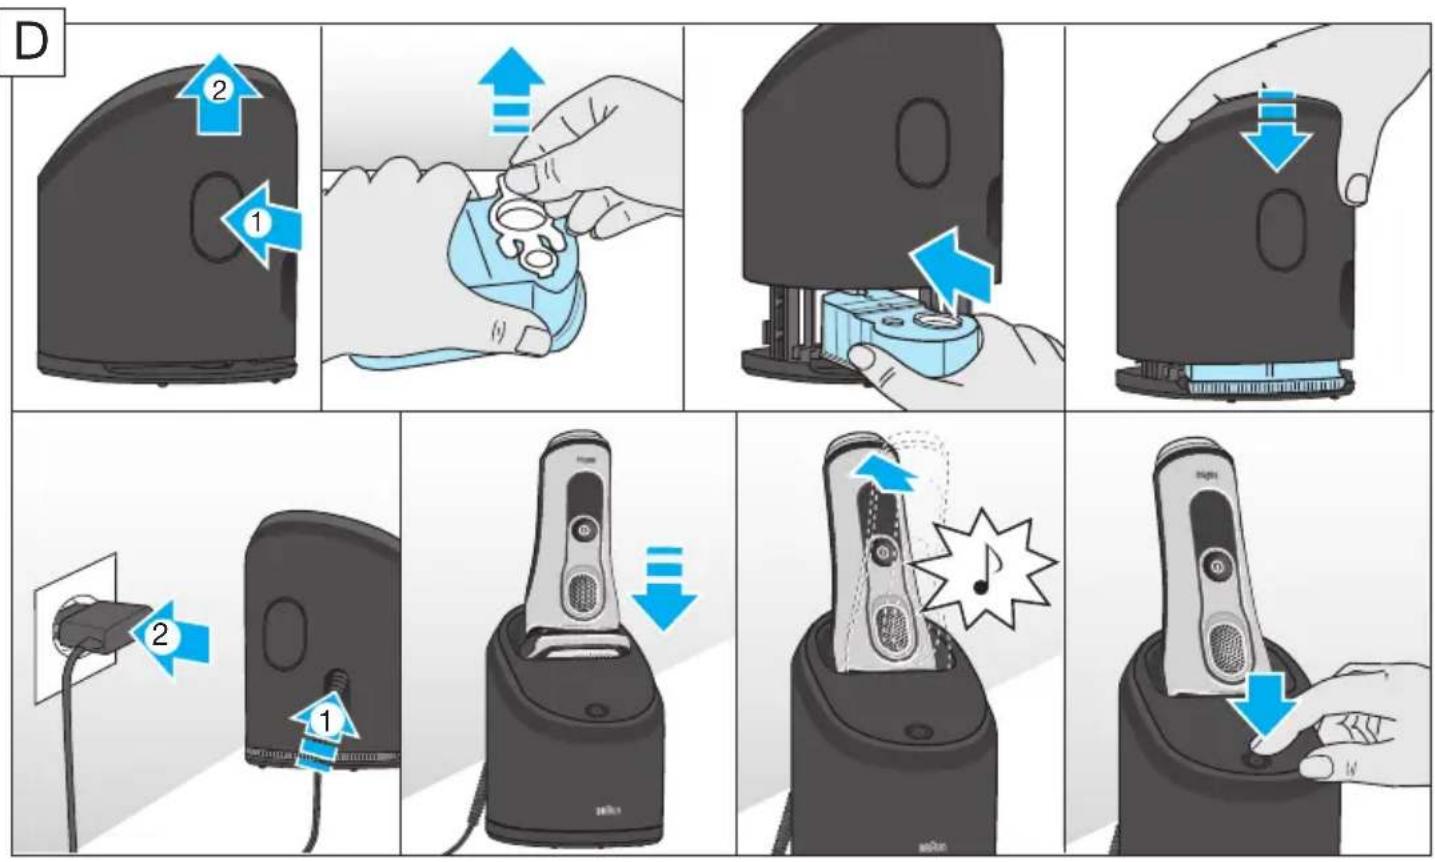
Installing the Clean&Charge Station (see fig. D)
- Press the lift button (13) at the rear side of the Clean&Charge Station to lift up the housing.
- Hold the cleaning cartridge (17) down on a flat, stable surface (e.g. table).
- Carefully remove the lid from the cartridge.
- Slide the cartridge from the rear side into the base of the station until it snaps into place.
- Slowly close the housing by pushing it down until it locks.
- Connect the station to an electrical outlet by snapping the special cord set (10) into the power socket (12).
Charging the shaver in the Clean&Charge Station (see fig. D)
Insert the shaver head with the front showing and released head lock into the cleaning station. Important: The shaver needs to be dry and free from any foam or soap residue!
The contacts (7) on the back of the shaver need to align with the contacts (14) in the station. Push the shaver into the correct position. A beep sound confirms that the shaver sits properly in the station. Charging will start automatically.
Cleaning the shaver (see fig. D)
When the cleaning indicator ♠ lights up in the shaver display, insert the shaver into the Clean&Charge Station, as described above, and press the start button (16).
The hygiene status will be analyzed and is shown by the cleaning program indicators (15c) in the Clean&Charge Station display.
If the status light (15b) does not shine (the Clean&Charge Station switches to stand-by after about 10 minutes), press the start button twice. Otherwise, cleaning will not start. For best shaving results, we recommend cleaning after each shave.
The cleaning process consists of several cycles, in which cleaning fluid is flushed through the shaver head. Depending on the program selected, the cleaning time takes up to 3 minutes, followed by an active drying phase of about 40 minutes, during which a fan is running.
Afterwards, charging will resume, which is indicated in the shaver display. When the shaver is fully charged, the display turns off.
Cleaning programs
Short economical cleaning, normal level of cleaning, high intensive cleaning
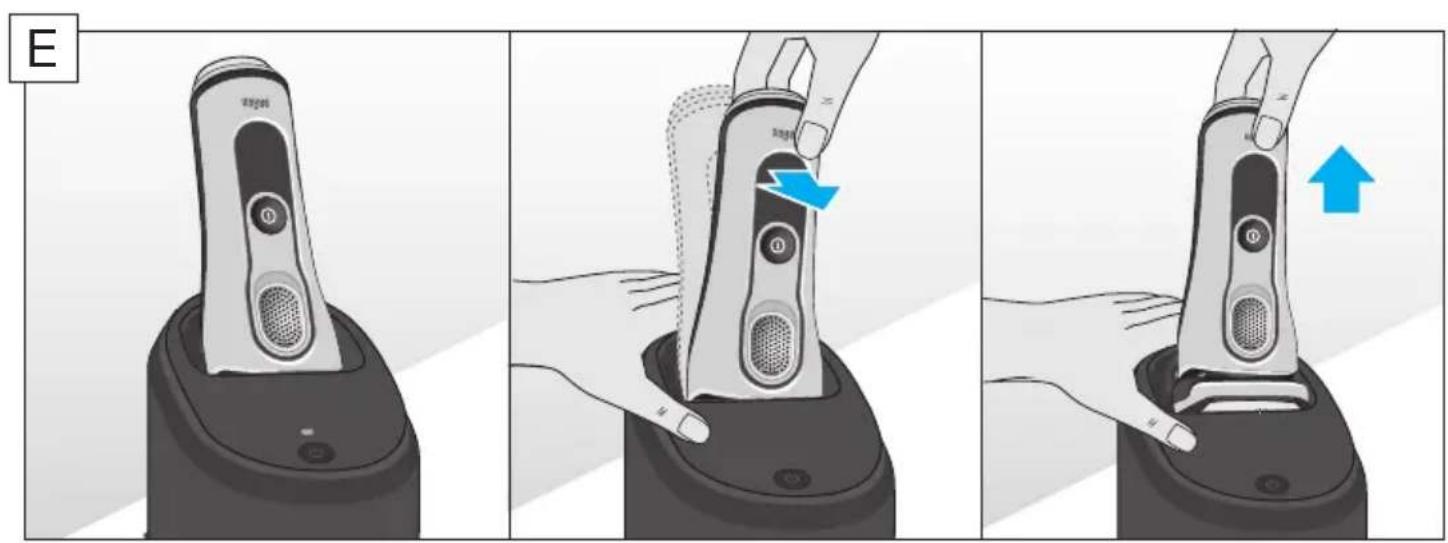
Removing the shaver from the Clean&Charge Station (see fig. E)
Hold the Clean&Charge Station with one hand and tilt the shaver slightly to the front to release it.
Cleaning Cartridge / Replacement (see fig. F)
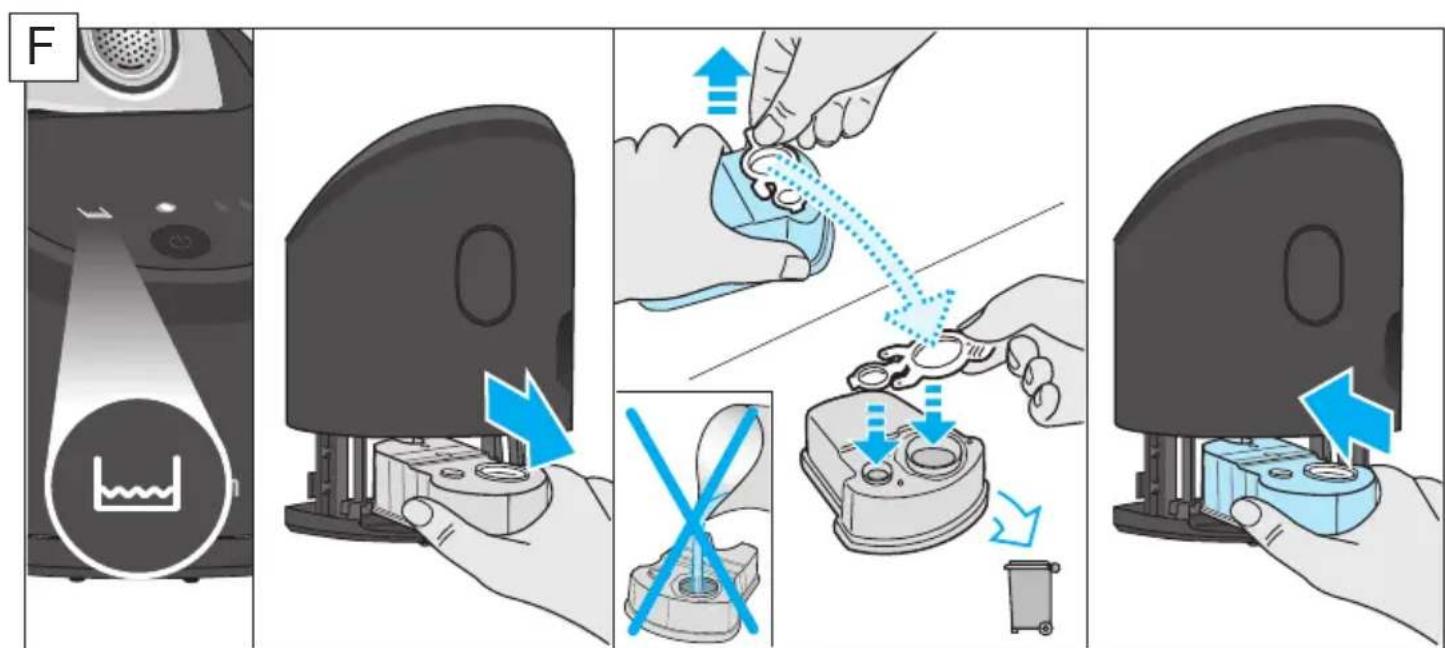
When the level indicator ≡ (15a) lights up permanently red, the remaining fluid in the cartridge is sufficient for about 3 more cycles. When the level indicator blinks red, the cartridge needs to be replaced (about every 3 weeks when used daily).
After having pressed the lift button (13) to open the housing, wait for a few seconds before removing the used cartridge to avoid any dripping. Before discarding the used cartridge, make sure to close the openings using the lid of the new cartridge, since the used cartridge will contain contaminated cleaning solution.
The hygienic cleaning cartridge contains ethanol or isopropanol (specification see cartridge), which once opened will naturally evaporate slowly. Each cartridge, if not used daily, should be replaced after approximately 8 weeks to ensure optimal disinfection. The cleaning cartridge also contains lubricants for the shaving system, which may leave residual marks on the outer foil frame and the cleaning chamber of the Clean&Charge Station. These marks can be removed easily by wiping gently with a damp cloth.
Accessories
Braun recommends changing your shaver's Foil & Cutter cassette every 18 months to maintain your shaver's maximum performance.
Available at your dealer or Braun Service Centres:
- Foil & Cutter cassette: 92S/92B
- Cleaning cartridge Clean&Charge Station: CCR
- Braun Shaver cleaner spray
Environmental notice
Product contains batteries and/or recyclable electric waste. For environment protection do not dispose of in household waste, but for recycling take to electric waste collection points provided in your country.
The cleaning cartridge can be disposed of with regular household waste.
Subject to change without notice.
For electric specifications, see printing on the special cord set.
Guarantee
We grant a 2 year guarantee on the product commencing on the date of purchase. Within the guarantee period we will eliminate any defects in the appliance resulting from faults in materials or workmanship, free of charge either by repairing or replacing the complete appliance at our discretion.
This guarantee extends to every country where this appliance is supplied by Braun or its appointed distributor.
This guarantee does not cover: damage due to improper use, normal wear and tear (e.g. shaver foil or cutter block) as well as defects that have a negligible effect on the value or operation of the appliance. The guarantee becomes void if repairs are undertaken by unauthorised persons and if original Braun parts are not used.
To obtain service within the guarantee period, hand in or send the complete appliance with your sales receipt to an authorised Braun Customer Service Centre (address information available online at www.service.braun.com).
For UK only:
This guarantee in no way affects your rights under statutory law.
Trouble-Shooting
Problem: Possible reason: Remedy:
| SHAYER | ||
| Shaver does not start when pressing the start button. | 1. Travel lock is activated. 2. This appliance can only be operated cordless. | 1. Press the on/off switch for 3 seconds to unlock the shaver. 2. Unplug the shaver. |
| Shaver does not charge completely and keeps blinking. | Ambient temperature is out of valid range. | Recommended ambient temperature for charging is 5 °C to 35 °C. |
| Charging does not start when connected to power socket or put in Clean&Charge Station. | 1. Shaver is not placed properly in the Clean&Charge Station. 2. Sometimes charging could start delayed (e.g. after long storage). 3. Ambient temperature is out of valid range. 4. Special cord set is not plugged in properly. | 1. Contacts of shaver need to align with contacts in the Clean&Charge Station. 2. Wait a few minutes, if charging will start automatically. 3. Recommended ambient temperature for charging is 5 °C to 35 °C. 4. Special cord set needs to snap into place. |
| Unpleasant smell from the shaver head. | 1. Shaver head is cleaned with water. 2. Cleaning cartridge is in use for more than 8 weeks. | 1. When cleaning the shaver head with water only use hot water and from time to time some liquid soap (without abrasive substances). Remove Foil & Cutter cassette to let it dry. 2. Change cleaning cartridge at least every 8 weeks. |
| Battery performance dropped significantly. | 1. Shaver head is regularly cleaned with water but not lubricated. 2. Foil and cutter are worn which requires more power for each shave. | 1. If the shaver is regularly cleaned with water, apply a drop of light machine oil on top of the foil once a week for lubrication. 2. Replace Foil & Cutter cassette. |
| Shaving performance dropped significantly. | 1. Shaving system is clogged. 2. Foil and cutter are worn. | 1. Soak the Foil & Cutter cassette in hot water with a drop of dish liquid. Afterwards rinse it properly and tap it out. Once dry apply a drop of light machine oil on the foil. 2. Replace Foil & Cutter cassette. |
| Shaver turns off with fully charged battery. | Foil and cutter are worn which requires more power than the motor can deliver. The appliance turns off. | - Replace Foil & Cutter cassette. - Regularly oil the shaving system, especially when cleaning with water only. |
| Shaver head is damp. | 1. Drain of the Clean&Charge Station is clogged. 2. Cleaning cartridge has been used for quite a while. | 1. Clean the drain with a wooden toothpick. 2. The ethanol/isopropanol proportion has decreased while the oil proportion has increased. Remove residue with a cloth. |
CLEAN&CHARGE STATION
| Cleaning does not start when pressing the start button. | 1. Shaver is not placed properly in the Clean&Charge Station. 2. Cleaning cartridge does not contain enough cleaning fluid (level indicator blinks red). 3. Appliance is in stand-by mode. | 1. Insert shaver into the Clean&Charge Station (contacts of the shaver need to align with contacts in the station). 2. Insert new cleaning cartridge. 3. Press start button again. |
| Increased consumption of cleaning fluid. | Drain of the Clean&Charge Station is clogged. | - Clean the drain with a wooden toothpick. - Regularly wipe the tub clean. |
Station Clean&Charge
Station Clean&Charge
Installing the Clean&Charge station (see fig. D)
Remove the shaver from the Clean&Charge station (see fig. E)
Stanice Clean&Charge
Stanice Clean&Charge
Jedinica Clean&Charge
To avoid leakage of cleaning fluid, place the Clean&Charge unit on a flat, stable surface. Do not tilt, move suddenly, or relocate the unit in any way if a cleaning cartridge is inserted, as this could cause spillage of the fluid. Do not store the unit in a bathroom cabinet or on polished or lacquered surfaces.
ELMIN, 48350, Durdevac, R. Boškovića 20,
048813365
MAGREL vl. Grković Marko, 51211, Rijeka / Matulji,
Frana Supila 11, 095 911 0009
RTV SERVIS KALAICA, 34310, Pleternica,
A.M. Relkovića 6, 034 252 000
SORIC ELEKTRONIKA, 44000, Sisak,
A. Starčevića 35, 044 549 117
MERC & DUJMOVIĆ, 21000, Split,
Alojzija Stepinca 6, 021 537 780
ELEKTRO OBRT MARKOVIC, 42000,
Varaždin, K. Filica 9, 042 210 588
ALTA, 23000, Zadar, Vukovarska 3c,
023 327 666
RJEŠAVANJE PROBLEMA
| Problem Muguči razljag Rješenje | ||
| APARAT ZA BRIJANJE | ||
| Urežaj se ne uključuje kada se pritisne njegov prekidač. | 1. Uključeno je putno zakljacavanje.2. Iz sigurnosnih razloga urežaj se možePokretenuti isklučivo kada nije spojen na priključni kabel. | 1. Pritisnite prekidač za uključivanje/isključivanje i držite ga tak 3 sekunde kako bist otključali urežaj.2. Iskopćajte priključni kabel. |
| Urežaj se ne puni do kraja i stalno bljeska. | Temperatura okoliša je izvan dopuštenog raspona. | Preporučena temperatura okoliša za punjenje je izmedu 5 °C i 35 °C. |
| Punjenje ne započinje kada je urežaj uključen u struju ili postavljen u Jedinicu Clean&Charge. | 1. Urežaj nije pravilno postavljen u Jedinicu Clean&Charge.2. Ponekad punjenje moze započeti malo kasnije (npr. ak so urežaj dugo nije koristio).3. Temperatura okoliša je izvan dopuštenog raspona.4. Posebni priljični kabel.nije pravilno spojen. | 1. Kontakti aparata za brijanje trebaju bitu i istoj razini s kontaktima na jeginici Clean&Charge.2. Pričekajte nekoliko minuta da vidite hoće li punjenje automatski započeti.3. Preporučena temperatura okoliša za punjenje je izmedu 5 °C i 35 °C.4. Posebni priključni kabel treba sjesti na svoje mjesto. |
| Neugodan miris brijace glave. | 1. Brijaca glava je Čišćena pod vodom.2. Patrona sa sredstvom za Čišćenje koristi se duže od 8 tjedana. | 1. Kada brijacu glavu Čišite vodom, koristite isklučivo vruću vodu i povremeno malo tekućeg sapuna (bez abrazivnih sastojaka). Skinite kazetu mrežice i bloka noža i pustite da se osuši.2. Zamijenite patronu sa sredstvom za Čišćenje barem svakih 8 tjedana. |
| Značajno lošiji rad baterije. | 1. Brijaca glava se redovito Čiesti vodom, ali se ne podmazuje.2. Mrežica i bloc noža su istrošeni pa urežaj troši više energije za svako brijanje. | 1. Ako se urežaj redovito Čiesti pod vodom, Jednom t Jedno u svruho podmazivanja nanesite kap mašinskog ulja na vrh mrežice.2. Zamijenite kazetu s mrežicom i blokom noža. |
| Primjetno lošiji rezultati brijanja. | 1. Brijaci sustav je zašopan.2. Mrežica i bloc noža su istrošeni. | 1. Ostavite kazetu s mrežicom i blokom noža da se nameće u vrućoj vodi, pa je nakon toga dobro isperite i tapkanjem o ravnu površinu izbacite zaostale dlacice i kapi vode. Kada se osuši, na mrežicu nanesite kap mašinskog ulja.2. Zamijenite kazetu s mrežicom i blokom noža. |
| Urežaj se isključuje iako mu je baterija u potpunosti napunjena. | Mrežica i bloc noža su istrošeni pa urežaj troši više energije za svako brijanje. Urežaj se isključuje. | - Zamijenite kazetu s mrežicom i blokom noža. - Redovito podmazujte brijaci sustav, pogotovo ak se urežaj Čiesti isklučivo pod vodom. |
| Brijáça glava je vlžna. | 1. Odvod jedinice Clean&Charge je zašopan.2. Patrona sa sredstvom za Čišćenje se koristi već dulje vrijeme. | 1. Očistene odvod drvenom Čačkalicom.2. Smanjio se omjer etanola/izopropanola, a povećao omjer ulja. Naslage ulkonite krpom. |
| JEDINICA CLEAN & CHARGE | ||
| Iako je prekidačza početak rada pritisnut, Čišćanje ne započinje. | 1. Aparat za brijanjeicates postavljen u Jedinicu Clean&Charge na pravilan način.2. Patrona za Čišćanje nemo dovoljno tekuciene (nazaslonu bljeska crveno).3. Urežaj je u načinu rada «Čekanje» (stand-by). | 1. Uložite aparat za brijanje u Jedinicu Clean&Charge i pritisnite stržnju stranu jeginice (kontakti aparata za brijanje trebaju biti u istoj razini s kontaktima na jeginici).2. Stavite novu patronu za Čišćanje.3. Ponovno pritisnite prekidačza početak rada. |
| Povećana potrošnja tekuciće za Čišćanje. | Odvod jedinice Clean&Charge je zaštopan. | - Očistite odvod drvenom Čačkalicom. - Redovito krpicom uklanjajte ostatke. |
Slovenski
Our products are designed to meet the highest standards of quality, functionality, and design. We thank you for your trust in Braun quality and hope you will enjoy your new Braun shaver.
Clean&Charge station
To prevent the cleaning fluid from leaking, make sure the Clean&Charge station is placed on a horizontal surface. When the cleaning cartridge is inserted, do not press, do not tilt suddenly, or transport the station in any way, as the cleaning fluid may spill. Do not place the station near the edge of a bathtub or place it on a wet or damp surface.
Do not refill the cartridge. Use only original Braun refill cartridges.
Shaving unit
1 Foil protector 2 Release button for the shaver head 3 Locking button for the shaver head (MultiHeadLock) 4 On/off button 5 Display of the shaving unit (design may vary) 6 Trimmer for long hair 7 Contact zone of the shaving unit with the station 8 Release button for the trimmer for long hair 9 Power socket 10 Special cord (design may vary) 11 Charging stand
First use and charging
Connect the shaving unit to the mains via the special cord (10) into the power socket (9), or for CC models via the Clean&Charge station (see chapter 'Clean&Charge station').
Charging and basic information for use
- For the first charge, charge continuously for 1 hour.
- A full charge provides 50 minutes of cordless operation. This may vary depending on the beard growth and the ambient temperature.
- The recommended charging temperature is between 5°C and 35°C. The battery may not charge properly or may not charge at all at extremely low or high temperatures.
- Do not expose the appliance to temperatures higher than 50°C for any period of time. When the shaving unit is connected to the mains, it may take a few minutes until the display lights up.
Display of the shaving unit
The display is on the charger.
The display on the charger (5) shows the charging status of the battery when it is connected to the electrical contact:
- During charging, the corresponding segments of the battery will flash. When the battery is fully charged, all segments light up for a few seconds, then turn off.
Low battery
Low battery indicator: The low battery indicator lights up when the battery is low. You must be able to close the flap. Turning off the charger sound signal reminds you of a low battery.
The last 9 minutes of remaining charging time are displayed in digits (depending on your model/display).
Cleaning status
The cleaning indicator lights up when the charger needs to be cleaned in the Clean&Charge station.
Locking for travel
The locking symbol lights up when the charger has been locked to prevent unintentional starting of the motor (e.g., for storage in a cupboard).
Using the charger (see Fig. A)
Press the on/off button (4) to switch on the charger.
Light for perfect dry shaving
- Shave before washing your face. 2. Hold the charger at a right angle (90°) to your skin.
- Moisten the skin and shave in the opposite direction of the hair growth.
MultiHeadLock trimmer (lock on head)
For trimming hard-to-reach areas (e.g., under the nose), use the MultiHeadLock trimmer (3) on the head to lock the head of the self-trimmer. The head of the self-trimmer can be locked in five positions. To change the position, turn the head of the self-trimmer back or forward until it clicks into place. It will automatically lock in the next position.
For automatic cleaning in the Clean&Charge station, the locking of the head must be released.
Example for trimming sideburns
To trim sideburns, mustache, or beard, press the release button (8) and pull the trimmer for sideburns (6) upwards.
Locking for travel
- Activation: The self-trimmer locks via holding the on/off button (4) for three seconds. This is confirmed by an acoustic signal and a lock symbol on the display. Then the display switches off.
- Deactivation: The self-trimmer unlocks by holding the on/off button again for three seconds.
Cleaning the self-trimmer (see fig. B/C)
Clean&Charge station
The Clean&Charge station is designed for cleaning, charging, lubricating, disinfecting, and storing your Braun self-trimmer.
12 Release button for the station 13 Raising button for changing the cassette 14 Contact zones of the station to the self-trimmer 15 Display of the Clean&Charge station 15a Charge level indicator 15b Status indicator 15c Cleaning program indicator 16 Start button 17 Cleaning cassette
Mounting the Clean&Charge station (see fig. D)
- Press the raising button (13) at the back part of the Clean&Charge station to raise the housing. Place the cleaning cassette (17) on a flat, stable surface (e.g., a table). Carefully pull the cable out of the cassette.
- Slide the cassette from the back side towards the base of the station until it clicks into place.
- Close the housing cover and press it down until it locks.
- Connect the electric razor
- via the special cable (10) into
- the charging socket (12).
Charging the shaver in the Clean&Charge station (Fig. D)
Place the shaver head with the
front part facing the open locking mechanism in the station.
Important: The shaver must be dry and free of hair or soap residue!
The contact zones (7) on the front part of the shaver must align with the station contacts (14). Press the shaver into the correct position. An audible signal confirms that the shaver is correctly seated in the station. Charging will begin automatically.
Cleaning the shaver (Fig. D)
When the cleaning indicator lights up on the display of the shaver, place the shaver in the Clean&Charge station as described above, and press the start button (16).
The cleaning status is analyzed and indicated by the program indicators for cleaning (15c) on the display of the Clean&Charge station.
If the status indicator (15b) does not light up (the Clean&Charge station switches to standby mode after 10 minutes), press the start button again. Otherwise, cleaning will begin. For best results when shaving, it is recommended to clean after every shave.
Each cleaning process consists of several cycles, during which the cleaning fluid passes through the shaver head. Depending on the selected program, the cleaning program takes up to 3 minutes, followed by an active drying phase of about 40 minutes, during which the fan operates.
Then charging will resume, as indicated on the display of the shaver. When the shaver is fully charged, the display turns off.
Procedure for filling
Brief description of the normal filling level and high-intensity filling
Removing the self-cleaning station from the stand (Fig. E)
Hold the Clean&Charge station with one hand and tilt the self-cleaning station slightly forward to release it.
Filling cassette / Signal (Fig. F)
When the filling level indicator (15a) lights up continuously in red, the remaining liquid in the cassette is sufficient for about 3 cycles. When the filling level indicator flashes in red,
the cassette must be replaced (approximately every 3 months if used daily).
After you have pressed the release button (13) to open the housing, wait a few seconds before removing the used cassette to avoid dripping. Before removing the used cassette, make sure you have closed the opening using the cap from the new cassette, so that the used cassette will not spill cleaning solution.
Fill the cleaning cassette with original Braun cleaning solution (see cassette for specifications), which should be replaced as soon as the indicator lights up. Each cassette, if not used daily, should be replaced after 3 months to ensure optimal disinfection. The cleaning cassette also contains lubricant for the brush system, which may leave residues on the upper frame of the cleaning chamber of the Clean&Charge station. These residues can be removed easily by careful wiping with a damp cloth.
Accessories
Braun recommends replacing the foil and razor block of the self-cleaning station every 18 months to maintain maximum performance and productivity.
Available at your retailer or at Braun Service Centers:
- Foil and razor block 92S/92B - Cleaning cartridge for Clean&Charge station: CCR - Cleaning cartridge for Braun self-cleaning station
Environmental protection
In order to protect the environment, when the product is no longer in use, dispose of the batteries separately in specially designated containers, collection points, or at a Braun Service Center.
The appliance must not be disposed of in the container for mixed household waste, as this may contain heavy metals, difficult-to-separate refractory materials, and other substances that are hazardous and have serious consequences for the environment. - Follow the information for possible reuse or other data for recycling of the appliance at the end of its use of electrical and electronic equipment.
The appliance may be disposed of with household waste.
Subject of the offer without engagement.
For electrical specifications, refer to the special cable.
Warranty
Our products have a warranty of 2 years, counted from the date of purchase. Within the warranty period, defects in materials and workmanship are repaired free of charge through repair, replacement of parts, or replacement of the entire device, at the discretion of the service centers. This warranty is valid in all countries where your device and its authorized distributor sell this device, or within the limits for use or household use, without restricting the performance of the required warranty service.
The warranty does not cover: damage from incorrect use (operation at inappropriate voltage, connection to an inappropriate electrical power source, dropping); wear and tear and minor defects that do not affect the normal operation of the device. The warranty is not recognized for repair of the device by unauthorized persons unless they have used original spare parts of the device. The warranty is valid when properly filled in: date of purchase, stamp, and signature on the warranty card.
For any claims arising within the warranty period, send the device along with its warranty card to the nearest service of the device. For information, call 0800 11 003 - national telephone for service without charge, or visit www.bgs.bg.
Recommendations for dry shaving
- Always shave on dry skin.
- Always hold the shaver at a right angle (90°) to the skin.
- Stretch the skin and move the shaver in the direction opposite to hair growth.
The cassette can be installed on either side. This does not affect the shaving quality.
Cleaning indicator
The cleaning indicator shows the need to clean the shaver using the cleaning device and the Clean&Charge station.
Locking mode
The lock indicator lights up when the device is locked to prevent accidental activation (e.g., in a suitcase).
Device operation (see figure A)
To turn the device on/off, set the switch (4) to the appropriate position.
Recommendations for dry shaving
1. Turn on the device. 2. Hold the device at a right angle (90°) to the skin. 3. Gently stretch the skin and move the device against the direction of hair growth.
Fixing the shaving head
For hard-to-reach areas (e.g., nose), move the locking button of the pivoting shaving head (3) to the lower position for locking the head. The shaving head can be locked in one of five positions. To change the position, take the head with two fingers and tilt it in the desired direction. During the transition to the next position, a characteristic click is heard.
For automatic cleaning using the cleaning station and Clean&Charge, it is necessary to remove the locking of the head position.
Trimmer for long hair
To trim sideburns, mustache, and beard, press the trimmer release button and move the trimmer to the upper position.
Locking mode
Activation: Locking is activated by pressing and holding the on/off button (4) for 3 seconds. On the display, you will see a lock symbol. After a few seconds, the display turns off. Deactivation: Locking is deactivated by pressing and holding the on/off button again for 3 seconds.
Device cleaning (see figure C)
Cleaning under running water
- Rinse the brush head (without using detergent) and shake off the water under running water. You can also use a mild soap without abrasive additives. Apply soap to the bristles and leave the brush head immersed for a few seconds. Rinse the brush head and press the release button (2). Remove the cassette (brush head + shaver block) (1) and rinse it under running water.
- For regular cleaning of the brush head under running water, it is necessary to apply a drop of machine oil to the upper part of the cassette (brush head + shaver block) once a week.
It is necessary to clean the razor head with water.
Cleaning with the brush
Remove the brush head. Remove the cassette (brush head + shaver block) (1) and place it on a flat surface. With the help of the brush
Clean the inner surface of the shaver head of the brush. Do not damage the cassette with the brush, as this may damage it.
The cassette can be installed on either side. This does not affect the shaver head.
Clean & Charge cleaning and charging system
The Clean & Charge cleaning and charging system is specially designed for cleaning, charging, lubricating, disinfecting, rinsing, and storing Braun shavers.
Description and scope of delivery
12 Power cord socket 13 Release button for changing the cartridge 14 Contact terminals for placing the shaver 15 Dispenser of the Clean & Charge cleaning and charging system 15a Charge level indicator 15b Status indicator 15c Cleaning program indicator 16 On/off button 17 Cleaning cartridge
Installing the Clean & Charge charging and cleaning system (see figure D)
Press the release button for changing the cartridge (13) on the side of the charging and cleaning station and lift the housing cover. - Place the cleaning cartridge on a flat, stable surface (e.g., a table). - Carefully remove the cover from the cartridge. - Gently insert the cartridge into the base of the device until it stops. Lower the housing cover until it clicks into place. - Connect the device to the power outlet using the special power cord (10) via the power socket (12).
Charging the shaver using the Clean & Charge charging and cleaning station (see figure D)
Place the shaver head down, after removing the protective cap, into the cleaning and charging station. Note: The shaver must be dry and completely free of soap residue or foam.
Connect the contacts (7) on the bottom side of the brush with the contacts (14) on the charging device. Install the brush in the required position. Check the correct installation of the brush.
On the charging and cleaning device Clean&Charge, the installation is confirmed by an audible signal. Charging starts automatically.
Cleaning the brush (see figure D)
When the indicator on the back of the brush lights up, place the brush on the charging and cleaning device Clean&Charge as described above and press the "Start" button (16).
The charging and cleaning device Clean&Charge controls the level of contamination of the brush; the result is displayed by lighting one of the indicators (15c) after the cleaning program.
If the status indicator (15b) does not light up (the charging and cleaning device Clean&Charge switches to standby mode after 10 minutes of inactivity), press the start button. Otherwise, the brush will not be cleaned. For the smoothest results, it is recommended to clean the brush immediately after use.
Each cleaning program consists of several cycles, during which the cleaning solution is passed through the brush head. The complete cleaning program takes up to 3 minutes, and the subsequent active drying phase, during which the fan runs, takes approximately 40 minutes.
After cleaning, the charging process begins; after its completion, the device switches off automatically.
Recommendations
Economical, short cleaning | Normal cleaning | Intensive cleaning
Removing the brush from the cleaning and charging device Clean&Charge (see figure E)
Hold the cleaning and charging device Clean&Charge with one hand, with the other hand slightly tilt the brush towards you.
Cleaning cartridge / replacement (see figure F)
When the cleaning solution level indicator (15a) lights up red, it means that the cleaning solution in the cartridge is almost used up, with about 3 cleaning cycles remaining. When the indicator starts flashing red, the cartridge must be replaced (after about 3 weeks of regular use).
Press the release buttons (13) and hold them for a few seconds before removing the cartridge, avoiding spillage. Before inserting a new cartridge, close its opening with the cap.
Cartridges, depending on how they are used, contain hygienic substances.
The sanitary installation and cartridges contain a liquid that must be evaporated after opening. If the device is not used, it is necessary to disinfect and replace the cartridges approximately once every 2 months. The cartridges also contain magnetic materials that may be deposited on the outer surface of the device after the procedure and in the device slots for cleaning and charging. They can be easily removed with a damp cloth.
Accessories
Braun recommends replacing the cassette (foil and cutter block) at least once every 18 months or more often for optimal results.
Available at retail outlets:
- Cassette (foil and cutter block): 92S/92B. Cleaning cartridge for the Clean&Charge station: CCR. Cleaning spray for Braun shavers
Environmental protection information
The product contains batteries and/or electronic waste that must be recycled. To protect the environment, do not dispose of it with household waste. Recycling can be carried out at collection points for electronic waste in your country.
Possible change of this design without prior notice
Information about electrical specifications is indicated on the rating plate.
Braun electric shaver type 5791 with power supply type 492-XXXX and cleaning system Clean&Charge type 5425.
If the device (shaver) is marked with the number 492, it can be used with any Braun power supply marked with the code 492-XXXX.
Detailed information for product identification is provided on the product itself, specifically on the label with its technical data.
Always use only the set of accessories that comes with your device.
100-240 volts, 50-60 hertz, 7 watts
Procter & Gamble Manufacturing GmbH, Waldstrasse 9, D-74731 Walldurn, Germany.
Manufacturer in Ukraine: TOV «Procter & Gamble Ukraine», Ukraine, 04070, Kyiv, str. Naberezhno-Khreshchatyk, 5/13, building IT.A. Tel. (0-800) 505-000. www.pg.com.ua
The production date is indicated in the form of a 3-digit code on the body, next to the technical type of the product: the first digit = the last digit of the year, the next 2 digits = the serial number of the week of the year of production. For example, code «345» means that the product was produced in the 45th week of 2013.
Warranty period/Service period - 2 years.
Additional information about Braun service centers in Ukraine can be obtained by phone on the hotline, as well as on the service portal of the manufacturer on the Internet - www.service.braun.com
The device complies with the requirements of the technical regulations for the safe use of electrical and electronic equipment.
Manufacturer's warranty obligations
For all products, we provide a warranty for two years, starting from the moment of acceptance of the product or from the date of its production, in case of absence or improper execution of the warranty card and receipt.
During the warranty period, we will free of charge eliminate defects caused by insufficient quality of materials or assembly by repairing, replacing parts or replacing the entire product.
If repair is impossible during the warranty period, the product may be replaced with a new one or an equivalent one in accordance with the law of Ukraine «On Protection of Consumer Rights».
The warranty comes into force from the date of purchase, which is confirmed by the stamp and signature of the seller (store) on the warranty card or on the last page of the operating instructions for Braun, which can also be a warranty card. The warranty is provided by the representative of the manufacturing company or an authorized distributor, and their obligations do not limit or otherwise affect the provision of warranty service.
The warranty replacement of parts ends at the moment of the end of the warranty for this product.
The warranty does not cover the following cases: damage caused by improper use, normal wear of parts (e.g., blades for the shaver or the shaving block), defects that have no significant impact on the quality of the device's operation. The warranty is void if the repair is carried out not by an authorized service center or if non-original spare parts of the manufacturer are used.
The service life of Braun products is equal to the warranty period of two years from the moment of purchase or from the moment of production, if the date of sale cannot be established.
The warranty is presented under the conditions of this warranty. Please make the selection in full compliance with the description of the original operating instructions together with the warranty coupon at the authorized service center, which is the officially authorized representative of the manufacturer's company.
All other claims, together with claims for damages due to wear and tear, are excluded, unless liability is established by law.
The warranty does not cover: - Defects caused by force majeure or circumstances; - Use for professional purposes or for profit; - Violation of operating instructions; - Incorrect installation of other accessories (if required); - Making technical modifications; - Mechanical damage; - Devices that operate on batteries - work with unsuitable or defective batteries, any damage caused by defective or leaking batteries; - Damage caused by animals, rodents, and insects (including in cases where rodents and insects are found inside the device); - Torn or broken mesh.
Attention! The warranty coupon is issued upon contact with the service center with a request for warranty repair. After the
After the repair, the warranty coupon will be considered fulfilled with the original repair list with the stamp of the service center and the consumer's signature on receipt of the repaired product. The warranty period is extended for the time during which this product was in the service center for repair.
In case of questions regarding warranty and post-warranty service, please contact the information service of the manufacturer's representative in Ukraine.
Hotline phone: 0 800 505 000. Calls from Ukraine from landline numbers are free. Calls from mobile phones are paid according to the tariffs of the corresponding operator.
You can also get initial information at the manufacturer's service portal on the Internet: www.service.braun.com
Problem: Possible cause: Remedy:
| БРИТВА | ||
| БрИТВа не ВИКа-étбя при наимс-kanні на кноку ВИКанн. | 1.УвIMКено блokувань.2.Дани писчий може 6утBNOKOPUCTANO тлькВ в abTOHOMHOMу реким. | 1.Нати检пь i утprimуто Кноку ВИК.ВИМК.Протягом 3 секунд дя 3нятублokувань.2.ВidknючьбрИТВВID eLEKTPOMepeхi. |
| БрИТВа не зараджа-étбя повпicitю,indankatopбатеipinoiodobxуьблимати. | Temnéраразуна habkoшьогocerepondицвixodmitьзмexdiOnyctmOrO diana3ohy. | Опtmальни дIANa3OH Temnepaуру nobITryдязардкьбрИТВВID 5°Cdo 35°C. |
| БрИТВа не зараджа-étбя,песьваочиВп prisстpoДдяошенияТПДЗAPДК Clean&ChargeaboodyuHbOуBbOуBaHcN BvPcStpoДдяошенияТПДЗAPДКClean&Charge.2.YdeякхВипадкх зардkaMOKE початся 3Затрм-ю(hanp.,nicla TrpbaloroNeBVKOPrstahnhy).3.Temnéраразуна habkoшь-нboro cepepondиьзмexdiOnydmoDДAna3Ohy.4.Cseцалынй komплektproponodibinigkIouchenHy. | 1.БрИТВа неrelapabilnoBbCTANOBJIeBAHbVprstpoДдяошенияТПДЗAPДКClean&Charge.2.Зачakай Te KIBkaXBVIlnH, moxльо,зардkapo3nocheTбСАВOTAMtUHNo.3.Oпtmальни дIANa3OH Temnepaуру nobITpyдязардкьбрИТВВID 5°Cdo 35°C.4.HeobxdiHo HANEXHM CHINOM iNDKIIQUHTN prpoBID eLEKTPoKwBInelHny. | |
| Вд rolівкибрИТВВidчувсьсянелпимпзлар. | 1.ГолikубкбрИТВЧИSTЯвою.2.Oчшьvalьни карtrpvdkBVKOPrstovbYte bILSOA,ale He 3mauzyotb.2.ЗнocCitOKндяroliHnyipixchuro6LOky,soBVMarae6Ilbwoi kIlkbokci eLEKTPoe-hepriДдяroliHny. | 1.Pri npommbanhi roJILBKn Brkivn BHKOPrstO-byte TlBKn rapiyu BOdy,perioDnHBOVKOPrstOBuyte piJke MInlo 6ez a6pa3HNHIXkomnoentlb. BID'ednaite kacety (citOKy dlya roJInHra ta pIXyUn6LoK) i npocuyitb II.2.MiHoiTe oChuSyBaBHykIkprrudxHe peIdSe1p3ay na 2MiaCui. |
| Якstь роботиakymул�торib pi3koBnala. | 1.ГолikубкбрИТВЧИSTЯвоюпrommbanhi prommbaETBOYO,ale He 3mauzyotb.2.ЗнocCitOKндяroliHnyipixchuro6LOky,soBVMarae6Ilbwoi kIlkbokci eLEKTPoe-hepriДдяroliHny. | 1.YakuBuPeruglyho prommbaete 6pRITBy niDpotoCHIO BOVO,3Mauzyute kpanleU CBItLoiMaunHHOoi OJIiCToCkU Dlya roJInHrynepe IpIdSe1p3ay na TnJdeHb.2.MiHitb kaceTy (citOKy i pIXyUn 6LoK). |
| Якstь rolінneyЗнuch nooripshnilacb. | 1.CsTema ДяглпнneyЗблalacry.2.ЗнocCitOKн ta pIXyUro6LOky. | 1.Promnite KaceTy (citOKy i pIXyUn 6LoK) niDrapaYIO prOToCHIO BOVO 3 BIVKOpustAHNHAmZacobydmeMTTg nocdy (1 kpaIJI),nicjaquero prommbe II bID niHn i BID'ednaite. PiclaBVCNUHHaHaeciB kpanlIo CBItLoi MaunHHOoiOJIHa NaCtKU.2.MiHitb kaceTy (citOKy dlya roJInHry ta pIXyUn 6LoK). |
| АкMuЯтortЗа direжен,ale6рТВа СЕ оДнOBIMINAeTBCS. | 3HOC citOKn ta pIXyUro6LOky,zzoBIMaRae 6IbwoiKilkbokci eLEKTPoEnerriДдярбOTnH, HiroKBrOBe6LOky | -3MiHNTn KaceTy (citOKy ta pIXyUn 6LoK).-CoderpЖанne этанOLA/izOpponaHOna cHImi-NloCb, a codepЖанne macna yBelenuHIOsc. YdaJInte OCTaTkn C POMOuBTO KaHni. |
| 3acmiiueHnra ciToUKN. 1. | 3acmiiueHnra priNcTpoI DЯ OuNiSeHnRA Ta PiДЗapЯДКn Clean&Charge. 2. OuNiyBaJIbHn KaPtrpIaX BVKOpNCTOBByEeTbcR NaPOTa- ROM DoCITb TrPINAJOrO YAcY. | 1. Прочисты засмiiueHня 3a ДОпOMою depeВ'яHOI 3уБочистКи. 2. КОнцeHTpaця рIDINи ДЯчSEHня 3MeHшл晋ся, при сьому 3бIJbшл晋ся КОнцeHTpaця оЛII. ВидалNTи habлишк N3a ДОпOMою ShMaTочka TKaHInHn. |
Country of origin: Germany Year of manufacture
To determine the year of manufacture, refer to the 3-digit production code located near the type plate. The first digit of the production code refers to the last digit of the year of manufacture. The next two digits refer to the calendar week in the year of manufacture. Example: "201" - The product was manufactured in week 01 of 2012.
MultiHeadLock (wJ)

- ENGLISH
- WARNING
- CLEAN&CHARGE STATION
- SHAVER
- FIRST USE AND CHARGING
- CHARGING AND BASIC OPERATING INFORMATION
- SHAVER DISPLAY
- CHARGE STATUS
- LOW CHARGE
- CLEANING STATUS
- TRAVEL LOCK
- USING THE SHAVER (SEE FIG. A)
- TIPS FOR A PERFECT DRY SHAVE
- MULTIHEADLOCK SWITCH (HEAD LOCK)
- LONG HAIR TRIMMER
- MANUAL CLEANING OF THE SHAVER (SEE FIG. B/C)
- CLEANING UNDER RUNNING WATER
- CLEANING WITH A BRUSH
- INSTALLING THE CLEAN&CHARGE STATION (SEE FIG. D)
- CHARGING THE SHAVER IN THE CLEAN&CHARGE STATION (SEE FIG. D)
- CLEANING THE SHAVER (SEE FIG. D)
- CLEANING PROGRAMS
- REMOVING THE SHAVER FROM THE CLEAN&CHARGE STATION (SEE FIG. E)
- CLEANING CARTRIDGE / REPLACEMENT (SEE FIG. F)
- ACCESSORIES
- ENVIRONMENTAL NOTICE
- GUARANTEE
- FOR UK ONLY
- TROUBLE-SHOOTING
- STATION CLEAN&CHARGE
- REMOVE THE SHAVER FROM THE CLEAN&CHARGE STATION (SEE FIG. E)
- STANICE CLEAN&CHARGE
- JEDINICA CLEAN&CHARGE
- RJEŠAVANJE PROBLEMA
- SLOVENSKI
- SHAVING UNIT
- CHARGING AND BASIC INFORMATION FOR USE
- DISPLAY OF THE SHAVING UNIT
- THE DISPLAY IS ON THE CHARGER
- LOW BATTERY
- LOCKING FOR TRAVEL
- USING THE CHARGER (SEE FIG. A)
- LIGHT FOR PERFECT DRY SHAVING
- MULTIHEADLOCK TRIMMER (LOCK ON HEAD)
- EXAMPLE FOR TRIMMING SIDEBURNS
- CLEANING THE SELF-TRIMMER (SEE FIG. B/C)
- MOUNTING THE CLEAN&CHARGE STATION (SEE FIG. D)
- CHARGING THE SHAVER IN THE CLEAN&CHARGE STATION (FIG. D)
- IMPORTANT: THE SHAVER MUST BE DRY AND FREE OF HAIR OR SOAP RESIDUE
- CLEANING THE SHAVER (FIG. D)
- PROCEDURE FOR FILLING
- REMOVING THE SELF-CLEANING STATION FROM THE STAND (FIG. E)
- FILLING CASSETTE / SIGNAL (FIG. F)
- ENVIRONMENTAL PROTECTION
- WARRANTY
- RECOMMENDATIONS FOR DRY SHAVING
- CLEANING INDICATOR
- LOCKING MODE
- DEVICE OPERATION (SEE FIGURE A)
- FIXING THE SHAVING HEAD
- TRIMMER FOR LONG HAIR
- DEVICE CLEANING (SEE FIGURE C)
- CLEANING WITH THE BRUSH
- CLEAN & CHARGE CLEANING AND CHARGING SYSTEM
- DESCRIPTION AND SCOPE OF DELIVERY
- INSTALLING THE CLEAN & CHARGE CHARGING AND CLEANING SYSTEM (SEE FIGURE D)
- CHARGING THE SHAVER USING THE CLEAN & CHARGE CHARGING AND CLEANING STATION (SEE FIGURE D)
- CLEANING THE BRUSH (SEE FIGURE D)
- RECOMMENDATIONS
- REMOVING THE BRUSH FROM THE CLEANING AND CHARGING DEVICE CLEAN&CHARGE (SEE FIGURE E)
- CLEANING CARTRIDGE / REPLACEMENT (SEE FIGURE F)
- ENVIRONMENTAL PROTECTION INFORMATION
- BRAUN ELECTRIC SHAVER TYPE 5791 WITH POWER SUPPLY TYPE 492-XXXX AND CLEANING SYSTEM CLEAN&CHARGE TYPE
- MANUFACTURER'S WARRANTY OBLIGATIONS
- COUNTRY OF ORIGIN: GERMANY YEAR OF MANUFACTURE
- MULTIHEADLOCK (WJ)
Brand : BRAUN
Model : Series 9 Pro 9376cc
Category : Razor