E-252 - Basket Pando - Free user manual and instructions
Find the device manual for free E-252 Pando in PDF.

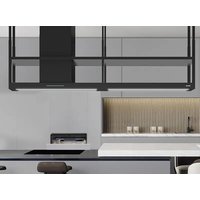
| Product type | Decorative ceiling hood |
| Brand | Pando |
| Model | E-252 |
| Power supply | 220-240 V ~ 50/60 Hz |
| Number of speeds | 4 (including one timed beyond 650 m³/h) |
| Timer | 5 minutes with automatic stop |
| Lighting | Ambient LED (perimeter) + main LED |
| Control | Touch and synchronized remote control |
| Installation distance | 140 to 170 cm from cooking surface |
| Maximum airflow | Up to 650 m³/h (depending on motor version) |
| Filters | Washable metal grease filters |
| Material | Stainless steel |
| Installation type | Ceiling or island (roof hood) |
| Warranty | Manufacturer warranty (see manual) |
| Exterior cleaning | Soft cloth and non-abrasive cleaner |
| Filter maintenance | Regular cleaning recommended |
| After-sales service | Official Pando after-sales service |
| Included accessories | Remote control, installation kit |
Frequently Asked Questions - E-252 Pando
User questions about E-252 Pando
0 question about this device. Answer the ones you know or ask your own.
Ask a new question about this device
Download the instructions for your Basket in PDF format for free! Find your manual E-252 - Pando and take your electronic device back in hand. On this page are published all the documents necessary for the use of your device. E-252 by Pando.
USER MANUAL E-252 Pando
Certificate of registration of carbon footprint, offsetting and CO2 absorption projects of the Ministry 1 or E ecological T transition and Demographic Challenge (MITFETI);
The Global Kitchen Partner
Images and content in this handbook is of exclusive property of Pando - INOXPAN S.L, for which it is completely forbidden the use of images as well as total or partial reproduction without previous authorisation in written.
LAS IMAGENES MOSTRADAS EN ESTE MANUAL NO SON CONTRACTUALES.
THE IMAGES SHOWN IN THIS HANDBOOK ARE NOT CONTRACTUAL
La Direc tion d Pando se reserva el direcho de modificar, alterar o melhorar los dibujos tecnicos que se exponen en este manual sin previo aviso. Pando Technical Management reserves the right to modify, alter or improve any technical drawings exposed in this handbook without previous warning.
Pando reserves the right to change or cancel any measures of the articles in the manual without prior notice, without affecting the essential characteristics of functionality and safety, and is not responsible for any errors or omissions that may occur in the manual.
Technical specifi cations valid except for typographical errors, omission, or printing. The images and content of this manual are the exclusive property of Pando - INOXPAN S.L., and any appropriation of images and total or partial reproduction without prior written authorization is strictly prohibited.
THE IMAGES SHOWN IN THIS MANUAL ARE NOT CONTRACTUAL.
Pando's Technical Management reserves the right to modify, alter, or improve the technical drawings displayed in this manual without prior notice.
The paper version of this manual cannot be updated in real-time, to ensure the latest version of your product's instructions, we recommend consulting the digital version at www.pando.es
First of all, we would like to thank you for the trust you have placed in our company by purchasing one of our products.
For purchasing one of our products. We are sure that you have made the right decision.
At Pando, not only do we offer top quality products, but we also have a large team of professionals who will help you and advise you on any queries you may have during installation or operation.
To get to know us better, we invite you to visit our website (www.pando.es) where you can see our full range of products with the most up to date commercial and technical information.
Here you will find a wide selection of Decorative Hoods; wall-mounted, ceiling-mounted, island, integrated into furniture and integrated into the hob.
This variety allows us to adapt to any style of kitchen.
We also show you our collection of essential appliances in any home.
Appliances such as our collection of high-performance Ovens and Microwaves with high performance, Induction and Gas Hobs that will help you to make the best recipes, Wine Cellars and Ageing Cellars to maintain and preserve your wines in the best conditions, Dishwashers with the most modern technology and our with the most up-to-date technology and our range of Refrigerators and Freezers with Freezers and Refrigerators for panel integration together with those for free installation.
All this under a brand with a very long trajectory of more than 40 years in the sector, which manufactures its products as a sector, which manufactures its products like a true craftsman. Bringing the best of our experience to everything we do.
We sincerely hope you have fun, experience and enjoy the comfort and capabilities of what is already your new capabilities of what is already your new kitchen ally.
Thank you
Pando team
ENVIRONMENTAL PROTECTION
The symbol on the product or its packaging indicates that this product cannot be disposed of like normal domestic waste. The product must be handed over at a collection point for recycling electrical and electronic equipment. If you ensure that this product is correctly disposed of, you will help to avoid the possible negative environmental and public health effects that could arise from incorrect disposal. For more detailed information about recycling this product, please contact your city authorities, the domestic waste service or the establishment where you purchased it. This electrical appliance is marked in compliance with European Directive 2012/19/EU on electrical and electronic appliance waste (WEEE).
COLLECTION OF HOUSEHOLD APPLIANCES

WASTE TREATMENT
DISPOSAL OF THE PACKAGING. The packaging is marked with in Green Dot.
In its commitment to the protection of the environment and in compliance with the provisions of the European Directive 94/62 / EC on packaging and packaging waste and the derived Law 22/2011 on Waste and Contaminated Soil, Pando entrusts entities of social economy an Integrated Management System, responsible for the periodic collection at the consumer's home or in its vicinity of used packaging and packaging waste for subsequent treatment.
To remove all packaging materials such as cardboard, expanded polyurethane, and fi lm, use the appropriate containers.
This ensures the correct treatment and reuse of packaging materials.
EN - SAFETY INSTRUCTIONS
Carefully read the safety instructions given in the use and installation manual. The entire installation process is reserved exclusively for qualified professionals, professional installers or official technical service.
IMPORTANT!
When you open the hood packaging, check that all the components are in perfect condition and that all the mounting accessories are present. If this is not the case, contact the seller and do not proceed with the installation. Any aesthetic damage to the appliance once it has been installed, such as scratches, knocks, stains, etc., will not be covered by the manufacturer's guarantee.
IMPORTANT!
The protective film must not be removed from the hood until it has been completely installed. If you do not have this plastic in any area that could be compromised during installation, it is recommended to apply preventive measures to protect against knocks, scratches and contact with corrosive agents.
IMPORTANT!
Take special care during installation if there are building works, as remains of paint, silicone, plaster, cement and materials of this type, or cleaning products, may contain corrosive chemical components that can damage the steel or the product. It is recommended that appropriate protective measures be taken, such as hermetically sealing the area of the hood that could possibly be affected with plastic sheeting. This avoids aesthetic damage to the appliance during installation, which would not be covered by the manufacturer's guarantee.
EN - CHARACTERISTICS AND RECOMMENDATIONS FOR CEILING-MOUNTED HOODS
- ROOF SHAPE. The ideal ceiling for the installation of these hood units should be completely open and smooth over its entire surface. If, for design reasons, different ceiling heights or unevennesses are chosen, the area where the hood is placed must be completely smooth and have a perimeter as wide as possible to avoid possible suction losses.
- CEILING HEIGHT. For optimum hood operation, the distance between the worktop or cooking area and the base of the hood should be between 140 and 170~cm . For other distances outside this range, please consult our Pando Technical Division.
- POSITION OF THE HOOD. The hood must be centred with the cooking area.
- AIR INTAKE GRILL. In order to ensure excellent extraction performance of the hood, it is essential that there is a constant air intake in the kitchen.
- INSTALLATION OF SMOKE TUBE. It is highly recommended to use Pando S.E.C. System® smoke extraction pipes, which considerably improve the use and soundproofing of the equipment.
IMPORTANT!
The hood and peripherals must be easily and safely accessible for possible maintenance or repair work by the official Pando technical service (SAT). The warranty will not cover the costs and means necessary for access to a product that does not meet these conditions. In the event that the product is not easily accessible or safe, as determined by the TAS upon initial inspection, it is the customer's responsibility to provide the means and bear the costs necessary for the TAS to carry out the intervention properly.
CONTENIDO / CONTEUDO / CONTENU / CONTENT


150cm (x1)
HERRAMIENTAS NECESARIAS / FERRAMENTAS NECESSÁRías / LES OUTILS NECESSAIRES / TOOLS REQUIRED


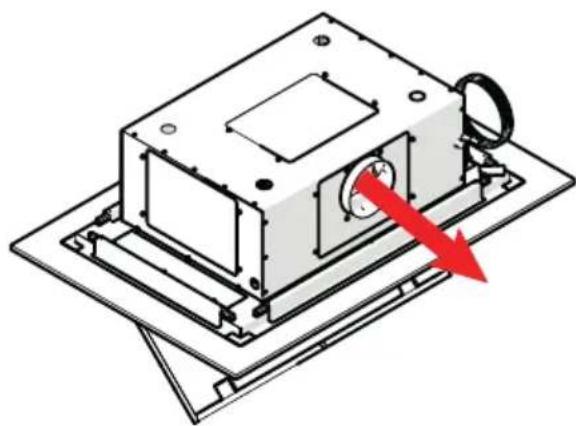
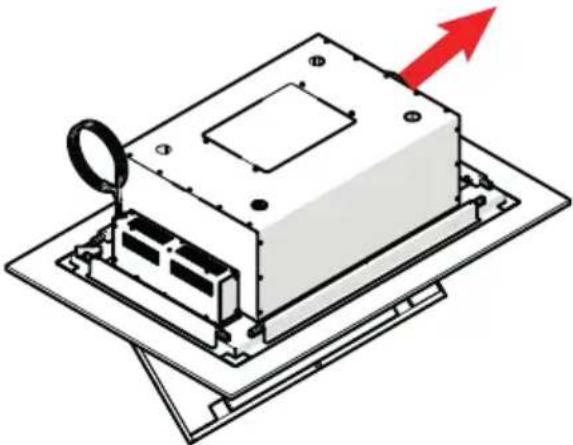
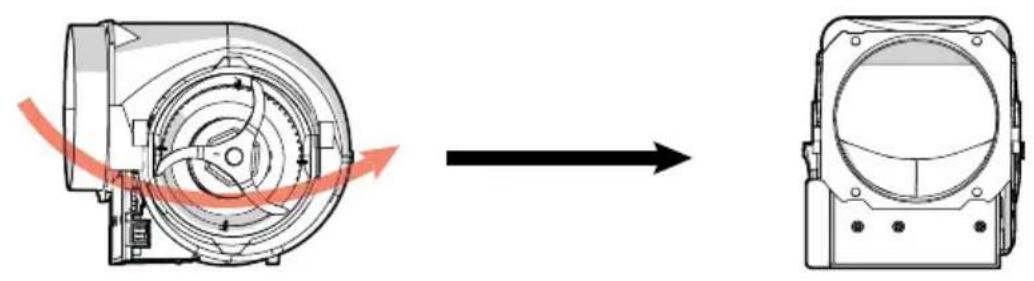
OPCIONAL:GIRO SALIDA MOTOR
OPCIONAL:GIRO SAIDA MOTOR
OPTIONNEL: ROTATION DE LA SORTIE DU MOTEUR
OPTIONAL: MOTOR OUTPUT TURN OPTIONAL: MOTOR OUTPUT TURN
A
D
B

E

C

Requires door opening change.
SALIDA LATERAL IZQUIERDO / SALIDA LATERAL ESQUERDA / SORTIE LATERALE GAUCHE / LEFT SIDE OUTLET


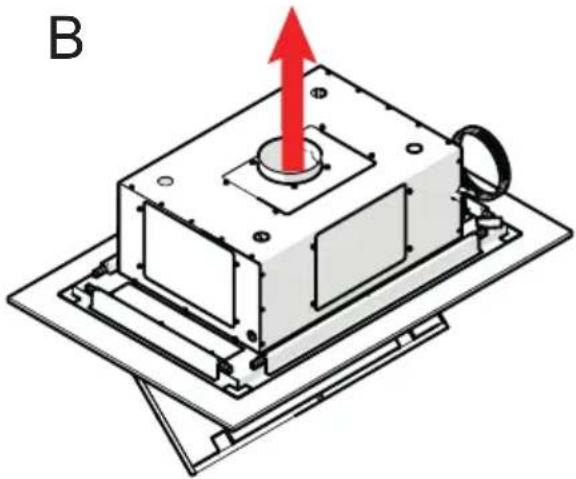
SALIDA SUPERIOR / SAÍDA SUPERIOR / SORTIE SUPÉRIEURE / UPPER OUTLET


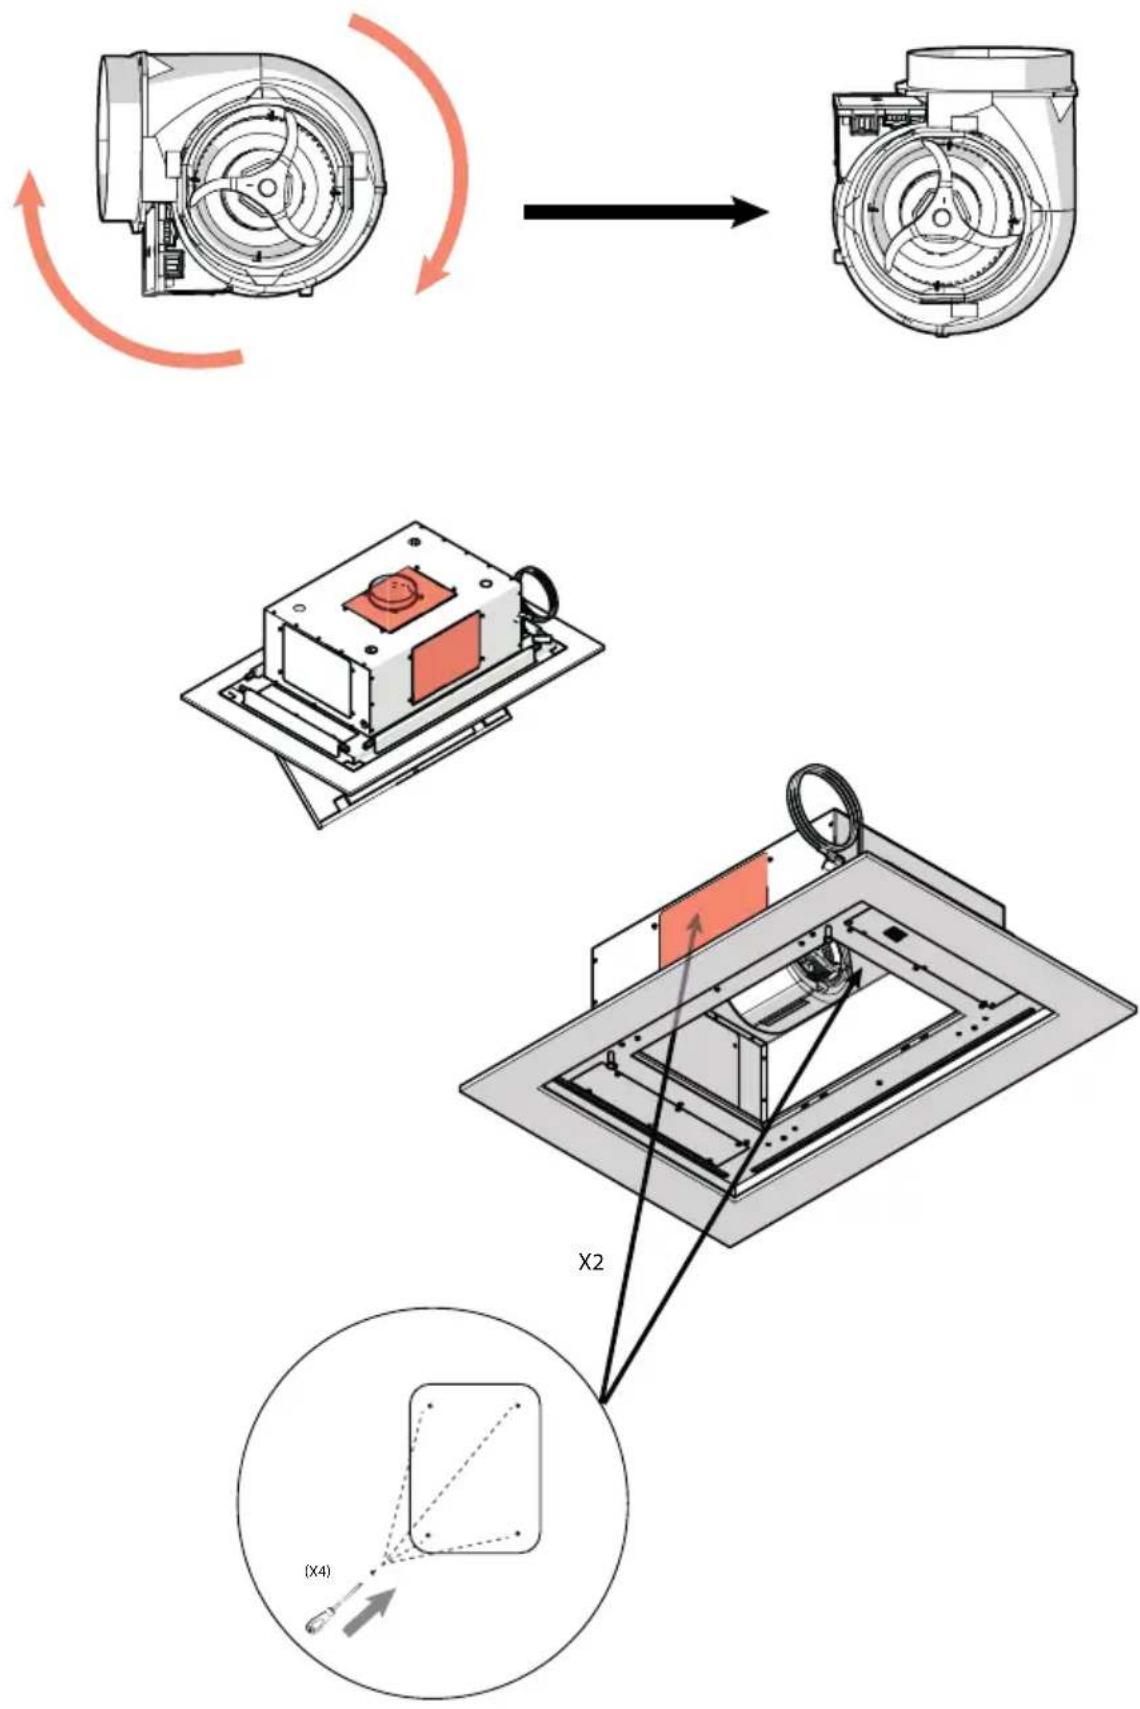
ATENCIón / ATENÇão / ATENTION / ATENTION
Before installing choose side opening door according to the position of flue pipe.
You will find instructions to change the opening side of the door in this manual.
CAMBIO LADO APERTURA (OPCIONAL) / MUDAR LADO ABERTURA (OPCIONAL) CHANGEMENT COTÉ OUVERTURE (OPTIONNEL)/OPENING SIDE CHANGE(OPTIONAL)

CAMBIO LADO APERTURA (OPCIONAL) / MUDAR LADO ABERTURA (OPCIONAL) / CHANGESMENT COTÉ OUVERTURE (OPTIONNEL) / OPENING SIDE CHANGE (OPTIONAL)

CAMBIO LADO APERTURA (OPCIONAL) / MUDAR LADO ABERTURA (OPCIONAL) / CHANGEMENT COTÉ OUVERTURE (OPTIONNEL) / OPENING SIDE CHANGE (OPTIONAL)
CAMBIO LADO APERTURA (OPCIONAL) / MUDAR LADO ABERTURA (OPCIONAL) / CHANGEMENT COTÉ OUVERTURE (OPTIONNEL) / OPENING SIDE CHANGE (OPTIONAL)
CAMBIO LADO APERTURA (OPCIONAL) / MUDAR LADO ABERTURA (OPCIONAL) / CHANGEMENT COTÉ OUVERTURE (OPTIONNEL) / OPENING SIDE CHANGE (OPTIONAL)
7
(x2)
8

CAMBIO LADO APERTURA (OPCIONAL) / MUDAR LADO ABERTURA (OPCIONAL) / CHANGEMENT COTÉ OUVERTURE (OPTIONNEL) / OPENING SIDE CHANGE (OPTIONAL)
CAMBIO LADO APERTURA (OPCIONAL) / MUDAR LADO ABERTURA (OPCIONAL) / CHANGESMENT COTÉ OUVERTURE (OPTIONNEL) / OPENING SIDE CHANGE (OPTIONAL)
11

ATENÇÃO / ATENÇÂO / ATENTION / ATENTION

IMPORTANT!
EN -The installation of the hood E-252 should be done before install and close the suspended ceiling.
jADVERTENCIA!
The maximum distance from the floor to the false ceiling must not exceed 2.40m .


iMUY IMPORTANTE! El espesor del falso techo DEBE SER de 13mm. Muito Important! A espessura do teto falso DEVE SER de 13mm. TRÉS IMPORTANT! L'épaisseur du faux plafond DOI ÉTRE de 13mm. VERY IMPORTANT! Thickness of suspended ceiling MUST BE 13mm.
INSTALACION / INSTALAÇÃO / INSTALLATION / INSTALLATION
1
ES- Atornillar las varillas roscadas al techo forjado y regular con las arandelas remachadas a la alta deseada. (200 mm a 370mm)
PT- Parafuso asistes o teto falso e regular com as arruelas na alta desejada. (200-370mm)
FR-Vissez les tiges filetées au plafond. On peut régler la hauteur de la hotte à l'aide des écrous (200-370mm)
EN- Screw threaded rods at ceiling and regulate to desired height using washer serts. (200mm to 370mm)
(x4)
INSTALACION / INSTALAÇÃO / INSTALLATION / INSTALLATION
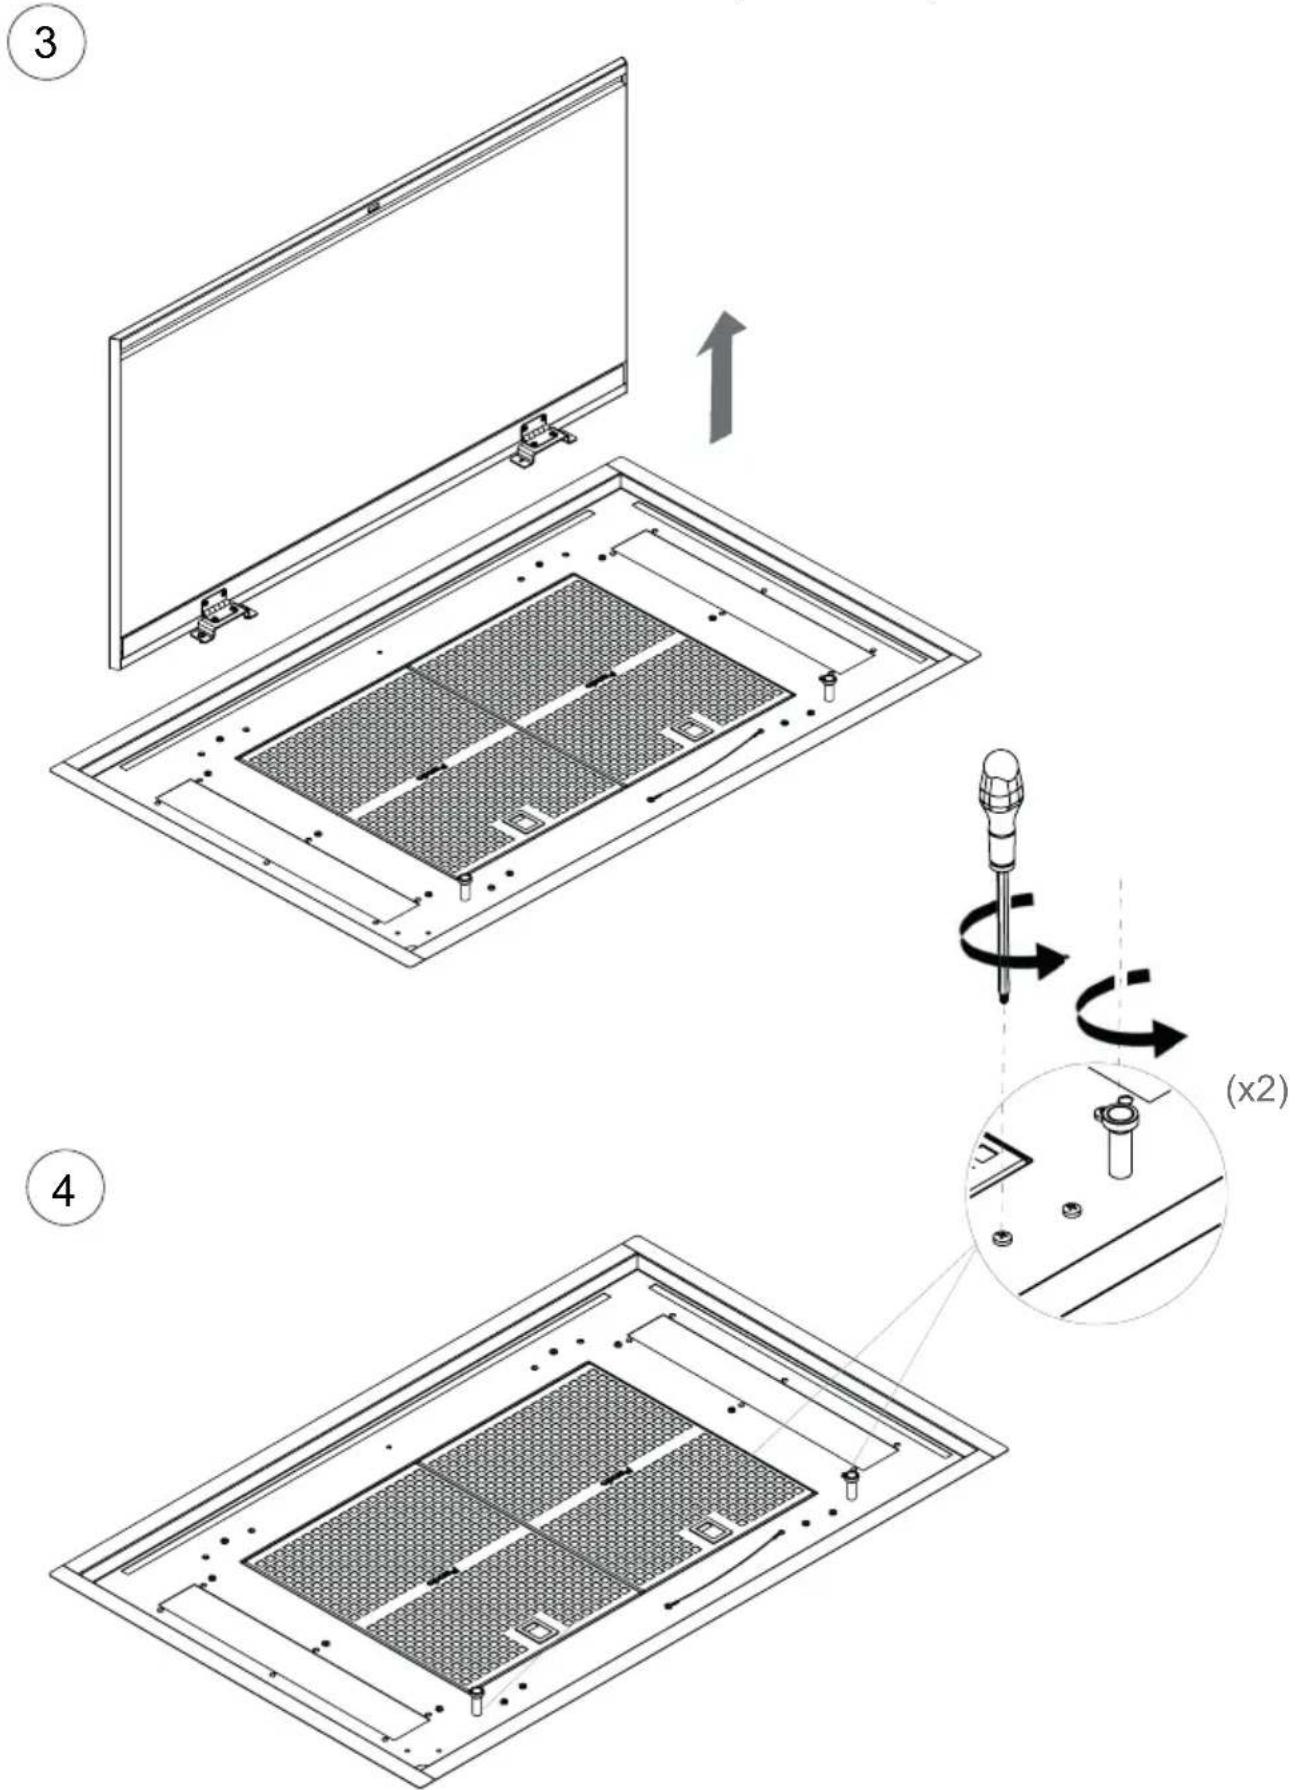
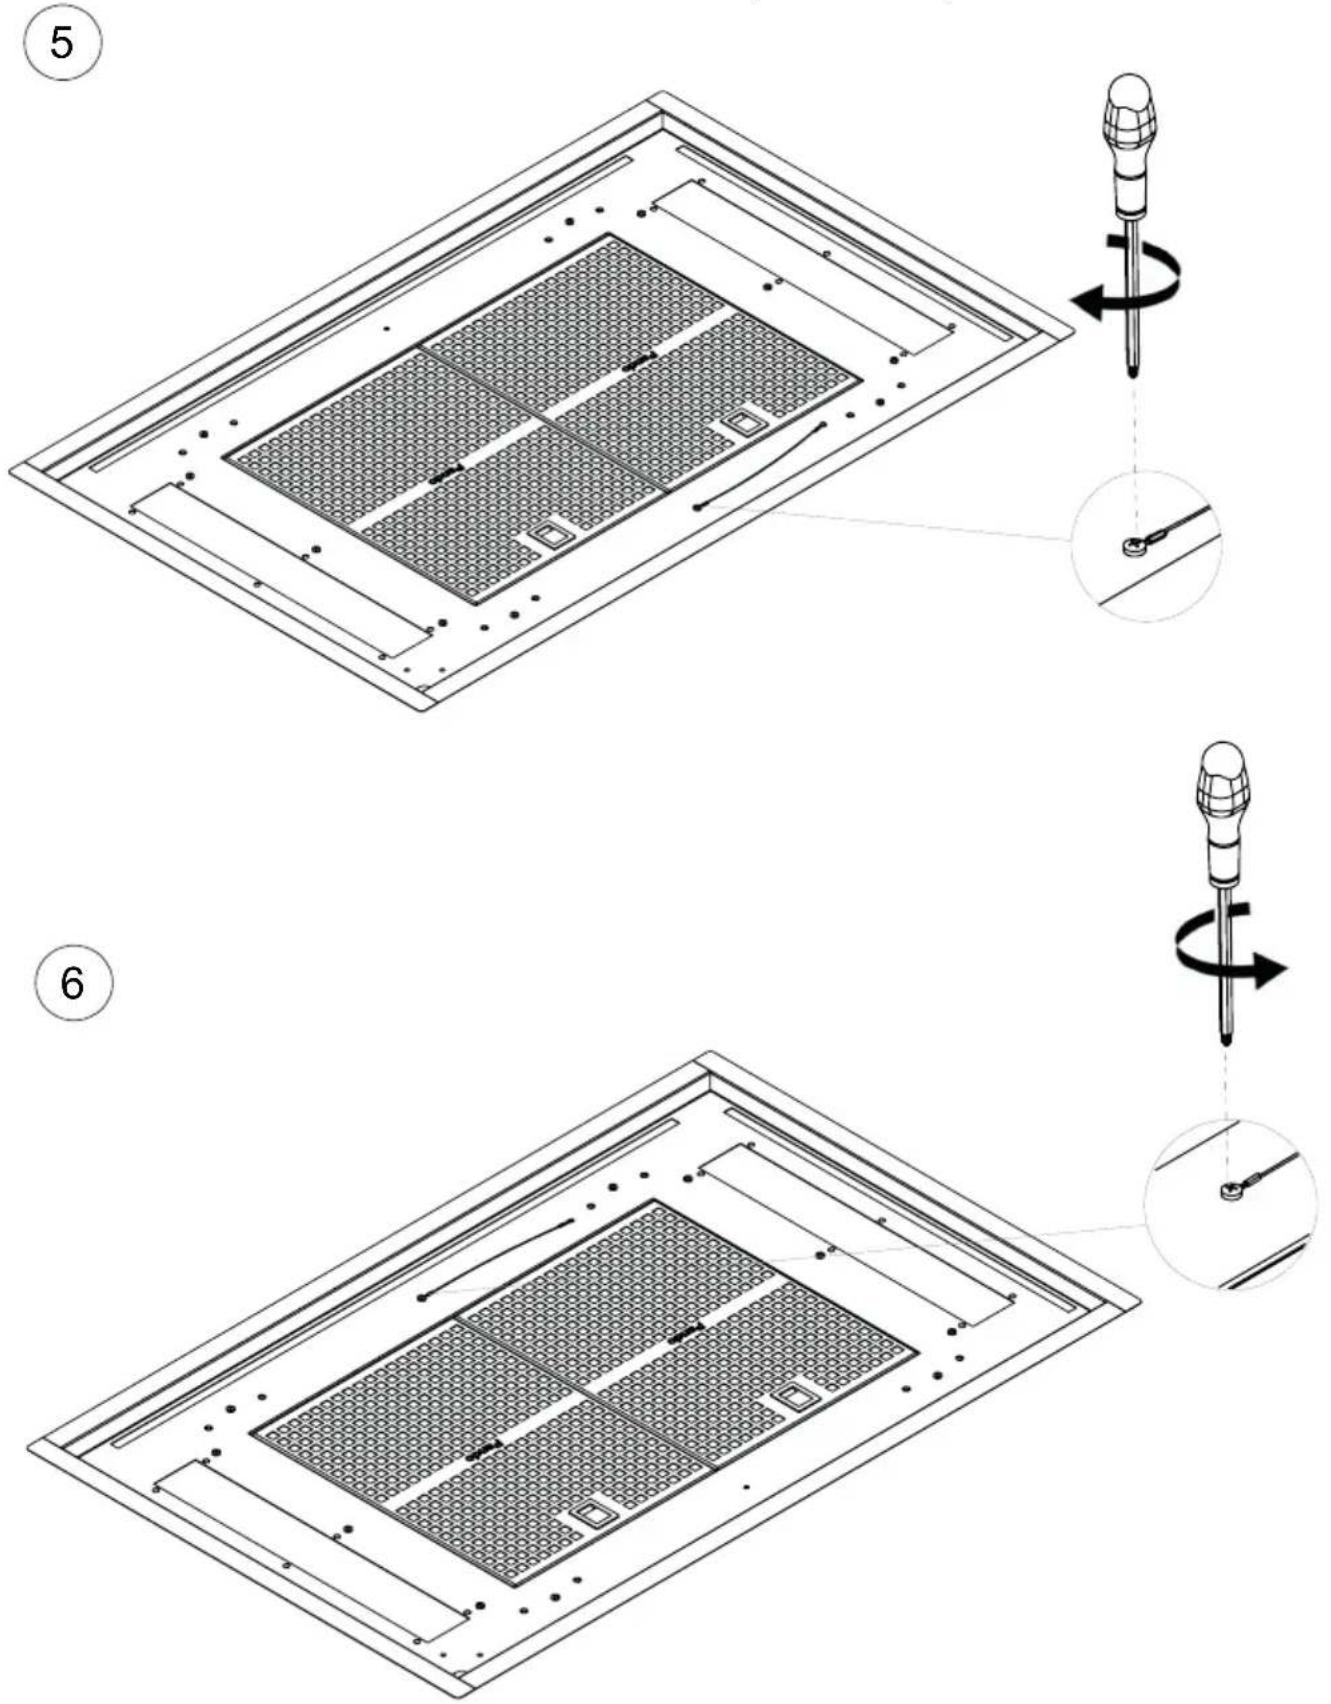
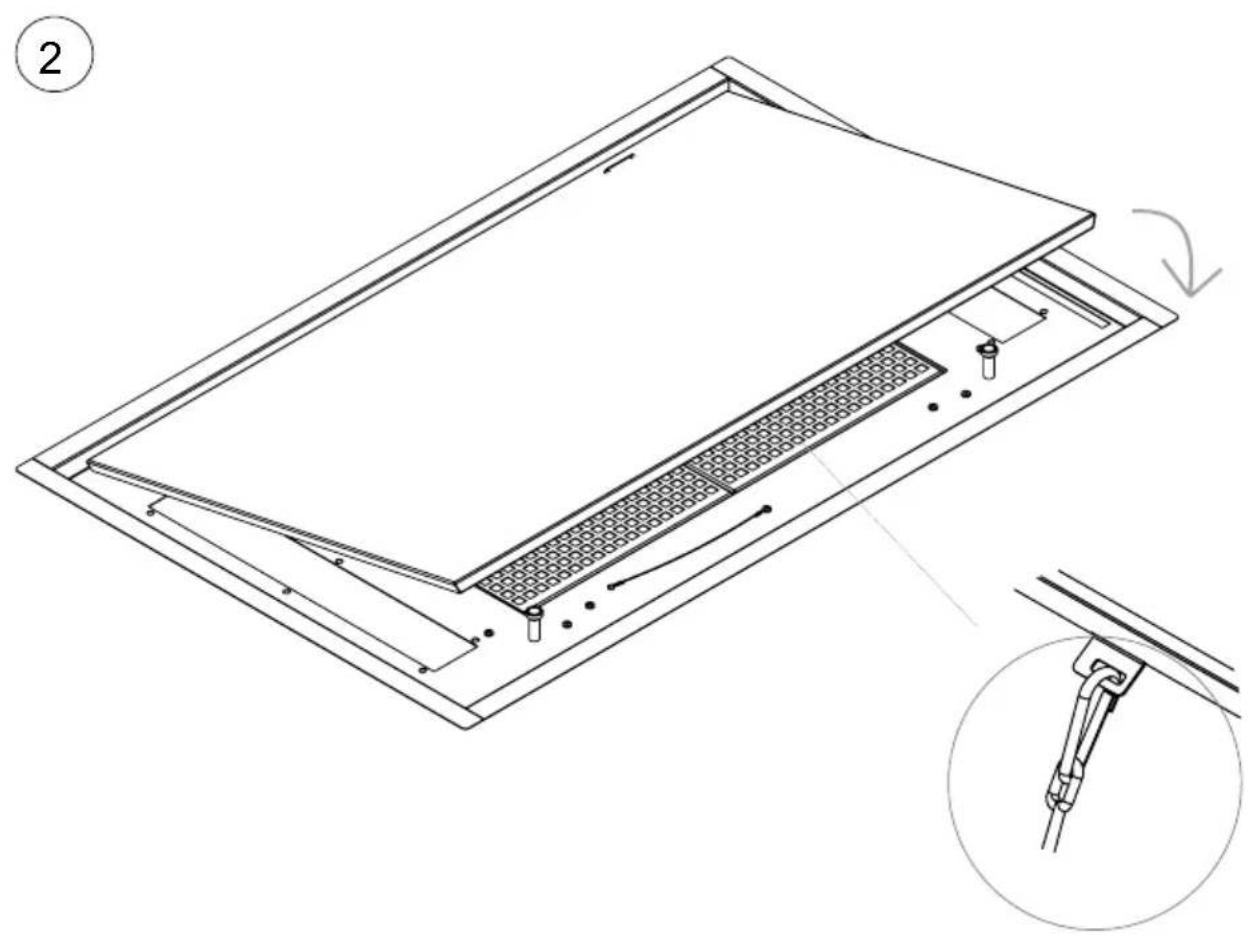
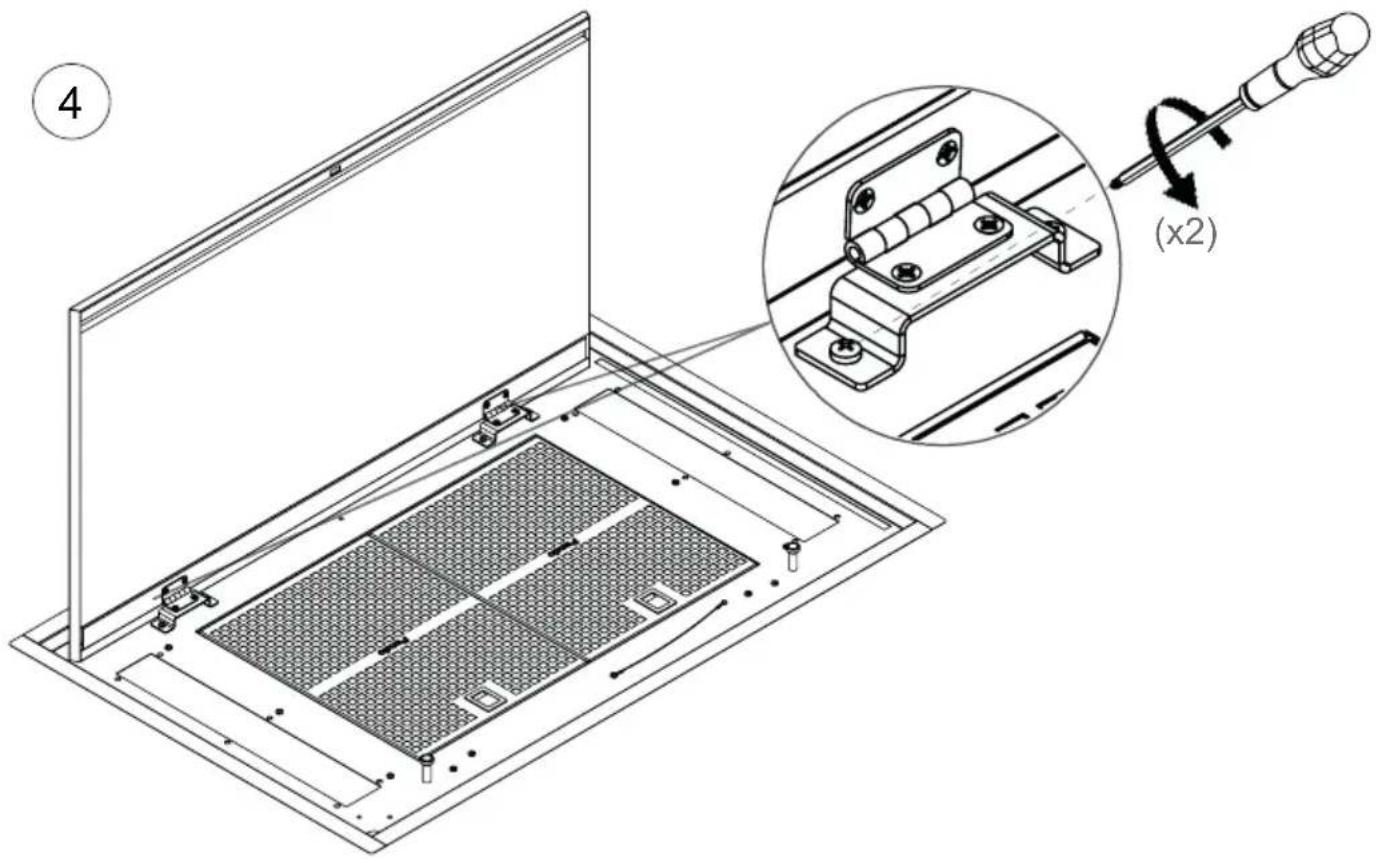
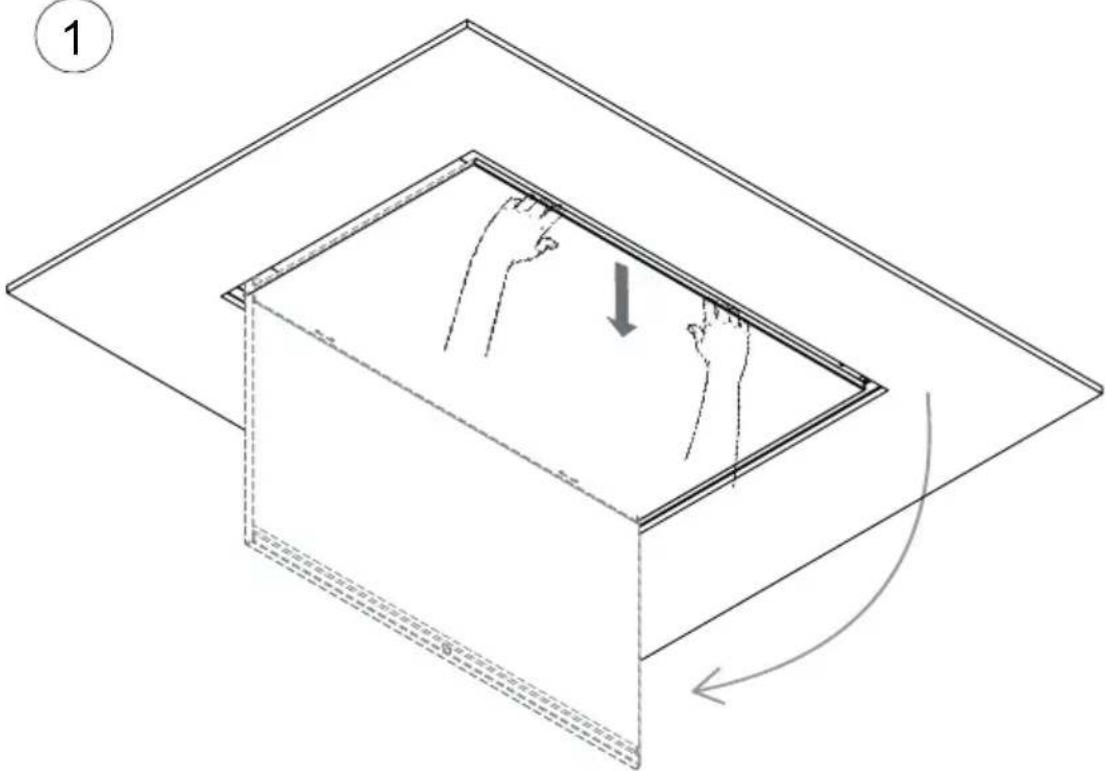
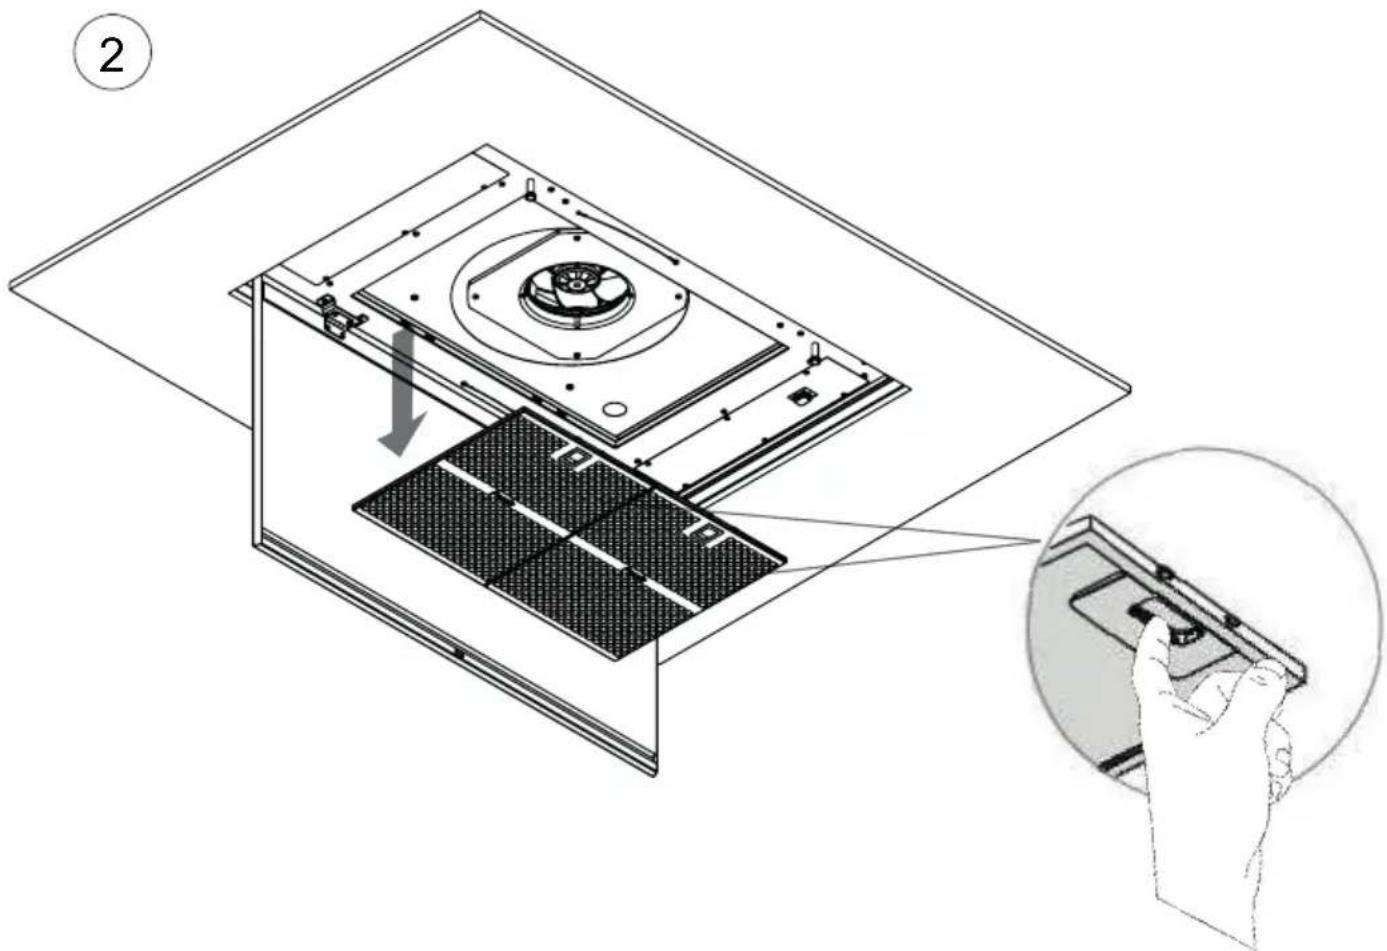
ES- Para continuar con la instalacion es requisiteo desmontar la puerta y los filtros. Pasos de 2 al 6.
PT- ParaContinuar a instalação desmontar porte eelterros.Passos de 2a6.
FR- Retirer la porte et les filtres pour permettre l'installation. Étapes de 2 à 6.
EN- To continue with the installation it is necessary to disassemble door and filters. Steps from 2 to 6.


10
ES- Antes de cerrar el falso techo, se deben realizar los agujeros para ubicar la campana según el Modelo elegido (950mm/1200mm).
PT- Antes de instalar o teto falso, realizar una abertura no teto falso de acordo com o Modelo escolhido (950mm/1200mm).
FR-Avant de fermer le faux plafond, réaliser une ouverture sur le faux plafond ayant les dimensions suivantes (950mm/1200mm).
EN- Before closing the suspended ceiling, make holes in it according to the hood model (950mm/1200mm).


11
ES-Instalar falso techo.
EN-Install suspended ceiling.
IMPORTANT! The E-252 hood has courtesy lighting (3) on the perimeter of the door. Do not cover the lighting while installing suspended ceiling.


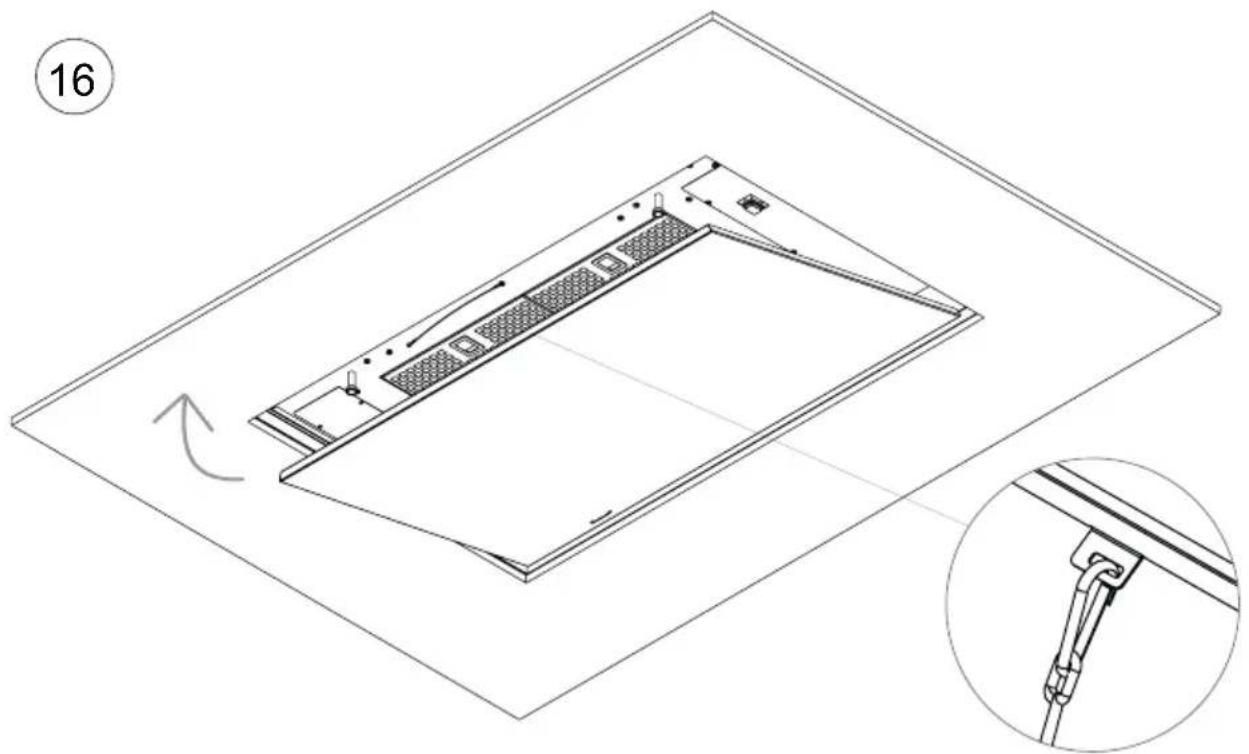
EN-Assemble door and filters. Steps from 12 to 16.
12


13
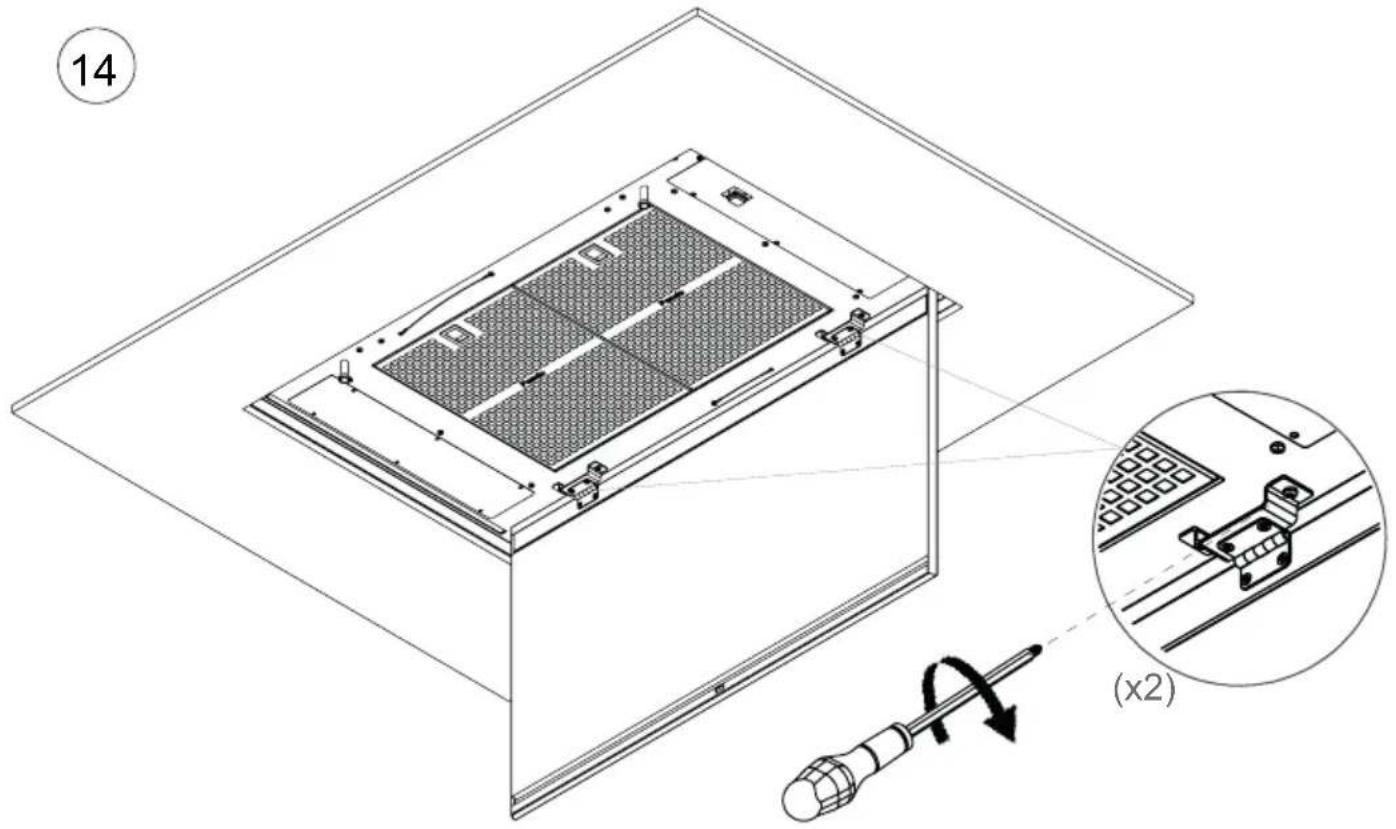
14

ES-Pintar puerta campana. (4)
PT-Pintar a porta do exaustor (4)
EN-Paint hood door. (4)

EN-With the door open, we find the start button (5).
jIMPORTANT! After starting the hood, follow the instructions to synchronize the remote control at page 54.

| ON/OFF, Press this symbol to turn on the motor, press again to turn off. | |
| Press this symbol to reduce the motor speed. | |
| Press this symbol to increase motor speed, Note: If you have a motor version that exceeds 650m³/h, 3rd or 4th speed will be be time limited. | |
| LAST TIME: When the motor is on at any speed, pressing this button will start a 5 -minute timer, at the end of which time the motor and lights will switch off. When on, it is possible to adjust the speed to the desired level. This function is indicated on the display by flashing dots. This function offers a visual indicator by flashing the pilot lamp. | |
| Blue LED that will light up whenever a function is pressed. | |
| MAIN OR WORKING LIGHT: Press to switch on main lights and press again to switch off. COURTESY OR AMBIENT LIGHT: (Optionally, depending on model and version) Keeping the key pressed for 2 seconds will switch on the courtesy light, and continuing pressing will switch it off again. |
A - SYNCHRONIZATING THE REMOTE CONTROL (* only if necessary, it is already synchronized):
- Connect the hood to the mains or turn on the hood switch, optional under filters or panel.
- ATTEN TION! once step 2 is completed, when connecting the hood to the electricity:

DO NOT TOUCH ANY COMMAND KEY UNTIL AFTER 5 SECONDS

- After the first 5 seconds, in the interval time between 5 and 20 seconds, with the remote control facing the hood, press or hold the LIGHT button on the remote control, and the lights on the hood will light up, confirming that the process has been successfully performed.

If it takes more than 20 seconds to synchronize the control, the hood switchboard closes the reception and does not record any code, you must repeat the process, making sure to press the key between 5 "and 20".
MANTENIMIENTO / MANUTENÇA / MAINTENANCE / MAINTENANCE
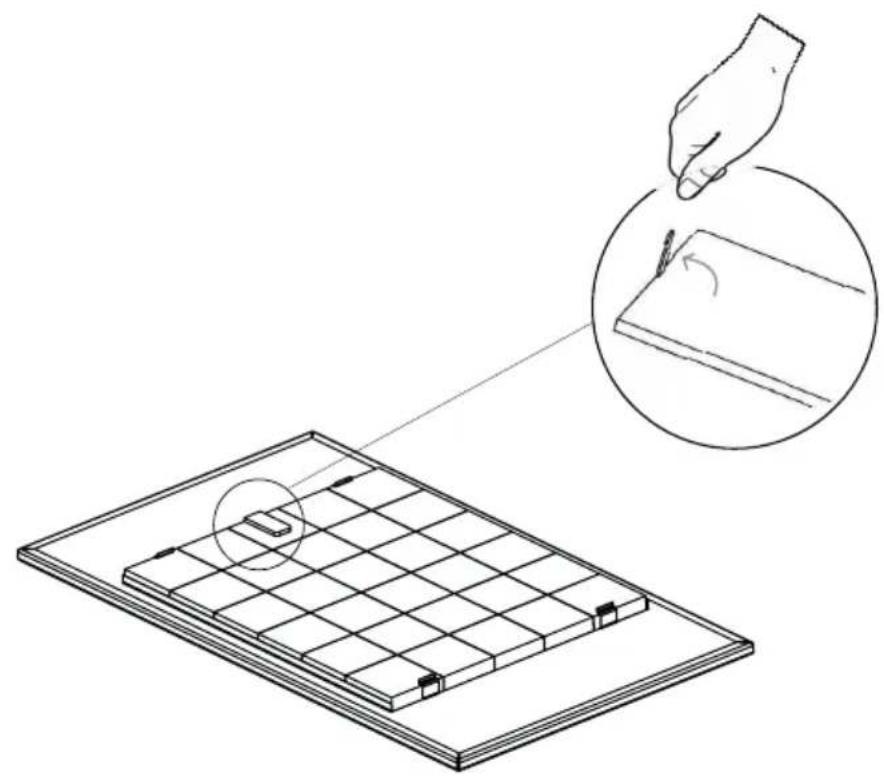
FILTRO ALUMINIO / FILTRO ALUMÍNIO / FILTRE D'ALUMINIUM / ALUMINIUM FILTER

1

2
MANTENIMIENTO / MANUTENÇA / MAINTENANCE / MAINTENANCE FILTRDE CARBON ACTIVADO (FCLR), LAVABLE Y REACTIBLE (OPCIONAL)
FILTRO DE CARVAO ATIVADO (FCLR), LAVÁVEL E REACTIBLE. (OPCIONAL)
FILTRE AU CHARBON ACTIVÉ (FCLR), LAVABLE ET RETIGGERABLE. (EN OPTION)
ACTIVATED CARBON FILTER (FCLR), WASHABLE AND RETRIGGERABLE. (OPTIONAL)
1
2
MANTENIMIENTO / MANUTENÇA / MAINTENANCE / MAINTENANCE FILTRO DE CARBON ACTIVADO (FCLR), LAVABLE Y REACTIBLE (OPCIONAL) FILTRO DE CARVAO ATIVADO (FCLR), LAVÁVEL E REACTIBABLE. (OPCIONAL) FILTRE AU CHARBON ACTIVÉ (FCLR), LAVABLE ET RETIGERABLE. (EN OPTION) ACTIVATED CARBON FILTER (FCLR), WASHABLE AND RETRIGGERABLE. (OPTIONAL)
3

C/ Can Carmany, 1
Pol. Ind. Nord, 08310 ARGENTONA (Barcelona - Spain)
Tel. +34 93 757 94 11
Fax +34 93 757 96 53
www.pando.es
com.pando@pando.es
Export: export@pando.es
Tel. 93 741 55 11
INOXPAN S.L
Pando
www.pando.es
SERVICIO POSVENTA
Espana, Portugal y Andorra
www.pando.es/asistencia-technica/
SERVICE APRES VENTE AFTERSALES SERVICE
Otros países
Autres pays / Other countries
www.pando.es/en/after-sales-services/
Certificacion del Sistema de Gestion de la Calidad Environmental Management System Certificat cation UNE-EN ISO 14001:2015 ES20/208675
Sistema de Gestion de la Calidad Quality Manage ment System UNE-EN ISO 9001:2015 ES19/86566