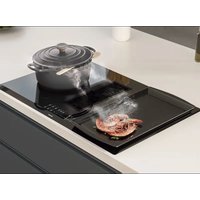
E-395 - Range hood Pando - Free user manual and instructions
Find the device manual for free E-395 Pando in PDF.


| Product type | Integrated extractor hood with induction hob |
| Brand | Pando |
| Model | E-395 |
| Dimensions (W x D x H) | 780 x 520 mm |
| Cut-out dimensions | 760 x 490 mm |
| Power supply | 220-240 V ~ 50/60 Hz |
| Maximum total power | 7400 W |
| Airflow (max / boost) | 540 m³/h / 614 m³/h |
| Noise level (max / boost) | 71 dB(A) / 72 dB(A) |
| Energy efficiency class | A+ |
| Grease filtration efficiency | 86.5% (Class B) |
| Filter type | Metal grease filter + Regenerable activated carbon filter |
| Number of speeds | 10 levels + Boost |
| Controls | Digital touch slider with LED display |
| Special functions | Clean Air function, Self-cleaning, Timer, Automatic connection with the hob |
| Lighting | Not specified (0 lux according to technical sheet) |
| Maintenance | Clean grease filters every 2 months; regenerate carbon filter every 120-240 h depending on usage |
| Safety | Automatic safety shutdown, pan detection, control locking, residual heat indication |
| Repairability | Pando after-sales service, spare parts available on request |
| Warranty | 3 years (excluding wear parts, incorrect installation) |
Frequently Asked Questions - E-395 Pando
User questions about E-395 Pando
0 question about this device. Answer the ones you know or ask your own.
Ask a new question about this device
Download the instructions for your Range hood in PDF format for free! Find your manual E-395 - Pando and take your electronic device back in hand. On this page are published all the documents necessary for the use of your device. E-395 by Pando.
USER MANUAL E-395 Pando
natural_image
Modern kitchen stove with a metal pot and steaming pan, placed on top (no visible text or symbols)Pando
integralcooking
E395 - E396
ES - PT - FR - EN

User manual - EN Certificate of Guarantee

Pando
integralcooking
CAMPANASDECORATIVAS
HORNOS&MICROONDAS
Certificate of registration of carbon footprint, offsetting and CO2 absorption projects of the Ministry for Ecological Transition and Demographic Challenge (MITERD).
The Global Kitchen Partner
Images and content in this handbook is of exclusive property of Pando - INOXPAN S.L, for which it is completely forbidden the use of images as well as total or partial reproduction without previous authorisation in written.
LAS IMÁGENES MOSTRADAS EN ESTE MANUAL NO SON CONTRACTUALES.
THE IMAGES SHOWN IN THIS HANDBOOK ARE NOT CONTRACTUAL
Pando Technical Management reserves the right to modify, alter or improve any technical drawings exposed in this handbook without previous warning.
natural_image
Symbol of a waste bin with no text or labels, crossed by diagonal lines and a solid rectangle below (no text or symbols present)
TRATAMIENTO DEL RESIDUO
| L | Marrón |
| L | Negro |
| N Azul | |
| N Gris | |
| Amarillo / Verde | |
415V 2N\~380V-415V 2N\~
| L1 | |
| L2 | Negro |
| N1 | Azul |
| N2 | Gris |
| Amarillo / Verde |
natural_image
Technical line drawing of a cabinet or rack unit with internal components (no text or symbols)natural_image
Technical illustration of a mechanical assembly with three steps showing hand positioning and packaging (no text or symbols)natural_image
Technical illustration of a mechanical assembly with an inset showing a hand placing a component into a container (no text or symbols present)natural_image
Technical line drawing of a mechanical assembly with cooling fan and housing (no text or symbols)natural_image
Technical line drawing of a mechanical assembly with a magnified inset showing a 4x zoomed-in component (no text or symbols present)natural_image
Technical line drawing of a mechanical assembly with a 2 mm scale indicator (no text or symbols on the diagram itself)natural_image
Technical illustration of a plastic housing assembly with three stages: front, side, and top views (no text or symbols)natural_image
Illustration of a measuring tool with a tape measure and a saw, both enclosed in a dotted circle (no text or symbols)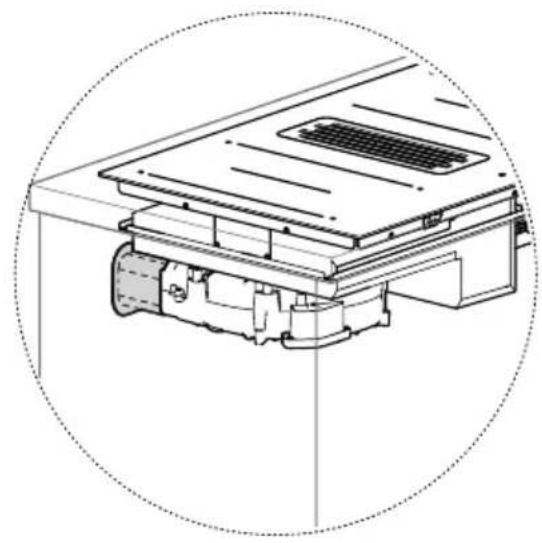
natural_image
Technical line drawing of a mechanical assembly with no visible text or symbols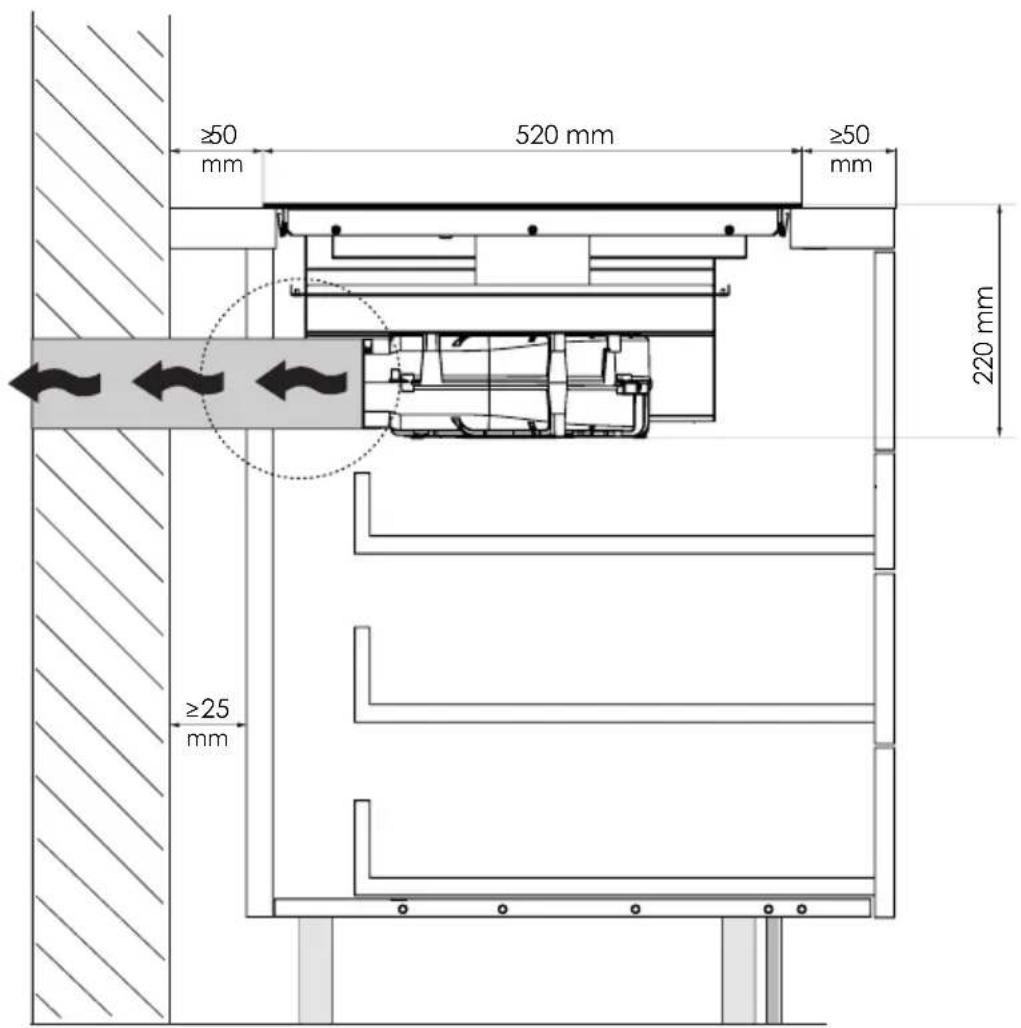
UTENSILIOS RECOMENDADOS
Calor residual Calor residual
natural_image
Technical illustration of a mechanical component with three stages: top, side, and cross-section (no text or symbols)natural_image
Symbol of a trash bin crossed with no text or numbers, representing waste sorting or disposal (no text present)
natural_image
Technical line drawing of a cabinet or rack unit with internal components (no text or symbols)natural_image
Technical illustration of a battery pack assembly with three steps showing hand positioning and packaging (no text or symbols)natural_image
Technical line drawing of a mechanical assembly with a 2 mm scale indicator (no text or symbols on the diagram itself)natural_image
Technical illustration of a plastic housing assembly with three stages: front, side, and top views (no text or symbols)natural_image
Illustration of a measuring tool with a tape measure, a saw, and a rectangular block labeled '1x' (no text or symbols on the objects)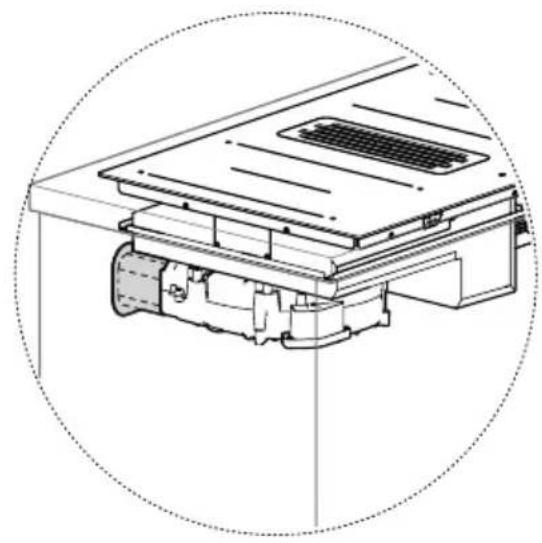
natural_image
Technical line drawing of a mechanical assembly with no visible text or symbols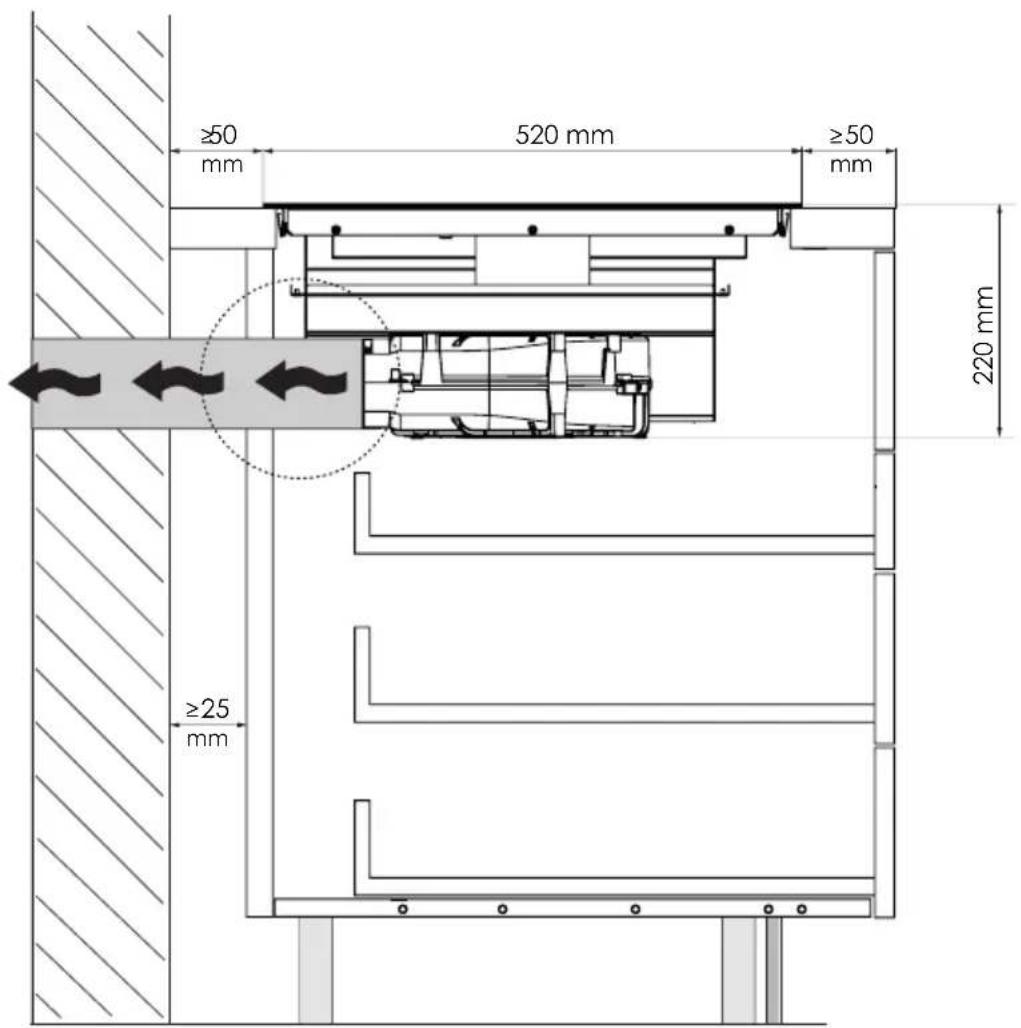
UTENSÍLIOS RECOMENDADOS
natural_image
Illustration of a cylindrical electronic component with coiled wires and a circular label showing 'INDUCTION' (no text on the component itself)DISPLAY \*
O.S.D. (Overflow Safety Device)
Calor residual Calor residual
natural_image
Symbol of a trash bin crossed with no text or numbers, representing waste sorting or disposal (no text present)
TRAITEMENT DES DÉCHETS
| L | Marrón |
| L | Negro |
| N Azul | |
| N Gris | |
| Amarillo / Verde | |
415V 2N\~380V-415V 2N\~
| L1 | |
| L2 | Negro |
| N1 | Azul |
| N2 | Gris |
| Amarillo / Verde |
natural_image
Technical line drawing of a cabinet or rack unit with internal components (no text or symbols)natural_image
Technical illustration of a battery pack assembly with three steps showing hand positioning and packaging (no text or symbols)Étape 2. Retirez le Filter.
natural_image
Technical line drawing of a mechanical assembly with cooling fan and mounting base (no text or symbols)natural_image
Technical line drawing of a mechanical assembly with a magnified inset showing a 4x zoom detail (no text or symbols present)natural_image
Technical line drawing of a mechanical assembly with a 2 mm scale indicator (no text or symbols on the diagram itself)natural_image
Technical illustration of a plastic housing assembly with three stages: front, side, and top views (no text or symbols)Installation de la version Suction Installation de la version Suction
natural_image
Illustration of a measuring tool with a tape measure, a saw, and a rectangular block labeled '1x' (no text or symbols on the objects)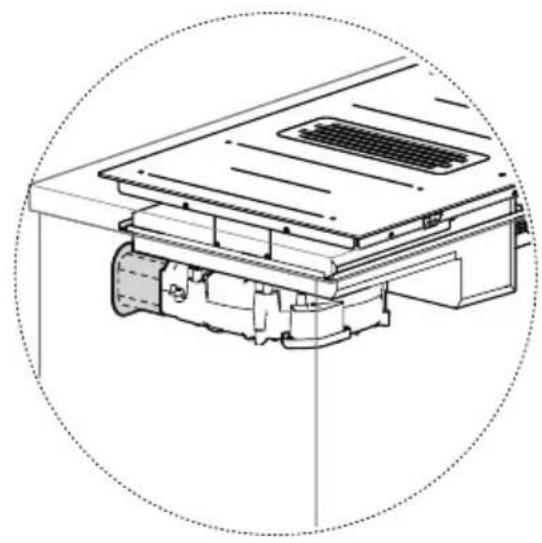
natural_image
Technical line drawing of a mechanical assembly with no visible text or symbols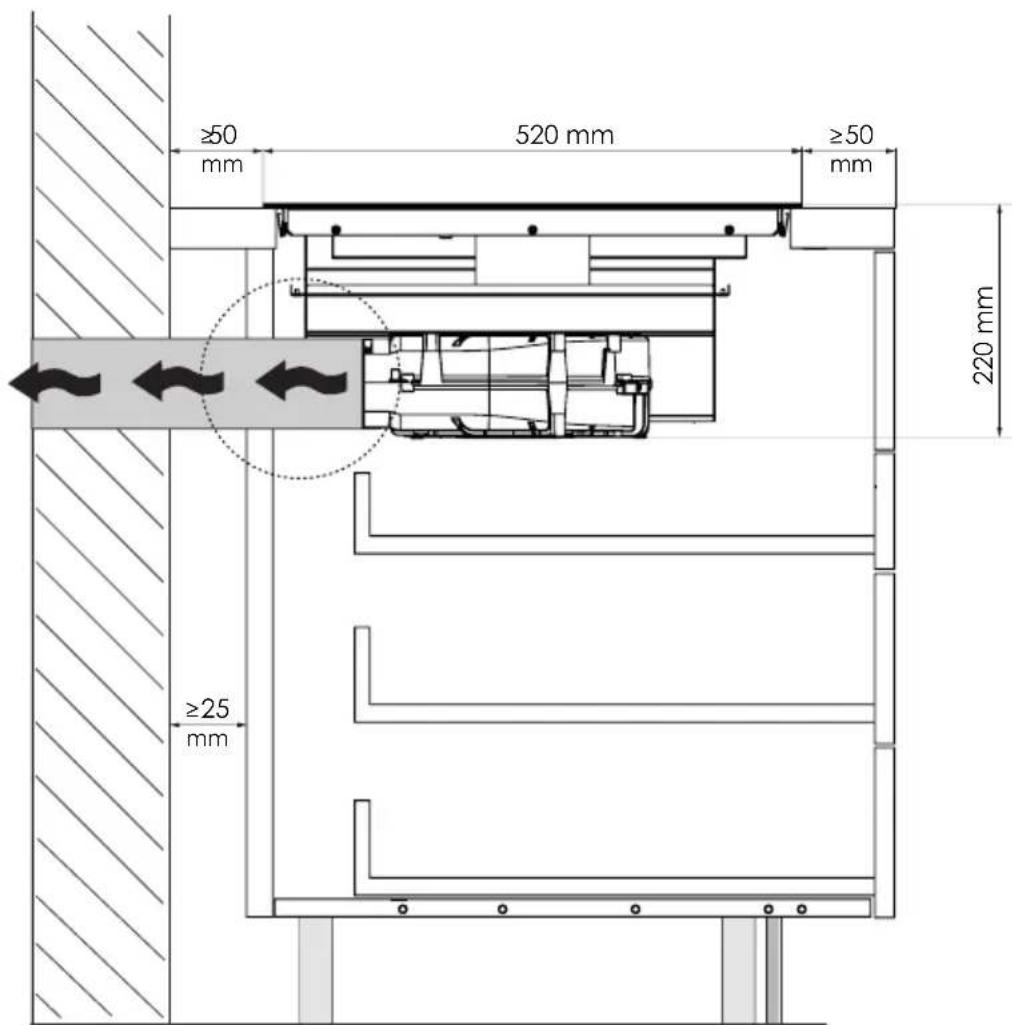
USTENSILES RECOMMANDÉS
O.S.D. (Overflow Safety Device) O.S.D.
Pando reserves the right to change or cancel any measures of the articles in the manual without prior notice, without affecting the essential characteristics of functionality and safety, and is not responsible for any errors or omissions that may occur in the manual.
Technical specifications valid except for typographical errors, omission, or printing.
The images and content of this manual are the exclusive property of Pando - INOXPAN S.L., and any appropriation of images and total or partial reproduction without prior written authorization is strictly prohibited.
THE IMAGES SHOWN IN THIS MANUAL ARE NOT CONTRACTUAL.
Pando's Technical Management reserves the right to modify, alter, or improve the technical drawings displayed in this manual without prior notice.
The paper version of this manual cannot be updated in real-time, to ensure the latest version of your product's instructions, we recommend consulting the digital version at www.pando.es
First of all, we would like to thank you for the trust you have placed in our company by purchasing one of our products.
For purchasing one of our products. We are sure that you have made the right decision.
At Pando, not only do we offer top quality products, but we also have a large team of professionals who will help you and advise you on any queries you may have during installation or operation.
To get to know us better, we invite you to visit our website (www.pando.es) where you can see our full range of products with the most up to date commercial and technical information.
Here you will find a wide selection of Decorative Hoods; wall-mounted, ceiling-mounted, island, integrated into furniture and integrated into the hob.
This variety allows us to adapt to any style of kitchen.
We also show you our collection of essential appliances in any home.
Appliances such as our collection of high-performance Ovens and Microwaves with high performance, Induction and Gas Hobs that will help you to make the best recipes, Wine Cellars and Ageing Cellars to maintain and preserve your wines in the best conditions, Dishwashers with the most modern technology and our with the most up-to-date technology and our range of Refrigerators and Freezers with Freezers and Refrigerators for panel integration together with those for free installation.
All this under a brand with a very long trajectory of more than 40 years in the sector, which manufactures its products as a sector, which manufactures its products like a true craftsman. Bringing the best of our experience to everything we do.
We sincerely hope you have fun, experience and enjoy the comfort and capabilities of what is already your new capabilities of what is already your new kitchen ally.
Muchas gracias
El equipo de Pando
ENVIRONMENTAL PROTECTION
The symbol on the product or its packaging indicates that this product cannot be disposed of like normal domestic waste. The product must be handed over at a collection point for recycling electrical and electronic equipment. If you ensure that this product is correctly disposed of, you will help to avoid the possible negative environmental and public health effects that could arise from incorrect disposal. For more detailed information about recycling this product, please contact your city authorities, the domestic waste service or the establishment where you purchased it. This electrical appliance is marked in compliance with European Directive 2012/19/EU on electrical and electronic appliance waste (WEEE).
COLLECTION OF
HOUSEHOLD APPLIANCES

natural_image
Symbol of a trash bin crossed out by two crossed lines, with no text or labels present.
WASTE TREATMENT
DISPOSAL OF THE PACKAGING. The packaging is marked with in Green Dot.
In its commitment to the protection of the environment and in compliance with the provisions of the European Directive 94/62 / EC on packaging and packaging waste and the derived Law 22/2011 on Contaminated Residues and Soils, Pando entrusts entities of social economy an Integrated Management System, responsible for the periodic collection at the consumer's home or in its vicinity of used packaging and packaging waste for subsequent treatment.
To remove all packaging materials such as cardboard, expanded polyurethane, and film, use the appropriate containers.
This ensures the correct treatment and reuse of packaging materials.
INDEX
SAFETY WARNINGS....122
INSTALLATION INSTRUCTIONS....128
- Electrical Installation: 128
- Installation of the plate ....130
RECOMMENDED UTENSILS....136
DISPLAY \* 137
- Initial power setting....138
- Normal Use Of The Board....138
- Using the integrated Hood....143
MAINTENANCE....147
- Cleaning the Hob....147
- Cleaning of components....147
- Error Codes....148
- Cleaning the liquid drip tray....150
DATA SHEET 151
GARANTÍA....153
SAFETY WARNINGS
Your safety is important to us. Read this information carefully before using the cooktop.
Make this information available to the person responsible for installing the appliance.
Important safety instructions:
- If the cooktop surface is broken or cracked, immediately disconnect the appliance from the mains (wall switch) and contact the manufacturer.
- To avoid hazards, this appliance must be installed in accordance with these installation instructions.
- Remove all packaging, labels and stickers from the ceramic glass.
- Never leave the appliance unattended when in use.
- The appliance must not be used on top of a dishwasher or tumble dryer: the water vapours released may damage the electronics.
- Do not transform or modify the appliance.
- Do not place or leave magnetisable objects (e.g. cre-
dit cards, memory cards) or electronic devices (e.g. computers, MP3 players) near the appliance, as they could be affected by its electromagnetic field.
- Never use the appliance to heat or warm the room.
- The appliance must only be used if it is mounted and installed on an approved and suitable piece of furniture or work surface.
- It is intended for domestic use only (food preparation), to the exclusion of any other domestic, commercial or industrial use.
- Do not use the hob as a stand or work surface.
- Do not use extension cords for connection to the mains.
- This appliance is not intended for operation with an external timer or remote control.
-
This appliance can be used by children aged from 8 years and above and persons with reduced physical, sensory or mental capabilities or lack of experience if they have been given supervision when using the appliance and understand the hazards involved.
-
Children or persons with a disability that limits their ability to use the appliance must have a responsible and competent person to instruct them in its use. The instructor must be convinced that they can use the appliance without danger to themselves or their environment.
- Children must not play with the appliance. Cleaning and maintenance must not be carried out by children without supervision. Do not allow children to play with the appliance or to sit, stand or climb on it. Do not store objects of interest to children in cabinets above the appliance. Children climbing on the hob could be seriously injured. Do not leave children alone or unattended in the area where the appliance is in use.
- Metal objects such as knives, forks, spoons and lids must not be placed on the hob surface as they may become hot.
- As regards the technical and safety measures to be taken for the smoke outlet, it is important to carefully follow the regulations laid down by the local authorities.
Not covered by warranty:
- If the power cable is damaged, it must be replaced by the manufacturer. To be carried out by a Pando sat specialist. If any damage occurs during this process that has been carried out by an unauthorised user or personnel, it will not be covered by the warranty, even if it is still valid!
- If you repair or replace any part of the appliance, unless specifically recommended in the Handbook, it must be carried out by a Pando sat specialist. If any damage occurs during this process that has been carried out by an unauthorised user or personnel, it will not be covered by the warranty, even if it is still valid!
- Incorrect installation of the appliance may invalidate any warranty or liability claims.
- Never use the appliance for purposes other than those for which it was designed.
Precautions when using the appliance:
- After use, always switch off the cooking zones and hob as described in this Handbook (i.e. using the touch controls). Do not rely on the pot detection function to switch off the cooking zones when removing pots.
- Keep a constant eye on stews that use fats and oils, as they are susceptible to rapid ignition. Never leave the appliance unattended when in use. Boiling produces smoke and fat spillage which can ignite.
- Never leave objects or utensils on the appliance.
- Do not drop heavy objects on the hob.
- Do not stand on the hob.
- Make sure that no electrical cords, fixed or mobile, from the appliance touch the glass or hot pan.
- Do not place any metal objects on the appliance, except for the containers to be heated.
- Never cover the appliance with a cloth or a protective
sheet, as it could become very hot and ignite.
• Always make sure that the cooking container is centred in the cooking zone. The bottom of the pan should cover the cooking zone as much as possible.
- This appliance can be used by children from the age of 8 years and above.
- Do not use pans with serrated edges or drag pans across the Induction glass surface, as this could scratch the glass.
- Do not use scouring pads or other abrasive cleaning agents to clean the hob as they may scratch the Induction glass.
WARNING: The appliance and its accessible parts become hot during use.
• Always ensure that the coo-king pan is centred in the cooking zone. The bottom of the pan should cover the cooking zone as far as possible.
- For users who wear a pacemaker, the magnetic field may influence its function. We recommend that you
seek advice from your supplier or doctor.
- Disposal of this appliance requires a special procedure. Check with your local authority for recycling options.
- Never put out a fire with water. Switch off the cooking area. Carefully smother flames with a lid, extinguishing cap or other similar means.
- Do not attempt to tamper with the filters when the Hood is in operation.
• Air must not be expelled into a duct used as a chimney for appliances powered by gas or other fuels. - Do not cut or prepare food directly on the surface.
- For wearers of cardiac stimulators and active equipment it is important to check before using the Induction Worktop that the stimulator is compatible with the appliance.
Precautions during cleaning:
- Do not use a steam cleaner to clean the cooktop
- Switch off the cooktop before cleaning or servicing
Electric shock hazard:
- Disconnect the appliance from the mains before carrying out any work or maintenance on the appliance. (Failure to observe this warning may result in electric shock or death.)
- Wear protective gloves before servicing or maintenance.
- This appliance must be connected to a circuit incorporating an isolating switch which provides a complete disconnection of the power supply.
- Connection to a good earth wiring system is essential and mandatory.
- Modifications to the domestic electrical installation must only be carried out by a qualified electrician.
WARNING: If the surface is cracked, switch off the appliance to avoid the possibility of electric shock.
If any damage occurs during this process that has been carried out by an unauthorised user or personnel, it will not be covered by the warranty, even if it is still valid!
Cutting and burning hazard:
- Be careful: the edges of the panel are sharp.
- The sharp blade of a work-top scraper is exposed when the safety cover is retracted. Use with extreme care and always store in a safe place out of the reach of children.
- Failure to use caution may result in injury or cuts.
- During use, accessible parts of this appliance will become hot enough to cause burns.
- Do not allow your body, clothing or any object other than suitable cooking utensils to come into contact with the induction glass until the surface is cool.
- Keep children away.
- Failure to follow this advice may result in burns and scalds.
- Pan handles may be hot to the touch. Check that pan handles do not protrude from other cooking zones that are lit. Keep the handles out of the reach of children.
WARNING: Fats and oils on the hob can catch fire.
WARNING: The cooking process must be supervised at all 1:5128 Integral Cooking
times. Short cooking times must be monitored continuously.
WARNING: Fire hazard: do not store objects on cooking surfaces.
WARNING: NEVER attempt to extinguish a fire with water, turn off the appliance and cover the flame, e.g. with a lid or a fire blanket.
Precautions to avoid damaging the appliance:
- Pans with an unpolished base (unglazed cast iron, etc.) or a damaged base can damage the glass ceramic.
- The presence of sand or other abrasive materials can damage the hob.
- Avoid dropping objects, even small ones, on the hob.
- Do not strike the edges of the glass with the pans.
• Make sure that the appliance is ventilated according to the manufacturer's instructions. - Do not place or leave empty pans on the hob.
- Avoid letting sugar, synthetic materials or aluminium foil touch the hot zones. These substances can cause breakage or other changes
to the product when they cool down.
- It is important to take great care when using fats or oils for cooking/frying and to monitor the cooking process at all times.
- Do not store objects on the hob
- Never place hot containers on the control panel area.
- If there is a drawer under the built-in appliance, make sure that there is sufficient distance (2 cm) between the contents of this drawer and the bottom of the appliance to ensure good ventilation.
- Do not place flammable objects (e.g. sprays) in the drawer under the hob. Any cutlery trays must be made of heat-resistant material.
Precautions in the event of appliance failure:
- If a fault is detected, the appliance must be switched off and the power supply must be disconnected.
- In the event of chipping or cracks in the hob, the appliance must be disconnected from the power supply and the after-sales ser-
vice must be notified.
• Repairs may only be carried out by specialised personnel.
• Under no circumstances should you dismantle the appliance yourself.
- If a fault is detected, it is necessary to disconnect the appliance and unplug the power supply line.
USE OF INADEQUATE PANS OR PANS MAY CAUSE MALFUNCTION OR MALFUNCTION AND WILL RESULT IN THE TERMINATION PREMATURE OF THE WARRANTY. (See recommended utensils section)
INSTALLATION INSTRUCTIONS
Precautions Before Starting Installation:
- Assembly and electrical connection operations must be carried out by specialised personnel.
- Wear protective gloves before carrying out assembly operations.
- WARNING: If screws or fixings are not installed in accordance with these instructions, electrical hazards may occur.
Electrical Installation:
Important! Observe the data on the nameplate inside the appliance.
Before starting the installation, check that the position of the mains plug is easily accessible and if it is connected directly to the mains, an omnipolar switch with a minimum opening of 3 mm between the contacts, dimensioned with respect to the load and complying with current standards, must be installed between the appliance and the mains.
Insulation class I
This appliance belongs to class I and must therefore be connected to earth.
Please note:
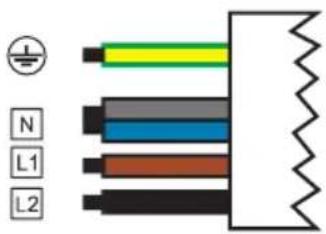
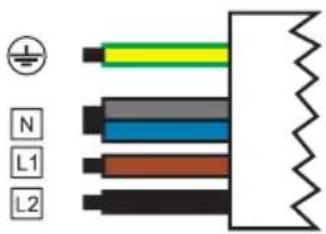
$$ B R O W N = L (\text { line }) $$
$$ \text { BLUE } = \text { N (neutral) } $$
$$ \text { YELLOW / GREEN } = \text { Earth } $$
The neutral cable must be connected to the terminal with the N symbol while the YELLOW/GREEN cable must be connected to the edge near the earth symbol.
The electrical cable corresponding to the earth wire must be 2 cm longer than the other two.
If the appliance is not supplied with a cable, use a cable of type: "H05V2V2-F", which has the necessary conditions for the total power consumption of the device.
H05V2V2-F 5 × 2.5 ~mm^2
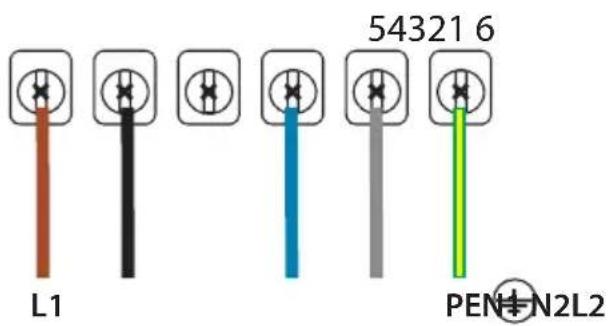
220V - 240V 1N \~ 380V
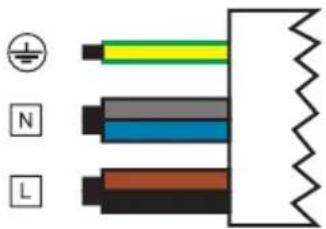
| L | Marrón |
| L | Negro |
| N Azul | |
| N Gris | |
| Amarillo / Verde | |
415V 2N\~380V-415V 2N\~
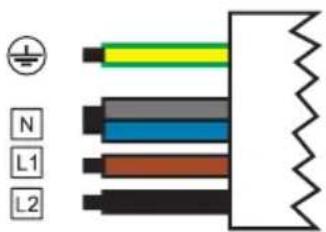
| L1 | |
| L2 | Negro |
| N1 | Azul |
| N2 | Gris |
| Amarillo / Verde |
Make sure that at no point is the cable in contact with an element that can heat up. It must never reach a temperature 50^ higher than the ambient temperature.
The device must be connected to the mains permanently, for this reason it is necessary to install an omnipolar switch with a minimum opening of 3mm between the contacts, dimensioned with respect to the load and complying with current standards. In this way it can be completely disconnected in the event of overvoltage conditions III.
(The yellow/green earth wire must not be interrupted by the switch). Once the installation of the appliance has been completed, the omnipolar switch must be easily accessible.
Installation of the plate
The appliance is designed to be recessed into a worktop.
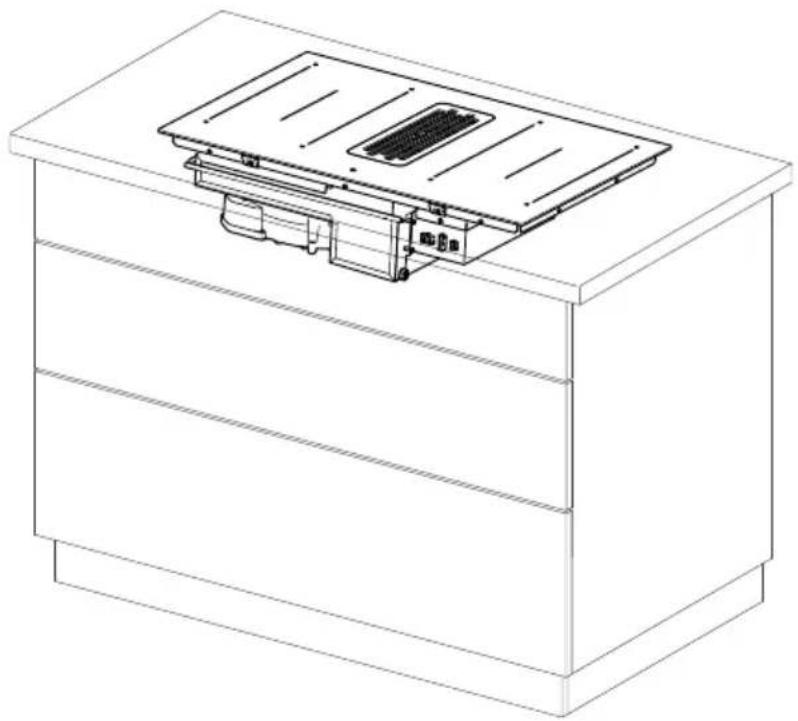
natural_image
Technical line drawing of a cabinet or rack with an internal component (no text or symbols)Step 1. Remove the adhesive tape and cardboard.

natural_image
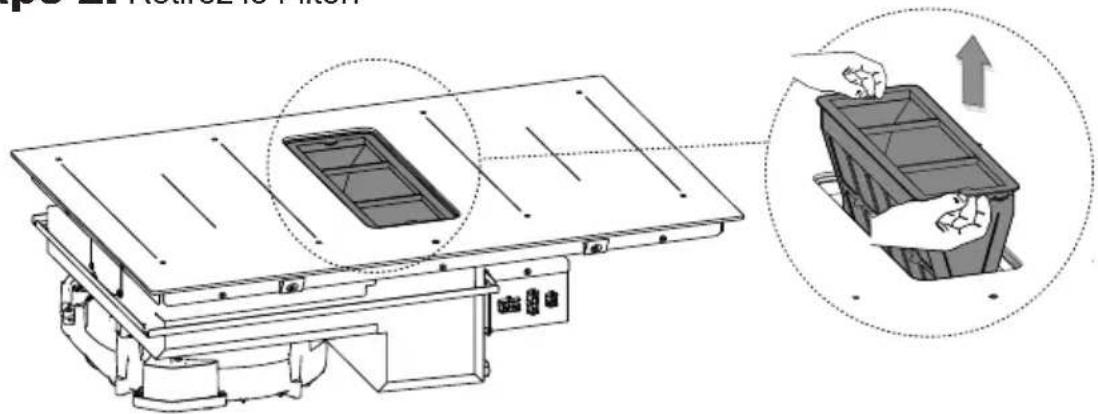
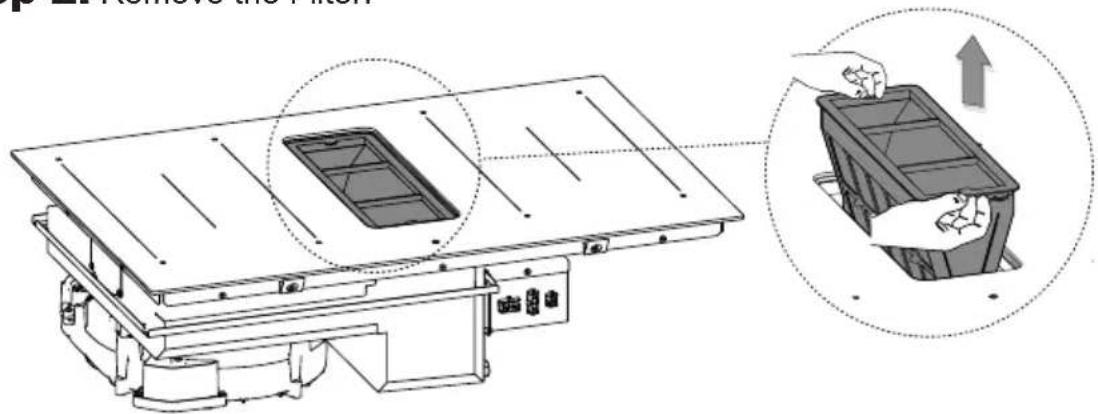
Technical illustration of a battery pack assembly with three steps showing hand positioning and packaging (no text or symbols)Step 2. Remove the Filter.
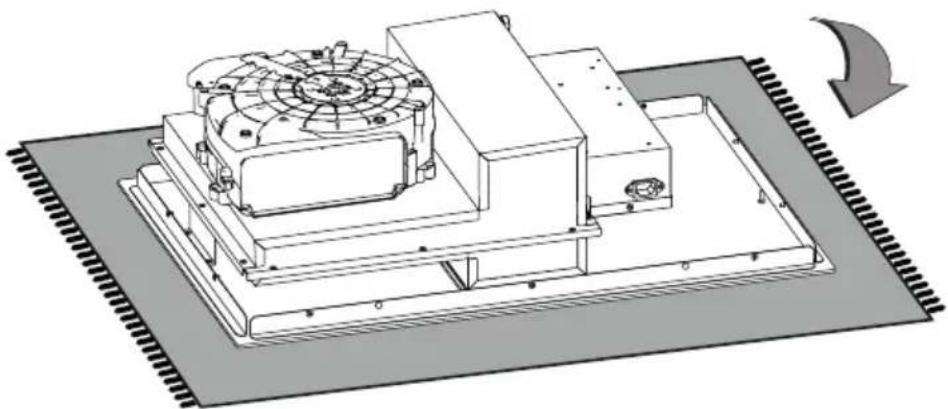
Step 3. Turn the plate over and place it on a soft surface to ensure that it does not scratch the glass.
natural_image
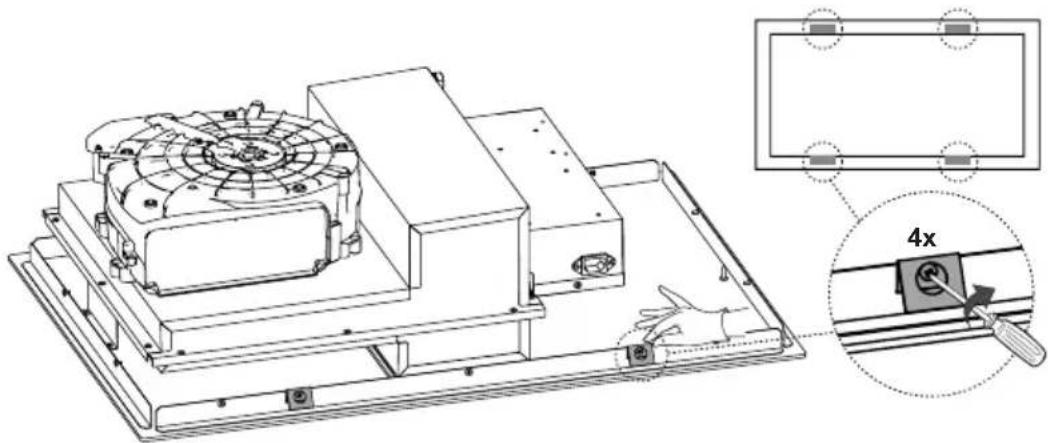
Technical line drawing of a mechanical assembly with cooling fan and mounting base (no text or symbols)Step 4. Fit the fixing brackets supplied to the long sides of the hob as illustrated below:
natural_image
Technical line drawing of a mechanical assembly with a magnified inset showing a 4x zoomed-in component (no text or symbols present)Step 5. Place the sealing material around the perimeter of the hob as shown below:
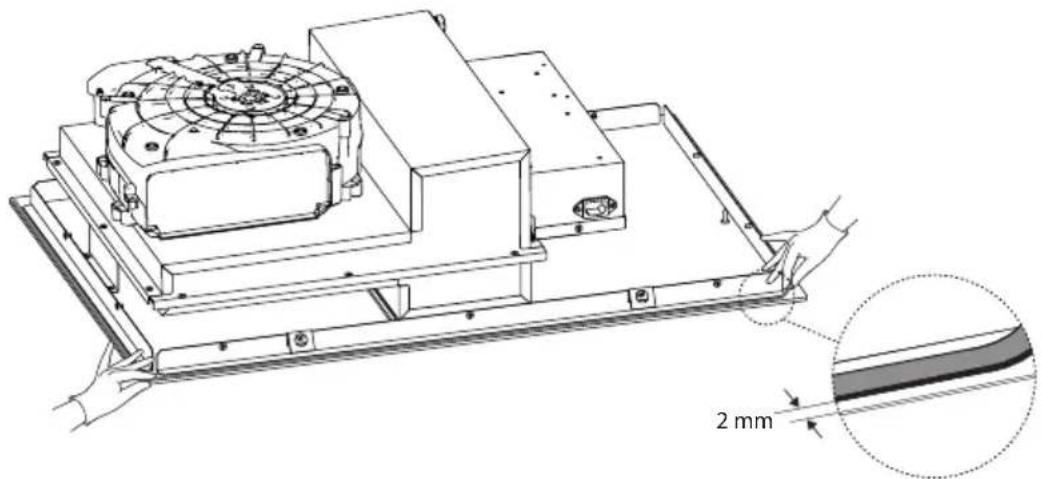
natural_image
Technical line drawing of a mechanical assembly with a 2 mm scale indicator (no text or symbols on the diagram itself)Step 6. Cut out the worktop following the measurements given in this Handbook, and taking into account whether you want to install your hob on the worktop or built-in at the same level as your worktop.
Measurements Worktop cut-out for worktop-mounted hob.
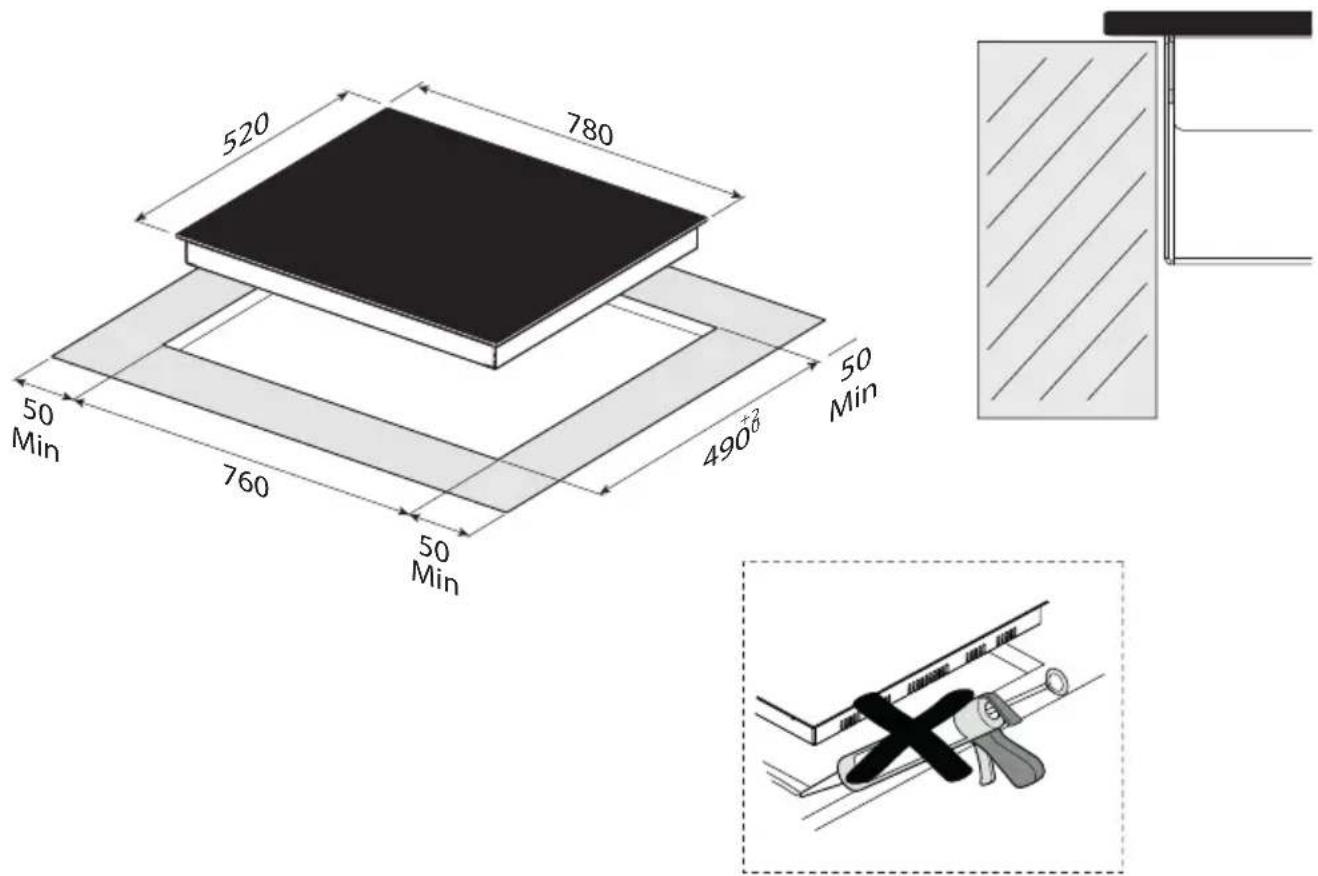
Dimensions Built-in hob cut-out. Dimensions Built-in hob cut-out.
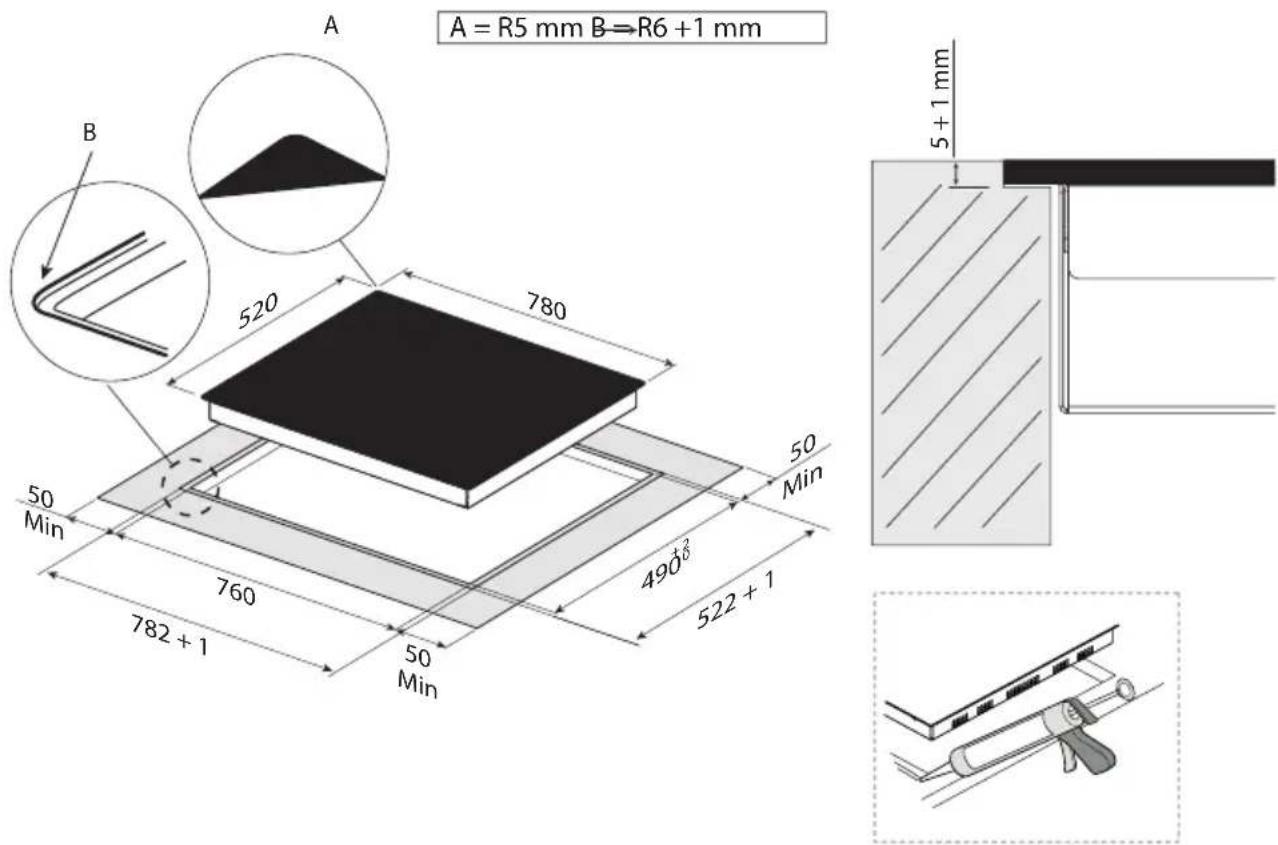
Caution: During the assembly process, make sure that the power cable is perpendicular to the worktop and that it does not come into contact with any adjacent metal parts.
Step 7. Select the type of extraction system you wish to install:
• FILTERING VERSION
With this type of installation, the appliance will discharge filtered, clean, odourless vapours into the room.
For a recirculating version, ask your dealer for regenerative odour filters.
(See diagrams of this installation on the following page.)
• VACUUMING VERSION
With this type of installation, the appliance can only discharge vapours to the outside through a perimeter wall.
(See diagrams of this installation on the following page.)
Filtering version installation Filtering version installation
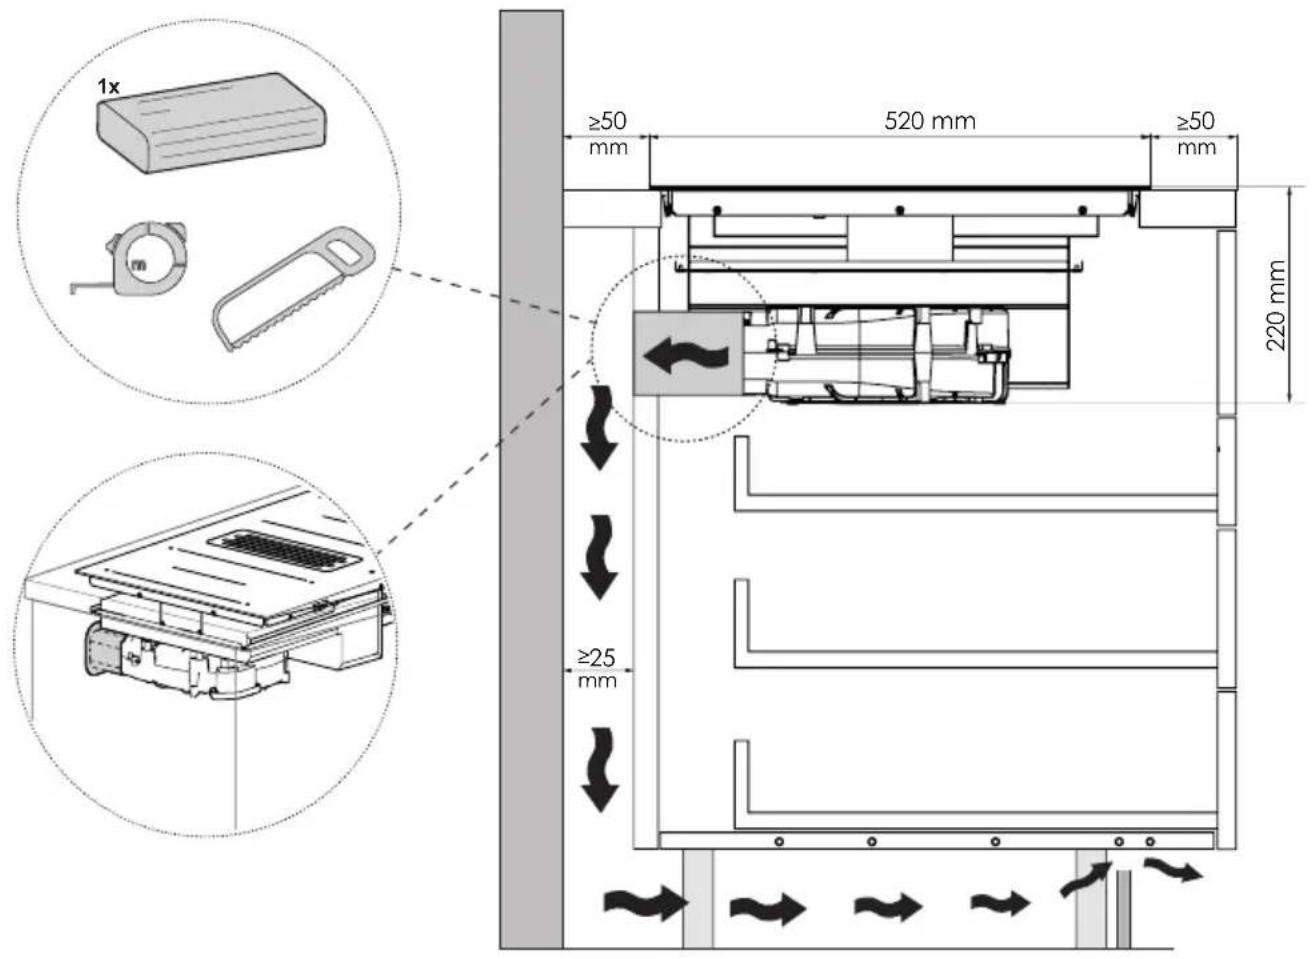
Once you have installed the panel following all the installation instructions, you must order the regenerative odour filters and install them as indicated:
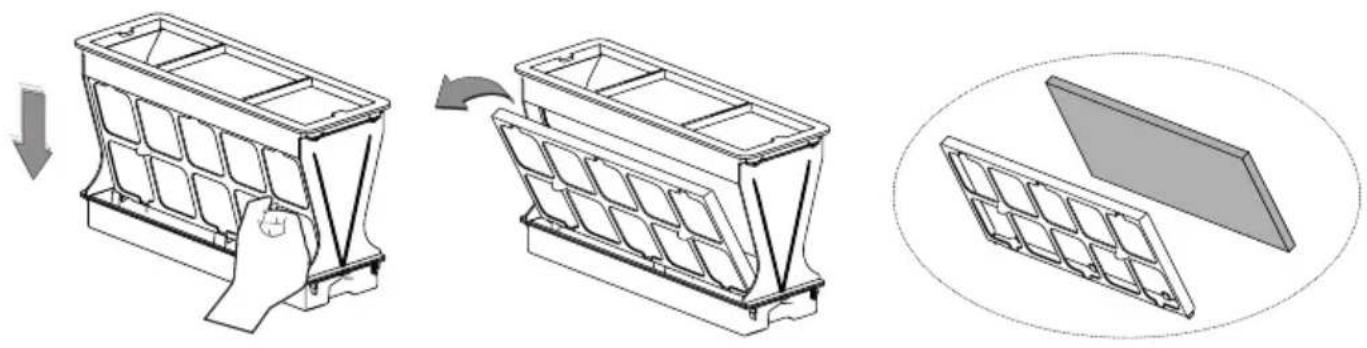
natural_image
Technical illustration of a plastic housing assembly with three stages: before, after, and post (no text or symbols)Suction version installation Suction version installation
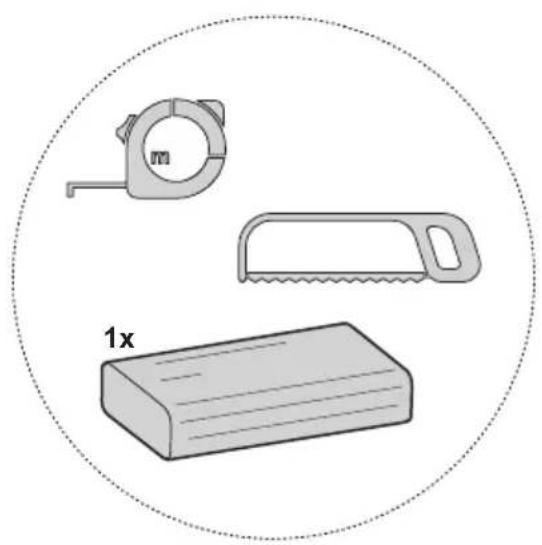
natural_image
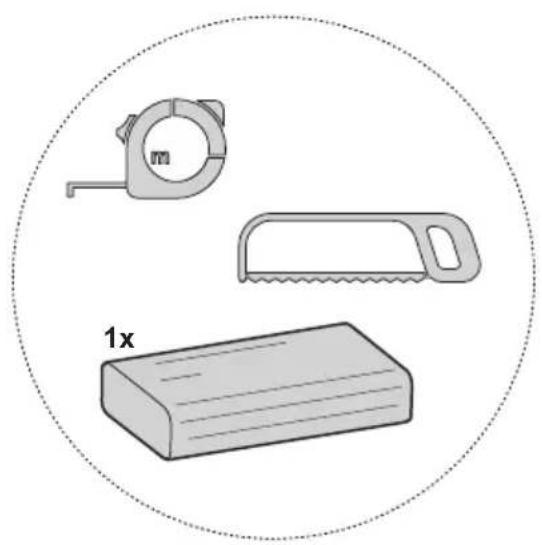
Illustration of a measuring tool with a tape measure, a saw, and a rectangular block labeled '1x' (no text or symbols on the objects themselves)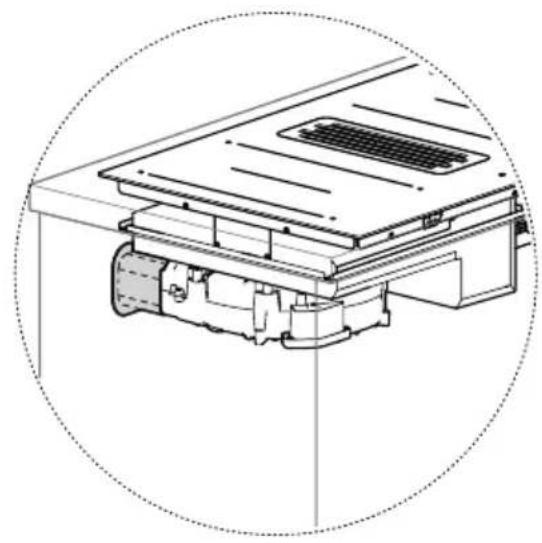
natural_image
Technical line drawing of a mechanical assembly with no visible text or symbols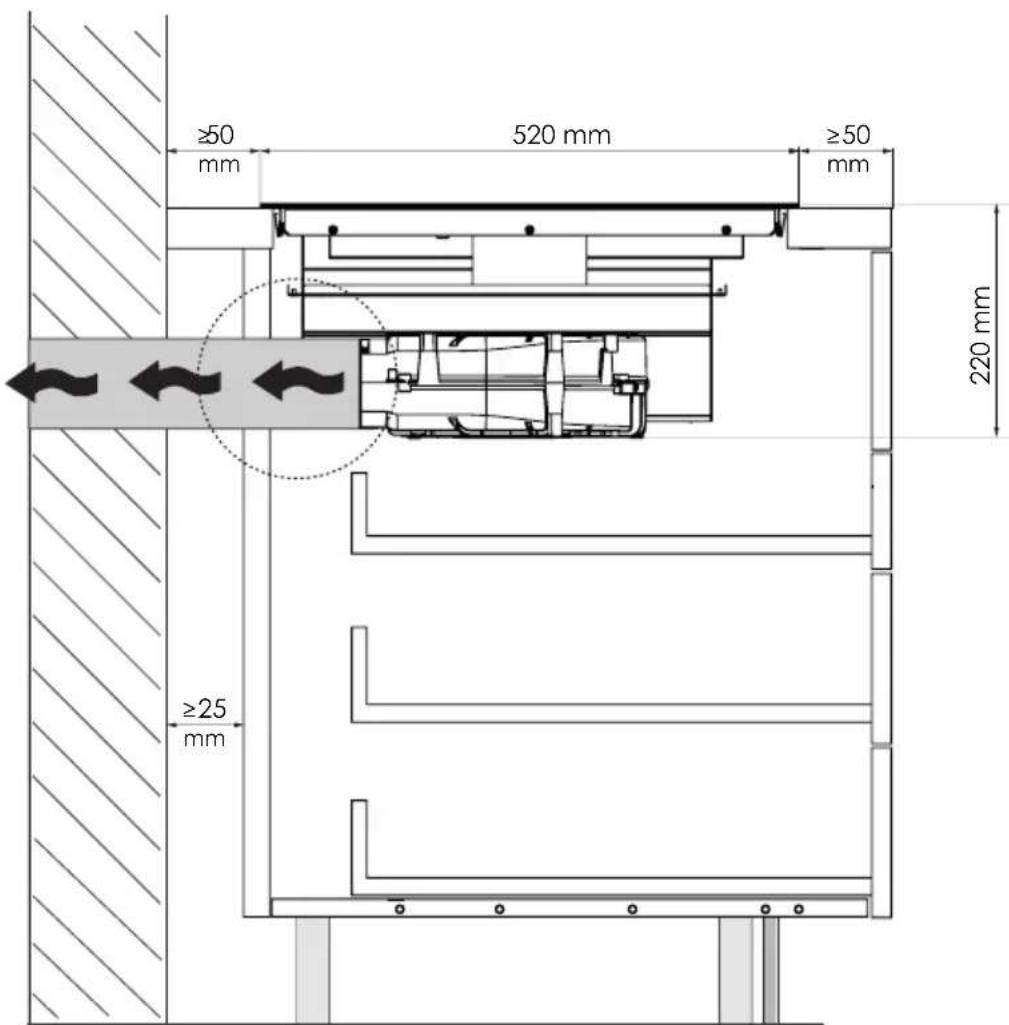
RECOMMENDED UTENSILS
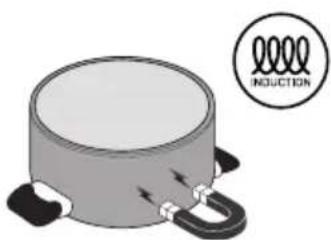
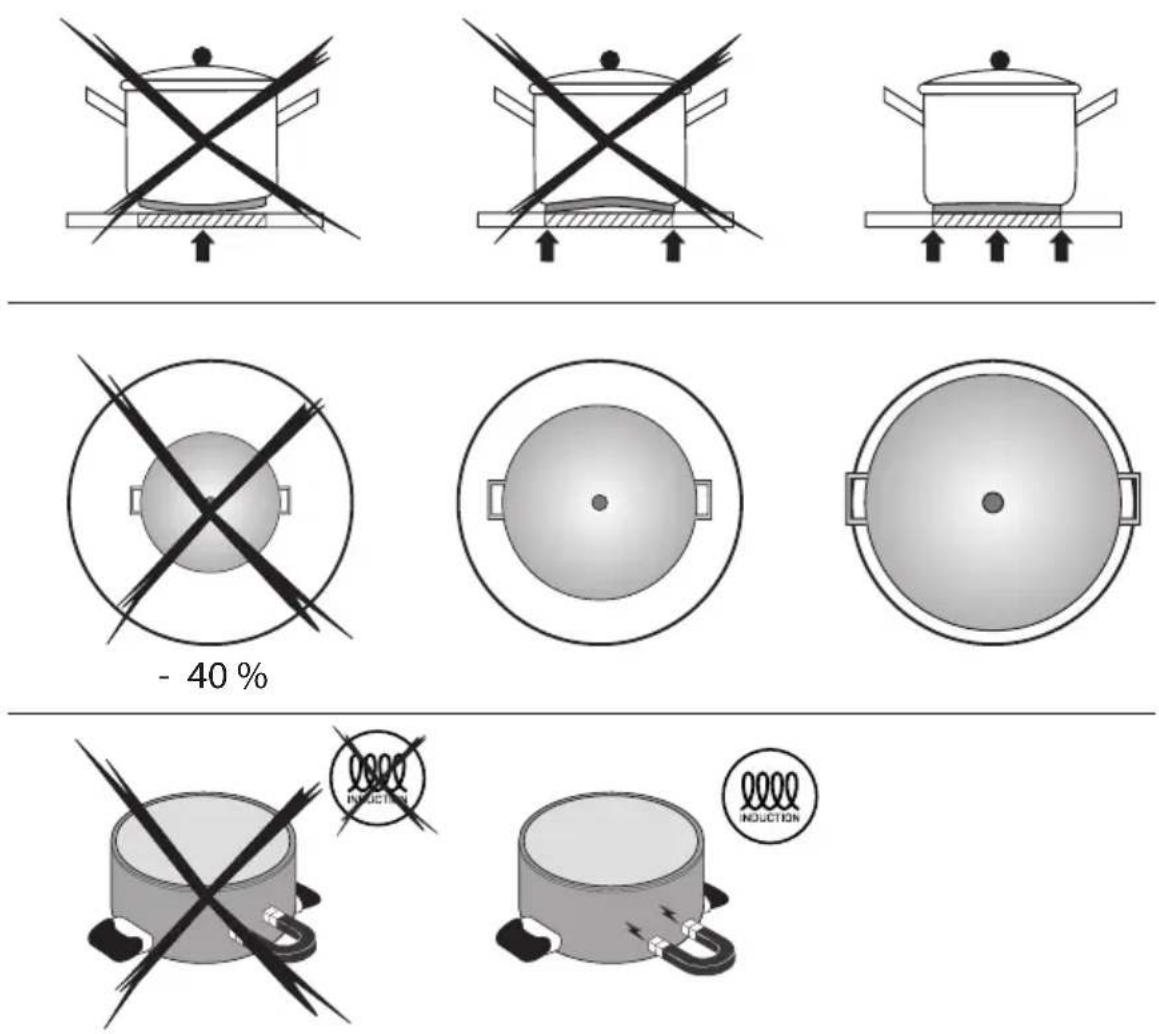
Induction cooking uses magnetism to generate heat. The cookware must therefore contain iron.
You can find out if your cooker is compatible:
- Use a magnet on the bottom of the cooker.
- Check for the presence of the induction symbol.
Important: To avoid permanent damage to the hob surface:
- Use only cookware with a perfectly flat bottom.
- Use cookware with a smooth base to avoid scratching the surface.
- Avoid metal pans with enamelled bottoms.
Pans to be used for cooking:
DISPLAY \*
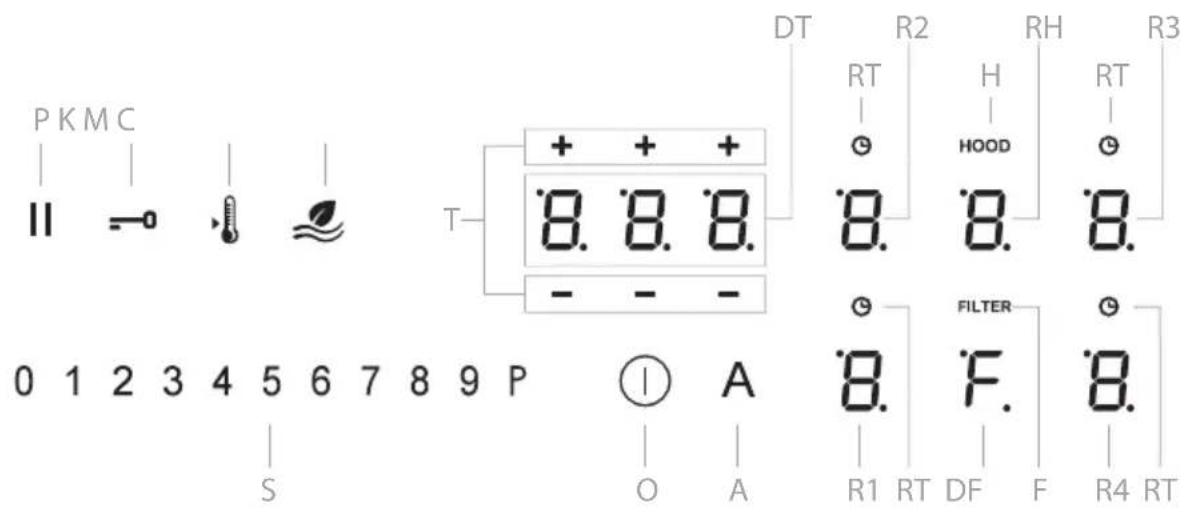
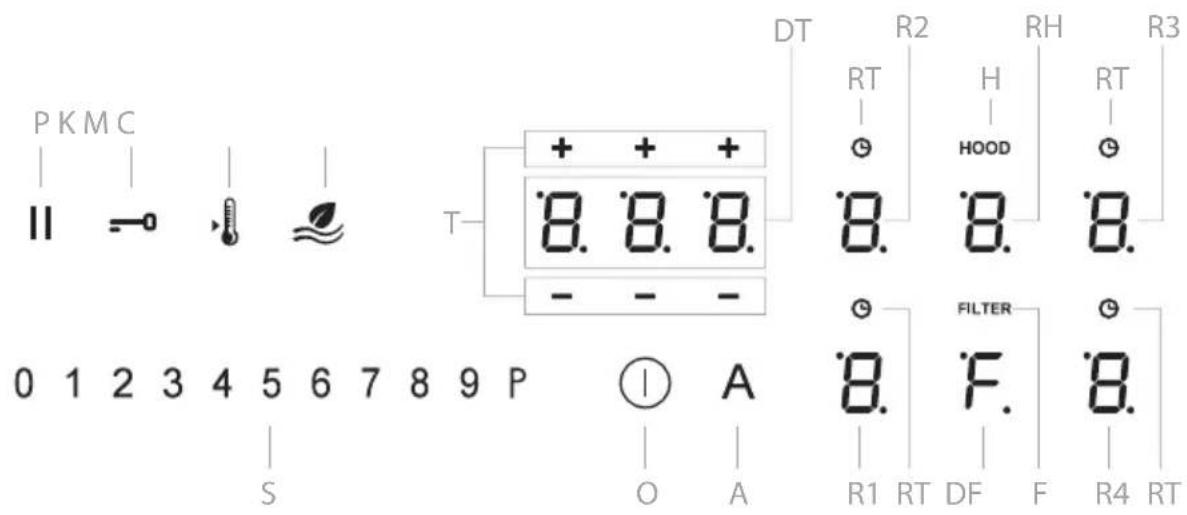
| Keys Function | |
| O ON/OFF cooktop and hoover. | |
| S | Cooktop and hoover slider. |
| R(1/2/3/4) | Cooking zone selection and display. |
| RT | Cooking zone timer activation. |
| H | Vacuum cleaner indicator and activation of regenerative filters saturation adjustment menu. |
| RH | Vacuum cleaner selection and display. |
| F | Anti-grease metal filters saturation indicator. |
| DF | Anti-grease metal and regenerative filters saturation display. |
| T | Timer area. |
| DT | Timer display. |
| A | Automatic hoover function. |
| P | Stop & go function. |
| K | Controls lock function. |
| M | Mealting function. |
| C | Clean air function. |
Your hob is equipped with a system that protects the electronic circuits, it is a safety system that prevents overheating in the event of prolonged use at high power. The device temporarily deactivates one or more cooking zones until optimum temperatures are restored.
Initial power setting
When you switch on your Suction plate for the first time all the displays will light up for a few seconds.
Then the displays will go off and only the A key will remain active and flashing.
ATTENTION: Before you start using your Hood, we recommend that you carry out the following settings:
Settings: Adjusting the power consumption
Within 2 minutes of connecting or reconnecting the Hood to the mains, the power of the cooking zones can be set to one of the following values: 7400 (preset setting), 4500, 3500 or 2800 watts.
This procedure will allow you to adapt the consumption to the real capacities of the electrical system in which the installation is installed.
Adapt the consumption by following the steps below:
- Press the key A* with one hand.
- Without releasing the key A* touch R4* - R3* - R2* and finally R1*.
Note: With each press a short beep will be emitted and the display R2* will show the symbols C and O alternately.
- Press the display R2*
- The display S* will light up. Select the power by pressing the value with which you want to set your product:
| Value KW Notes | ||
| 0 7,4 Standard setting | ||
| 1 4,5 | ||
| 2 3,5 | ||
| 3 2,8 | ||
- Confirm the setting by pressing the key OR* for 2 seconds (an acoustic signal will be emitted to confirm the change)
- Press any key to finish (except the key OR*)
Normal Use Of The Board
ON/OFF
Switch on the device by pressing the key OR*.
All activatable functions are switched on at a reduced brightness of 30%. The luminous intensity will increase as the various functions are activated.
To switch the hob off, press the O^* key again.
Note: If no function is activated within 20 seconds, the hob switches off automatically.

Handbook Activation Handbook Activa
- Switch on one or more cooking zones by pressing the key corresponding to the desired zone (R1*/R2*/R3*/R4*). (The selected display lights up 100%.)
- To adjust the power level, slide your finger from left to right or press directly on the specific point of the slider "S*". (The power goes from 0 to 9 and vice versa.)
- The display (DT*) shows the activity for the first 10 seconds.
Note 1: If after about 10 seconds no operation is performed and if one or more cooking zones are active, the selected display will return to the stand-by state (with 30% brightness).
Note 2: If after about 10 seconds no operation is performed and no zone is active, the suction plate switches off automatically.
Note 3: If you press on the zone display while it is in operation, it is possible to see in real time on the DT display the activity time.

Minute Minder (countdown) Minute Mi
The Minute Minder function is an independent countdown of the cooking zone and the suction zone.
It is possible to set the time up to a maximum of 1 hour and 59 minutes.
Activation procedure:
- Press the display DT*
- Use the buttons T^* to set the time;
- Wait 10 seconds without pressing any buttons for the timer to be activated;
- At the end of the countdown, the displays are reset to zero. An acoustic signal is emitted;
- The signal can be interrupted by pressing any key.
- To deactivate the function before the time runs out, select the zone and set the timer duration to 0.00 using the keys T^* .
Note: when the minutes are less than 10, a fixed point appears on the display DT* after the first number, showing the remaining minutes and seconds.
Note: the remaining time can be seen even when the hob is switched off.

Magnetic detector
As the hob is equipped with a pot detector in the cooking zones. If a missing pot is detected (if the pot is removed or if the pot is not suitable), the symbol
will appear. Note: Wait for the surface to cool down before handling it. der (countdown)

Booster function
The appliance is equipped with a "Booster" system which allows cooking times to be accelerated by applying higher power for a defined period of time.
Activation procedure:
- Select the desired cooking zone
- Slide your finger on the slider from left to right (0-P) or place your finger directly on the P.
- The P symbol will appear on the display corresponding to the cooking zone.
- The function will be active for 5 minutes. At the end, it will beep and cooking will continue at level 9;
- To deactivate the function, select the zone by returning the slider to 0 or to the desired power.
Bridge function Bridge function
The Bridge function allows the cooking zo- nes to operate in a connected manner, as if it were a single larger cooking area. This offers the opportunity to use larger pots and pans while maintaining an identical power level. This allows even cooking of food.
Activation procedure:
- Simultaneously select the zones that can be unified ( R1^+R2^ and/or R3^+R4^ );
- The symbol appears in the upper display (R2* and/or R3*);
- Set the desired power level using the slider;
- To deactivate the Bridge function, simultaneously select the unified zones.
Note: if the cooking zones timer is activated during the Bridge function, both unified zones will be switched off simultaneously, as they are considered as a single area.
◇ Cooking zones timer
This function allows you to set the time for the automatic switch-off of the selected cooking zone. All cooking zones can be programmed simultaneously at any power level (1...P) as each one has its own timer.
Activation procedure:
Note: The cooking zone must be set to a power level higher than zero.
- Press the key RT* of the corresponding zone;
- Use the keys T^* to set the time;
- The display DT* will show hours and/or minutes;
- Wait 5 seconds without pressing any key for the timer to be activated;
- At the end of the countdown, the displays are reset to zero. An acoustic signal is emitted;
- The signal can be interrupted by pressing any key. The cooking zone is switched off;
- To deactivate the function before the time runs out, select the zone and set the timer duration to 0.00 using the keys T*.
Note: if the timer is active for several zones at the same time, the display DT will always show the timer that is closest to its end.
Recall function:
In case of an unintentional stop of the suction plate, the previously activated settings can be restored within 6 seconds.
Restore procedure:
- Switch the suction plate on again with the key O^ . The key P^ flashes
- Press the key P^* to reset the settings.
- Procedure to reject settings:
- Wait 15 seconds or long press the key P^* .

Controls lock function: Controls lock
The function allows you to lock the panel settings to prevent accidental manipulation, leaving the functions already configured active.
Activation procedure:
-
Press the key K^* for about 1 second. The control lock is active.
-
Press the key K^* again to deactivate the function.
Note: If any other key is pressed while the control lock is active, the symbol will flash to indicate that the function is in use.
Note: The function remains active even after switching off and on again. In the event of a power failure, the function is deactivated.

Keep warm function (Melting) Keep v
With the keep warm function, food that has already been cooked can be kept warm at low power without the risk of burning.
Activation procedure:
- Select the desired cooking zone
-
Press M*
-
Verify activation by the symbol on the zone display.
- To deactivate, repeat the same procedure.

Heat-Up function:
The "Heat-up" function allows you to quickly bring a pan to maximum power before cooking to the desired level (see table)
| POWER | HEAT-UP TIME |
| 1 | 48 |
| 2 | 144 |
| 3 | 230 |
| 4 | 312 |
| 5 | 408 |
| 6 | 120 |
| 7 | 168 |
| 8 | 216 |
- Select the desired cooking zone
- Press and hold down a point on the slide control (from 1 to 8)
- Wait for the A symbol alternating at the set power level (e.g. power level 5 - 408 sec.). power level 5 - 408 sec.)
-
The cooking zone operates at maximum power for the preset time function (Melting) the end, the cooking zone automatically switches to the initial power setting.
-
By successively increasing the power level with the slider control "S*", the function remains active.
-
When this function is deactivated or automatically switched off, the cooking zone display will show the power setting.
Child safety Child safety
It is possible to prevent the hob from being used by children or persons in need of supervision.
Activation procedure:
- If there are no pots with cooking zones in operation, press any cooking zone selection key for 3 seconds and slide the slider from 0 to 9.
Note: the sequences must be carried out within 20 seconds. The displays indicate L to confirm activation.
- To deactivate safety, repeat the reverse procedure.
Stop & Go function Stop & Go function
This function allows you to temporarily suspend operation of the hob if you need to interrupt cooking.
Activation procedure:
-
Press the key P*; an acoustic signal will be emitted. All cooking zones are blocked and the corresponding displays show the symbol 1 1
-
Only the keys P^ and O^ will remain active;
-
To reactivate cooking, press the key P*
-
again. Press any other key within 10 seconds. The function is deactivated and the hob continues with the previous settings.
Note: cooking processes can be interrupted for a maximum of 10 minutes, after which the hob switches off automatically.
O.S.D. (Overflow Safety Device)
The Worktop has a safety system which switches off all the hobs and activates the safety block in the presence of liquids or objects in the control zone.
The display will show these flashing symbols which will be deactivated by removing the object or liquid. The Worktop will switch off automatically.
Safety shutdown
The appliance is equipped with a safety system which automatically switches off the cooking zones after the switch-on time limit has elapsed at a certain power level (see table).
| POWER | ON LIMIT TIME (hours) |
| 1 | 8 |
| 2 | 6 |
| 3 | 5 xml-ph-0031@deepl5 |
| Error Codes | |
| 7 | 1,5 |
| 8 | 1,5 |
| 9 | 1,5 |
Residual heat
After one or more cooking zones have been switched off, the H symbol shown on the display of the corresponding zone indicates the presence of residual heat.
Using the integrated Hood
It is recommended that the appliance is switched on before cooking any food. It is also recommended to let the appliance run for 15 minutes after the end of cooking for complete removal of the stale air.

Switching on the central hoover Switch
Activation procedure:
- Switch on the suction plate using the key O^*
- Press the key RH*
- Increase and decrease the suction power using the slide control.

Booster function central hooverBoos
The hoover is equipped with a "Booster" system which allows an additional level of suction by applying more power for a defined period of time.
Activation procedure:
- Select the specific display (RH*);
- Increase the suction power using the slider to P^* .
- The function remains active for 15 minutes, after which the vacuum plate switches off automatically.
- The remaining time can be seen on the display DT*.
- To deactivate the function, select the key RH* and return the slider to 0 or to the desired power.

Automatic Vacuum Function
The automatic vacuum function is activated by default when the hob is switched on for the first time.
When the Hood starts operating, the motor speed is indicated on the display RH^ and on the slider. The key A^ lights up at 100%. The key H^* also remains active at 100% on the central hoover all times.
If the power of at least one cooking zone is greater than or equal to 1, the Hood switches on at the most appropriate speed, adapting the suction capacity to the cooking level used (see table).
| Induction level | 1 | 2 | 3 | 4 | 5 |
| Motor speed | 1 | 1 | 1 | 1 | 1 |
| Induction level | 6 | 7 | 8 | 9 | P |
| Motor speed | 2 | 3 | 5 | 7 | 8 |
- When the cooking zones are switched off, the Hood adjusts its suction speed, gradually decreasing it, to eliminate residual vapours and odours.
- If, on the other hand, the booster is selected, the hob switches off after 15 minutes.
- If, with the active function, speeds between 1 and 9 are selected using the slider, automatic operation is temporarily interrupted (until the hob is switched off) and the hoover switches to manual mode. When switching back on, the automatic mode will be active again.
• If the hob is switched off with the automatic vacuum function active, the
Hood will automatically switch off gradually. When the hob is switched on again, the automatic suction function remains active.
- To deactivate the automatic function and return to the Handbook control, press the A^ key* for about 3 seconds after switching on the hob. The display RH^ shows the value 0 to indicate deactivation. The next time the hoover is switched on, it will be in manual mode.

Central hoover timer Central hoover
With the hoover active in manual mode and power between 1 and 9, it is possible to activate the timer up to a maximum of 1 hour and 59 minutes.
Activation procedure:
- Press the key H*. The display DT*
- will be activated. Press the controls T^* to set the desired time.
- To view the remaining time, press the display RH*.
- To cancel the timer, return the hours and minutes to 0.00.

Clean Air function
The Clean Air function is useful for purifying the air in the room 24 hours a day. When the function is activated, the hoover switches on every hour for 10 minutes at speed 1, for 24 cycles.
It is possible to activate the function within 10 seconds of switching on the control panel.
Activation procedure:
- Press the button C*
- When the motor is active (10 minutes) the symbols C^ and H^ are 100% illuminated. On the other hand, when the function is in stand-by (50 minutes) the C symbol is illuminated at 30%
- At the end of the 24 cycles the function is automatically deactivated and the symbol goes out.
Note: The function can be deactivated at any time by pressing and holding down the C key or by pressing the O key.
Note: The function is available again when the appliance is switched on again.

Off function with Delay
When cooking has finished and the hob is switched off, the extractor remains active for a further 5 minutes, setting the speed to the 2nd level.
The key H* and the slider will remain visible on the touchpad with the light at 100%.
Procedure for interruption: On the other hand, the value 2 and the remaining time will remain visible with the light at 30%.
- Press the key O^* for about 3 seconds and wait for the symbology to go out.
Note: The function is not activated in the following cases:
- At the end of the Clean Air function;
-
If the hob is switched on or off without activating any function except the Egg-timer;
-
At the end of cooking with the Hood switched off.
Note: the Delay function is always active, both in Handbook and automatic mode.
The Hood's proper operation depends on correct and constant maintenance; particular attention must be paid to the Filter and the active carbon filter.
- The function of the grease filter is to retain the grease particles suspended in the air, and it can therefore become clogged in relation to the time of use.
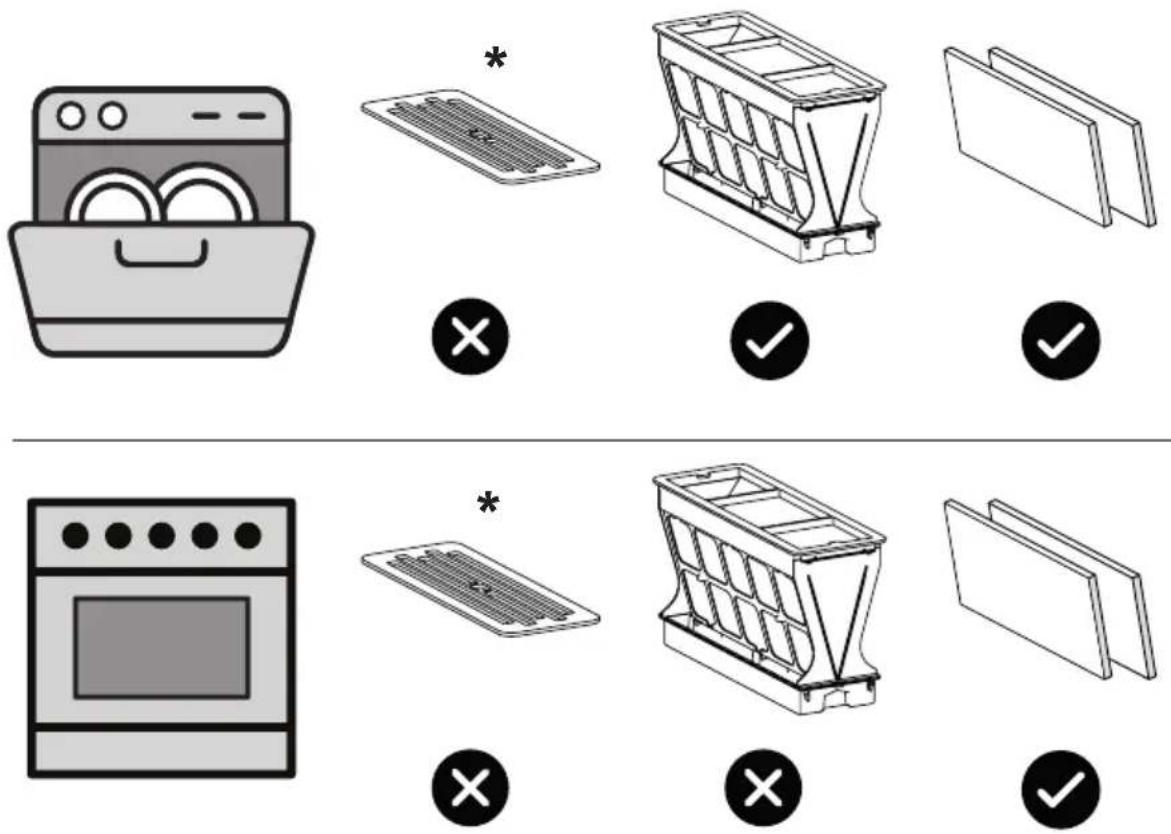
- To prevent the risk of fire, the grease filters should be washed by hand every 2 months at the latest, using neutral, non-abrasive liquid detergents, or else in the dishwasher at low temperature and short cycles.
• After a few washes, the colour of the filter may change. This does not entitle you to claim for its replacement.
- The odour filters are used to purify the air that is re-injected into the environment, with the aim of reducing unpleasant cooking odours.
- Regenerable activated carbon filters must be washed by hand, using neutral, non-abrasive detergents, or else in the dishwasher at a maximum temperature of 65°C (the washing cycle must be carried out without the dishes). Remove excess water without damaging the Filter and also remove the plastic parts, then dry the mat in the oven for at least 15 minutes at a maximum temperature of 60°C. To maintain the effective operation of the
regenerative filter, it is recommended not to exceed 8/9 regenerations.
- Before reassembling the grease filters and regenerative odour filters, dry them thoroughly.
- Clean the Hood frequently, both internally and externally, using a cloth dam-pened with denatured alcohol or neutral, non-abrasive liquid detergents.
Caution: Failure to follow the warnings on Hood cleaning and Filter replacement and cleaning causes fire hazards. It is therefore recommended that you follow the instructions given.
◇ Grease filter saturation indicator
The grease filter saturation indicator is activated by default. The signal is activated after a total time of use of the hoover of 40 hours.
With the appliance switched off, the key F^ is activated on the control unit and the display DF^ shows the symbol F^* .
Reset procedure:
- Clean the grease filters
- Press the key F^* for 3 seconds.
- The key F^ is deactivated and the display DF^ .
Activation of the odour filter saturation indicator
Activation is necessary if the device is in filter version.
This indicator is deactivated by default and is independent of the "grease filter saturation indicator" function.
Activation procedure:
- Press the display RH^* ;
- Hold down the H key until the F^ key is activated and the display DF^ is 100% bright;
- The display DF^* will indicate the Hood suction method value. The default value 0 is set (see table on the next page).
| Value Mode | Time to restart |
| 0 Aspirant Never | |
| 1 Heavy cooking 120 hours | |
| 2 Medium cooking | 180 hours |
| 3 Infrequent cooking | 240 hours |
Mode change procedure:
- Press the button F^* briefly and select the desired mode
- Confirm by holding down the button F^ for 3 seconds until the button goes out and the display DF^ .
- The mode is active.
Reset procedure:
• After the time has elapsed, depending on the selected mode (see table above), the keys F^ and DF^ are activated simultaneously to indicate that the odour filters need to be washed or replaced.
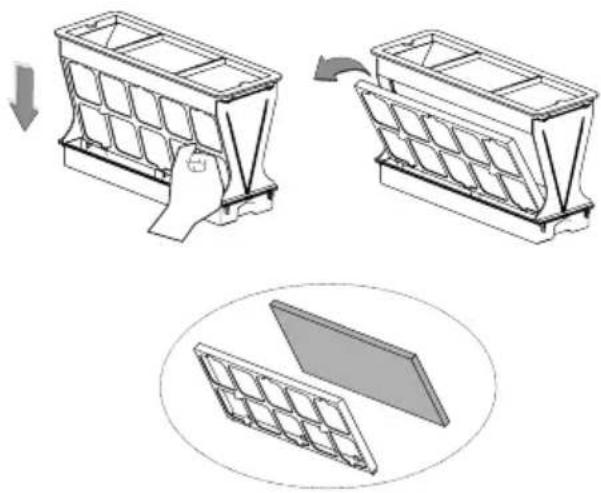
natural_image
Technical illustration of a mechanical component with three stages: top, side, and cross-section (no text or symbols)- Insert the filters
Note: at this stage it is possible to change the suction mode by briefly pressing the key F^* .
Reset the time by pressing the key F^ for 3 seconds until it goes out and the display DF^ .

MAINTENANCE
Cleaning the Hob
Remove food residues and grease drippings from the cooking surface with the special scraper provided. Clean the heated area as well as possible using SIDOL, STAHLFIX or similar products and a paper towel, then rinse with water and dry with a clean cloth.
Use the special scraper (optional) to immediately remove inadvertently melted fragments of aluminium foil and plastic material or traces of sugar or food with a high sugar content from the heated cooking zone. This will prevent possible damage to the cooktop surface.
Under no circumstances use abrasive sponges or irritating chemical cleaners such as oven sprays or stain removers.
ANY LIABILITY FOR ANY DAMAGE CAUSED BY NON-observance of the above warnings is DISCLAIMED.
Cleaning of components
*The rack should be washed by hand with hot water and neutral detergent and dried carefully to prevent rusting.
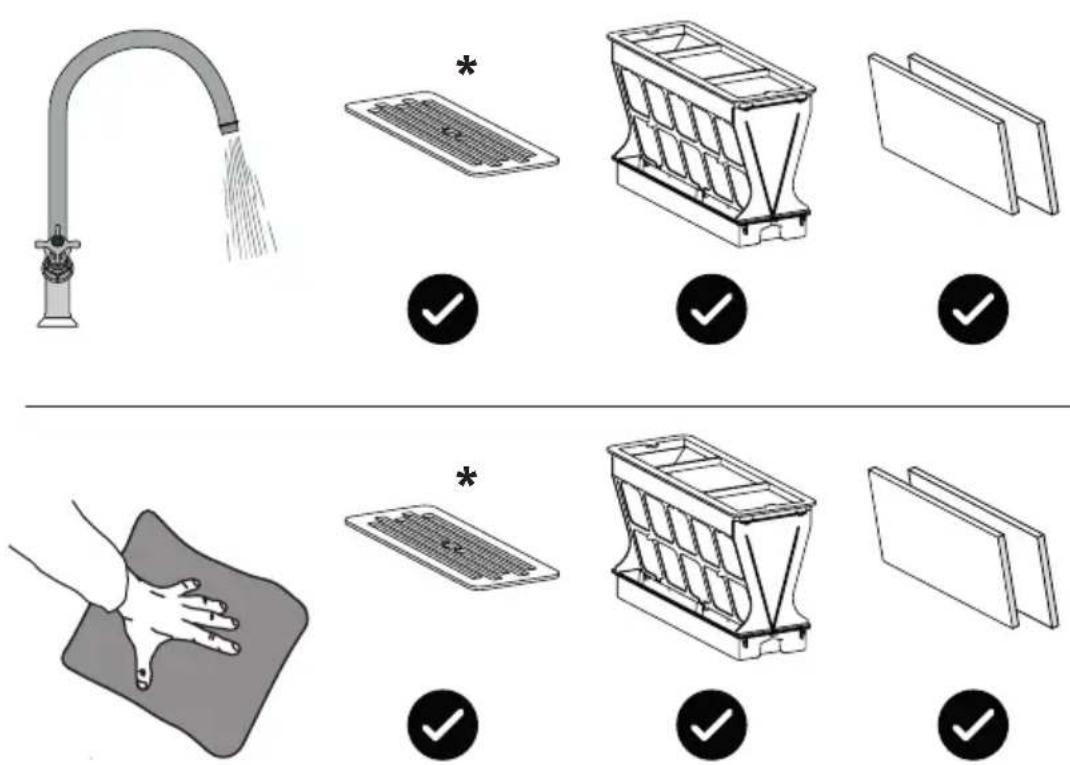
Error Codes
| Error codes: | Description: Possible causes: Error recovery: | |
| E2 | Overheating of the cooking zone. | Electronic temperature too high. Remove all pans and let the hob cool down. Restart afterwards. If the error persists contact service. |
| E3 | Unsuitable pan. The pan creates an unsuitable operating point in the module which can destroy the devices, e.g. IGBT. | The error is automatically cancelled after 8 s. and the cooking zone can be used again. If further errors occur, the pan must be replaced. |
| E4 | Start module not configured. | The start module is not configured. |
| E5 | No communication between UI and starter module. | No power supply to the starter module. |
| E6 | Main power interruption. | 1. Main power frequency detection failure.2. Excess voltage. |
| E7 | Internal error. - Contact service. E7 | Contact service. |
| E8 | Fan failure. | Defect in fan or electronic control. |
| E9 | Temperature sensor error for cooking zone. | Temperature sensor line is open or shorted. |
| EA | Hardware defect in starter module. | Faulty hardware device detected by module self-test. |
| EH | Temperature sensor blocked. | - |
Cleaning the liquid drip tray
In the event of accidental or abundant spillage of liquids from the pans, it is possible to intervene through the grease filter and the drain valve, located on the lower part of the suction plate, to remove any residue, guaranteeing maximum hygienic safety.
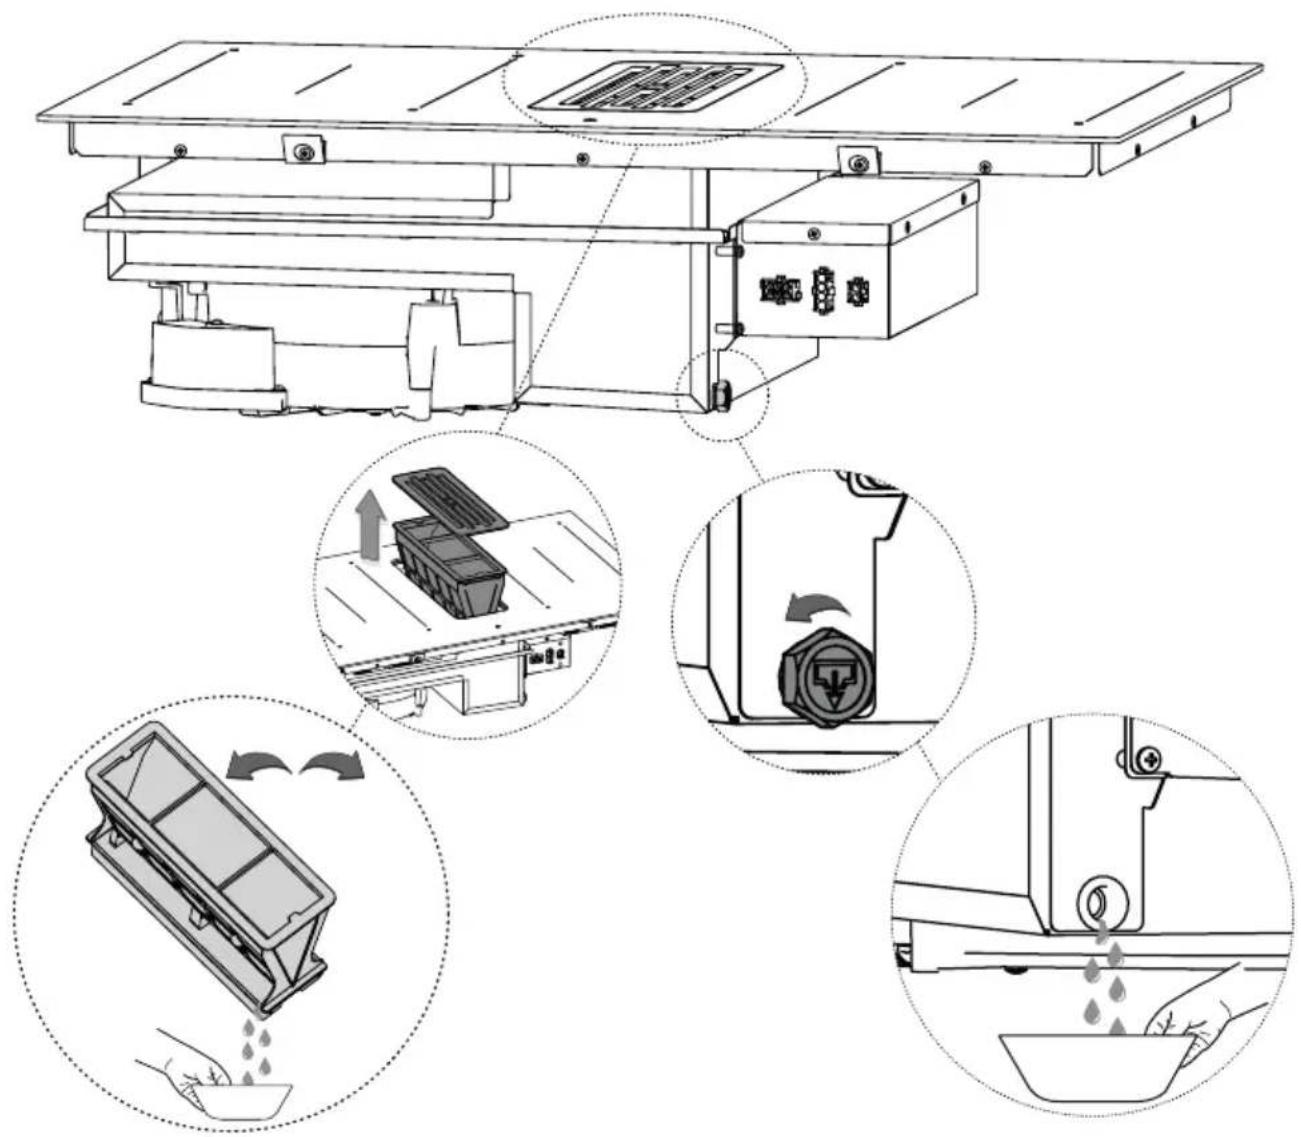
Tip: Periodically check the Drip trays according to the time of use.
| Pando - Hob Data Sheet | E395 E396 | |
| Product dimensions (mm) | 780 x 520 780 x | 520 |
| Dimensions (mms) | 490x760 490x760 | |
| Voltage (VAC) | 220 - 240 220 - 240 | |
| Frequency (Hz) | 50 - 60 50 - 60 | |
| Total Power W | 7400w 7400w | |
| Net Weight (Kg) | - | - |
| Tempered glass ceramic glass (edges) | Biselado/Recto Biselado/Recto | |
| Glass - Keraspectrum Quality | Sí Sí | |
| Glass - Schoot Quality | - | - |
| Power levels | 10 10 | |
| Colour Display | Azul Azul | |
| Cooking zones (no. of inductors) | 4 | 4 |
| Flexizones Bridge | 2 | 2 |
| ∅180mm (1400w) | - | - |
| ∅200mm (2000w) | - | - |
| ∅220mm (3000w) | - | - |
| ∅280mm (3000w) | - | - |
| ∅300mm (3000w) | - | - |
| ■ 220 x 180mm (3700w) | - | - |
| ∅180mm (2100w) | - | - |
| ∅280mm (3700w) | - | - |
| ∅280mm (2100w) | - | - |
| ∅290mm (3800w) | - | - |
| ■ 205 x 92mm (1850w) | - | - |
| ■ 210 X 190mm (2100w) | Sí | Sí |
Pando - Motor Hoob Data Sheet
V930e NE/BI
| Annual energy consumption | AEC_hood (KWh/a) | 42,7 |
| Energy Efficiency | EEI_class | A+ |
| Fluid dynamic efficiency | FDE_hood | 32,0 |
| Fluid Dynamics Energy Efficiency | FDE_class | A |
| Luminous efficacy | LE_hood (lux/W) | - |
| Luminous efficacy class | LE_class | - |
| Grease Filtration Efficiency | GFE_hood (%) | 86,5 |
| Grease Filtration Efficiency Index | GFE_class | B |
| Airflow under normal conditions of use | Q_min m3/h | 198,0 |
| Airflow under normal conditions of use | Q_max m3/h | 540,0 |
| Airflow in boost mode | Q_boost m3/h | 614,0 |
| Sound power in normal use | SPE_min dB(A) | 52,0 |
| Sound power in normal use | SPE_max dB(A) | 71,0 |
| Sound power in boost mode | SPE_boost dB(A) | 72,0 |
| Power consumption in off mode | P_o(W) | 0,0 |
| Power consumption in stand-by mode | P_s(W) | 0,49 |
| Directive | (EU) N° 66/2014 | |
| Factor increase over time | f | 0,8 |
| Energy efficiency index | EEI_hood (%) | 44,6 |
| Airflow at the point of maximum efficiency | Q_bep (m^3/h) | 327,6 |
| Air pressure at the point of maximum efficiency | P_bep (Pa) | 514,0 |
| Maximum air flow rate | Q_max (m3/h) | 540,0 |
| Power consumed at maximum efficiency point | W_bep (W) | 146,2 |
| Nominal power of the lighting system | WL (W) | 0,0 |
| Medium illumination of the cooking surface | E_middle (lux) | 0 |
INOXPAN S.L., thanks you for choosing and placing your trust in a product of our brand Pando, which is distinguished by its Quality, Design and Innovation, being faithful to its origins and commitments.
PANDO WARRANTY CONDITIONS:
This appliance is guaranteed for 3 years from the date of purchase and covers it against any manufacturing defect affecting its proper operation. In order for this warranty to be valid, it is essential to present the invoice or purchase receipt to the Pando Authorised Service technician.
During this period, the Company undertakes to replace or repair free of charge any defective part due to a defect or manufacturing defect in the appliance, until it is working properly, as well as the necessary labour and expenses incurred as a result of such repair or replacement.
EXCLUSIONS FROM THE PANDO WARRANTY:
The following cases will not be covered by the guarantee or could be cause for cancellation of the same, in which case the user will be responsible for the cost of materials, labour and travel expenses of the technical service:
• Installation or operation checks, cleaning or maintenance of the Hood and ducts.
- Breakdowns or damage caused by not respecting or following the safety instructions, recommendations for use and maintenance in the appliance's manuals.
- When the Hood is intended for commercial or non-domestic use, for which it is not intended.
- Malfunctions of the Hood due to non-compliance with the standards, instructions and recommendations indicated in the appliance's manuals.
- Problems caused by improper installation of the Hood or fume extraction duct.
- Breakdowns or damage caused by transport or moving, and handling of the Hood by unauthorised personnel not authorised by this company or the Pando brand.
- Blows, dents, scratches or scratches, broken glass.
- Presence of foreign bodies outside the appliance, inside or outside the product.
- If the Hood or peripheral parts such as the external motor are not accessible, because there are elements that prevent easy and safe access to it. The means required for the Pando Authorised technician to access the appliance will be the responsibility of the user.
- Improper handling of the wiring and connections of the internal, external or roof motor and the Hood.
- Aesthetic components, wear and tear, such as light screens, filters and lamps.
- Rust, stains, changes in tone caused by improper application or unprotected exposure to corrosive elements such as cleaning products not recommended by the manufacturer and unsuitable ones, such as those containing corrosive chemical agents, and exposure to sea breeze (saltpetre).
- Breakdowns or damage caused by variations in electricity supply or fortuitous and natural causes of atmospheric or geological origin such as storms, lightning, earthquakes, floods, etc.
- Appliances from resales, second hand, change of original owner of the appliance or from exhibitions that are more than two years old since their date of manufacture.
INOXPAN, S.L., is expressly excluded from any liability for any direct or indirect damage to persons or materials caused by improper handling of the appliance.
Contact details Official Pando Authorised Technical Service:
| SPAIN, PORTUGAL AND ANDORRA: | OTHER COUNTRIES: | ||
| ESwww.pando.es/asistencia-tecnica/ |  | ENhttps://www.pando.es/en/after-sales-services/ |  |
| FRhttps://www.pando.es/fr/service-apres-vente/https://www.pando.es/fr/service-apres-vente/ | |||
Pol. Ind. El Cros
SERVICIO POST VENTA

Environmental Management System Certification
UNE-EN ISO 14001:2015
ES20/208675



- Pando
- integralcooking
- E395 - E396
- The Global Kitchen Partner
- TRATAMIENTO DEL RESIDUO
- UTENSILIOS RECOMENDADOS
- Calor residual Calor residual
- UTENSÍLIOS RECOMENDADOS
- DISPLAY \*
- TRAITEMENT DES DÉCHETS
- Étape 2. Retirez le Filter.
- USTENSILES RECOMMANDÉS
- O.S.D. (Overflow Safety Device) O.S.D.
- ENVIRONMENTAL PROTECTION
- WASTE TREATMENT
- INDEX
- SAFETY WARNINGS....122
- INSTALLATION INSTRUCTIONS....128
- RECOMMENDED UTENSILS....136
- DISPLAY \* 137
- MAINTENANCE....147
- DATA SHEET 151
- GARANTÍA....153
- SAFETY WARNINGS
- Important safety instructions:
- Not covered by warranty:
- Precautions when using the appliance:
- Precautions during cleaning:
- Electric shock hazard:
- Cutting and burning hazard:
- Precautions to avoid damaging the appliance:
- Precautions in the event of appliance failure:
- INSTALLATION INSTRUCTIONS
- Precautions Before Starting Installation:
- Electrical Installation:
- Insulation class I
- Installation of the plate
- Step 2. Remove the Filter.
- Step 3. Turn the plate over and place it on a soft surface to ensure that it does not scratch the glass.
- Step 4. Fit the fixing brackets supplied to the long sides of the hob as illustrated below:
- Dimensions Built-in hob cut-out. Dimensions Built-in hob cut-out.
- Step 7. Select the type of extraction system you wish to install:
- • FILTERING VERSION
- • VACUUMING VERSION
- Filtering version installation Filtering version installation
- Suction version installation Suction version installation
- RECOMMENDED UTENSILS
- Initial power setting
- Settings: Adjusting the power consumption
- Adapt the consumption by following the steps below:
- Normal Use Of The Board
- ON/OFF
- Handbook Activation Handbook Activa
- Minute Minder (countdown) Minute Mi
- Magnetic detector
- Booster function
- Restore procedure:
- Controls lock function: Controls lock
- Activation procedure:
- Keep warm function (Melting) Keep v
- Heat-Up function:
- Child safety Child safety
- Stop & Go function Stop & Go function
- O.S.D. (Overflow Safety Device)
- Safety shutdown
- Residual heat
- Using the integrated Hood
- Switching on the central hoover Switch
- Booster function central hooverBoos
- Automatic Vacuum Function
- Central hoover timer Central hoover
- Clean Air function
- Off function with Delay
- ◇ Grease filter saturation indicator
- Activation of the odour filter saturation indicator
- MAINTENANCE
- Cleaning the Hob
- Cleaning of components
- Cleaning the liquid drip tray
- PANDO WARRANTY CONDITIONS:
- EXCLUSIONS FROM THE PANDO WARRANTY:
Brand : Pando
Model : E-395
Category : Range hood