H6 ID23B3CTW - Oven HAIER - Free user manual and instructions
Find the device manual for free H6 ID23B3CTW HAIER in PDF.

| Product type | Built-in oven |
| Brand | Haier |
| Model | H6 ID23B3CTW |
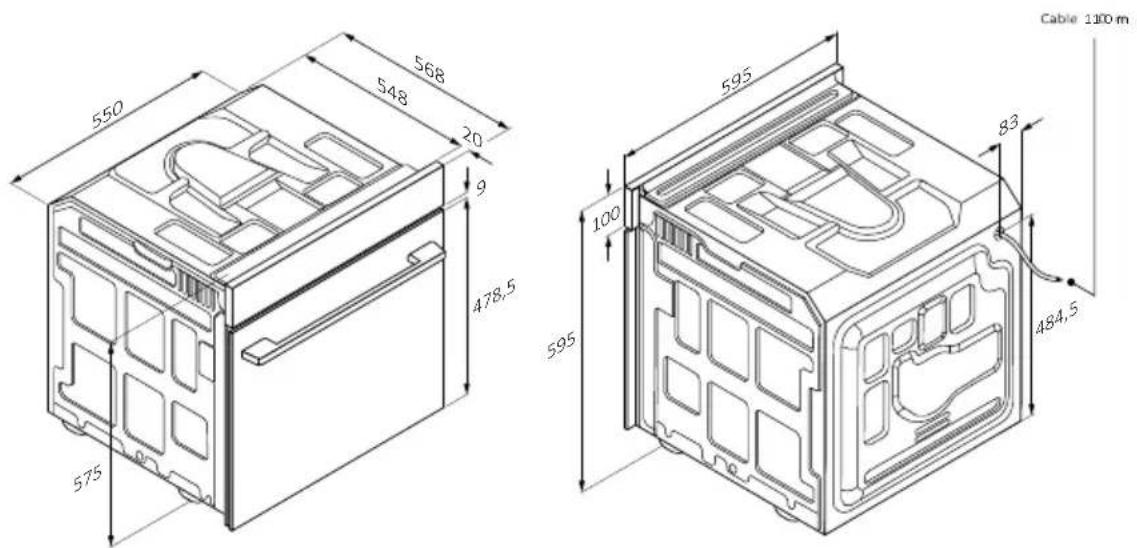
| Dimensions (W x H x D) | Approximately 595 x 595 x 575 mm |
| Net weight | Approximately 35 kg |
| Power supply | 220-240 V ~ 50/60 Hz, 16 A (adjustable 13 A) |
| Maximum power | 3.5 kW (approx.) |
| Cleaning type | Pyrolysis, Hydro Clean, Catalytic (catalytic panels) |
| Cooking functions | Natural convection, Multi-level, Supergrill, Gratin, Air fry, Pizza, Jolly, ECO, Gentle cooking, Everyday Cooking |
| Connectivity | Wi-Fi (IEEE 802.11 b/g/n), Bluetooth v4.2 |
| Remote control | Yes via hOn app |
| Child safety | Yes (screen lock) |
| Number of cooking levels | 6 or 7 depending on model |
| Lighting | Halogen bulb (efficiency class G) |
| Included accessories | Metal grid, oven tray, deep tray, drip pan, telescopic guides (depending on model), cooking probe (depending on model), rotisserie (depending on model) |
| Warranty | 2 years |
Frequently Asked Questions - H6 ID23B3CTW HAIER
User questions about H6 ID23B3CTW HAIER
0 question about this device. Answer the ones you know or ask your own.
Ask a new question about this device
Download the instructions for your Oven in PDF format for free! Find your manual H6 ID23B3CTW - HAIER and take your electronic device back in hand. On this page are published all the documents necessary for the use of your device. H6 ID23B3CTW by HAIER.
USER MANUAL H6 ID23B3CTW HAIER
Haier.com
English
Français
Italiano
Deutsch
Ελληνικά
Español
Nederlands
Português
Slovenčina
Slovenščina
Српски
Polski
Češ na
Dansk
Suomi
Norsk
Svenska
Казак
Русский
Українська
Български
Hrvatski
Română
Türkçe
تَيْبِرْعُلَا
中文 chinese
Magyar
בִרָה
Lietuvių
Ees
Latviešu
WELCOME
Thank you for choosing our product. To ensure your safety and get the best results, please read this manual carefully, including the safety instructions, and keep it for future reference.
Before installing the oven note the serial number, which you might need for repairs. Check for any damage during transportation and consult a technician if you're unsure before using it. Keep packaging materials away from children.
NOTE: Please note that the oven's features and accessories may vary depending on the model you purchased.
SUMMARY
1. SAFETY INFORMATION
2. PRODUCT INTRODUCTION
2.1. Overview of the product
2.2. Accessories
2.3. Control panel
2.4. Connectivity
3. BEFORE STARTING
3.1. Information to start
3.2. First usage
3.3. Preliminary cleaning
4. OPERATION OF PRODUCT
4.1. How the product works
4.2. Cooking functions
4.2.1. Standard functions
4.2.2. Special functions
5. COOKING GUIDELINES
5.1. General Cooking tables
5.2. Everyday Cooking tables
6. CARE & CLEANING
6.1. General recommendations
6.2. Cleaning the oven
6.2.1. Inside the oven: cleaning functions
6.2.2. Outside the oven: removal and cleaning the glass door
6.3. Cleaning of accessories
6.4. Maintenance
7. TROUBLESHOOTING
8. ENVIRONMENTAL PROTECTION & DISPOSAL
8.1. Appliance disposal
8.2. Saving and respecting the environment
9. INSTALLATION
GENERAL WARNINGS
- Do not use a steam cleaner for cleaning opera ons.
- CAUTION: in order to avoid a hazard due to inadvertent rese ng of the thermal cut-out, this appliance must not be supplied through an external switching device, such as a mer, or connected to a cir-cuit that is regularly switched on and o by the u lity
- During use the appliance become hot. Care should be taken to avoid touching heating elements inside the oven.
Use in accordance with attendend use
- Only use the oven for its intended purpose, that is only for the cooking of foods: any other use, for example as a heat source, is considered improper and therefore dangerous. The manufacturer cannot be held responsible for any damage resulting from improper, incorrect or unreasonable usage.
Use limitations
- The appliance can be used by children aged from 8 years and above and persons with reduced physical, sensory or mental capabilities or lack of experience and knowledge if they have been given supervision or instruction concerning use of the appliance in a safe way and understand the hazards involved. Children shall not play with the appliance. Cleaning and maintenance shall not be made by children without supervision.
- This appliance is not intended to be used by persons (including children) with reduced physical, sensory or mental capabilities, or lack of experience and knowledge, unless they have been given supervision or instruction concerning use of the appliance by a person responsible for their safety.
- Children should be supervised to ensure that they do not play with the appliance.
- ⚠WARNING: the appliance and its accessible parts become hot during use. Care should be taken to avoid touching heating elements
Children less than 8 years of age shall be kept at away unless continuously supervised.
- ⚠ WARNING: Accessible parts may become hot during use. Young children should be kept away.
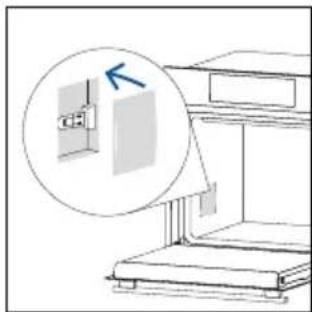
INSTALLATION WARNINGS
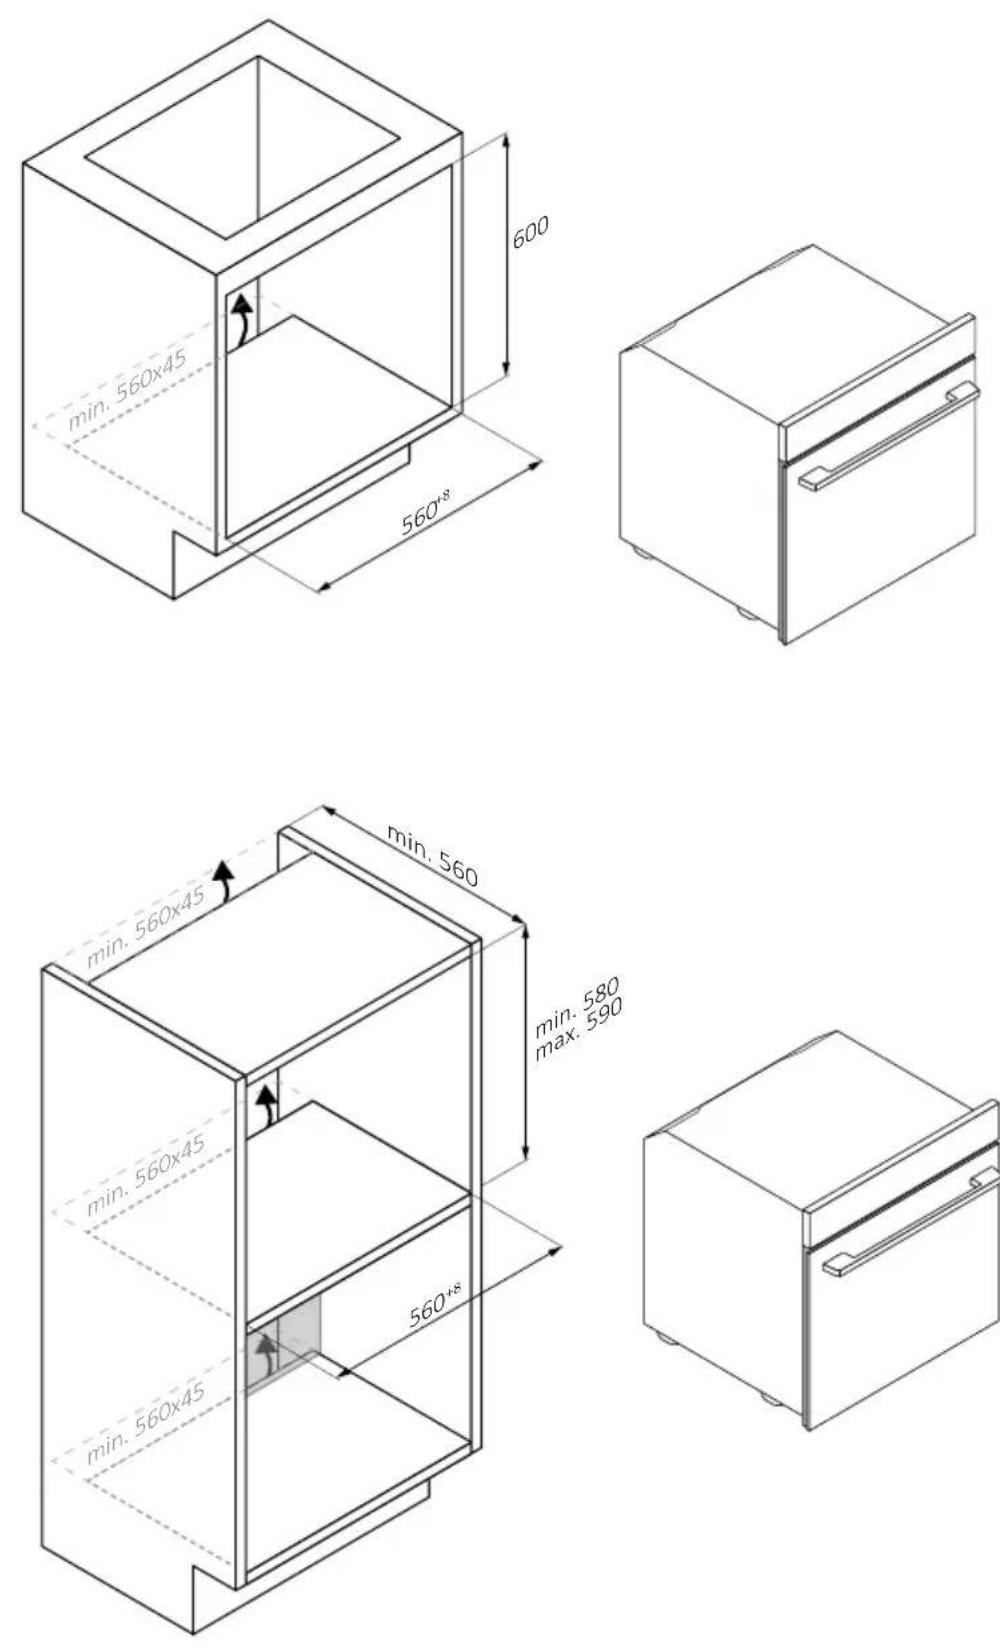
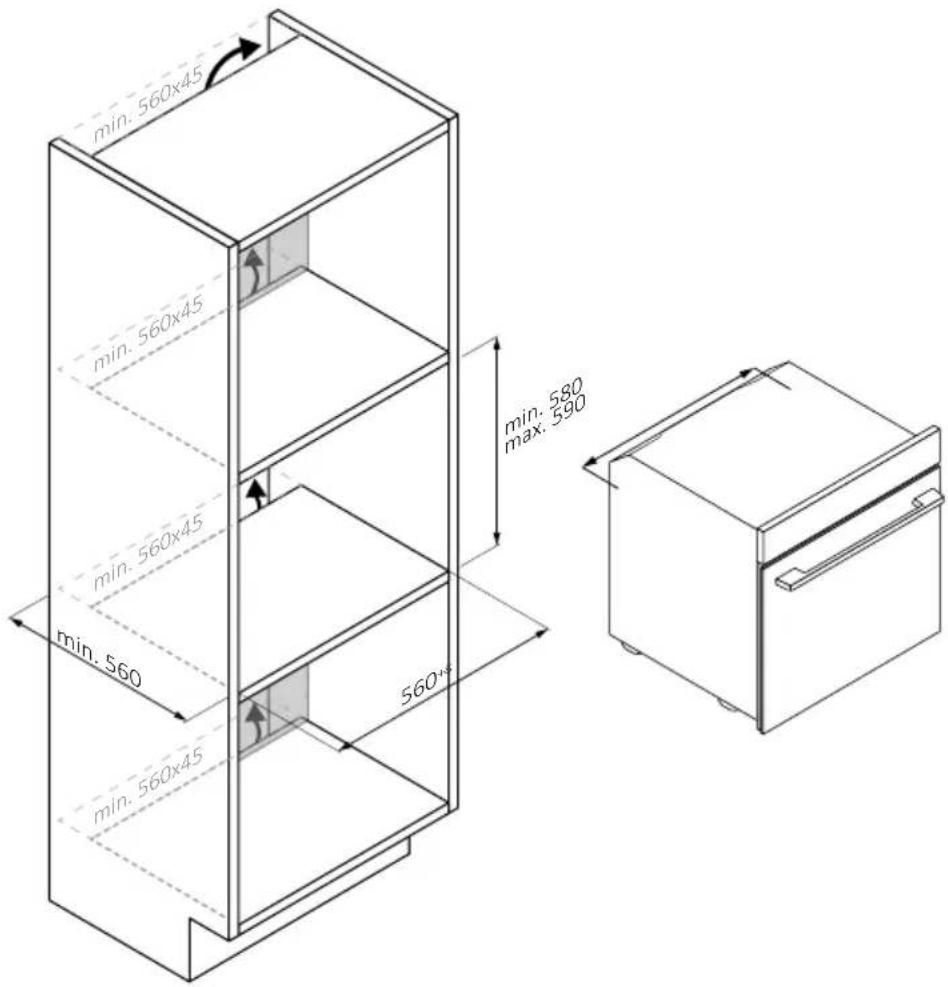
- The oven can be located high in a column or under a worktop.
- Before fixing, you must ensure good ventilation in the oven space to allow proper circulation of the fresh air required for cooling and protecting the internal parts. Make the openings specified on the illustrations according to the type of fitting. Always fix the oven to the furniture with screws provided with the appliance.
- No additional operation/setting is required in order to operate the appliance at the rated frequencies.
- The appliance must not be installed behind a decorative door in order to avoid overheating.
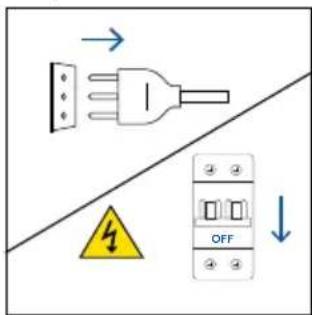
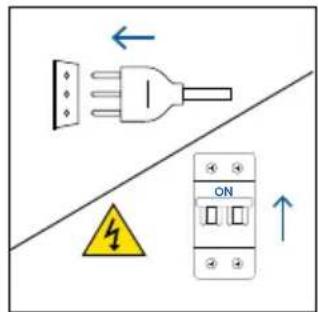
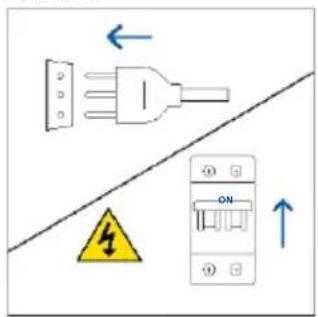
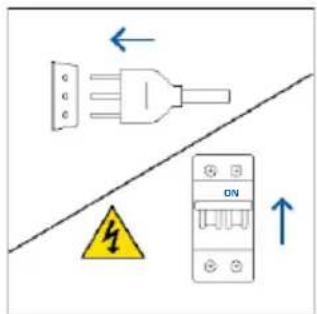
- During installation the oven should be disconnected from the mains to avoid overheating.
- If the assistance of the manufacturer is required to rectify faults arising from incorrect installation, this assistance is not covered by the guarantee. The installation instructions for professionally qualified personnel must be followed.
- Incorrect installation may cause harm or injury to people, animals or belongings. The manufacturer cannot be held responsible for such harm or injury.
- Installation must be carried on by a qualified technician who must know and respect the laws in force in the country of installation and the manufacturer's instruction.
- After unboxing the appliance, always check it is not damaged, in case of issue contact the customer service before installing and do not connect to the power supply.
- Remove the packaging material before operating the appliance.
- During installation do not use the oven door's handle to lift and move the oven.
- The installation furniture and the adjacent ones must with stand temperatures of 95^ .
- It is recommended to wear protective gloves during installation to
avoid cut injuries.
- Do not install the product in open environments exposed to atmospheric agents.
- This appliance is designed to be used at al tude lower than 2000m.
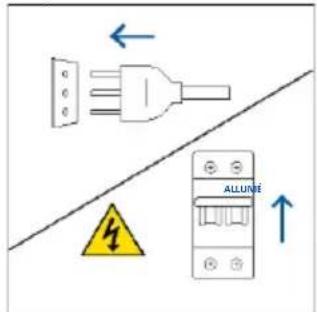
ELECTRICAL WARNINGS
- The socket must be suitable for the load indicated on the tag and must have ground contact connected and in opera on. The earth conductor is yellow-green in colour. This opera on should be carried out by a suitably qualified professional.
- Connec on to the power source can be made by plug or by xed wiring placing an omnipolar breaker, with contact separa on compliant to the requirements for overvoltage category III, between the appliance and the power source that can bear the maximum connected load and that is in line with current legisla on.
- In case of incompa bility between the socket and the appliance plug, ask a quali ed electrician to sub s tute the socket with another suitable type. The plug and the socket must be conformed to the current norms of the installa on country.
- The yellow-green earth cable should not be interrupted by the breaker. The socket or omnipolar breaker used for the connection should be easily accessible when the appliance is installed.
- If the supply cord is damaged, it must be replaced by the manufacturer, its service agent or similarly qualified persons in order to avoid a hazard. For any repairs, refer only to the Customer Care Department and request the use of original spare parts.
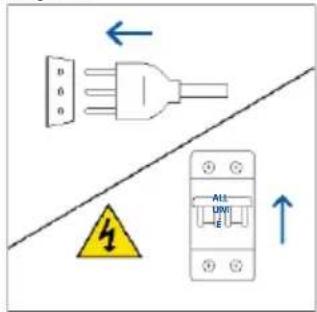
- Disconnect the appliance from the mains electricity supply before carrying out any work or maintenance on it.
- ⚠ WARNING: ensure that the appliance is switched o before replacing the bulb, to avoid the possibility of electric shocks.
- The oven must be switched o before removing the removable parts. A er cleaning, reassemble them according the instruc ons.
- The use of any electrical appliance implies the observance of some fundamental rules:
Do not pull on the power cable to disconnect the appliance from the power source;
Do not touch the appliance with wet or damp hands or feet;
∞ in general the use of adaptors, mul ple sockets and extension cables is not recommended;
in case of malfunc on and/or poor opera on, switch o the appliance and do not tamper with it.
- NOTE: as the oven could require maintenance work, it is advisable to keep another wall socket available so that the oven can be connected to this if it is removed from the space in which it is installed.
- Any repair, installation and maintenance not carried out correctly can seriously endanger the user.
- The manufacturing company hereby states that it does not assume any responsibility for direct or indirect damages caused by incorrect installation, maintenance, or repair work. Furthermore, it is not liable for damages caused by the absence or interruption of the grounding system (e.g., electric shock).
- CAUTION: in order to avoid a hazard due to inadvertent rese ng of the thermal cut-out, this appliance must not be supplier through an external switching device, such as a mer, or connected to a cir-cuit that is regularly switched on and o by the u lity.
- The appliance is not designed to be ac vated by an external mer or separate remote control system.
USE & MANTEINANCE
- The dripping pan collects the residues that drip during cooking.
- When you place the grid on the side racks, make sure that the shorter sec on of the side (between the stop and the extremity) is directed towards the interior of the oven. If the grid has a decora ve metal bar, pay a en on to posi on it on the exterior of the oven so that the brand logo can be visible and readable. For the correct posi oning refer also to the image in the Accessories sec on of this user manual.
- Do not use harsh abrasive cleaners or sharp metal scrapers to clean the oven door glasses, since they can scratch the surface, which may result in shading of the glass.
- Only use the temperature probe recommended for this oven.
- During cooking, moisture may condense inside the oven cavity or on the glass of the door. This is a normal condition. To reduce this effect, wait 10-15 minutes a user turning on the power before putting food inside the oven. In any case, the condensation disappears when the
oven reaches the cooking temperature.
- Cook the vegetables in a container with a lid instead of an open tray.
- Avoid leaving food inside the oven after cooking for more than 15/20 minutes.
- A long power supply failure during an occurring cooking phase may cause a malfunction of the monitor. In this case contact customer service.
- WARNING: Do not line the oven walls with aluminium foil or single-use protection available from stores. Aluminium foil or any other protection, in direct contact with the hot enamel, risk melting and deteriorating the enamel of the insides.
- WARNING: Never remove the oven door seal.
- CAUTION: Do not refill the cavity bottom with water during cooking or when the oven is hot.
- For a correct use of the oven it is advisable not to put the food in direct contact with the racks and trays, but to use oven papers and/or special containers.
WARNINGS (\*FOR PYRO OVENS)
- Excess spillage must be removed before cleaning.
-
▲ WARNING: before initiating the automatic cleaning cycle:
-
Clean the oven door;
- Remove large or coarse food residues from the inside of the oven using a damp sponge. Do not use detergents;
- Remove all accessories and the sliding rack kit (where present);
-
Do not place tea towels.
-
In ovens with meat probe it is necessary, before making the cleaning cycle, close the hole with the nut provided. Always close the hole with the nut when the meat probe is not used.
- During the pyrolytic cleaning process (if available), the surfaces may get hotter than usual and children should be kept away.
- If a hob has been fitted above the oven, never use the hob while the Pyrolizer is working, this will prevent the hob from overheating.
2. PRODUCT INTRODUCTION
2.1. OVERVIEW OF THE PRODUCT

2.2 ACCESSORIES
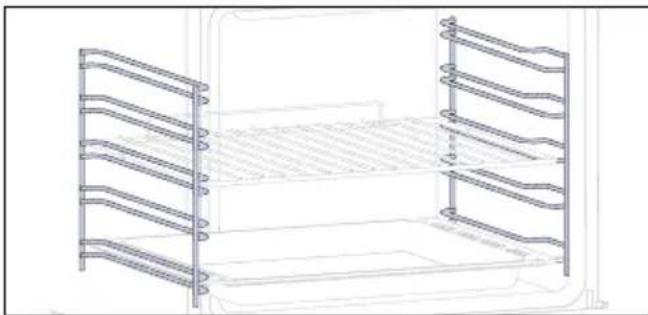
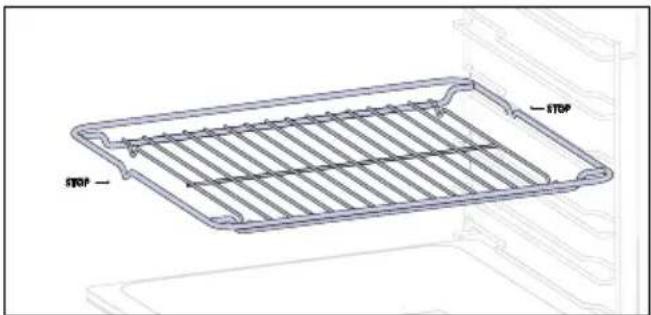
Lateral wire grids (only if present*)
natural_image
Line drawing of a two-tiered modular bed with horizontal and vertical metal racks (no text or symbols)Located on both sides of the oven cavity, the side racks are designed for placing baking tray and grids during the cooking.
NOTE: 6 or 7 levels depending on the model.
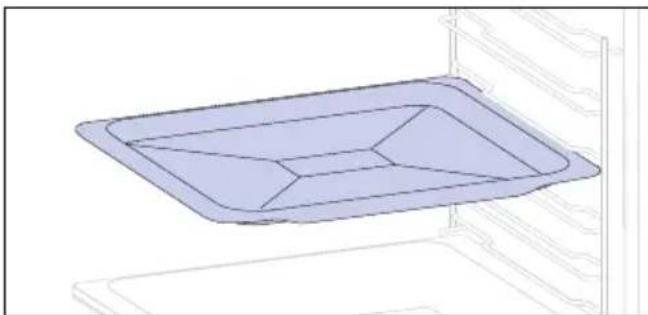
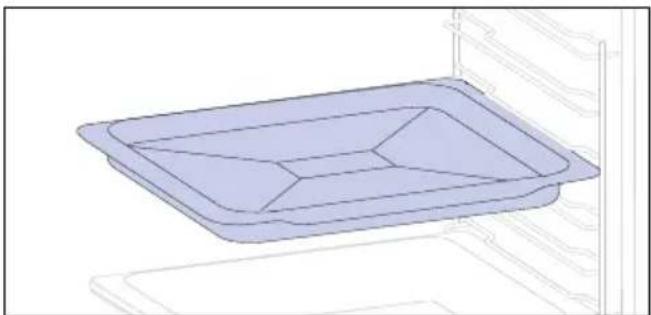
Baking tray (only if present*)
natural_image
3D diagram of a rectangular tray with internal geometric pattern, placed on a shelf (no text or symbols)A baking tray is ideal for achieving even bottom browning, making it perfect for cookies and pastries due to its shallow, flat design. Additionally, placing it under a cooking grid can help collect drips and prevent messes in the oven.
- Control panel
- Shelf positions numbers
- Grids
- Trays
- Fan cover
- Oven door
- Lateral wire grids (if present: only for flat cavity)
- Serial number & QRcode
natural_image
Empty white rectangle with black border (no text or symbols)Write here your serial number for future reference.
Metal grid
A metal grid in an oven is a removable, adjustable shelf that supports cookware, ensuring even cooking, and makes cleaning easy. It can be used to hold plates and pans at different heights for various cooking needs.
Deeper Tray
natural_image
3D line drawing of a rectangular tray with internal compartments, placed on an open shelf (no text or symbols)The deeper tray is ideal for recipes with added liquids or layers, such as casseroles or roasts. Its depth is specifically designed to ensure the desired consistency of the food prepared in it.
Telescopic Guides (only if present*)
Softclose/Soft open hinges (only if present*)
Telescopic oven rails are shelves that can be extended, making it easier to place or remove items, without the need to reach deep inside a hot oven. They improve safety, stability, and can be adjusted at different level positions.
Soft close and open hinges control the door's motion, ensuring smooth movement and preventing slamming.
Dual tray – BBQ mode (only if present*)
Dual tray – STEAM mode (only if present*)
The concave shape allows a correct circulation of humidity generated in cooking, keeping the food humidity rate high. According to the quantity of water inserted in the tray, a drier or more “wet” cooking will be obtained.
The convex shape is suitable for grilling in the oven at high temperature (220°) allowing a BBQ result even at home with little smoke thanks to the drainage action of the fats on the bottom of the tray.
Turnspit (only if present*)
Meat probe (only if present*)
The turnspit works together with the top heating element, by rotating the food can be cooked omogeniously. It is best used for medium-sized food. Ideal for rediscovering the taste of traditional roast.
This Meatprobe is a temperature sensor that, inserted into the food and connected to the oven via cable, allows to control the inner temperature of the food during cooking. It is mainly used for fish and meat.
Airfry tray (only if present*)
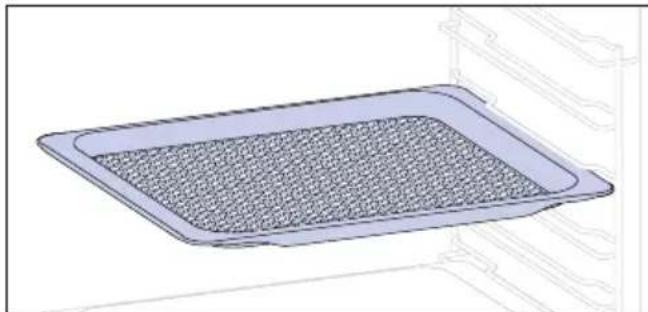
natural_image
3D rendering of a rectangular tray with a mesh pattern inside, placed on an open shelf (no text or symbols)The airfry tray ensures that hot air reaches the food evenly and tridimensionally, resulting in a crispier exterior while maintaining tenderness inside. To collect juices and breading, place it on top of the baking tray.
2.3 CONTROL PANEL

Functions and function ranking can be changed depending on the model.
- Function selector knob
- Time
- Temperature
- LED display 7
- Remote control
- Lamp
- Dial control
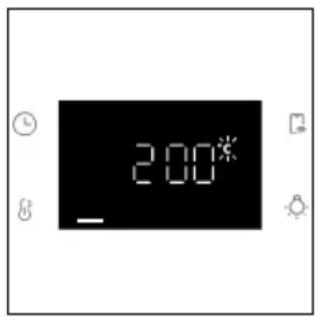
MAIN FUNCTIONS
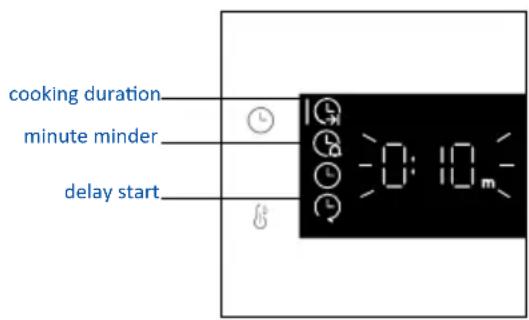
The display has 4 main functions:
| Symbol Function Description | ||
 | Time | Press once for cooking duration, twice for the minute minder (available in standby mode), three times for the time of day, and four times for delay start. In standby mode, only the kitchen timer is accessible. |
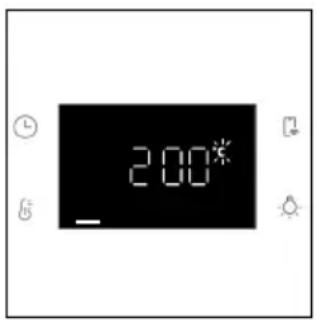
 | Temperature | Press once to check the cavity temperature, press and hold for 3 seconds to activate the fast-pre - heating option (only available during the oven's preheat phase). When the preheat is active, the released icon will be shown on the display. |
 | Remote Control on/off | Press the button to activate remote control, after pairing the oven with the hOn app (through the application). |
 | Light Press to turn on/off the oven cavity light. | |
2.4 CONNECTIVITY
Wireless parameters
| Technology Wi-Fi Bluetooth | ||
| Standard IEEE 802.11 | b/g/n Bluetooth v4.2, BR/EDR, BLE | |
| Frequency Band(s) [MHz] | 2401 ÷2483 2402÷2480 | |
| Maximum Power [mW] | 100 10 | |
Product information for networked equipment
Power consumption of the product in networked standby if all wired network ports are connected and all wireless network ports are activated:
2,0 W.
How to activate wireless network port:
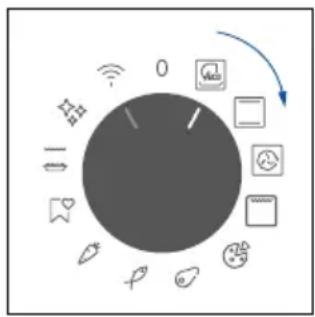
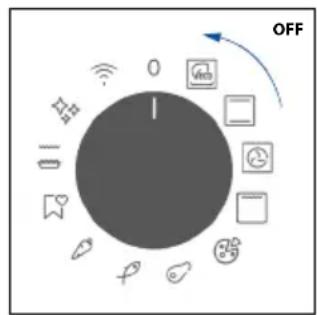
WIFI module switches on as soon as the function knob is set to a position different to zero.
How to deactivate wireless network port:
WIFI module is always off when the function knob is set to zero position.
If the knob is set to different position, go to WIFI menu and select off to deactivate the WIFI.
Hereby, Candy Hoover Group Srl declares that the radio equipment is in compliance with Directive 2014/53/EU and with the relevant statutory requirements for the UK market. The full text of the declaration of conformity is available at the following internet address: www.candy-group.com
HOW TO INTERACT WITH THE APP
Your appliance may be connected to your home wireless network and operated remotely using the app. Connect your appliance to ensure it stays up to date with the latest software and features.
NOTE
- Once the oven is turned on, the WIFI icons blinks for 30 minutes. During this period it's possible to enroll the product.
- Ensure your home Wi-Fi network is turned on.
- You will be given step by step guidance on both your appliance and mobile device.
- It may take up to 10 minutes to connect your oven.
- For further guidance and troubleshooting, please refer to the app.
Download on your smartphone.
NEW USER REGISTRATION
- Click on "Register"
- You can register through social accounts or sign up with your personal email
QUICK PAIR ENROLLMENT
Step 1
- Select "Add appliance".
Step 2
- Allow your location permission.

Allow your location permission
To enhance your experience, please allow location permission to hOn app in the next step.


CONTINUE
Step 3
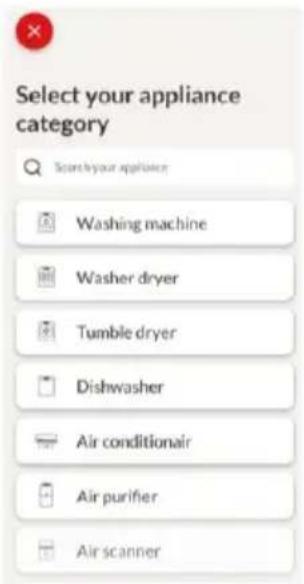
- Select oven from the appliance category.

Select your appliance category

Search your appliance

Washing machine

Washer dryer

Tumble dryer

Dishwasher

Air conditionair

Air purifier

Air scanner
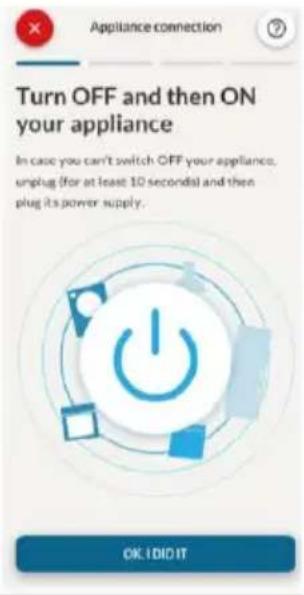
Step 4
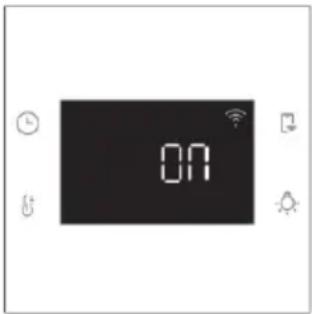
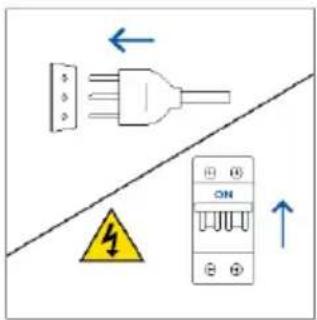
- Turn on your appliance; if it is already on, turn it off and on again.

Appliance connection

Turn OFF and then ON your appliance
In case you can't switch OFF your appliance, unplug (for at least 10 seconds) and then plug its power supply.

natural_image
Circular icon with a blue 'Power' button surrounded by abstract geometric shapes (no text or symbols)OK, I DID IT
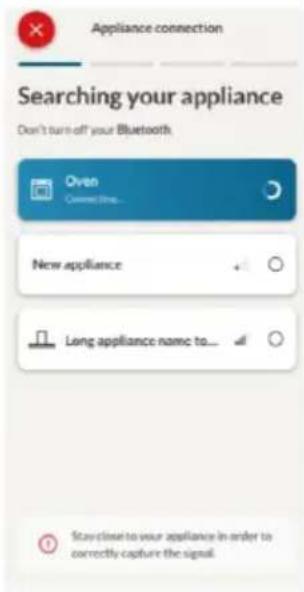
Step 5
• After turning on, the hOn app will start searching for your home appliance.

Appliance connection
Searching your appliance
Don't turn off your Bluetooth. bOn app is looking for your appliance...

pie
| Time | Value | |---|---| | 00:00:40 | 40 |
Stay close to your appliance in order to correctly capture the signal.
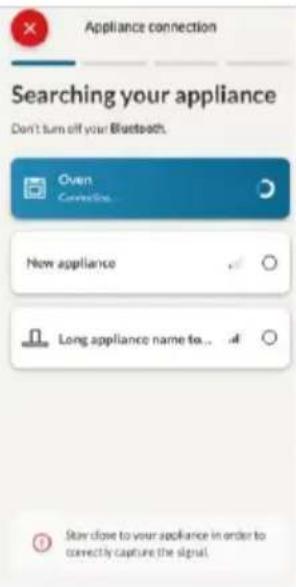
Step 6.1-6.2
- Select your home appliance, tap on "connect" and wait a few seconds.

Appliance connection
Searching your appliance
Don't turn off your Bluetooth.

Oven


Long appliance name to..

CONNECT
PRODUCT NOT FOUND

Appliance connection
Searching your appliance
Don't turn off your Bluetooth.

Oven Connecting

New appliance


Long appliance name to...


Stay close to your appliance in order to correctly capture the signal.
Step 7
- Your Oven will be found and you can control it through hOn.

Appliance connection

Your appliance has been correctly identified!
Brand Hoover Model 31008486-7888-1824 Serial number 12345678-1234-1234
Is this your appliance?
YESITS MY OVEN
NO IT'S NOT

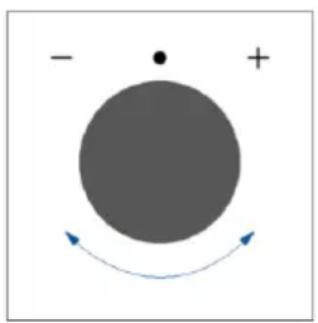
HOW TO CHANGE WIFI SETTINGS
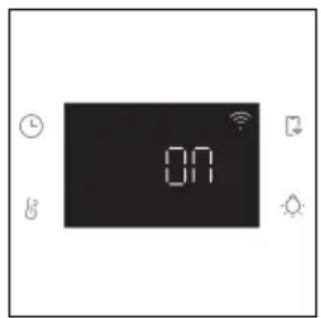
Once the appliance is enrolled, the user can change the WIFI settings between:
- WIFI ON: It is only possible to monitor the oven status by App.
• WIFI OFF: The oven is not connected but still enrolled with network credentials saved. -
WIFI RESET: The connection is reset and a new enrollment is possible.
-
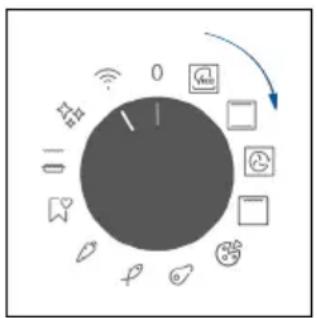
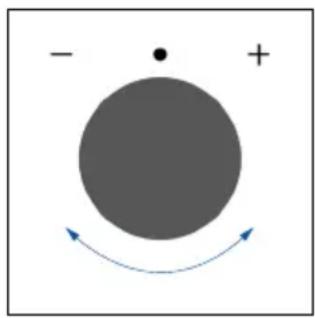
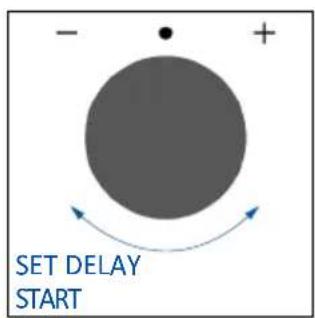
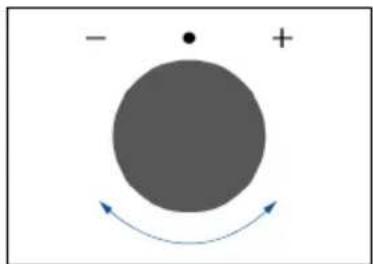
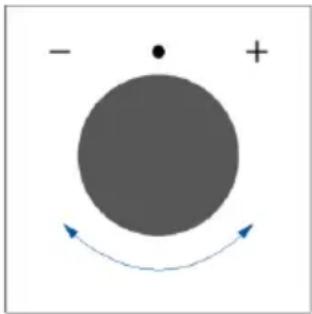
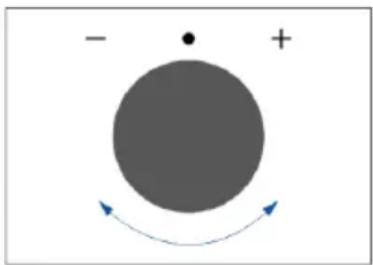
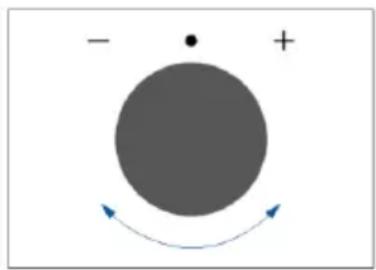
Turn the function knob on WIFI menu.
- On display appears "On".
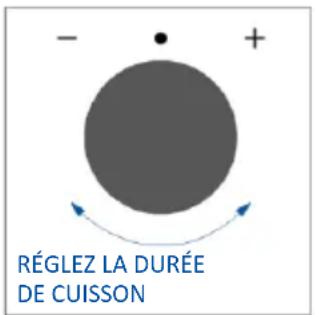
- Rotate the dial control until "Off" or the reset setting "rSt" will be showed.
natural_image
Simple diagram with a gray circle, a dot, and a plus sign, with curved arrows indicating direction (no text or symbols)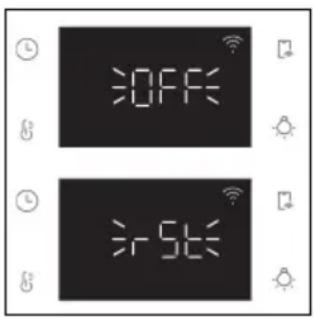

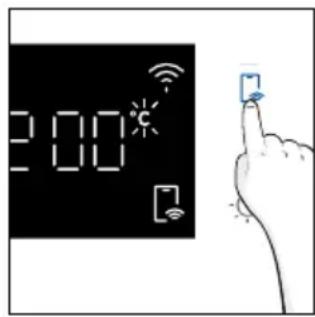
REMOTE CONTROL
The Remote Control offers numerous advantages for users, enhancing convenience, efficiency, and the overall cooking experience, by giving the capability to control the product directly from both the appliance and hOn App
This function allows, through your device, to enjoy various features, such as: instant or scheduled start of recipes or cooking programs already available in the app; real-time monitoring of the progress of your recipes; adjustment of the cooking parameters in use; monitoring of the cooking process using the probe; managing saved recipes using the "Jolly function" on the product (see related section). Furthermore, it is possible to receive notifications once programs or recipes are completed. The Remote Control can be activated exclusively when the product is enrolled.
NOTE: It is available for all cooking functions on the product, except for Gratin and Supergrill programs.
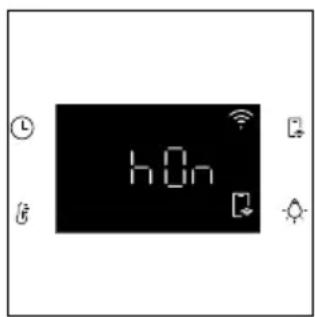
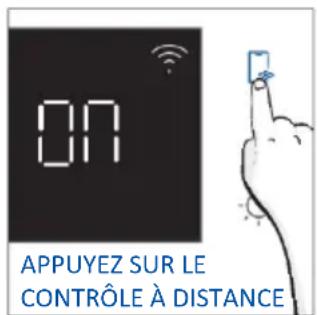
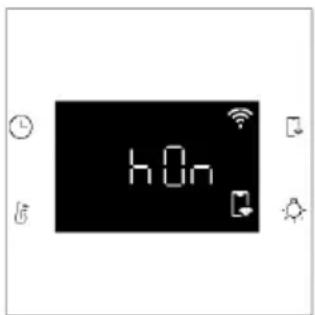
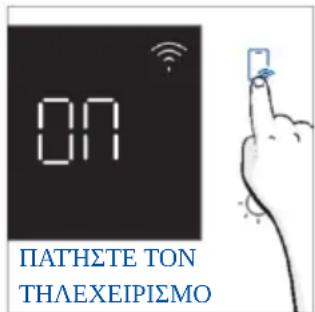
How to activate Remote Control:
- Turn the function knob on WIFI menu.
- Press
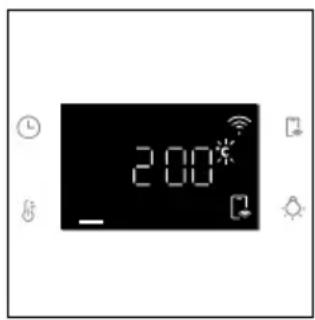
- On display appears "hOn". Both WIFI and Remote Control icons will be shown.
- Access to the App, select a program and let the cooking starts. During the process is possible to control and change the program parameters from both product and App.

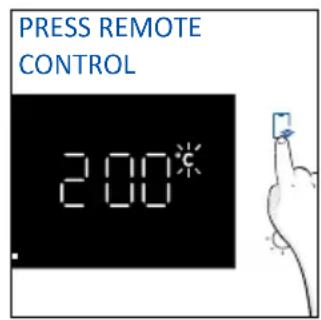
It's also possible to activate Remote Control during cooking process by pressing related button
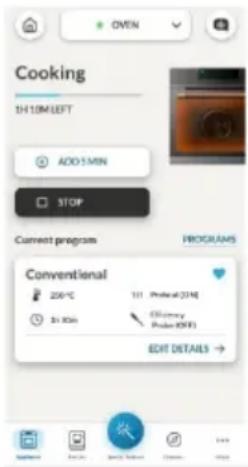
How to stop Remote Control:
While the cooking program is in progress, it can be stopped directly from the product itself by rotating the function knob to a different position. These actions interrupt the cooking process. Another way is by pressing the corresponding button of Remote Control that came with your appliance. These actions interrupt the cooking process.
flowchart
graph TD
    A["Signal"] --> B["Wi-Fi"]
    B --> C["Camera Icon"]
    C --> D["Display Icon"]
    D --> E["Smart Display Icon"]
    E --> F["Control Panel Icon"]
    F --> G["Feedback to Display Icon"]
    G --> H["User Interface Icon"]
    H --> I["External Display Icon"]
You can also stop the cooking program remotely using the app by clicking the 'STOP' Button on display device. The oven will automatically stop the cooking.
NOTE: If the user stops the cooking in progress from the oven, simultaneously the stopped cooking will be seen in the App.
3. BEFORE STARTING
3.1. INFORMATION TO START
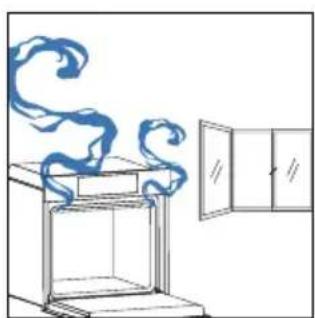
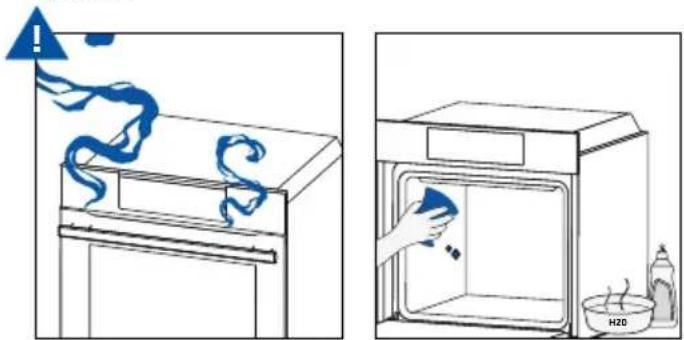
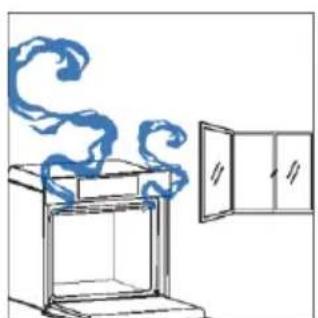
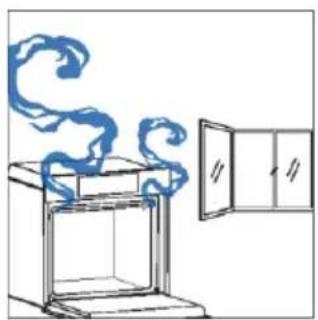
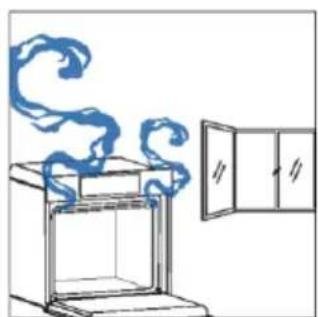
When you first turn on the oven, you might no ce some smoke. Don't worry, just wait for the smoke to clear before using the oven.
How door works
For functions that use the grill, thanks to the door switch technology the oven will automatically pause the heating elements when you open the door and continue cooking once you close it.
This feature is available only on specific oven con gura ons. All the pyro models have it.
During the pyroly c cleaning process, the oven door remains locked at all mes. If it's not locked, the oven will display error code 24 and pause the cleaning func on.
How illumination works
The oven cavity is illuminated by one or more light bulbs, typically activated each meal a cooking function begins.
For ovens equipped with a door switch (see below), the light automa cally turns on when the door is opened.
For ovens equipped with lamp button, it can also be used to activate the lighting.
If the oven door remains open for more than 10 minutes, the lights will automatically turn o .
During pyroly c cleaning process light remains o .*
How cooling fan works
The cooling fan is responsible for dissipa ng the heat, keeping the oven and its surroundings from ge ng too hot, as well as prote ng kitchen appliances from the e ects of high temperatures. For this reason, the cooling fan remains audible for a period of me even a er the oven is turned o . It operates during and a er cooking cycle in rela on to the internal temperature of the oven.
When the cooling fan is opera onal, it usually generates a gentle humming or whirring noise. You may also no ce a warm air ow emana ng from the gap between the oven door and the control panel.
During pyroly c cleaning and when door is locked, cooling fan is switched on. *
During ECO func on the light will remain o .
(*only for pyro ovens)
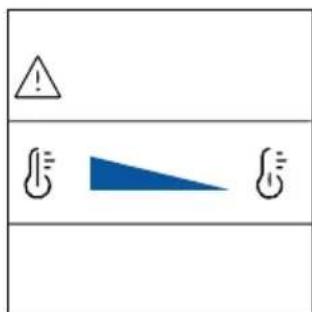
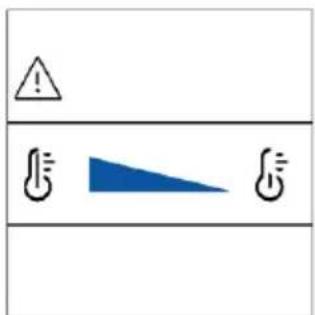
How status bar works
The status bar, based on the set programs, simpli es monitoring of temperature and me. Specif ically, for func ons involving prehea ng, it displays the temperature increase during this phase. In cooking programs and the pyroly c cleaning func on, it shows the countdown of cooking me and the cleaning cycle, respec vely.
3.2. FIRST USAGE
When the appliance is switched On for the first time, the initial step is to set time of day, choose between 13 ampere or 16 ampere, select brightness and sound level.
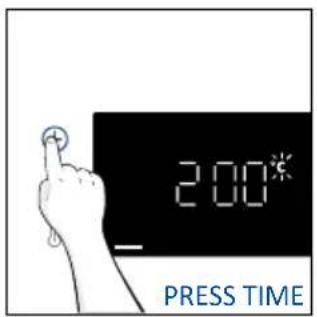
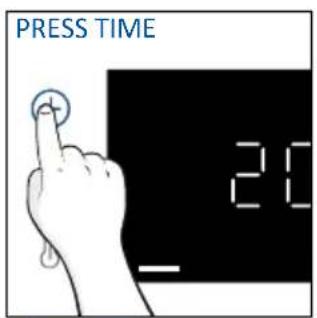
- SET THE TIME: The display will show the blinking preset time '12:00'. To modify it, press and use the right knob to adjust the current hour. Press again and follow the same procedure to set the minutes. To confirm, press once more.
PRESS
SET
TIME
PRESS
PRESS TO CONFIRM
- AMPERAGE: By default, the oven is set to work with higher power suitable for households with more than 3 kW (16 A). If your home has lower power, you can change this setting to 13 A. This setting affects how quickly the oven heats up. Choosing the higher option (16A) means it heats up faster (because the power absorption is increased). On the display, you'll see two choices: 13A and 16A. Just turn the right knob to pick the one you want, then press to confirm.
SET
AMPERAGE
PRESS TO CONFIRM
NOTE: The option to set the amperage is only available during the initial installation. To modify the set amperage, please refer to the post-installation instructions.
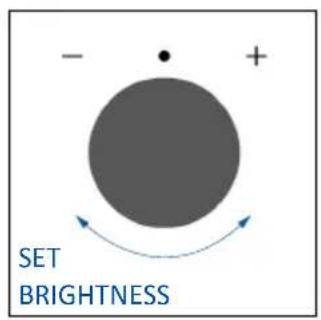
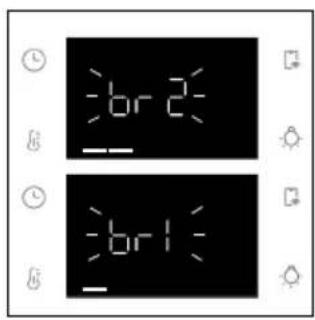
- BRIGHTNESS: The display shows the symbol "br". The numbers represent the level of brightness intensity, editable turning the right knob. To confirm press Ⓛ


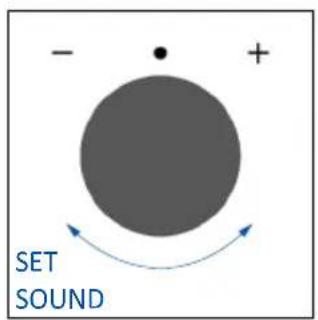
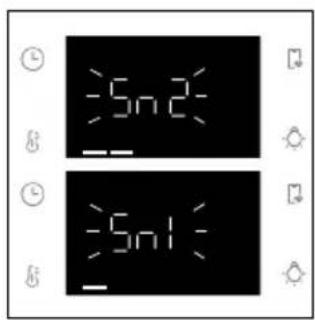
- SOUND: The display shows the symbol "Sn". The numbers represent the level of sound intensity, editable turning the right knob. To confirm press ⏻


When oven is in stand-by mode, it is possible to go back to initial settings by pressing simultaneously Temperature and Lamp buttons for 5 sec.

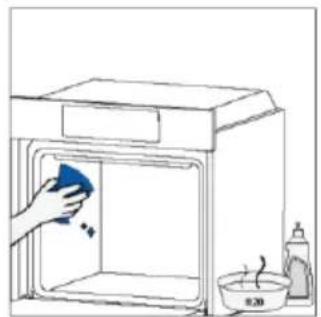
3.2. PRELIMINARY CLEANING
Clean the oven before using for the first time. Wipe over external surfaces with a damp soft cloth. Wash all accessories and wipe inside the oven with a solution of hot water and washing up liquid. Set the empty oven to the maximum temperature and leave on for about 1 hour, this will remove any lingering smells of newness.
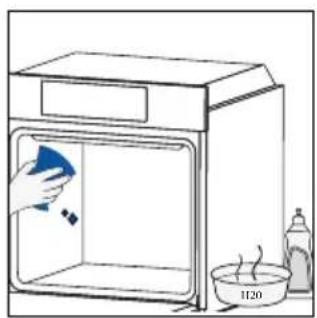
natural_image
Simple line drawing of a kitchen sink with a hand cleaning the interior and a bowl with steam rising (no text or symbols)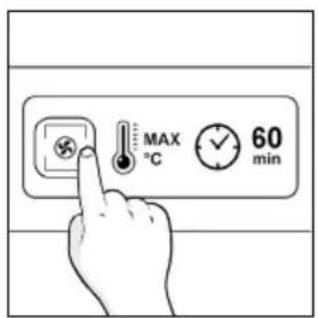
natural_image
Simple line drawing of a cabinet with swirling smoke rising from the top, next to an open door (no text or symbols)4. OPERATION OF PRODUCT
4.1. HOW THE PRODUCT WORKS
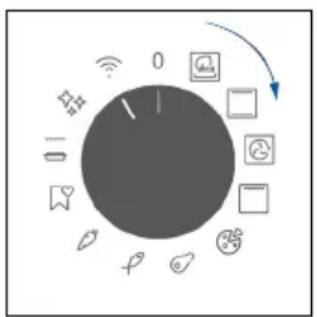
SWITCHING ON/OFF THE OVEN
To turn ON the oven rotate the function knob (clockwise/counterclockwise) and select a cooking program. To turn it OFF, set the function knob to the '0' position.
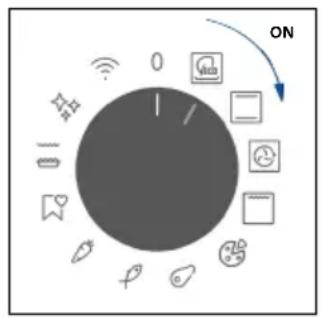
SET COOKING PROGRAM
Turn the function knob and select the desired program. On display will appear a default temperature that can be edit in every moment turning the right knob (clockwise to increase and counterclockwise to decrease the temperature).
TIME MENU
Access the Time menu by pressing Ⓛ. To navigate into tap Ⓞ as many times as is needed to enter in the following settings:
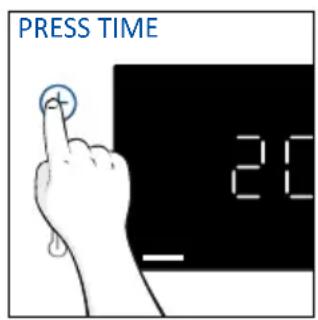
NOTE: several parameters cannot be set at the same time, therefore only the last set remains in the memory while the previous one is deleted.
©OOKING DURATION
Allows to preset the cooking me required for the recipe chosen.
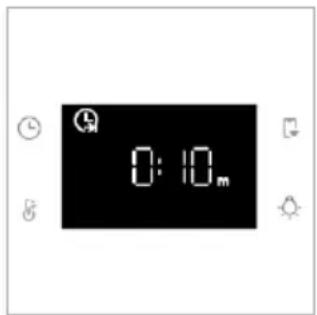
ACTIVATION: press ⏻ to enter in the Time menu. Tap ⓐ as many times as you need to select “Cooking dura on” func on. Then use the dial control to regulate the value.
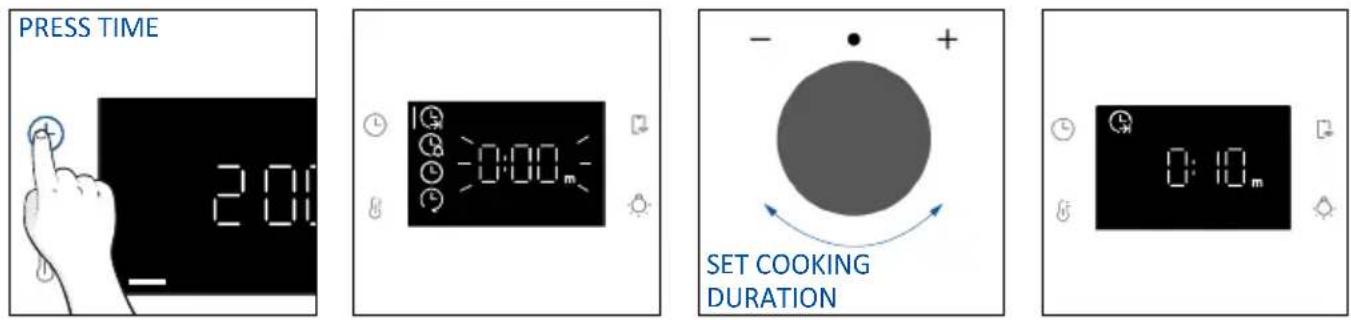
The countdown starts at the end of prehea ng (if present). During cooking phase is possible to change the dura on value by turning the right knob. When dura on is elapsed the cooking stops.
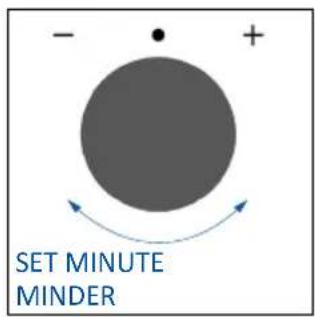
MINUTE MINDER
Allows to use the oven as alarm clock.
ACTIVATION: press Ⓛ to enter in the Time menu. Tap ☑ as many times as you need to select “Minute minder” func on. Then use the dial control to regulate the value.

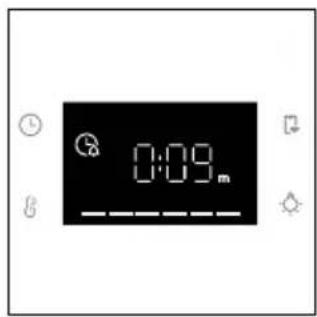
When the func on is set, the primary informa on showed on display is always the me. To edit the temperature, press to enter dedicated edit mode. When dura on is elapsed, the cooking continues until the le knob is turned in 0 posi on.
This func on can be set also when the oven is in stand by mode by pressing Ⓤ. When ac vated, the minute minder operates independently of the oven's cooking func ons.
DELAY START
Allows to choose the cooking start me.
ACTIVATION: press Ⓛ to enter in the Time menu. Tap as many mes as you need to select “Delay start” func on. Then use the dial control to set the start me of cooking.

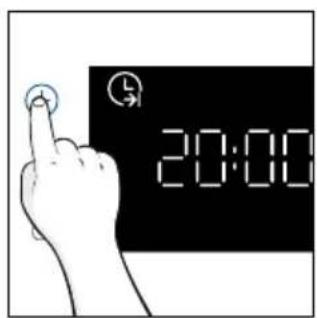
NOTE: Delay start is ac vable only a er se ng Cooking Dura on and it is not available with grill's func ons.
ADDITIONAL FUNCTIONS
CHILD LOCK
This function allows you to lock the screen to prevent any unwanted use by minors. To activate the screen lock, press and hold down the Remote Control and Lamp buttons simultaneously.
Repeat the same action to deactivate the lock.

4.2. COOKING FUNCTIONS
FAST PREHEATING OPTION
In order to accelerate prehea ng phase, the fast-prehea ng op on can be selected by pressing the temperature icon for 3s a er having selected cooking program and temperature. This op on will ac vate a combina on of fan and hea ng elements regardless of the chosen cooking func on. To save energy, when fast prehea ng is ac vated the cavity fan will be turned OFF un l the oven reaches the desired temperature.
4.2.1. STANDARD FUNCTIONS
NOTE: for functions that require prehea ng, ensure all accessories are removed during this phase.
* Tested in accordance with the EN 60350-1 for the purpose of energy consumption declaration and energy class.
**Use with the door closed.
*** Depending on the oven model.
| Symbol Func on | T°C default T°C range | Suggested shelf posi on | Preheat | Sugges ons | |
 | *ECO | 190 °C 150-220 °C | L3/L4 NO | IDEAL FOR: cooking meat, sh or vegetablesThis func on allows to save energy during cooking keeping the food moist and tender. Cavity lamp is switched o | |
 | *Conven onal | 200°C 30°C | L2/L3 | Yes/Fast preheat | IDEAL FOR: cakes, breads, biscuits, quiches on one level using both upper and lower hea ng.Can be used with Preci Probe. |
 | Mul -Level | 160°C 50-250°C | L4 (one tray) L2+L5 (two trays) L2+L4+L6 (three trays) | Yes/Fast preheat | IDEAL FOR: cakes, biscuits and pizzas on one or more levels. Ideal to cook di erent foods. Can be used with Preci Probe. |
 | **Supergrill | 05 01-05 | L6 NO | IDEAL FOR: big quan es of sausages, steaks and toast bread.The en re area below the grill element becomes hot. Use with the door closed. Turn food two thirds of the way through cooking (If necessary). | |
 | **Gra n(***) | 200°C 150-250°C | L4/L5 | Yes/Fast preheat | IDEAL FOR: whole pieces of meat (roasts) or gra nated foods. Use with the door closed. Slide the drip tray under the shelf to collect juices. Turn food over halfway through cooking if needed. |
 | Airfry(***) | 200°C150-250°C | L3/L4 NO | IDEAL FOR: preparing frozen foods or breaded par-cooked foods which are usually fried. Thanks to the dedicated tray, the hot air can flow evenly over the foods. | |
4.2.2. SPECIAL FUNCTIONS
| Symbol Function | T°C default T°C range | Suggested shelf position | Preheat | Suggestions | |
 | Pizza | 300°C200-300°C | 2/3 NO | IDEAL FOR: all kind of pizzas without preheating the oven. Use lower temperatures for frozen items and 300°C for home-made recipes | |
 | Jolly - - - | Add to the preset list of functions your favorite one that's not already present in your oven. You canconfigure it through the hOn app. | |||
Jolly function
Thanks to the Jolly function, this product offers a fully customizable experience, allowing you to store your personalized recipes directly on the oven. You can execute these recipes as often as you like, even without the need to log into the app.
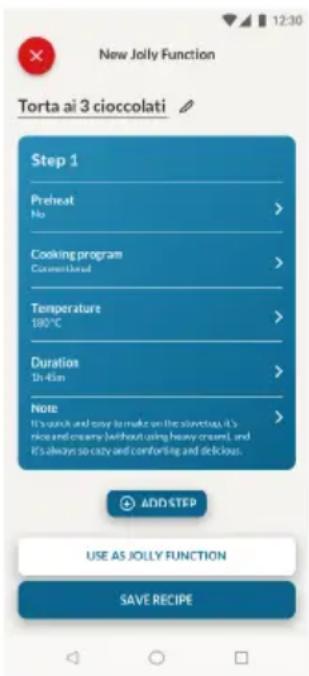
How to Set the Jolly Function:
To set the Jolly function on your oven, open the app's recipe section, select the recipe you want to use, and click 'Use As Jolly Function'.
From this point onward, you can launch it from the product even without interaction with the app. Simply turn the function knob to the Jolly function to start the cooking process.
The display will show the preset temperature.
How to edit the Jolly function:
To edit a Jolly function, go to the app's recipe section and select the card of the recipe designated as a Jolly function. Tap the "edit" button to customize the recipe and modify the previously set settings.
A pop-up message will inform you that to save the newly modified Jolly function, you must remove the previous one. If you confirm, the previous Jolly function will be deleted, and the new parameters will be saved on the product and will be visible in the app.
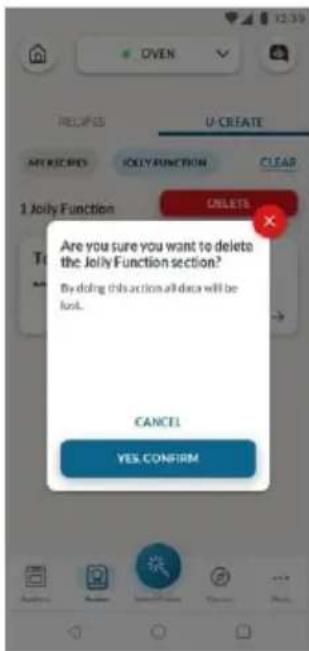
How to Delete the Jolly Function:
To remove the Jolly function from the oven's user interface, access the app's recipe section.
By tapping on the card of the recipe designated as a Jolly function, it's possible to delete it by clicking the red button 'delete button'.
A pop-up will confirm the operation, asking for your confirmation. If you proceed, the Jolly function saved on the oven will be removed, and it will no longer be available in the app.

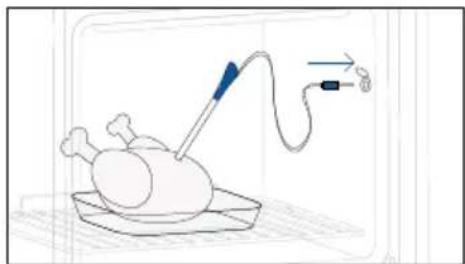
WIRED PROBE
How to use the probe:
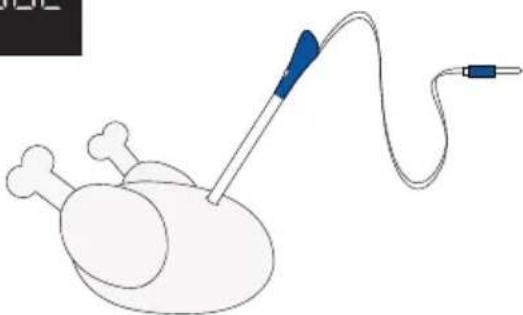
- Plug the Probe into designed port on the oven and insert the accessory in the food.
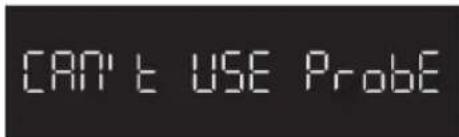
- On display appears the Probe icon. Only dedicated functions or cooking programs are available. From this moment, the displayed temperature will be that of the probe
- Choose the cooking function and set the Probe target temperature to begin. The oven will then use the Probe data to monitor your food's internal temperature and stop cooking once the desired temperature is reached.
NOTE: When using the probe, there's no need to set a cooking mer; it will automatically stop once the desired temperature is reached.
- Once the desired internal temperature is reached, the alarm sounds and the oven turns o . Before taking the food out of the oven, be sure to remove the Probe from the food carefully.
natural_image
Illustration of a medical procedure involving a tool and tubing on a patient's abdomen (no text or symbols)
natural_image
Simple diagram with a gray circle, a dot, and a plus sign, with curved arrows indicating rotation or direction (no text or symbols)The Probe icon will be displayed on the screen. Only specific functions or cooking programs are accessible when this icon is active. If you attempt to use other functions, the oven will display a message saying "can't use probe."
Cooking tips
The Probe is equipped with a single measuring point. Insert it en rely into the food with the metal p posi oned at the centre of the food. Place this point as close as possible to the thickest (coldest) part of the food to accurately monitor the cooking process.
natural_image
Medical catheter device with attached tubing and bulbous body (no text or symbols)The Probe can be used with manual func ons (Sta c, Sta c + Fan, Grill, Super grill, Gra n, and Mul level), with FOOD COOKING CATEGORIES (Meat, Fish and Vegetables) and Gentle cooking.
| Food category | Suggested core T°C | Suggested positioning |
| Roast beef | 45°C | Diagonally in the thickest part. For cylindrical shape foods (i.e. beef roasts) place the tip as close as possible to the geometric center |
| Roasted meats 55 | °C / 60 °C / 65 °C | |
| Poultry | 83-85°C | Into the thickest part of the breast |
| Fish (whole/steaks) | 65°C | Diagonally in the thickest part |
| Bread/casseroles | 90°C | Close to the geometric center of the food |
5.1. GENERAL COOKING TABLE
| Category | Recipe | N° of levels | Cooking program | T°C | Preheat | Cooking accessory | Shelf position | Cooking time after pre heating*(min) |
| Sweet bakery | Small cakes /Muffins | 1 | Static Multilevel | 175°C 160°C | Y | Baking tray Baking tray | L3 L4 | 20-30 30-40 |
| 2 Multilevel 150°C | Baking +Deeper trays | L2+L5 30-40 | ||||||
| 3 | Multilevel | 140°C | Baking trays | L2+L4+L6 | 40-50 | |||
| Sponge cakes (26 cm ø) | 1 | Static Multilevel | 170°C 150°C | Y | Metal grid + Cake tin Metal grid + Cake tin | L3 L4 | 30-40 40-50 | |
| 2 Multilevel 150°C | Metal grids + Cake tin | L1+L4 50-60 | ||||||
| Biscuits | 1 | Static Multilevel | 150°C 150°C | Y | Baking tray Baking tray | L3 L4 | 25-30 30-40 | |
| 2 Multilevel 140°C | Baking + Deeper trays | L2+L5 30-40 | ||||||
| 3 | Multilevel | 140°C | Baking trays | L2+L4+L6 | 35-40 | |||
| Choquettes | 1 | Static | 190°C | Y | Baking tray | L4 | 25-35 | |
| 2 | Multilevel | 170°C | Baking tray | L3 | 25-35 | |||
| Yorkshire pudding | 1 | Static | 200°C | Y | Baking tray | L3 | 20-30 | |
| Meringues | 1 | Multilevel | 90°C | Y | Baking tray | 90-160 | ||
| Macaron | 1 | Static | 150°C | Y | Baking tray | L3 | 15-20 | |
| Apple pie | 1 Static 185°C Y | Metal grid + Cake tin | L2 60-70 | |||||
| 1 Multilevel 170°C Y | Metal grid + Cake tin | L4 65-75 | ||||||
| Tarte tatin | 1 | Static | 170°C | Y | Metal grid + Cake tin | L2 40-60 | ||
| Chocolate souffle | 1 Static 200°C Y | Baking tray + molds | L3 10-15 | |||||
| Cheesecake | 1 Static 150°C Y | Metal grid + Cake tin | L2 50-65 | |||||
| Frozen croissants | 1 Static 180°C | Y | Baking tray L3 | 20-25 | ||||
| 2 Multilevel | 180°C | Baking trays | L2+L5 | 25-35 | ||||
| 3 Multilevel | 160°C | Baking trays | L2+L4+L6 | 30-40 | ||||
| Strudel, frozen | 1 | Static | 210°C | Y | Baking tray | L3 | 30-45 | |
| Breads and Flatbread | Toast bread | 1 | Supergrill | 5 | N | Metal grid | L6 | 4-6 |
| Focaccia | 1 | Static | 200°C | Y | Baking tray | L2 or L3 | 25-35 | |
| Bread, whole | 1 | Static | 200°C | Y | Baking tray | L3 | 35-50 | |
| Category Recipe | N° of levels | Cooking program | T°C | Preheat | Cooking accessory | Shelf position | Cooking time after pre heating*(min) | |
| Savory pies and casseroles | Salty cakes / Quiches (26 cm ∅) | 1 Static 200°C | Y | Metal grid + Quiche tin | L1 or L2 30-50 | |||
| 2 Multilevel 180°C | Metal grid + Quiche tin | L1+L4 50-70 | ||||||
| Cheese souffle | 1 Static 200°C Y | Baking tray + molds | L3 20-35 | |||||
| Lasagna, fresh | 1 Static 200°C Y | Metal grid + ovenproof dish | L3 40-60 | |||||
| Lasagna, frozen | 1 Static 180°C Y | Metal grid + ovenproof dish | L3 50-60 | |||||
| Cannelloni, frozen | 1 Static 180°C Y | Metal grid + ovenproof dish | L3 45-55 | |||||
| Baked pasta | 1 Gratin 200°C Y | Metal grid + ovenproof dish | L4 20-30 | |||||
| Pizza | Pizza, fresh (Tray) | 1 | Static | 250°C | Y | Baking tray | L2 or L3 | 15-20 |
| Pizza, fresh (Tray) | 1 | Pizza | 250°C | N | Baking tray | L2 or L3 | 18-25 | |
| 2 Multilevel 180°C Y | Baking + Deeper trays | L2+L5 25-35 | ||||||
| Pizza, fresh (Round) | 1 | Static | 300°C | Y | Baking tray | L2 or L3 | 8-10 | |
| Pizza, fresh (Round) | 1 | Pizza | 300°C | N | Baking tray | L2 or L3 | 15-20 | |
| 2 Multilevel 180°C Y | Baking + Deeper trays | L2+L5 30-40 | ||||||
| Pizza, frozen (thin crust) | 1 | Pizza | 200°C | N | Metal grid | L2 | 10-15 | |
| Pizza, frozen (thin crust) | 1 Static 220°C | Y | Metal grid | L3 | 10-15 | |||
| 2 Multilevel | 200°C | Metal grid | L2+L5 | 15-25 | ||||
| 3 Multilevel | 180°C | Metal grid | L2+L4+L6 | |||||
| Meat & Poultry | Roasted whole chicken (1-1.2kg) | 1 | Gratin | 220°C | Y | Metal grid/L4 Place Backing tray at L1 with half cup of water | L4 40-60 | |
| Chicken thighs | 1 | AirFry** | 220°C | N | Air fry tray** | L4 | 30-50 | |
| Roasted duck | 1 | Gratin | 200°C | Y | Metal grid + Ovenproof dish | L3 50-60 | ||
| Rooster | 1 | Gratin | 220°C | Y | Metal grid Place baking tray at L1 | L4 20-40 | ||
| Roasted turkey | 1 | Gratin | 200°C | Y | Metal grid + Ovenproof dish | L3 50-60 | ||
| Pork ribs (1000-1200g) | 1 | Static | 200°C | Y | Metal grid + Ovenproof dish | L3 | 80-100 | |
| Sausages | 1 | Supergrill | 4 | Y | Metal grid | L5 | 40-50 | |
| Category | Recipe | N° of levels | Cooking program | T°C | Preheat | Cooking accessory | Shelf position | Cooking time after pre heating*(min) |
| Beef fillet (1000-1500g) | 1 | Gentle cooking** | 60°C | N | Metal grid + Ovenproof dish | L3 60-80 | ||
| Roast beef (500g) | 1 | Gratin | 220°C | Y | Baking tray | L3 | 20-40 | |
| Meatloaf (1000-1500g) | 1 | Static | 180°C | Y | Baking tray | L3 | 40-50 | |
| Roasted chicken with potatoes | 1 | Gratin | 200°C | Y | Deeper tray | L4 | 45-60 | |
| Fish and Seafood | Grilled seafood | 1 | Supergrill | 4 | N | Metal grid | L5 | 15-30 |
| Frozen fish sticks | 1 | AirFry** | 200°C | N | Air fry tray** | L4 | 20-25 | |
| Baked fish | 1 | ECO | 200°C | N | Metal grid Place baking tray at L1 | L3 40-60 | ||
| Vegetables | Vegetable gratin | 1 | ECO | 200°C | N | Metal grid + Ovenproof dish | L3 80-90 | |
| Frozen french fries (300-500g) | 1 | AirFry** | 220°C | N | Air fry tray** | L4 | 18-25 | |
| Potato gratin | 1 | Gratin | 200°C | Y | Metal grid + Ovenproof dish | L4 15-25 | ||
| Roasted potatoes | 1 | Static | 200°C | Y | Baking tray | L4 | 30-50 | |
Cooking times may vary according to consumer's recipe and ingredients.
*if preheating required
** Depending on the oven model.
NOTE: For cooking cakes, quiches and other recipes that require a mold or a container on 2 levels, place the staggered: the upper tray on the left side and the lower tray on the right side.
5.2. EVERYDAY COOKING TABLE
Food category menu allows to cook a variety of recipes without preheating the oven, thanks to dedicated cooking programs tailored to each category needs.
After selecting the cooking program, the default time will be shown and can be edited by turning the right knob; cooking temperature can be changed by pressing the dedicated icon. Both parameters can be set within a limited range as shown in the table below.
| Symbol | Description Preheat | Shelf position | Temperature range (°C) | Time Range (min) | Meat Probe temperature (if available) | Description | |
 | Meat | NO | 2-3-4 | 180-200 | 20-30 | 55-85°C | For beef, veal and pork roasts, poultry and cuts of meat. |
 | Fish | NO | 3-4 | 160-180 | 15-45 | 55-65°C | For whole fish and fillets. |
 | Vegetables | NO | 3-4 | 180-200 | 30-80 | 70-90°C | For roasted vegetables and potatoes |
NOTE: if, after turning off the oven, there is a need to continue cooking, it's recommended avoiding the use of everyday cooking programs and instead opting for standard functions.
| Recipe Serving size | Cooking program | T°C | Cooking accessory | Shelf position | Cooking time (min) | |
| Beef roast | 500-800g | Meat | 190°C | Metal grid | L3 | 30-40 |
| Beef fillet | 200g | Meat | Metal grid | L3 | ||
| Meatloaf | 1000-1500g | Meat | 180°C | Metal grid | L3 | 40-50 |
| Beef wellington | 500g | Meat | 200°C | Metal grid | L3 | 50-80 |
| Port roast | 800-1000g | Meat | 200°C | Metal grid | L3 | 40-70 |
| Pork ribs | 1000-1200g | Meat | 200°C | Metal grid | L3 | 80-100 |
| Lamb rack | 800-1000g | Meat | 200°C | Metal grid | L3 | 60-80 |
| Lamb leg | 1500-2000g | Meat | 190°C | Metal grid | L3 | 80-100 |
| Salmon filets | 200-600g | Fish | 170°C | Baking tray | L3 | 20-35 |
| Tuna steaks | 600g (app. 4 pcs) | Fish | 180°C | Metal grid | L3 | 10-20 |
| Swordfish steaks | 700g (app. 4 pcs) | Fish | 200°C | Baking tray | L3 | 15-20 |
| Cod fillet | 600g (app. 4 pcs) | Fish | 150°C | Baking tray | L3 | 10-20 |
| Seabream, whole | 1 | Fish | 170°C | Baking tray | L3 | 35-45 |
| Seabream, fillet | 600g (app. 4 pcs) | Fish | 150°C | Baking tray | L3 | 10-20 |
| Seabass fillet | 600g (app. 4 pcs) | Fish | 150°C | Baking tray | L3 | 10-20 |
| Salt baked fish | 1 | Fish | 220°C | Baking tray | L3 | 30-40 |
| Fish skewers | 8 pieces | Fish | 150°C | Metal grid | L3 | 20-30 |
| Stuffed squid | 4 pieces | Fish | 180°C | Baking tray | L3 | 25-40 |
| Whole bread | 1 | Bakery | 200°C | Metal grid | L3 | 35-50 |
| Rye bread | 1 | Bakery | 190°C | Metal grid | L3 | 35-50 |
| Sandwich loaf | 1 | Bakery | 200°C | Metal grid | L3 | 35-50 |
| Frozen baguettes | 1 | Bakery | 200°C | Metal grid | L3 | 15-25 |
| Frozen puff pastry snacks | 1 | Bakery | 190°C | Metal grid | L3 | 20-30 |
| Fennels | 1 tray | Vegetables | 200°C | Metal grid | L3 | 30-40 |
| Mixed vegetables | 1 tray | Vegetables | 190°C | Metal grid | L3 | 40-45 |
| Cauliflowers | 1 tray | Vegetables | 190°C | Metal grid | L3 | 40-50 |
| Pumpkins, cubed | 1 tray | Vegetables | 200°C | Metal grid | L3 | 30-40 |
| Stuffed peppers | 1 tray | Vegetables | 180°C | Metal grid | L3 | 70-80 |
| Stuffed zucchini | 1 tray | Vegetables | 190°C | Metal grid | L3 | 35-45 |
| Carrot sticks | 1 tray | Vegetables | 180°C | Baking tray | L3 | 35-40 |
| Broccoli | 1 tray | Vegetables | 190°C | Baking trat | L3 | 30-40 |
| Ratatouille | 1 tray | Vegetables | 190°C | Metal grid | L3 | 40-45 |
| Vegetable flan | 6 ramekins | Vegetables | 180°C | Baking tray + molds | L3 25-35 | |
6. CARE & CLEANING
6.1. GENERAL RECOMMENDATIONS
Regular cleaning can extend the lifecycle of your appliance. Wait for the oven to cool before carrying out manual cleaning.
- After each use of the oven, a minimum of cleaning will help keep the oven perfectly clean.
- Do not line the oven walls with aluminum foil or single-use protection available from stores. Aluminum foil or any other protection, in direct contact with the hot enamel, risks melting and deteriorating the enamel of the insides.
- In order to prevent excessive dirt of your oven and the resulting strong smokey smells, we recommend not using the oven at very high temperature. It is better to extend the cooking time and lower the temperature a little.
- In addition to the accessories supplied with the oven, we advise you only use dishes and baking molds resistant to very high temperatures.
6.2. CLEANING THE OVEN
6.2.1. INSIDE THE OVEN: cleaning func ons
Pyroly c cleaning (*depending on the oven model)
This process relies on the chemical process bearing the same name, which involves the decomposition of complex substances through the application of heat treatment.
Once initiated, it automatically locks the oven door and swily elevates the temperature to a searing 410^ C.
At the end of the cleaning cycle, all that remains within the cavity is a minimal deposit of dust, easily wiped away with a damp cloth.
How does it work:
- Remove any accessories from the oven, such as grids, side racks and side racks screw (*);
- Turn func on knob on ❖. Turn the dial control to set the Pyroly c program; Allow the func on to operate for the preset me. During this process and the following cooling phase, the oven door will remain locked.
- When the appliance is cool, clean the inner surfaces of the oven with a cloth.
▲ WARNING: Make sure that the appliance is cool before you touch it. Care must be taken with all hot surfaces as there is a risk of burns. Use dis- lled or drinkable water.
(*) only for models with 7 levels.

natural_image
Line drawing of an oven with a rack inside, showing internal structure and airflow direction (no text or symbols)
natural_image
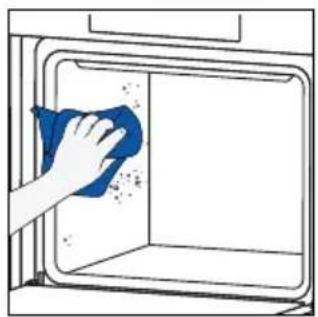
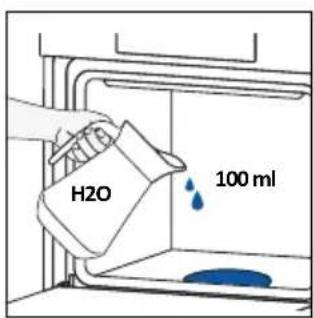
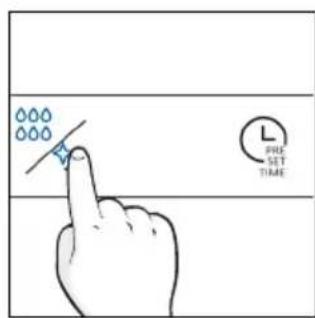
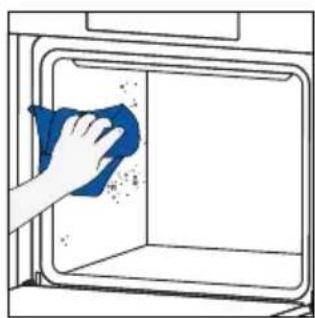
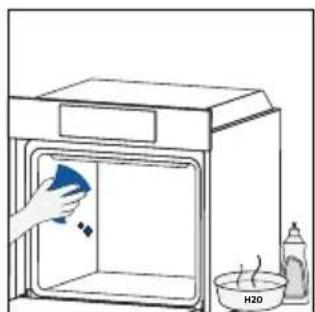
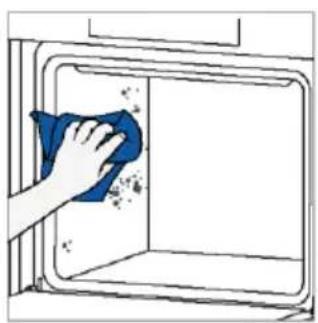
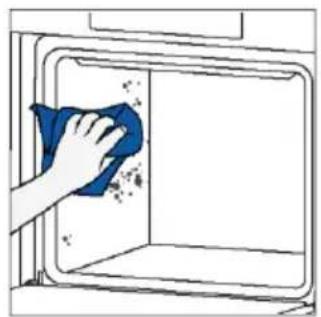
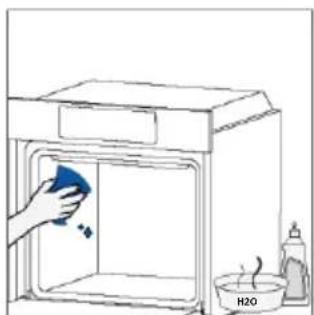
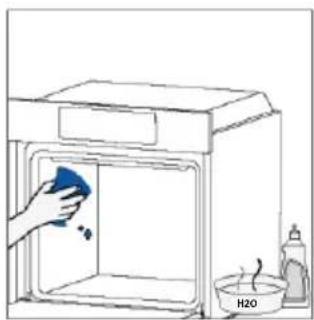
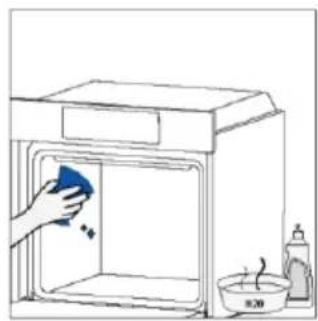
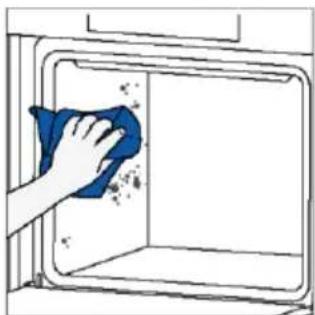
Hand cleaning a window with a blue cloth, no text or symbols visibleH2O cleaning
The H2O cleaning function is designed to effortlessly tackle light dirt and provide a quick and eco-friendly solution for cleaning your oven cavity using the power of steam.
How does it work:
- Pour 100 ml of water into the bottom embossment of the oven.
- Turn the knob on ☐/☐. If necessary, turn the dial control to set the Hydro clean program. Allow the function to operate for the preset time.
- At the end of the cleaning process, allow the oven to cool down.
- When the appliance is cool, clean the inner surfaces of the oven with a cloth.
- ⚠ WARNING: Make sure that the appliance is cool before you touch it. Care must be taken with all hot surfaces as there is a risk of burns. Use distilled or drinkable water.

natural_image
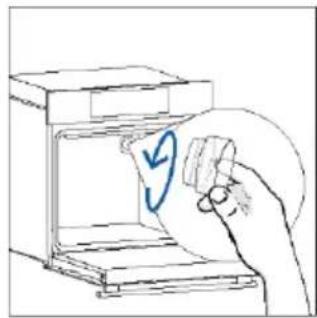
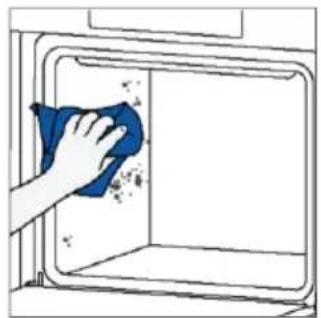
Illustration of a hand cleaning a window with a blue cloth (no text or symbols)Catalytic cleaning
The Catalytic panels line the oven cavity and grant you the luxury of never having to contend with a dirty oven.
The panels are coated with a specialized enamel that boasts a microporous structure, adept at absorbing absorbs grease from splashes.
Through a catalytic chemical reaction, they efficiently convert the absorbed grease into gaseous elements when exposed to high temperatures.
Recommendation: Consider replacing the catalytic panels after approximately three years of use, especially if you use your oven for two to three cooking cycles per week. This ensures optimal performance and cleanliness.
natural_image
Line drawing of an oven with internal grating and a blue arrow indicating direction (no text or symbols)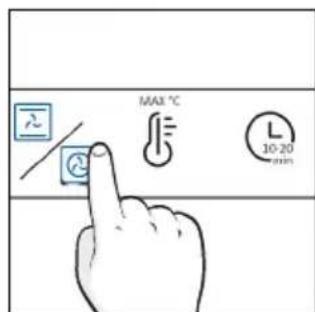
natural_image
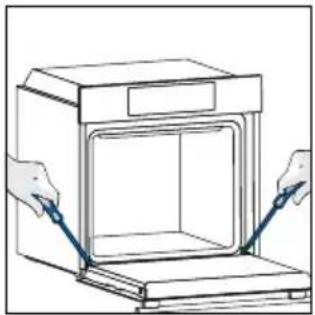
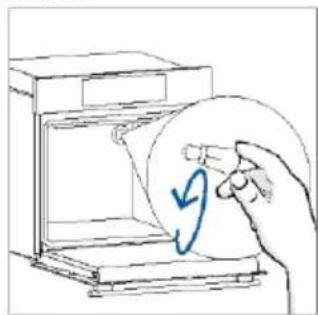
Simple line drawing of a kitchen sink with a hand cleaning the interior and a bottle nearby (no text or symbols)6.2.2. OUTSIDE THE OVEN: removal and cleaning the glass door
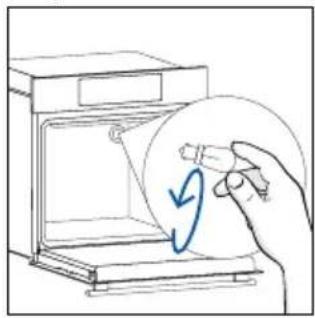
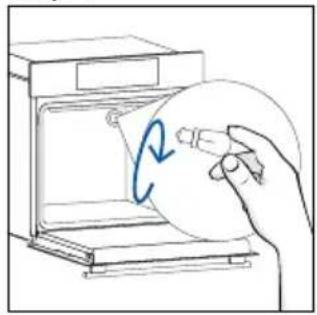
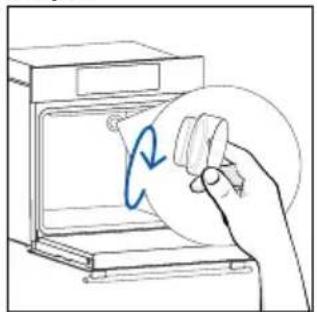
- Position the door at 90°. Rotate the hinge locking tabs outward from the oven.
natural_image
Line drawing of a door opening with two hands inserting a blue clip (no text or symbols)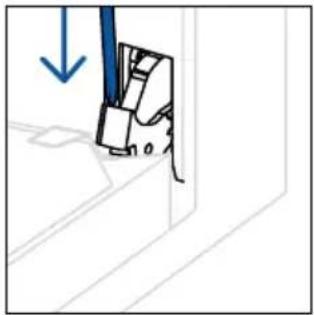
natural_image
Simple line drawing of a mechanical component with a blue arrow indicating downward motion (no text or symbols)2.
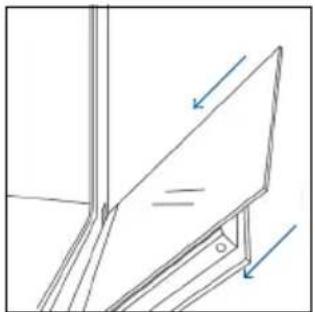
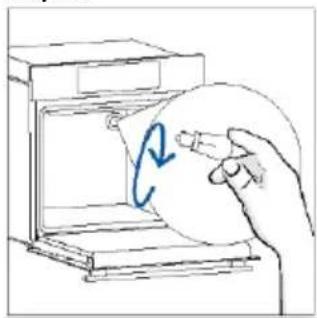
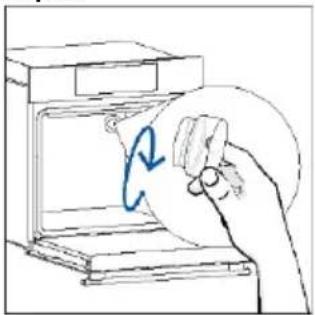
- Position the door at 45°. Simultaneously press the two buttons on both the sides of the door's lateral shoulders and pull towards yourself to remove the upper glasses' door cover.
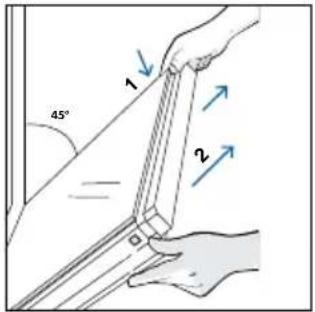
- Very carefully remove the oven glass, starting with the inner one. During the procedure, firmly hold the glass with both hands and place them on a cushioned flat surface (e.g., on a fabric).
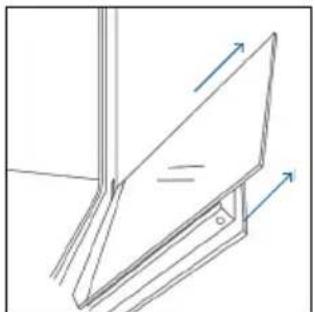
natural_image
Simple line drawing of a folding chair or stand with arrows indicating direction (no text or symbols)- ⚠ WARNING: The outer glass is not removable.
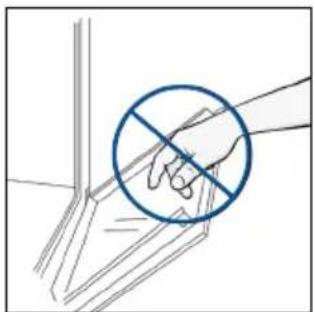
natural_image
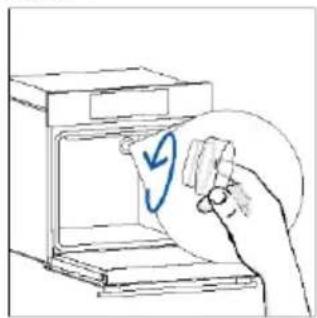
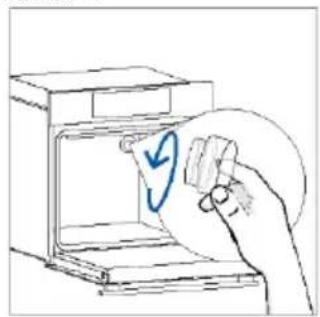
Hand holding a hand with a blue prohibition symbol (no text or labels)- Clean the glass using a soft cloth and suitable cleaning products.
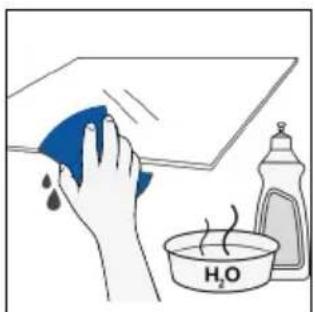
natural_image
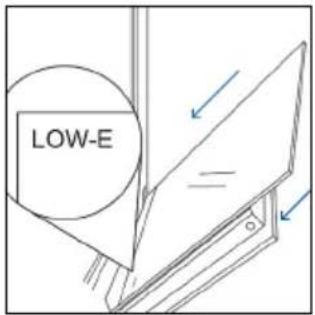
Illustration of a hand cleaning a blue cloth over a plate with a water bottle and a bowl labeled H₂O (no text or symbols on the main objects)-
Insert the glass panels, making sure that the "Low-E" label is correctly readable and positioned on the lower left side of the door, near the left-side hinge. This way, the printed label on the first glass will remain on the inside of the door.
-
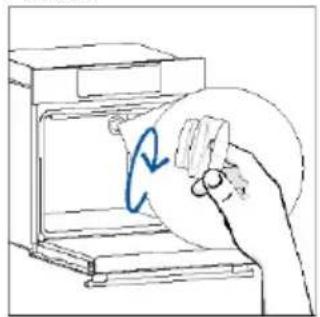
Reattach the upper glasses' door cover by pushing it inwards until you hear a click from the two side buttons.
-
Then, bring the door back to 90^ and rotate the hinge locking tabs inward towards the inside of the oven.
natural_image
Line drawing of a window frame with an open panel and directional arrows indicating movement (no text or symbols)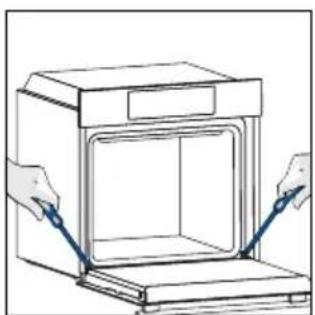
natural_image
Line drawing of a door opening with hands holding blue tools (no text or symbols)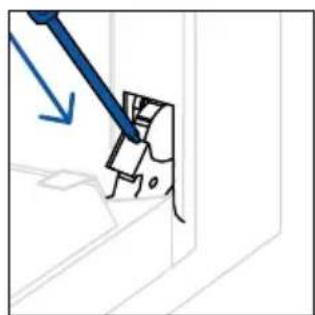
natural_image
Simple line drawing of a mechanical component with a blue tool and arrow indicating direction (no text or symbols)6.3 CLEANING OF ACCESSORIES
Ensure that you clean the accessories thoroughly after every use and dry them using a towel. For persistent residues, consider soaking the accessories in a mixture of water and soap for approximately 30 minutes before giving them a second wash.
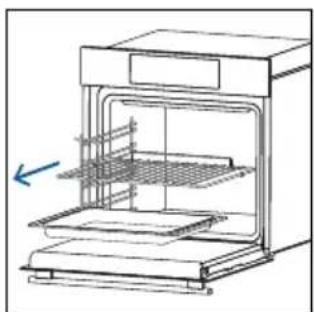
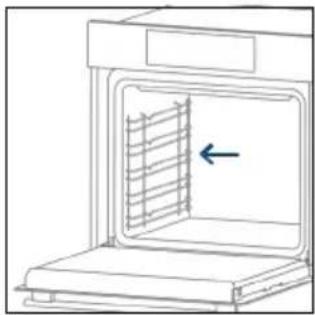
CLEANING OF SIDE RACKS:
- 6 levels model
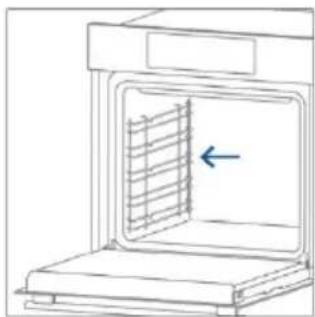
- Remove the side racks by pulling them in the direction of the arrows.
- To clean the side racks either put them in the dishwasher or use a wet sponge, ensuring that they are dried afterwards.
- After the cleaning process install the side racks in reverse order.

natural_image
Line drawing of an oven with a right vent and internal structure (no text or symbols)
natural_image
Line drawing of an oven with a rack inside, showing airflow direction (no text or symbols)- 7 levels model
- Remove the side racks by first pulling the front part in the direction of the arrow and detaching the rear part from the screws.
- To clean the side racks either put them in the dishwasher or use a wet sponge, ensuring that they are dried afterwards.
- After the cleaning process install the side racks in reverse order: positioning the rear part between the screws and push the front part in the direction of the arrow.
6.4 MAINTENANCE
COMPONENTS REPLACEMENT
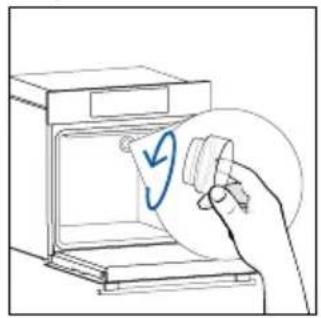
Changing the bulb on top:
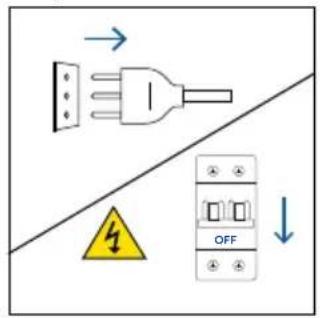
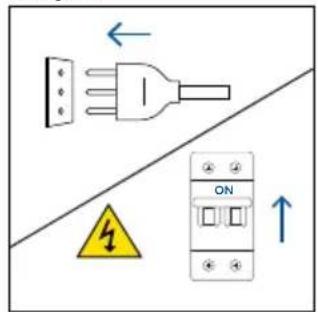
- Disconnect the oven from mains supply.
- Remove the lamp's glass cover.
- Disassemble the bulb.
- Replace the bulb with a new one of the same type.
- Relocate the lamp's glass cover.
- Reconnect the oven from mains supply.
Step 1
Step 2
natural_image
Hand holding a circular object with a blue checkmark inside an oven (no text or symbols visible)Step 3
natural_image
Line drawing of a hand holding a circular object inside an open appliance (no text or symbols)Step 4
natural_image
Hand holding a circular object inside an oven with a blue circular arrow indicating rotation (no text or symbols)Step 5
natural_image
Hand holding a circular object inside an oven, with a blue arrow indicating rotation (no text or symbols)Step 6
This product contains one or more light sources of energy efficiency class G (Lamp)
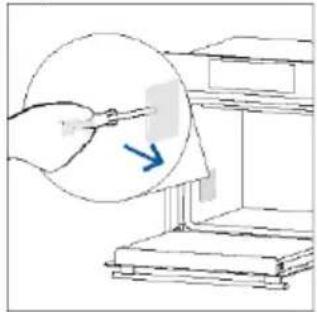
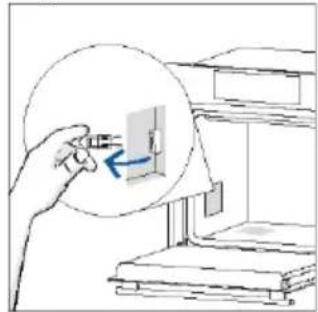
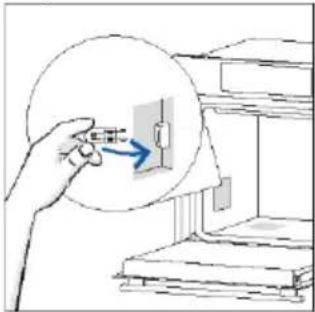
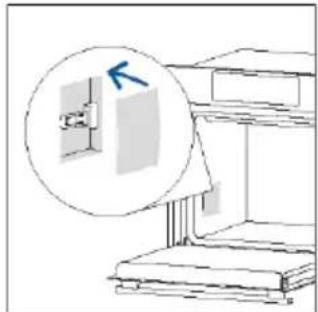
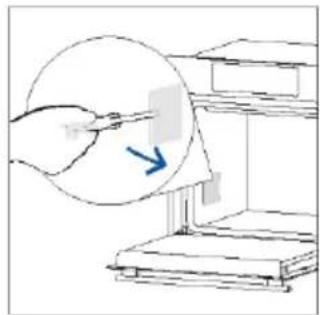
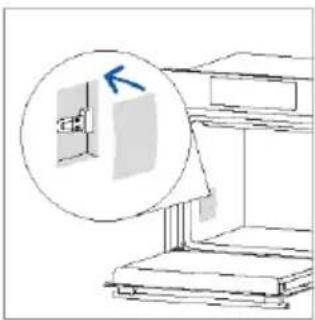
Changing the lateral bulb:
- Disconnect the oven from mains supply.
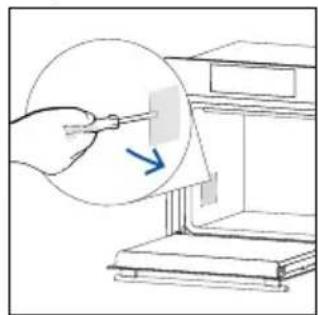
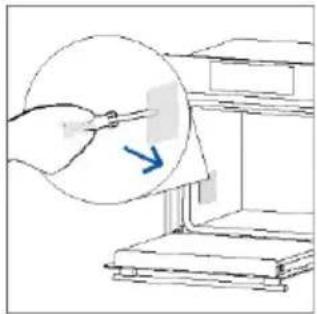
- Use a flat-head screwdriver by positioning it to the side of the protective glass and gently apply pressure to remove it.
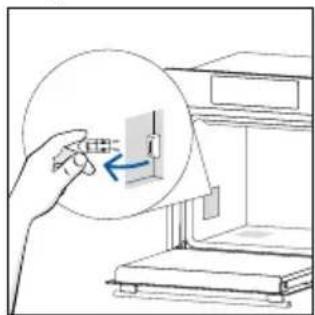
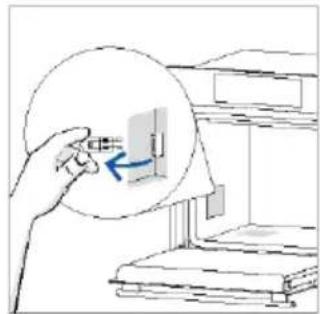
- Carefully grasp the bulb from its base.
- Insert the new one.
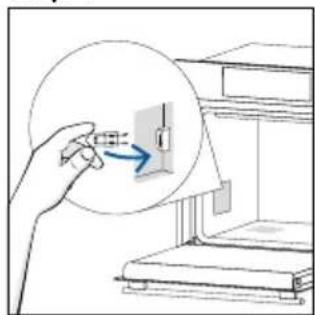
- Reinstall the protective glass by pressing it gently until it's locked into position.
- Reconnect the oven from mains supply.
Step 1
Step 2
natural_image
Illustration of a hand using a tool to clean or store items, with no visible text or symbolsStep 3
natural_image
Illustration of a hand inserting a small component into a device inside a rack (no text or symbols)Step 4
natural_image
Illustration of a hand inserting a component into a device (no text or symbols visible)Step 5
natural_image
Diagram of a cabinet with an inset showing a door handle and a blue arrow pointing to the door (no text or symbols present)Step 6
This product contains one or more light sources of energy efficiency class G (Lamp)
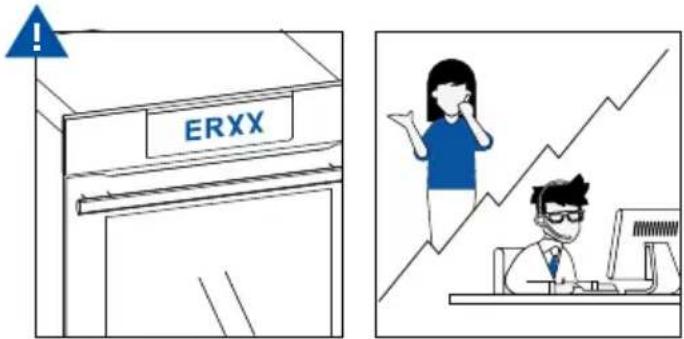
7. TROUBLE SHOOTING
If, during oven use, an error occurs, the display will show the code "ER" followed by two digits, which will identify the error.
Proceed by turn off the oven and un-plug it, wait for a few minutes, and then reconnect it.
If the error disappears, you can resume using the oven. If it doesn't, call customer service and communicate the code (ERXX) you see on the display.
Error
Smoke
8. ENVIRONMENTAL PROTECTION & DISPOSAL
8.1. APPLIANCE DISPOSAL
This appliance is labelled in accordance with European Directive 2012/19/EU regarding electric and electronic appliances (WEEE). The WEEE contain both polluting substances (that can have a negative effect on the environment) and base elements (that can be re-used). It is important that the WEEE undergo specific treatments to correctly remove and dispose of the pollutants and recover all the materials.
Individuals can play an important role in ensuring that the WEEE do not become an envi -
ronmental problem; it is essential to follow a few basic rules:
– the WEEE should not be treated as domestic waste;
– the WEEE should be taken to dedicated collection areas managed by the town council or a registered company.
In many countries, domestic collections may be available for large WEEEs. When you buy a new appliance, the old one can be returned to the vendor who must accept it free of charge as a one-off, as long as the appliance is of an equivalent type and has the same functions as the purchased appliance.
8.2. SAVING AND RESPECTING THE ENVIRONMENT
Where possible, avoid pre-heating the oven and always try to fill it.
Open the oven door as infrequently as possible, because heat from the cavity disperses every time it is opened. For a significant energy saving, switch off the oven between 5 and 10 minutes before the planned end of the cooking time, and use the residual heat that the oven continues to generate. Keep the seals clean and in order, to avoid any heat dispersal outside of the cavity. If you have an electric contract with an hourly tariff, the “delayed cooking” programme makes energy saving simpler, moving the cooking process to start at the reduced tariff time slot.


Vista posteriore Vista laterale

WILLKOMMEN
natural_image
Blank white image with a thin border (no text, symbols, or markings)natural_image
Line drawing of a two-tiered storage rack or shelf system (no text or symbols)natural_image
3D wireframe diagram of a rectangular tray or basin with internal partitioning, placed on a shelf (no text or symbols)natural_image
3D wireframe diagram of a rectangular tray with internal compartments, placed inside a storage unit (no text or symbols)natural_image
Line drawing of a kitchen sink with a bowl and a round object on a metal rack (no text or symbols)natural_image
Simple line drawing of a door with a circular arrow and a hanging object, no text or symbols present.natural_image
Line drawing of a rectangular appliance with a slatted lid and internal grid pattern (no text or symbols)natural_image
Diagram of a rectangular appliance with internal grating and ventilation slots, placed inside an oven (no text or symbols)natural_image
Line drawing of a rooster on a tray with steam rising, enclosed in a kitchen appliance (no text or symbols)natural_image
Illustration of a medical procedure involving a mouse and a catheter, with no visible text or symbolsnatural_image
3D technical illustration of a rectangular tray with a mesh pattern inside, mounted on a shelf (no text or symbols)COMMENT INTERAGIR AVEC L'APPLICATION
INSCRIPTION D'UN NOUVEL UTILISATEUR
APPAIRAGE RAPIDE
Étape 1
Étape 2
Étape 3
Étape 4
Étape 5
Étape 6.1-6.2
Étape 7

COMMENT MODIFIER LES PARAMÈTRES DU WI-FI
flowchart
graph TD
    A["Data Input"] --> B["Processing"]
    B --> C["Output"]
    style A fill:#333,stroke:#fff,color:#fff
    style B fill:#999,stroke:#000,color:#fff
    style C fill:#ccc,stroke:#000,color:#fff
    Note: The diagram includes icons representing data input, processing, and output stages.
natural_image
Simple diagram with a gray circle, a black dot, and a plus sign, with curved arrows indicating direction (no text or symbols)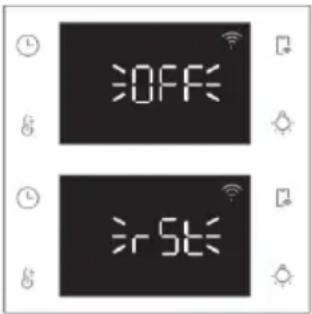

CONTRÔLE À DISTANCE
3. AVANT DE COMMENCER
3.1. INFORMATIONS POUR COMMENCER
natural_image
Simple line drawing of a washing machine with a hand cleaning the interior and a water bottle nearby (no text or symbols)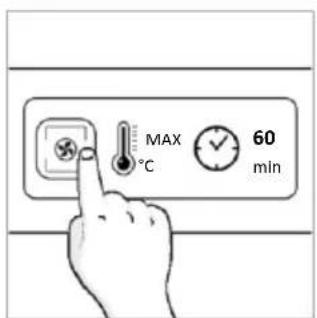
natural_image
Simple line drawing of a box with swirling smoke next to an open door (no text or symbols)4. FONCTIONNEMENT DU PRODUIT
4.1. FONCTIONNEMENT DU PRODUIT
MISE EN MARCHE/ARRÊT DU FOUR

natural_image
Line drawing of an oven with internal structure and airflow direction arrow (no text or symbols)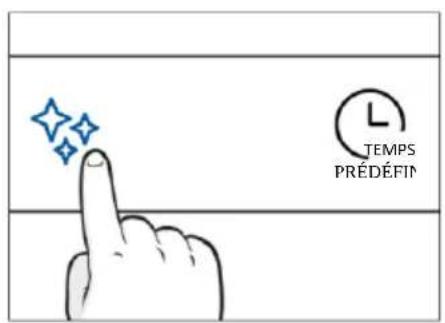
natural_image
Illustration of a hand cleaning a window with a cloth (no text or symbols)H2O-Clean
natural_image
Hand cleaning a kitchen appliance with a blue cloth (no text or symbols visible)natural_image
Line drawing of an oven with a rack and cooling unit (no text or symbols)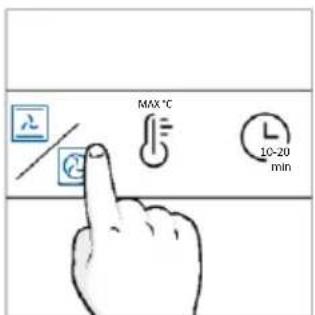
natural_image
Simple line drawing of a hand cleaning a small kitchen oven with a water bottle and H2O label (no text or symbols on main elements)6.2.2. EXTERIEUR DU FOUR : RETRAIT ET NETTOYAGE DE LA PORTE EN VERRE
natural_image
Illustration of hands operating a box with blue tool pins, no text or symbols present
natural_image
Simple line drawing of a mechanical component with a blue arrow indicating downward motion (no text or symbols)natural_image
Simple line drawing of a tilted rectangular object with two arrows indicating direction (no text or symbols)natural_image
Hand holding a blue circle with a diagonal line through a window frame (no text or symbols)natural_image
Illustration of a hand cleaning a tiled surface with a blue cloth and a water bottle labeled 'H2O' (no text or symbols on the main subject)natural_image
Simple line drawing of a wooden plank with arrows indicating direction (no text or symbols)natural_image
Line drawing of hands installing or adjusting a cabinet interior (no text or symbols)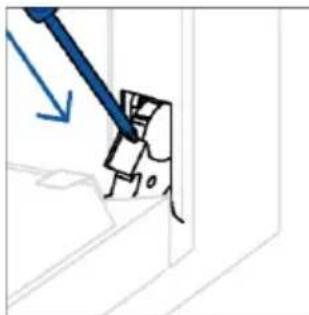
natural_image
Simple line drawing of a tool interacting with a mechanical component (no text or symbols)6.3. NETTOYAGE DES ACCESSOIRES
natural_image
Line drawing of an oven with a blue arrow indicating direction (no text or symbols)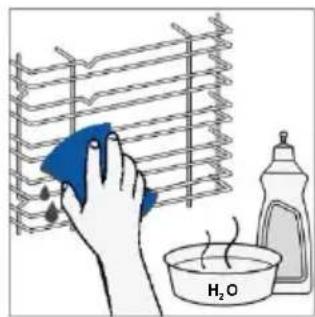
natural_image
Line drawing of an oven with a rack inside, showing airflow direction (no text or symbols)REPLACEMENT DES COMPOSANTS
Étape 2
natural_image
Hand holding a paper with a blue checkmark inside an open box (no text or symbols visible)Étape 3
natural_image
Hand holding a circular object with a blue checkmark inside, next to an open device (no text or symbols visible)Étape 4
natural_image
Hand holding a circular object with a blue arrow inside, inside an open appliance (no text or symbols)Étape 5
natural_image
Hand holding a circular object with a blue arrow inside, next to an open box (no text or symbols visible)Étape 6
Étape 2
natural_image
Hand holding a pen over a circular object, with an arrow pointing to it (no text or symbols present)Étape 3
natural_image
Illustration of a hand inserting a small object into a device, with no visible text or symbolsÉtape 4
natural_image
Hand holding a magnified view of a small electrical component with an arrow indicating direction (no text or symbols present)Étape 5
natural_image
Diagram of a printer with a magnified view showing a printer's internal structure (no text or symbols present)Étape 6
natural_image
Illustration showing a kitchen appliance with a blue swirl and a hand cleaning the interior (no text or symbols)8. PROTECTION DE L'ENVIRONNEMENT ET ÉLIMINATION
8.1. ÉLIMINATION DE L'APPAREIL
natural_image
Line drawing of a 3D box with a side panel and handle (no text or symbols)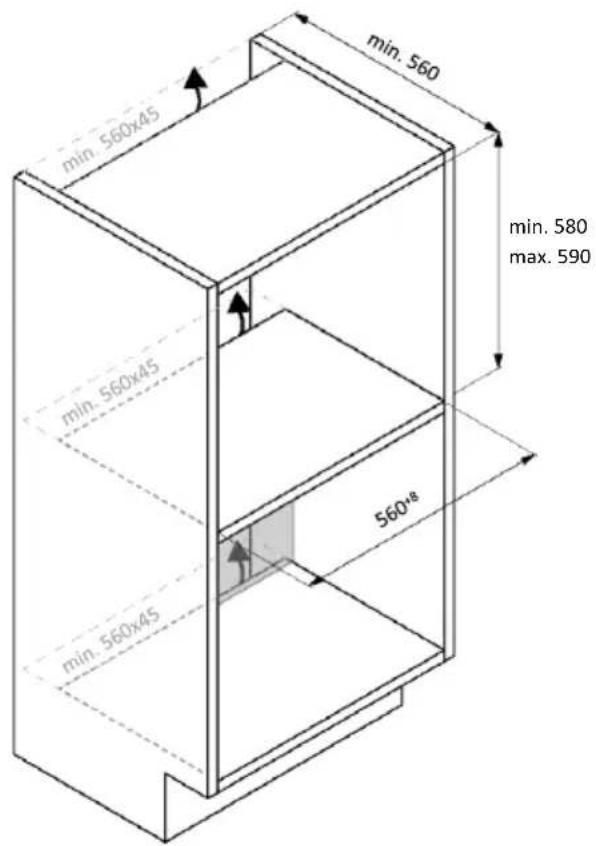
natural_image
Line drawing of a 3D box with a side panel and handle (no text or symbols)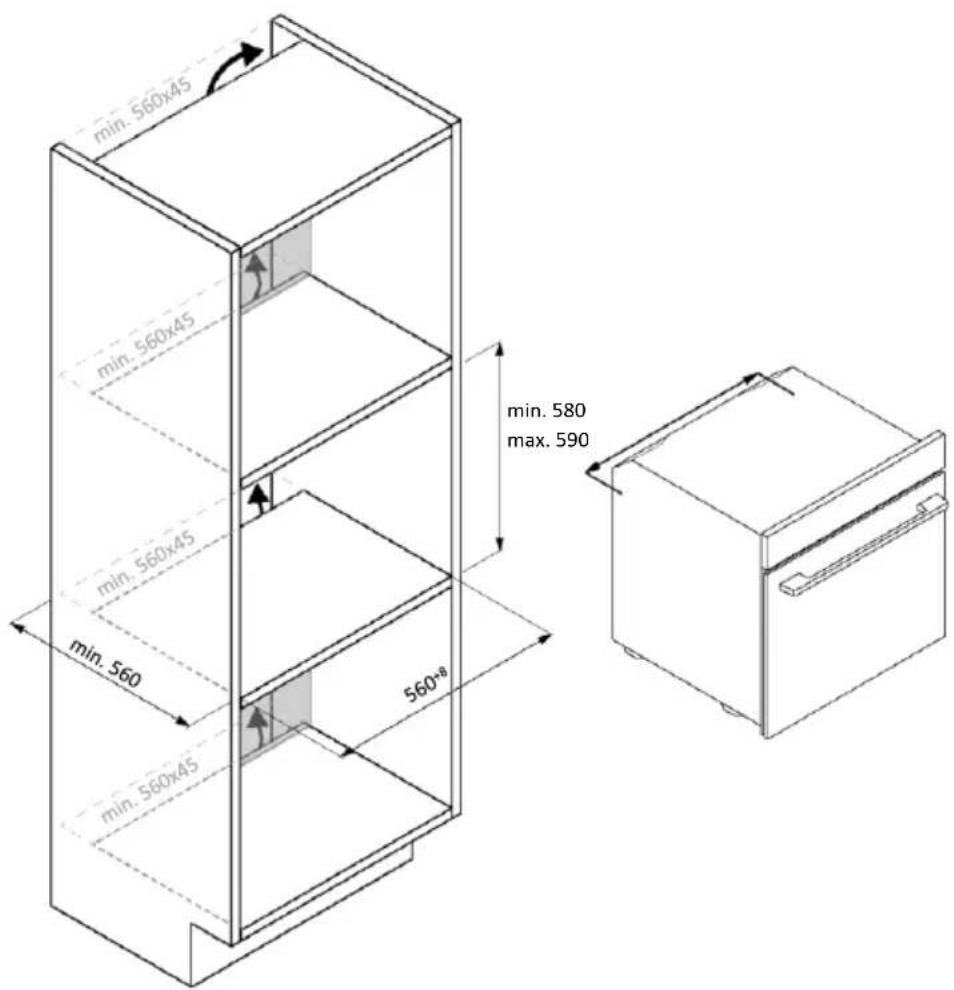


BENVENUTI
natural_image
Empty white rectangle with a thin gray border (no text or symbols)natural_image
Line drawing of a two-tiered storage rack system with no text or symbolsnatural_image
3D wireframe diagram of a rectangular tray with internal compartments, placed inside an oven (no text or symbols)natural_image
3D wireframe diagram of a rectangular tray or container with internal compartments (no text or symbols)natural_image
Line drawing of a bathroom sink with a bowl and wall-mounted shelf (no text or symbols)natural_image
Simple line drawing of a door with a circular component and a hanging object, no text or symbols present.natural_image
Line drawing of a rectangular tray with a blue slatted interior and gray patterned exterior (no text or symbols)natural_image
Diagram of a rectangular appliance with a mesh grille and lid, placed inside an oven (no text or symbols)natural_image
Line drawing of a rooster on a cutting board with dough and steam (no text or symbols)natural_image
Illustration of a mouse being tested with a probe, no text or symbols presentnatural_image
3D rendering of a rectangular tray with a textured inner surface, placed inside a rack (no text or symbols visible)Passo 2
Passo 5
Passo 6.1-6.2

Passo 7
3. PRIMA DI COMINCIARE
natural_image
Simple line drawing of a washing machine with a hand cleaning it, and a bottle nearby (no text or symbols)
natural_image
Simple line drawing of a cabinet with swirling smoke and a door open (no text or symbols)4. USO DEL PRODOTTO
natural_image
Illustration of a medical procedure on a patient's abdomen with a tool and tubing (no text or symbols)
natural_image
Simple diagram with a gray circle, a dot, and a plus sign, with curved arrows indicating rotation or direction (no text or symbols)natural_image
Simple line drawing of a medical procedure with a tool and tubing, no text or symbols presentnatural_image
Technical line drawing of an oven with internal grating and cooling unit (no text or symbols)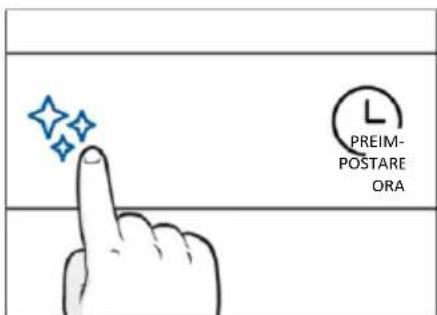

natural_image
Hand cleaning a window with a cloth, showing surface dust and debris (no text or symbols)H2O Clean
natural_image
Illustration of a hand cleaning a window with a cloth (no text or symbols)Pulizia catalitica
natural_image
Line drawing of an oven with a rack and vent, showing internal structure without any text or symbols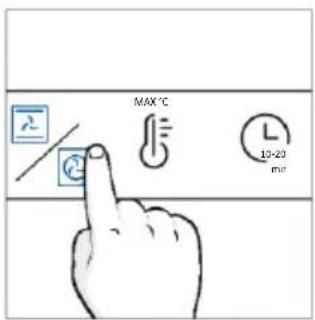

natural_image
Simple line drawing of a kitchen sink with a hand cleaning the interior and a bottle labeled H2O nearby (no text or symbols on main subject)6.2.2. ESTERNO DEL FORNO: SMONTAGGIO E PULIZIA DELLA PORTA IN VETRO
natural_image
Line drawing of hands operating a doorbell with blue tape, no text or symbols present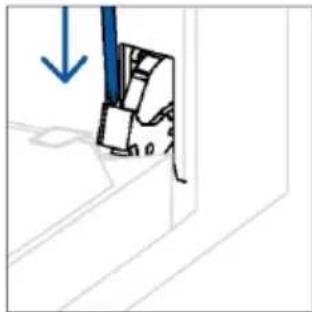
natural_image
Simple line drawing of a mechanical component with a blue arrow indicating downward motion (no text or symbols)natural_image
Pure technical line drawing of a mechanical component with no text or symbolsnatural_image
Hand holding a blue circle with a diagonal line, no text or symbols presentnatural_image
Illustration of a hand cleaning a tiled surface with a blue cloth and a water bath labeled H2O (no text or symbols on the main subject)natural_image
Simple line drawing of a mechanical or architectural component with arrows indicating direction (no text or symbols)natural_image
Line drawing of hands operating a small box with a lid, no text or symbols present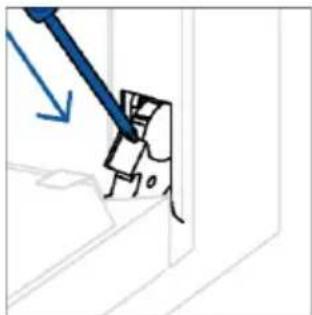
natural_image
Simple line drawing of a tool interacting with a mechanical component (no text or symbols)6.3. PULIZIA DEGLI ACCESSORI
— Modello a 7 livelli
Passo 2
natural_image
Hand holding a paper with a blue checkmark inside an open box (no text or symbols visible)Passo 3

natural_image
Hand holding a circular object with a blue arrow inside, next to an open appliance (no text or symbols visible)Passo 4

natural_image
Hand holding a circular object with a blue arrow inside, inside an open storage unit (no text or symbols visible)Passo 5
natural_image
Hand holding a circular object with a blue arrow inside, next to an open appliance (no text or symbols visible)Passo 6
Passo 2
natural_image
Illustration of a hand holding a pen over a document with an arrow pointing to it, next to a stack of books (no text or symbols present)Passo 3
natural_image
Illustration of a hand holding a circular object with an arrow pointing to a wall-mounted device, next to stacked books (no text or symbols)Passo 4

natural_image
Illustration of a hand inserting a component into a device (no text or symbols present)Passo 5

natural_image
Simple line drawing of a cabinet with a magnified inset showing a blue letter 'K' (no text or symbols present)Passo 6
8.1. SMALTIMENTO DELL'ELETTRODOMESTICO
natural_image
Isometric line drawing of a rectangular box with a side panel and handle (no text or symbols)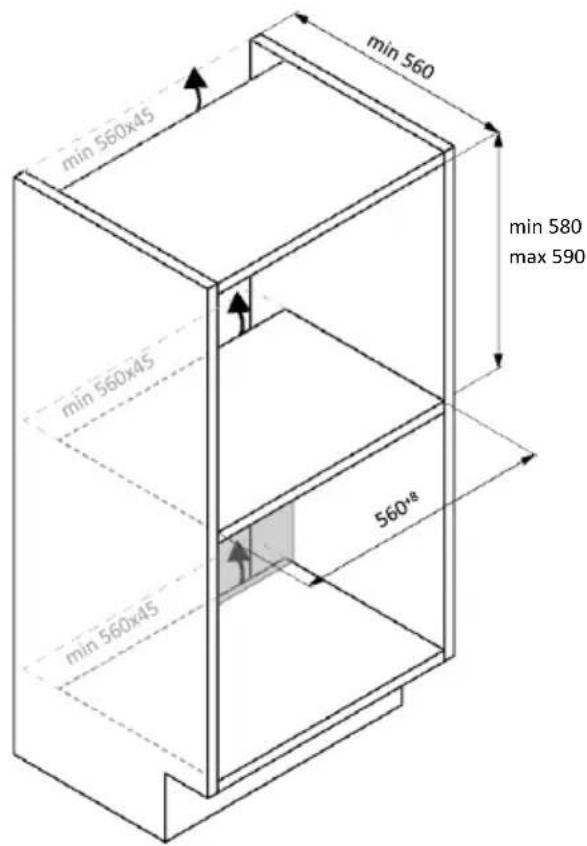
natural_image
Line drawing of a 3D rectangular box with a side tab and handle (no text or symbols)
WILLKOMMEN
2.2. ZUBEHÖR
natural_image
Line drawing of a two-tiered storage unit with horizontal shelves and metal frame (no text or symbols)natural_image
3D diagram of a rectangular tray with internal compartments, no text or symbols presentnatural_image
Empty white rectangle with a thin border (no text or symbols)natural_image
3D rendering of a rectangular tray with internal compartments, placed on a shelf (no text or symbols)natural_image
Line drawing of a kitchen sink with a bowl and a sphere on a grater (no text or symbols)natural_image
Diagram of a rectangular tray with a grid pattern, placed inside a kitchen appliance (no text or symbols)natural_image
Line drawing of a rolling pan with dough and steam, no text or symbols presentnatural_image
Simple line drawing of a door with a circular component and a hanging object, no text or symbols present.natural_image
Line drawing of a rectangular appliance with a grid-patterned lid and base, placed inside an oven (no text or symbols)natural_image
Illustration of a medical procedure involving a mouse and a syringe, with no visible text or symbolsnatural_image
3D rendering of a rectangular tray with a mesh pattern inside, placed on a shelf (no text or symbols visible)Schritt 2
Schritt 6.1-6.2
Schritt 7
flowchart
graph TD
    A["Central Node"] --> B["Control Icon"]
    A --> C["Navigation Icon"]
    A --> D["User Interface Icon"]
    A --> E["Smart Control Icon"]
    A --> F["External System Icon"]
    A --> G["Data Bus Icon"]
    A --> H["Remote Control Icon"]
    A --> I["External System Monitor Icon"]
    A --> J["External System Display Icon"]

natural_image
Simple diagram with a large gray circle, a dot, and a plus sign, with curved arrows indicating direction (no text or symbols)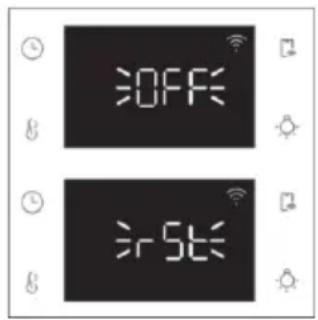
FERNSTEUERUNG
natural_image
Circular icon with a black center and surrounding icons (no text or symbols)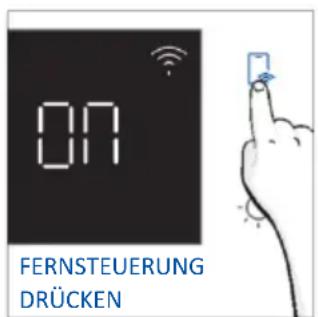
3. VOR DEM START
3.1. INFORMATIONEN ZUM START
natural_image
Simple line drawing of a kitchen sink with a hand cleaning the interior and a water bottle nearby (no text or symbols)

natural_image
Simple line drawing of a cabinet with swirling smoke rising from the top, next to an open door (no text or symbols)
natural_image
Simple line drawing of a laboratory setup with a test tube and test tube tip, no text or symbols present.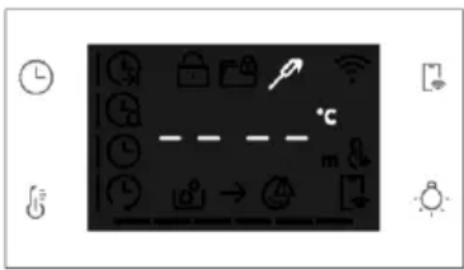
natural_image
Simple diagram with a large gray circle, a dot above it, and curved arrows indicating rotation or direction (no text or symbols)natural_image
Line drawing of a laboratory oven with cooling fins and a blue arrow indicating airflow direction (no text or symbols)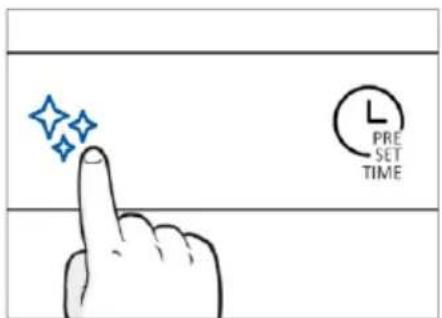

natural_image
Hand cleaning a window with a blue cloth, showing dust and spray (no text or symbols)H2O Clean

natural_image
Hand cleaning a kitchen appliance with a blue cloth (no text or symbols visible)natural_image
Line drawing of an oven with a rack and vent, showing internal structure without any text or symbols

natural_image
Simple line drawing of a kitchen sink with a hand cleaning the interior (no text or symbols)natural_image
Line drawing of hands installing or adjusting a cabinet panel (no text or symbols)
natural_image
Diagram showing a mechanical component with a blue arrow indicating downward motion (no text or symbols present)2.
natural_image
Simple line drawing of a tilted rectangular object with directional arrows indicating movement or force (no text or symbols)natural_image
Hand holding a tool with a blue prohibition symbol (no text or labels)natural_image
Illustration of a hand cleaning a tiled surface with a blue cloth, water being washed in a basin labeled H₂O (no text or symbols on main objects)natural_image
Simple line drawing of a ladder leaning against a wall, with arrows indicating direction (no text or symbols)natural_image
Line drawing of hands installing or adjusting a cabinet interior (no text or symbols)
natural_image
Simple line drawing of a hand holding a tool, with no text or symbols presentSchritt 2
natural_image
Hand holding a paper with a blue checkmark inside a device (no text or symbols visible)Schritt 3

natural_image
Hand holding a circular object with a blue arrow inside, next to an open device (no text or symbols visible)Schritt 4

natural_image
Hand holding a circular object with a blue arrow inside, inside an open appliance (no text or symbols visible)Schritt 5

natural_image
Hand holding a circular object with a blue arrow inside, next to an open box (no text or symbols visible)Schritt 6

Schritt 2
natural_image
Illustration of a hand holding a pen over a document with an arrow indicating direction (no text or symbols present)Schritt 3

natural_image
Illustration of a hand holding a small object near a shelf, with no visible text or symbolsSchritt 4

natural_image
Illustration of a hand inserting a plug into a wall-mounted electrical outlet (no text or symbols)Schritt 5
natural_image
Simple line drawing of a printer with a magnified inset showing a printer's screen (no text or symbols)Schritt 6

ΚΑΛΩΣΗΡΘΑΤΕ
natural_image
3D rendering of a rectangular tray with a textured inner surface, placed inside a rack (no text or symbols visible)ΕΓΓΡΑΦΗ ΝΕΟΥ ΧΡΗΣΤΗ
Βήμα 2
Βήμα 3
Βήμα 4
Βήμα 5
Βήμα 6.1-6.2

Βήμα 7
natural_image
Simple diagram with a gray circle, a dot, and a plus sign, with curved arrows indicating direction (no text or symbols)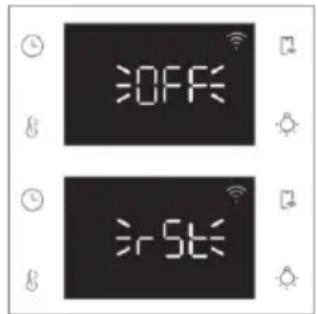
THΛΕΧΕΙΡΙΣΜΟΣ
natural_image
Simple line drawing of a washing machine with a hand cleaning it, and a small bowl with liquid nearby (no text or symbols)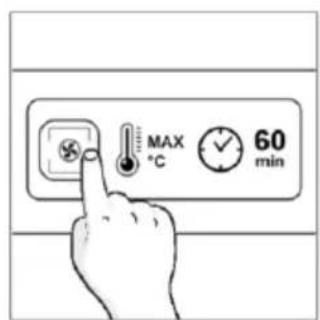
natural_image
Simple line drawing of a steam rising from a chimney next to a cabinet (no text or symbols)
natural_image
Line drawing of an oven with internal grating and cooling unit (no text or symbols)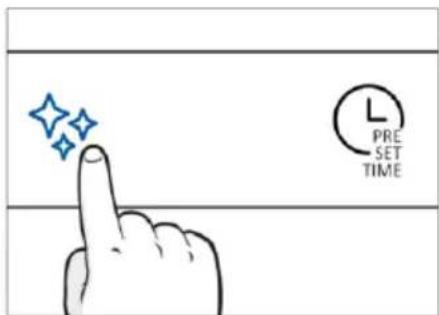
natural_image
Hand cleaning a kitchen appliance with a blue cloth (no text or symbols visible)H2O Clean
natural_image
Hand cleaning a kitchen appliance with a blue cloth (no text or symbols visible)natural_image
Line drawing of an oven with a rack and vent, showing internal structure without any text or symbols

natural_image
Simple line drawing of a kitchen sink with a hand cleaning the interior and a bottle nearby (no text or symbols)natural_image
Line drawing of hands installing or adjusting a cabinet interior (no text or symbols)
natural_image
Diagram showing a mechanical component with a blue arrow indicating downward motion (no text or symbols present)natural_image
Simple line drawing of a tilted rectangular object with two arrows indicating direction (no text or symbols)natural_image
Hand holding a diagonal line through a window frame, with no text or symbols presentnatural_image
Illustration of a hand cleaning a blue cloth over a plate with a water bottle and beaker labeled H₂O (no text or symbols on main objects)natural_image
Simple line drawing of a ladder leaning against a wall, with arrows indicating direction (no text or symbols)natural_image
Line drawing of hands installing or adjusting a door frame inside an oven (no text or symbols)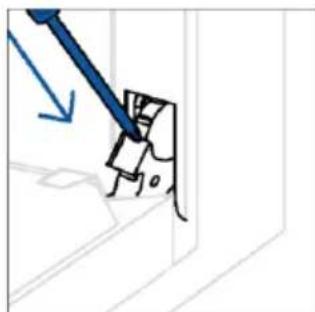
natural_image
Simple line drawing of a hand holding a tool, with no text or symbols present6.3. ΚΑΘΑΡΙΣΜΟΣ ΕΞΑΡΤΗΜΑΤΩΝ
Βήμα 2

natural_image
Hand holding a paper with a blue checkmark inside a device (no text or symbols visible)Βήμα 3

natural_image
Hand holding a circular object with a blue arrow inside, next to an open device (no text or symbols visible)Βήμα 4

natural_image
Hand holding a circular object with a blue arrow inside, inside an open appliance (no text or symbols visible)Βήμα 5

natural_image
Hand holding a circular object with a blue arrow inside, next to an open box (no text or symbols visible)Βήμα 6


BIENVENIDO/A
natural_image
Empty white rectangle with a thin gray border (no text or symbols)natural_image
Line drawing of a two-tiered storage unit with horizontal shelves and metal frame (no text or symbols)natural_image
3D wireframe diagram of a rectangular tray with internal compartments, placed inside an oven (no text or symbols)natural_image
Technical line drawing of a kitchen sink with a bowl, a sphere, and a mesh rack (no text or symbols)natural_image
Line drawing of a rectangular tray with a grid pattern on the front face (no text or symbols)natural_image
Line drawing of a roasted chicken on a cutting board (no text or symbols)natural_image
Simple line drawing of a kitchen appliance with a circular button and fan, no text or symbols presentnatural_image
Line drawing of a rectangular appliance with a grid-patterned lid and base, placed inside an oven (no text or symbols)natural_image
Illustration of a chicken being tested with a syringe and probe, no text or symbols presentnatural_image
3D rendering of a rectangular tray with a textured inner surface, placed inside a rack (no text or symbols visible)Paso 3
Paso 4
Paso 5
Paso 6.1-6.2

Paso 7
flowchart
graph TD
    A["Central Node"] --> B["Control Icon"]
    A --> C["Navigation Icon"]
    A --> D["User Interface Icon"]
    A --> E["Remote Control Icon"]
    A --> F["External Interface Icon"]
    A --> G["Data Bus Icon"]
    A --> H["Remote Display Icon"]
    A --> I["External Display Icon"]
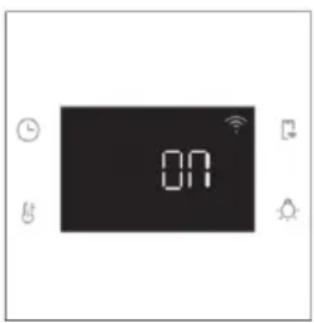
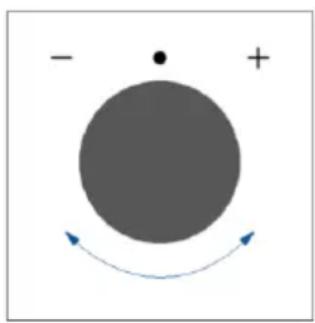
natural_image
Simple diagram with a large gray circle, a dot, and a plus sign, with curved arrows indicating direction (no text or symbols)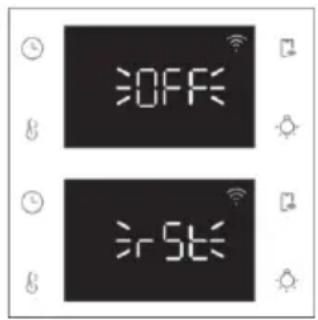
CONTROL REMOTO
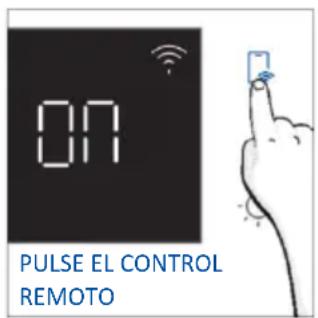
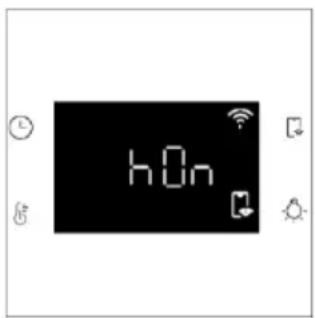
natural_image
Simple line drawing of a washing machine with a hand cleaning it and a bowl of water nearby (no text or symbols)
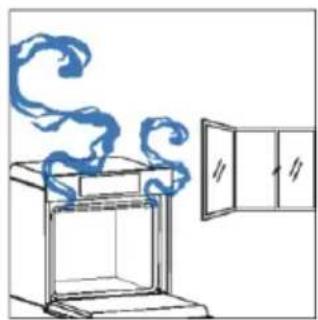
natural_image
Simple line drawing of a chimney with steam rising, next to an open door (no text or symbols)
natural_image
Simple line drawing of a mouse being heated by a tool, no text or symbols present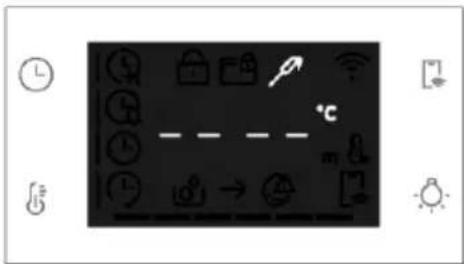
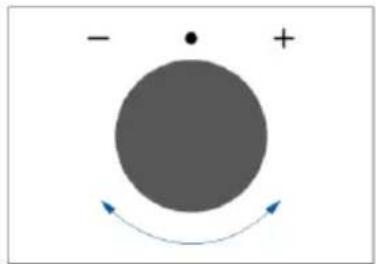
natural_image
Simple diagram with a gray circle, plus signs, and curved arrows indicating rotation or direction (no text or symbols)natural_image
Medical catheter device with attached tubing and bulbous body (no text or symbols)natural_image
Line drawing of a laboratory oven with cooling fins and a side panel (no text or symbols)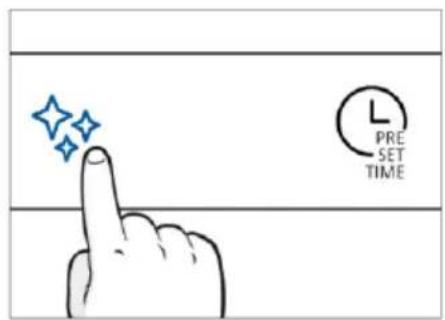
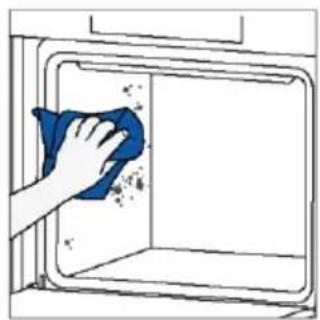
natural_image
Hand cleaning a window with a blue cloth (no text or symbols visible)H2O Clean

natural_image
Hand cleaning a window with a blue cloth (no text or symbols visible)Limpieza catalítica
natural_image
Line drawing of an oven with a blue arrow indicating direction (no text or symbols)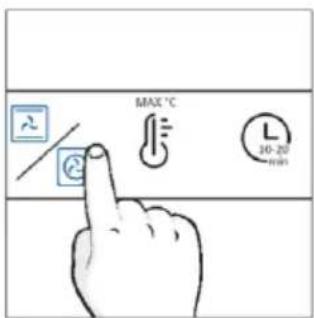

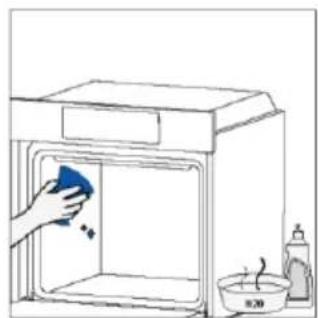
natural_image
Simple line drawing of a kitchen sink with a hand cleaning it, and a bottle pouring liquid into a bowl (no text or symbols)natural_image
Line drawing of hands installing or adjusting a cabinet interior with blue tools (no text or symbols)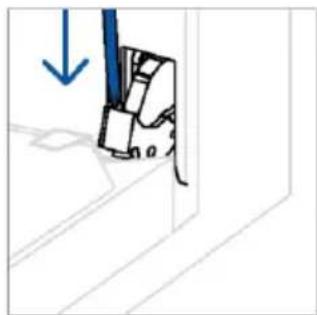
natural_image
Simple line drawing of a mechanical component with a blue arrow indicating downward motion (no text or symbols)2.
natural_image
Simple line drawing of a tilted rectangular frame with directional arrows indicating movement or force (no text or symbols)5.
natural_image
Hand holding a diagonal line with a blue circle highlighting the construction detail (no text or symbols)natural_image
Illustration of a hand cleaning a tiled surface with a blue cloth and a small bowl labeled H₂O (no text or symbols on the main subject)natural_image
Pure technical line drawing of a mechanical component with no text or symbolsnatural_image
Line drawing of hands installing or adjusting a door frame inside an oven (no text or symbols)
natural_image
Simple line drawing of a tool interacting with a wall-mounted device (no text or symbols)6.3. LIMPIEZA DE ACCESORIOS
Paso 2

natural_image
Illustration of a hand holding a pen over a document with an arrow indicating direction (no text or symbols present)Paso 3
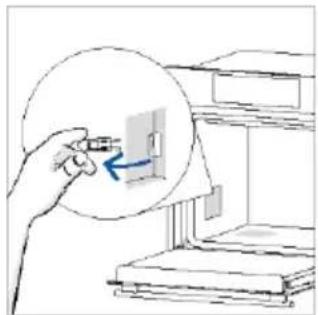
natural_image
Illustration of a hand holding a small object near a shelf, with no visible text or symbolsPaso 4
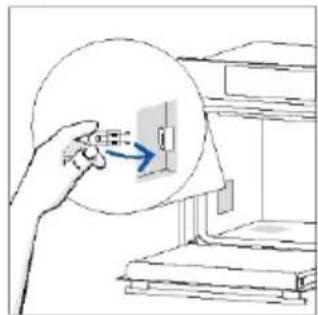
natural_image
Illustration of a hand inserting a plug into a wall-mounted electrical outlet (no text or symbols)Paso 5

natural_image
Simple line drawing of a printer with a magnified inset showing a printer's screen (no text or symbols)Paso 6

Humo
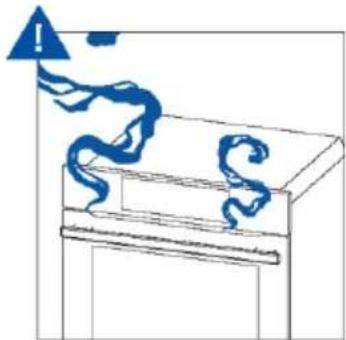
natural_image
Simple line drawing of a cabinet with blue ribbons and an upward arrow, no text or symbols present
natural_image
Simple line drawing of a kitchen sink with a hand cleaning the interior (no text or symbols)en mm
WELKOM
2. PRODUCTINTRODUCTIE
4. WERKING VAN HET PRODUCT
ALGEMENE WAARSCHUWINGEN
INSTALLATIEWAARSCHUWINGEN
2. PRODUCTINTRODUCTIE
2.1. OVERZICHT VAN HET PRODUCT

2.2. ACCESSOIRES
natural_image
Line drawing of a two-tiered storage unit with horizontal and vertical metal racks (no text or symbols)natural_image
3D wireframe diagram of a rectangular tray or basin with internal divisions, placed inside an oven (no text or symbols)natural_image
Empty white rectangle with a thin gray border (no text or symbols)natural_image
Technical line drawing of a rectangular metal grate or rack with 'STOP' annotations indicating stop points (no text or symbols beyond labels)natural_image
3D wireframe diagram of a rectangular tray with internal compartments, placed inside an oven (no text or symbols)natural_image
Line drawing of a kitchen sink with a bowl, a sphere, and a tray (no text or symbols)natural_image
Line drawing of a rectangular tray with a grid pattern on top, placed inside a storage unit (no text or symbols)natural_image
Line drawing of a rooster on a tray with chopsticks, no text or symbols presentnatural_image
Simple line drawing of a door with a circular component and directional arrow, no text or symbols presentnatural_image
Line drawing of a rectangular appliance with a slatted lid and internal grating, placed inside an oven (no text or symbols)natural_image
Illustration of a mouse being heated by a medical or laboratory device, with no visible text or symbolsnatural_image
Illustration of a rectangular tray with a textured inner surface, placed inside an oven (no text or symbols)REGISTRATIE NIEUWE GEBRUIKER
SNELLE KOPPELING
Stap 1
Stap 2
Stap 3
- Selecteer 'Oven' in de apparaatcategorie.
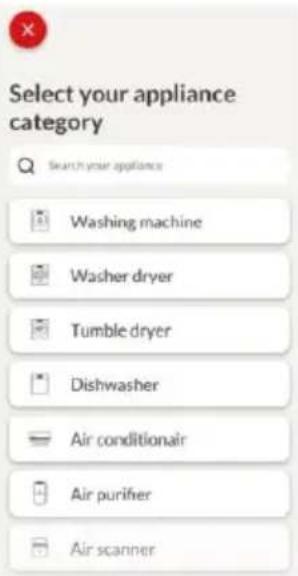
Stap 4
Stap 5
Stap 6.1–6.2
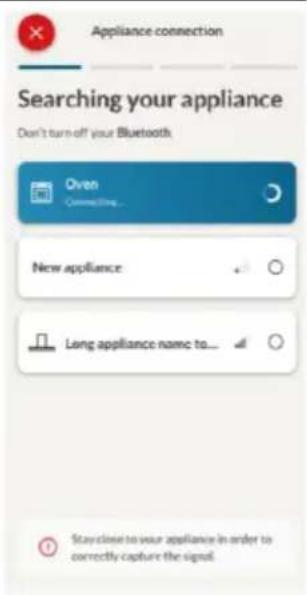
Stap 7
natural_image
Simple diagram with a gray circle, black dot, and plus sign, and curved arrows indicating direction (no text or symbols)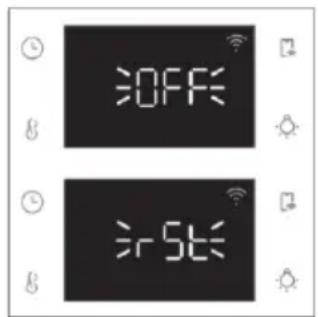
natural_image
Circular icon with icons and a curved arrow, no readable text or symbols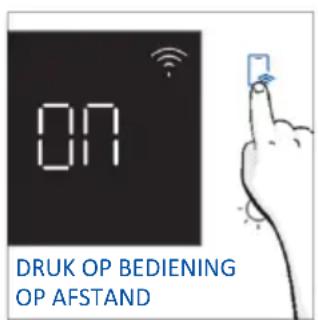
natural_image
Simple line drawing of a kitchen sink with a hand cleaning the interior and a water bottle nearby (no text or symbols)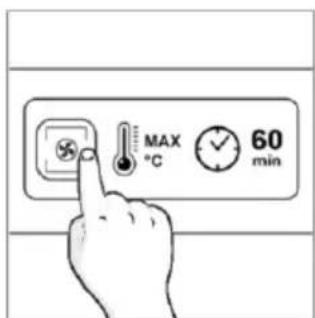

natural_image
Simple line drawing of a steam rising from an oven to a cabinet (no text or symbols)4. WERKING VAN HET PRODUCT
4.1. HOE HET PRODUCT WERKT
DE OVEN AAN-/UITZETTEN


natural_image
Illustration of a hand cleaning a window with a cloth (no text or symbols)Katalytisch reinigen
natural_image
Line drawing of an oven with a blue arrow indicating direction (no text or symbols)

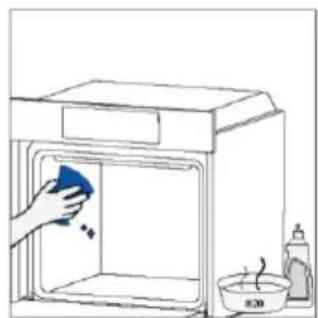
natural_image
Simple line drawing of a kitchen sink with a hand cleaning the interior and a bottle nearby (no text or symbols)natural_image
Line drawing of hands operating a small oven with blue tool tips (no text or symbols)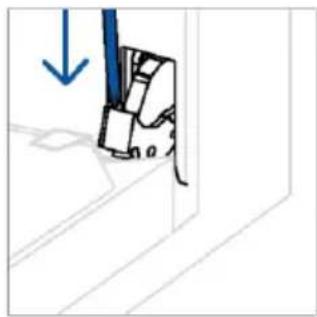
natural_image
Diagram showing a mechanical component with a blue arrow indicating downward motion (no text or symbols present)2.
natural_image
Simple line drawing of a tilted rectangular object with directional arrows indicating movement or force (no text or symbols)natural_image
Hand holding a tool with a blue prohibition symbol (no text or labels)natural_image
Illustration of a hand cleaning a tiled surface with a blue cloth, accompanied by a water bottle and a bowl labeled H₂O (no text or symbols on the main image)natural_image
Simple line drawing of a ladder leaning against a wall, with arrows indicating direction (no text or symbols)natural_image
Line drawing of hands installing or adjusting a door frame inside an oven (no text or symbols)
natural_image
Simple line drawing of a tool interacting with a mechanical component (no text or symbols)6.3. SCHOONMAKEN VAN ACCESSOIRES
natural_image
Line drawing of an oven with a right vent and internal structure (no text or symbols)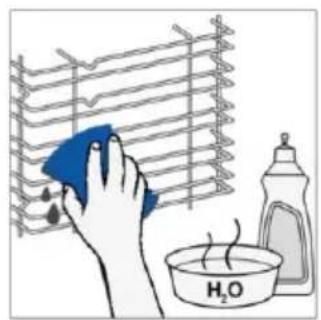
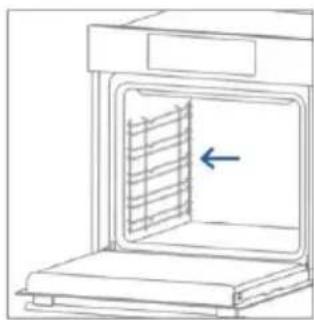
natural_image
Line drawing of an oven with a vent and airflow direction arrow (no text or symbols)Stap 2
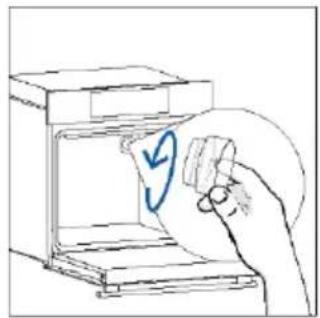
natural_image
Hand holding a cleaning tool over a kitchen appliance with a blue circular arrow (no text or symbols)Stap 3

natural_image
Hand holding a circular object with a blue arrow, inside an open device (no text or symbols visible)Stap 4
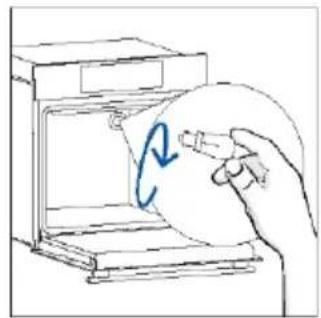
natural_image
Hand holding a circular object with a blue arrow inside, inside an open appliance (no text or symbols)Stap 5
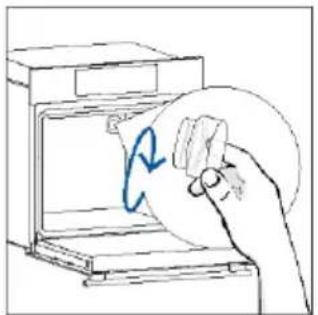
natural_image
Hand holding a circular object with a blue arrow inside, next to an open box (no text or symbols visible)Stap 6

Stap 2
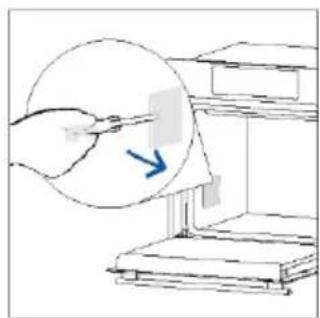
natural_image
Illustration of a hand using a tool to interact with a document or paper (no text or symbols visible)Stap 3
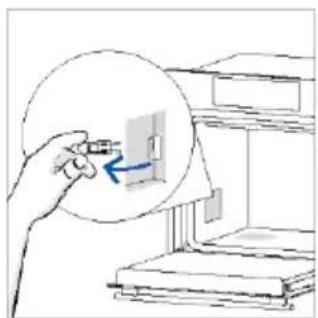
natural_image
Illustration of a hand holding a small electronic device with an arrow pointing to a screen (no text or symbols present)Stap 4
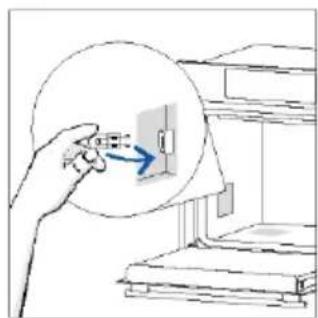
natural_image
Illustration of a hand inserting a plug into a wall-mounted electrical outlet, with no text or symbols present.Stap 5
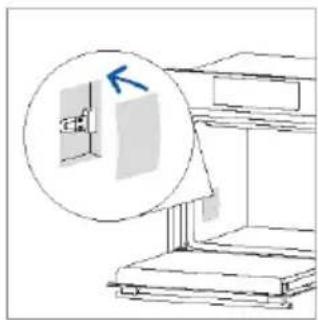
natural_image
Simple line drawing of a cabinet with an inset magnified view showing a blue arrow pointing to the cabinet (no text or symbols)Stap 6

8.1. VERWIJDERING VAN APPARATEN
BEM-VINDO
natural_image
Empty white rectangle with a thin border (no text or symbols)natural_image
Line drawing of a two-tiered storage unit with horizontal and vertical metal racks (no text or symbols)natural_image
3D wireframe diagram of a rectangular tray or basin with internal compartments, placed on an inclined shelf (no text or symbols)natural_image
3D wireframe diagram of a rectangular tray with internal compartments, placed inside an oven (no text or symbols)natural_image
Technical line drawing of a bathroom sink with a bowl, wall-mounted shelf, and circular object (no text or symbols)natural_image
Line drawing of a rectangular tray with a grid pattern on the front face (no text or symbols)natural_image
Line drawing of a rooster on a tray with chopsticks, no text or symbols presentnatural_image
Simple line drawing of a door with a circular button and directional arrow, no text or symbols presentnatural_image
Line drawing of a rectangular appliance with a grid-patterned lid and base, placed inside an oven (no text or symbols)natural_image
Illustration of a mouse being held by a medical device, no text or symbols presentWelcome! Sign in to enter in your home page
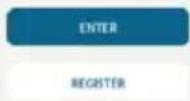
Are you new to hOn? Click below to learn about our products
① TRY DEMO

Do you already have a thousand passwords? Register with your social accounts and log in the easiest and fastest way.
SIGN UP WITH GOOGLE
SIGN UP WITH APPLE
f SIGN UP WITH FACEBOOK
The differences are underlying, its own will be inferred and will well here present anything. The data.
of
SIGN UP WITH EMAIL
Already registered?
LOGIN
Passo 2
Passo 3
Passo 4
Passo 5
Passo 6.1-6.2
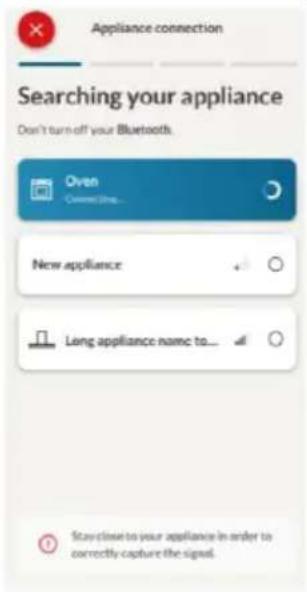
Passo 7
natural_image
Simple diagram with a large gray circle, a dot, and a plus sign, with curved arrows indicating direction (no text or symbols)
CONTROLO REMOTO
natural_image
Circular icon with a black center and surrounding icons (no text or symbols)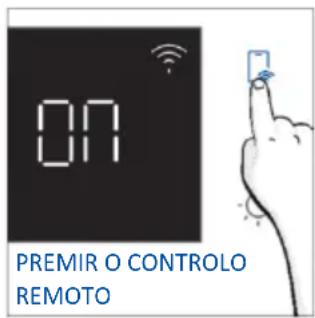
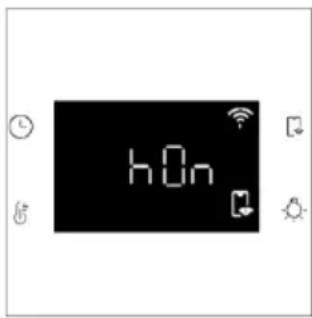
3. ANTES DE COMEÇAR
3.1. INFORMAÇÕES PARA COMEÇAR
natural_image
Simple line drawing of a kitchen sink with a hand cleaning the interior and a bowl of water nearby (no text or symbols)
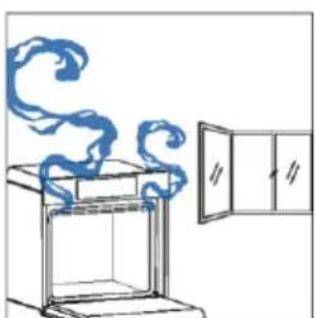
natural_image
Simple line drawing of a steam rising from an oven to a cabinet (no text or symbols)
natural_image
Simple line drawing of a laboratory setup with a mouse, a pen, and a tool (no text or symbols)
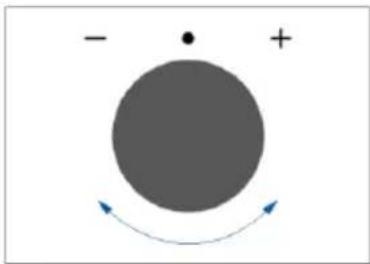
natural_image
Simple diagram with a gray circle, a dot, and a plus sign, with curved arrows indicating rotation or direction (no text or symbols)natural_image
Medical catheter device with attached tubing and bulbous body (no text or symbols)natural_image
Line drawing of an oven with internal structure and airflow direction indicator (no text or symbols)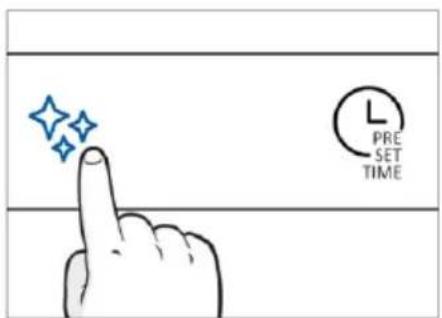

natural_image
Hand cleaning a window with a blue cloth (no text or symbols visible)H2O Clean

natural_image
Illustration of a hand cleaning a blue cloth inside a washing machine (no text or symbols)Limpeza catalítica
natural_image
Line drawing of an oven with a rack and vent, showing internal structure without any text or symbols
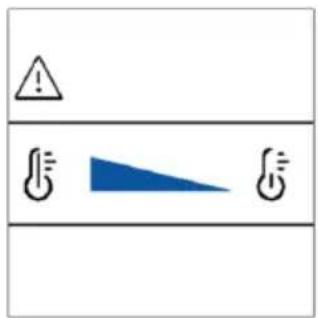
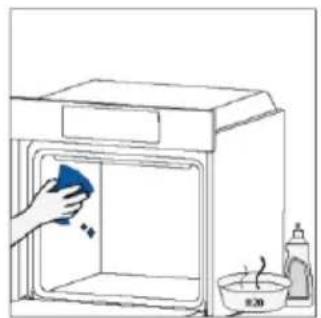
natural_image
Simple line drawing of a kitchen sink with a hand cleaning the interior (no text or symbols)natural_image
Line drawing of hands installing or adjusting a cabinet interior with blue tool tips (no text or symbols)
natural_image
Diagram showing a mechanical component with a blue arrow indicating downward motion (no text or symbols present)2.
natural_image
Simple line drawing of a tilted rectangular object with two blue arrows indicating upward motion (no text or symbols)5.

natural_image
Hand holding a tool with a blue prohibition symbol (no text or labels)natural_image
Illustration of a hand cleaning a tiled surface with a blue cloth and a water bottle labeled H₂O (no text or symbols on the main image)natural_image
Simple line drawing of a ladder leaning against a wall, with arrows indicating direction (no text or symbols)natural_image
Line drawing of hands operating a doorbell with blue tape, no text or symbols present
natural_image
Simple line drawing of a hand holding a tool, with no text or symbols present6.3. LIMPEZA DOS ACESSÓRIOS
Passo 2

natural_image
Hand holding a paper with a blue checkmark inside a device (no text or symbols visible)Passo 3
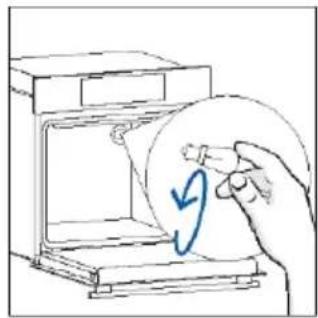
natural_image
Hand holding a circular object with a blue arrow inside, next to an open device (no text or symbols visible)Passo 4

natural_image
Hand holding a circular object with a blue arrow inside, inside an open appliance (no text or symbols visible)Passo 5
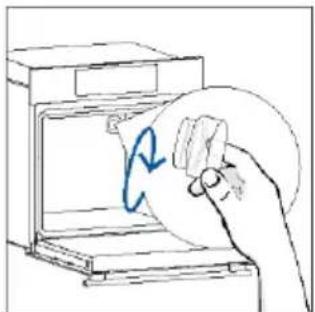
natural_image
Hand holding a circular object with a blue arrow inside, next to an open box (no text or symbols visible)Passo 6
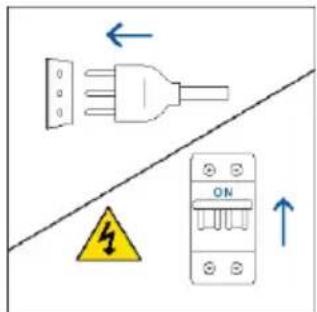
Passo 2

natural_image
Illustration of a hand inserting a small object into a device (no text or symbols visible)Passo 3

natural_image
Illustration of a hand holding a small object inside a circular frame, with no visible text or symbols.Passo 4
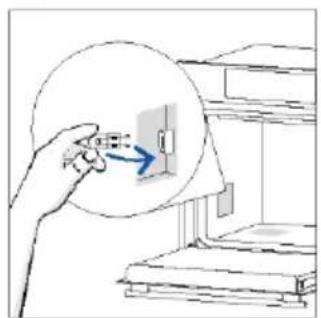
natural_image
Illustration of a hand inserting a cable into a wall-mounted electrical outlet (no text or symbols)Passo 5

natural_image
Diagram of a mechanical assembly with a magnified inset showing a component (no text or symbols)Passo 6
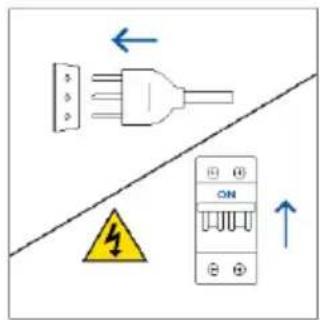
Fumo
[Non-Text]
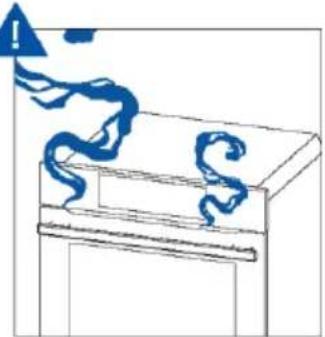
natural_image
Simple line drawing of a cabinet with a blue spiral and warning symbol above (no text or labels)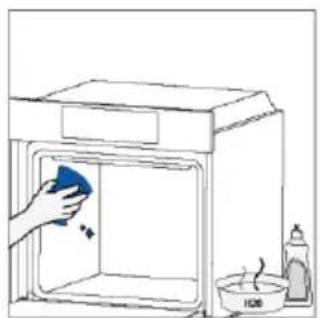
natural_image
Simple line drawing of a kitchen sink with a hand cleaning the interior (no text or symbols)
VITAJTE
natural_image
Line drawing of a two-tiered storage unit with horizontal shelves and a central rack (no text or symbols)natural_image
3D diagram of a rectangular tray with internal compartments, no text or symbols presentnatural_image
Illustration of a rectangular tray with internal compartments, no text or symbols presentnatural_image
Line drawing of a bathroom sink with a bowl, a sphere, and a mesh platform (no text or symbols)natural_image
Diagram of a rectangular tray with internal grid pattern, no text or symbols presentnatural_image
Line drawing of a rooster on a tray with dough, placed inside an oven (no text or symbols)natural_image
Simple line drawing of a window with a circular arrow indicating airflow or motion (no text or symbols)natural_image
Illustration of a rectangular tray with a grid pattern, placed inside a transparent housing (no text or symbols)natural_image
Illustration of a mouse being fed with a syringe, no text or symbols presentnatural_image
3D rendering of a rectangular tray with a mesh pattern inside, placed in a kitchen or storage unit (no text or symbols visible)AKO KOMUNIKOVAŤ S APLIKÁCIOU
REGISTRÁCIA NOVÉHO POUŽÍVATEL'A

RÝCHLE PÁROVANIE
Krok 1
Krok 2
- Povol'te lokalizáciu zariadenia.

Allow your location permission
To enhance your experience, please allow location permission to hOn app in the next step.


CONTINUE
Krok 3
Select your appliance category

Seizetivone appliance

Washing machine

Washer dryer

Tumble dryer

Dishwasher

Air conditionair

Air purifier

Air scanner
Krok 4
- Zapnite spotrebič. Ak už je zapnutý, vypnite ho a znova zapnite.

Appliance connection

Turn OFF and then ON your appliance
In case you can't switch OFF your appliance, unplug (for at least 10 seconds) and then plug its power supply.

natural_image
Circular icon with a blue 'Power' button and surrounding geometric shapes, no text or symbols present.Krok 5
Appliance connection
Searching your appliance
Don't turn off your Bluetooth. hOn app is looking for your appliance...

pie
| Time | Value | |---|---| | 00:00:40 | 40 |
May close to your appliance in order to correctly capture the signal.
Krok 6.1-6.2
Appliance connection
Searching your appliance
Don't burn-off your Bluetooth.

Oven


New appliance


Long appliance name to...


CONNECT
PRODUCT NOT FOUND

Appliance connection
Searching your appliance
Don't turn off your Bluetooth.

Own Convesting

New appliance


Long appliance name to...


Stay close to your appliance in order to correctly capture the signal.
Krok 7
Appliance connection

Your appliance has been correctly identified!

Brand Hoover Model 31008486-7888-1824
Serial number 12345678-1234-1234
Is this your appliance?
YES!S MY OVER
NO IT'S NOT

AKO ZMENIČ NASTAVENIA WIFI
flowchart
graph TD
    A["Central Device"] --> B["Smart"]
    A --> C["Other Software"]
    A --> D["Mobile Phone"]
    A --> E["Desktop Icon"]
    A --> F["Smart Speaker Icon"]
    A --> G["User Interface Icon"]
    A --> H["Remote Control Icon"]
    A --> I["Wireless Interface Icon"]
    A --> J["Global Display Icon"]
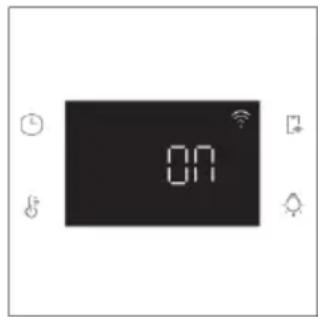
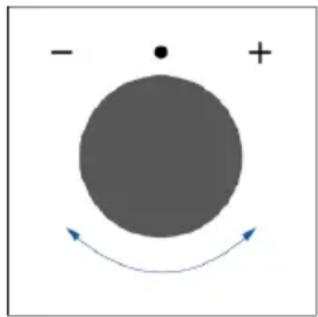
natural_image
Simple diagram with a gray circle, a dot, and a plus sign, with curved arrows indicating direction (no text or symbols)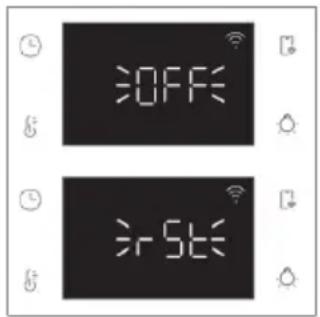

DIALKOVÉ OVLÁDANIE
3. PRED ZAČATÍM
3.1. INFORMÁCIE PRED SPUSTENÍM
natural_image
Simple line drawing of a kitchen appliance with a hand cleaning the interior (no text or symbols)
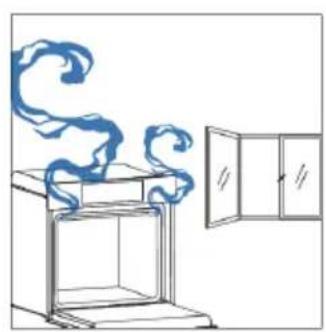
natural_image
Simple line drawing of a cabinet with swirling smoke rising from the top, next to an open door (no text or symbols)4. OBSLUHA SPOTREBIČA
4.1. FUNGOVANIE SPOTREBIČA
ZAPNUTIE/VYPNUTIE RÚRY
Ako nastavit funkciu Jolly:

natural_image
Line drawing of a medical procedure involving a tool and pressure gauge on a patient's abdomen (no text or symbols)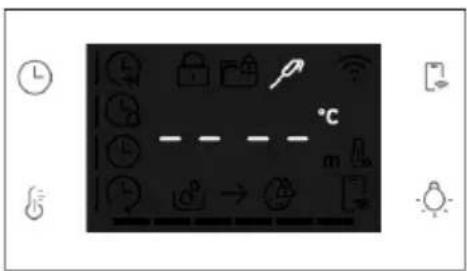
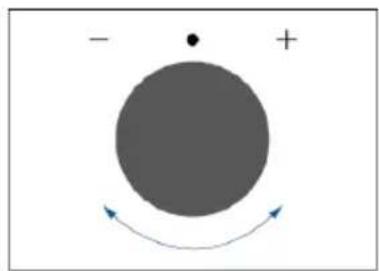
natural_image
Simple diagram with a gray circle, a dot, and a curved arrow inside, no text or symbols present.natural_image
Illustration of a medical procedure with a needle inserted into a patient's chest (no text or symbols)natural_image
Line drawing of hands operating a cabinet with a door open, no text or symbols present
natural_image
Diagram of a mechanical component with a blue arrow indicating downward motion (no text or symbols)2.
natural_image
Simple line drawing of a tilted rectangular object with directional arrows indicating movement or force (no text or symbols)natural_image
Illustration of a hand holding a blue circle with a crossed-out line, no text or symbols presentnatural_image
Illustration of a hand cleaning a tiled surface with a blue cloth, a water bottle, and a beaker labeled H₂O (no text or symbols on main objects)natural_image
Line drawing of a mechanical assembly with arrows indicating direction (no text or symbols)
natural_image
Line drawing of a cabinet with two hands inserting a tool into the opening (no text or symbols)
natural_image
Simple line drawing of a mechanical component with a blue tool and downward arrow, no text or symbols present.6.3. ČISTENIE PRÍSLUŠENSTVA
natural_image
Line drawing of an oven with a heat exchanger inside, showing airflow direction (no text or symbols)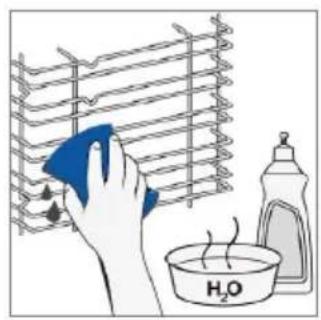
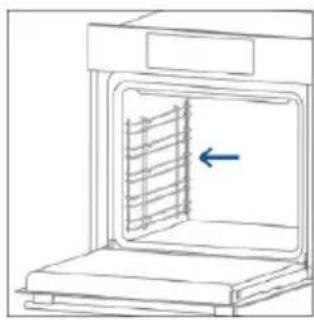
natural_image
Line drawing of an oven with a blue arrow pointing to the interior panel (no text or symbols)Krok 5
Krok 2

natural_image
Hand holding a paper with a blue checkmark inside an open box (no text or symbols visible)Krok 6
Krok 3

natural_image
Hand holding a circular object inside a device (no text or symbols visible)Krok 4
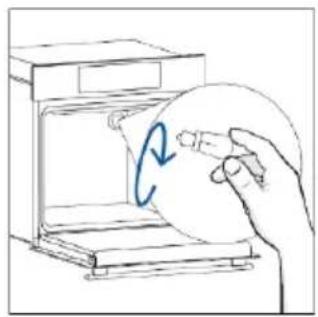
natural_image
Hand holding a circular object inside a kitchen appliance (no text or symbols visible)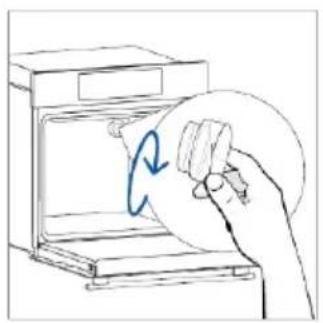
natural_image
Hand placing a circular object into an oven with a blue arrow indicating rotation (no text or symbols)
Krok 2

natural_image
Illustration of a hand using a pen to write on a document inside a filing cabinet (no text or symbols visible)Krok 3
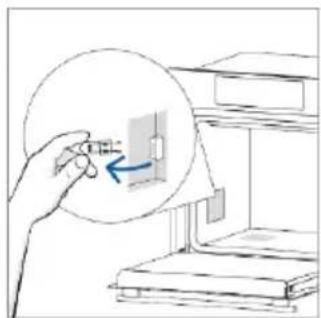
natural_image
Hand inserting a small component into a rack, showing a blue arrow (no text or symbols)Krok 4

natural_image
Illustration of a hand inserting a component into a device, showing a blue arrow indicating rotation (no text or symbols present)Krok 5
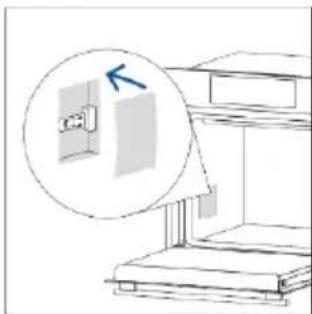
natural_image
Simple line drawing of a cabinet or shelf with an open door and a magnified inset showing a blue arrow labeled 'K' (no text or symbols on the diagram itself)Krok 6

natural_image
Illustration of two people working at a desk with a computer, one standing on a rising line graph (no text or symbols)Dym
!

natural_image
Simple line drawing of a cabinet with blue swirls on top (no text or symbols)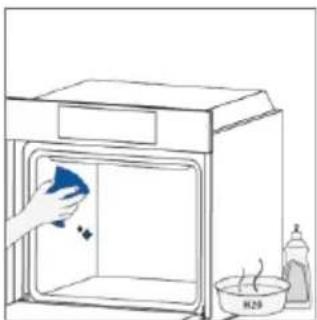
natural_image
Simple line drawing of a kitchen sink with a hand cleaning it, no text or symbols present8. OCHRANA ŽIVOTNÉHO PROSTREDIA A LIKVIDÁCIA SPOTREBIČA
8.1. LIKVIDÁCIA SPOTREBIČA
WITAMY
natural_image
Empty white rectangle with black border (no text or symbols)natural_image
Line drawing of a two-tiered storage unit with horizontal racks and a central grid (no text or symbols)natural_image
3D wireframe diagram of a rectangular tray with internal compartments, no text or symbols presentnatural_image
3D wireframe diagram of a rectangular tray or container with internal compartments, placed on an inclined shelf (no text or symbols)natural_image
3D rendering of a rectangular tray with a mesh pattern inside, placed in a technical view (no text or symbols)SZYBKA REJESTRACJA PAROWANIA
Krok 1
Krok 2
Allow your location permission
I do enhance your experience, please allow location permission to hOn app in the next step.


CONTINUE
Krok 3
Select your appliance category

Search your appliance

Washing machine

Washer dryer

Tumble dryer

Dishwasher

Air conditionair

Air purifier

Air scanner
Krok 4
Appliance connection

Turn OFF and then ON your appliance
In case you can't switch OFF your appliance, unplug (for at least 10 seconds) and then plug its power supply.

natural_image
Circular icon with a blue power button and surrounding geometric shapes, no text or symbols present.Krok 5
Appliance connection
Searching your appliance
Don't turn off your Bluetooth. On app is looking for your appliance...


May close to your appliance in order to correctly capture the signal.
Krok 6.1-6.2
Appliance connection
Searching your appliance
Don't burn-off your Bluetooth.

Oven


New appliance


Long appliance name to...


CONNECT
PRODUCT NOT FOUND

Appliance connection
Searching your appliance
Don't turn off your Bluetooth.

Oven
Connecting.

New appliance


Long appliance name to...


Stay close to your appliance in order to correctly capture the signal.
Krok 7
Appliance connection

Your appliance has been correctly identified!
natural_image
Simple icon of a kitchen oven inside a light green circular frame (no text or symbols)Brand Hoover
Model 31008486-7888-1824
Serial number 12345678-1234-1234
Is this your appliance?
YES!S MY OVEN
NO IT'S NOT
JAK ZMIENIĆ USTAWIENIA WIFI
natural_image
Simple diagram with a gray circle, a dot, and a plus sign, connected by curved arrows (no text or symbols)
ZDALNE STEROWANIE
3.1. INFORMACJE NA START
natural_image
Illustration of a kitchen sink with a hand cleaning the interior and a bowl of water nearby (no text or symbols)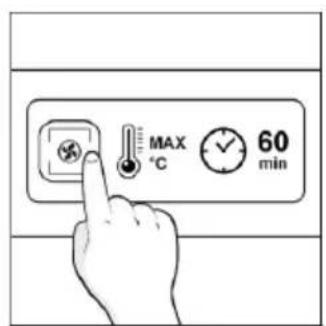
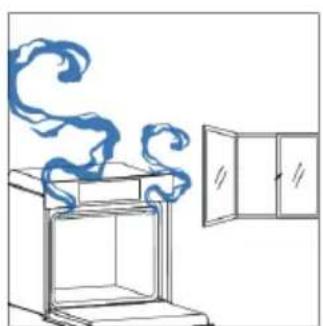
natural_image
Simple line drawing of a cabinet with swirling smoke rising from the top, next to an open cabinet (no text or symbols)4. DZIAŁANIE PRODUKTU
4.1. JAK DZIAŁA PRODUKT
WŁĄCZANIE/WYŁĄCZANIE PIEKARNIKA
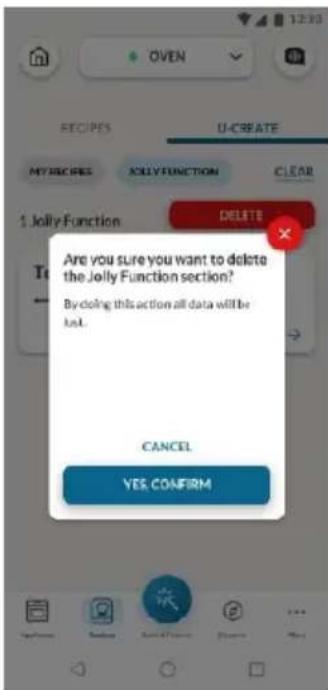
natural_image
Illustration of a medical procedure involving a tool and probe inserted into a patient's abdomen (no text or symbols)
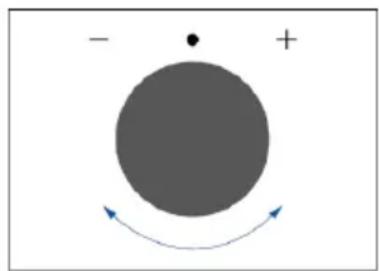
natural_image
Simple diagram with a large gray circle, a dot above it, and curved arrows indicating direction (no text or symbols)natural_image
Illustration of a medical procedure with a tool and tubing, no text or symbols presentnatural_image
Line drawing of an oven with a rack and vent, showing internal structure without any text or symbols
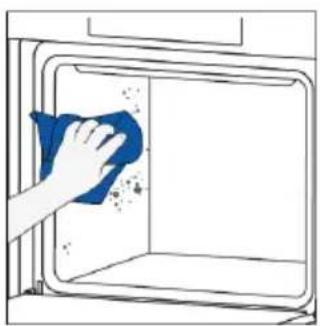
natural_image
Hand cleaning a window with a blue cloth (no text or symbols visible)H2O Clean


natural_image
Illustration of a hand cleaning a window with a cloth (no text or symbols)natural_image
Line drawing of an oven with a rack and vent, showing internal structure without any text or symbols

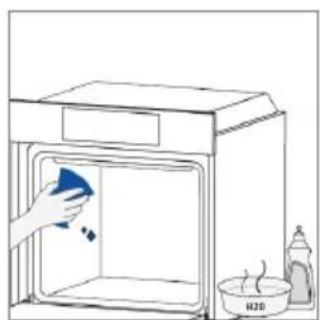
natural_image
Simple line drawing of a kitchen oven with a hand cleaning it, no text or symbols presentnatural_image
Line drawing of a cabinet with two hands operating it, no text or symbols present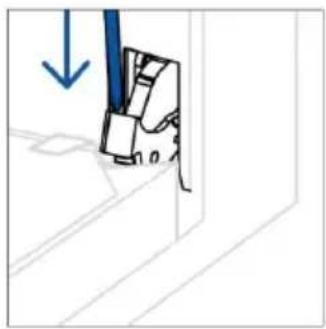
natural_image
Pure technical diagram showing a mechanical component with a blue arrow indicating downward motion (no text or symbols)2.
natural_image
Simple line drawing of a tilted rectangular object with directional arrows indicating movement or force (no text or symbols)natural_image
Illustration of a hand holding a diagonal line against a vertical wall, with a blue circle highlighting the intersection area (no text or symbols present)natural_image
Illustration of a hand cleaning a blue cloth over a surface with a water bottle and 20% oxygen indicator (no text or symbols)natural_image
Pure technical line drawing of a structural component with no text or symbols
natural_image
Line drawing of a cabinet with two hands inserting a tool into the opening (no text or symbols)
natural_image
Pure technical line drawing of a mechanical component with a blue tool, no text or symbols present6.3. CZYSZCZENIE AKCESORIÓW
natural_image
Line drawing of an oven with a vent and airflow direction arrow (no text or symbols)

natural_image
Line drawing of an oven with a blue arrow indicating airflow or heat transfer (no text or symbols)- Model 7-poziomowy
Krok 2
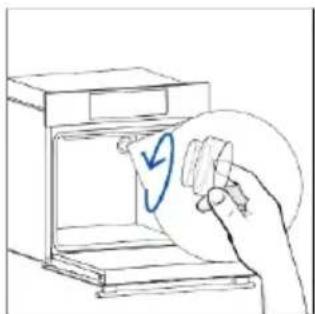
natural_image
Hand holding a circular object with a blue arrow inside an open oven (no text or symbols)Krok 3

natural_image
Hand holding a circular object with a blue arrow inside, next to an open appliance (no text or symbols visible)Krok 4

natural_image
Hand holding a circular object inside a microwave oven, with a blue circular arrow indicating rotation (no text or symbols)Krok 5

natural_image
Hand holding a paper roll inside an oven, with a circular arrow indicating rotation (no text or symbols)Krok 6

Krok 2

natural_image
Illustration of a hand holding a pen over a document inside a storage cabinet (no text or symbols visible)Krok 3

natural_image
Illustration of a hand inserting a small object into a device inside a circular frame, with no visible text or symbols.Krok 4

natural_image
Hand holding a small electronic component with an arrow indicating rotation, next to stacked books (no text or symbols visible)Krok 5

natural_image
Simple line drawing of a cabinet or rack with an inset magnified view showing a wall-mounted fixture (no text or symbols)Krok 6
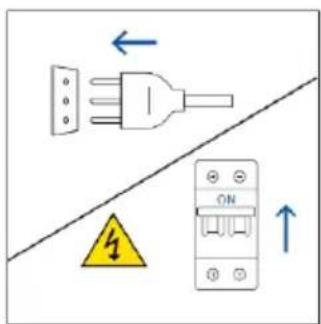
natural_image
Architectural diagram of a multi-level building interior with internal fixtures and a close-up inset showing a mechanical component (no text or symbols)
VÍTEJTE
2.2. PŘÍSLUŠENSTVÍ
Boční drátěné rošty
natural_image
Line drawing of a two-tiered storage unit with horizontal racks and a grid-patterned base (no text or symbols)natural_image
3D wireframe diagram of a rectangular tray with internal geometric lines, placed on a shelf (no text or symbols)natural_image
Empty white rectangle with black border (no text or symbols)natural_image
3D rendering of a rectangular tray or container with internal compartments, placed on a shelf (no text or symbols visible)natural_image
Line drawing of a kitchen sink with a bowl and a sphere on a grater (no text or symbols)natural_image
Diagram of a rectangular tray with internal grid pattern, no text or symbols presentnatural_image
Line drawing of a roasted chicken on a cutting board (no text or symbols)natural_image
Simple line drawing of a cabinet with a circular arrow indicating airflow or motion (no text or symbols)natural_image
Illustration of a rectangular appliance with a grid pattern on top, placed inside a rack (no text or symbols visible)natural_image
Illustration of a mouse being fed with a syringe, no text or symbols presentnatural_image
3D rendering of a rectangular tray with a mesh pattern inside, placed on a shelf (no text or symbols visible)Allow your location permission
I do enhance your experience, please allow location permission to hOn app in the next step.


CONTINUE
Krok 3
Select your appliance category

Search your appliance

Washing machine

Washer dryer

Tumble dryer

Dishwasher

Air conditionair

Air purifier

Air scanner
Krok 4
Appliance connection

Turn OFF and then ON your appliance
In case you can't switch OFF your appliance, unplug (for at least 10 seconds) and then plug its power supply.

natural_image
Circular icon with a blue 'Power' button surrounded by abstract geometric shapes, no text or symbols present.Krok 5
Kroky 6.1–6.2
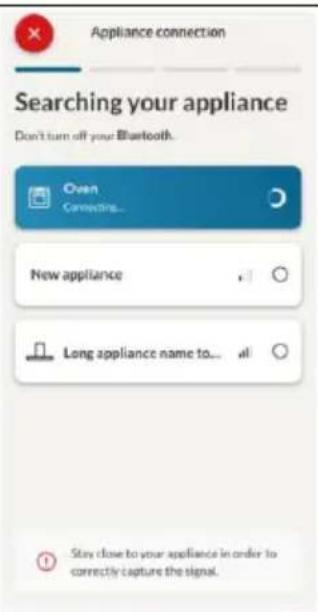
Krok 7

JAK ZMĚNIT NASTAVENÍ WIFI
natural_image
Simple diagram with a gray circle, a dot, and a plus sign, with curved arrows indicating direction (no text or symbols)

DÁLKOVÉ OVLÁDÁNÍ
3. NEŽ ZAČNETE
3.1. INFORMACE KE SPUŠTĚNÍ
natural_image
Simple line drawing of a kitchen oven with a hand cleaning the interior and a water bottle nearby (no text or symbols)

natural_image
Simple line drawing of a cabinet with swirling smoke rising from the top, next to an open door (no text or symbols)4. OVLÁDÁNÍ SPOTŘEBIČE
4.1. JAK TENTO VÝROBEK FUNGUJE

natural_image
Line drawing of a medical procedure involving a tool and pressure gauge attached to a patient's abdomen (no text or symbols)

natural_image
Simple diagram with a gray circle, a dot, and a curved arrow indicating direction (no text or symbols)natural_image
Medical catheter device with attached tubing and bulbous body (no text or symbols)

natural_image
Hand cleaning a window with a blue cloth, no text or symbols visibleKatalytické čištění
natural_image
Line drawing of an oven with a rack and vent, showing internal structure without any text or symbols
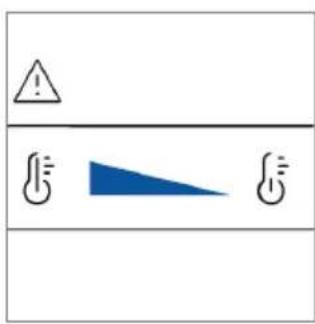
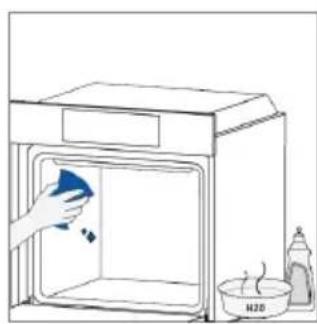
natural_image
Simple line drawing of a kitchen oven with a hand cleaning it and a water bottle nearby (no text or symbols)natural_image
Line drawing of hands operating a cabinet with a door open, no text or symbols present
natural_image
Diagram of a mechanical component with a blue arrow indicating downward motion (no text or symbols)2.
natural_image
Simple line drawing of a tilted rectangular object with directional arrows indicating movement (no text or symbols)natural_image
Illustration of a hand holding a diagonal line against a vertical wall, with a blue circle highlighting the intersection area (no text or symbols present)natural_image
Illustration of a hand cleaning a blue cloth over a surface with a water bottle and beaker (no text or symbols)natural_image
Line drawing of a mechanical assembly with arrows indicating direction (no text or symbols)
natural_image
Line drawing of a cabinet with two hands inserting a tool into the opening (no text or symbols)
natural_image
Simple line drawing of a mechanical component with a blue tool and downward arrow, no text or symbols present.natural_image
Line drawing of a oven with a heat exchanger inside, showing airflow direction (no text or symbols)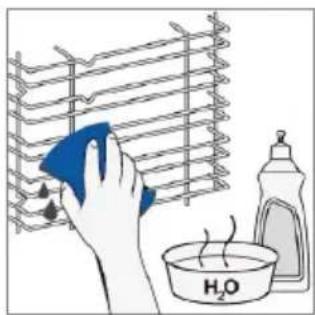
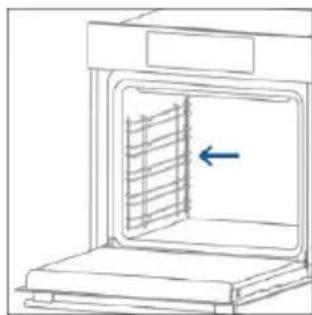
natural_image
Line drawing of an oven with a blue arrow indicating airflow or heat transfer (no text or symbols)Krok 2

natural_image
Hand holding a paper with a blue checkmark inside an open box (no text or symbols visible)Krok 3

natural_image
Hand holding a circular object inside an open appliance (no text or symbols visible)Krok 4

natural_image
Hand holding a circular object inside an oven, with a blue arrow indicating rotation (no text or symbols)Krok 5

natural_image
Hand holding a circular object with a blue arrow inside, next to an open oven (no text or symbols visible)Krok 6

Krok 2
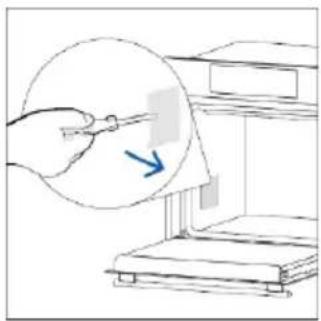
natural_image
Illustration of a hand using a tool to download or write on a document inside a filing cabinet (no text or symbols visible)Krok 3
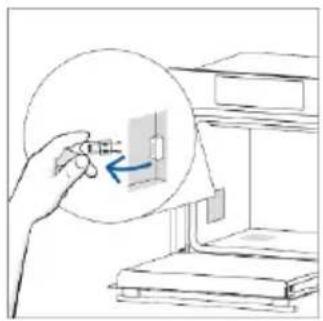
natural_image
Illustration of a hand holding a small electronic component with an arrow pointing to it, next to stacked books (no text or symbols present)Krok 4

natural_image
Illustration of a hand inserting a cable into a wall-mounted electrical component (no text or symbols)Krok 5
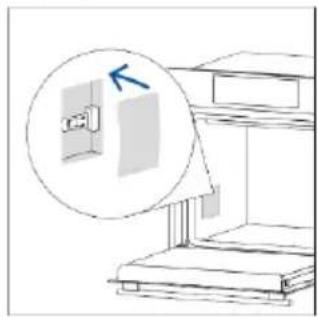
natural_image
Simple line drawing of a cabinet or rack with an inset magnified view showing a door and a blue arrow (no text or symbols)Krok 6

8. OCHRANA ŽIVOTNÍHO PROSTŘEDÍ A LIKVIDACE
8.1. LIKVIDACE SPOTŘEBIČE


BUN VENIT
2.2. ACCESORII
natural_image
Line drawing of a two-tiered bunk bed with horizontal railings and a grid-patterned seat (no text or symbols)natural_image
Simple line drawing of a rectangular tray or vent with internal compartments, placed inside an oven (no text or symbols)natural_image
Empty white rectangle with black border (no text or symbols)natural_image
3D wireframe diagram of a rectangular tray with internal compartments, no text or symbols presentnatural_image
Line drawing of a bathroom sink with a bowl, a sphere, and a mesh platform (no text or symbols)natural_image
Line drawing of a rectangular tray with a grid pattern inside, placed on a shelf (no text or symbols)natural_image
Line drawing of a rooster rolling out dough on an oven (no text or symbols)natural_image
Simple line drawing of a door with a circular arrow indicating airflow or motion (no text or symbols)natural_image
Illustration of a rectangular tray with a grid pattern, no text or symbols presentnatural_image
Illustration of a mouse being fed with a syringe, no text or symbols presentnatural_image
3D rendering of a rectangular tray with a mesh pattern inside, placed on a shelf (no text or symbols visible)ÎNREGISTRAREA UNUI NOU UTILIZATOR
ÎNREGISTRAREA RAPIDĂ A ASOCIERILOR
Pasul 1
Pasul 2
Pasul 3
Pasul 4
Pasul 5
Appliance connection
Searching your appliance
Don't turn off your Bluetooth. hOn app is looking for your appliance...


May close to your appliance in order to correctly capture the signal.
Pasul 6.1-6.2
Appliance connection
Searching your appliance
Don't burn-off your Bluetooth.

Oven


New appliance


Long appliance name to...


CONNECT
PRODUCT NOT FOUND

Appliance connection
Searching your appliance
Don't turn off your Bluetooth.

Oven
Convering

New appliance


Long appliance name to...


Stay close to your appliance in order to correctly capture the signal.
Pasul 7
Appliance connection

Your appliance has been correctly identified!

Brand Hoover
Model 31008486-7888-1824
Serial number 12345678-1234-1234
Is this your appliance?
YES!S MY OVER
NO IT'S NOT

CUM SE SCHIMBĂ SETĂRILE WI-FI
natural_image
Simple diagram with a gray circle, a dot, and a plus sign, with curved arrows indicating direction (no text or symbols)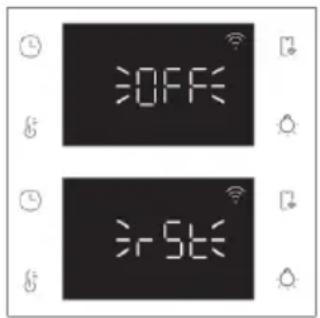

CONTROL LA DISTANȚĂ
natural_image
Simple line drawing of a kitchen sink with a hand cleaning the interior (no text or symbols)

natural_image
Simple line drawing of a cabinet with swirling smoke rising from the top, next to an open door (no text or symbols)4. UTILIZAREA PRODUSULUI
4.1. CUM FUNCȚIONEAZĂ PRODUSUL
PORNIREA/OPRIREA CUPTORULUI
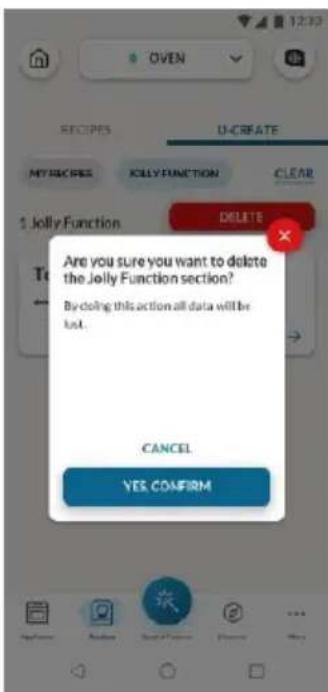
natural_image
Line drawing of a medical procedure involving a mouse on a tray with a probe and thermometer (no text or symbols)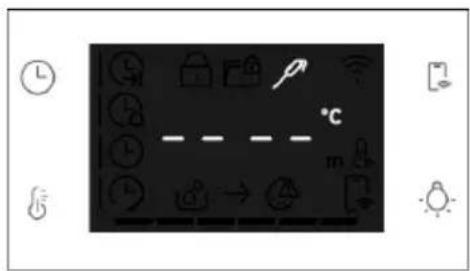
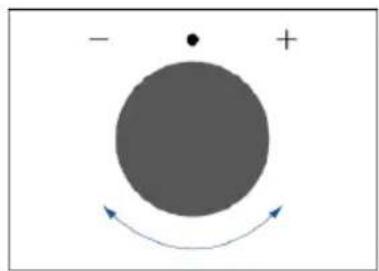
natural_image
Simple diagram with a gray circle, a dot, and a curved arrow indicating rotation or direction (no text or symbols)natural_image
Medical illustration of a surgical procedure with a needle inserted into a patient's chest (no text or labels)

natural_image
Hand cleaning a window with a blue cloth, no text or symbols visibleCurățare catalitică
natural_image
Line drawing of an oven with a rack and vent, showing internal structure (no text or symbols)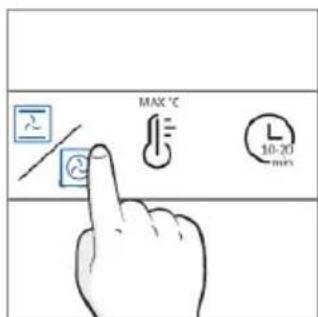

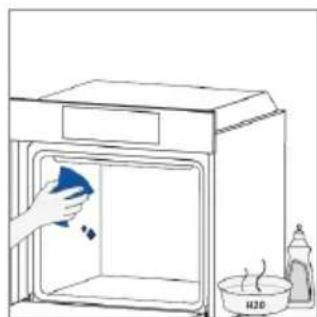
natural_image
Simple line drawing of a kitchen oven with a hand cleaning it, no text or symbols presentnatural_image
Line drawing of a cabinet with two hands operating it, no text or symbols present
natural_image
Pure technical diagram showing a mechanical component with a blue arrow indicating downward motion (no text or symbols)2.
natural_image
Simple line drawing of a tilted rectangular object with directional arrows indicating movement (no text or symbols)natural_image
Illustration of a hand holding a diagonal line against a vertical wall, with a blue circle highlighting the intersection area (no text or symbols present)natural_image
Illustration of a hand cleaning a surface with a blue cloth and a water bottle, showing a steaming dish labeled H₂O (no text or symbols on the main image)natural_image
Line drawing of a mechanical assembly with arrows indicating direction (no text or symbols)
natural_image
Line drawing of a cabinet with two hands inserting a tool into the opening (no text or symbols)
natural_image
Simple line drawing of a mechanical component with a blue tool and downward arrow, no text or symbols present.6.3. CURĂȚAREA ACCESORIILOR
natural_image
Line drawing of an oven with a vent and airflow direction arrow (no text or symbols)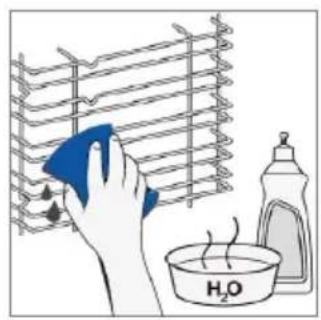

natural_image
Line drawing of an oven with a blue arrow indicating airflow or heat transfer (no text or symbols)- Model cu 7 niveluri
Pasul 2
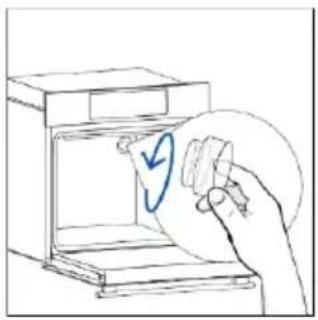
natural_image
Hand holding a paper with a blue checkmark inside an open box (no text or symbols visible)Pasul 3

natural_image
Hand holding a circular object inside an open appliance (no text or symbols visible)Pasul 4

natural_image
Hand holding a circular object inside a kitchen appliance (no text or symbols visible)Pasul 5

natural_image
Hand holding a circular object above an open kitchen appliance (no text or symbols visible)Pasul 6

Pasul 2
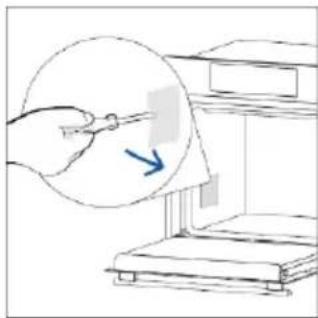
natural_image
Illustration of a hand holding a pen over a document inside a storage cabinet (no text or symbols visible)Pasul 3

natural_image
Illustration of a hand inserting a small object into a device inside a circular frame, with no visible text or symbols.Pasul 4

natural_image
Hand holding a small electronic component with an arrow indicating rotation, next to stacked books (no text or symbols visible)Pasul 5

natural_image
Simple line drawing of a cabinet or rack with an inset magnified view showing a wall-mounted fixture (no text or symbols)Pasul 6


ÜDVÖZÖLJÜK
natural_image
Empty white rectangle with black border (no text or symbols)natural_image
Line drawing of a two-tiered dormer rack with horizontal bars (no text or symbols)natural_image
3D diagram of a rectangular tray with internal compartments, no text or symbols presentnatural_image
Line drawing of a rectangular tray or container with internal compartments, placed on a shelf (no text or symbols)natural_image
Line drawing of a bathroom sink with a bowl, a sphere, and a mesh platform (no text or symbols)natural_image
Technical line drawing of a rectangular tray with internal grid pattern (no text or symbols)natural_image
Line drawing of a rooster rolling out dough on a cutting board (no text or symbols)natural_image
Simple line drawing of a door with a circular arrow indicating airflow or motion (no text or symbols)natural_image
Line drawing of a rectangular appliance with a grid pattern on top, placed inside a rack (no text or symbols)natural_image
Simple line drawing of a chicken being heated by a tool, with no text or symbols present.natural_image
3D rendering of a rectangular tray with a mesh pattern inside, placed in a kitchen or storage room environment (no text or symbols visible)ÚJ FELHASZNÁLÓ REGISZTRÁLÁSA
GYORS PÁROSÍTÁS
1. lépés
2. lépés
3. lépés
4. lépés
5. lépés
Appliance connection
Searching your appliance
Don't turn off your Bluetooth. On app is looking for your appliance...


May close to your appliance in order to correctly capture the signal.
6.1-6.2. lépés
Appliance connection
Searching your appliance
Don't burn-off your Bluetooth.

Oven


New appliance


Long appliance name to...


CONNECT
PRODUCT NOT FOUND

Appliance connection
Searching your appliance
Don't turn off your Bluetooth.

Oven
Connecting.

New appliance


Long appliance name to...


Stay close to your appliance in order to correctly capture the signal.
7. lépés
Appliance connection

Your appliance has been correctly identified!

Brand Hoover
Model 31008486-7888-1824
Serial number 12345678-1234-1234
Is this your appliance?
YES!S MY OVEN
NO IT'S NOT
flowchart
graph TD
    A["Signal"] --> B["Data Transmission"]
    B --> C["Feedback Loop"]
    C --> D["User Interface"]
    D --> E["Mobile Device"]
    E --> F["User Interface"]
    F --> G["User Interface"]
    G --> H["User Interface"]
    H --> I["User Interface"]
    I --> J["User Interface"]
    J --> K["User Interface"]
    K --> L["User Interface"]
    L --> M["User Interface"]
    M --> N["User Interface"]
    N --> O["User Interface"]
    O --> P["User Interface"]
    P --> Q["User Interface"]
    Q --> R["User Interface"]
    R --> S["User Interface"]
    S --> T["User Interface"]
    T --> U["User Interface"]
    U --> V["User Interface"]
    V --> W["User Interface"]
    W --> X["User Interface"]
    X --> Y["User Interface"]

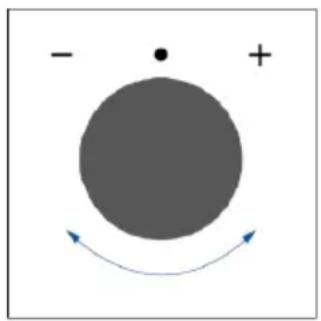
natural_image
Simple diagram with a gray circle, a dot, and a plus sign, with curved arrows indicating direction (no text or symbols)
TÁVVEZÉRLÉS
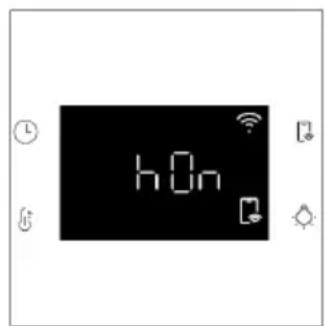
3. MIELÓTT ELKEZDENÉ
3.1. KEZDÉSHEZ SZÜKSÉGES INFORMÁCIÓK
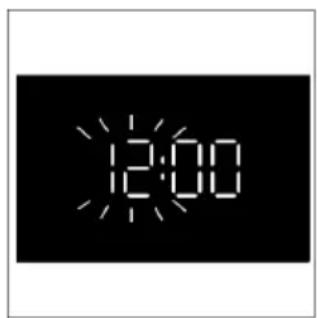
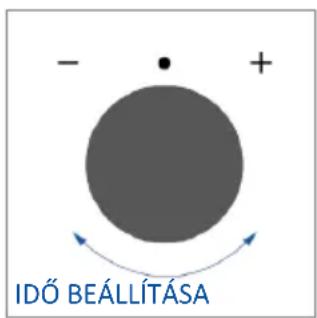
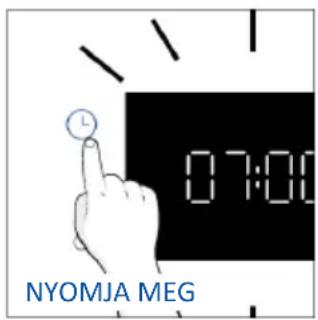
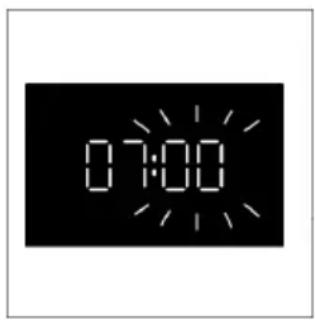

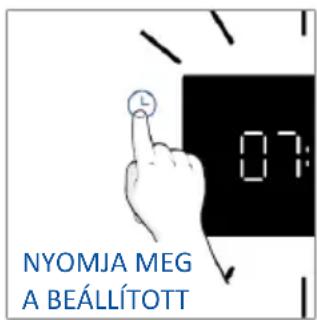
natural_image
Simple line drawing of a kitchen oven with a hand cleaning the interior and a water bottle nearby (no text or symbols)

natural_image
Simple line drawing of a cabinet with swirling blue smoke rising from the top, next to an open door (no text or symbols)4. A TERMÉK MÚKÖDÉSE
4.1. A TERMÉK MÚKÖDÉSE
A SÜTŐ BE- ÉS KIKAPCSOLÁSA

natural_image
Line drawing of a medical procedure involving a mouse, tubing, and pressure gauge (no text or symbols)
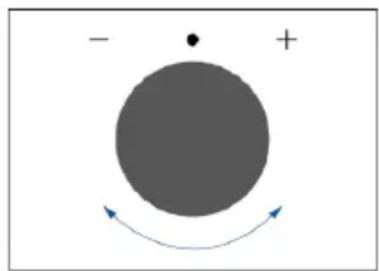
natural_image
Simple diagram with a large gray circle, a dot above it, and curved arrows indicating direction (no text or symbols)natural_image
Illustration of a medical procedure with a tool and tubing attached to a patient's abdomen (no text or symbols)natural_image
Line drawing of an oven with a rack and vent, showing internal structure without any text or symbols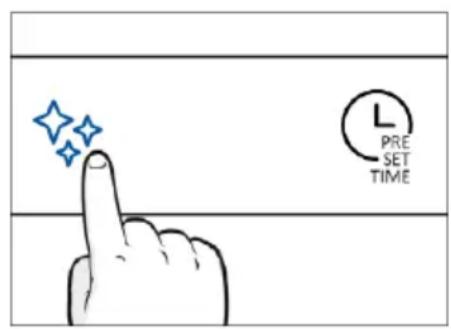
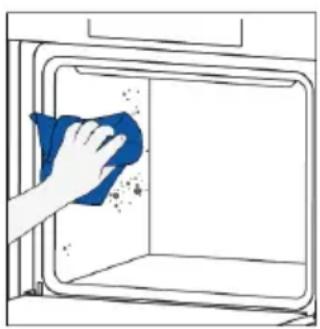
natural_image
Hand cleaning a blue cloth inside a washing machine (no text or symbols visible)H2O cleaning
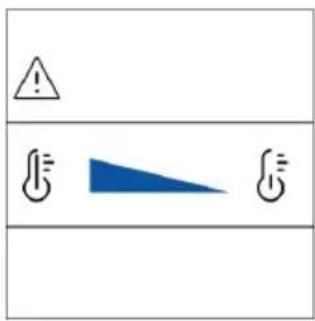

natural_image
Hand cleaning a window with a blue cloth, no text or symbols visiblenatural_image
Line drawing of an oven with a rack and vent, showing internal structure without any text or symbols


natural_image
Simple line drawing of a kitchen oven with a hand cleaning it, no text or symbols presentnatural_image
Line drawing of a cabinet with two hands operating it, no text or symbols present
natural_image
Pure technical diagram showing a mechanical component with a blue arrow indicating downward motion (no text or symbols)2.
natural_image
Simple line drawing of a tilted rectangular object with directional arrows indicating movement or force (no text or symbols)natural_image
Illustration of a hand holding a diagonal line against a vertical wall, with a blue circle highlighting the intersection area (no text or symbols present)natural_image
Illustration of a hand cleaning a blue cloth over a surface with a water bottle and 20% label (no text or symbols on main objects)natural_image
Technical line drawing of a structural bracket with arrows indicating direction (no text or symbols)natural_image
Line drawing of a cabinet with two hands inserting a tool into the opening (no text or symbols)
natural_image
Pure technical line drawing of a mechanical component with a blue tool, no text or symbols presentnatural_image
Line drawing of an oven with a heat exchanger inside, showing airflow direction (no text or symbols)

natural_image
Line drawing of an oven with a blue arrow pointing to the interior panel (no text or symbols)- 7 szintes modell
- lépés
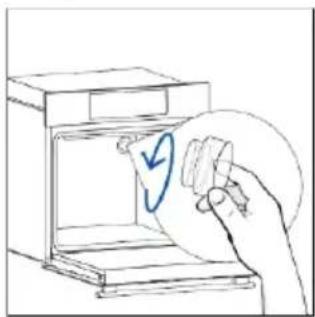
natural_image
Line drawing of a hand holding a circular object with a blue arrow inside, next to an open appliance (no text or symbols)- lépés

natural_image
Hand holding a circular object with a blue arrow inside, next to an open appliance (no text or symbols visible)- lépés

natural_image
Hand holding a circular object inside a kitchen appliance (no text or symbols visible)- lépés

natural_image
Hand holding a circular object with a blue arrow inside, next to an open oven (no text or symbols)- lépés

- lépés

natural_image
Illustration of a hand holding a pen over a document with an arrow indicating direction (no text or symbols present)- lépés

natural_image
Illustration of a hand inserting a small electronic component into a rack (no text or symbols)- lépés

natural_image
Hand holding a device with an arrow pointing to a wall-mounted component, next to stacked books (no text or symbols visible)- lépés
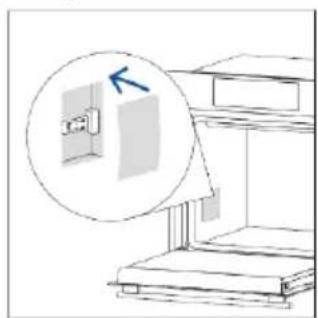
natural_image
Simple line drawing of a cabinet with an open door and a magnified inset showing a blue arrow labeled 'K' (no text or symbols on the diagram itself)- lépés

natural_image
Line drawing of a 3D box with a side panel and handle (no text or symbols)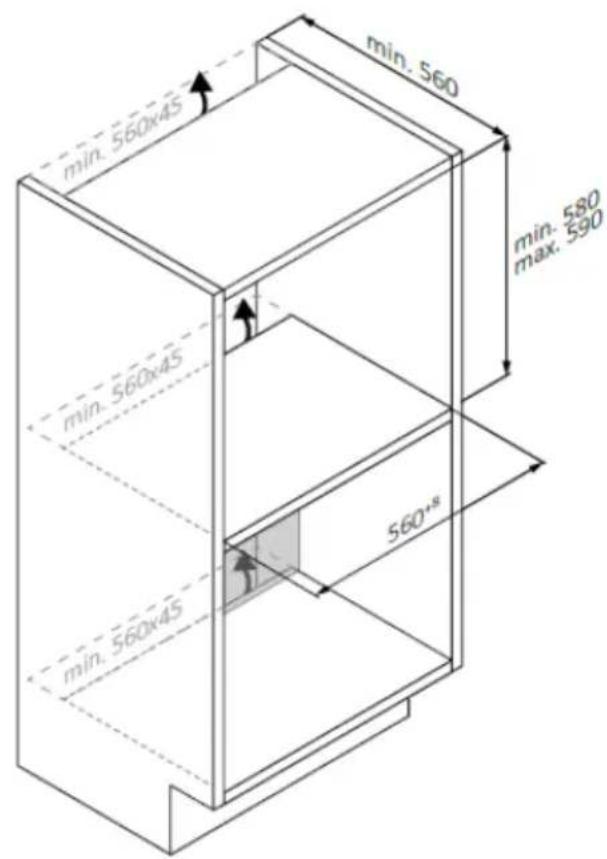
natural_image
Line drawing of a 3D box with a side latch and lid (no text or symbols)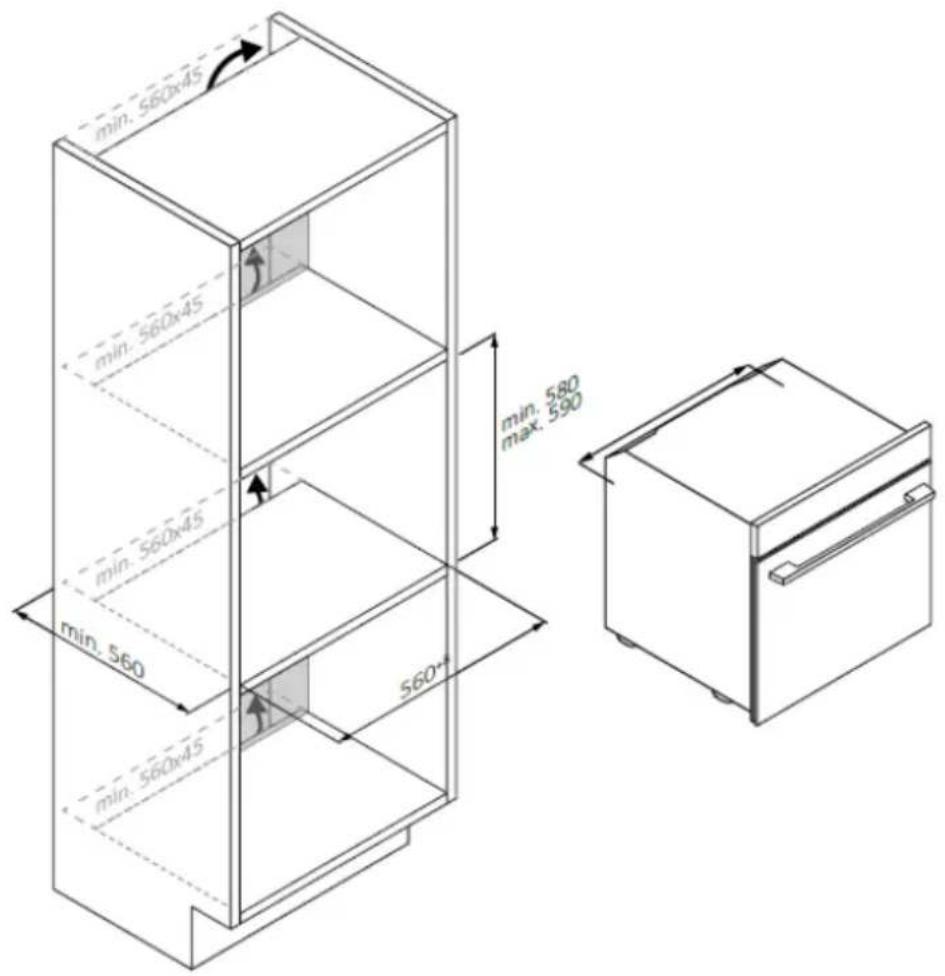
natural_image
Technical line drawing of a multi-level cabinet with internal compartments and an inset close-up showing internal components (no text or symbols)
DOBRODOŠLI
natural_image
Empty white rectangle with black border (no text or symbols)natural_image
Line drawing of a two-tiered storage rack or shelf unit (no text or symbols)natural_image
Simple line drawing of a rectangular tray or container with internal compartments, placed on a shelf (no text or symbols)natural_image
Simple line drawing of a rectangular tray or container with internal compartments (no text or symbols)natural_image
Line drawing of a bathroom sink with a bowl, a sphere, and a mesh platform (no text or symbols)natural_image
Diagram of a rectangular tray with a grid pattern, no visible text or symbolsnatural_image
Line drawing of a rooster on a tray with dough, placed inside an oven (no text or symbols)natural_image
Simple line drawing of a door with a circular arrow indicating airflow or motion (no text or symbols)natural_image
Illustration of a rectangular tray with a grid pattern, no text or symbols presentnatural_image
Illustration of a mouse being fed with a syringe, no text or symbols presentnatural_image
3D rendering of a rectangular tray with a mesh pattern inside, placed on a shelf (no text or symbols visible)REGISTRACIJA NOVEGA UPORABNIKA

VPIS S HITRO SEZNANITVIJO
1. korak
- Izberite »Dodaj aparat«.

2. korak
• Dajte dovoljenje za lokacijo.

Allow your location permission
I do enhance your experience, please allow location permission to hOn app in the next step.


CONTINUE
3. korak
- Izberite pečico v kategorijah aparatov.

Select your appliance category

Search your appliance

Washing machine

Washer dryer

Tumble dryer

Dishwasher

Air conditionair

Air purifier

Air scanner
4. korak
Appliance connection

Turn OFF and then ON your appliance
In case you can't switch OFF your appliance, unplug (for at least 10 seconds) and then plug its power supply.

natural_image
Circular icon with a blue power button and surrounding icons, no text or symbols present.5. korak
Appliance connection
Searching your appliance
Don't turn off your Bluetooth. hOn app is looking for your appliance...


May close to your appliance in order to correctly capture the signal.
6.1-6.2 korak
Appliance connection
Searching your appliance
Don't burn-off your Bluetooth.

Oven


New appliance


Long appliance name to...


CONNECT
PRODUCT NOT FOUND

Appliance connection
Searching your appliance
Don't turn off your Bluetooth.

Own Convesting

New appliance


Long appliance name to...


Stay close to your appliance in order to correctly capture the signal.
7. korak
Appliance connection

Your appliance has been correctly identified!

Brand Hoover Model 31008486-7888-1824
Serial number 12345678-1234-1234
Is this your appliance?
YES!S MY OVER
NO IT'S NOT

KAKO SPREMENITI NASTAVITVE WI-FI
natural_image
Simple diagram with a gray circle, a dot, and a plus sign, with curved arrows indicating direction (no text or symbols)

DALJINSKO UPRAVLJANJE
3. PRED ZAČETKOM
3.1. INFORMACIJE ZA ZAČETEK
natural_image
Line drawing of a kitchen sink with a hand cleaning the interior, next to a washing bottle and a bowl (no text or symbols)

natural_image
Simple line drawing of a cabinet with swirling blue smoke rising from the top, next to an open door (no text or symbols)4. DELOVANJE IZDELKA
4.1. KAKO IZDELEK DELUJE
VKLOP/IZKLOP PEČICE
Za vklop pečice zavrtite funkcijski gumb (v smeri urinega kazalca/v nasprotni smeri urinega kazalca) in izberite program kuhanja. Če jo želite izklopiti, nastavite funkcijski gumb v položaj »0«.
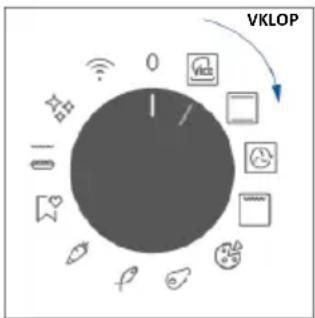
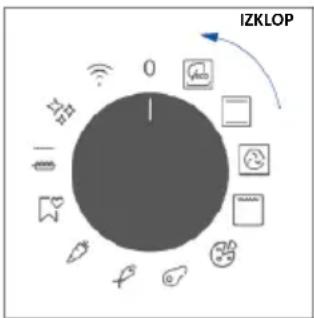
NASTAVITE PROGRAM KUHANJA
Kako nastaviti funkcijo Jolly:

natural_image
Line drawing of a medical procedure involving a mouse, pen, and probe (no text or symbols)

natural_image
Simple diagram with a gray circle, a dot, and a curved arrow indicating direction (no text or symbols)natural_image
Medical catheter device with attached tubing and bulbous body (no text or symbols)natural_image
Line drawing of an oven with a rack and vent, showing internal structure without any text or symbols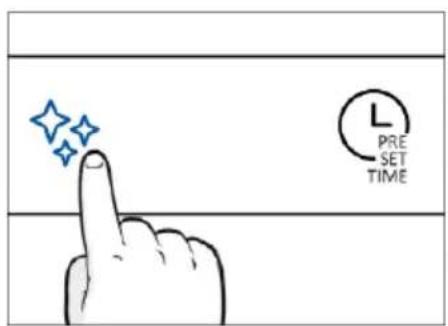

natural_image
Hand cleaning a window with a blue cloth (no text or symbols visible)
H2O cleaning


natural_image
Hand cleaning a window with a blue cloth, no text or symbols visibleČiščenje s katalizo
natural_image
Line drawing of an oven with a rack and vent, showing internal structure without any text or symbols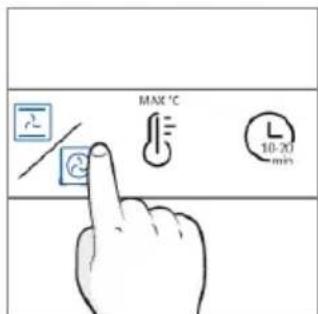
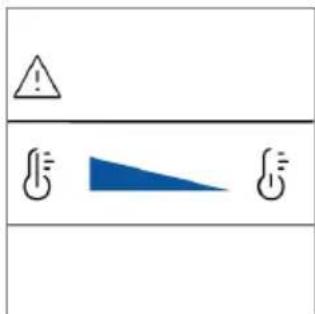

natural_image
Line drawing of a kitchen sink with a hand cleaning it, and a bottle nearby (no text or symbols)natural_image
Line drawing of a cabinet with two hands operating it, no text or symbols present
natural_image
Pure technical diagram showing a mechanical component with a blue arrow indicating downward motion (no text or symbols)2.
- Vrata postavite pod kotom 45°. Hkrati pritisnite oba gumba na obeh straneh stranskih ramen vrat in jih povlecite proti sebi, da odstranite pokrov zgornjih stekel vrat.
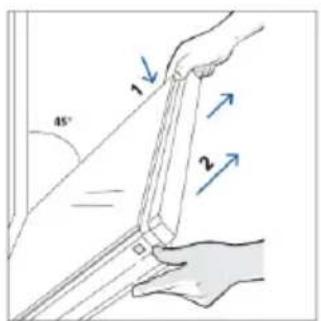
natural_image
Simple line drawing of a tilted rectangular object with directional arrows indicating movement or force (no text or symbols)natural_image
Hand holding a blue circle with a diagonal line crossing through it, no text or symbols present- Očistite steklo z mehko krpo in ustreznim čistilnim sredstvom.
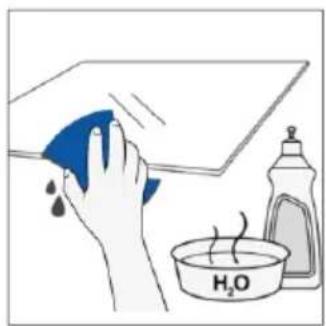
natural_image
Illustration of a hand cleaning a surface with a blue cloth and a water bottle, showing a steaming dish labeled H₂O (no text or symbols on the main image)natural_image
Line drawing of a mechanical assembly with arrows indicating direction (no text or symbols)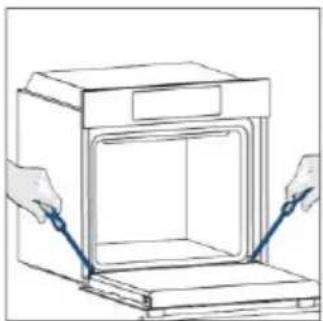
natural_image
Line drawing of a cabinet with two hands inserting a tool into the opening (no text or symbols)
natural_image
Simple line drawing of a mechanical component with a blue tool and downward arrow, no text or symbols present.6.3. ČIŠČENJE DODATKOV
natural_image
Line drawing of an oven with a vent and airflow direction arrow (no text or symbols)

natural_image
Line drawing of an oven with a blue arrow indicating airflow or heat transfer (no text or symbols)- Model s 7 nivoji
- korak

natural_image
Hand holding a paper with a blue checkmark inside an open box (no text or symbols visible)- korak

natural_image
Hand holding a circular object inside an open appliance (no text or symbols visible)- korak

natural_image
Hand holding a circular object inside a kitchen appliance (no text or symbols visible)- korak

natural_image
Hand holding a circular object with a blue arrow inside, next to an open oven (no text or symbols)- korak

- korak
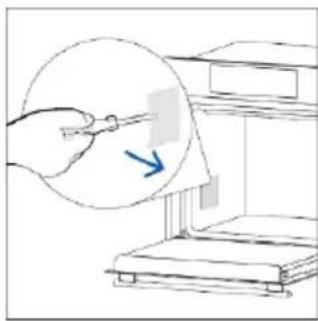
natural_image
Illustration of a hand using a tool to clean or store items on a machine (no text or symbols visible)- korak
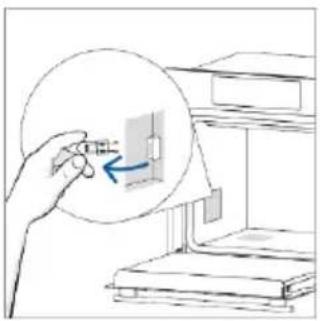
natural_image
Hand holding a small electronic device with an arrow pointing to it, next to stacked books (no text or symbols visible)- korak
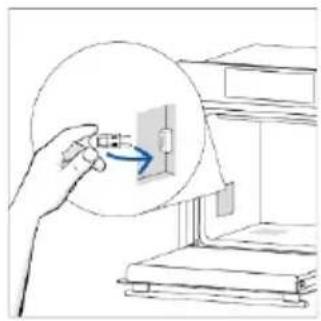
natural_image
Illustration of a hand inserting a component into a device (no text or symbols present)- korak

natural_image
Simple line drawing of a cabinet or rack with an inset magnified view showing a wall-mounted device (no text or symbols)- korak
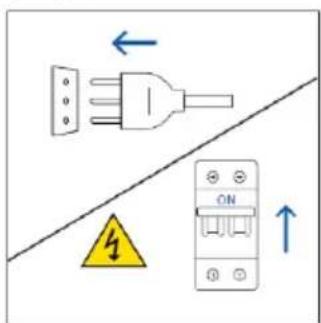
8.1. ODSTRANJEVANJE APARATA

natural_image
Technical line drawing of a multi-level cabinet or enclosure with internal components and an inset close-up showing a close-up view of the interior (no text or symbols present)
DOBRO DOŠLI
- Kontrolni panel
- Brojevi pozicija polica
- Rešetke
- Plehovi
- Poklopac ventilatora
- Vrata pećnice
- Bočne žičane rešetke (ako su deo opreme: samo za ravnu šupljinu)
- Serijski broj i QR kod
natural_image
Empty white rectangle with a thin black border (no text or symbols)natural_image
Line drawing of a two-tiered storage rack or shelf unit (no text or symbols)Postavljene na obe strane unutrašnjosti pećnice, bočne rešetke su dizajnirane za postavljanje pleha za pečenje i rešetki tokom kuvanja.
i NAPOMENA: 6 ili 7 nivoa u zavisnosti od modela.
Pleh za pečenje (samo ako je deo opreme*)
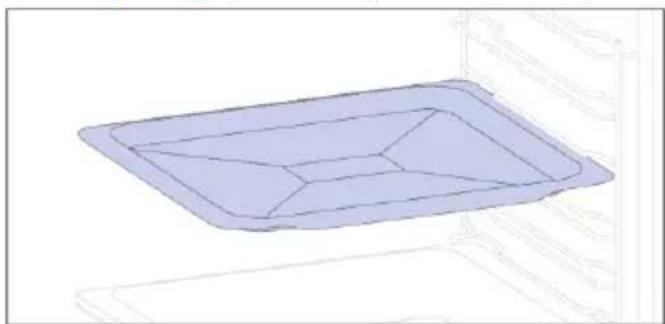
natural_image
3D diagram of a rectangular tray with internal compartments, no text or symbols presentPleh za pečenje je idealan za postizanje ravnomer nog potamnjivanja sa donje strane, što ga čini savršenim za kolače i peciva zbog svog plitkog ravnog dizajna. Pored toga, ako se postavi ispod rešetke za kuvanje može pomoći u sakupljanju curenja i sprečava prljanje pećnice.
Metalna rešetka
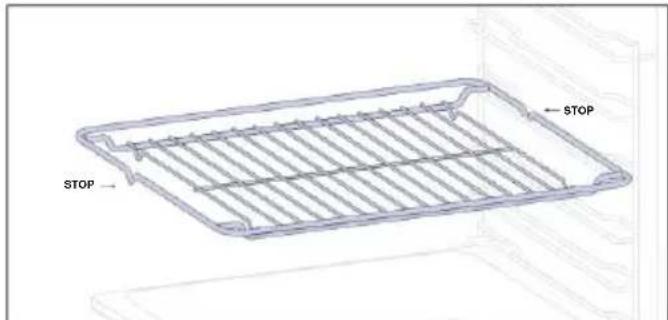
natural_image
Simple line drawing of a rectangular tray or container with internal compartments (no text or symbols)Dublji pleh je idealan za recepte prema kojima se dodaju tečnosti ili slojevi, kao što su duveč ili pečenja. Njegova dubina je posebno dizajnirana da osigura željenu ujednačenost hrane pripremljene u njemu.
Teleskopske vodice
(samo ako su deo opreme*)
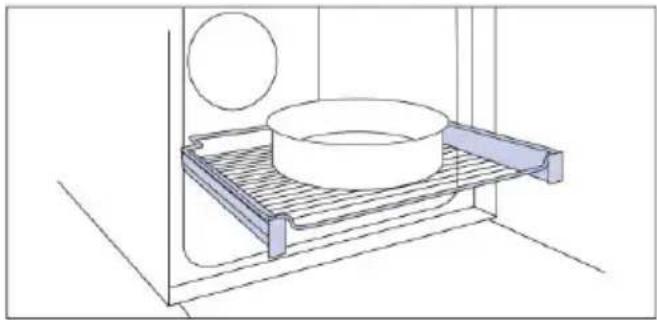
natural_image
Technical line drawing of a kitchen sink with a bowl and a sphere on a platform (no text or symbols)natural_image
Diagram of a rectangular tray with a patterned lid and internal grid lines, no text or symbols present.natural_image
Line drawing of a rooster on a tray with dough and steam (no text or symbols)Ražanj funkcioniše zajedno sa gornjim grejnim elementom, a okretanjem se hrana može pripremati ujednačeno. Najbolje se koristi za hranu srednje veličine. Idealno za ponovno otkrivanje ukusa tradicionalnih pečenja.
Šarke za lagano zatvaranje/otvaranje (samo ako su deo opreme*)
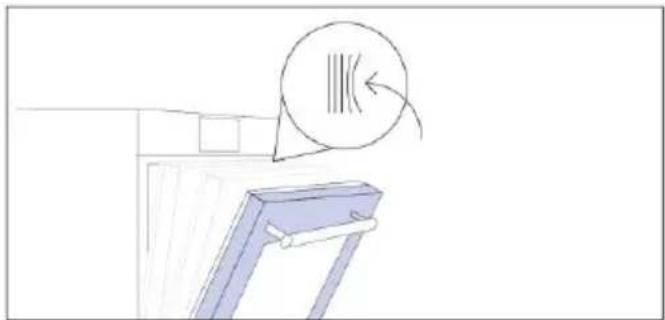
natural_image
Simple line drawing of a cabinet with a circular arrow indicating airflow or motion (no text or symbols)natural_image
Line drawing of a rectangular tray with a grid pattern inside, placed on a shelf (no text or symbols)Konveksni oblik je pogodan za pravljenje roštilja u pećnici na visokoj temperaturi (220°), omogućavajući rezultat roštiljanja čak i kod kuće sa malo dima zahvaljujući dejstvu ceđenja masti na dno posude.
Sonda za meso (samo ako je deo opreme*)
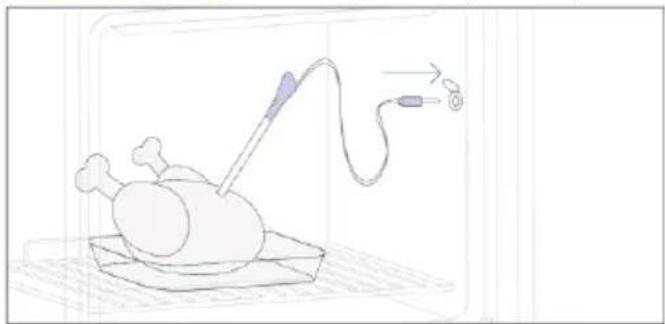
natural_image
Illustration of a mouse being fed with a medical device, no text or symbols presentnatural_image
3D rendering of a rectangular tray with a mesh pattern inside, placed in a kitchen or storage unit (no text or symbols visible)Airfry pleh obezbeđuje da vruć vazduh ravnomerni i trodimenzionalno dođe do hrane, čime se dobija hrskavija spoljašnjost uz održavanje mekoće unutra. Da biste sakupljali sokove i mrvice, stavite ga na vrh pleha za pečenje.
2.3. KONTROLNI PANEL
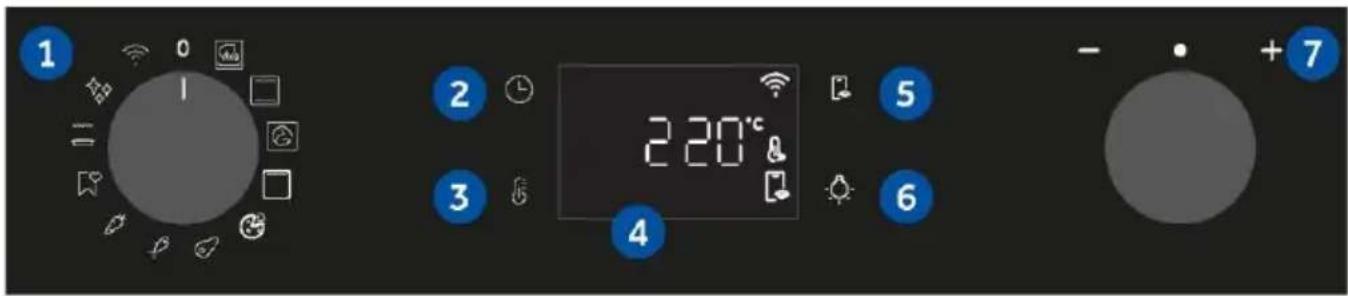
REGISTRACIJA NOVOG KORISNIKA
- Kliknite na „Registrujte se“
- Registrujte se pomoću naloga na društvenim mrežama ili ličnom imejl adresom

PRIJAVLJIVANJE ZA BRZO UPARIVANJE
1. korak
2. korak
3. korak
4. korak
5. korak
- Nakon uključivanja, aplikacija hOn počinje da traži vaš kućni uređaj.

Appliance connection
Searching your appliance
Don't turn off your Bluetooth. On app is looking for your appliance...


May close to your appliance in order to correctly capture the signal.
6.1-6.2. korak
Appliance connection
Searching your appliance
Don't burn-off your Bluetooth.

Oven


New appliance


Long appliance name to...


CONNECT
PRODUCT NOT FOUND

Appliance connection
Searching your appliance
Don't turn off your Bluetooth.

Open Connecting

New appliance


Long appliance name to...


Stay close to your appliance in order to correctly capture the signal.
7. korak
Appliance connection

Your appliance has been correctly identified!
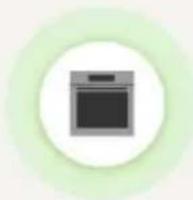
Brand Hoover Model 31008486-7888-1824
Serial number 12345678-1234-1234
Is this your appliance?
YES!S MY OVEN
NO IT'S NOT
KAKO DA PROMENITE PODEŠAVANJA WI-FI MREŽE
Kada se uređaj registruje, korisnik može da promeni podešavanja Wi-Fi mreže između:
• Wi-Fi ON: Moguće je pratiti stanje pećnice samo pomoću aplikacije.
• Wi-Fi OFF: Pećnica nije povezana, ali je i dalje registrovana sa sačuvanim mrežnim akreditivima.
• Wi-Fi Reset: Veza se resetuje i registracija može ponovo da se izvrši.
natural_image
Simple diagram with a gray circle, a dot, and a plus sign, connected by curved arrows (no text or symbols)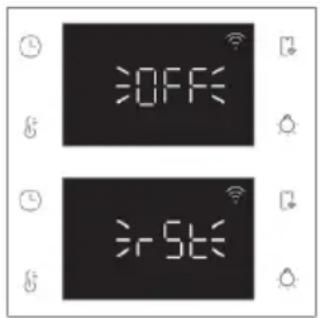
DALJINSKO UPRAVLJANJE
flowchart
graph TD
    A["Start"] --> B["Send to Email"]
    B --> C["Receive Text"]
    C --> D["Send to App"]
    D --> E["Return to Email"]
    E --> F["Send to Web"]
    F --> G["Receive Text"]
    G --> H["Send to Email"]
    H --> I["Receive Text"]
    I --> J["Send to Web"]
    J --> K["Receive Text"]
    K --> L["Send to Email"]
    L --> M["Receive Text"]
    M --> N["Send to Web"]
    N --> O["Receive Text"]
    O --> P["Send to Email"]
    P --> Q["Receive Text"]
    Q --> R["Send to Web"]
    R --> S["Receive Text"]
    S --> T["Send to Email"]
    T --> U["Receive Text"]
    U --> V["Send to Web"]
    V --> W["Receive Text"]
    W --> X["Send to Email"]
    X --> Y["Receive Text"]


3. PRE POČETKA
3.1. INFORMACIJE VEZANE ZA POČETAK
Kada prvi put uključite pećnicu, možda ćete primetiti dim. Ne brinite, pre upotrebe pećnice samo sačekajte da se dim raščisti.
natural_image
Line drawing of a kitchen sink with a hand cleaning the interior, next to a washing bottle and a bowl (no text or symbols)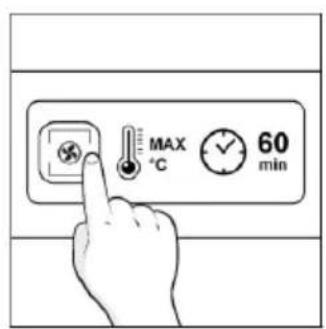

natural_image
Simple line drawing of a cabinet with swirling smoke rising from the top, next to an open door (no text or symbols)4. RAD PROIZVODA
4.1. KAKO PROIZVOD RAD
UKLJUČIVANJE/ISKLJUČIVANJE PEĆNICE
Da biste uključili pećnicu, okrenite funkcijsko dugme (u smeru kazaljke na satu/suprotno od kazaljke na satu) i izaberite program pečenja. Da biste je ISKLJUČILI, podesite funkcijsko dugme u položaj „0“.
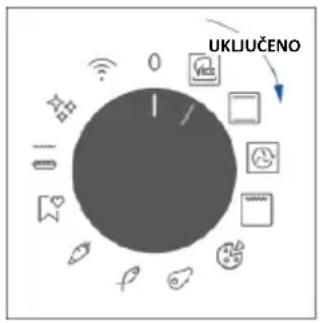
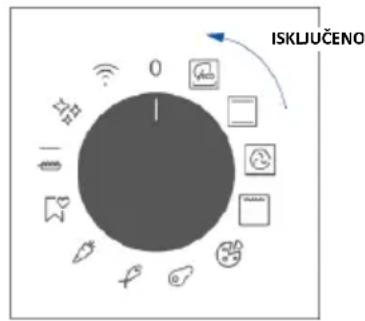
PODESITE PROGRAM KUVANJA
Kako da podesite funkciju Jolly:
Da biste podesili funkciju Jolly na pećnici, otvorite odeljak sa receptim u aplikaciji, izaberite recept koji želite da koristite i kliknite na „Koristi kao Jolly funkciju“.
Od tog trenutka, možete je pokrenuti iz proizvoda čak i bez interakcije sa aplikacijom. Jednostavno okrenite funkcijsko dugme na funkciju Jolly da biste započeli proces kuvanja.

natural_image
Illustration of a medical procedure with a tool and tubing, no text or symbols presentSonda se može koristiti sa ručnim funkcijama (konvekcija, konvekcija + ventilator, roštilj, Super grill, gratiniranje i više nivoa), sa KATEGORIJAMA KUVANJA HRANE (meso, riba i povrće) i Gentle cooking.
| Kategorija hrane | Predložena T °C sredine | Predloženo pozicioniranje |
| Pečena govedina | 45 °C | Dijagonalno u najdebljem delu. |
| Pečeno meso | 55 °C / 60 °C / 65 °C | Za namirnice cilindričnog oblika (kao što je goveđe pečenje), postavite vrh što bliže geometrijskom centru |
| Živinsko meso | 83-85 °C | U najdeblji deo grudi |
| Riba (cela/odresci) | 65 °C | Dijagonalno u najdebljem delu |
| Hleb/musaka | 90 °C | Blizu geometrijskog centra hrane |
5. SMERNICE ZA KUVANJE
5.1. OPŠTA TABELA KUVANJA
| Kategorija | Recept | Br. nivoa | Program kuvanja | T °C | Predgrevanje | Pribor za kuvanje | Položaj police | Vreme kuvanja nakon predgrevanja * (min) |
| Slatka peciva | Sitni kolači / mafini | 1 | Konveksni višeslojni | +175 °C~ +160 °C | Da | Pleh za pečenje Pleh za pečenje | L3 L4 | 20-30 30-40 |
| 2 | Više nivoa | 150 °C | Pleh za pečenje / dublji pleh | L2+L5 | 30-40 | |||
| 3 | Više nivoa | 140 °C | Pleh za pečenje | L2+L4+L6 | 40-50 | |||
| Vazdušasti kolači (26 cm ∅) | 1 | Konveksni višeslojni | +170 °C~ +150 °C | Da | Metalna rešetka + kalup za kolače Metalna rešetka + kalup za kolače | L3 L4 | 30-40 40-50 | |
| 2 | Više nivoa | 150 °C | Metalne rešetke + kalup za kolače | L1+L4 | 50-60 | |||
| Keks | 1 | Konveksni višeslojni | +150 °C~ +150 °C | Da | Pleh za pečenje Pleh za pečenje | L3 L4 | 25-30 30-40 | |
| 2 | Više nivoa | 140 °C | Pleh za pečenje + dublji pleh | L2+L5 | 30-40 | |||
| 3 | Više nivoa | 140 °C | Pleh za pečenje | L2+L4+L6 | 35-40 | |||
| Kroketi | 1 | Konvekcija | 190 °C | Da | Pleh za pečenje | L4 | 25-35 | |
| 2 | Više nivoa | 170 °C | Pleh za pečenje | L3 | 25-35 | |||
| Jorkširski puding | 1 | Konvekcija | 200 °C | Da | Pleh za pečenje | L3 | 20-30 | |
| Puslice | 1 | Više nivoa | 90 °C | Da | Pleh za pečenje | 90-160 | ||
| Makaronsi | 1 | Konvekcija | 150 °C | Da | Pleh za pečenje | L3 | 15-20 | |
| Pita od jabuka | 1 | Konvekcija | 185 °C | Da | Metalna rešetka + kalup za kolače | L2 | 60-70 | |
| 1 | Više nivoa | 170 °C | Da | Metalna rešetka + kalup za kolače | L4 | 65-75 | ||
| Tart tatin | 1 | Konvekcija | 170 °C | Da | Metalna rešetka + kalup za kolače | L2 | 40-60 | |
| Čokoladni sufle | 1 | Konvekcija | 200 °C | Da | Pleh za pečenje + modle | L3 | 10-15 | |
| Čizkejk | 1 | Konvekcija | 150 °C | Da | Metalna rešetka + kalup za kolače | L2 | 50-65 | |
| Smrznuti kroasani | 1 | Konvekcija | 180 °C | Da | Pleh za pečenje | L3 | 20-25 | |
| 2 | Više nivoa | 180 °C | Pleh za pečenje | L2+L5 | 25-35 | |||
| 3 | Više nivoa | 160 °C | Pleh za pečenje | L2+L4+L6 | 30-40 | |||
| Štrudla, smrznuta | 1 | Konvekcija | 210 °C | Da | Pleh za pečenje | L3 | 30-45 | |
| Hleb i lepinja | Tost hleb | 1 | Supergrill | 5 | Ne | Metalna rešetka | L6 | 4-6 |
| Fokača | 1 | Konvekcija | 200 °C | Da | Pleh za pečenje | L2 ili L3 | 25-35 | |
| Hleb, ceo | 1 | Konvekcija | 200 °C | Da | Pleh za pečenje | L3 | 35-50 | |
| Slane pite i musake | Slani kolači / kiševi (26 cm ∅) | 1 | Konvekcija | 200 °C | Da | Metalna rešetka + Pleh za kiš | L1 ili L2 | 30-50 |
| 2 | Više nivoa | 180 °C | Metalna rešetka + Pleh za kiš | L1+L4 | 50-70 | |||
| Sufle od sira | 1 | Konvekcija | 200 °C | Da | Pleh za pečenje + modle | L3 | 20-35 | |
| Lazanje, sveže | 1 | Konvekcija | 200 °C | Da | Metalna rešetka + posuda za pečenje | L3 | 40-60 | |
| Lazanje, smrznute | 1 | Konvekcija | 180 °C | Da | Metalna rešetka + posuda za pečenje | L3 | 50-60 | |
| Kaneloni, smrznuti | 1 | Konvekcija | 180 °C | Da | Metalna rešetka + posuda za pečenje | L3 | 45-55 | |
| Pečena testenina | 1 | Grati-niranje | 200 °C | Da | Metalna rešetka + posuda za pečenje | L4 | 20-30 | |
| Pica | Pica, sveža (pleh) | 1 | Konvekcija | 250 °C | Da | Pleh za pečenje | L2 ili L3 | 15-20 |
| Pica, sveža (pleh) | 1 | Pica | 250 °C | Ne | Pleh za pečenje | L2 ili L3 | 18-25 | |
| 2 | Više nivoa | 180 °C | Da | Pleh za pečenje + dublji pleh | L2+L5 | 25-35 | ||
| Pica, sveža (okrugla) | 1 | Konvekcija | 300 °C | Da | Pleh za pečenje | L2 ili L3 | 8-10 | |
| Pica, sveža (okrugla) | 1 | Pica | 300 °C | Ne | Pleh za pečenje | L2 ili L3 | 15-20 | |
| 2 | Više nivoa | 180 °C | Da | Pleh za pečenje + dublji pleh | L2+L5 | 30-40 | ||
| Pica, smrznuta (tanka kora) | 1 | Pica | 200 °C | Ne | Metalna rešetka | L2 | 10-15 | |
| Pica, smrznuta (tanka kora) | 1 | Konvekcija | 220 °C | Da | Metalna rešetka | L3 | 10-15 | |
| 2 | Više nivoa | 200 °C | Metalna rešetka | L2+L5 | 15-25 | |||
| 3 | Više nivoa | 180 °C | Metalna rešetka | L2+L4+L6 | ||||
| Meso i živina | Pečeno celo pile (1-1,2 kg) | 1 | Grati-niranje | 220 °C | Da | Metalna rešetka/L4 Postavite pleh za pečenje na L1 sa pola šolje vode | L4 | 40-60 |
| Pileći karabatak | 1 | AirFry** | 220 °C | Ne | Air fry pleh** | L4 | 30-50 | |
| Pečena patka | 1 | Grati-niranje | 200 °C | Da | Metalna rešetka + posuda za pečenje | L3 | 50-60 | |
| Petao | 1 | Grati-niranje | 220 °C | Da | Metalna rešetka Postavite pleh za pečenje na L1 | L4 | 20-40 | |
| Pečena ćurka | 1 | Grati-niranje | 200 °C | Da | Metalna rešetka + posuda za pečenje | L3 | 50-60 | |
| Svinjska rebra (1000-1200g) | 1 | Konvekcija | 200 °C | Da | Metalna rešetka + posuda za pečenje | L3 | 80-100 | |
| Kobasice | 1 | Supergrill | 4 | Da | Metalna rešetka | L5 | 40-50 | |
| Goveđi file (1000-1500g) | 1 | Gentle cooking** | 60 °C | Ne | Metalna rešetka + posuda za pečenje | L3 | 60-80 | |
| Pečena govedina (500g) | 1 | Grati-niranje | 220 °C | Da | Pleh za pečenje | L3 | 20-40 | |
| Mesna vekna (1000-1500g) | 1 | Konvekcija | 180 °C | Da | Pleh za pečenje | L3 | 40-50 | |
| Pečena piletina sa krompirom | 1 | Grati-niranje | 200 °C | Da | Dublji pleh | L4 | 45-60 | |
| Riba i morski plodovi | Morski plodovi sa roštilja | 1 | Supergrill | 4 | Ne | Metalna rešetka | L5 | 15-30 |
| Smrznuti riblji štapići | 1 | AirFry** | 200 °C | Ne | Air fry pleh** | L4 | 20-25 | |
| Pečena riba | 1 | ECO | 200 °C | Ne | Metalna rešetka Postavite pleh za pečenje na L1 | L3 | 40-60 | |
| Povrće | Gratinirano povrće | 1 | ECO | 200 °C | Ne | Metalna rešetka + posuda za pečenje | L3 | 80-90 |
| Zamrznuti pomfrit (300-500g) | 1 | AirFry** | 220 °C | Ne | Air fry pleh** | L4 | 18-25 | |
| Gratinirani krompir | 1 | Grati-niranje | 200 °C | Da | Metalna rešetka + posuda za pečenje | L4 | 15-25 | |
| Pečeni krompir | 1 | Konvekcija | 200 °C | Da | Pleh za pečenje | L4 | 30-50 |
natural_image
Line drawing of a kitchen oven with a side panel and cooling unit (no text or symbols)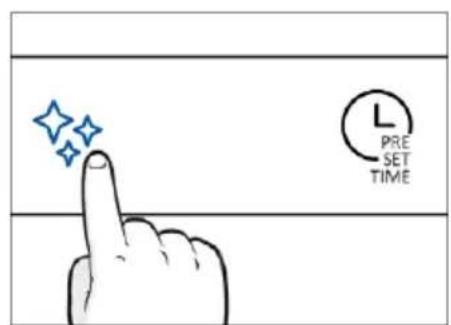
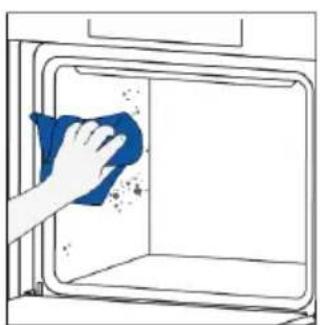
natural_image
Illustration of a hand cleaning a window with a blue cloth (no text or symbols)H2O Clean
Funkcija H2O Clean je dizajnirana da se bez napora uhvati u koštac sa laganom zaprljanošću i pruži brzo i ekološki prihvatljivo rešenje za čišćenje unutrašnjosti pećnice pomoću snage pare.
Kako funkcioniše:
- Sipajte 100 ml vode u donji utisnuti deo pećnice.
- Uključite dugme 🚗️. Ako je potrebno, okrenite kontrolu brojčanika da biste podesili program Hydro Clean. Funkcija će raditi tokom unapred podešenog vremena.
- Na kraju postupka čišćenja, pustite pećnicu da se ohladi.
- Kada se uređaj ohladi, očistite unutrašnje površine pećnice krpom.
- ▲ UPOZORENJE: Proverite da li je uređaj ohlađen pre nego što ga dodirnete. Vodite računa o svim vrućim površinama jer postoji rizik od opekotina. Koristite destilovanu ili pijaću vodu.
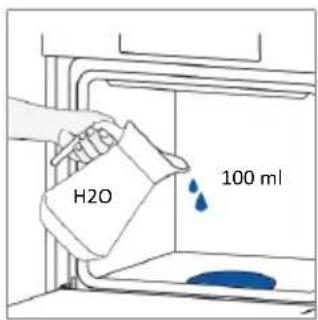
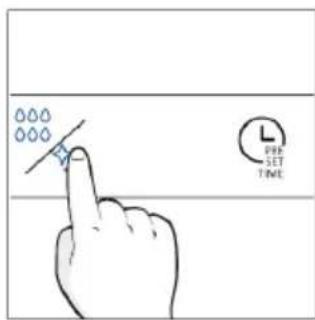

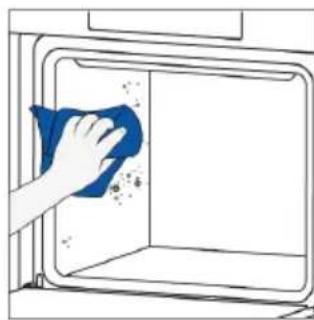
natural_image
Hand cleaning a window with a blue cloth, no text or symbols visibleKatalitičko čišćenje
Katalitički paneli oblažu unutrašnjost pećnice i pružaju vam luksuz da se nikada ne borite sa prljavom pećnicom.
Paneli su obloženi specijalizovanim emajlom koji se može pohvaliti mikroporoznom strukturom koja dobro apsorbuje mast koja prska.
Katalitičkom hemijskom reakcijom oni efikasno pretvaraju apsorbovanu mast u gasovite elemente kada su izloženi visokim temperaturama.
natural_image
Line drawing of an oven with a rack and vent, showing internal structure without any text or symbols

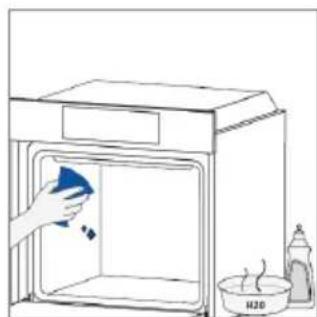
natural_image
Simple line drawing of a kitchen sink with a hand cleaning the interior (no text or symbols)6.2.2. SPOLJAŠNJOST PEĆNICE: uklanjanje i čišćenje staklenih vrata
natural_image
Line drawing of a cabinet with two hands operating it, no text or symbols present
natural_image
Pure technical diagram showing a mechanical component with a blue arrow indicating downward motion (no text or symbols)2.
- Postavite vrata na 45°. Istovremeno pritisnite dva dugmeta sa obe strane bočnih strana vrata i povucite prema sebi da biste uklonili poklopac gornjih stakala.
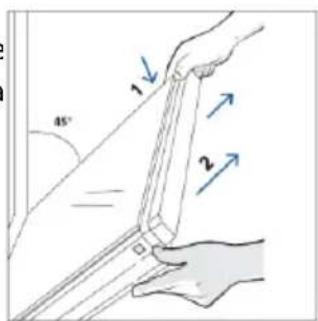
- Veoma pažljivo uklonite staklo pećnice, počevši od unutrašnjeg stakla. Tokom postupka, čvrsto držite staklo obema rukama i stavite ga na mekanu ravnu površinu (npr. na tkaninu).
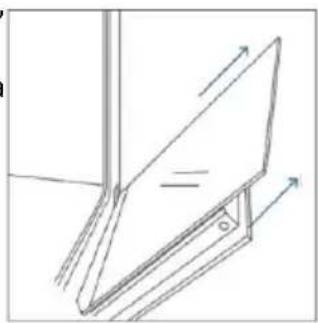
natural_image
Simple line drawing of a tilted rectangular object with directional arrows indicating movement or force (no text or symbols)natural_image
Illustration of a hand holding a diagonal line against a vertical wall, with a blue circle highlighting the intersection area (no text or symbols present)- Očistite staklo mekom krpom i odgovarajućim sredstvima za čišćenje.
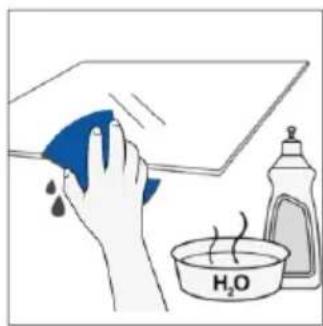
-
Umetnite staklene ploče, vodeći računa da oznaka „Low-E“ bude ispravno čitljiva i postavljena na donjoj levoj strani vrata, u blizini leve šarke. Na taj način će štampana etiketa na prvom staklu ostati na unutrašnjoj strani vrata.
-
Ponovo pričvrstite poklopac vrata gornjeg stakla tako što ćete ga gurati prema unutra do ne čujete klik dva bočna dugmeta.
-
Zatim vratite vrata na 90° i okrenite jezičke za zaključavanje šarki prema unutrašnjosti pećnice.
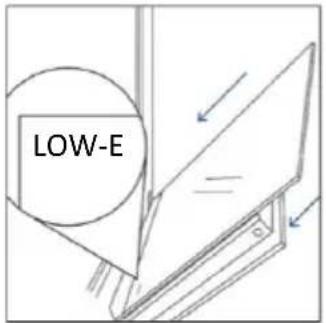
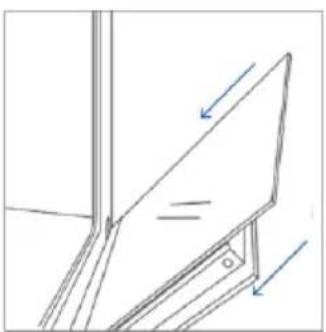
natural_image
Technical line drawing of a structural bracket with arrows indicating direction (no text or symbols)
natural_image
Line drawing of a cabinet with two hands inserting a tool into the opening (no text or symbols)
natural_image
Diagram showing a blue tool interacting with a mechanical component, no text or symbols present6.3. ČIŠĆENJE DODATNE OPREME
Obavezno temeljno očistite dodatnu opremu nakon svake upotrebe i osušite je peškirom. Za tvrdokorne naslage, natopite dodatnu opremu u mešavini vode i sapuna oko 30 minuta pre nego što je ponovo operete.
ČIŠĆENJE BOČNIH NOSAČA:
- Model sa 6 nivoa
- Uklonite bočne nosače povlačenjem u pravcu strelica.
- Da biste očistili žičane nosače, stavite ih u mašinu za pranje sudova ili koristite vlažni sunder i obavezno ih posle osušite.
- Nakon procesa čišćenja, postavite žičane nosače obrnutim redosledom.
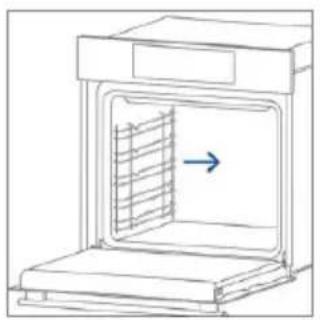
natural_image
Line drawing of an oven with a vent and airflow direction arrow (no text or symbols)

natural_image
Line drawing of an oven with a blue arrow indicating airflow or heat transfer (no text or symbols)- Model sa 7 nivoa
- Uklonite bočne držače tako što ćete prvo povući prednji deo u smeru strelice i odvojiti zadnji deo od vijaka.
- Da biste očistili žičane nosače, stavite ih u mašinu za pranje sudova ili koristite vlažni sunder i obavezno ih posle osušite.
- Nakon postupka čišćenja postavite bočne nosače obrnutim redosledom: postavite zadnji deo između vijaka i gurnite prednji deo u smeru strelice.
6.4. ODRŽAVANJE
ZAMENA KOMPONENTI
- korak

natural_image
Hand holding a paper with a blue checkmark inside an open box (no text or symbols visible)- korak
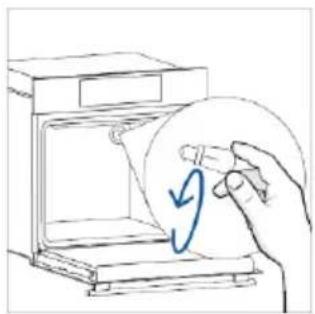
natural_image
Hand holding a circular object inside an open appliance (no text or symbols visible)- korak

natural_image
Hand holding a circular object inside a kitchen appliance (no text or symbols visible)- korak

natural_image
Hand holding a circular object with a blue arrow inside, next to an open oven (no text or symbols visible)- korak

- korak

natural_image
Illustration of a hand holding a pen near a document with an arrow, next to a bookshelf (no text or symbols)- korak

natural_image
Illustration of a hand inserting a small object into a device inside a circular frame, with no visible text or symbols.- korak

natural_image
Illustration of a hand holding a small electrical component inside a circular frame, with no visible text or symbols.- korak

natural_image
Simple line drawing of a cabinet or rack with an inset magnified view showing a wall-mounted fixture (no text or symbols)- korak

natural_image
Simple line drawing of a cabinet with blue ribbons and an exclamation mark (no text or symbols)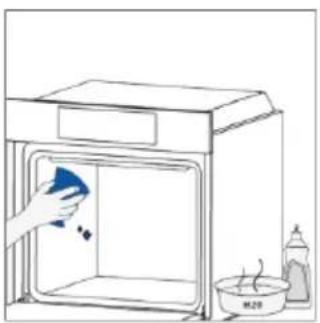
natural_image
Simple line drawing of a kitchen sink with a hand cleaning the interior (no text or symbols)8. ZAŠTITA ŽIVOTNE SREDINE I ODLAGANJE NA OTPAD
8.1. ODLAGANJE UREĐAJA NA OTPAD

natural_image
Empty white rectangle with black border (no text or symbols)natural_image
Line drawing of a two-tiered modular bed or rack structure (no text or symbols)natural_image
3D diagram of a rectangular tray with internal compartments, no text or symbols presentnatural_image
3D wireframe diagram of a rectangular tray or container with internal compartments (no text or symbols)natural_image
Line drawing of a kitchen sink with a bowl and a sphere on a grater (no text or symbols)natural_image
Diagram of a rectangular tray with a patterned lid and internal grid lines, no text or symbols present.natural_image
Line drawing of a rooster on a tray with dough and steam (no text or symbols)natural_image
Simple line drawing of a kitchen appliance with a circular label and directional arrow (no text or symbols)natural_image
Illustration of a rectangular appliance with a grid pattern on top, placed inside an oven (no text or symbols)natural_image
Illustration of a mouse being injected with a syringe, no text or symbols presentNAUJO NAUDOTOJO REGISTRACIJA
SPARČIOJO SUSIEJIMO REGISTRACIJA
1 veiksmas
2 veiksmas
Allow your location permission
To enhance your experience, please allow location permission to hOn app in the next step.


CONTINUE
3 veiksmas
Select your appliance category

Search your appliance

Washing machine

Washer dryer

Tumble dryer

Dishwasher

Air conditionair

Air purifier

Air scanner
4 veiksmas
Appliance connection

Turn OFF and then ON your appliance
In case you can't switch OFF your appliance, unplug (for at least 10 seconds) and then plug its power supply.

natural_image
Circular icon with a blue power button and surrounding geometric shapes, no text or symbols present.5 veiksmas
Appliance connection
Searching your appliance
Don't turn off your Bluetooth. On app is looking for your appliance...

pie
| Time | Value | |---|---| | 00:00:40 | 40 |
May close to your appliance in order to correctly capture the signal.
6.1–6.2 veiksmai
Appliance connection
Searching your appliance
Don't burn-off your Bluetooth.
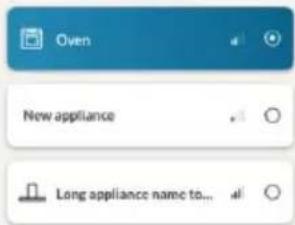
CONNECT
PRODUCT NOT FOUND

Appliance connection
Searching your appliance
Don't turn off your Bluetooth.
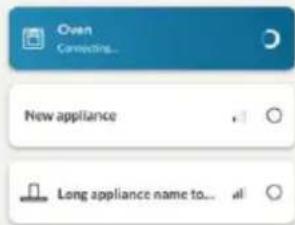

Stay close to your appliance in order to correctly capture the signal.
7 veiksmas
Appliance connection

Your appliance has been correctly identified!
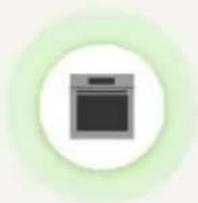
natural_image
Simple icon of a kitchen oven inside a circular frame (no text or symbols)Brand Hoover
Model 31008486-7888-1824
Serial number 12345678-1234-1234
Is this your appliance?
YES IT'S MY OVEN
NO IT'S NOT

KAIP PAKEISTI „WI-FI“ NUSTATYMUS
natural_image
Simple diagram with a gray circle, a dot, and a plus sign, with curved arrows indicating direction (no text or symbols)

NUOTOLINIO VALDYMO PULTELIS
3. PRIEŠ PALEIDŽIANT
3.1. INFORMACIJA PRADEDANT
natural_image
Simple line drawing of a kitchen sink with a hand cleaning the interior and a water bottle nearby (no text or symbols)

natural_image
Simple line drawing of a cabinet with swirling blue smoke rising from the top, next to an open door (no text or symbols)4. GAMINIO VEIKIMAS
4.1. KAIP GAMINYS VEIKIA
ORKAITĖS IJUNGIMAS / IŠJUNGIMAS

natural_image
Illustration of a medical procedure involving a tool and tubing on a patient's abdomen (no text or symbols)

natural_image
Simple diagram with a gray circle, a dot, and a curved arrow indicating rotation or direction (no text or symbols)natural_image
Illustration of a medical procedure with a tool and tubing, no text or symbols present

natural_image
Hand cleaning a kitchen appliance with a blue cloth (no text or symbols visible)natural_image
Line drawing of an oven with a rack and vent, showing internal structure without any text or symbols
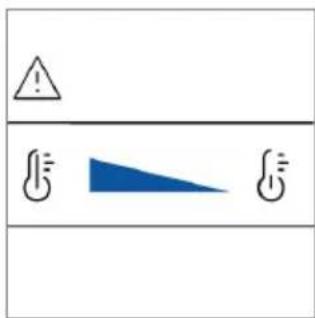

natural_image
Simple line drawing of a kitchen sink with a hand cleaning the interior (no text or symbols)natural_image
Line drawing of a cabinet with two hands operating it, no text or symbols present
natural_image
Pure technical diagram showing a mechanical component with a blue arrow indicating downward motion (no text or symbols)2.
natural_image
Simple line drawing of a tilted rectangular object with directional arrows indicating movement or force (no text or symbols)natural_image
Hand holding a diagonal line with a blue circle highlighting the intersection of two fingers (no text or symbols present)natural_image
Illustration of a hand cleaning a blue cloth over a surface with a water bottle and 20% oxygen indicator (no text or symbols)natural_image
Technical line drawing of a structural bracket with arrows indicating direction (no text or symbols)natural_image
Line drawing of a cabinet with two hands inserting a tool into the opening (no text or symbols)
natural_image
Pure technical line drawing of a mechanical component with a blue tool, no text or symbols present6.3. PRIEDU VALYMAS
natural_image
Line drawing of an oven with a vent and airflow direction arrow (no text or symbols)

natural_image
Line drawing of an oven with a blue arrow indicating airflow or heat transfer (no text or symbols)- 7 lygių modelis
2 veiksmas

natural_image
Hand holding a paper with a blue checkmark inside an open box (no text or symbols visible)3 veiksmas

natural_image
Hand holding a circular object inside an open appliance (no text or symbols visible)4 veiksmas

natural_image
Hand holding a circular object inside a kitchen appliance (no text or symbols visible)5 veiksmas

natural_image
Hand holding a circular object with a blue arrow inside, next to an open oven (no text or symbols)6 veiksmas
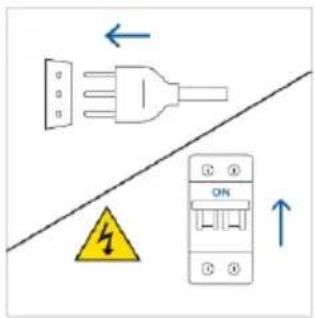
2 veiksmas
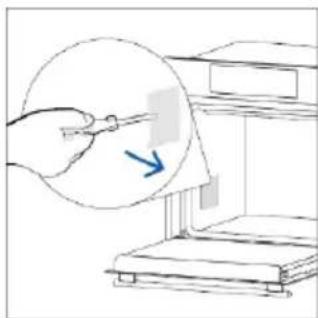
natural_image
Illustration of a hand using a tool to write or print a document inside a storage cabinet (no text or symbols visible)3 veiksmas

natural_image
Illustration of a hand holding a small electronic device with an arrow pointing to it, next to stacked books (no text or symbols present)4 veiksmas
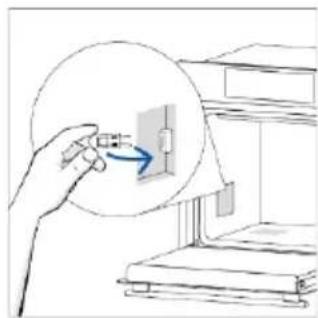
natural_image
Illustration of a hand inserting a component into a device (no text or symbols present)5 veiksmas
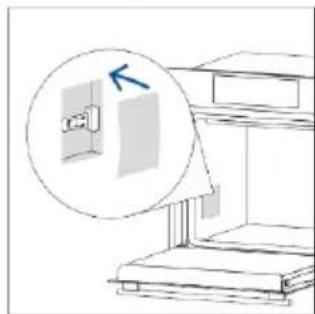
natural_image
Simple line drawing of a cabinet or shelf with an inset magnified view showing a wall-mounted device (no text or symbols)6 veiksmas
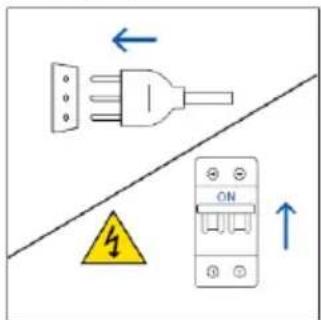
natural_image
Illustration of two people working at a desk with a computer, one standing on a rising line graph (no text or symbols)Dūmai
!
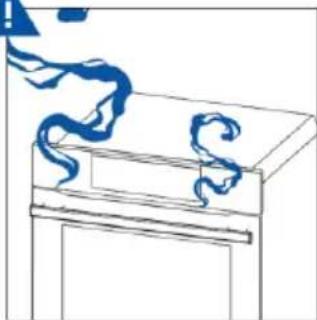
natural_image
Simple line drawing of a cabinet with blue ribbons above (no text or symbols)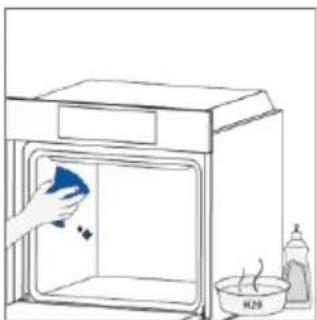
natural_image
Simple line drawing of a kitchen sink with a hand cleaning the interior (no text or symbols)8. APLINKOS APSAUGA IR ATLIEKŲ ŠALINIMAS
8.1. PRIETAISO ŠALINIMAS
natural_image
Empty white rectangle with black border (no text or symbols)natural_image
Line drawing of a two-tiered bunk bed with horizontal railings and a flat base (no text or symbols)natural_image
3D diagram of a rectangular tray with internal geometric lines, no text or symbols presentnatural_image
3D wireframe diagram of a rectangular tray or container with internal compartments (no text or symbols)natural_image
Line drawing of a kitchen sink with a bowl and a sphere on a grater (no text or symbols)natural_image
Line drawing of a rectangular tray with a patterned lid and internal grid lines (no text or symbols)natural_image
Line drawing of a rolling pin on a rectangular plate with dough and steam (no text or symbols)natural_image
Simple line drawing of a cabinet with a circular arrow indicating airflow or motion (no text or symbols)natural_image
Illustration of a rectangular appliance with internal shelves and a grid pattern (no text or symbols)natural_image
Illustration of a mouse being heated by a medical device, no text or symbols presentUUE KASUTAJA REGISTREERIMINE
KIRÜHENDAMINE
1. samm
2. samm
3. samm
4. samm
5. toiming
Appliance connection
Searching your appliance
Don't turn off your Bluetooth. On app is looking for your appliance...


May close to your appliance in order to correctly capture the signal.
6.1-6.2. samm
Appliance connection
Searching your appliance
Don't burn-off your Bluetooth.

Oven


New appliance


Long appliance name to...


CONNECT
PRODUCT NOT FOUND

Appliance connection
Searching your appliance
Don't turn off your Bluetooth.

Oven Connecting

New appliance


Long appliance name to...


Stay close to your appliance in order to correctly capture the signal.
7. samm
Appliance connection

Your appliance has been correctly identified!
natural_image
Simple icon of a kitchen oven inside a light green circular frame (no text or symbols)Brand Hoover Model 31008486-7888-1824
Serial number 12345678-1234-1234
Is this your appliance?
YES!S MY OVEN
NO IT'S NOT

KUIDAS WIFI-SEADEID MUUTA
natural_image
Simple diagram with a gray circle, a dot, and a plus sign, with curved arrows indicating direction (no text or symbols)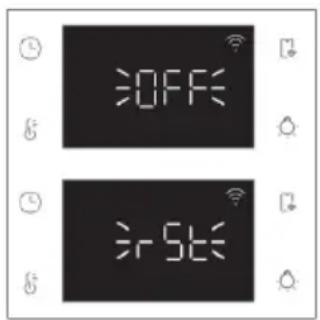

KAUGJUHTIMISPULT
3. ENNE ALUSTAMIST
3.1. TEAVE ALUSTAMISEKS

natural_image
Line drawing of a medical procedure on a patient's abdomen, showing a tool and device (no text or symbols)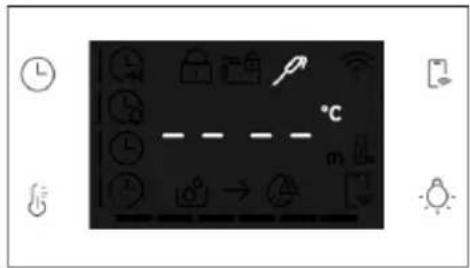
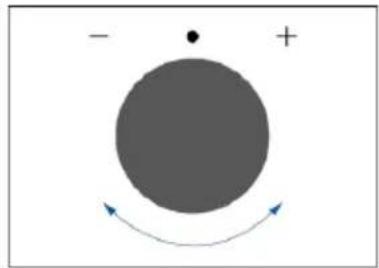
natural_image
Simple diagram with a gray circle, a dot, and a curved arrow indicating rotation or direction (no text or symbols)natural_image
Illustration of a medical procedure with a tool and tubing, no text or symbols present

natural_image
Hand cleaning a window with a blue cloth, showing surface dust and debris (no text or symbols)natural_image
Line drawing of an oven with a rack and vent, showing internal structure without any text or symbols


natural_image
Line drawing of a kitchen sink with a hand cleaning the interior (no text or symbols)natural_image
Line drawing of a cabinet with two hands pulling an open lid (no text or symbols)
natural_image
Pure technical diagram showing a mechanical component with a blue arrow indicating downward motion (no text or symbols)2.
natural_image
Simple line drawing of a tilted rectangular object with directional arrows indicating movement or force (no text or symbols)natural_image
Illustration of a hand holding a diagonal line with a blue circle containing a crossed-out symbol (no text or labels)natural_image
Technical line drawing of a structural bracket with arrows indicating direction (no text or symbols)natural_image
Line drawing of a cabinet with two hands inserting a tool into the opening (no text or symbols)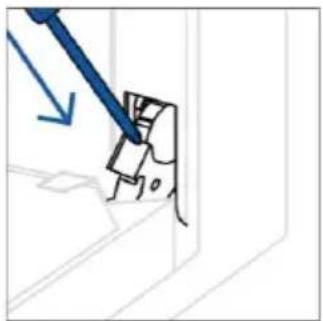
natural_image
Pure technical line drawing of a mechanical component with a blue tool, no text or symbols present6.3. TARVIKUTE PUHASTAMINE
natural_image
Line drawing of a oven with a vent and airflow direction arrow (no text or symbols)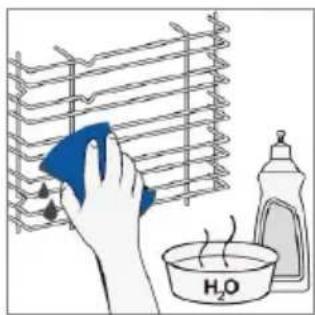
natural_image
Illustration of a hand cleaning a rack with a blue cloth and a water bottle labeled H₂O (no text or symbols on the main objects)
natural_image
Line drawing of an oven with a rack inside, showing airflow direction (no text or symbols)- 7 tasemega mudel
- samm

natural_image
Line drawing of a hand holding a circular object with a blue arrow inside, next to an open appliance (no text or symbols)- samm

natural_image
Hand holding a circular object with a blue arrow inside, next to an open appliance (no text or symbols visible)- samm
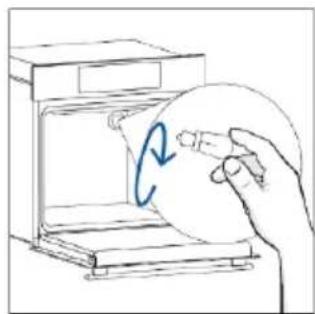
natural_image
Hand holding a circular object inside a microwave oven (no text or symbols visible)- samm

natural_image
Hand holding a circular object with a blue arrow inside, next to an open oven (no text or symbols visible)- samm

- samm

natural_image
Illustration of a hand holding a pen over a document inside a storage cabinet (no text or symbols visible)- samm

natural_image
Illustration of a hand inserting a small object into a device inside a circular frame, with no visible text or symbols.- samm

natural_image
Illustration of a hand holding a small electronic component with an arrow indicating rotation (no text or symbols present)- samm

natural_image
Simple line drawing of a cabinet or rack with an inset magnified view showing a wall-mounted fixture (no text or symbols)- samm

8. KESKKONNAKAITSE JA KÖRVALDAMINE
8.1. SEADME KÖRVALDAMINE
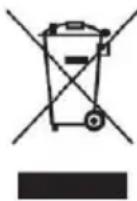

LAIPNI LÜDZAM
2.1. PRODUKTA PÄRSKATS
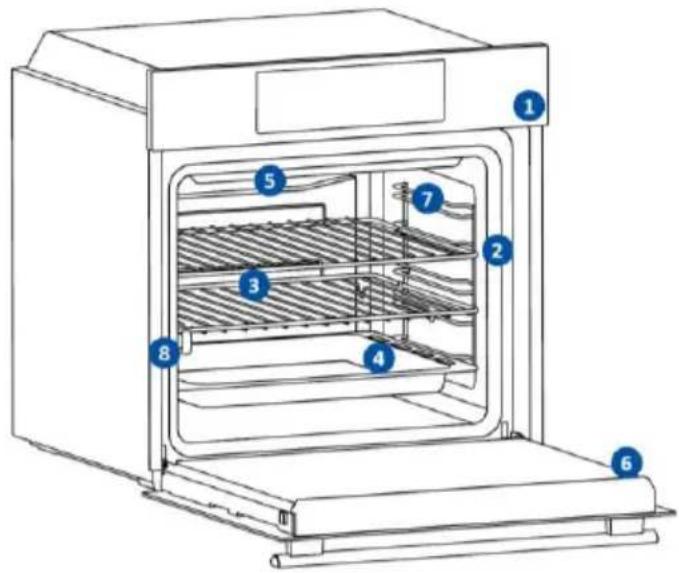
natural_image
Empty white rectangle with black border (no text or symbols)natural_image
Line drawing of a two-tiered modular bed or shelf structure (no text or symbols)natural_image
3D wireframe diagram of a rectangular tray or vent with internal geometric cutouts (no text or symbols)natural_image
3D diagram of a rectangular tray with internal compartments, no text or symbols presentnatural_image
Line drawing of a kitchen sink with a bowl and a sphere on a metal rack (no text or symbols)natural_image
Line drawing of a rectangular tray with a grid pattern on top, placed inside an oven (no text or symbols)natural_image
Line drawing of a rooster on a cutting board with dough and steam (no text or symbols)natural_image
Simple line drawing of a kitchen appliance with a circular arrow indicating airflow or motion (no text or symbols)natural_image
Line drawing of a rectangular appliance with a grid-patterned lid (no text or symbols)natural_image
Illustration of a medical procedure involving a mouse and a syringe, with no visible text or symbolsnatural_image
3D rendering of a rectangular tray with a mesh pattern inside, placed on a shelf (no text or symbols visible)JAUNA LIETOTĀJA REGISTRĀCIJA
ĀTRĀ PĀRA REGISTRĀCIJA
1. darbība
- Atlasiet "Pievienot ierīci".

2. darbība
Allow your location permission
To enhance your experience, please allow location permission to hOn app in the next step.


CONTINUE
3. darbība
Select your appliance category

Search your appliance

Washing machine

Washer dryer

Tumble dryer

Dishwasher

Air conditionair

Air purifier

Air scanner
4. darbība
Appliance connection

Turn OFF and then ON your appliance
In case you can't switch OFF your appliance, unplug (for at least 10 seconds) and then plug its power supply.

natural_image
Circular icon with a blue power button and surrounding geometric shapes, no text or symbols present.5. darbība
Appliance connection
Searching your appliance
Don't turn off your Bluetooth. On app is looking for your appliance...

pie
| Time | Value | |---|---| | 00:00:40 | 40 |
May close to your appliance in order to correctly capture the signal.
6.1-6.2. darbība
- Atlasiet savu sadzīves tehniku, pieskarieties pie "Savienot" un uzgaidiet dažas sekundes.

Appliance connection
Searching your appliance
Don't burn-off your Bluetooth.
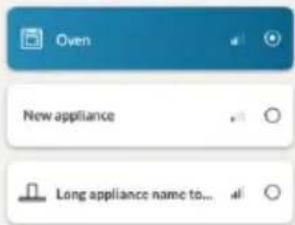
CONNECT
PRODUCT NOT FOUND

Appliance connection
Searching your appliance
Don't turn off your Bluetooth.
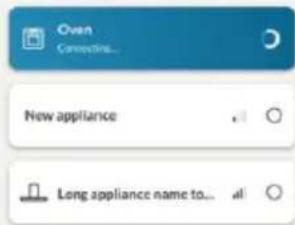

Stay close to your appliance in order to correctly capture the signal.
7. darbība
Appliance connection

Your appliance has been correctly identified!

natural_image
Simple icon of a kitchen oven inside a light green circular frame (no text or symbols)Brand Hoover
Model 31008486-7888-1824
Serial number 12345678-1234-1234
Is this your appliance?
YES!S MY OVER
NO IT'S NOT

WI-FI IESTATIJUMU MAINA
flowchart
graph TD
    A["Signal"] --> B["Data Transmission"]
    B --> C["Feedback Loop"]
    C --> D["User Interface"]
    D --> E["Mobile Device"]
    E --> F["User Interface"]
    F --> G["User Interface"]
    G --> H["User Interface"]
    H --> I["User Interface"]
    I --> J["User Interface"]
    J --> K["User Interface"]
    K --> L["User Interface"]
    L --> M["User Interface"]
    M --> N["User Interface"]
    N --> O["User Interface"]
    O --> P["User Interface"]
    P --> Q["User Interface"]
    Q --> R["User Interface"]
    R --> S["User Interface"]
    S --> T["User Interface"]
    T --> U["User Interface"]
    U --> V["User Interface"]
    V --> W["User Interface"]
    W --> X["User Interface"]
    X --> Y["User Interface"]

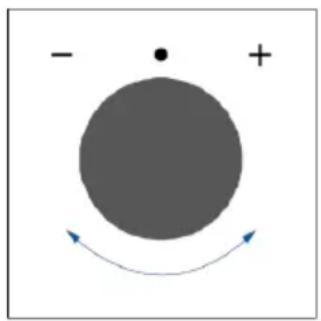
natural_image
Simple diagram with a gray circle, a dot, and a plus sign, with curved arrows indicating direction (no text or symbols)

TÄLVADİBA
3. PIRMS SĀKŠANAS
3.1. INFORMĀCIJA, LAI SĀKTU
natural_image
Simple line drawing of a kitchen sink with a hand cleaning the interior (no text or symbols)
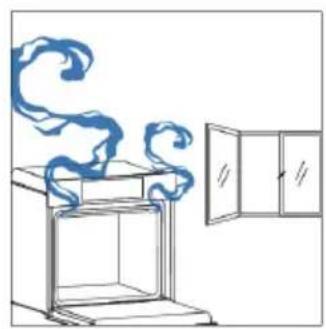
natural_image
Simple line drawing of a steam rising from a chimney to an open cabinet (no text or symbols)4. PRODUKTA DARBĪBA
4.1. KÄ PRODUKTS DARBOJAS
CEPEŠKRĀSNS IESLĒGŠANA/IZSLĒGŠANA

natural_image
Illustration of a medical procedure involving a tool and probe inserted into a patient's abdomen (no text or symbols)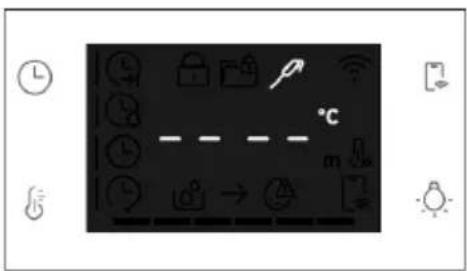
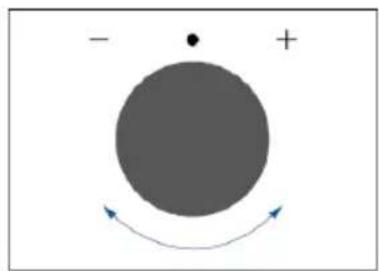
natural_image
Simple diagram with a gray circle, a dot, and a curved arrow indicating direction (no text or symbols)natural_image
Medical catheter device with attached tubing and a chicken-shaped body (no text or symbols)Termometru var izmantot ar manuālām funkcijām (statisks, statisks + ventilators, grils, super grill, sacepums un daudzlīmeņu), ar ĪDIENU GATAVOŠANAS KATEGORIJĀM (gaļa, zivis un dārzeni) un Gentle cooking.
natural_image
Line drawing of a kitchen oven with an open tray and side panel (no text or symbols)

natural_image
Illustration of a hand cleaning a kitchen appliance with a blue cloth (no text or symbols)H2O cleaning


natural_image
Hand cleaning a window with a blue cloth, no text or symbols visiblenatural_image
Line drawing of an oven with a rack and vent, showing internal structure without any text or symbols


natural_image
Simple line drawing of a kitchen sink with a hand cleaning the interior (no text or symbols)natural_image
Line drawing of a cabinet with two hands operating it, no text or symbols present
natural_image
Diagram of a mechanical component with a blue arrow indicating downward motion (no text or symbols)2.
natural_image
Simple line drawing of a tilted rectangular object with directional arrows indicating movement or force (no text or symbols)natural_image
Illustration of a hand holding a diagonal line against a vertical wall, with a blue circle highlighting the intersection area (no text or symbols present)natural_image
Illustration of a hand cleaning a tiled surface with a blue cloth, a water bottle, and a beaker labeled H₂O (no text or symbols on main objects)natural_image
Technical line drawing of a structural bracket with arrows indicating direction (no text or symbols)natural_image
Line drawing of a cabinet with two hands inserting a tool into the opening (no text or symbols)
natural_image
Diagram showing a blue tool interacting with a mechanical component, no text or symbols present6.3. PIEDERUMU TİRİŞANA
natural_image
Line drawing of an oven with a vent and airflow direction arrow (no text or symbols)

natural_image
Line drawing of an oven with a blue arrow indicating airflow or heat transfer (no text or symbols)- 7 līmeņu modelis
- darbība

natural_image
Hand holding a paper with a blue checkmark inside an open box (no text or symbols visible)- darbība

natural_image
Hand holding a circular object inside an open appliance (no text or symbols visible)- darbība

natural_image
Hand holding a circular object inside a kitchen appliance (no text or symbols visible)- darbība
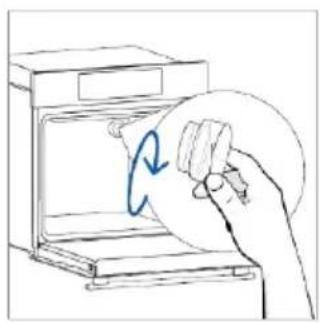
natural_image
Hand holding a circular object inside an oven with a paper roll, no text or symbols visible- darbība

- darbība

natural_image
Illustration of a hand holding a pen over a document inside a storage cabinet (no text or symbols visible)- darbība

natural_image
Illustration of a hand inserting a small object into a device inside a circular frame, with no visible text or symbols.- darbība
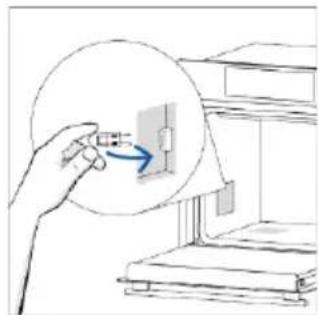
natural_image
Illustration of a hand holding a small electronic component with an arrow indicating rotation (no text or symbols present)- darbība

natural_image
Simple line drawing of a cabinet or rack with an inset magnified view showing a wall-mounted fixture (no text or symbols)- darbība

8. VIDES AIZSARDZĪBA UN UTILIZĀCIJA
8.1. IERICES UTILIZACIJA

natural_image
Empty white rectangle with a thin black border (no text or symbols)natural_image
Line drawing of a two-tiered storage unit with horizontal racks and a central grid (no text or symbols)natural_image
3D diagram of a rectangular tray with internal compartments, placed inside a storage unit (no text or symbols)natural_image
3D wireframe diagram of a rectangular tray or basin with internal compartments, placed on a shelf (no text or symbols)natural_image
Technical line drawing of a kitchen sink with a bowl and a sphere on a platform (no text or symbols)natural_image
Line drawing of a rectangular tray with a patterned lid and grid lines, placed inside a kitchen appliance (no text or symbols)natural_image
Line drawing of a roasted chicken on a cutting board (no text or symbols)natural_image
Simple line drawing of a door with a circular arrow indicating airflow or motion (no text or symbols)natural_image
Line drawing of a rectangular tray with a grid pattern, placed on a shelf (no text or symbols)natural_image
Illustration of a mouse being injected with a syringe and probe, no text or symbols presentnatural_image
3D rendering of a rectangular tray with a mesh pattern inside, placed in a kitchen or storage room environment (no text or symbols visible)Стъпка 2
Стъпка 3
Стъпка 4
Стъпка 5
Appliance connection
Searching your appliance
Don't turn off your Bluetooth. On app is looking for your appliance...

pie
| Time | Value | |---|---| | 00:00:40 | 40 |
May close to your appliance in order to correctly capture the signal.
Стъпка 6.1-6.2
Appliance connection
Searching your appliance
Don't burn-off your Bluetooth.

CONNECT
PRODUCT NOT FOUND

Appliance connection
Searching your appliance
Don't turn off your Bluetooth.
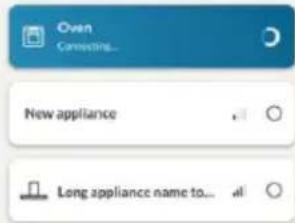

Stay close to your appliance in order to correctly capture the signal.
Стъпка 7
Appliance connection

Your appliance has been correctly identified!

natural_image
Simple icon of a kitchen oven inside a light green circular frame (no text or symbols)Brand Hoover Model 31008486-7888-1824
Serial number 12345678-1234-1234
Is this your appliance?
YES IT'S MY OVER
NO IT'S NOT
КАК ДА ПРОМЕНЯ НАСТРОЙКИТЕ НА WIFI
natural_image
Simple diagram with a gray circle, a black dot, and a plus sign, with curved arrows indicating direction (no text or symbols)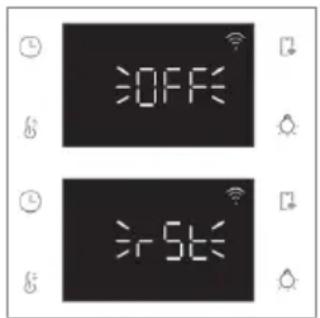
3. ПРЕДИ ДА ЗАПОЧНЕТЕ
natural_image
Simple line drawing of a kitchen sink with a hand cleaning the interior and a bottle nearby (no text or symbols)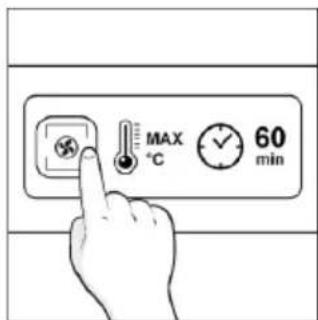
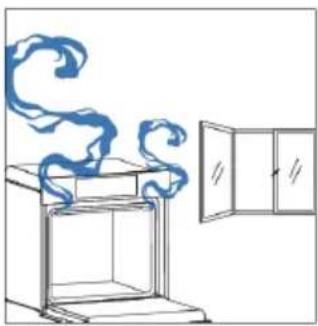
natural_image
Simple line drawing of a cabinet with a swirling blue smoke rising from the top, next to an open cabinet (no text or symbols)
natural_image
Illustration of a medical procedure involving a tool and a mouse on a tray (no text or symbols)
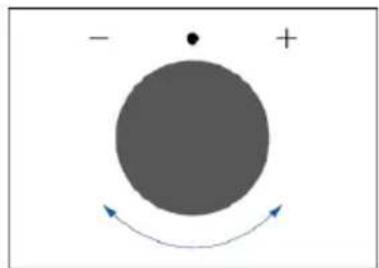
natural_image
Simple diagram with a gray circle, a dot, and a curved arrow with blue arrows (no text or symbols)natural_image
Illustration of a medical procedure with a needle inserted into a patient's abdomen (no text or symbols)natural_image
Line drawing of an oven with a rack and vent, showing internal structure (no text or symbols)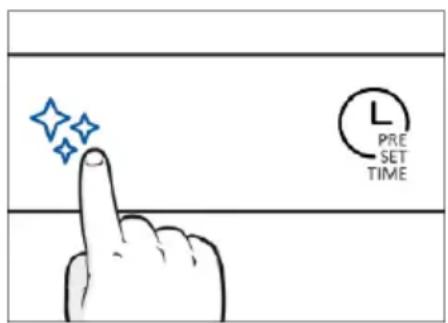
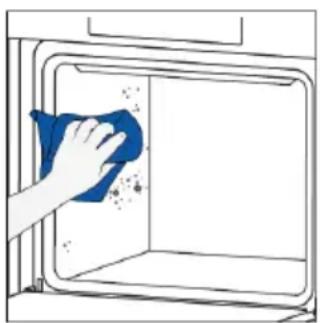
natural_image
Illustration of a hand cleaning a kitchen appliance with a blue cloth (no text or symbols)H2O cleaning
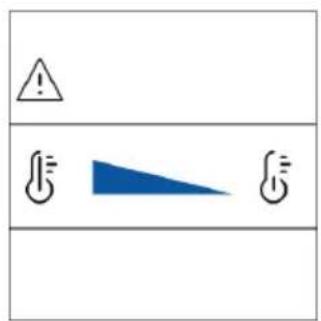

natural_image
Hand cleaning a kitchen appliance with a blue cloth (no text or symbols visible)natural_image
Line drawing of an oven with a rack and vent, showing internal structure without any text or symbols

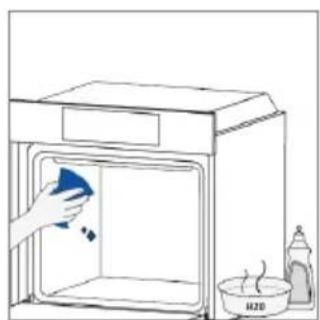
natural_image
Simple line drawing of a kitchen oven with a hand cleaning it, water being poured into the oven (no text or symbols)natural_image
Line drawing of a cabinet with two hands operating it, no text or symbols present
natural_image
Pure technical diagram showing a mechanical component with a blue arrow indicating downward motion (no text or symbols)2.
natural_image
Simple line drawing of a tilted rectangular object with directional arrows indicating movement (no text or symbols)natural_image
Illustration of a hand holding a diagonal line against a vertical wall, with a blue circle highlighting the intersection area (no text or symbols present)natural_image
Technical line drawing of a structural bracket with arrows indicating direction (no text or symbols)
natural_image
Line drawing of a cabinet with two hands inserting a tool into the opening (no text or symbols)
natural_image
Pure technical line drawing of a mechanical component with a blue tool, no text or symbols present6.3. ПОЧИСТВАНЕ НА ПРИНАДЛЕЖНОСТИ
natural_image
Line drawing of an oven with a vent and airflow direction arrow (no text or symbols)

natural_image
Line drawing of an oven with a blue arrow indicating airflow or heat transfer (no text or symbols)- Модел на 7 нива
Стъпка 2

natural_image
Hand holding a paper with a blue checkmark inside an open box (no text or symbols visible)Стъпка 3

natural_image
Hand holding a circular object inside a device (no text or symbols visible)Стъпка 4

natural_image
Hand holding a circular object inside a kitchen appliance (no text or symbols visible)Стъпка 5

natural_image
Hand placing a circular object into an oven with a blue arrow indicating rotation (no text or symbols)Стъпка 6
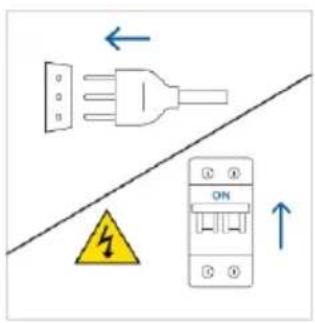
Стъпка 2
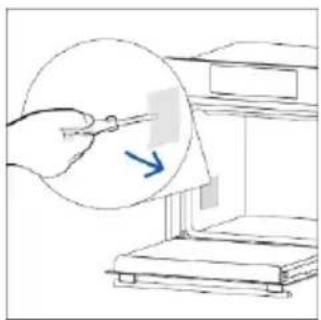
natural_image
Illustration of a hand using a tool to zoom the square on a document or paper (no text or symbols present)Стъпка 3
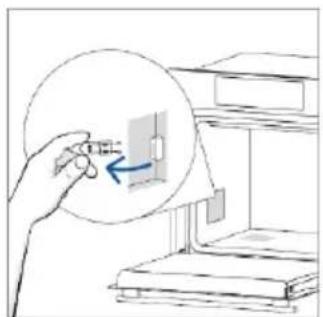
natural_image
Illustration of a hand holding a small electronic component with an arrow pointing to it, next to stacked books (no text or symbols present)Стъпка 4
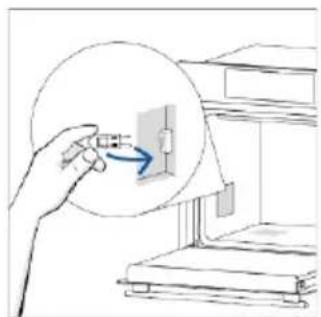
natural_image
Illustration of a hand inserting a plug into a wall-mounted electrical component (no text or symbols)Стъпка 5
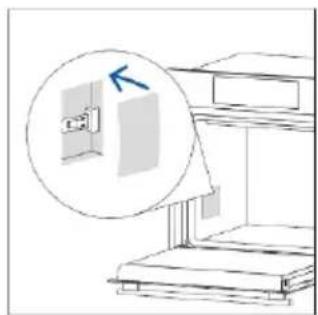
natural_image
Simple line drawing of a staircase with an inset magnified view showing a window labeled 'K' (no text or symbols on the diagram itself)Стъпка 6
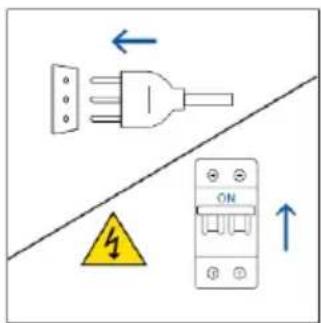
8. ОПАЗВАНЕ НА ОКОЛНАТА СРЕДА И ИЗХВЪРЛЯНЕ
8.1. ИЗХВЪРЛЯНЕ НА УРЕДА


DOBRO DOŠLI
Hvala što ste odabrali naš proizvod. Radi svoje sigurnosti i najboljih rezultata pažljivo pročitajte ovaj priručnik, uključujući upute u vezi sigurnosti i sačuvajte ga za buduću upotrebu.
- Upravljačka ploča
- Brojevi položaja police
- Rešetke
- Plitice
- Poklopac ventilatora
- Vrata pećnice
- Bočne žičane rešetke
natural_image
Empty white rectangle with black border (no text or symbols)natural_image
Line drawing of a two-tiered storage unit with horizontal shelves and vertical supports (no text or symbols)natural_image
3D wireframe diagram of a rectangular tray or vent with internal grid pattern (no text or symbols)natural_image
Illustration of a rectangular tray with internal compartments, placed inside an oven (no text or symbols)Duboka ladica idealna je za recepte s dodanim tekućinama ili slojevima, kao što su složenci ili pečenja. Njena je dubina posebno dizajnirana kako bi hrana koja se u njenoj priprema imala željenu konzistentnost.
Teleskopske vodilice
natural_image
Line drawing of a kitchen sink with a bowl and a sphere on a grater (no text or symbols)Teleskopske vodilice u pećnici police su koje se mogu produljiti, što olakšava postavljanje i uklanjanje predmeta, bez potrebe za posezanjer duboko u vruću pećnicu. Poboljšavaju sigurnost, stabilnost i mogu se postaviti na različite razine.
Dvostruki pladanj - način rada roštilja
natural_image
Diagram of a rectangular tray with internal grid pattern, no text or symbols presentnatural_image
Line drawing of a rooster on a cutting board with dough, placed inside an oven (no text or symbols)Ražanj radi zajedno s gornjim grijaćim elementom, hrana se okretanjem peče ravnomjerno. Najbolje ga je upotrebljavati za hranu srednje veličine. Idealno za ponovno otkrivanje okusa tradicionalnog pečenja.
Šarke za postupno zatvaranje / otvaranje
natural_image
Simple line drawing of a door with a circular arrow indicating airflow or motion (no text or symbols)Šarke za postupno zatvaranje i otvaranje upravljanju kretanjem vrata koja se zbog njih zatvaraju glatko, bez lupanja.
Dvostruki pladanj – PARNI način rada
natural_image
Illustration of a rectangular appliance with a grid pattern on top, placed inside a rack (no text or symbols visible)Konveksni oblik prikladan je za pečenje roštiljanje u pećnici na visokoj temperaturi (220 °), omogućujući rezultate kao na roštilju čak i koc kuće, s malo dima zahvaljujući drenažnom djelovanju masti na dnu ladice.
natural_image
Illustration of a mouse being heated by a medical device, no text or symbols presentOva sonda za meso je senzor temperature koji, kada je postavljena u hranu i povezana s pećnicom, putem kabela omogućuje upravljanje unutarnjom temperaturom hrane tijekom njene pripreme. Uglavnom se koristi za ribu i meso.
Airfry tava (samo ako je uređaj opremljen*)
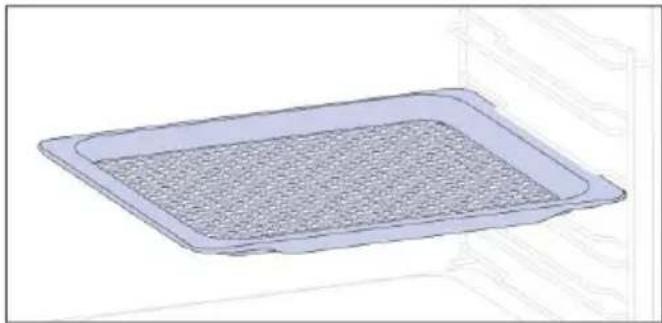
natural_image
3D rendering of a rectangular tray with a mesh pattern inside, no text or symbols visibleREGISTRACIJA NOVOG KORISNIKA
- Kliknite na „Register“ (Registriraj se)
- Možete se registrirati putem računa društvenih mreža ili se registrirati adresom osobne e-pošte


BRZA REGISTRACIJA ZA UPARIVANJE
1. korak
- Odaberite „Add appliance" (Dodaj uređaj).
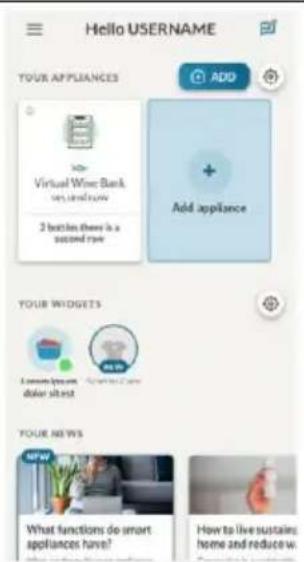
2. korak
Allow your location permission
To enhance your experience, please allow location permission to hOn app in the next step.


CONTINUE
3. korak
- Odaberite pećnicu iz kategorije uređaja.

Select your appliance category

Seizetivone appliance

Washing machine

Washer dryer

Tumble dryer

Dishwasher

Air conditionair

Air purifier

Air scanner
4. korak
Appliance connection

Turn OFF and then ON your appliance
In case you can't switch OFF your appliance, unplug (for at least 10 seconds) and then plug its power supply.

natural_image
Circular icon with a blue power button and surrounding geometric shapes, no text or symbols present.5. korak
Appliance connection
Searching your appliance
Don't turn off your Bluetooth. On app is looking for your appliance...

pie
| Time | Value | |---|---| | 00:00:40 | 40 |
May close to your appliance in order to correctly capture the signal.
Korak 6.1 - 6.2
- Odaberite kućanski uređaj, dodirnite „Connect” (Poveži se) i pričekajte nekoliko sekundi.

Appliance connection
Searching your appliance
Don't turn off your Bluetooth.

Oven


New appliance


Long appliance name to...


CONNECT
PRODUCT NOT FOUND

Appliance connection
Searching your appliance
Don't turn off your Bluetooth.

Open Connecting

New appliance


Long appliance name to...


Stay close to your appliance in order to correctly capture the signal.
7. korak
Appliance connection

Your appliance has been correctly identified!

natural_image
Simple icon of a kitchen oven inside a light green circular frame (no text or symbols)Brand Hoover
Model 31008486-7888-1824
Serial number 12345678-1234-1234
Is this your appliance?
YES IT'S MY OVEN
NO IT'S NOT
KAKO PROMIJENITI POSTAVKE WIFI MREŽE
Nakon registracije uređaja, korisnik može odabrati sljedeće postavke Wi-Fi mreže:
- WIFI ON (UKLJUČI Wi-Fi): Stanje pećnice može se pratiti samo putem aplikacije.
- WIFI OFF (ISKLJUČI Wi-Fi): Pećnica nije spojena, ali je i dalje registrirana sa spremljenim mrežnim vjerodajnicama.
-
WIFI RESET: Veza je ponovno uspostavljena i moguća je nova registracija.
-
Okrenite birač funkcija u izborniku Wi-Fi mreže.
- Na zaslonu se prikazuje „On” (Uključeno).
- Okrećite birač dok se ne prikaže „Off” (Isključeno) ili postavka za resetiranje „rSt”.
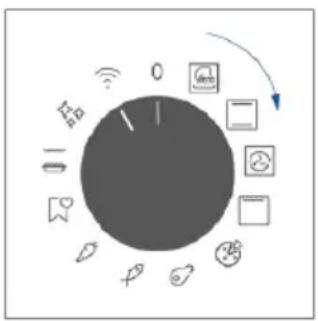
flowchart
graph TD
    A["Central knob"] --> B["Node 0"]
    A --> C["Node 1"]
    A --> D["Node 2"]
    A --> E["Node 3"]
    A --> F["Node 4"]
    A --> G["Node 5"]
    A --> H["Node 6"]
    A --> I["Node 7"]
    A --> J["Node 8"]
    A --> K["Node 9"]
    A --> L["Node 10"]
    A --> M["Node 11"]
    A --> N["Node 12"]
    A --> O["Node 13"]
    A --> P["Node 14"]
    A --> Q["Node 15"]
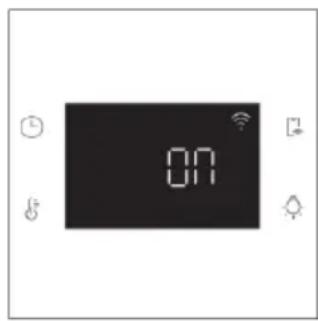
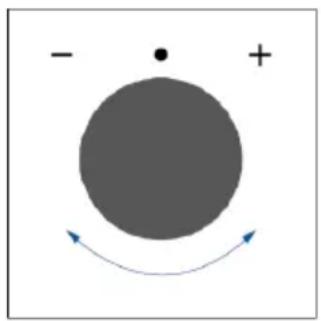
natural_image
Simple diagram with a gray circle, a dot, and a plus sign, with curved arrows indicating direction (no text or symbols)
DALJINSKO UPRAVLJANJE
Daljinsko upravljanje nudi brojne prednosti za korisnike, povećava praktičnost, učinkovitost i cjelokupno iskustvo pripreme hrane i pružaj mogućnost upravljanja proizvodom izravno s uređaja i iz aplikacije hOn
Ova funkcija omogućuje da putem uređaja uživate u raznim značajkama, kao što su: trenutno ili planirano pokretanje recepata ili programa kuhanja koji su već dostupni u aplikaciji; praćenje napretka vaših recepata u stvarnom vremenu; podešavanje korištenih parametara kuhanja; praćenje postupka kuhanja pomoću sonde; upravljanje spremljenim receptima pomoću funkcije „Jolly” na proizvodu (pogledajte odgovarajući odjeljak). Nadalje, moguće je primati obavijesti nakon završetka programa ili recepata. Daljinsko upravljanje možete aktivirati isključivo kada je proizvod registriran.
i NAPOMENA: Dostupan je za sve funkcije kuhanja na proizvodu, osim za programe Gratiniranje i Supergrill.
3. PRIJE POKRETANJA
3.1. INFORMACIJE ZA POČETAK
natural_image
Simple line drawing of a kitchen sink with a hand cleaning the interior (no text or symbols)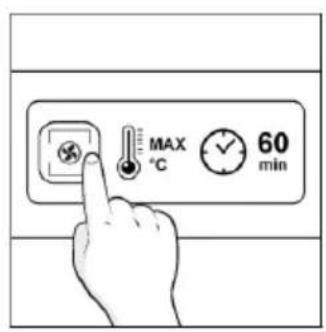

natural_image
Simple line drawing of a cabinet with swirling smoke rising, next to an open door (no text or symbols)4. UPOTREBA PROIZVODA
4.1. NAČIN RADA PROIZVODA
UKLJUČIVANJE/ISKLJUČIVANJE PEĆNICE
Za uključivanje pećnice okrenite birač funkcija (udesno/ulijevo) i odaberite program pečenja. Želite li je isključiti, postavite birač funkcija u položaj „0”.
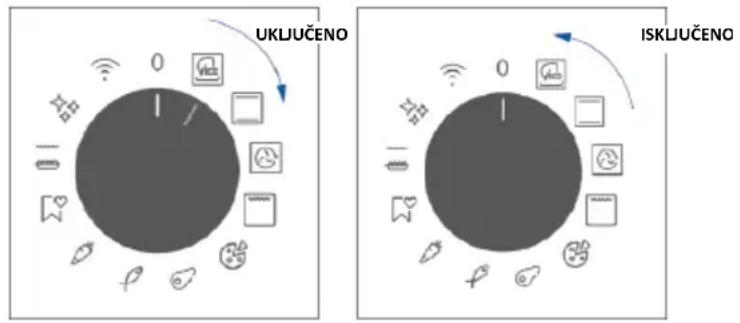
PODEŠAVANJE PROGRAMA KUHANJA
Okrenite birač funkcija i odaberite željeni program. Na zaslonu će se pojaviti zadana temperatura koja se može urediti u svakom trenutku okretanjem desnog birača (udesno za povećanje i ulijevo za smanjenje temperature).
IZBORNIK VREMENA
Pristupite izborniku vremena pritiskom na ⚠Za navigaciju dodirnite onoliko puta koliko je potrebno za unos sljedećih postavki:

i NAPOMENA: nije moguće postaviti nekoliko parametara istovremeno, stoga u memoriji ostaje samo posljednji, a prethodni se briše.

TRAJANJE KUHANJA
Omogućuje se prethodno postavljanje vremena kuhanja za odabrani recept.
AKTIVACIJA: pritisnite ⏻ za ulazak u izbornik Time (Vrijeme). Dodirnite ⏻ onoliko puta koliko je potrebno za odabir funkcije „Trajanje kuhanja”. Zatim biračem odaberite vrijednost.
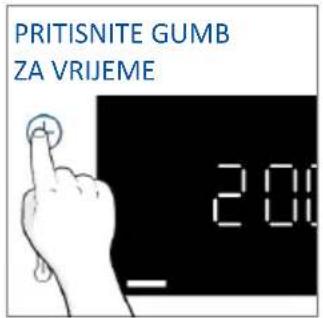
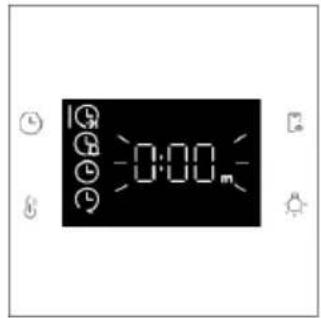
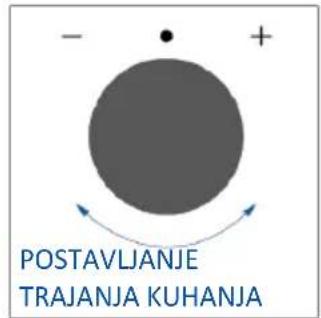
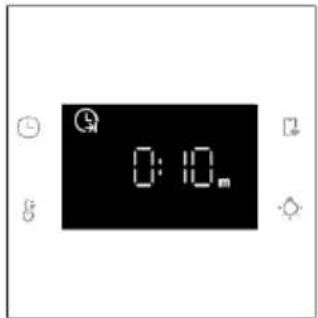
Odbrojavanje počinje po završetku zagrijavanja (ako je uređaj opremljen). Tijekom faze kuhanja moguće je promijeniti vrijednost trajanja okretanjem desnog birača. Kad istekne vrijeme trajanja, kuhanje se zaustavlja.

TAJMER
Kako podesiti funkciju Jolly:
Za podešavanje funkcije Jolly na pećnici otvorite odjeljak s receptima u aplikaciji, odaberite recept koji želite upotrijebiti i kliknite „Use As Jolly Function” (Koristi kao funkciju Jolly).
Od ovog trenutka pa nadalje, možete je pokrenuti s uređaja čak i bez interakcije s aplikacijom. Za početak kuhanja jednostavno okrenite bira funkcija na funkciju Jolly.
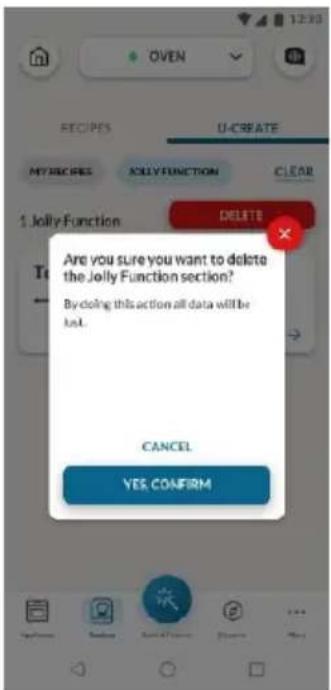
natural_image
Illustration of a medical procedure involving a rodent and pressure gauge attached to a patient's abdomen (no text or symbols)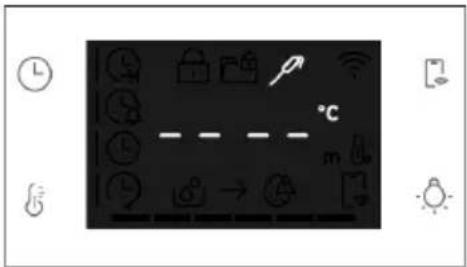
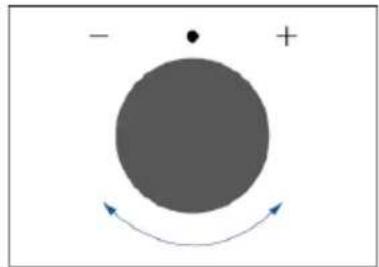
natural_image
Simple diagram with a gray circle, a dot, and a curved arrow indicating direction (no text or symbols)Na zaslonu će se prikazati ikona sonde. Kad je ova ikona aktivna, dostupne su samo određene funkcije ili programi kuhanja. Ako pokušate koristiti druge funkcije, pećnica će prikazati poruku „can't: use probe” (Nije moguće korištenje sonde).
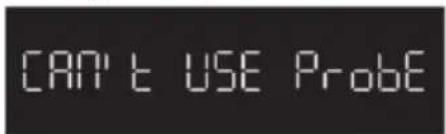
natural_image
Illustration of a medical procedure with a tool and tubing, no text or symbols presentSonda se može koristiti s ručnim funkcijama (Konvencionalna, Konvencionalna + ventilator, Roštilj, Supergrill, Gratiniranje i Više razina), s KATEGORIJAMA HRANE ZA KUHANJE (meso, riba i povrće) i s programom Gentle cooking.
| Kategorija hrane | Predložena temperatura u središtu hrane T °C | Predloženi položaj |
| Pečena govedina | 45 °C | Dijagonalno u najdebljoj piti. |
| Pečeno meso | 55 °C / 60 °C / 65 °C | Za namirnice cilindričnog oblika (npr. goveđe pečenje) postavite vrh što je moguće bliže geometrijskom središt |
| Perad | 83 - 85 °C | U najdeblji dio prsa |
| Riba (cijela/odresci) | 65 °C | Dijagonalno u najdebljem dijelu |
| Kruh/složenci | 90 °C | Blizu geometrijskog središta namirnice |
5. SMJERNICE ZA PRIPREMANJE HRANE
5.1. OPĆA TABLICA ZA PRIPREMU HRANE
| Kategorija | Recept | Br. razina | Program kuhanja | T °C | Zagrijavanje | Pribor za kuhanje | Položaj police | Vrijeme kuhanja nakon zagrijavanja * (min) |
| Slatki pekarski proizvodi | Mali kolačići / mafini | 1 | Konvencionalna na više razina | 175 °C 160 °C | Y | Ladica za pečenje Ladica za pečenje | L3 L4 | 20 - 30 30 - 40 |
| 2 | Više razina | 150 °C | Pečenje + dublje ladice | L2 + L5 | 30 - 40 | |||
| 3 | Više razina | 140 °C | Ladice za pečenje | L2 + L4 + L6 | 40 - 50 | |||
| Biskviti (26 cm ∅) | 1 | Konvencionalna na više razina | 170 °C 150 °C | Y | Metalna rešetka + kalup za kolače Metalna rešetka + kalup za kolače | L3 L4 | 30 - 40 40 - 50 | |
| 2 | Više razina | 150 °C | Metalne rešetke + kalup za kolače | L1 + L4 | 50 - 60 | |||
| Keksi | 1 | Konvencionalna na više razina | 150 °C + 150 °C | Y | Ladica za pečenje Ladica za pečenje | L3 L4 | 25 - 30 30 - 40 | |
| 2 | Više razina | 140 °C | Ladice za pečenje + dublje ladice | L2 + L5 | 30 - 40 | |||
| 3 | Više razina | 140 °C | Ladice za pečenje | L2 + L4 + L6 | 35 - 40 | |||
| Francuska peciva s punjenjem | 1 | Konvencionalna | 190 °C | Y | Ladica za pečenje | L4 | 25 - 35 | |
| 2 | Više razina | 170 °C | Ladica za pečenje | L3 | 25 - 35 | |||
| Jorkširski puding | 1 | Konvencionalna | 200 °C | Y | Ladica za pečenje | L3 | 20 - 30 | |
| Puslice | 1 | Više razina | 90 °C | Y | Ladica za pečenje | 90-160 | ||
| Macaron | 1 | Konvencionalna | 150 °C | Y | Ladica za pečenje | L3 | 15 - 20 | |
| Pita od jabuka | 1 | Konvencionalna | 185 °C | Y | Metalna rešetka + kalup za kolače | L2 | 60 - 70 | |
| 1 | Više razina | 170 °C | Y | Metalna rešetka + kalup za kolače | L4 | 65 - 75 | ||
| Tarte tatin | 1 | Konvencionalna | 170 °C | Y | Metalna rešetka + kalup za kolače | L2 | 40 - 60 | |
| Cokoladni nabujak | 1 | Konvencionalna | 200 °C | Y | Ladica za pečenje + kalupi | L3 | 10 - 15 | |
| Torta sa sirom | 1 | Konvencionalna | 150 °C | Y | Metalna rešetka + kalup za kolače | L2 | 50 - 65 | |
| Smrznuti kroasani | 1 | Konvencionalna | 180 °C | Y | Ladica za pečenje | L3 | 20 - 25 | |
| 2 | Više razina | 180 °C | Ladice za pečenje | L2 + L5 | 25 - 35 | |||
| 3 | Više razina | 160 °C | Ladice za pečenje | L2 + L4 + L6 | 30 - 40 | |||
| Savijača, smrznuta | 1 | Konvencionalna | 210 °C | Y | Ladica za pečenje | L3 | 30 - 45 | |
| Kruh i lepinja | Tostirani kruh | 1 | Supergrill | 5 | N | Metalna rešetka | L6 | 4 - 6 |
| Focaccia | 1 | Konvencionalna | 200 °C | Y | Ladica za pečenje | L2 ili L3 | 25 - 35 | |
| Kategorija | Recept | Br. razina | Program kuhanja | T °C | Zagrija-vanje | Pribor za kuhanje | Položaj police | Vrijeme kuhanja nakon zagrijavanja * (min) |
| Kruh, cijeli | 1 | Konvencionalna | 200 °C | Y | Ladica za pečenje | L3 | 35 - 50 | |
| Slane pite i složenci | Slani kolači / quichevi (∅ 26 cm) | 1 | Konvencionalna | 200 °C | Y | Metalna rešetka + plitica za quiche | L1 ili L2 | 30 - 50 |
| 2 | Više razina | 180 °C | Metalna rešetka + plitica za quiche | L1 + L4 | 50 - 70 | |||
| Nabujak od sira | 1 | Konvencionalna | 200 °C | Y | Ladica za pečenje + kalupi | L3 | 20 - 35 | |
| Lazanje, svježe | 1 | Konvencionalna | 200 °C | Y | Metalna rešetka + vatrostalna posuda | L3 | 40 - 60 | |
| Lazanje, smrznute | 1 | Konvencionalna | 180 °C | Y | Metalna rešetka + vatrostalna posuda | L3 | 50 - 60 | |
| Cannelloni, smrznuti | 1 | Konvencionalna | 180 °C | Y | Metalna rešetka + vatrostalna posuda | L3 | 45 - 55 | |
| Pečena tjestenina | 1 | Grati-niranje | 200 °C | Y | Metalna rešetka + vatrostalna posuda | L4 | 20 - 30 | |
| Pizza | Pizza, svježa (ladica) | 1 | Konvencionalna | 250 °C | Y | Ladica za pečenje | L2 ili L3 | 15 - 20 |
| Pizza, svježa (ladica) | 1 | Pizza | 250 °C | N | Ladica za pečenje | L2 ili L3 | 18 - 25 | |
| 2 | Više razina | 180 °C | Y | Ladice za pečenje + dublje ladice | L2 + L5 | 25 - 35 | ||
| Pizza, svježa (okrugla) | 1 | Konvencionalna | 300 °C | Y | Ladica za pečenje | L2 ili L3 | 8 - 10 | |
| Pizza, svježa (okrugla) | 1 | Pizza | 300 °C | N | Ladica za pečenje | L2 ili L3 | 15 - 20 | |
| 2 | Više razina | 180 °C | Y | Ladice za pečenje + dublje ladice | L2 + L5 | 30 - 40 | ||
| Pizza, smrznuta (tanka kora) | 1 | Pizza | 200 °C | N | Metalna rešetka | L2 | 10 - 15 | |
| Pizza, smrznuta (tanka kora) | 1 | Konvencionalna | 220 °C | Y | Metalna rešetka | L3 | 10 - 15 | |
| 2 | Više razina | 200 °C | Metalna rešetka | L2 + L5 | 15 - 25 | |||
| 3 | Više razina | 180 °C | Metalna rešetka | L2 + L4 + L6 | ||||
| Meso i perad | Pržena cijela piletina (1 do 1,2 kg) | 1 | Grati-niranje | 220 °C | Y | Metalna rešetka / L4, postavite ladicu za pečenje na L1 s pola šalice vode | L4 | 40 - 60 |
| Pileća batkovi | 1 | AirFry** | 220 °C | N | Airfry tava** | L4 | 30 - 50 | |
| Pečena patka | 1 | Grati-niranje | 200 °C | Y | Metalna rešetka + vatrostalna posuda | L3 | 50 - 60 | |
| Pijetao | 1 | Grati-niranje | 220 °C | Y | Metalna rešetka, postavite ladicu za pečenje na L1 | L4 | 20 - 40 | |
| Pečena puretina | 1 | Grati-niranje | 200 °C | Y | Metalna rešetka + vatrostalna posuda | L3 | 50 - 60 | |
| Kategorija | Recept | Br. razina | Program kuhanja | T °C | Zagrijavanje | Pribor za kuhanje | Položaj police | Vrijeme kuhanja nakon zagrijavanja * (min) |
| Svinjska rebra (1000-1200g) | 1 | Konvencionalna | 200 °C | Y | Metalna rešetka + vatrostalna posuda | L3 | 80 - 100 | |
| Kobasice | 1 | Supergrill | 4 | Y | Metalna rešetka | L5 | 40 - 50 | |
| Goveđi file (1000 do 1500 g) | 1 | Gentle cooking ** | 60 °C | N | Metalna rešetka + vatrostalna posuda | L3 | 60 - 80 | |
| Pečena govedina (500 g) | 1 | Gratiniranje | 220 °C | Y | Ladica za pečenje | L3 | 20 - 40 | |
| Mesna štruca (1000 do 1500 g) | 1 | Konvencionalna | 180 °C | Y | Ladica za pečenje | L3 | 40 - 50 | |
| Pečena piletina s krumpirom | 1 | Gratiniranje | 200 °C | Y | Duboka ladica | L4 | 45 - 60 | |
| Riba i morski plodovi | Morski plodovina žaru | 1 | Supergrill | 4 | N | Metalna rešetka | L5 | 15 - 30 |
| Smrznuti riblji štapići | 1 | AirFry** | 200 °C | N | Airfry tava** | L4 | 20 - 25 | |
| Pečena riba | 1 | ECO | 200 °C | N | Metalna rešetka, postavite ladicu za pečenje na L1 | L3 | 40 - 60 | |
| Povrće | Gratinirano povrće | 1 | ECO | 200 °C | N | Metalna rešetka + vatrostalna posuda | L3 | 80-90 |
| Smrznuti pomfri (300 do 500 g) | 1 | AirFry** | 220 °C | N | Airfry tava** | L4 | 18 - 25 | |
| Gratinirani krumpir | 1 | Gratiniranje | 200 °C | Y | Metalna rešetka + vatrostalna posuda | L4 | 15 - 25 | |
| Pečeni krumpir | 1 | Konvencionalna | 200 °C | Y | Ladica za pečenje | L4 | 30 - 50 |
natural_image
Line drawing of a kitchen oven with an open tray and side panel (no text or symbols)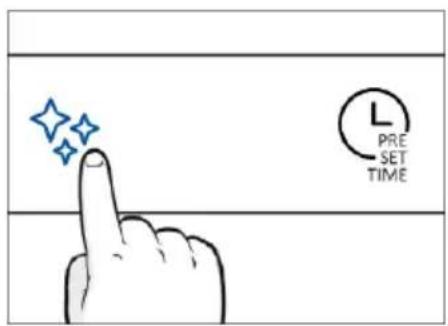

natural_image
Hand cleaning a window with a blue cloth, showing surface dust and debris (no text or symbols)H2O cleaning
Funkcija H2O cleaning dizajnirana je za lako uklanjanje lagane prljavštine, brzo je i ekološki prihvatljivo rješenje za čišćenje unutrašnjosti pećnice snagom pare.
Kako funkcionira:
- Ulijte 100 ml vode u donje udubljenje u pećnici.
- Okrenite birač na 🚗/». Ako je potrebno, okrenite birač za podešavanje programa Hydro Clean. Pričekajte da funkcija odradi svoj posao tijekom postavljenog vremena.
- Po završetku postupka čišćenja, pričekajte da se pećnica ohladi.
- Kad se uređaj ohladi, očistite unutarnje površine pećnice krpom.
- ▲ UPOZORENJE: Provjerite je li se uređaj ohladio prije nego ga dodirnete. Vodite računa o svim vrućim površinama jer postoji opasnost od opeklina. Koristite destiliranu ili pitku vodu.

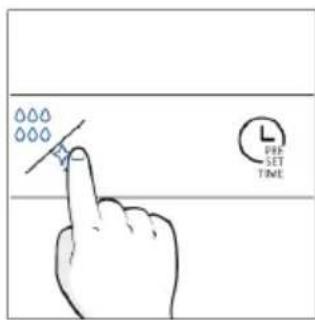


natural_image
Hand cleaning a window with a blue cloth, showing dust and spray (no text or symbols)Katalitičko čišćenje
Katalitičke ploče oblažu pećnicu i pružaju vam luksuz da se ne morate boriti s prljavom pećnicom. Ploče su obložene specijaliziranim emajlom koji se diči mikroporoznom strukturom, vještom u apsorpciji masnih ostataka prskanja.
Katalitičkom kemijskom reakcijom učinkovito pretvaraju apsorbiranu mast u plinovite elemente kada su izloženi visokim temperaturama.
natural_image
Line drawing of an oven with a rack and door, showing internal structure without any text or symbols

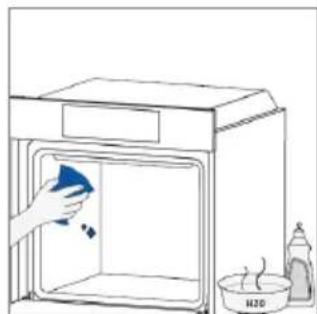
natural_image
Line drawing of a kitchen sink with a hand cleaning it, and a bottle nearby (no text or symbols)6.2.2. VANJSKE POVRŠINE PEĆNICE: uklanjanje i čišćenje staklenih vrata
- Postavite vrata na 90°. Zakrenite jezičke za zaključavanje šarke tako da su okrenuti od pećnice.

natural_image
Line drawing of a cabinet with two hands operating it, no text or symbols present
natural_image
Pure technical diagram showing a mechanical component with a blue arrow indicating downward motion (no text or symbols)2.
natural_image
Simple line drawing of a tilted rectangular object with directional arrows indicating movement or force (no text or symbols)- VPOZORENJE: Vanjsko staklo ne može se ukloniti.
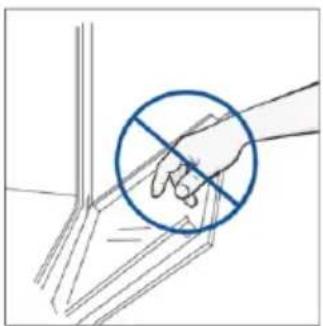
natural_image
Hand holding a diagonal line with a blue circle highlighting the intersection of two lines (no text or symbols present)- Očistite staklo mekom krpom i odgovarajućim sredstvima za čišćenje.

natural_image
Illustration of a hand cleaning a tiled surface with a blue cloth, water being washed in a beaker labeled H₂O (no text or symbols on the main subject)natural_image
Technical line drawing of a structural bracket with arrows indicating direction (no text or symbols)- Zatim vratite vrata na 90° i zakrenite jezičke za zaključavanje šarki tako da gledaju prema unutrašnjosti pećnice.
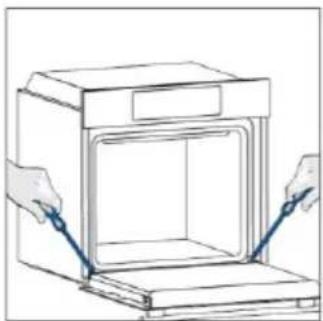
natural_image
Line drawing of a cabinet with two hands inserting a tool into the opening (no text or symbols)
natural_image
Pure technical line drawing of a mechanical component with a blue tool, no text or symbols present6.3. ČIŠĆENJE PRIBORA
Nakon svake upotrebe temeljito očistite pribor i osušite ga ručnikom. Tvrdokorne je ostatke na priboru pribora možda najbolje namočiti u mješavini vode i sapuna otprilike 30 minuta prije drugog pranja.
ČIŠĆENJE BOČNIH REŠETKI:
- Model sa 6 razina
- Uklonite bočne rešetke povlačenjem u smjeru strelica.
- Žičane rešetke prilikom čišćenja stavite u perilicu posuđa ili upotrijebite mokru spužvu, a zatim ih obavezno osušite.
- Nakon čišćenja postavite bočne police obrnutim redoslijedom.
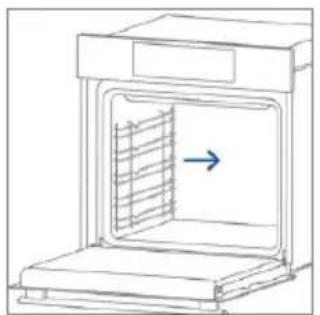
natural_image
Line drawing of an oven with a vent and airflow direction arrow (no text or symbols)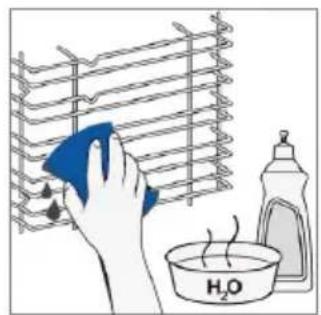

natural_image
Line drawing of an oven with a blue arrow indicating a ventilation grille (no text or symbols)- Model sa 7 razina
- Uklonite bočne nosače tako što ćete prvo povući prednji dio u smjeru strelice i odvojiti stražnji dio od vijaka.
- Žičane rešetke prilikom čišćenja stavite u perilicu posuđa ili upotrijebite mokru spužvu, a zatim ih obavezno osušite.
- Nakon čišćenja postavite bočne police obrnutim redoslijedom: postavite stražnji dio između vijaka i gurnite prednji dio u smjeru strelice.
6.4. ODRŽAVANJE
ZAMJENA DIJELOVA
- korak

natural_image
Hand holding a paper with a blue checkmark inside an open box (no text or symbols visible)- korak

natural_image
Hand holding a circular object inside an open appliance (no text or symbols visible)- korak
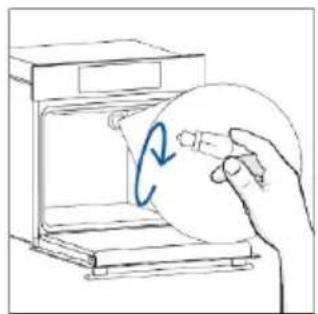
natural_image
Hand holding a circular object inside a kitchen appliance (no text or symbols visible)- korak

natural_image
Hand holding a circular object above an open oven with a blue circular arrow indicating rotation (no text or symbols)- korak

- korak
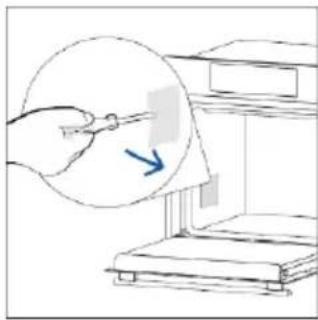
natural_image
Illustration of a hand holding a pen near a document with an arrow, next to a bookshelf (no text or symbols)- korak

natural_image
Illustration of a hand inserting a small object into a device inside a circular frame, with no visible text or symbols.- korak
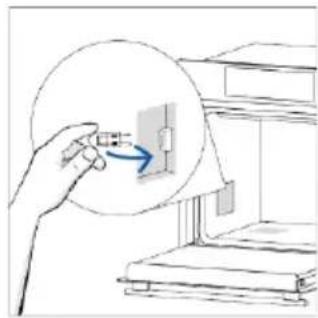
natural_image
Illustration of a hand holding a small electrical component inside a circular frame, with no visible text or symbols.- korak

natural_image
Simple line drawing of a cabinet or rack with an inset magnified view showing a wall-mounted fixture (no text or symbols)- korak

8. ZAŠTITA OKOLIŠA I ZBRINJAVANJE
8.1. ZBRINJAVANJE UREĐAJA

Ovaj uređaj označen je u skladu s Direktivom 2012/19/EZ o otpadnoj električnoj i elektroničkoj opremi (OEEO). Otpadna električna i elektronička oprema sadrži onečišćujuće tvari (koje mogu imati negativan učinak na okoliš) i bazne elemente (koji se mogu ponovno upotrijebiti). Važno je posebno obraditi otpadnu električnu i elektroničku opremu da bi se ispravno uklonili i odložili onečišćivači i vratili svi materijali. Pojedinci mogu imati važnu ulogu u postizanju cilja da otpadna električna i elektronička oprema ne postane ekološki problem. Treba se pridržavati nekoliko osnovnih pravila:

VELKOMMEN
natural_image
Empty white rectangle with black border (no text or symbols)Skriv dit serienummer her til fremtidig reference.
2.2. TILBEH∅R
natural_image
Line drawing of a two-tiered storage bed with horizontal racks (no text or symbols)natural_image
3D diagram of a rectangular tray with internal compartments, no text or symbols presentnatural_image
3D wireframe diagram of a rectangular tray or container with internal compartments (no text or symbols)natural_image
Line drawing of a kitchen sink with a bowl and a sphere on a grater (no text or symbols)natural_image
Diagram of a rectangular tray with internal grid pattern, no text or symbols presentnatural_image
Line drawing of a rooster on a tray with dough, placed inside an oven (no text or symbols)natural_image
Simple line drawing of a window with a circular arrow indicating airflow or motion (no text or symbols)natural_image
Illustration of a rectangular appliance with a grid pattern on top, placed inside a rack (no text or symbols visible)natural_image
Illustration of a mouse being fed with a syringe and a probe, no text or symbols presentnatural_image
3D rendering of a rectangular tray with a mesh pattern inside, placed on a shelf (no text or symbols visible)REGISTRERING AF NY BRUGER
- Klik på "Registrer"
- Du kan registrere dig via dine SoMe-konti eller tilmelde dig med din personlige e-mailadresse

TILMELDING TIL HURTIG PARRING
Trin 1
Trin 2
- Tillad geolokation.

Allow your location permission
I do enhance your experience, please allow location permission to hOn app in the next step.


CONTINUE
Trin 3
Select your appliance category

Seizetivone appliance

Washing machine

Washer dryer

Tumble dryer

Dishwasher

Air conditionair

Air purifier

Air scanner
Trin 4
Appliance connection

Turn OFF and then ON your appliance
In case you can't switch OFF your appliance, unplug (for at least 10 seconds) and then plug its power supply.

natural_image
Circular icon with a blue power button and surrounding icons, no text or symbols present.Trin 5
Appliance connection
Searching your appliance
Don't turn off your Bluetooth. hOn app is looking for your appliance...

pie
| Time | Value | |---|---| | 00:00:40 | 40 |
May close to your appliance in order to correctly capture the signal.
Trin 6.1-6.2
Appliance connection
Searching your appliance
Don't burn-off your Bluetooth.

Oven


New appliance


Long appliance name to...


CONNECT
PRODUCT NOT FOUND

Appliance connection
Searching your appliance
Don't turn off your Bluetooth.

Oven
Converting

New appliance


Long appliance name to...


Stay close to your appliance in order to correctly capture the signal.
Trin 7
Appliance connection

Your appliance has been correctly identified!
Brand Hoover
Model 31008486-7888-1824
Serial number 12345678-1234-1234
Is this your appliance?
YES!S MY OVEN
NO IT'S NOT
SÅDAN AENDRES WI-FI-INDSTILLINGERNE
flowchart
graph TD
    A["Central Device"] --> B["Smart glasses"]
    A --> C["App icon"]
    A --> D["Mobile phone icon"]
    A --> E["Desktop icon"]
    A --> F["Camera icon"]
    A --> G["Neural network icon"]
    A --> H["Data card icon"]
    A --> I["User interface icon"]


natural_image
Simple diagram with a gray circle, plus sign, and curved arrows indicating direction (no text or symbols)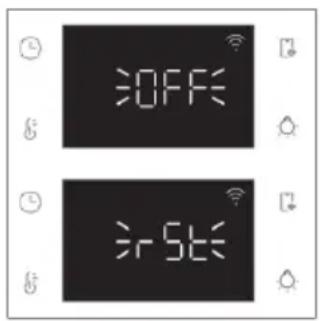
FJERNBETJENING
3. INDEN DU STARTER
3.1. OPLYSNINGER FOR AT BEGYNDE
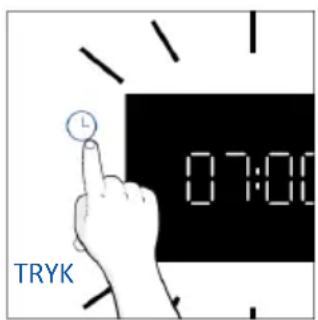
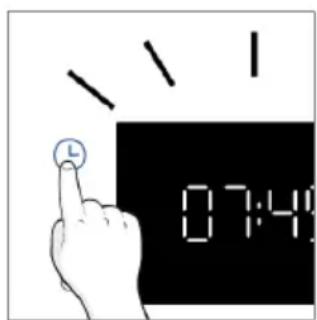
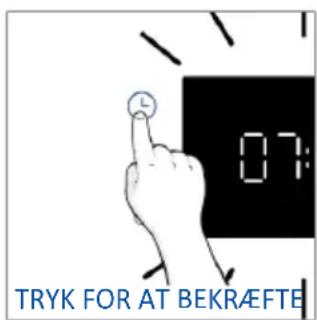
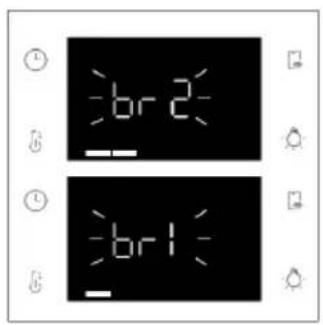
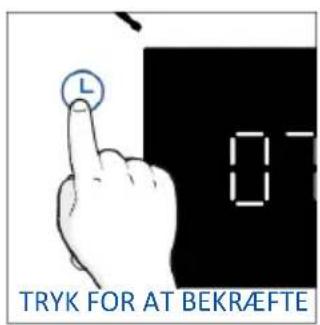
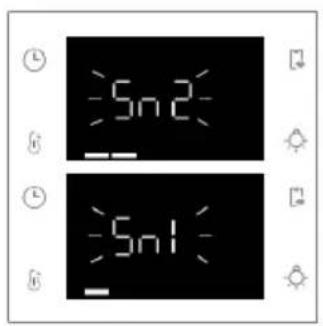
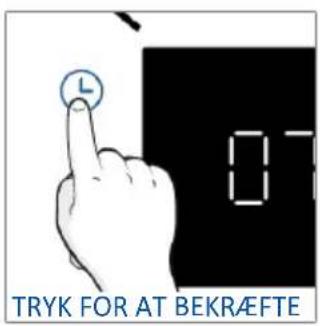
natural_image
Line drawing of a kitchen sink with a hand cleaning the interior, next to a washing bottle and a bowl (no text or symbols)
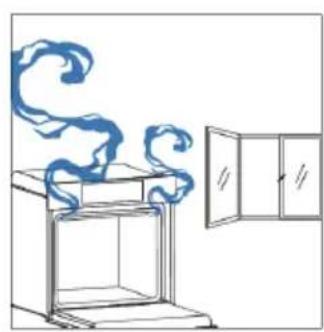
natural_image
Simple line drawing of a cabinet with swirling smoke rising from the top, next to an open door (no text or symbols)4. BETJENING AF PRODUKTET
4.1. SÅDAN VIRKER PRODUKTET
TÆND/SLUK FOR OVNEN
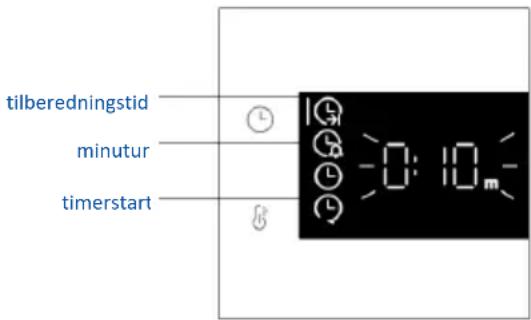
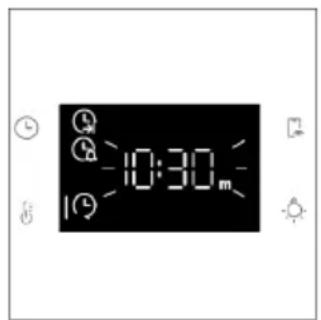
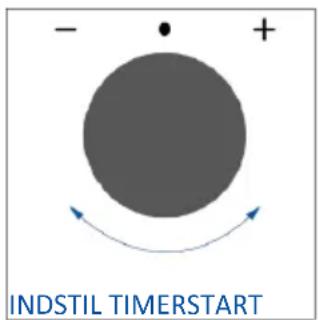
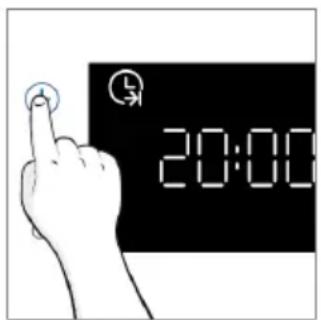

natural_image
Line drawing of a medical procedure involving a mouse on a tray with a probe and pressure gauge (no text or symbols)
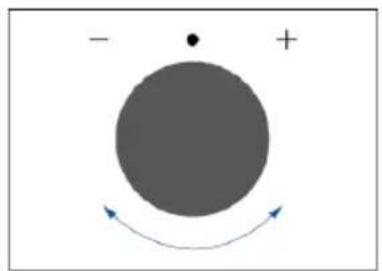
natural_image
Simple diagram with a gray circle, a dot, and a plus sign, with curved arrows indicating direction (no text or symbols)natural_image
Medical catheter device with attached tubing and bulbous body (no text or symbols)natural_image
Line drawing of an oven with a rack and vent, showing internal structure without any text or symbols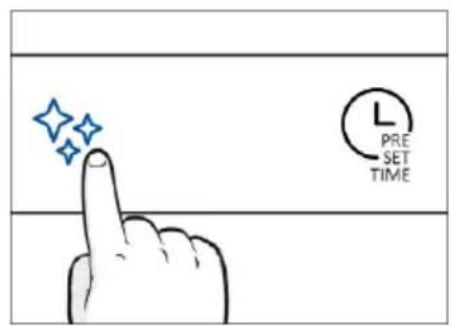

natural_image
Hand cleaning a window with a blue cloth (no text or symbols visible)H2O Clean

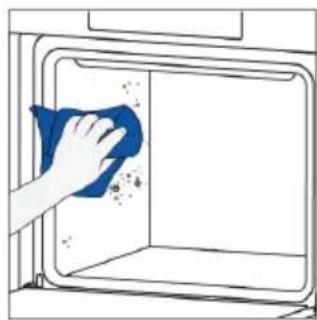
natural_image
Hand cleaning a window with a blue cloth, no text or symbols visibleKatalyserengøring
natural_image
Line drawing of an oven with a rack and vent, showing internal structure without any text or symbols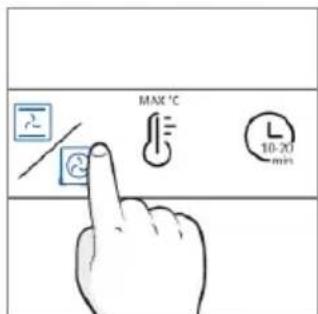


natural_image
Line drawing of a kitchen sink with a hand cleaning the interior (no text or symbols)natural_image
Line drawing of a cabinet with two hands operating it, no text or symbols present
natural_image
Pure technical diagram showing a mechanical component with a blue arrow indicating downward motion (no text or symbols)natural_image
Simple line drawing of a tilted rectangular object with directional arrows indicating movement (no text or symbols)natural_image
Illustration of a hand holding a diagonal line against a vertical wall, with a blue circle highlighting the intersection area (no text or symbols present)natural_image
Pure technical line drawing of a mechanical component with no text or symbols
natural_image
Line drawing of a cabinet with two hands inserting a tool into the opening (no text or symbols)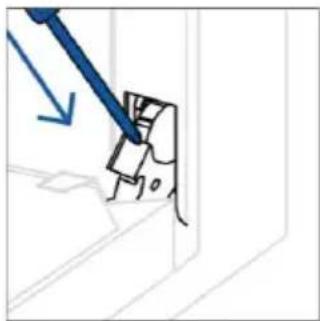
natural_image
Simple line drawing of a mechanical component with a blue tool and downward arrow, no text or symbols present.6.3. RENG∅RING AF TILBEH∅R
RENG∅RING AF SIDESKINNERNE:
- Model med 6 niveauer
natural_image
Line drawing of an oven with a vent and airflow direction arrow (no text or symbols)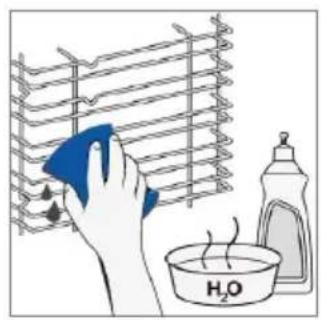

natural_image
Line drawing of an oven with a blue arrow indicating airflow or heat transfer (no text or symbols)- Model med 7 niveauer
Trin 2
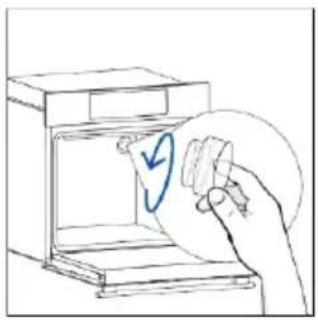
natural_image
Hand holding a paper with a circular arrow inside an open box (no text or symbols)Trin 3

natural_image
Hand holding a circular object inside a device (no text or symbols visible)Trin 4

natural_image
Hand holding a circular object inside a kitchen appliance (no text or symbols visible)Trin 5

natural_image
Hand placing a circular object into an oven with a blue arrow indicating rotation (no text or symbols)Trin 6
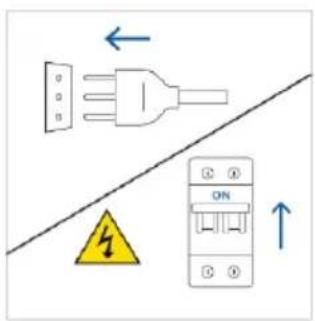
Trin 2

natural_image
Illustration of a hand holding a pen over a document inside a storage cabinet (no text or symbols visible)Trin 3

natural_image
Illustration of a hand inserting a small object into a device inside a circular frame, with no visible text or symbols.Trin 4

natural_image
Hand holding a device with an arrow pointing to a wall-mounted component, next to stacked books (no text or symbols visible)Trin 5

natural_image
Simple line drawing of a cabinet or rack with an inset magnified view showing a wall-mounted fixture (no text or symbols)Trin 6

8.1. BORTSKAFFELSE AF APPARATET


TERVETULOA
4.1. MITEN TUOTE TOIMII
4.2. KYPSENNYSTOIMINNOT
4.2.1. VAKIOTOIMINNOT
4.2.2. ERIKOISTOIMINNOT
5. RUOANVALMISTUSOHJEET
5.1. YLEISET ASETUKSET
5.2. EVERYDAY COOKING -TAULUKKO
6. HOITO JA PUHDISTUS
natural_image
Empty white rectangle with a thin black border (no text or symbols)natural_image
Line drawing of a two-tiered dormer bed with horizontal bars and a flat top (no text or symbols)natural_image
3D wireframe diagram of a rectangular tray or container with internal compartments, placed on a shelf (no text or symbols)natural_image
Simple line drawing of a rectangular tray or container with internal compartments (no text or symbols)natural_image
Line drawing of a kitchen sink with a bowl and a sphere on a rack (no text or symbols)natural_image
Line drawing of a rectangular tray with a patterned lid and internal striped pattern (no text or symbols)natural_image
Line drawing of a roasted chicken on an induction tray inside a kitchen (no text or symbols)natural_image
Simple line drawing of a door with a circular arrow indicating airflow or motion (no text or symbols)natural_image
Line drawing of a rectangular appliance with internal grating and lid, placed inside a kitchen appliance (no text or symbols)natural_image
Illustration of a mouse being heated by a medical or laboratory device, with no visible text or symbolsnatural_image
3D rendering of a rectangular tray with a mesh pattern inside, placed on a shelf (no text or symbols visible)UUDEN KÄYTTÄJÄN REKISTERÖINTI
NOPEA PARILIITOS
Vaihe 1
Vaihe 2
Allow your location permission
I do enhance your experience, please allow location permission to hOn app in the next step.


CONTINUE
Vaihe 3
Select your appliance category

Search your appliance

Washing machine

Washer dryer

Tumble dryer

Dishwasher

Air conditionair

Air purifier

Air scanner
Vaihe 4
Appliance connection

Turn OFF and then ON your appliance
In case you can't switch OFF your appliance, unplug (for at least 10 seconds) and then plug its power supply.

natural_image
Circular icon with a blue power button and surrounding icons, no text or symbols present.Vaihe 5
Appliance connection
Searching your appliance
Don't turn off your Bluetooth. hOn app is looking for your appliance...

pie
| Time | Value | |---|---| | 00:00:40 | 40 |
May close to your appliance in order to correctly capture the signal.
Vaihe 6.1-6.2
Appliance connection
Searching your appliance
Don't burn-off your Bluetooth.

Oven


New appliance


Long appliance name to...


CONNECT
PRODUCT NOT FOUND

Appliance connection
Searching your appliance
Don't turn off your Bluetooth.

Own Convesting

New appliance


Long appliance name to...


Stay close to your appliance in order to correctly capture the signal.
Vaihe 7
Appliance connection

Your appliance has been correctly identified!

Brand Hoover Model 31008486-7888-1824
Serial number 12345678-1234-1234
Is this your appliance?
YES!S MY OVER
NO IT'S NOT

NÄIN MUUTAT WIFI-ASETUKSIA
natural_image
Simple diagram with a gray circle, a dot, and a plus sign, with curved arrows indicating direction (no text or symbols)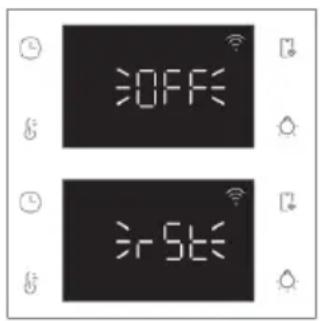

ETÄOHJAUS
3. ENNEN ALOITTAMISTA
3.1. KÄYNNISTYSTÄ KOSKEVAT TIEDOT
natural_image
Simple line drawing of a kitchen sink with a hand cleaning the interior and a bowl of water nearby (no text or symbols)
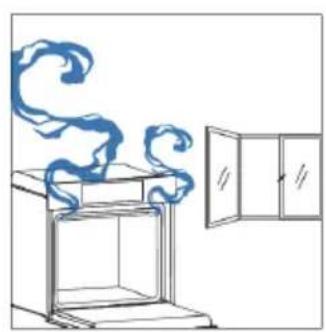
natural_image
Simple line drawing of a cabinet with swirling smoke rising from the top, next to an open door (no text or symbols)4. TUOTTEEN TOIMINTA
4.1. MITEN TUOTE TOIMII
UUNIN KYTKEMINEN PÄÄLLE/POIS PÄÄLTÄ
4.2. KYPSENNYSTOIMINNOT
NOPEA ESILÄMMITYSVAIHTOEHTO
4.2.2. ERIKOISTOIMINNOT

natural_image
Line drawing of a medical procedure involving a tool and pressure gauge on a patient's abdomen (no text or symbols)