
SENSIXX B25L - Iron BOSCH - Free user manual and instructions
Find the device manual for free SENSIXX B25L BOSCH in PDF.
User questions about SENSIXX B25L BOSCH
0 question about this device. Answer the ones you know or ask your own.
Ask a new question about this device
Download the instructions for your Iron in PDF format for free! Find your manual SENSIXX B25L - BOSCH and take your electronic device back in hand. On this page are published all the documents necessary for the use of your device. SENSIXX B25L by BOSCH.
USER MANUAL SENSIXX B25L BOSCH
natural_image
Close-up of a modern stainless steel air conditioner with a glass handle and cooling fan (no visible text or symbols)
natural_image
Line drawing of a vintage telephone handset and antenna (no text or symbols)
natural_image
Line drawing of a decorative object resembling a bottle with a bow and pedestal, accompanied by a small figure (no text or symbols)B25L / TDS25..
text_image
Technical diagram of a toaster with numbered parts for identification and assembly reference.TDS 2510
TDS 2515
TDS 2530
text_image
13 5 14 15 16TDS 2520
TDS 2540
TDS 2545
text_image
14 15 13 5 16TDS 2540
TDS 2545

text_image
Technical diagram showing exploded view of a EV charger with labeled parts including plug, cable, and connector components.A
natural_image
Illustration of three different cleaning or cleaning methods for a food appliance, showing step-by-step assembly (no text or symbols present)B

natural_image
Illustration of two iron iron machines, one with a handle and label '15', shown from different angles (no text or symbols on the devices themselves)C
natural_image
Two views of a mechanical device with labeled parts (15), no text or symbols presentD
natural_image
Two views of a steam iron with labeled parts (12), shown from different angles (no text or symbols on the device itself)E

text_image
°C ~ 2 h.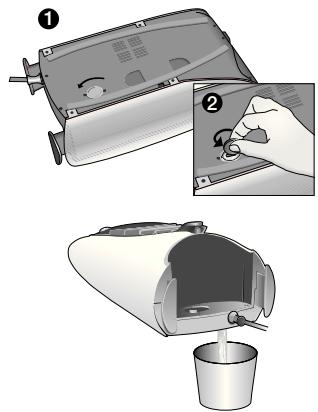
natural_image
Illustration of a kitchen blender being poured into a cup, with step-by-step instructions showing the process (no text or symbols present)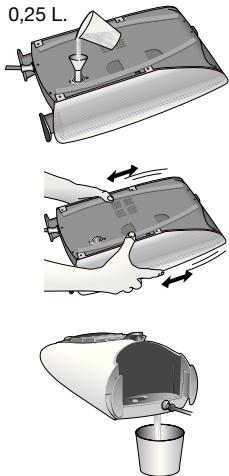
text_image
0,25 L.x2
text_image
Diagram showing a hand pressing a button on a device with two labeled steps (① and ②) indicating rotation or adjustment.This appliance has been designed exclusively for domestic use and must not be used for industrial purposes.
Carefully read through the operating instructions for the appliance and safeguard them for future reference.
Introduction
Thank you for buying the B25L steam station, the new steam-ironing system from Bosch. Please read these instructions for use. They contain valuable information about the unique features of this system and some hints to make ironing easier for you.
This powerful system produces non-stop steam for an ideal ironing performance. It has a large detachable water tank that can be refilled at any time without switching off the system. We hope that you enjoy ironing with this steam station.
Important
Read these instructions for use carefully before using the appliance and save them for future reference.
Open out the first page of the booklet, this will help you to understand how the appliance works.
This appliance complies with international safety standards.
General safety instructions
- Before plugging the appliance into the mains, check that the voltage corresponds to that stated on the characteristics plate. This appliance must be connected to an earthed socket. If using an extension cable, make sure that it has a 10 A bipolar socket with an earth connection.
- This appliance must only be used only for the purposes for which it was designed, i.e. as an iron. Any other use will be considered improper and consequently dangerous. The manufacturer will not be held responsible for any damage arising from misuse or improper use.
- The electrical plug must not be removed from the socket by tugging on the cable.
- Do not leave the appliance exposed to weather conditions (rain, sun, frost, etc.).
- Do not leave the iron unattended while it is plugged in.
- The mains cable on this appliance must not be replaced by the user. If the cable becomes damaged or needs to be replaced, this must
only be done at an authorised Technical Service Centre.
- Never immerse the iron or steam tank in water or any other liquid.
- The appliance must never be placed under the tap to fill it with water.
- Remove the plug from the socket before filling the appliance with water or before pouring out the remaining water after use.
- Keep the appliance out of children's reach.
- This appliance is not intended to be used by persons (including children) with reduced physical, sensory or mental capacities, or lack of experience and knowledge, unless they have been given supervision or instruction.
Children should be supervised to ensure that they do not play with the appliance.
- This appliance reaches high temperatures and produces steam during use, this could cause scalds or burns.
- If the safety fuse fitted in the appliance blows the appliance will be rendered inoperative. To restore normal operation the appliance will have to be taken to an authorised Technical Service Centre.
- Never aim the steam at people or animals.
- The appliance must be used and placed on a stable surface, when placed on its support, make sure that the surface on which the support stands is stable.
- Do not use the iron if it has been dropped, shows visible signs of damage or if it is leaking water. It will have to be checked by an authorised technical service centre before it can be used again.
- Do not allow the cord to come into contact with the soleplate when it is hot.
Description
- Removable water tank
- Removable iron pad
- Variable steam control
- Illuminated Start/Stop button for steam generator
- Steam hose
- Illuminated main power On/Off button
- "Steam ready" pilot light
- "Water empty" pilot light
- Housing with internal steam generator
- Mains plug
en
- Mains cable with storage facility
- Cord clip
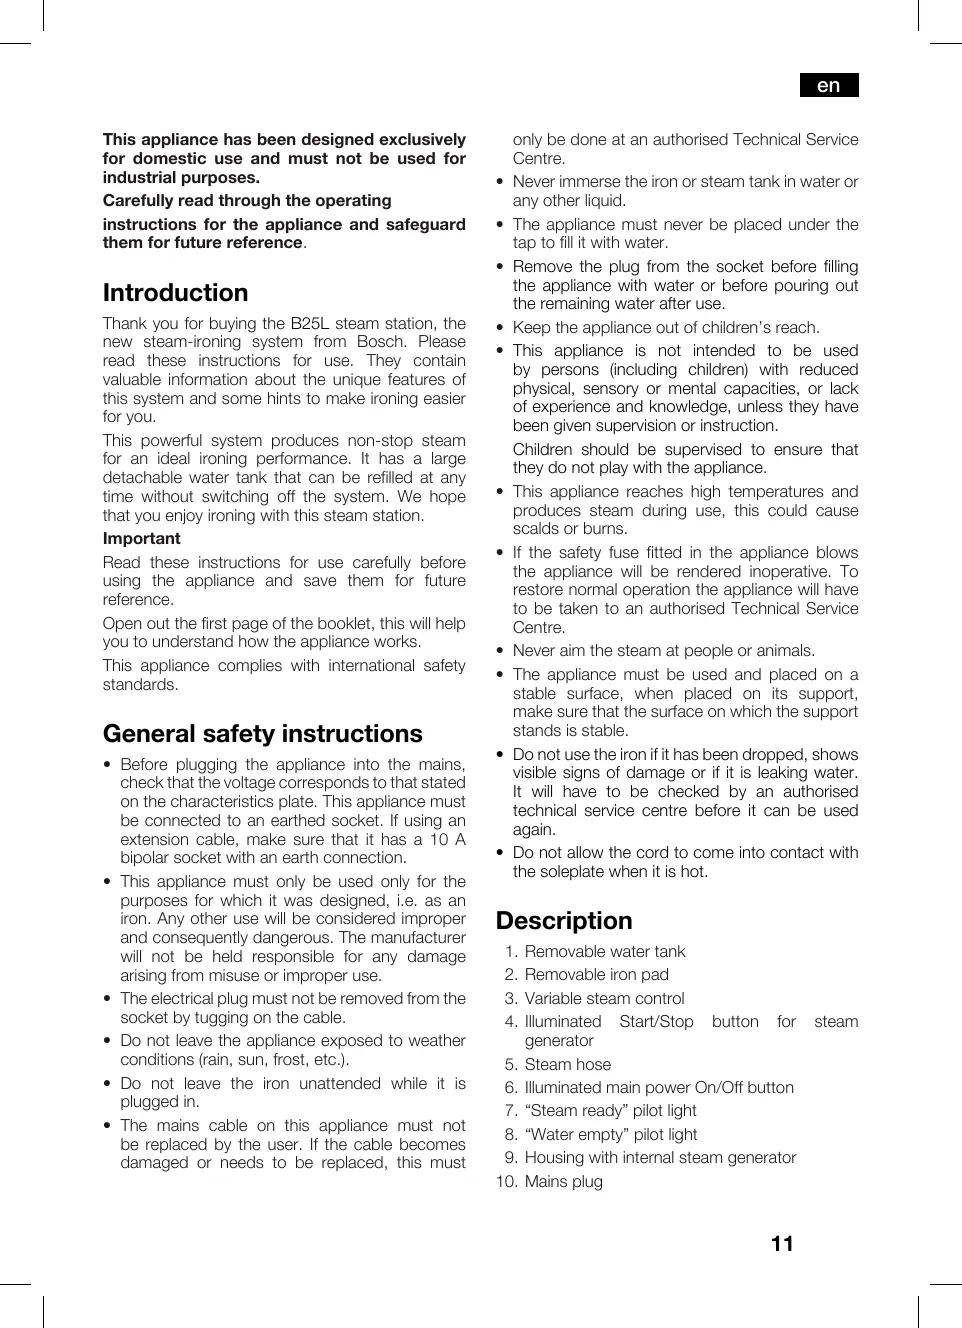
- Temperature dial
- Iron pilot light
- Steam release button
- Soleplate
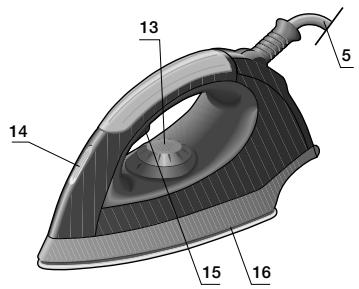
- Steam gun
- Steam release button
- Steam concentrator
- Brush extension
- Diffuser extension
- Accessorie box
- Protection cap
- Slot position for connection
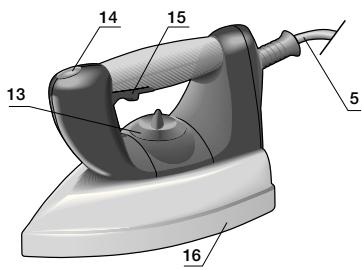
Preparations (A)
- Remove any label or protective covering from the soleplate.
- Place the appliance horizontally on a solid, stable surface. You may remove the iron pad from the appliance and place the iron on it on another solid, stable, horizontal surface.
- Remove the detachable water tank and fill it, making sure not to pass the level mark.
- Fit the water tank back onto the steam tank.
- Unwind the mains cable fully and plug it into an earthed socket.
- Set the boiler «Start/Stop» button (4) and main power «On/Off» button (6) switches to the «Start/On» position.
- The green «steam ready» indicator lamp (7) will light up after approximately 5 minutes, indicating that the appliance is ready to use.
- This appliance has a built-in water level sensor. The red «refill water tank» indicator (8) will light when the water tank is empty.
Important:
• Normal tap water can be used.
To prolong the optimum steam function, mix tap water with distilled water 1:1. If the tap water in your district is very hard, mix tap water with distilled water 1:2.
You can inquire about the water hardness with your local water supplier.
- The water tank can be filled at any time while using the appliance.
- To avoid damage and/or contamination of the water tank, do not put perfume, vinegar, starch,
descaling agents, additives or any other type of chemical product into the water tank.
- The iron pad (2) can be placed into the specially designed recess on the appliance or somewhere suitable alongside the ironing area.
Never rest the iron on the appliance without the iron pad!.
- During it first use the iron may produce certain vapours and odours, along with white particles on the soleplate, this is normal and it will stop after a few minutes
- While the steam release button is pressed, the water tank may produce a pumping sound, this is normal, indicating that water is being pumped to the steam tank.
Setting the temperature
- Check the ironing instruction label on the garment to determine the correct ironing temperature.
- Select the temperature (13)
«●» Synthetics
«●●» Silk – Wool
«●●●» Cotton – Linen
- The indicator lamp (14) will remain lit while the iron is heating and go out as soon as the iron has reached the selected temperature.
Tips:
- Sort your garments out based on their cleaning symbol labels, always starting with clothes that have to be ironed at the lowest temperatures.
- If you are not sure what the garment is made of then begin ironing at a low temperature and decide on the correct temperature by ironing a small section not usually seen when worn
Ironing with steam (B)
- Make sure that there is enough water in the water tank
- Turn the temperature selector to the steam position, between «●●» and «max».
- Set the amount of steam to suit your needs, using the variable steam control (3)
- Press the steam release button to release steam (15)
Important:
- The steam hose may get hot if you are ironing for long periods.
Ironing without steam
- Begin ironing but without pressing the steam release button (15).
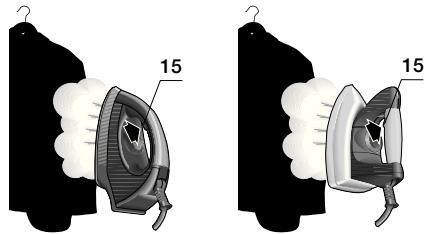
Vertical steam (C)
- Set the temperature control to the «●●●» or «max» position.
- You can steam iron curtains and hanging garments (jackets, suits, coats...) by placing the iron in a vertical position and pressing the steam release button (15).
Stain remover steam gun
Preparation: (only for TDS2540, TDS2545)
Ensure that the appliance is not connected to the mains. Remove connection plug for the iron (5) if this is connected. Then lift the cover (23) and insert the connection plug for the steam gun in the correct position - with slot (22) to the left - Then follow the same steps as for ironing, the indicator lights and switches operate in exactly the same way.
Important:
When the gun is being used, while pushing Steam release button (18), there might be some water drops, but this is normal.
Attention
- Use the steam gun in intervals of no longer than 10 seconds at a time.
- Direct the first steam jets towards a cloth in order to eliminate any possible water condensation residue from the steam tube.
- Never direct the steam jet at garments that are being worn by people or animals.
- Do not use the brush extension for delicate fabrics such as silk or cashmere.
To refresh fabrics
Refreshing garments with the steam gun can lessen creases and wrinkles, although this does not substitute ironing with the iron.
For better results, hang the clothes which you would like to refresh on hangers.
With diffuser (21) the sprayed steam enables superficial fabric creases to be lessened.
Fully insert the accesory into the concentrator (19). Press the steam release button (18) for the steam supply and direct the jet towards the fabric that you would like to refresh. Maintain a minimum distance of 10 cm to avoid getting the fabric too damp.
To remove fabric stains
The steam gun can help to remove washable, fresh stains.
The concentrator (19) and brush extension (20) supply a concentrated jet of steam that makes it possible to remove certain types of fabric stains
- If the stain is not fresh, the garment should be washed in a washing machine or hand-washed according to the garment care label.
- For stubborn or non-washable stains, take the garment to a specialist cleaning centre or dry cleaners.
Use the concentrator (19) to direct the steam jet at the stain, in direction from the outer side of the garment into the fabric placing a sponge or cloth underneath it to absorb the dirt. The brush extension (20) can also be used with gentle action to support the cleaning effect.
If the above does not solve the problem, get in touch with an authorised technical service centre.
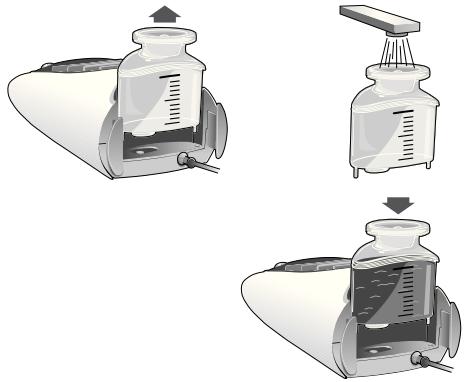
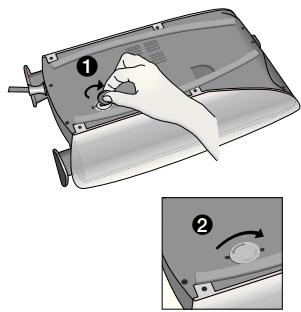
«Calc'n clean» (E)
Cleaning the Boiler
To extend the life of your steam generator and to avoid any build up of scale, it is essential that you rinse out the boiler after several hours of use. If your water is hard, increase the frequency.
Do not use descaling agents for rinsing out the boiler, as they could damage it.
- Check that the appliance is cold and unplugged for more than 2 hours, and that the removable water tank (1) is empty.
- Place your appliance on the edge of your kitchen sink.
- Unscrew the boiler drainage plug located on the bottom of the appliance using a coin.
- Holding your steam generator in upside down position, and using a jug, fill the boiler (in the base unit) with 1/4 litre of water
- Shake the base unit for a few moments and then empty it completely over a sink or bucket. To obtain the best result, we recommend that this operation is done twice
- Important: before re-closing, make sure no water remains in the boiler.
- Replace and tighten up the boiler drainage plug with a coin
Cleaning & Maintenance
- After ironing, pull out the plug and allow the appliance to cool down before cleaning.
- Wipe the housing, handle and iron body with a damp cloth.
- If the soleplate is soiled with dirt or scale, clean it with a damp cloth.
- Never use abrasive products or solvents.
Important:
- Always unplug the appliance from the mains supply before carrying out any cleaning or maintenance operation on it.
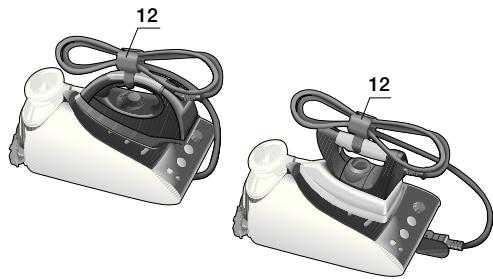
Storing the appliance (D)
- Always allow the appliance to cool down before storing it.
- Set the switches for main power and steam boiler to the «Off/Stop» position and disconnect the connection.
- Place the iron on the iron pad, standing on the soleplate.
- Empty the water tank and store the mains cable on the cord rewind facility. Tidy the steam hose on the handle of the iron using the cord clip provided (12). Do not wrap the cords too tight.
Trouble shooting
| Problem | Possible causes | Solution |
| The steam generator does not come on. | There is a connection problem.The steam tank and/or main power button is not switched on. | Check the mains cable, the plug and the socket.Press the buttons for main power (6) and steam tank (4) «On/Start». |
| The iron does not heat up. | The main power button is not switched on.The temperature control knob is set to the «min» position. | Press the main power button (6) «On».Set the temperature control knob (13) to the desired position. |
| The iron begins to smoke when switched on. | During first use: Certain components on the appliance have been lightly greased at the factory and may produce a little smoke when initially heated.During later use: the soleplate may be soiled. | This is completely normal and will stop after a short while.Clean the soleplate according to the cleaning instructions in this manual. |
| Water flows through the holes on the sole plate. | The steam function is being used before it has reached temperature.The water is condensing inside the pipes because steam is being used for the first time or has not been used for a long time. | Reduce the steam flow when ironing at low temperatures (Variable steam control (3)).Point the iron away from the ironing area and press the steam release button (15) until steam is produced. |
| Dirt comes out through the sole plate. | There is a build-up of scale or minerals in the steam tank.Chemical products or additives have been used. | Use tap water mixed 50% with distilled or demineralised water.Clean the sole plate with a damp cloth.Never add products to the boiler water. |
| The iron does not produce any steam. | The boiler is not switched on or the water tank is empty.The water tank is not fitted onto the steam tank correctly.The steam regulator is set to the minimum position. | Set the switch (4) to the «Start» position and/or fill the water tank.Fit the water tank back onto the steam tank correctly (you will hear a click).Increase the steam flow by turning the steam control (3). |
| The ironed garment turns dark and/or sticks to the soleplate. | The selected temperature is too high and has damaged the garment. | Select a suitable temperature for the material being and clean the sole plate with a damp cloth. |
| The soleplate turns brown. | This is a regular consequence of usage. | Clean the soleplate regularly with a damp cloth. |
| The appliance makes a pumping sound. | Water is being pumped into the steam tank.The sound will not stop. | This is normal.If the sound will not stop, do not use the steam generator and contact an authorised technical service centre. |
| Loss of pressure during ironing. | Steam release button activated during a long period of time. | Use the steam release button (15) with intervals. This improves the ironing result as the textiles will be dried and stay smooth better. |
| Water leakage from the boiler | Drainage plug located at the bottom of the appliance is loose. | Tighten up boiler drainage plug with a coin |
Warranty conditions
The terms of the guarantee for this appliance are in accordance with that stated by our representative for the country in which it is sold. The details of these conditions can be obtained from the retailer from whom the appliance was purchased. The purchase receipt must be presented when making any claims against the terms of this guarantee.
Advice on disposal
Our goods come in optimised packaging. This basically consists in using non-contaminating materials which should be handed over to the local waste disposal service as secondary raw materials. Your local town council can give you information about how to dispose of obsolete appliances.
This appliance is labelled in accordance with European Directive 2002/96/EG concerning used electrical and electronic appliances (waste electrical and electronic equipment - WEEE).
Vapore verticale (C)
Loddrett dampstryking (C)
Fallersleber Straße 50
40227 Düsseldorf
Oberbilker Allee 270 A
Jebel Ali Free Zone – Dubai
Tel.: 04 881 4401
Fax: 04 881 4805
www.bosch-household.ae
CLAYTON, Victoria 3168
Tel.: 1300 368 339
Fax: 1300 306 818
valid only in AUS
mailto:bshau-as@bshg.com
BA Bosna i Hercegovina,
Bosnia-Herzegovina
«HIGH» d.o.o.
Odobašina 57
71000 Sarajewo
Info-Line: 061 100 905
Fax: 033 213 513
mailto:delicnanda@hotmail.com
Bosch Hvidevareservice
BSH Hvidevarer A/S
Telegrafvej 4
2750 Ballerup
Tel.: 44 89 89 85
Fax: 44 89 89 86
mailto:BSH-Service.dk@
BSHG.com
www.bosch-hvidevarer.com
EE Eesti, Estonia
SIMSON OÜ
RAUA 55
10152 Tallinn
Tel.: 0627 8730
Fax: 0627 8733
mailto:teenindus@simson.ee
ES España, Spain
BSH Electrodomésticos
España S. A.
www.bshappliancecare.co.uk/
bosch
Service Requests (nationwide)
Tel: 0844 8928979
mailto:mks-servicerequest@
bshg.com
Spares and Accessories
Tel.: 0844 8928921
mailto:mks-spares@bshg.com
Product Advice
Tel: 0844 8928925
mailto:mks-productadvice@
bshg.com
Head office
Tel.: 0844 8928922
Fax: 01908 328670
GR Greece, Ελλάς
BSH Ikiakes Siskeves A. B. E.
Kentriko Ipokatastima Service
17 km E.O. Athinon-Lamias &
Potamou 20
145 64 Kifisia
Unit 1&2B, 3th Floor
North Block, Skyway House
3 Sham Mong Road
Tai Kok Tsui, Kowloon
Hongkong
Tel.: 2565 6151
Fax: 2565 6252
mailto:bshhkg.service@bshg.com
HR Hrvatska, Croatia
Andabaka d.o.o.
Gunduliceva 10
21000 Split
Info-Line: 021 481 403
Info-Fax: 021 481 402
mailto:servis@andabaka.hr
IE Republic of Ireland
BSH Home Appliances Ltd.
BSH Appliance Care,
Service Division
Unit F4, Ballymount Drive
Ballymount Industrial Estate
Walkinstown
Dublin 12
www.bshappliancecare.ie/Bosch
Service Requests,
Spares and Accessories
Tel.: 01450 2655
Fax: 01450 2520
Kundendienst-Zentren • Central-Service-Depots • Service Après-Vente • Servizio Assistenza • Centrale Servicestation • Asistencia técnica • Servicevaerkter • Apparatservice • Huolto
IL Israel, בַרִי
C/S/B Home Appliance Ltd.
Uliel Building
2, Hamelacha St.
Industrial Park North
71293 Lod
Tel.: 08 9777 222
Fax: 08 9777 245
mailto:csb-serv@zahav.net.il
IS Iceland
Smith & Norland hf.
Noatuni 4
105 Reykjavik
Tel.: 0520 3000
Fax: 0520 3011
www.sminor.is
IT Italia, Italy
LT Lietuva, Lithuania
Senuku Prekybos Centras UAB.
Jonavos g. 62
44192 Kaunas
Tel.: 0372 12146
Fax: 0372 12165
www.senukai.lt
LU Luxembourg
Building C, 39-43 Apollo Drive
Mairangi Bay, Auckland 1310
Tel.: 09 478 6158
Fax: 09 478 2914
www.bosch.co.nz
PL Polska, Poland
BSH Home Appliances (SEA)
Pte. Ltd.
Chung Hsiao E. Road, Sec. 1
Taipei
Tel.: 02 5556 2556
Fax: 02 5556 1235
www.boschappliance.com.tw
UA Ukraine, Україна
Киев
СП «Транс-Сервис»
тел.: 044 568 51 50
ООО «Дойчэлектросервис»
тел.: 044 467 80 46
ООО «Три О Сервис»
тел.: 044 565 93 99
www.bosch-pt.com.ua
XK Kosovo
NTP GAMA
Rruga Mag Prishtine-Ferizaj
70000 Ferizaj
Tel.: 038 502 448
Fax: 029 021 434
mailto:gama_mb@yahoo.com
XS Srbija, Serbia
SZR «SPECIJALELEKTRO»
Bulevar Milutina Milankovića 34.
11070 Novi Beograd
Tel.: 011 2147 110
Tel.: 011 2139 552
Fax: 011 2139 689
mailto:spec.el@eunet.yu
ZA South Africa
BSH Home Appliances (Pty) Ltd.
15 th Rd., Randjespark
Private Bag X36, Randjespark
1685 Midrand – Johannesburg
Tel.: 086 002 6724
Fax: 011 265 7852
mailto:service@bsh.co.za
www.boschappliances.co.za

BOSCH
002 TDS 25..10/09/08
de,en,fr,it,nl,da,no,sv,fi,es,pt,el,tr,pl,hu,uk,ru,ro,ar