DW0802 - Laser level DEWALT - Free user manual and instructions
Find the device manual for free DW0802 DEWALT in PDF.

| Product Type | Line Laser Level |
| Brand | DeWALT |
| Model | DW0802 |
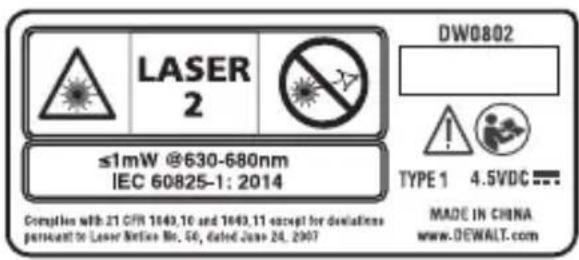
| Laser Class | Class 2 |
| Light Source | Laser Diodes |
| Laser Wavelength | 630 to 680 nm (visible) |
| Output Power | ≤ 1.0 mW |
| Operating Range | 33 ft (10 m) |
| Accuracy | ± 0.16 in @ 33 ft (± 4 mm @ 10 m) |
| Number of Laser Lines | 2 (horizontal and vertical at 90°) |
| Bubble Vials | 3 (0°, 45°, 90°) |
| Power Source | 3 AA batteries (1.5 V each, 6 V DC) |
| Battery Life | 20 hours |
| Operating Temperature | 0 °C to 40 °C (32 °F to 104 °F) |
| Storage Temperature | -25 °C to 70 °C (-16 °F to 158 °F) |
| Ingress Protection (IP) Rating | IP54 (dust and splash resistant) |
| Weight | Approximately 0.5 kg (not exactly specified) |
| Dimensions | Approximately 12 x 8 x 6 cm (estimated) |
| Wall Mounting | 3 push pins (2 on top, 1 on bottom) |
| Maintenance | Clean with a damp cloth and wipe with a soft dry cloth; do not use solvents |
| Repairability | Repairs by authorized DeWalt service centers only; disassembly voids warranty |
| Warranty | Consult the DeWalt website for warranty information |
Frequently Asked Questions - DW0802 DEWALT
User questions about DW0802 DEWALT
0 question about this device. Answer the ones you know or ask your own.
Ask a new question about this device
Download the instructions for your Laser level in PDF format for free! Find your manual DW0802 - DEWALT and take your electronic device back in hand. On this page are published all the documents necessary for the use of your device. DW0802 by DEWALT.
USER MANUAL DW0802 DEWALT
natural_image
Technical line drawing of a DeWALT industrial device with control buttons and a power button (no text or symbols beyond branding)Figures
B
Figures

E
E
natural_image
Two types of electrical insulator components with metal pins, shown against a plain background (no text or symbols)E
Contents
- Laser Information
- User Safety
- Battery Safety
• Installing New AA Batteries - Using the Tool
- Maintenance
- Troubleshooting
• Service and Repairs - Specifications
Laser Information
The DW0802 DIY Tile laser is a Class 2 laser tool that is used to display 2 laser lines at 90° to help you place tile and other materials in straight, square patterns. You can attach the tool to a horizontal or vertical surface using its pins. Use its 3 level vials at 0°, 45°, and 90° in vertical applications to create level lines on walls.
Supplier's Declaration of Conformity 47 CFR § 2.1077 Compliance Information
Responsible Party – U.S. Contact Information
DEWALT
701 East Joppa Road
Towson, Maryland 21286
www.DEWALT.com
FCC Statement
This equipment has been tested and found to comply with the limits for a Class B digital device, pursuant to part 15 of the FCC Rules. These limits are designed to provide reasonable protection against harmful interference in a residential installation. This equipment generates, uses and can radiate radio frequency energy and, if not installed and used in accordance with the instructions, may cause harmful interference to radio communications. However, there is no guarantee that interference will not occur in a particular installation. If this equipment does cause harmful
interference to radio or television reception, which can be determined by turning the equipment off and on, the user is encouraged to try to correct the interference by one or more of the following measures:
- Reorient or relocate the receiving antenna.
- Increase the separation between the equipment and receiver.
- Connect the equipment into an outlet on a different circuit (not the circuit to which the receiver is connected).
- Consult the dealer or an experienced radio/TV technician for help.
Canada, Industry Canada (IC) Notices
This Device complies with Industry Canada License-exempt RSS standard(s). Operation is subject to the following two conditions: 1) this device may not cause interference, and 2) this device must accept any interference, including interference that may cause undesired operation of the device.
Under Industry Canada regulations, this radio transmitter may only operate using an antenna of a type and maximum (or lesser) gain approved for the transmitter by Industry Canada. To reduce potential radio interference to other users, the antenna type and its gain should be so chosen that the equivalent isotropically radiated power (e.i.r.p.) is not more than that necessary for successful communication.
READ ALL INSTRUCTIONS
User Safety
Safety Guidelines
The definitions below describe the level of severity for each signal word. Please read the manual and pay attention to these symbols.

DANGER: Indicates an imminently hazardous situation which, if not avoided, will result in death or serious injury.

WARNING: Indicates a potentially hazardous situation which, if not avoided, could result in death or serious injury.

CAUTION: Indicates a potentially hazardous situation which, if not avoided, may result in minor or moderate injury.
NOTICE: Indicates a practice not related to personal injury which, if not avoided, may result in property damage.
If you have any questions or comments about this or any DEWALT® tool, go to www.DEWALT.com.

WARNING:
Read and understand all instructions.
Failure to follow the warnings and instructions in this manual may result in electric shock, fire, and/or serious personal injury.
SAVE THESE INSTRUCTIONS

WARNING:
Laser Radiation Exposure. Do not disassemble or modify the tool. There are no user serviceable parts inside. Serious eye injury could result.

WARNING:
Hazardous Radiation. Use of controls or adjustments, or performance of procedures, other than those specified herein may result in hazardous radiation exposure.
The label on your tool may include the following symbols.
| Symbol Meaning | |
| V Volts | |
| mW Milliwatts | |
| Laser Warning | |
| nm Wavelength | in nanometers |
| 2 Class 2 Laser | |
Warning Labels
For your convenience and safety, the following labels are on your tool.


WARNING: To reduce the risk of injury, user must read instruction manual.
WARNING: LASER RADIATION. DO NOT STARE INTO BEAM. Class 2 Laser Product.
- Do not operate the tool in explosive atmospheres, such as in the presence of flammable liquids, gases, or dust. Power tools create sparks which may ignite the dust or fumes.
- Store an idle tool out of reach of children and other untrained persons. Lasers are dangerous in the hands of untrained users.
- Tool service MUST be performed by qualified repair personnel. Service or maintenance performed by unqualified personnel may result in injury. To locate your nearest DEWALT service center go to www.DEWALT.com.
- Do not use optical tools such as a telescope or transit to view the laser beam. Serious eye injury could result.
- Do not place the tool in a position which may cause anyone to intentionally or unintentionally stare into the laser beam. Serious eye injury could result.
- Do not position the tool near a reflective surface which may reflect the laser beam toward anyone's eyes. Serious eye injury could result.
E
- Turn the tool off when it is not in use. Leaving the tool on increases the risk of staring into the laser beam.
- Do not modify the tool in any way. Modifying the tool may result in hazardous laser radiation exposure.
- Do not operate the tool around children or allow children to operate the tool. Serious eye injury may result.
- Do not remove or deface warning labels. If labels are removed, the user or others may inadvertently expose themselves to radiation.
- Position the tool securely on a level surface. If the tool falls, damage to the tool or serious injury could result.
Personal Safety
- Stay alert, watch what you are doing, and use common sense when operating the tool. Do not use the tool when you are tired or under the influence of drugs, alcohol, or medication. A moment of inattention while operating the tool may result in serious personal injury.
- Use personal protective equipment. Always wear eye protection. Depending on the work conditions, wearing protective equipment such as a dust mask, non-skid safety shoes, hard hat, and hearing protection will reduce personal injury.
Tool Use and Care
- Do not use the tool if the Power button does not turn the tool off. Any tool that cannot be controlled with the power button is dangerous and must be repaired.
- Follow instructions in the Maintenance section of this manual. Use of unauthorized parts or failure to follow Maintenance instructions may create a risk of electric shock or injury.
Battery Safety

WARNING: Batteries can explode, or leak, and can cause injury or fire. To reduce this risk:
- Carefully follow all instructions and warnings on the battery label and package:
- Always insert batteries correctly with regard to polarity (+ and -), as marked on the battery and the equipment.
- Do not short battery terminals.
- Do not charge disposable batteries.
- Do not mix old and new batteries. Replace all batteries at the same time with new batteries of the same brand and type.
- Remove dead batteries immediately and dispose of per local codes.
- Do not dispose of batteries in fire.
- Keep batteries out of reach of children.
- Remove batteries when the device is not in use.
Installing New AA Batteries
This tool is powered by 3 AA batteries. Use of any other batteries may create a risk of fire.
- Lift up the handle on the battery compartment cover (Figure B ①).
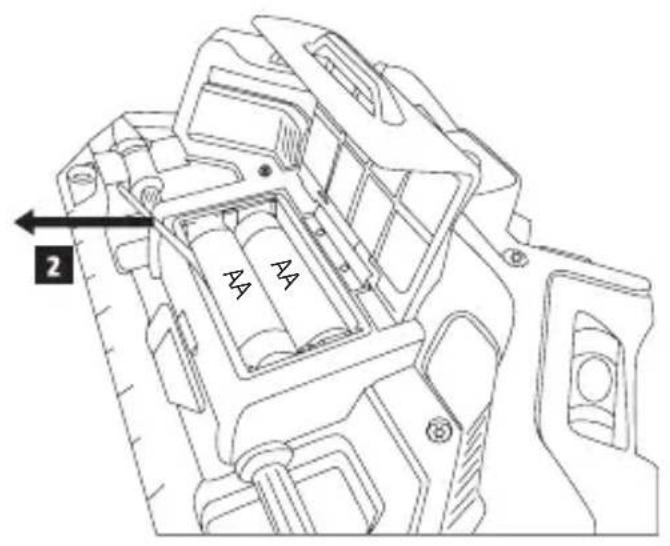
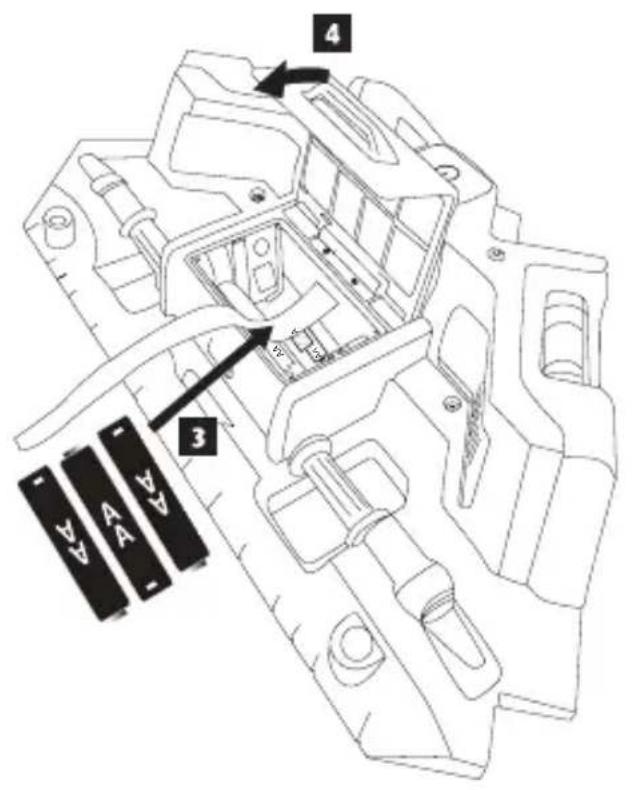
- Pull the black ribbon to loosen the batteries so you can easily remove them from the battery compartment (Figure B ②).
- Over the black ribbon, insert three new, high-quality, name brand AA batteries, making sure to position the - and + ends of each battery as noted inside the battery compartment (Figure B 3).
- Push the battery compartment cover down until it snaps in place (Figure B ④).
Using the Tool
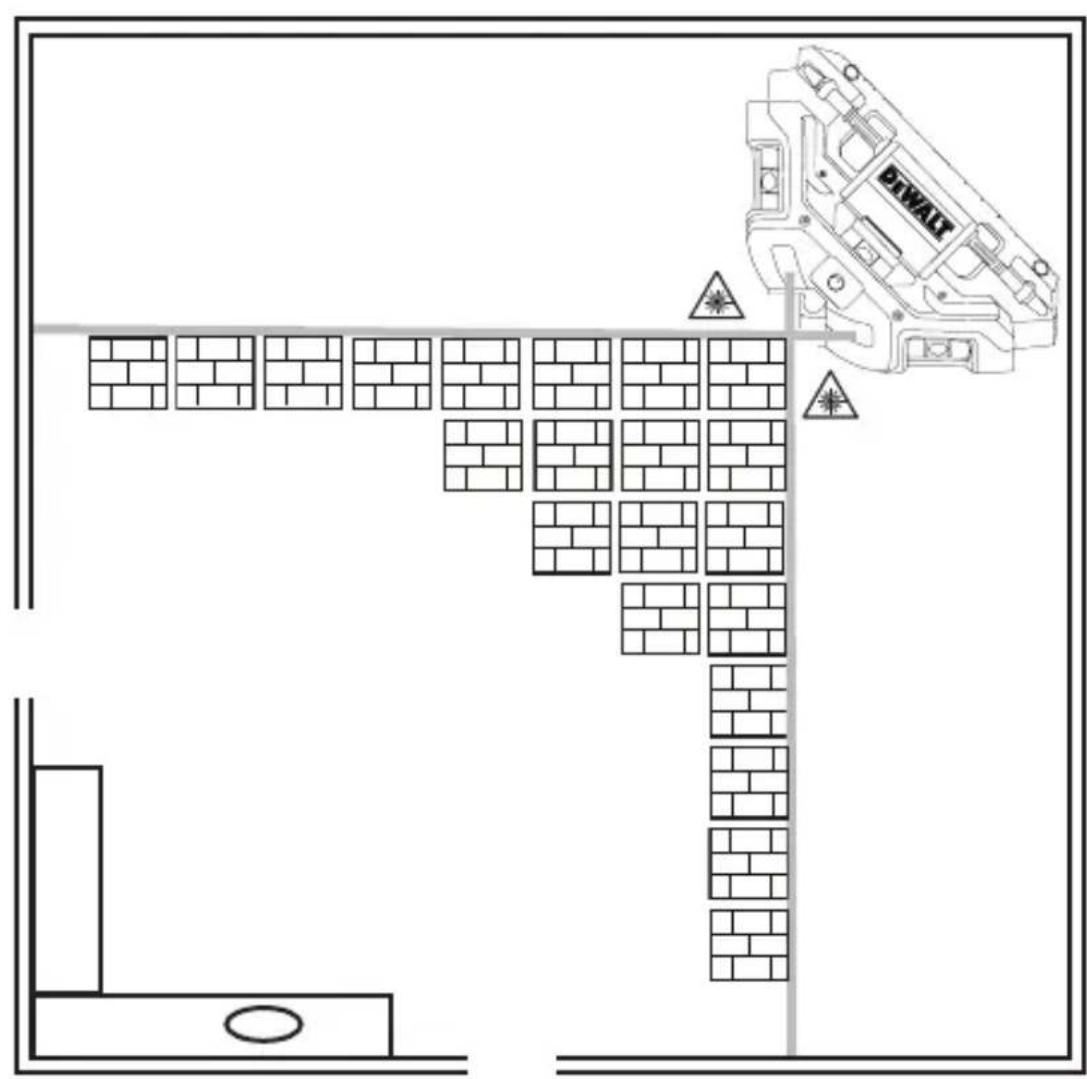
Lining up Tiles on a Floor
- Position the tool on the smooth, flat floor where you are ready to begin placing tiles.
- Press the Power button ⏻ (Figure A 1) to display the horizontal and vertical laser lines.
- Line up your tiles along the laser lines (Figure ©).
- Once you have placed all the tiles that will fit along the current laser lines, reposition the tool for the next tiles to be placed on the floor.
- When you are finished using the tool, press the Power button ⏻ to turn off the laser lines.
Lining up Objects on a Wall
- Position the tool on the smooth, flat wall where you are ready to place tiles, pictures, or other objects.
- Press the Power button ⏻ (Figure A 1) to display the horizontal and vertical laser lines.
-
Use the Level Vials to make sure the horizontal laser line is level on the wall.
-
Use Level Vial ④ to level laser line ③ horizontally on the wall.
- Use Level Vial ⑥ to level laser line ② horizontally on the wall.
-
Use Level Vial A 5 to correctly position the laser lines at a 45^ angle on the wall.
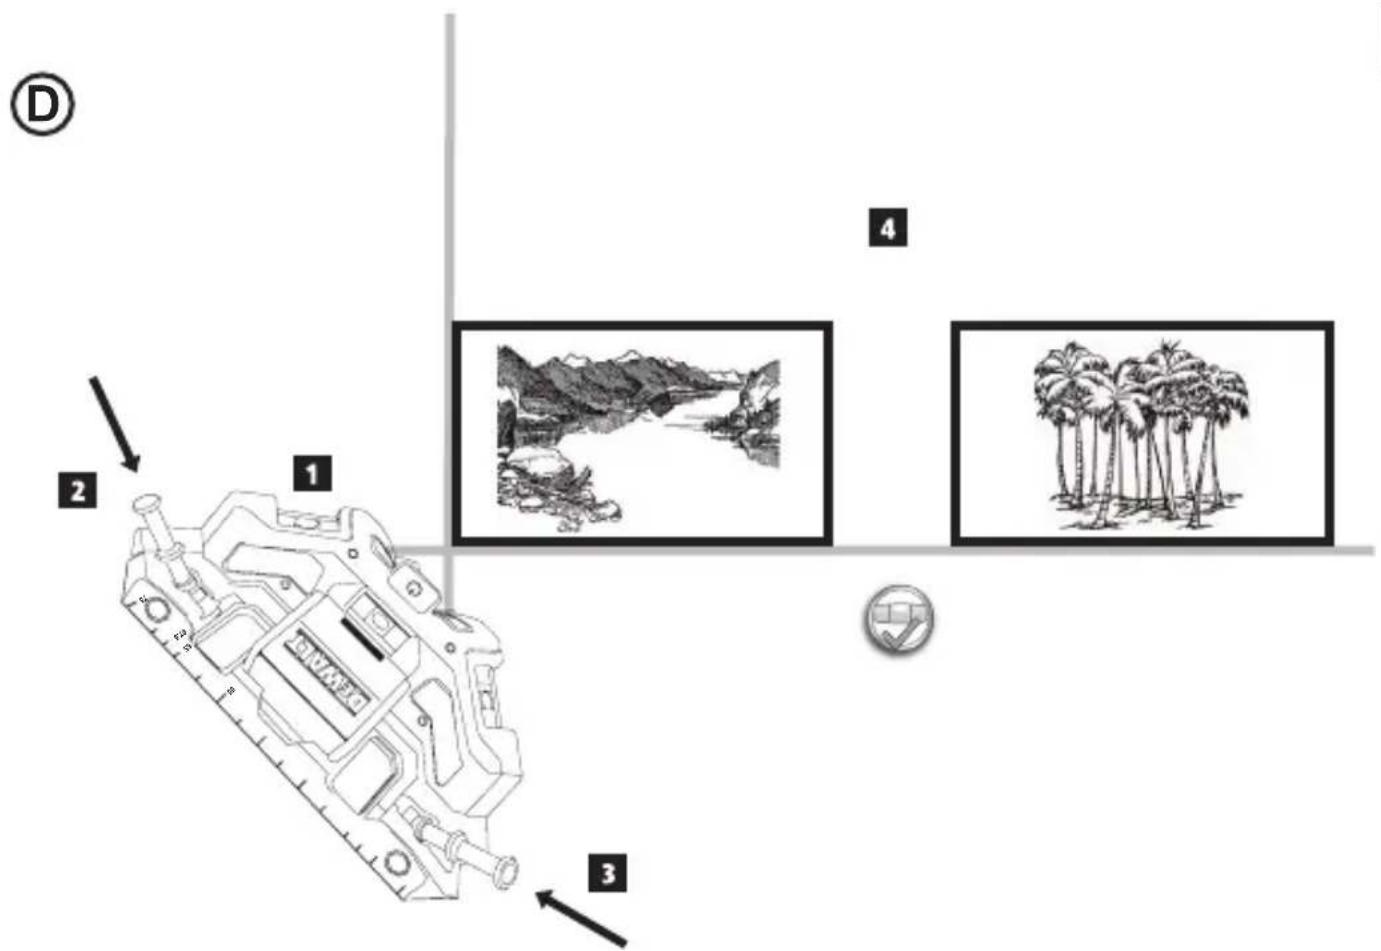
-
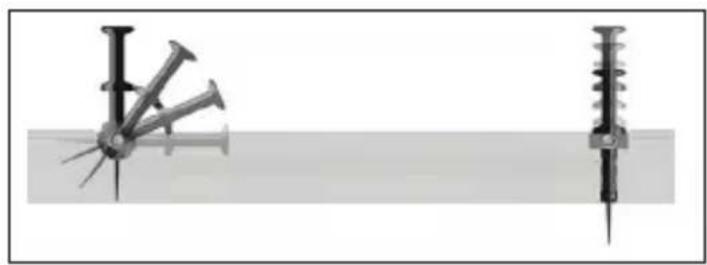
Use the 2 connected push pins and/or the third push pin on the bottom of the tool to attach the tool to the wall. The pins can be pushed straight in or at an angle into the wall (Figure E).
-
To use the 2 connected push pins on the top of the tool, lift them up and then push them into the wall (Figure D② and D③).
-
To use the third push pin on the bottom of the tool, pull it up and out of the tool. Then push it through any of the 3 outer holes (Figure A 9-11).
-
Line up your objects on the wall.
- If you need to place more objects on the wall, remove the pins and reposition the tool on the wall as you did before.
- When you are finished using the tool, press the Power button ⏻ to turn off the laser lines.
Maintenance
- When the tool is not in use, clean the exterior parts with a damp cloth, wipe the tool with a soft dry cloth to make sure it is dry, and then store the tool in the pouch provided.
- Although the tool exterior is solvent resistant, NEVER use solvents to clean the tool.
- Do not store the tool at temperatures below -16 °F (-25 °C) or above 158 °F (70 °C).
- To maintain the accuracy of your work, check the tool often to make sure it is properly calibrated.
- Calibration checks and other maintenance repairs may be performed by DEWALT service centers.
E Troubleshooting
The Laser Lines Do Not Turn On
- Make sure:
• Each battery is installed correctly, according to (+) and (−) listed inside the battery compartment.
- The battery contacts are clean and free of rust or corrosion.
- The batteries are new, high-quality, name brand batteries to reduce the chance of battery leakage.
- Make sure the AA batteries are in proper working condition. If in doubt, try installing new batteries.
- Be sure to keep the tool dry.
- If the tool has been stored in extremely hot temperatures, allow it to cool.
Service and Repairs
Note: Disassembling the tool will void all warranties on the product.
To assure product SAFETY and RELIABILITY, repairs, maintenance and adjustment should be performed by authorized service centers. Service or maintenance performed by unqualified personnel may result in a risk of injury. To locate your nearest DEWALT service center, go to www.DEWALT.com.
Warranty
Go to www.DEWALT.com for the latest warranty information.
Specifications
| DW0802 | |
| Light Source Laser diodes | |
| Laser Wavelength 630-680 nm visible | |
| Laser Power ≤1.0 mW CLASS 2 LASER PRODUCT | |
| Working Range 33' (10m) | |
| Accuracy ±0.16" @ 33' (±4 mm @ 10 m) | |
| Level Vials 0°, 45°, and 90° to set plumb or level lines | |
| Power Source 3 AA (1.5V) size batteries (6V DC) | |
| Run Time 20 hrs. | |
| Operating Temperature 32°F to 104°F (0°C to 40°C) | |
| Storage Temperature -16°F to 158°F (-25°C to 70°C) | |
| Environmental Water & Dust Resistant to IP54 |
E
Contenido
Towson, Maryland 21286
www.DEWALTcom
Declaración de FCC
Towson, Maryland 21286
www.DEWALT.com
Towson, Maryland 21286
www.DEWALT.com
Declaração da FCC
Towson, Maryland 21286
022950 June 2019