USER MANUAL EBA6000W BEKO
natural_image
Abstract black line drawing with three curved strokes on white background (no text or symbols)
EBA 6000 W
EBA 6000 B
EN - FR - IT - DE - RO - RU
CONTENTS
ENGLISH 04-16
FRANÇAIS 17-34
ITALIANO 35-49
DEUTSCH 50-65
ROMÂNĂ 66-83
РУССКИЙ 84-104
Please read this user manual first!
Dear Valued Customer,
Thank you for preferring this Beko appliance. We hope that you get the best results from your appliance which has been manufactured with high quality and state-of-the-art technology. For this reason, please read this entire user manual and all other accompanying documents carefully before using the appliance and keep it as a reference for future use. If you handover the appliance to someone else, give the user manual as well. Follow the instructions by paying attention to all the information and warnings in the user manual.
Remember that this user manual may also apply to other models. Differences between models are explicitly described in the manual.
Meanings of the Symbols
Following symbols are used in various sections of this user manual:

Important information and useful hints about usage.

WARNING: Warnings against dangerous situations concerning the security of life and property.
Electrical insulation class.
1 Important safety and environmental instructions
This section includes safety instructions that will help ensure the protection from risks of personal injuries or materialistic damages. Failure to follow these instructions shall void the warranty.
1.1 General safety
• This appliance complies with international safety standards.
- This appliance can be used by children aged from 8 years and above and persons with reduced physical, sensory or mental capabilities or lack of experience and knowledge if they have been given supervision or instruction concerning use of the appliance in a safe way and understand the hazards involved. Children shall not play with the appliance. Cleaning and user maintenance shall not be made by children without supervision.
- If the instructions state that the guard has to be removed for cleaning purposes, the instructions shall state the substance of the following: Ensure that the fan is switched off from the supply mains before removing the guard.
- Be extremely careful when using the device near children and people with limited physical, emotional, or mental capacity.
- Do not leave the appliance unattended while it is in use.
- Do not use the appliance if the power cord or the appliance is damaged. Contact authorized service.
- Do not insert anything into the device while it is running.
- Unplug the appliance before changing its location.
1 Important safety and environmental instructions
- Before connecting it to power and mounting its parts, dry the product and all the parts of it.
- Do not use this product outdoors or in the bathroom.
- Do not use the device near the window. Exposure to rain can create the risk of electric shock.
- This appliance is intended to be used in household and similar ap- plications such as:
- Staff kitchen are in shops, offices and other working environments;
- Farm houses
- By clients in hotels, and other residential type environments;
- Bed and Breakfast type environments.
- This device cannot be used in open areas such as camping sites and similar places.
- We shall not be held responsible or accept the warranty claims for the damages arising from misuse or inconvenient transportation of the product.
- Do not disassemble the product. We shall not accept the warranty claims for the damages due to misuse
• Always use the appliance on a balanced, flat, clean, dry and non slip surface.
- This appliance should not be operated together with an external timer or a separate remote control system.
- Please read the instruction manual carefully before operating the device, which contains important information such as placement, use and maintenance.
- Contact with the authorized service before destroying your device.
1 Important safety and environmental instructions
- This appliance conforms to the valid safety standards; therefore in order to prevent any danger, when the appliance or the power cable is damaged, they must be repaired or replaced by the authorized service. Faulty or insufficient repairing procedures might cause dangers and risks to the user.
- Make sure that your mains power supply is in conformity with the information given on the rating plate of the appliance. The only way to disconnect the appliance from the power supply is to unplug it.
- Connect the appliance to a grounded socket.
- Do not use it if the power cable or the product is damaged.
- Do not use this product with an extension cable.
- Do not touch the appliance or its plug when your hands are damp or wet.
- Place the product so that it can always reach the electrical outlet.
- Do not immerse the device into water to clean it.
- For additional protection, this appliance should be connected to a household appliances residual current appliance with a maximum nominal current of 30 mA.
- In order to prevent the power cable from getting damaged, make sure that it doesn't get stuck, twisted or rub against sharp surfaces. Keep the power cable away from hot surfaces and open flame.
- Make sure that the power cable doesn't accidentally get unplugged or someone doesn't trip over the cable during the operation of the appliance.
1 Important safety and environmental instructions
- If there is a breakdown after using the product, unplug it.
• Always unplug the appliance before cleaning and never clean it while the appliance is being used.
- WARNING! When positioning the appliance, ensure the supply cord is not trapped or damaged.
- Never operate any part of this appliance on or near hot surfaces such as gas stoves, electric stoves or heated ovens or place it on these surfaces.
- Never use the appliance at or near the places where there are explosive or inflammable atmosphere or materials.
-
Place the this appliance in a shady area away from the electronics and valuables such as TV, CD player or music system.
-
Do not cover or block the product with any material.
- Flammable items or products that contain flammable gases (e.g. spray) as well as the explosive materials should never be kept near the appliance.
- Place the device in accordance with the instructions to avoid hazards due to imbalance.
- It should be at least 30 cm away from heat sources such as stoves, ovens, heater cores and electric ovens and should not be kept under the direct sunlight.
- This device is designed for use in homes and workplaces.
- Suffocation hazard! Keep all the packaging materials away from children.
- Do not use the appliance for purposes other than its intended use.
1 Important safety and environmental instructions
- Do not use any part of the device as a support or stepping tool.
1.2 Compliance with the WEEE Directive and Disposing of the Waste Product:
This product complies with EU WEEE Directive (2012/19/EU). This product bears a classification symbol for waste electrical and electronic equipment (WEEE).
This symbol indicates that this product shall not be disposed with other household wastes at the end of its service life. Used device must be returned to offical collection point for recycling of electrical and electronic devices. To find these collection systems please contact to your local authorities or retailer where the product was purchased. Each household performs important role in recovering and recycling of old appliance. Appropriate disposal of used appliance helps prevent potential negative consequences for the environment and human health.
1.3 Compliance with RoHS Directive
The product you have purchased complies with EU RoHS Directive (2011/65/EU). It does not contain harmful and prohibited materials specified in the Directive.
Packaging materials of the product are manufactured from recyclable materials in accordance with our National Environment Regulations. Do not dispose of the packaging materials together with the domestic or other wastes. Take them to the packaging material collection points designated by the local authorities.
This symbol on rechargeable batteries/batteries or on the packaging indicates that the rechargeable battery/battery may not be disposed of with regular house hold rubbish. For certain rechargeable batteries/batteries, this symbol may be supplemented by a chemical symbol. Symbols for mercury (Hg) or lead (Pb) are provided if the rechargeable batteries/batteries contain more than 0,0005 % mercury or more than 0,004 % lead.
Rechargeable batteries/batteries, including those which do not contain heavy metal, may not be disposed of with household waste. Always dispose of used batteries in accordance with local environmental regulations. Make enquiries about the applicable disposal regulations where you live.
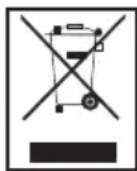
2.1 Control and parts
- Top cover
- Air outlet
- Display and Control panel
- Center piece
- Base
- Adapter
- Air inlet grille
- Pre-filter
- HEPA filter
2.2 Technical data
Working Voltage : 24V ---
Rated power : 36 W
Noise : ≤58 dBA
Adapter
Input : 100V-240V\~50/60Hz
1.5A
Output : 24V 1.5A
Technical and design modifications reserved.
Values stated on the markings on the product or in the printed materials supplied with the product are the values obtained in laboratory in accordance with relevant standards. Such values may vary depending on the usage of the product and the ambient conditions.
2 Overview
| Technical and design modifications reserved. |
| Made in P.R.C. |
| Model no: EBA 6000 W | |
| Rated power 36W | |
| Electrical insulation class: II |
| Parameter of external power supply |
| Manufacturer: | Foshan Shunde Guanyuda Power Supply Co.,Ltd |
| Model Identifier GM42-240150-2D | |
| Input Voltage 100V-240V~ | |
| Input Frequency 50Hz/60Hz | |
| Input Current 1.5A | |
| Output Voltage 24.0 V DC | |
| Output Current 1.5A | |
| Output Power 36 W | |
| Average active efficiency ≥ % 88.99% |
| Efficiency at low load (10%) ≥ % 86.74% |
| No-load power consumption ≤ 0.075W |
| Information |
| Description Symbol Value | Unit | | |
| Maximum fan flow rate | F | 21 | m^3/min. |
| Fan power input | P | 36 | W |
| Service value | SV | 0.58 | (m^3/mnn.)/W |
| Standby power consumption | P_SB | 0.5 | W |
| Fan sound power level | L_WA | 58 | dB(A) |
| Maximum air velocity | C | 2.0 | meters/sec |
| Measurement standard for service value | EN/IEC 60879:2019; |
| Contact details for obtaining more information | Arcelik A.S. Sutluce, Karaagac Cad. 2-6, 34445 Beyoglu Istanbul Turkey |
3 Use
3.1 Installation steps
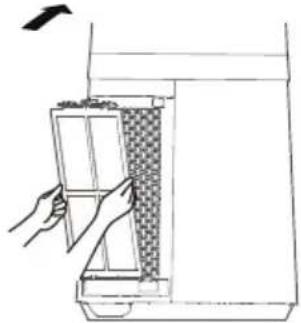
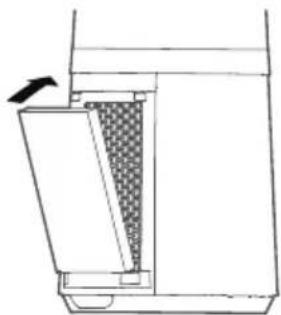
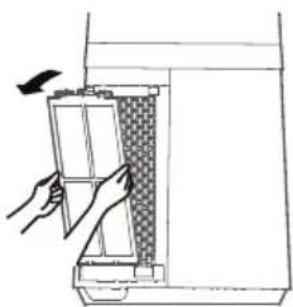
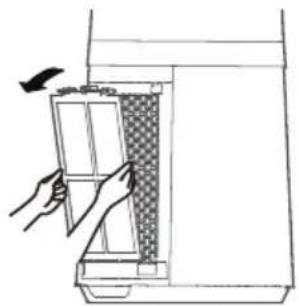
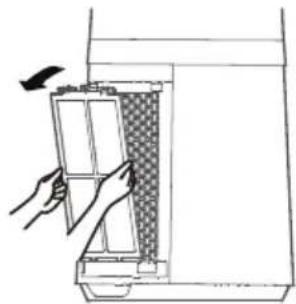
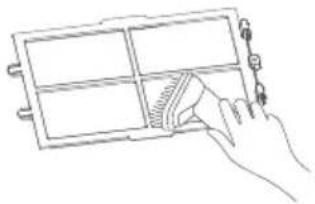
- Remove the air inlet grille.
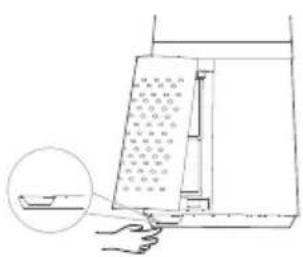
- Take out the pre-filter Press the raised part on both sides to pull it outwards, and take out the pre-filter.
natural_image
Line drawing of a hand opening a door with a patterned lid (no text or symbols)
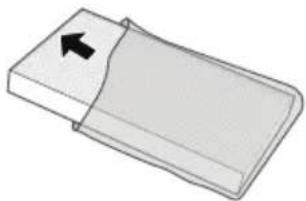
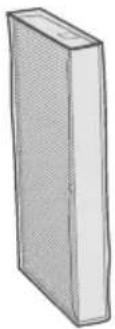
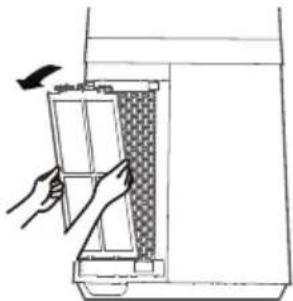
- Remove the protective film of the filter.
natural_image
Simple 3D diagram of a rectangular object with a black arrow pointing to its side (no text or symbols)
- Install the HEPA filter.
natural_image
Line drawing of a hand inserting a card into a device (no text or symbols)
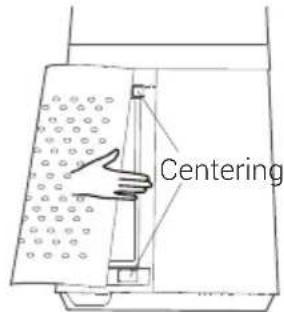
- Install the pre-filter Align the slot position at the bottom, and buckle up the upper U-shaped buckle.
natural_image
Line drawing of a hand opening a container with granular material inside, no text or symbols present
- Install the air inlet grille Align the upper two buckles and press them tightly, then press the two sides at lower part, slowly and gently buckle the air inlet grille.
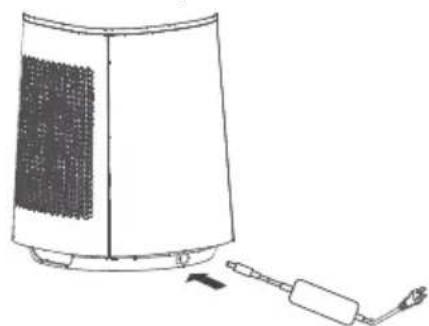
- Install the adapter, Tighten the plug with the socket position of the base
natural_image
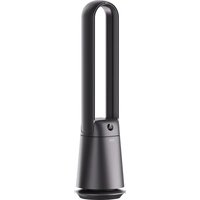
Line drawing of a portable air purifier with a cooling unit and attached plug (no text or symbols)
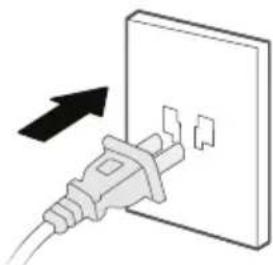
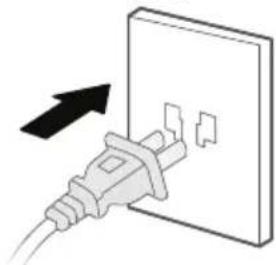
- Plug power supply.
natural_image
Illustration of a white electrical plug inserted into a wall socket with an arrow indicating direction (no text or symbols)
3 Use
| C | It is recommended to clean the filter once every two weeks and replace it once every six months (the cleaning and replacement cycle can be adjusted according to the use environment). |
3.2 Control and display panel
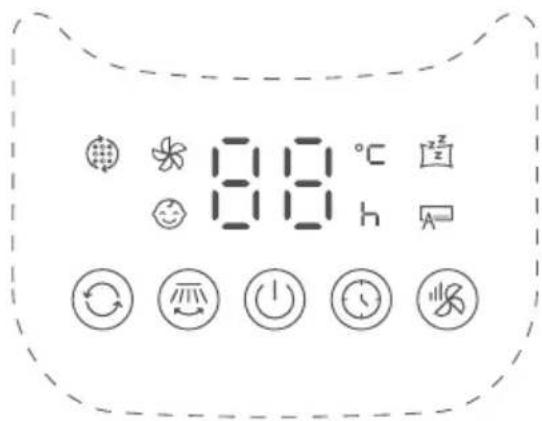
| Button | Function description |
| Startup/Standby |
| Touch this button to switch the wind mode among normal, baby sleep and AI smart. (When the filter replacement reminder light is on, press and hold this button to turn off the reminder light) |
| Touch this button to start/stop the swing. |
| Touch this button to switch the wind speed (cycles among level 1-2-3-...-10-1-2). |
| Schedule to shut down in the power-on state, and schedule to start up in the standby state; Touch this button to set the timer (the display cycles among 0-1-2-...-12-0h); 0h means that the timer is canceled. |
| Filter replacement reminder icon; when the icon stays on, the filter needs to be replaced; |
| In AI smart wind mode, the indicator light is on, and the wind power is automatically adjusted according to changes in ambient temperature. |
| This indicator light is on in sleep wind mode. Start the sleep wind function, and the fan automatically adjusts the level according to the program; there are three levels: 1, 2 and 3; you can adjust the level of the sleep wind by pressing the wind speed button. |
| Displays the wind speed level or set timer, and displays the temperature in the wind mode. |
 | This indicator light is on baby wind mode.(When the filter replacement reminder light is on, press and hold this button to turn off the reminder light) Touch this button to switch the wind mode among normal, baby sleep and AI smart. Start the baby wind function, and the fan automatic call a adjusts the level according to the program; there are two levels: 1, 2 ; you can adjust the level of the baby wind by pressing the wind speed button. |
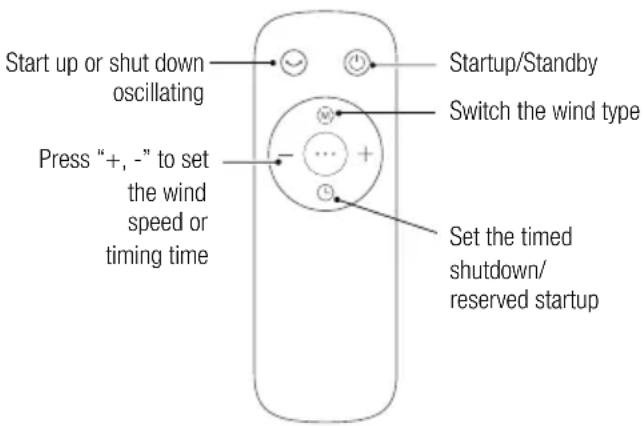
3.3 Additional Features
- Forced shutdown
There is no operation during the running of the fan, after 15 hours of continuous operation, the fan will be forced to shut down automatically.
- Intelligent memory
When the fan is turned off or powered off, it will run in the state before turning off or power off when the power is powered on again (the timing function is not memorized).
- Screen-off function
In case of no operation for 30 seconds during normal operation, the indicator light on the body will be automatically off, but the fan will continue to operate. Press the ON/OFF button to turn off the fan when the screen is off, and press the other button to restore display.

- The remote control should be normally used within 5 meters of the front of the product and 30 degrees of the deviation angle.
- The battery contains many heavy metals, acids and bases, etc., which may threaten human's health; Waste batteries should be recycled separately.
3 Use
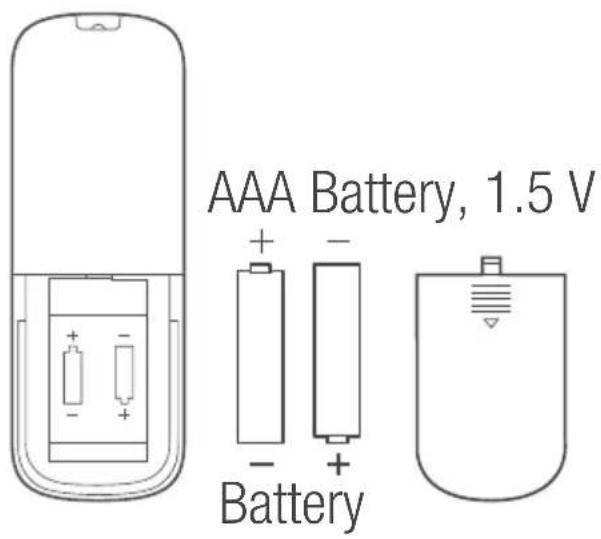
WARNING: Use manganese or alkaline batteries of type "AAA". DO not use rechargeable batteries.
3.5 Filter replacement
- Filter model: FQ150CJ-2 (including 2 sets)
- When the indicator light for replacement of filter is on, the prompt that reminds you of filter replacement will appear. If it is not replaced in time, the prompt will appear during each startup.

natural_image
Abstract diagram with a central circle containing nine dots and two curved arrows, enclosed by a dashed circular border (no text or symbols)
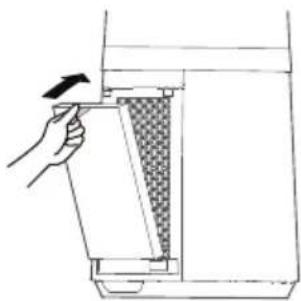
- Replace a new filter.
natural_image
Cross-sectional diagram of a mechanical device with internal components and an arrow indicating direction (no text or symbols)
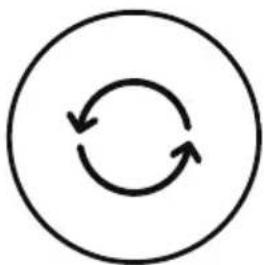
- Long press the mode button for 3 seconds to turn off the indicator light for filter replacement.
natural_image
Simple circular diagram with two curved arrows forming a loop (no text or symbols)
3.6 Pre-Filter cleaning
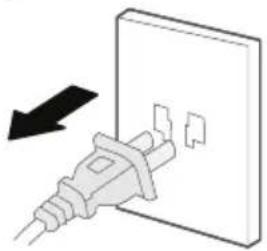
- Unplug the power cord.
natural_image
Illustration of a plug inserted into a wall socket with a black arrow indicating direction (no text or symbols)
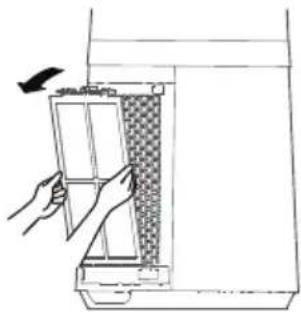
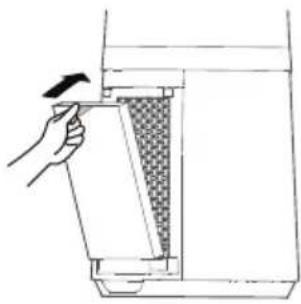
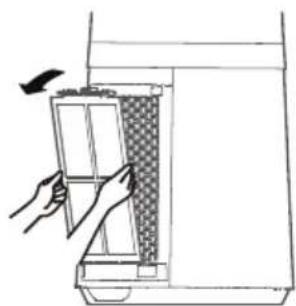
- Take out the filter.
3 Use
natural_image
Line drawing of a hand inserting a component into a device (no text or symbols)
- Remove the dust with vacuum cleaner.

natural_image
Line drawing of a hand holding a notebook with a pen inserted (no text or symbols)
- Install the machine in reverse order and plug power supply.
natural_image
Illustration of a plug inserted into a wall socket with an arrow indicating direction (no text or symbols)
4 Cleaning and maintenance
Switch off and unplug the appliance before cleaning it.
WARNING: Never use gasoline, solvent, abrasive cleaning agents, metal objects or hard brushes to clean the appliance.

WARNING: The fan requires little maintenance. Do not try to fix it by yourself. Refer it to qualified service personnel if service is needed.
4.1 Cleaning
- To ensure adequate air circulation to the motor, keep vents at the rear of the motor free of dust. Do not disassemble the fan to remove dust.
- Please wipe the exterior parts with a soft cloth soaking a mild detergent. Please wipe the exterior parts with a soft cloth soaking a mild detergent.
- Do not use abrasive detergent or solvents to avoid scratching the surface. Do not use gasoline and thinners as cleaners.
- Do not use any abrasive detergent or solvents to avoid scratching the surface. Do not use any of the following as a cleaner: gasoline, thinner.
- Plastic parts should be cleaned with a soft cloth moisten with mild soap. Thoroughly remove soap film with dry cloth.
4.2 Storage
- If you do not intend to use the appliance for a long time, store it carefully.
- Unplug the appliance.
- Keep the appliance out of the reach of children.
4.3 Handling and transportation
- During handling and transportation, carry the appliance in its original packaging. The packaging of the appliance protects it against physical damages.
- Do not place heavy loads on the appliance or on the packaging. The appliance may get damaged.
- Dropping the appliance may render it non-operational or cause permanent damage.
This symbol on rechargeable batteries/batteries or on the packaging indicates that the rechargeable battery/battery may not be disposed of with regular house hold rubbish. For certain rechargeable batteries/batteries, this symbol may be supplemented by a chemical symbol. Symbols for mercury (Hg) or lead (Pb) are provided if the rechargeable batteries/batteries contain more than 0,0005 % mercury or more than 0,004 % lead.
Rechargeable batteries/batteries, including those which do not contain heavy metal, may not be disposed of with household waste. Always dispose of used batteries in accordance with local environmental regulations. Make enquiries about the applicable disposal regulations where you live.
natural_image
Line drawing of a hand opening a cylindrical device with a checkered pattern on the side panel (no text or symbols)
natural_image
Simple 3D diagram of a rectangular object with a curved top edge and an arrow pointing to it, no text or symbols present.
- Instalati filtrul HEPA.
natural_image
Line drawing of a hand opening a rectangular object with a checkered pattern, no text or symbols present
natural_image
Line drawing of a hand opening a door with a grid-patterned panel inside, no text or symbols present
natural_image
Line drawing of a portable air purifier with a plug and base, no text or symbols present
natural_image
Illustration of a plug inserted into a wall socket with an arrow indicating direction (no text or symbols)
3 Utilizarea

natural_image
Simple circular diagram with arrows and dots, enclosed by a dashed circle (no text or symbols)
natural_image
Cross-sectional diagram of a mechanical device with internal components and an arrow indicating direction (no text or symbols)
natural_image
Simple circular diagram with two opposing curved arrows forming a loop (no text or symbols)
natural_image
Illustration of a plug inserted into a wall socket with a black arrow indicating direction (no text or symbols)
- Scoateți filtrul.
natural_image
Line drawing of hands installing or adjusting a panel inside a device (no text or symbols)
natural_image
Line drawing of a hand holding a grid notebook with a finger pointing at it (no text or symbols)
natural_image
Illustration of a white electrical plug inserted into a wall socket with a black arrow indicating direction (no text or symbols)
natural_image
Line drawing of a hand opening a door with a patterned lid (no text or symbols)
natural_image
Simple 3D diagram of a rectangular object with a curved top and arrow indicating direction (no text or symbols)
natural_image
Illustration of a hand inserting a card into a container with a checkered pattern (no text or symbols)
natural_image
Line drawing of a hand opening a gridded gridded machine (no text or symbols)
natural_image
Line drawing of a portable air purifier with attached cable and connector (no text or symbols)
natural_image
Illustration of a plug inserted into an electrical outlet with a black arrow indicating direction (no text or symbols)
3 Utilisation
natural_image
Simple circular diagram with arrows and dots inside a dashed circle (no text or symbols)
natural_image
Diagram of a mechanical device with a textured internal component and an arrow indicating direction (no text or symbols)
natural_image
Simple circular diagram with three curved arrows forming a loop (no text or symbols)
3 Utilisation
natural_image
Illustration of a plug inserted into a wall socket with a black arrow indicating direction (no text or symbols)
- Retirez le filtre.
natural_image
Line drawing of a hand inserting a grid into a device (no text or symbols)
natural_image
Line drawing of a hand holding a pen, poised to write on a notebook (no text or symbols present)
natural_image
Illustration of a plug inserted into a wall socket with an arrow indicating direction (no text or symbols)
- Ambienti come Bed and Breakfast.
natural_image
Line drawing of a hand opening a door with a patterned lid (no text or symbols)
natural_image
Simple 3D diagram of a rectangular object with a black arrow pointing to its side (no text or symbols)
natural_image
Line drawing of a hand inserting a card into a device (no text or symbols)
natural_image
Line drawing of a hand opening a cylindrical device with a checkered pattern (no text or symbols)
natural_image
Line drawing of a portable air purifier with a side-mounted connector (no text or symbols)
natural_image
Illustration of a black arrow pointing to a wall socket with two plug connectors (no text or symbols)
3 Uso

natural_image
Diagram of a mobile phone casing showing two battery cells with positive and negative charges (no text or labels)
Batteria AAA, 1.5 V

3 Uso

natural_image
Simple circular diagram with arrows and dots inside, enclosed by a dashed circle (no text or symbols)
natural_image
Diagram of a mechanical device with a textured internal layer and directional arrow (no text or symbols)
natural_image
Diagram of a plug inserted into a wall socket with a black arrow indicating direction (no text or symbols)
- Estrarre il filtro.
natural_image
Line drawing of hands installing or adjusting a door panel with a checkered pattern (no text or symbols)
- Rimuovere la polvere con l'aspirapol-
vere.
natural_image
Line drawing of a hand holding a grid notebook with a magnifying glass (no text or symbols)
natural_image
Illustration of a white electrical plug inserted into a wall socket with a black arrow indicating direction (no text or symbols)
natural_image
Line drawing of a hand opening a door with a patterned lid, no text or symbols present
natural_image
Simple 3D diagram of a rectangular object with a black arrow pointing to its side (no text or symbols)
natural_image
Diagram of a hand inserting a card into a device, showing the card being inserted (no text or symbols present)
natural_image
Line drawing of a hand opening a textured container into a machine (no text or symbols)
natural_image
Line drawing of a portable air purifier with a cooling unit attached (no text or symbols)
3 Verwendung
natural_image
Illustration of a plug inserted into a wall socket with an arrow indicating direction (no text or symbols)
natural_image
Simple circular diagram with arrows and dots inside, enclosed by a dashed circle (no text or symbols)
natural_image
Diagram of a mechanical device with a shaded internal section and an arrow indicating direction (no text or symbols)
natural_image
Simple circular diagram with two curved arrows forming a loop (no text or symbols)
natural_image
Illustration of a plug inserted into a wall socket with a black arrow indicating direction (no text or symbols)
natural_image
Line drawing of a hand inserting a grid into a device (no text or symbols)
natural_image
Line drawing of a hand holding a grid notebook with a magnifying glass (no text or symbols)
natural_image
Illustration of a white electrical plug inserted into a wall socket with two connectors, showing an arrow indicating direction (no text or symbols present)
natural_image
Abstract black line drawing with three curved strokes on white background (no text or symbols)
EBA 6000 W
EBA 6000 B
RU
natural_image
Line drawing of a hand opening a door with a patterned lid (no text or symbols)
natural_image
Simple 3D diagram of a rectangular object with a black arrow pointing to its side (no text or symbols)
natural_image
Line drawing of a hand inserting a card into a device (no text or symbols)
natural_image
Illustration of a hand opening a cleaning or cleaning device with a checkered pattern on the cover (no text or symbols)
natural_image
Line drawing of a portable air purifier with attached cable (no text or symbols)
natural_image
Illustration of a white electrical plug inserted into a wall socket with a black arrow indicating direction (no text or symbols)
3 Эксплуатация

natural_image
Diagram of a mechanical device with a textured internal component and an arrow indicating direction (no text or symbols)
natural_image
Illustration of a plug inserted into a wall socket with a black arrow indicating direction (no text or symbols)
natural_image
Line drawing of a hand holding a grid notebook with keys (no text or symbols)
natural_image
Simple circular diagram with arrows and dots, enclosed by a dashed circle (no text or symbols)
natural_image
Simple circular diagram with three curved arrows forming a loop (no text or symbols)
- Выньте фильтр.
natural_image
Line drawing of a hand opening a door with a patterned lid (no text or symbols)
natural_image
Illustration of a black arrow pointing to a wall socket with two small cutouts (no text or symbols)