
EFS7000CW - Fan BEKO - Free user manual and instructions
Find the device manual for free EFS7000CW BEKO in PDF.


| Product Type | Pedestal Fan |
| Model | EFS7000CW |
| Brand | Beko |
| Color | White |
| Height | 130 cm (51.2 in) |
| Base Diameter | 40 cm (15.7 in) |
| Fan Diameter | 40 cm (15.7 in) |
| Weight | 5.5 kg (12.1 lbs) |
| Power Supply | 220-240 V ~ 50/60 Hz |
| Power Consumption | 60 W |
| Airflow Speed Settings | 3 speeds |
| Oscillation | Yes, 90° horizontal |
| Tilt Adjustment | Manual tilt up/down |
| Remote Control | Included |
| Timer | 1-8 hours |
| Blade Material | ABS plastic |
| Grille Material | Steel with powder coating |
| Safety Features | Tip-over protection, overheat protection |
| Cleaning | Wipe with damp cloth; disassemble grille for deep clean |
| Noise Level | 45-55 dB (approx.) |
| Warranty | 2 years |
| Spare Parts Availability | Blades, motor, remote control available via service centers |
Frequently Asked Questions - EFS7000CW BEKO
User questions about EFS7000CW BEKO
0 question about this device. Answer the ones you know or ask your own.
Ask a new question about this device
Download the instructions for your Fan in PDF format for free! Find your manual EFS7000CW - BEKO and take your electronic device back in hand. On this page are published all the documents necessary for the use of your device. EFS7000CW by BEKO.
USER MANUAL EFS7000CW BEKO
EFS 7000 CW
EN - IT
CONTENTS
ENGLISH 03-16
ITALIANO 17-32
Please read this user manual first!
Dear Customer,
Thank you for preferring a Beko product. We hope that you get the best results from your product which has been manufactured with high quality and state-of-the-art technology. Therefore, please read this entire user manual and all other accompanying documents carefully before using the product and keep it as a reference for future use. If you handover the product to someone else, give the user manual as well. Follow all warnings and information in the user manual.
Meanings of the symbols
Following symbols are used in the various sections of this manual:

Important information or useful hints about usage.

Warning for hazardous situations with regard to life and property.
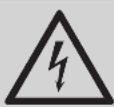
Warning for electric shock.
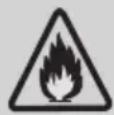
Warning for danger of fire.

Electrical insulation class
1 Important safety and environmental instructions
This section includes safety instructions that will help ensure protection from risks of personal injuries or material damages. Failure to follow these instructions shall void the warranty.
1.1 General safety
• This appliance complies with international safety standards. - This appliance can be used by children aged from 8 years and above and persons with reduced physical, sensory or mental capabilities or lack of experience and knowledge if they have been given supervision or instruction concerning use of the appliance in a safe way and understand the hazards involved. Children shall not play with the appliance. Cleaning and user maintenance shall not be made by children without supervision.
- Be extremely careful when using the device near children and people with limited physical, emotional, or mental capacity.
- Do not leave the appliance unattended while it is in use.
- Unplug the appliance before changing its location.
- This appliance is intended to be used in household and similar applications such as:
- Staff kitchen areas in shops, offices and other working environments; - Farm houses - By clients in hotels, and other residential type environments; - Bed and Breakfast type environments.
1 Important safety and environmental instructions
- If the electrical cord or the product is damaged, if the product is dropped, if there is any sign of visible damage or if it doesn't work properly, if the device's electrical parts are visibly damaged, if the product is left in outdoor conditions or submerged in water, do not use it. Contact the authorized service.
- While the product is running, never place your fingers or insert a pen or similar items into the ventilator or inside the grill section.
- Before connecting it to power and mounting its parts, dry the product and all its parts. • Always use the appliance on a balanced, flat, clean, dry and non-slip surface.
- Do not use this product outdoors or in the bathroom.
- Do not use the device near a window. Exposure to rain can create the risk of electric shock.
- Keep all packaging materials away from children.
- The device must start and stop without shaking. Place the device horizontally on a solid surface to keep it balanced.
- Do not pinch the power cord of your appliance indoors, do not keep it in contact with sharp edges and corners, and keep the power cord away from heat sources and wet areas. The power cable must remain in a free state at all times.
- Never operate any part of this appliance on or near hot surfaces such as gas stoves, electric stoves, or heated ovens, and do not place it on these surfaces.
1 Important safety and environmental instructions
- Do not touch the appliance or its plug when your hands are damp or wet.
- Before connecting to electricity and before attaching its parts, dry the device and all parts.
- Do not use this product with an extension cable.
- Connect the appliance to a grounded socket.
- During the use of the appliance, make sure that the power cable does not accidentally get pulled out or cause someone to trip over it.
- Make sure that your mains power supply complies with the information specified on the rating plate of the product.
- Do not immerse the device in water to clean it.
- Do not cover or block the product with any material.
- Make sure not to have gas products containing flammable and explosive ingredients near your product.
- Place this appliance in a shady area away from electronics and valuables such as TV, CD player, or music system.
- Please do not use any part of the product as a support, replacement support, or as a stepping tool.
- The use of additional parts in your device is not recommended and may cause danger.
- This appliance should not be operated together with an external timer or a separate remote control system.
- Be careful that your fan's air inlet and any of its outputs are not blocked by objects during installation of the fan.
1 Important safety and environmental instructions
- Be careful that your fan's air inlet and any of its outputs are not blocked by objects.
- Do not put or spray any liquid into the product.
- When unplugging your device from the power cord, pay attention not to carry it by pulling or holding the power cord. When unplugging, be sure to hold the plug and do not pull towards the cable.
- Do not operate or use your fan in flammable and/or at risk of explosion near items.
1.2 Compliance with the WEEE Directive and Disposing of the Waste Product:
This product complies with EU WEEE Directive (2012/19/EU). This product bears a classification symbol for waste electrical and electronic equipment (WEEE).
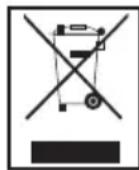
This symbol indicates that this product shall not be disposed of with other household wastes at the end of its service life. Used devices must be returned to an official collection point for recycling of electrical and electronic devices. To find these collection systems, please contact your local authorities or the retailer where the product was purchased. Each household plays an important role in recovering and recycling old appliances. Appropriate disposal of used appliances helps prevent potential negative consequences for the environment and human health.
1.3 Compliance with RoHS Directive
The product you have purchased complies with EU RoHS Directive (2011/65/EU). It does not contain harmful and prohibited materials specified in the Directive.
1 Important safety and environmental instructions
1.4 Package Information

Packaging materials of the product are manufactured from recyclable materials in accordance with our National Environment Regulations. Do not dispose of the packaging materials together with domestic or other wastes.
Take them to the packaging material collection points designated by the local authorities.
1.6 Information on waste batteries
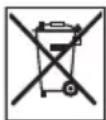
This symbol on rechargeable batteries/batteries or on the packaging indicates that the rechargeable battery/battery may not be disposed of with regular household rubbish. For certain rechargeable batteries/batteries, this symbol may be supplemented by a chemical symbol. Symbols for mercury (Hg) or lead (Pb) are provided if the rechargeable batteries/batteries contain more than 0.0005% mercury or more than 0.004% lead.
Rechargeable batteries/batteries, including those which do not contain heavy metals, may not be disposed of with household waste. Always dispose of used batteries in accordance with local environmental regulations. Make enquiries about the applicable disposal regulations where you live.
1.7 Batteries instructions
- Slide open the battery compartment cover located on the backside of the remote controller.
- Remove the batteries from the battery compartment.
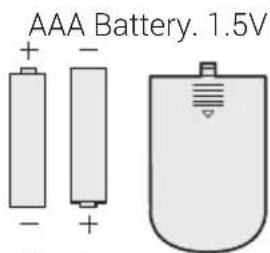
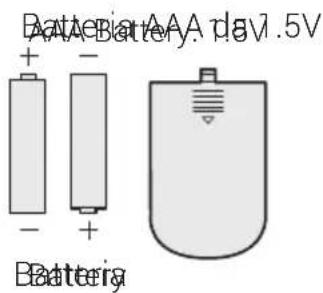
- Insert two new AAA 1.5 V batteries in the battery compartment, paying attention to the polarities (+ and -) marked on the battery and the battery compartment.
- Slide close the battery compartment cover. Make sure it locks in place.
- Non-rechargeable batteries are not to be recharged.
- Different types of batteries or new and used batteries are not to be mixed.
- Batteries are to be inserted with the correct polarity.
- Exhausted batteries are to be removed from the appliance and safely disposed of.
- If the appliance is to be stored unused for a long period, the batteries are removed.
- The supply terminals are not to be short-circuited.
2 Part figure
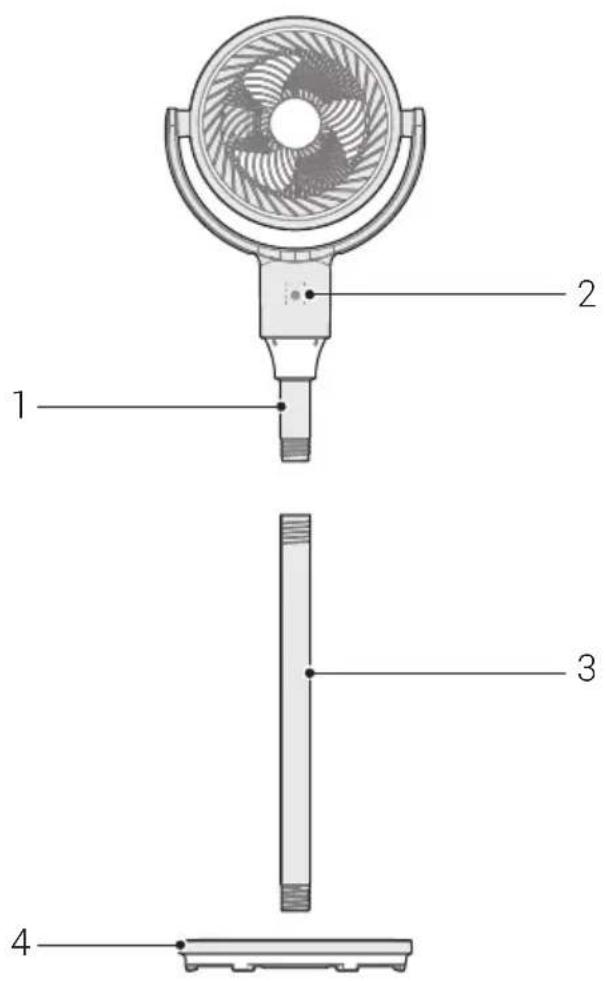
2.1 Control and parts
- Stationary post of head
- Display
- Internal pole
- Chassis
2.2 Technical data
Power supply: 220-240 V~, 50 Hz
Power: 30 W
Technical and design modifications reserved.
Values stated on the markings on the product or in the printed materials supplied with the product are the values obtained in laboratory in accordance with relevant standards. Such values may vary depending on the usage of the product and the ambient conditions.
2 Part figure
| Information | |||
| Description Symbol Value Unit | |||
| Maximum fan flow rate F 55.3 m3/min | |||
| Fan power input P 30 W | |||
| Service value SV 1.11 (m3/min)/W | |||
| Standby power consumption PSB 0 W | |||
| Fan sound power level | LWA | 63 | dB(A) |
| Maximum air velocity | c 2.83 meters/sec | ||
| Measurement standard for service value | IEC 60879:1986+(corr, 1992) | ||
| Contact details for obtaining more information | Arçelik A.S. Sutluce, KaraagacCad. No: 2-6 34445Istanbul/Türkiye | ||
3 Installation
3.1 Chassis mounting
Align the chassis and the base interface, and rotate clockwise to tighten it.

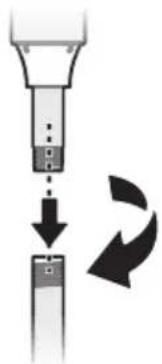
3.2 Chassis Pole mounting
Align the stationary post with the post interface and insert, then rotate clockwise and tighten it.
3 Installation
3.3 Pole mounting for using table top
Align the fixing pipe under the body directly to the base interface and tighten by turning clockwise.
3.4 Add aromatherapy oil
Rotate the aroma diffuser cover in the center of the front grille counterclockwise to open it, drop the essential oil (floral water) on the cotton sheet in the center of the front grille, then align the aroma diffuser cover and press lightly. After assembling according to the alignment mark, tighten it clockwise.
![graph TD A["Open"] --> B["Internal Rotation"] B --> C["Drip essential oil"] C --> D["Close"]](/content/2026/05/907298/images/f6369ecaae623171254ed749cd2840a734ead0335b6f743a99512600325cea9f.jpg)
When assembling, first insert the large round hole according to the alignment mark, and then rotate clockwise.

This product does not come with essential oil. It needs to be purchased separately.
4 Operation
4.1 Description of buttons
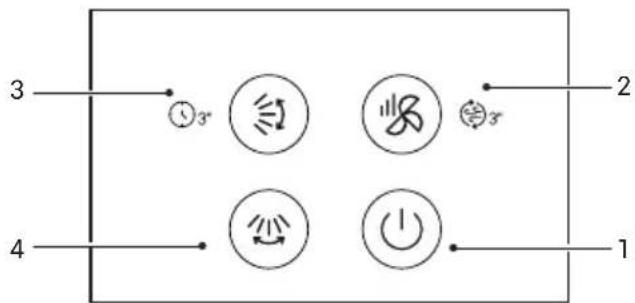
| No. | Button Function description | |
| 1 |  On/Standby button On/Standby button | • Press this button to start or stop the fan. |
| 2 |  Wind speed button(wind type) Wind speed button(wind type) | • When the fan is running, press this button to switch the fan speed in the sequence of low-medium-high-low...; the corresponding level • indicator light turns on.• When the fan is running, press and hold this button to enter the cir-culating air, and hold it again to exit the circulating air. |
| 3 | [HKSC]Up/down oscillator button (timer) | • In the power-on state, press this button to turn on/off the up/down oscillator.• In the power-on state, press and hold this button to enter the timer adjustment, continue to press it to switch in the following sequence: 1h, 2h, 3h, 4h (1h and 3h indicators turn on at the same time), 5h (2h and 3h indicators turn on at the same time), 6h (1h, 2h and 3h indicators turn on at the same time), off; the setting is confirmed if there is no operation for 3 seconds. In standby mode, press and hold this button to set scheduled power-on; continue to press it to switch in the following sequence: 1h, 2h, 3h, 4h (1h and 3h indicators turn on at the same time), 5h (2h and 3h indicators turn on at the same time), 6h (1h, 2h and 3h indicators turn on at the same time), off; the setting is confirmed if there is no operation for 3 seconds. |
| 4 |  Left/right oscillator button Left/right oscillator button | • In the power-on state, press this button to turn on/off the left/right oscillator. |
| Other function description | • After plugging in the power and entering the power-on state, if there is no operation on the machine, it will automatically shut down after 15 hours | |
4 Operation
4.2 Display panel description
![graph TD A["1"] --> B["Clock"] C["2"] --> D["Hour 3h"] E["3"] --> F["Hour 2h"] G["4"] --> H["Hour 1h"] B --> I["Square Box"] D --> I F --> J["Square Box"] H --> J](/content/2026/05/907298/images/8ebddf6f4cddb2ed8b7ed2495b35ce66efd69d5d69df71824167f698147fcab4.jpg)
| No. | Icon Function description | |
| 1 • | Tim  | tion indicator. |
| 2 | 3 hour2 hour1 hour | Schedule time indicator. |
| 3 |  | Circulating air indicator. |
| 4 |    | Low speed indicator.Medium speed indicator.High speed indicator. |
5 Remote control
5.1 Description of remote control buttons
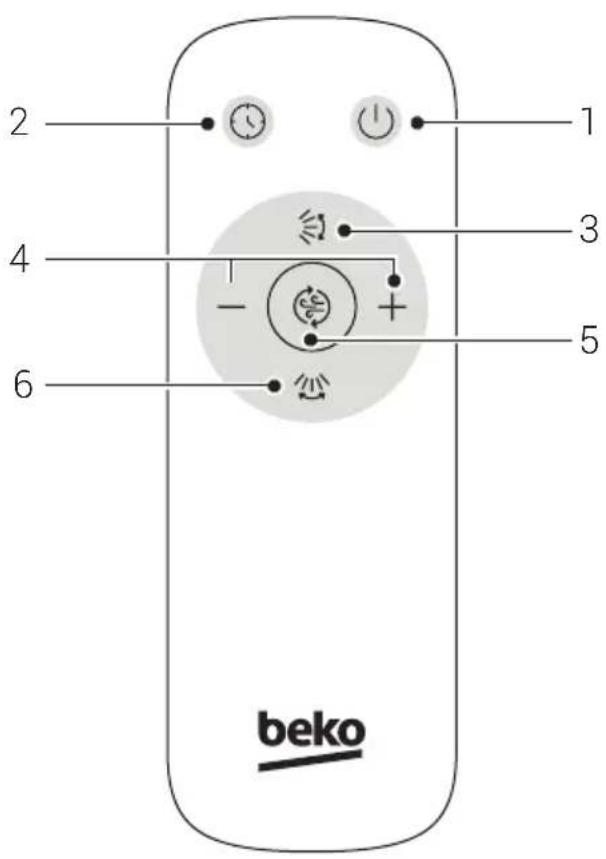

Battery
| No. | Button | Function description |
| 1 |  | • On/standby. |
| 2 |  | • Directly touch to set the schedule on/off time. |
| 3 |  | • Turn on/off up/down oscillator. |
| 4 |  | • Directly touch to increase or decrease the wind speed; when the timer light is flashing, the schedule time can be increased or decreased. |
| 5 |  | • Turn on/off circulating air. |
| 6 |  | • Turn on/off left/right oscillator. |

• The remote control can be used normally within 5 meters from the front of the product, and the deviation angle is within 30 degrees.
- Batteries contain many heavy metals and acid-base substances, which threaten human health; used batteries should be recycled separately.
- Battery for the remote control: AAA 1.5V
6.1 Cleaning
Before cleaning and assembling, fan must be unplugged.

WARNING: Do not use any abrasive detergent or solvents to avoid scratching the surface. Do not use any of the following as a cleaner: gasoline, thinner.
- To ensure adequate air circulation to the motor, keep vents at the rear of the motor free of dust. Do not disassemble the fan to remove dust.
- Please wipe the exterior parts with a soft cloth soaking a mild detergent.

WARNING: Do not allow water or any other liquid into the motor housing or interior parts.
- Plastic parts should be cleaned with a soft cloth moistened with mild soap.
- Thoroughly remove soap film with a dry cloth.
6.2 Handling and transportation
- During handling and transportation, carry the appliance in its original packaging. The packaging protects the appliance against physical damage.
- Do not place heavy loads on the appliance or on the packaging. The appliance may get damaged.
- Dropping the appliance may render it non-operational or cause permanent damage.
7 Troubleshooting
Operation of your appliance can lead to errors and malfunctions. The following tables contain possible causes and notes for resolving an error message or malfunction. It is recommended to read the table below carefully in order to save your time and money that may cost for calling the service center.
| Problem Cause Solution | ||
| The machine does not work properly after installed | The power cable is not plugged in or has poor contact. | Make sure the plug is properly inserted into the socket. |
| The switch on the body is not turned on. | Turn on the switch on the body. | |
| The remote does not work | The battery needs replacing. | Replace the battery. |
| The remote is being used more than 5m away from the fan. | Use the remote closer to the fan and make sure it is pointing directly at the display panel. |

- CONTENTS
- PLEASE READ THIS USER MANUAL FIRST
- MEANINGS OF THE SYMBOLS
- IMPORTANT SAFETY AND ENVIRONMENTAL INSTRUCTIONS
- GENERAL SAFETY
- COMPLIANCE WITH THE WEEE DIRECTIVE AND DISPOSING OF THE WASTE PRODUCT
- COMPLIANCE WITH ROHS DIRECTIVE
- PACKAGE INFORMATION
- INFORMATION ON WASTE BATTERIES
- BATTERIES INSTRUCTIONS
- PART FIGURE
- CONTROL AND PARTS
- TECHNICAL DATA
- INSTALLATION
- CHASSIS MOUNTING
- CHASSIS POLE MOUNTING
- POLE MOUNTING FOR USING TABLE TOP
- ADD AROMATHERAPY OIL
- OPERATION
- DESCRIPTION OF BUTTONS
- DISPLAY PANEL DESCRIPTION
- REMOTE CONTROL
- DESCRIPTION OF REMOTE CONTROL BUTTONS
- CLEANING
- HANDLING AND TRANSPORTATION
- TROUBLESHOOTING
Brand : BEKO
Model : EFS7000CW
Category : Fan