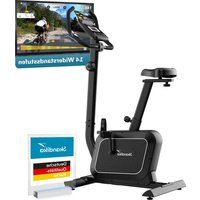
Atlantis Pro - Exercise bike Skandika - Free user manual and instructions
Find the device manual for free Atlantis Pro Skandika in PDF.

| Product Type | Exercise Bike |
| Brand | Skandika |
| Model | Atlantis Pro |
| Maximum User Weight | 150 kg (HA class) |
| Number of Programs | 17 (1 manual, 12 preset, 4 cardio, 1 watts) |
| Connectivity | Bluetooth 2.4 GHz compatible with Kinomap, Fitshow, Zwift |
| Display | LCD with time, distance, calories, heart rate, speed, RPM, watts, body fat percentage |
| Resistance | Levels adjustable manually or automatically based on program |
| Heart Rate Measurement | Handlebar sensors + receiver for chest strap (5.3 kHz, not included) |
| Power Supply | Mains adapter (DC, included) |
| Included Accessories | Bottle holder, smartphone holder, Allen keys, adapter |
| Transport Wheels | Yes, at the front of the frame |
| Warranty | 24 months (defective parts, excluding normal wear) |
| Maintenance | Clean with damp cloth, occasional lubrication of moving parts |
| Storage | In a clean and dry place, preferably in original packaging |
| Usage | Indoor only, domestic use |
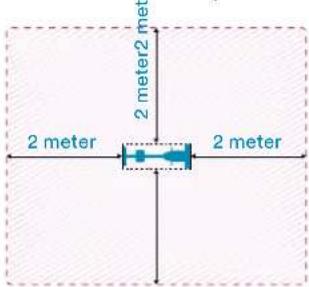
| Safety | Clear space of 2 m around, flat surface, do not use outdoors |
Frequently Asked Questions - Atlantis Pro Skandika
User questions about Atlantis Pro Skandika
0 question about this device. Answer the ones you know or ask your own.
Ask a new question about this device
Download the instructions for your Exercise bike in PDF format for free! Find your manual Atlantis Pro - Skandika and take your electronic device back in hand. On this page are published all the documents necessary for the use of your device. Atlantis Pro by Skandika.
USER MANUAL Atlantis Pro Skandika
natural_image
Line drawing of a stationary exercise bike with adjustable arms and control panel (no text or symbols)Atlantis Pro
Inhalt

skandika.com/service
text_image
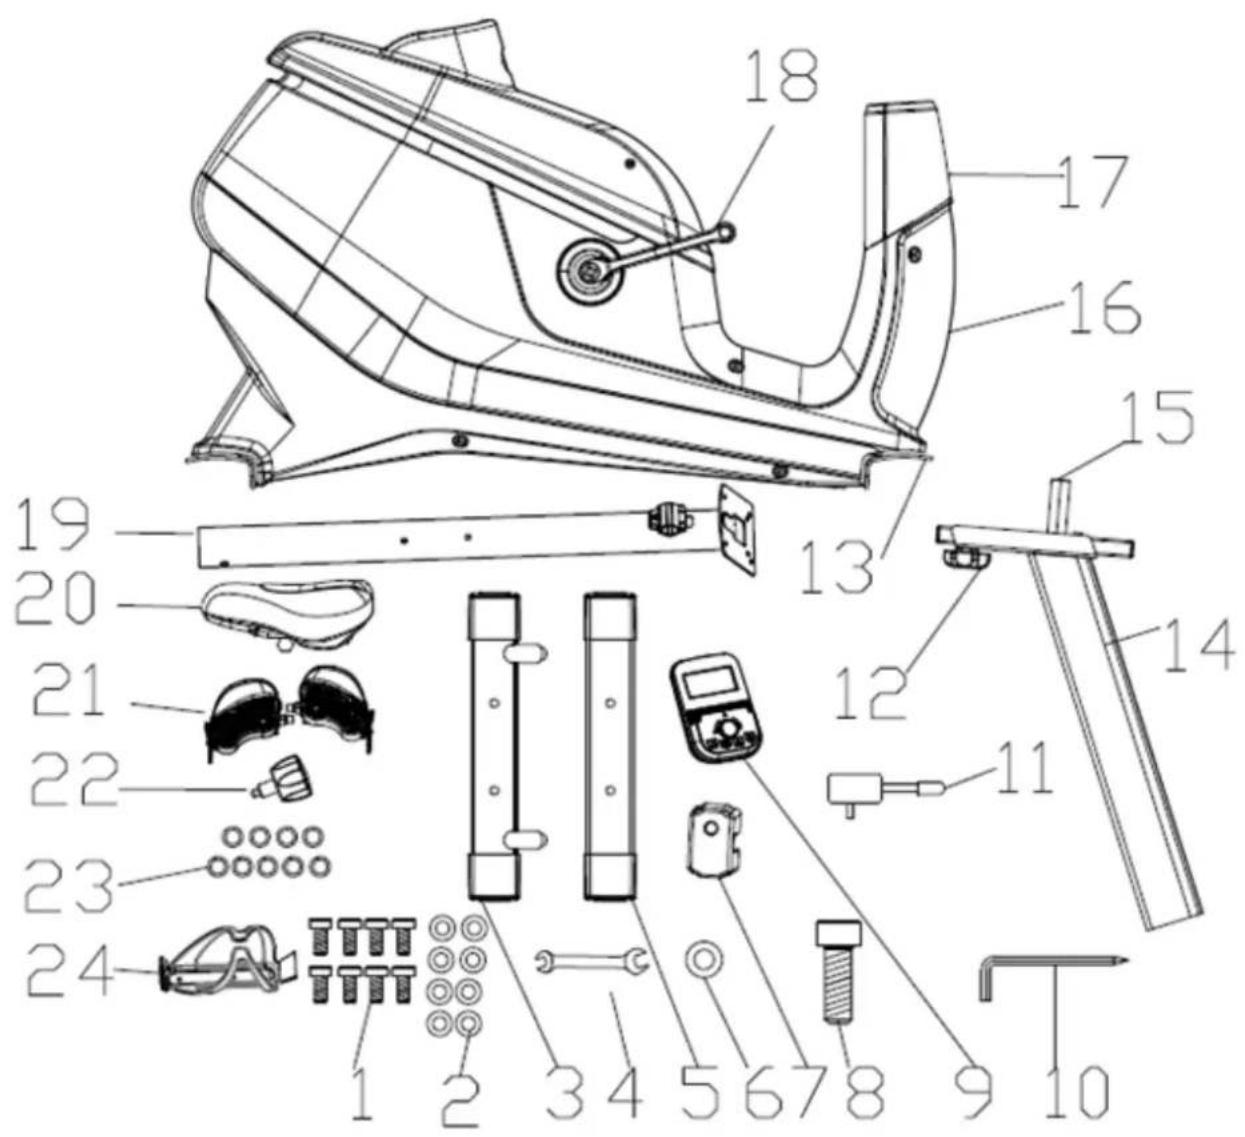
Technical diagram of a mechanical device with numbered parts for identification and assembly reference.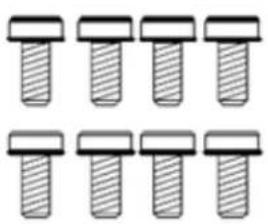
natural_image
Grid of nine identical screw fasteners with no text or symbolsA
B
C

D
E
natural_image
Technical line drawing of a mechanical assembly with components and mounting holes (no text or symbols)SCHRITT 2
natural_image
Technical line drawing of a stationary exercise machine with an inset showing internal components (no text or labels)SCHRITT 3
natural_image
Technical line drawing of a stationary exercise bike with labeled components (no text or symbols present)SCHRITT 4
natural_image
Technical line drawing of a mechanical assembly with exploded view and component detail (no text or symbols)SCHRITT 5
natural_image
Technical line drawing of a mechanical assembly with no visible text or symbolsSCHRITT 6
natural_image
Line drawing of a medical or electrical device with tubing, connector, and digital multimeter (no text or symbols)SCHRITT 7
natural_image
Silhouette of a person pushing a stationary exercise machine (no text or symbols visible)
text_image
8688 8688 868 8689 868 8689P13: 55% Max H.R.C. - Zielherzrate = (220 - Alter) x 55%
P14: 75% Max H.R.C. - Zielherzrate = (220 - Alter) x 75%
P15: 90% Max H.R.C. - Zielherzrate = (220 - Alter) x 90%
text_image
Apple Store Kinomap Kinomap SAS 4.3 ★★★★ *53 4+ NEue Funktionen This is the following: Our daily concern is offering you the level experience There is Vorschau
text_image
Kinomap FOLGT SIE Kinomap Geosporger1 STAVANGER, LIMBURG & HONG KONG RACES JOIN THE CHALLENGE HAMMER in Kinomap IN ASSOCIATION WITH wahoo Mehr erfahren >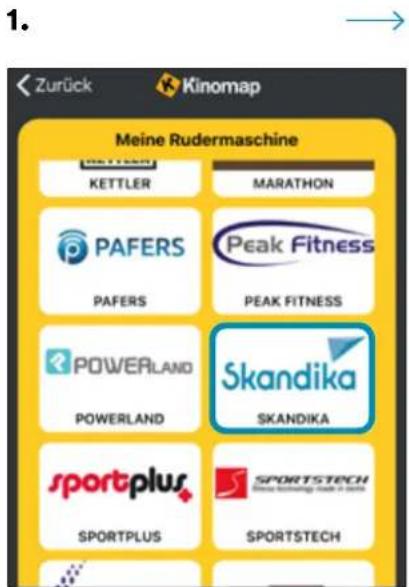
text_image
1. Zurück Kinomap Meine Rudermaschine KETTLER MARATHON PAFERS Peak Fitness PAFERS PEAK FITNESS POWERLAND Skandika POWERLAND SKANDIKA sportplus SPORTSTECH SPORTPLUS SPORTSTECHMAC: http://www.zwift.com/download/mac
GooglePlay: https://play.google.com/store/apps/details?id=com.zwift.zwiftgame
Appstore: https://itunes.apple.com/us/app/id1134655040?mt=8

natural_image
3D rendering of a device's internal panel with green indicator lights and control knobs (no text or symbols visible)19 Safety precautions
20 Parts identification
21 Set-up instructions
26 Computer instructions
29 Using apps
31 Smartphone holder / Using a chest-belt
32 Warm-up and cool-down / Cleaning & care
33 Guarantee conditions

skandika.com/service
Please visit the Skandika Service portal on our website for setup & help videos, FAQs and downloadable instructions. For more information about Skandika, simply visit our main page www.skandika.com

WARNING
To reduce risk of injury, read and understand this instruction manual before using the device! This machine is intended for home use only in accordance with the instructions provided in this manual. Read the instruction manual carefully before using this device and keep the instruction manual for future use.
SAFETY PRECAUTIONS
-
Keep children and pets away from the machine at all times. DO NOT leave children unattended in the same room with the machine.
-
Only one person at a time should use the machine.
-
If the user experiences dizziness, nausea, chest pain, or any other abnormal symptoms, STOP the workout immediately. CONSULT A PHYSICIAN IMMEDIATELY.
-
Position the machine on a plain, leveled surface. DO NOT use the machine near liquids or outdoors.
-
Keep hands away from all moving parts.
-
Always wear appropriate workout clothing when exercising. DO NOT wear robes or other clothing that could become caught in the machine. Running or aerobic shoes are also required when using the machine.
-
Use the machine only for its intended use as described in this manual. DO NOT use attachments not recommended by the manufacturer.
-
Do not place any sharp objects around the machine.
-
Disabled persons should not use the machine without a qualified person or physician, who can provide qualified surveillance / assistance.
-
Before using the device, always do stretching exercises to properly warm up.
-
Never operate the device if it is not functioning properly.
-
The max. user capacity of this class HA device is 150 KGS.
-
Do not use this device directly after meals or drinks.
-
This device is not suitable for therapeutically use. Only use this unit according to the intended purpose and as directed in the instruction manual.
-
Please do not attempt to repair the unit yourself in the event of malfunctions, since this will void all warranty claims. Only have repairs carried out by authorised service centres. It is recommended to lightly lubricate all moving parts from time to time to maintain functionality.
-
Please only exercise with a minimum clearance area of 2 meters around the device.
text_image
2 meter 2 meter2 meter 2 meter 2 meterBe sure to consult a physician before you start any device program. He may give you proper hints and advice with respect to the individual intensity of stress for you, your workout and sensible eating habits. This is especially important for individuals over the age of 35 or persons with pre-existing health problems.
text_image
Technical diagram of a mechanical device with numbered parts for identification and assembly reference.
natural_image
Grid of nine identical screw or nut designs with no text or symbolsA

B
C

D

E
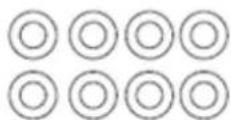
| Part No. | Description | Specification | Q'ty |
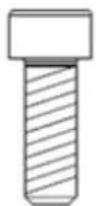
| 1 / A Screw M8×20 8 | |||
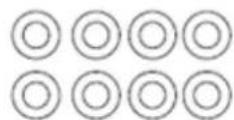
| 2 / B Washer ø8xø20×2 8 | |||
| 3 Front stand 1 | |||
| 4 Open-end spanner 1 | |||
| 5 Rear stand 1 | |||
| 6 / D Washer ø8xø12 | 1 | ||
| 7 | Cover | 1 | |
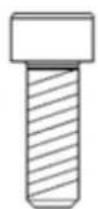
| 8 / E Screw M8×25 | 1 | ||
| 9 Computer | 1 | ||
| 10 | Allen key | 1 | |
| 11 | Adaptor | ||
| 12 | Locking device | 1 | |
| 13 | Main frame | 1 | |
| 14 | Seat post | 1 | |
| 15 | Saddle mount | 1 | |
| 16 | Main cover | 1 | |
| 17 | Handlebar support cover | 1 | |
| 18 | Pedal arm | 2 | |
| 19 | Handlebar support | 1 | |
| 20 | Saddle | 1 | |
| 21 | Pedals | left & right | 2 |
| 22 | Locking device | 1 | |
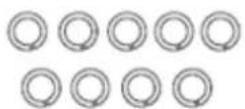
| 23 / C | Spring washer | ø8 | 9 |
| 24 | Boutle holder | 1 | |
SET-UP INSTRUCTIONS
We recommend setting up the unit with 2 people.
STEP 1
Attach the front (3) and rear (5) stand to the main frame with each 2 screws (1 / A), 2 spring washers (23 / C) and 2 washers (2 / B).
Align the unit so that it is level and straight on the door. The unit has adjustable end caps that can be adjusted for a level stand.
natural_image
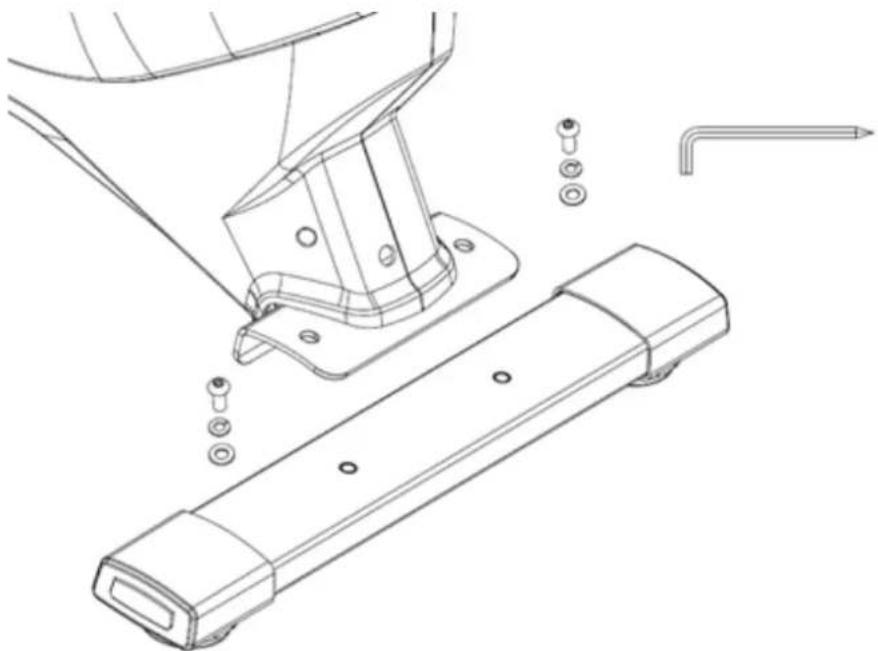
Technical line drawing of a mechanical assembly with mounting bracket and support components (no text or symbols)STEP 2
Lock the seat post (14) at the desired height using the locking device (22) and then attach the saddle (20) to the top of the saddle mount (15).
natural_image
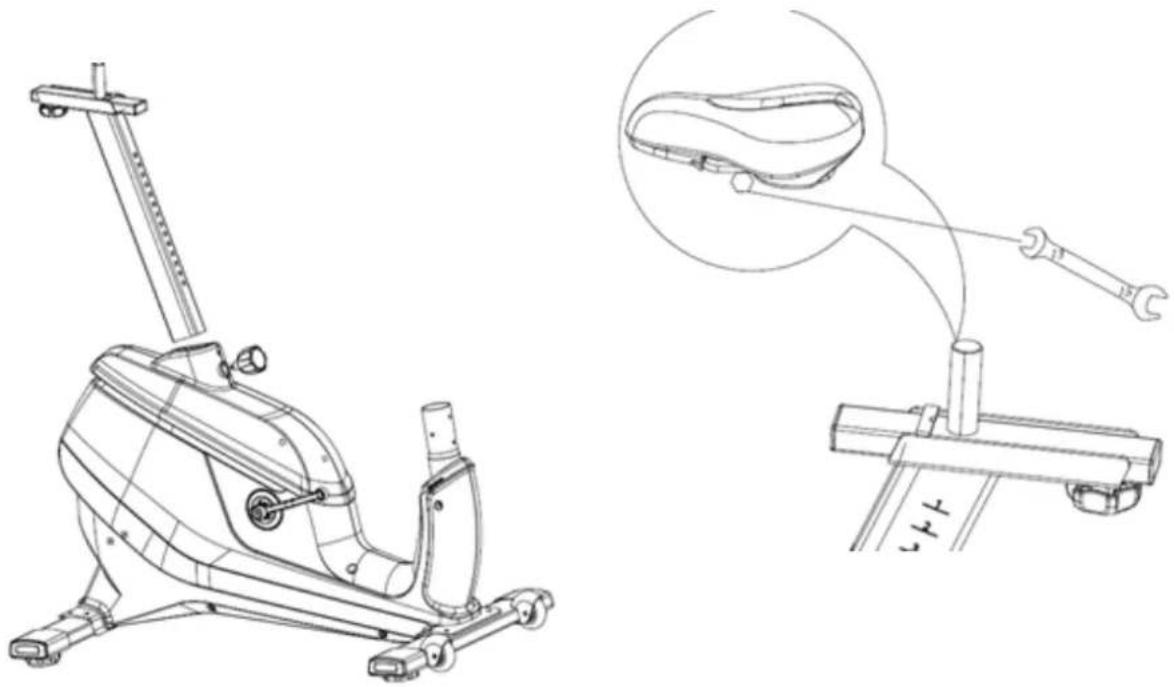
Technical line drawing of a stationary exercise machine with an inset showing internal components (no text or symbols present)STEP 3
Attach the right pedal (21R) to the right pedal arm by screwing it on clockwise, the left pedal (21L) is attached to the left pedal arm accordingly (screwing direction counterclockwise). The pedals are marked with „R“ for right and „L“ for left for better assignment.

natural_image
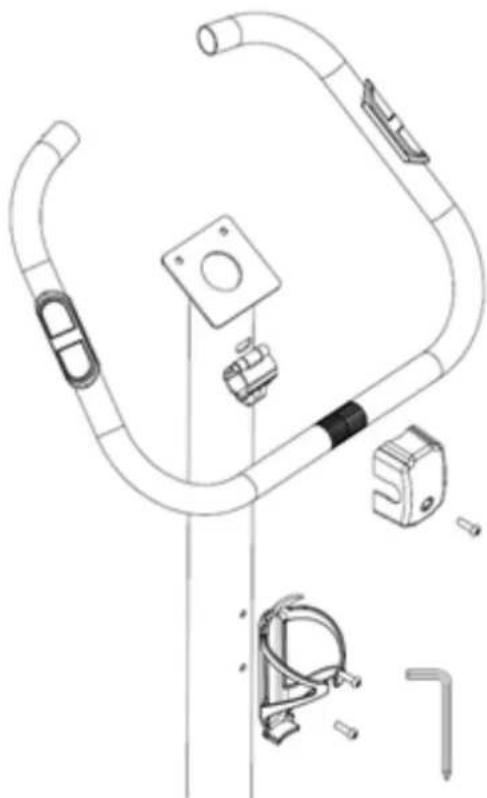
Technical line drawing of a stationary exercise seat assembly with labeled components (no text or symbols present)STEP 4
Guide the handlebar support (19) through the cover (17) and connect the lower and upper parts of the sensor cable. Then fix the handlebar support to the main frame as shown with 4 screws M8×20 (1 / A) and 4 washers 8mm (2 / B).

natural_image
Technical line drawing of a mechanical assembly with exploded view and component detail (no text or symbols)STEP 5
Attach the bottle cage and handlebar grip to the handlebar support as shown.
natural_image
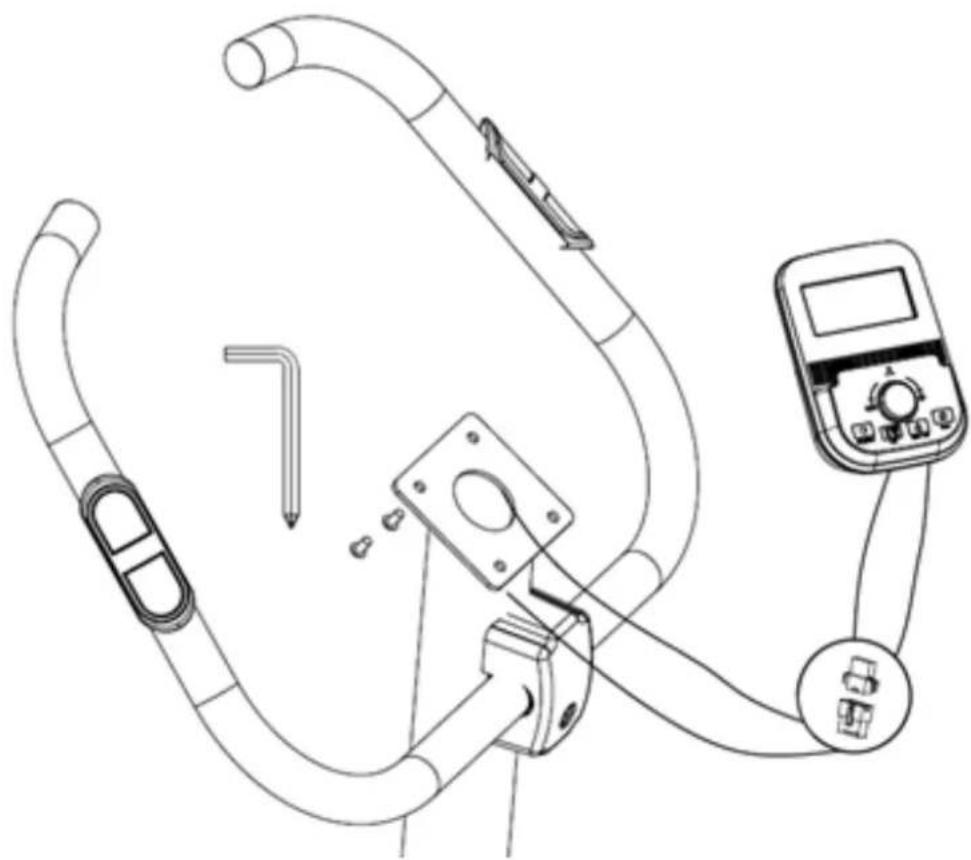
Technical line drawing of a mechanical device with attached components and mounting holes (no text or symbols)STEP 6
Carefully connect the sensor and pulse cables to the computer and then attach it to the top of the console support using 4 screws. These 4 screws are located on the back of the computer when delivered.
natural_image
Line drawing of a medical or electrical device with tubing, connector, and digital multimeter (no text or symbols)STEP 7
Connect the adapter plug to the unit in the area of the rear part of the main frame. („DC“).
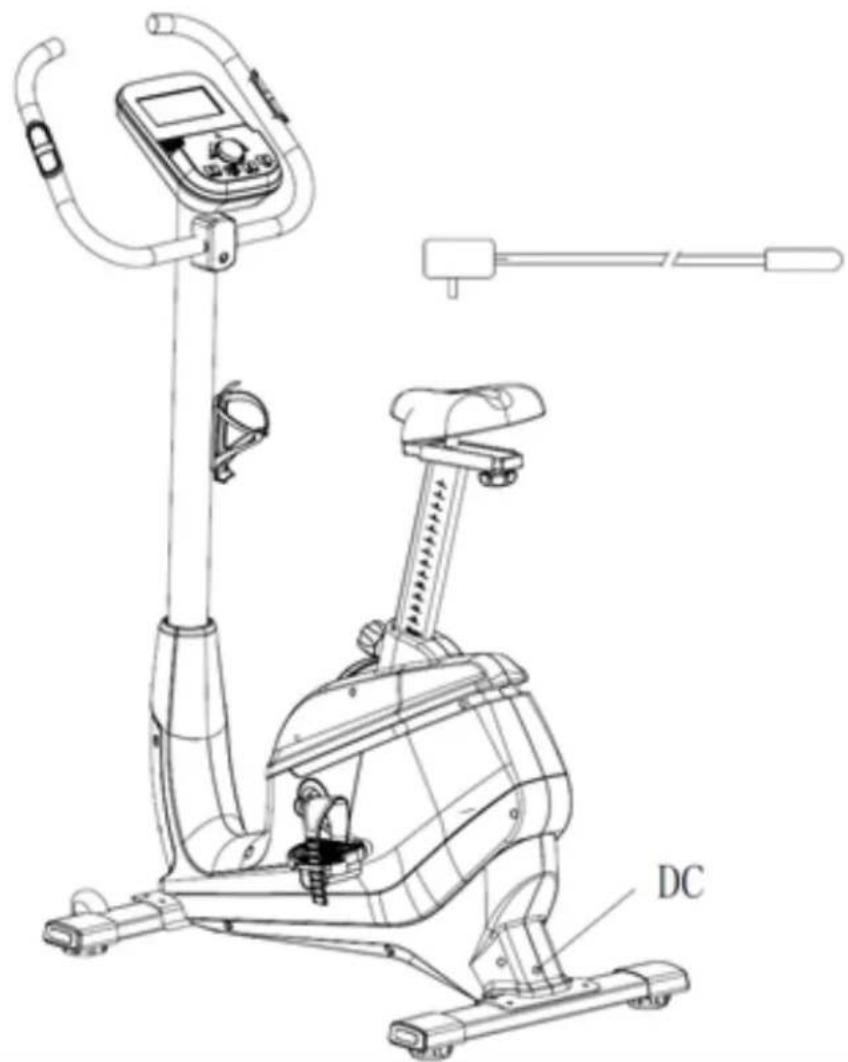
text_image
DCCheck again that all connections are tight and that the unit is standing straight. There are adjustable end caps on the rear stand if the height of the unit needs to be adjusted. There are transport wheels on the front stand of the unit that you can use to move the unit easily.

natural_image
Silhouette of a person pushing a stationary exercise bike (no text or symbols visible)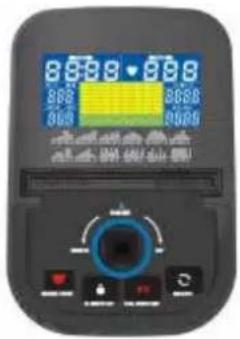
text_image
86.88 86.88 86.89 86.89FUNCTIONAL BUTTONS
UP / DOWN 1. Select training mode / 2. Increase or decrease values
MODE Confirm input or selection (only available in stop mode)
RECOVERY Start heart recovery rate measurement
BODY FAT Start a body fat measurement
START/STOP Start or stop a training
RESET 1. Back to main menu (in stop mode) /
- Pressing and holding the key for approx. 2 seconds sets all values to 0 and performs a restart
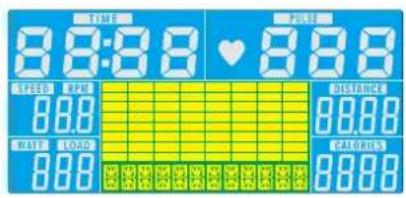
THE COMPUTER FUNCTIONS
TIME Time 0:00 - 99:99 minutes (presettable: 5:00 - 99:00)
DISTANCE Distance 0 - 99,99 km (presettable: 1,0 - 99,9)
CALORIES Calorie consumption* 0 - 9999 kcal (presettable: 100 - 9900)
PULSE Pulse frequency 30-230 beats/min. (presettable: 50-220)
WATT Watts 0 - 999 W (presettable: 10 - 350)
SPEED Speed 0 - 99,9 km/h
RPM Rounds per minute (0 - 999)
BODY FAT Body fat percentage
USE
After establishing the power supply (or a reset), the computer starts with an acoustic signal and a display test (all elements are briefly displayed). After that, other elements (e.g. wheel diameter, the unit (km or miles) and/or „E“) are displayed. After that the computer is in standby mode with the initial resistance set to 1 (low).
Now you can select a mode with UP / DOWN and MODE (MANUAL→P01→P02→P03→P04→P05→P06→P07→P08→P09→P10→P11→P12→P13→P14→P15→P16→P17).
text_image
TIME 8:8:8.8 PULSE 8:8.8 SPEED RPM 8:8 DISTANCE 8:8.8 WATH LOAD 8:8 CALORIES 8:8.8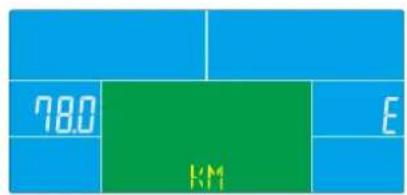
text_image
780 KM E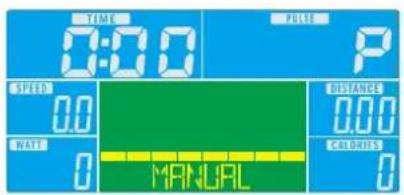
text_image
TIME 0:00 PULSE P SPEED 0.0 WATT 0 DISTANCE 0.00 CALORIES 0 MANUAL
Manual mode:
With this training mode you can adjust the resistance manually (with UP / DOWN). It is also possible to preset training values (time, distance or calories) with UP / DOWN and MODE. The training starts by pressing START/STOP. If a target value has been entered, the workout ends automatically after reaching the set value - but you can also stop the training at any time by pressing START/STOP.
text_image
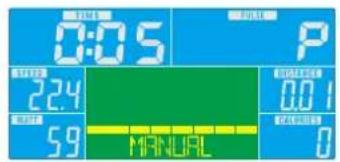
0:05 P 22.4 5.9 MANUAL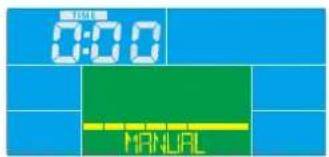
text_image
0:00 MANUALProgrammes P01-P12:
These training programmes offer a variety of training modes for different requirements. Just try it out! Basically the first 4 programmes (P01 - P04) are more suitable for beginners, the next 4 (P05 - P08) for advanced athletes and the last 4 (P09 - P12) for experienced athletes.
Select a programme with UP / DOWN and MODE. You can also set a target training time for each programme if you wish. The programme profile is displayed accordingly. Press START/STOP to start the training. If a target training time has been entered, the training ends automatically when it is reached - but you can also stop the training at any time by pressing START/STOP.
text_image
0:00 PULS P DATE 0 SPEED 0.0 CALORIES 0 DISTANCE 0.00Programmes P13-P16:
After selecting one of these programmes, you will be in heart rate controlled training mode. This training mode allows you to do an automatically controlled training depending on your pulse rate. You can set a target training time if you wish. Set your age with UP / DOWN and MODE. The programmes differ in terms of target heart rate:
P13: 55% Max H.R.C. - target heart rate = (220 - age) x 55%
P14: 75% Max H.R.C. - target heart rate = (220 - age) x 75%
P15: 90% Max H.R.C. - target heart rate = (220 - age) x 90%
P16: „TAG“ = target heart rate -- Enter value for target heart rate (with UP / DOWN and MODE).
Press START/STOP to start training. Depending on the measured pulse rate, the device tries to control the resistance automatically according to the desired heart rate level. If a target training time has been entered, the training ends automatically when it is reached - but you can also stop the training at any time by pressing START/STOP.

text_image
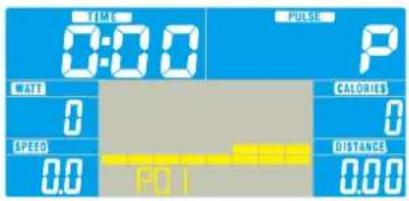
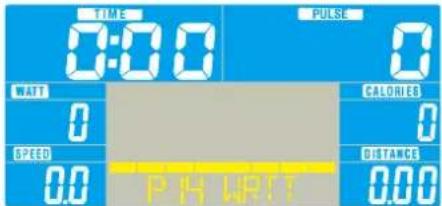
TIME 0:00 PULSE WATT CALORIES 0 0 SPEED DISTANCE 0.0 PUB HRC 0.00Programme P17: Watt-controlled programme
With this training mode you can do an automatically controlled training depending on the watt power. After selecting the programme and, if necessary, setting a target training time, you must set the watt value with UP / DOWN and MODE (between 10 and 350 watts). By pressing START/STOP the training starts. The computer will automatically control the pedalling resistance according to the value set. You can adjust the WATT preset value at any time during the training with UP or DOWN.
text_image
TIME 0:00 PULSE 0 WATT 0 SPEED 0.0 CALORIES 0 DISTANCE 0.00 P H ART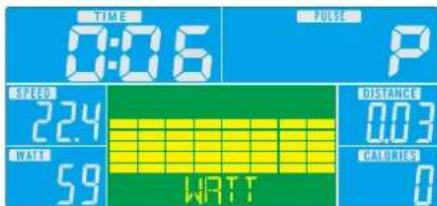
text_image
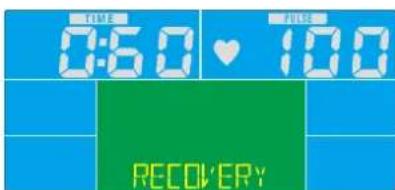
TIME 0:06 PULSE SPEED 22.4 WATT 59 DISTANCE 0.03 CALORIES WATT 0Recovery
With this special function, you can check your hearts recovery rate after a training session. This is a very important indication for the physical condition of your body. Try to improve your recovery rate with regular training sessions. The aim is, to calm down to a normal pulse frequency (frequency, when you are not in motion) as quickly as possible. To check your recovery rate, you need to keep your hands onto the hand pulse-sensors (or keep wearing a chest belt) after your exercise. Now press the button RECOVERY. The computer will start to countdown 60 seconds. During this period the computer will constantly measure your heart rate through the hand sensors. After this minute, your recovery rate will be displayed on the display. The range is F1.0 to F6.0, whereby F1.0 is very good and F6.0 is insufficient. Improve your value by intense and regular training! After the recovery function is finished, press RECOVERY again to return to normal operation mode.
text_image
0:50 ♥ 100 RECOVERYBody fat
Press BODY FAT to start a body fat measurement.
Set your gender, age, height and weight. Keep both hands on the hand pulse sensors while the measurement is being taken. It will take about 8 seconds to complete the measurement. After the measurement, your body fat percentage will be displayed in % and - depending on the computer model version - further information (classification symbol and/or BMI).
The computer can be connected via Bluetooth (frequency: 2.4 GHz) to communicate with the apps KinoMap FitShow and Zwift.
KINOMAP
The free KinoMap app turns your device into a powerful and fun fitness product! Choose from the geotagged video on Kinomap and go! Your position is shown in the video and as icon on the map. Download the Kinomap Fitness app in the app or play store by searching for 'Kinomap Fitness' or follow one of the links below.
Install and open the app and register resp. log in. Activate Bluetooth. Now add the training device as follows:

text_image
Apple Store Kinomap Kinomap SAS METALISERATE 4,3 ***** *53 4+ Neue Funktionen Tharua für Träking on Kinomap. Our dahl's concert is offering you the level experience there is Vorschau
text_image
Kinomap FOLGT SIE Kinomap Gesponsert1 STAVANGER, LIMBURG & HONG KONG RACES JOIN THE CHALLENGE HAMMER in Konomap IN ASSOCIATION WITH wahoo Mehr erfahren >-
- Tap on „+“ 3. Hometrainer
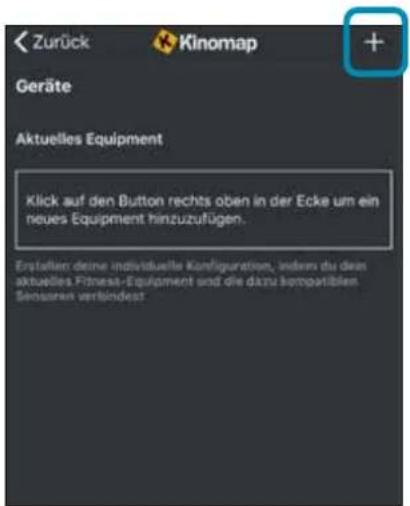
Now tap on OK and return to main menu. You can now choose a course for your exercise (depending on your type of KinoMap account maybe only some free courses). Press Start and begin to exercise!

text_image
Free videos Options HACCA.471 - Hong Kong Harbour HACCA.471 - Hong Kong Harbour HACCA.471 - Hong Kong HarbourFITSHOW
Turn on Bluetooth on your mobile device, download the app and install it on your iOS or Android device. You can find the app through your device's app search feature. After successful installation, you can launch the app on your mobile device.
To record training data, you need to register in the app. However, a simple training without permanent data recording is also possible without registration.

text_image
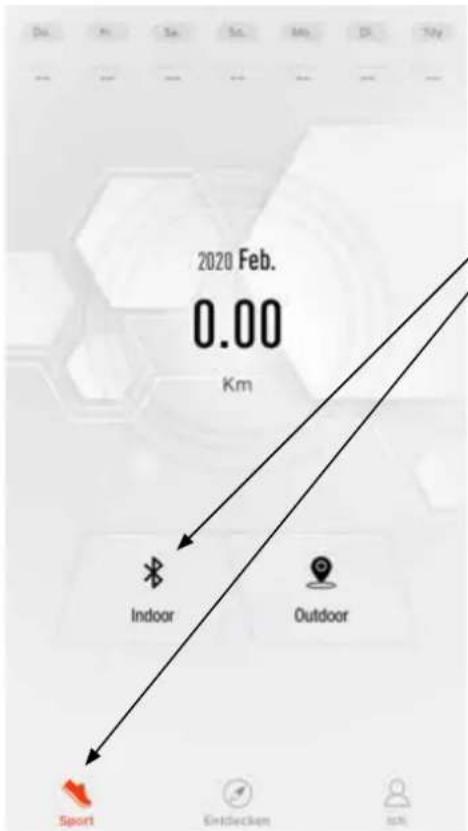
2020 Feb. 0.00 Km Indoor Outdoor Sport Entchecken Akti-
Tap on „Sport“ and „Indoor“
-
Tap on "Start"

text_image
Start Mehr ...If you are not registered, a corresponding message may appear:

Confirm by tapping „Continue“. Now you can start training and the corresponding data will be displayed in the app, while the device computer only displays the Bluetooth icon. If your device's training computer is not found, please check if Bluetooth is enabled on your training device and on your mobile device.
If you want to finish the workout, tap and hold the red STOP button in the app.
ZWIFT
Your device computer is equipped with Bluetooth and is compatible to the „ZWIFT“ app. Please note the following information. Download ZWIFT from the following sources and install the app on your device (e.g. PC, notebook or mobile phone):

ZWIFT
Windows: http://www.zwift.com/download/pc
MAC: http://www.zwift.com/download/mac
GooglePlay: https://play.google.com/store/apps/details?id=com.zwift.zwiftgame
Appstore: https://itunes.apple.com/us/app/id1134655040?mt=8
After the installation, please follow the instructions of the app. To connect to the computer of the training device, select the device and confirm with „OK“.
ZWIFT is a third party supplier. We offer you this connectivity to make your training even more interesting. However, due to possible changes or updates, we cannot guarantee permanent compatibility. You may need to register with ZWIFT to use the app. The app contains partly chargeable content.
SMARTPHONE HOLDER
The article comes with a rubber holder for the smartphone. This can be used to hold a smartphone (e.g. when using apps) on the device computer. In this way, the entire display of the smartphone can be viewed. The rubber holder is not needed for tablets or iPads.
natural_image
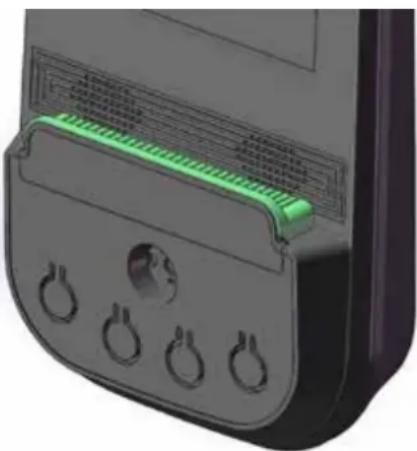
3D rendering of a device's internal components with green indicator lights and circular ports (no text or symbols visible)USING A CHEST-BELT
The computer is equipped with a built-in receiver for the wireless receipt of the pulse frequency with a compatible SKANDIKA chest-belt (frequency: 5.3 kHz, not included in the scope of delivery). Recommended range: 100 - 150 cm.
If you want to transmit your pulse frequency via chest-belt, follow these instructions:
- Make sure, the correct battery is inserted into the chest belt (button cell of type CR-2032, 3 volts). Battery replacement: Open the battery case cover on the back side of your transmitter (you may use a coin for easier handling) and replace the old battery by a fitting new one. The „+“ symbol should point upwards. Make sure, the sealing ring ist correctly placed. Close the case cover properly.
- The transmitter needs to be attached to the belt with the 2 buttons. Moisten the electrodes slightly before wearing the belt. This increases the contact sensibility and enables a better wireless signal transmitting.
- Put on the chest belt and make sure the electrodes are touching your breast directly. You may adjust the belt to a comfortable length. However, the electrodes must have contact with your skin in order to measure your heart rate correctly.
- The 5.3 kHz-chest-belt communicates with the computer via the built-in receiver. It may last up to one minute before a correct display can be seen.
Safety hint:
Do not use the chest-belt if you have a pacemaker, unless you double-checked with the producer of the pacemaker and with your doctor!
Battery-Disposal:
Batteries should not be considered as regular garbage. As consumer you are obliged to return finished batteries. The finished batteries can be returned to a collection base at your residential area or at places, where batteries can be bought.
WARM-UP and COOL-DOWN
A successful exercise program consists of a warm-up, aerobic exercise and a cool-down. Exercise for at least two or preferably three times a week, resting for a day between workouts. After several months, you may increase the frequency to four or five times per week.
WARM-UP
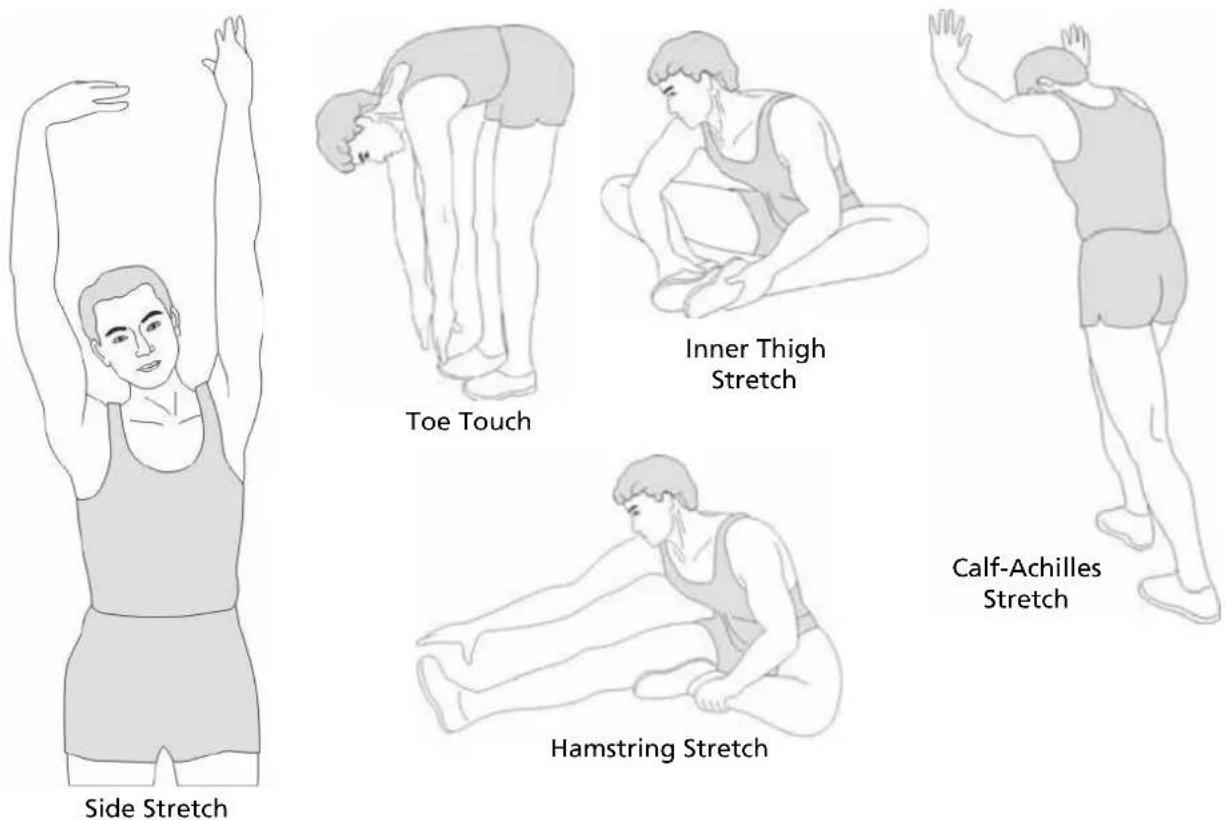
This stage helps to improve the blood circulation and prepares the muscles for your workout. It additionally helps to reduce the risk of injury or cramps. It is recommended to do some stretching exercises as shown here below. Hold each stretching position for approximately 30 seconds. Never force or jerk yourself into a stretching position – if you feel pain, STOP immediately. Warm-up exercises may also include brisk walking, jogging, jumping jacks, jump rope exercises or running in place.
STRETCHING
Muscles can be stretched more easily when these are warm. This reduces the risk of injury. DO NOT BOUNCE.
COOL-DOWN
This stage helps to soothe your muscles and your cardiovascular system after your workout. At the end of your workout, reduce the speed and exercise for approximately 5 minutes at this lower speed level. Afterwards, repeat the warm-up exercises as described above.
CLEANING & CARE
- Before cleaning the appliance, make sure that the appliance is switched off and the plug is disconnected. Allow the unit to cool down.
- Clean the device with a slightly damp cloth only. Never use brushes, aggressive cleaning agents, petrol, thinners or alcohol. Rub the seat dry with a clean dry cloth.
- Never immerse the appliance in water to clean it and ensure water cannot get into the appliance.
- Wait until the device is completely dry before using it again.
• Take care when rolling up the mains lead to avoid damaging it. - You should ideally store the device in its original packaging and keep it in a clean, dry place.
GUARANTEE CONDITIONS
For our devices we provide a warranty as defined below.
- In accordance with the following conditions (numbers 2-5) we repair defect or damage to the device free of charge, if the cause is a manufacturing defect. Therefore, these defects / damages need to be reported to us without delay after appearance and within the warranty period of 24 months after delivery to the end user. The warranty does not cover parts, which easily break (e.g. glass or plastic). The warranty does not cover slight deviations of the product, which are insignificant for usability and value of the device and damage caused by chemical or electrochemical effects and damages caused by penetration of water or generally force majeure damage.
- The warranty achievement is the replacement or repair of defective parts, depending on our decision. The cost of material and labor will be borne by us. Repairs at customer site cannot be demanded. The proof of purchase along with the date of purchase and / or delivery is required. Replaced parts become our property.
- The warranty is void if repairs or adjustments are made,
which are not authorized by us or if our devices are equipped with additional parts or accessories that are not adapted to our devices. Furthermore, the warranty is void if the device is damaged or destroyed by force majeure or due to environmental influences and in case of improper handling / maintenance (e.g. due to non-observance of the instruction manual) or mechanical damages. The customer service may authorize you to replace or repair defective parts after telephone consultation. In this case, the warranty is not void.
- Warranty services do not extend the warranty period nor do they initiate a new warranty period.
- Further demands, especially claims for damages which occurred outside the device, are excluded as long as a liability is not obligatory legal.
- Our warranty terms - which cover the requirements and scope of our warranty conditions - do not affect the contractual warranty obligations of the seller.
- Parts of wear and tear are not included in the warranty.
- The warranty is void if not used properly or if used in gyms, rehabilitation centers and hotels. Even if most of our units are suitable for a professional use, this requires a separate agreement.
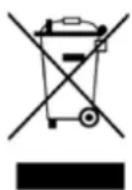
ENVIRONMENTAL PROTECTION
At the end of its life cycle, this product must not be disposed of with household waste but must be taken to a collection unit for the recycling of electric and electronic equipment. The symbol on the product, the instructions for use or the packaging express mention of this. The basic materials can be recycled as specified on the labelling.
When recycling the materials and finding other utilisation for used equipment, you are making a significant contribution towards protecting our environment. Ask at your council about the respective local disposal sites.
In accordance with our policy of continual product improvement, we reserve the right to make technical and visual changes without notice.
For spare parts please contact: service@skandika.de Service centre: MAX Trader GmbH, Wilhelm-Beckmann-Straße 19, 45307 Essen, Germany
Contenu

skandika.com/service
text_image
Technical diagram of a mechanical device with numbered parts for identification and assembly reference.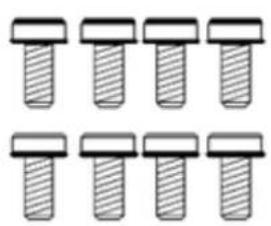
natural_image
Grid of nine identical screw or nut designs with no text or symbolsA
B

C

D
E
natural_image
Technical line drawing of a mechanical assembly with mounting bracket and rod (no text or symbols)ÉTAPE 2
natural_image
Technical line drawing of a stationary exercise machine with an inset showing internal components (no text or symbols present)ÉTAPE 3
natural_image
Technical line drawing of a stationary exercise bike with labeled components (no text or symbols present)ÉTAPE 4
natural_image
Technical line drawing of a mechanical assembly with exploded view and component detail (no text or symbols)ÉTAPE 5
natural_image
Technical line drawing of a mechanical assembly with pipes, connectors, and mounting brackets (no text or symbols)ÉTAPE 6
natural_image
Line drawing of a medical or electrical device with tubing, connector, and digital multimeter (no text or symbols)ÉTAPE 7
natural_image
Silhouette of a person pushing a stationary exercise bike (no text or symbols visible)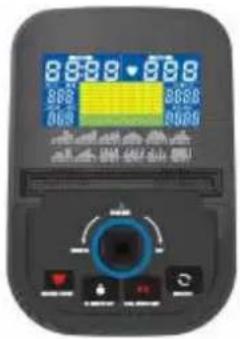
text_image
8688 8688 868 8689 868 8689TOUCHES DE FONCTION
MAC: http://www.zwift.com/download/mac
GooglePlay: https://play.google.com/store/apps/details?id=com.zwift.zwiftgame
Appstore: https://itunes.apple.com/us/app/id1134655040?mt=8