Cykling P14 Touchscreen - Exercise bike Skandika - Free user manual and instructions
Find the device manual for free Cykling P14 Touchscreen Skandika in PDF.

| Product type | Exercise bike with touch screen |
| Brand | Skandika |
| Model | Cykling P14 Touchscreen |
| Usage | Home, indoor use |
| Max user weight | 150 kg |
| Category | HA (not suitable for therapeutic applications) |
| Screen | Color touch screen, Android display |
| Resistance | 32 levels, electromagnetic adjustment |
| Training programs | Quick Start, Fitness Test, User Program, Goal, HRC, Watt Mode, 32 preset programs |
| Connections | Bluetooth 2.4 GHz, WiFi, headphone/speaker Bluetooth jack |
| Power supply | Mains power supply (220-240 V) |
| Heart rate sensors | Manual sensors on handles + compatible with Bluetooth chest strap |
| Included accessories | Adjustable saddle, left/right pedals, bottle holder, assembly tools |
| Safety | Automatic stop in case of no movement, child lock (password) |
| Cleaning | Soft cloth and mild detergent, avoid abrasive products |
| Warranty | 24 months, defective manufacturing parts |
| Customer service | MAX Trader GmbH, Germany (service@skandika.de) |
| Spare parts | Parts list provided in the manual (93 parts) |
| Software update | Via USB stick, firmware and APK update |
| App compatibility | Kinomap (Bluetooth) |
Frequently Asked Questions - Cykling P14 Touchscreen Skandika
User questions about Cykling P14 Touchscreen Skandika
0 question about this device. Answer the ones you know or ask your own.
Ask a new question about this device
Download the instructions for your Exercise bike in PDF format for free! Find your manual Cykling P14 Touchscreen - Skandika and take your electronic device back in hand. On this page are published all the documents necessary for the use of your device. Cykling P14 Touchscreen by Skandika.
USER MANUAL Cykling P14 Touchscreen Skandika
natural_image
Exterior view of a Skandiko stationary exercise bike (no signage or text visible on body)Cykling P14 Touchscreen
Inhalt

skandika.com/service
natural_image
Simple line drawing of a mechanical tool with a circular head and hexagonal base (no text or symbols)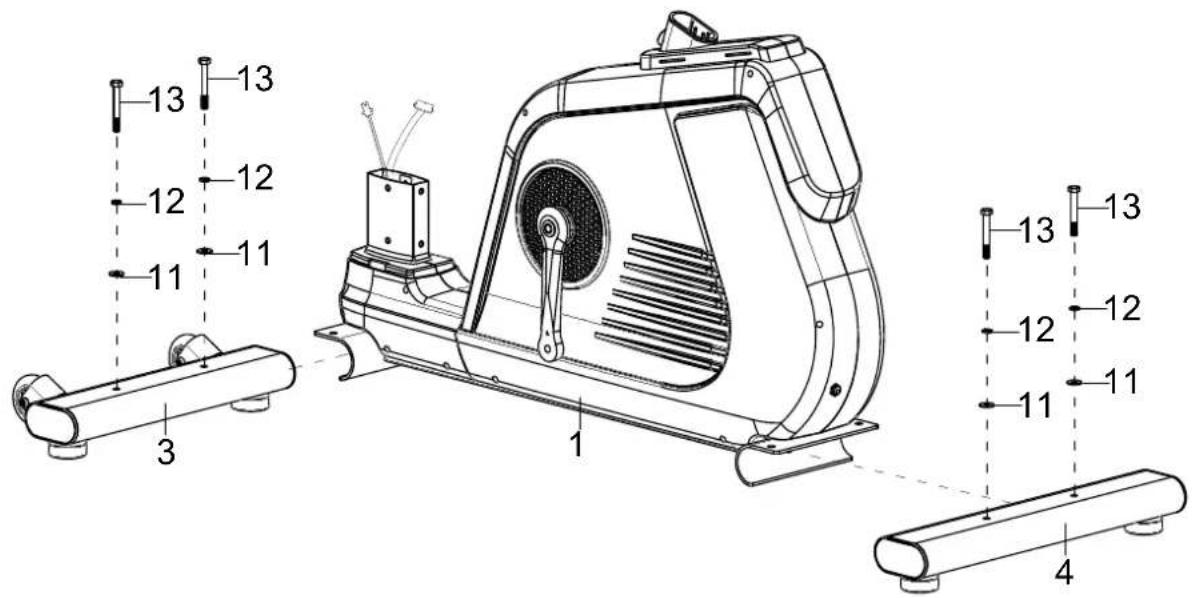
text_image
13 12 11 3 12 11 13 12 11 13 12 11 4SCHRITT 3
natural_image
Simple line drawing of a mechanical component with a central hub and cross-shaped end (no text or symbols)
text_image
Technical diagram of a stationary exercise machine with numbered parts for identificationSCHRITT 6
text_image
Technical diagram of an exercise machine with numbered components and labeled partsSCHRITT 7
text_image
GOAL This program allows the user to set one goal for the workout by selecting either TIME, DISTANCE, or CALORIES. Time --- min Distance --- km Calories 200 kcal Press Start to begin workout Start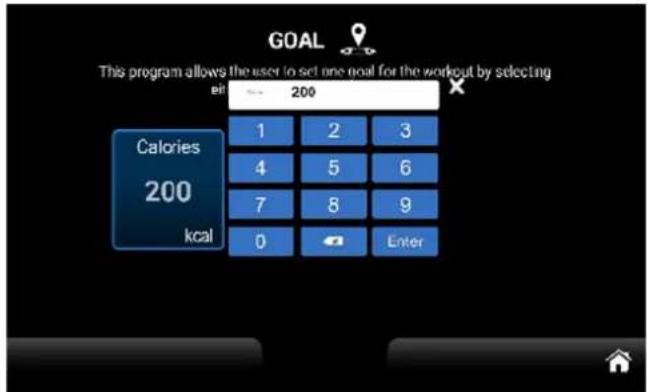
text_image
GOAL This program allows the user to set one goal for the workout by selecting cal 200 Calories 200 kcal 1 2 3 4 5 6 7 8 9 0 Entertext_image
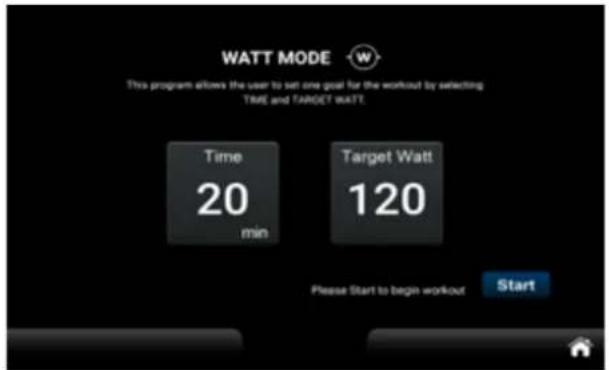
WATT MODE This program allows the user to set one goal for the workout by selecting TIME and TARGET WATT. Time 20 min Target Watt 120 Please Start to begin workout Start
text_image
WATT MODE This program allows the user to set one goal for the workout by selecting TIME and TARGET WATT Target Watt 120 Time 120 1 2 3 4 5 6 7 8 9 0 Enter
text_image
WATT MODE This program allows the user to set one goal for the workout by selecting TIME and TARGET WATT Time 20 1 2 3 4 5 6 7 8 9 0 Enter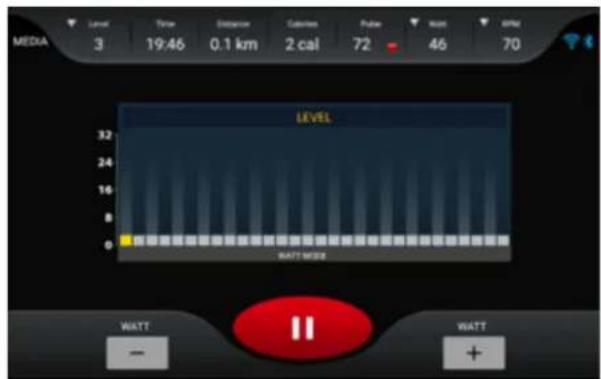
text_image
MEDIA 3 Time 0.1 km Calibration Pulse Rest 46 47 3 19:46 2 cal 72 70 LEVEL 32 24 16 8 WATT MORE WATT - WATT +text_image
Setting System Language US Bluetooth Brightness Wireless Sounds Lock SYSTEM & APPS Update Heart rate Skandikatext_image
Bluetooth Devices Available devices ※ A8 Connect Bluetooth Devices Pared devices 00 A8 DISCONNECT Available devicestext_image
B1.0 B2.0 B3.0 B4.0 B5.0 B6.0 B7.0 B8.0 B9.0 B10.0 B11.0 B12.0 B13.0 B14.0 B15.0 B16.0 B17.0 B18.0 B19.0 B20.0 B21.0 B22.0 B23.0 B24.0 B25.0 B26.0 B27.0 B28.0 B29.0 B30.0 B31.0 B32.0 B33.0 B34.0 B35.0 B36.0 B37.0 B38.0 B39.0 B40.0 B41.0 B42.0 B43.0 B44.0 B45.0 B46.0 B47.0 B48.0 B49.0 B50.0
text_image
Change from 0 Change from 0 Change from 0 Change from 0 Change from 0 Change from 0 Change from 0 Change from 0 Change from 0 Change from 0 Change from 0 Change from 0 Change from 0 Change from 0 Change from 0 Change from 0 Change from 0 Change from 0 Change from 0 Change from 0 Change from 0text_image
Setting Lock Password Password 1 2 3 4 5 6 7 8 9 0 Enter
text_image
Setting Lock Time 0 hr Distance 0 Km Password Ramian Time 0 min 00 sec Ramian Distance 0 Km Reset Reset
text_image
Setting Lock Customer Password add0 Password Reset SR Password ****text_image
SELECT MODE Please select from the following modes either Factory I, Factory II. Factory I Factory II 喻門
text_image
Factory II Setting Display Mode Off Brake Test Information Pause Mode Off Brake Level 32 King Turn SMC Brake COUNTER 370 Update Buzzer ON System Reset Reset Logo Touch Test Offtext_image
Factory I Unit Metric Engineset Type 734S5 764S4 Parityset Settingtext_image
Factory II Setting Information Please make sure the USB, which contains the updated software, is inserted into the USB port Update Logo Update S / WFEHLERMELDUNGEN
natural_image
Black Bluetooth device with a strap and logo, no visible text or symbols on the device itself.SKANDIKA Bluetooth Brustgurt
text_image
Exploded view diagram of a mechanical device with numbered components and exploded view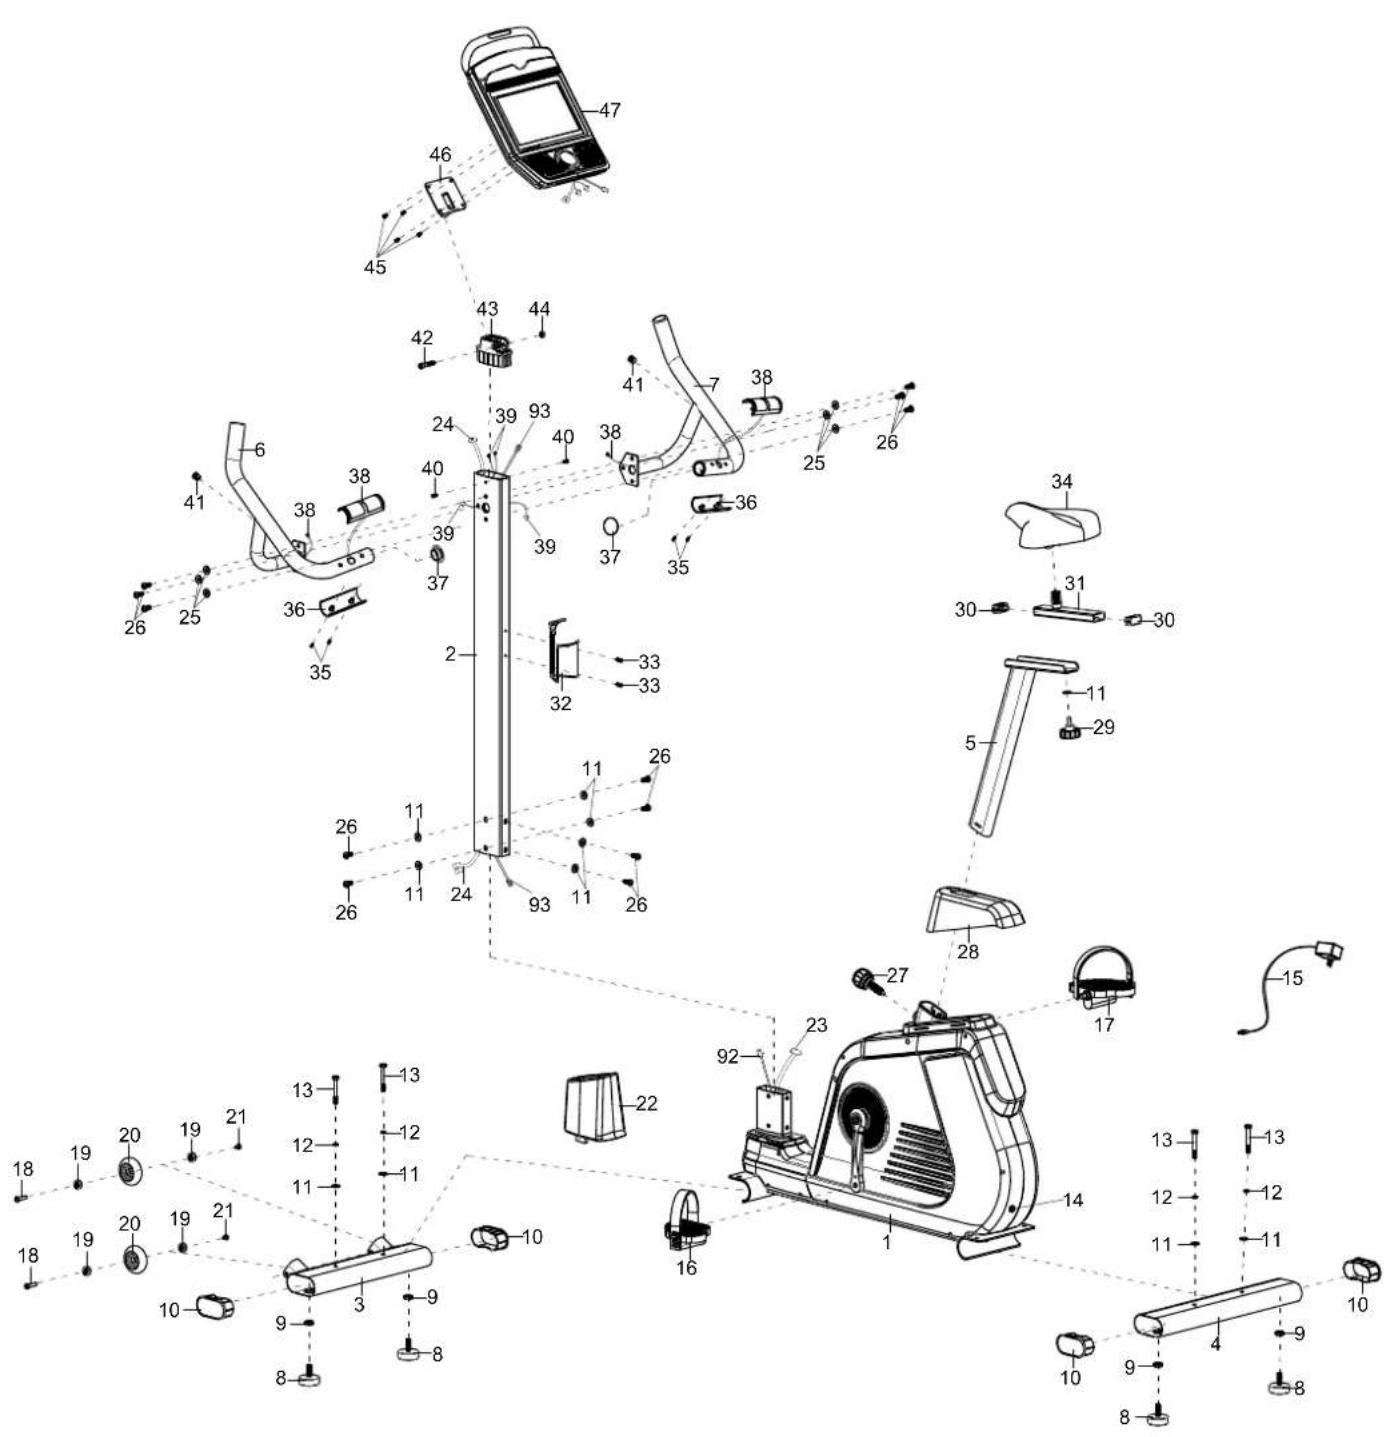
text_image
Technical diagram of a stationary exercise machine with numbered components and labeled partsnatural_image
Pure diagram of three identical mechanical shafts with threaded end caps, no text or symbols presentnatural_image
Eight circular diagrams with internal lines, no text or symbols present35 Safety precautions
36 Set-up instructions
43 Computer operation manual
57 Warm-up and cool-down
58 Using a chest-belt
59 Connecting to KINOMAP app
60 Cleaning/maintenance and Troubleshooting
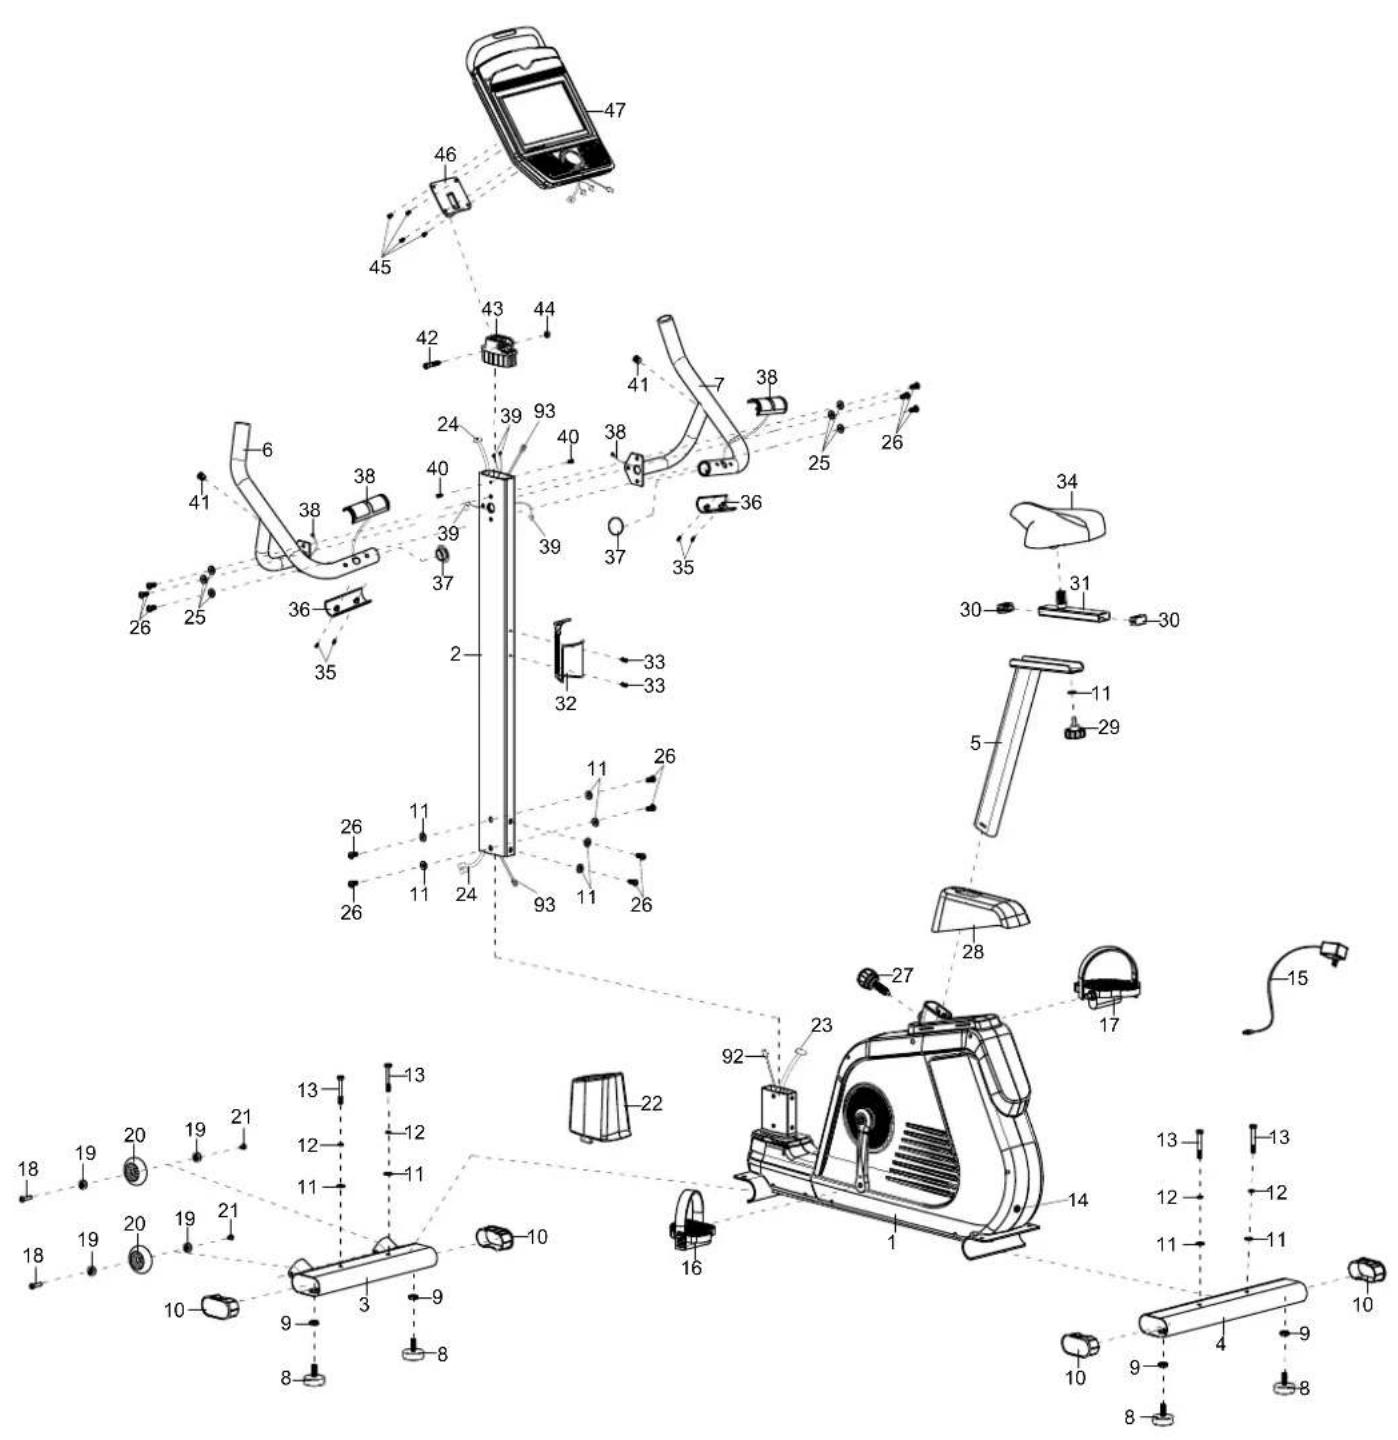
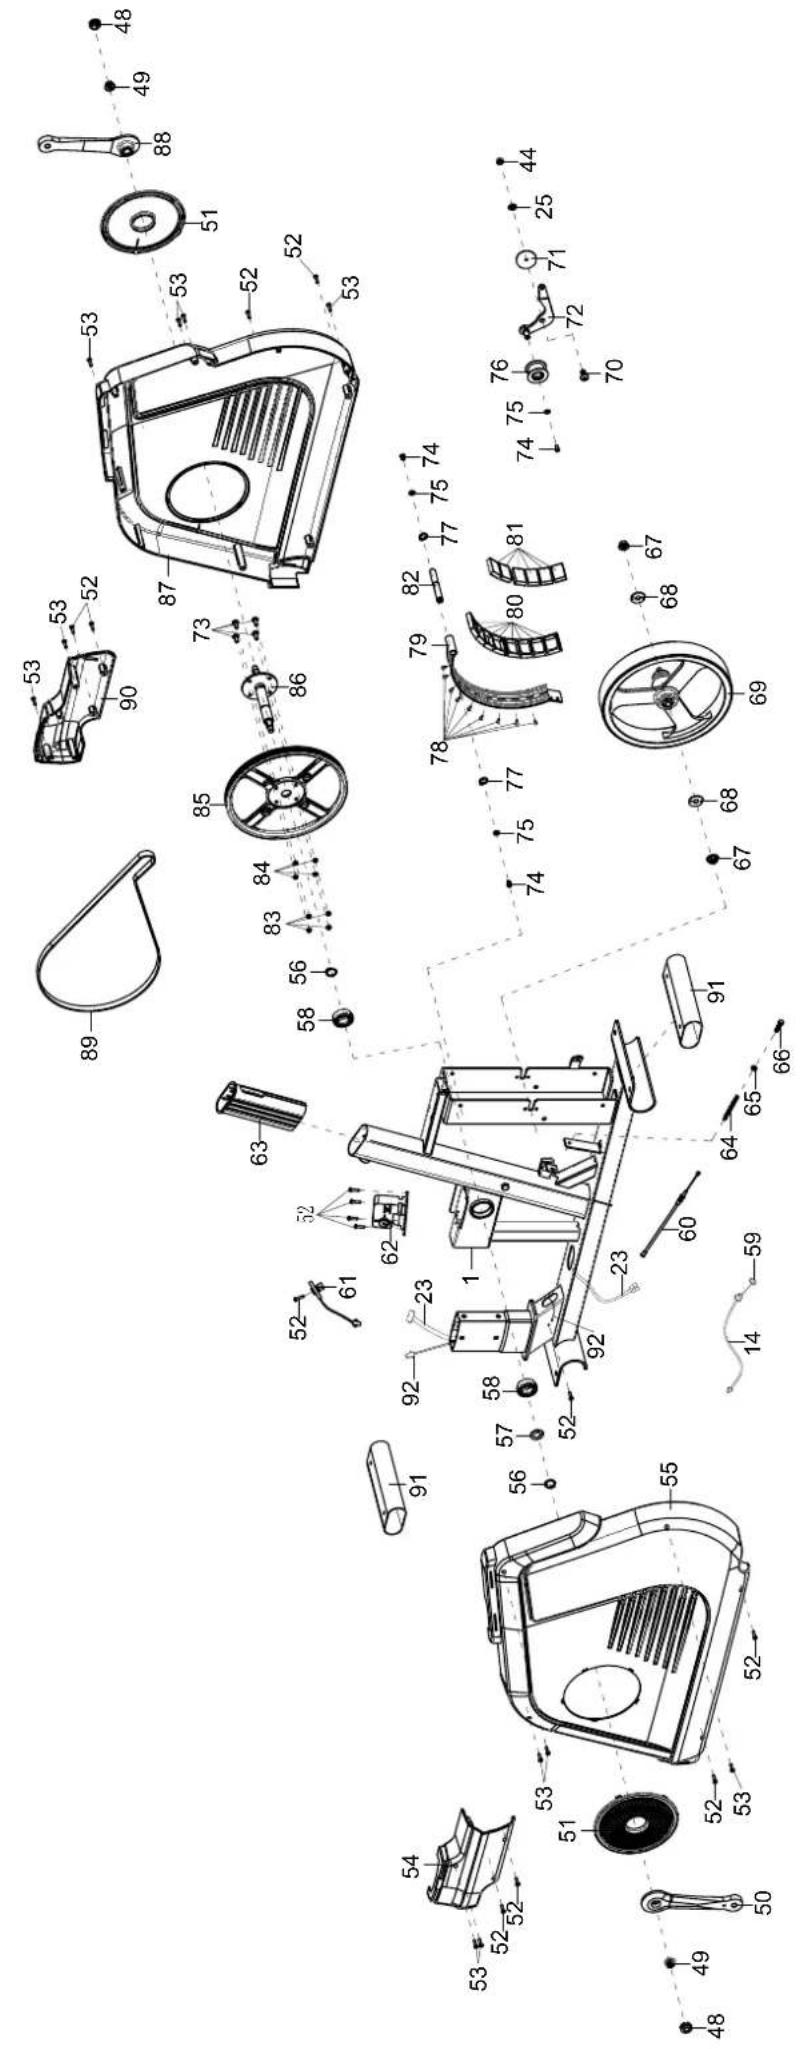
61 Explosion drawing
63 Parts list
64 Small pieces pack
65 Guarantee conditions

skandika.com/service
Please visit the Skandika Service portal on our website for setup & help videos, FAQs and downloadable instructions.
For more information about Skandika, simply visit our main page www.skandika.com

WARNING
To reduce risk of injury, read and understand this instruction manual before using the device! This machine is intended for home use only in accordance with the instructions provided in this manual. Read the instruction manual carefully before using this device and keep the instruction manual for future use.
SAFETY PRECAUTIONS
- To ensure the best safety of the device, regularly check it on damages and worn parts.
- If you pass on this device to another person or if you allow another person to use it, make sure that that person is familiar with the content and instructions in these instructions.
- Only one person should use the exerciser at a time. The maximum load of this device is 150 kg. Class: HA - not suitable for therapeutically use!
- Before the first use and regularly make sure that all screws, bolts and other joints are properly tightened and firmly seated.
- Before starting an exercise programme, consult your doctor to determine if you have any health or physical conditions that could compromise your health and safety or prevent you from using the machine properly. Your doctor's advice is essential if you are taking medication that affects your heart rate, blood pressure or cholesterol levels.
- Pay attention to your body's signals. Exercising incorrectly or excessively can damage your health. Stop exercising if you experience any of the following symptoms: pain, chest tightness, irregular heartbeat, shortness of breath, lightheadedness, dizziness or feeling nauseous. If you experience one or more of these symptoms, you should first consult your doctor before continuing with your exercise programme. Always warm up carefully before you start training.
- Keep small children and pets away from the exercise equipment. Never leave children under 14 years of age unattended in a room with the machine.
- Parents and other guardians should be aware of their responsibility, as due to children's natural play instinct and eagerness to experiment, situations are to be expected for which training equipment is not built.
-
Set up the unit in a dry, level place and protect it from moisture. If you want to protect the place of installation against pressure marks, dirt, etc., we recommend that you place a suitable, non-slip base under the unit. Do not use the unit near water or outdoors.
-
Always use the unit as described in this manual. If you notice any defective parts when assembling or checking the unit, or if you hear unusual noises coming from the unit during exercise, stop using the unit immediately and do not use it again until the problem is solved. Contact the customer service.
- Always wear appropriate clothing and shoes which are suitable for your workout on the device. The clothes must be designed in a way so that they will not get caught in any part of the device during the work-out due to their form (for example, length). Be sure to wear appropriate shoes which are suitable for the work-out, firmly support the feet and which are provided with a non-slip sole.
- Make sure that you and other persons never place any parts of your body (e.g. fingers) in the area of moving parts. In addition, there should be no objects in the immediate vicinity that could interfere with the training process.
- To avoid physical injury and/or damage to the product or property, the unit must be lifted and moved properly.
- This unit is intended for indoor and home use only, it is not intended for commercial use!
- Never repair the appliance without authorisation. If problems occur, contact customer service.
- This appliance is intended for use and storage in cool, dry conditions. You should avoid storing it in extremely cold, hot or humid areas as this may cause corrosion and other related problems.
- Do not work out immediately after meals!
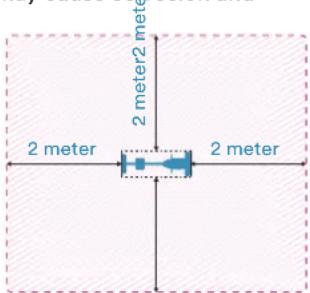
- Please only exercise with a minimum clearance area of 2 meters around the device.
Be sure to consult a physician before you start any device program. He may give you proper hints and advice with respect to the individual intensity of stress for you, your workout and sensible eating habits. This is especially important for individuals over the age of 35 or persons with pre-existing health problems.
SET-UP INSTRUCTIONS
Before you begin assembly, we recommend that you find a place with sufficient free space and a flat surface for assembly. We recommend that 2 people carry out the assembly.
Please use the parts list to check whether all the parts required for assembly are available. Some parts may already be pre-assembled to make assembly easier for you.
We recommend that you use the tools supplied to assemble the appliance.
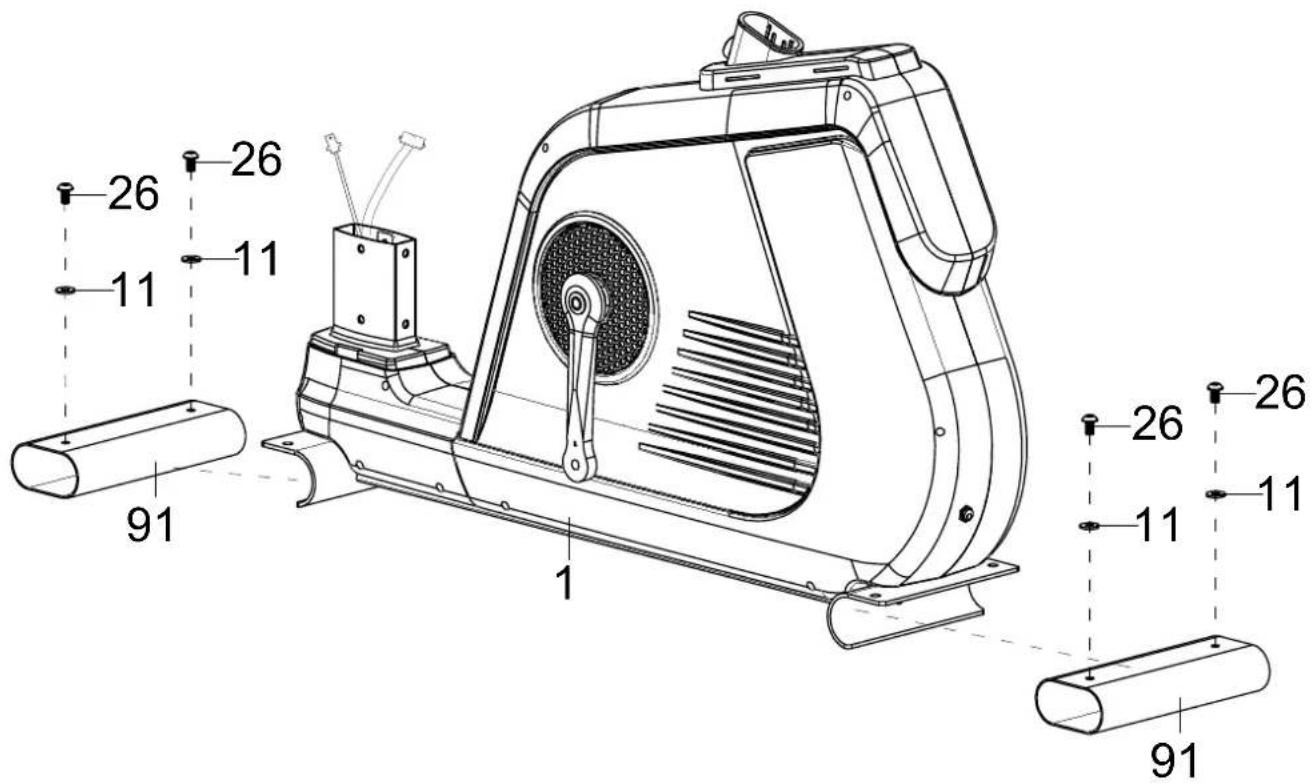
STEP 1
Remove two screws (26), two large washers (11) and the two transport protection tubes (91) from the front and rear foot mounting bracket of the main frame (1). These parts were used to protect the main frame (1) during transport and can now be disposed of completely.
text_image
26 26 11 11 91 1 26 26 11 11 91STEP 2
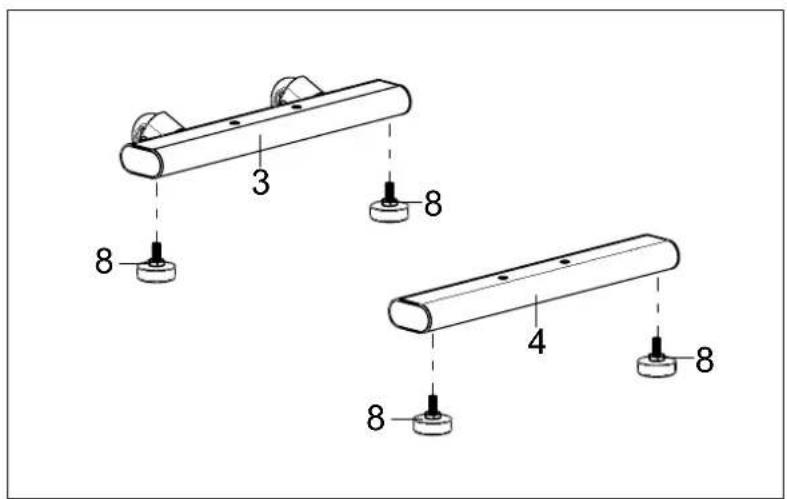
Attach the 4 adjustable feet (8) to the front (3) and rear (4) feet as shown.
Loosen the 4 screws (13), spring washers (12) and washers (11) from the two feet (3/4) and then mount them with these parts on the main frame (1).
The adjustable feet (8) are used later to ensure that the appliance can be levelled.
text_image
3 8 4 8 8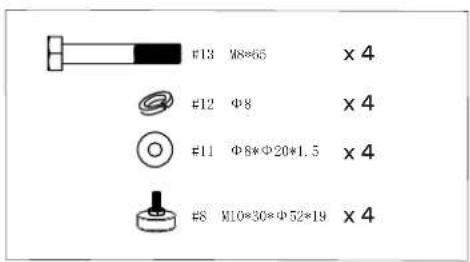
text_image
#13 M8*65 × 4 #12 Φ8 × 4 #11 Φ8*Φ20*1.5 × 4 #8 M10*30*Φ52*19 × 4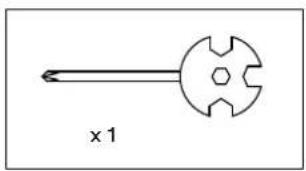
natural_image
Simple line drawing of a mechanical tool with a circular head and hexagonal base (no text or symbols)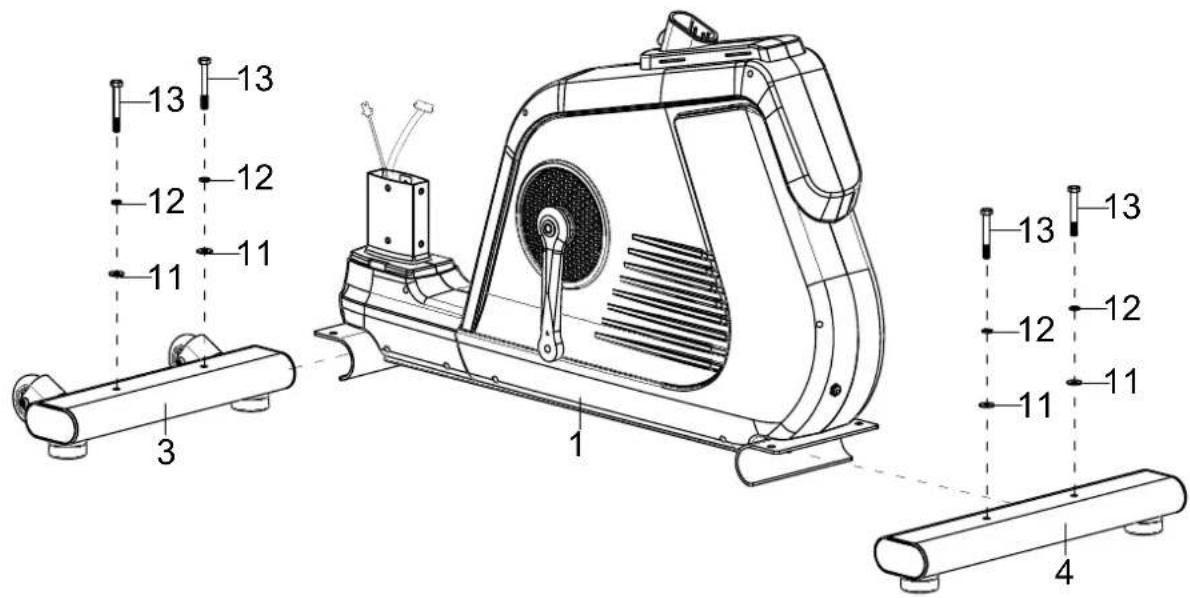
text_image
13 12 11 3 1 11 12 12 13 13 12 12 13 13 12 11 4STEP 3
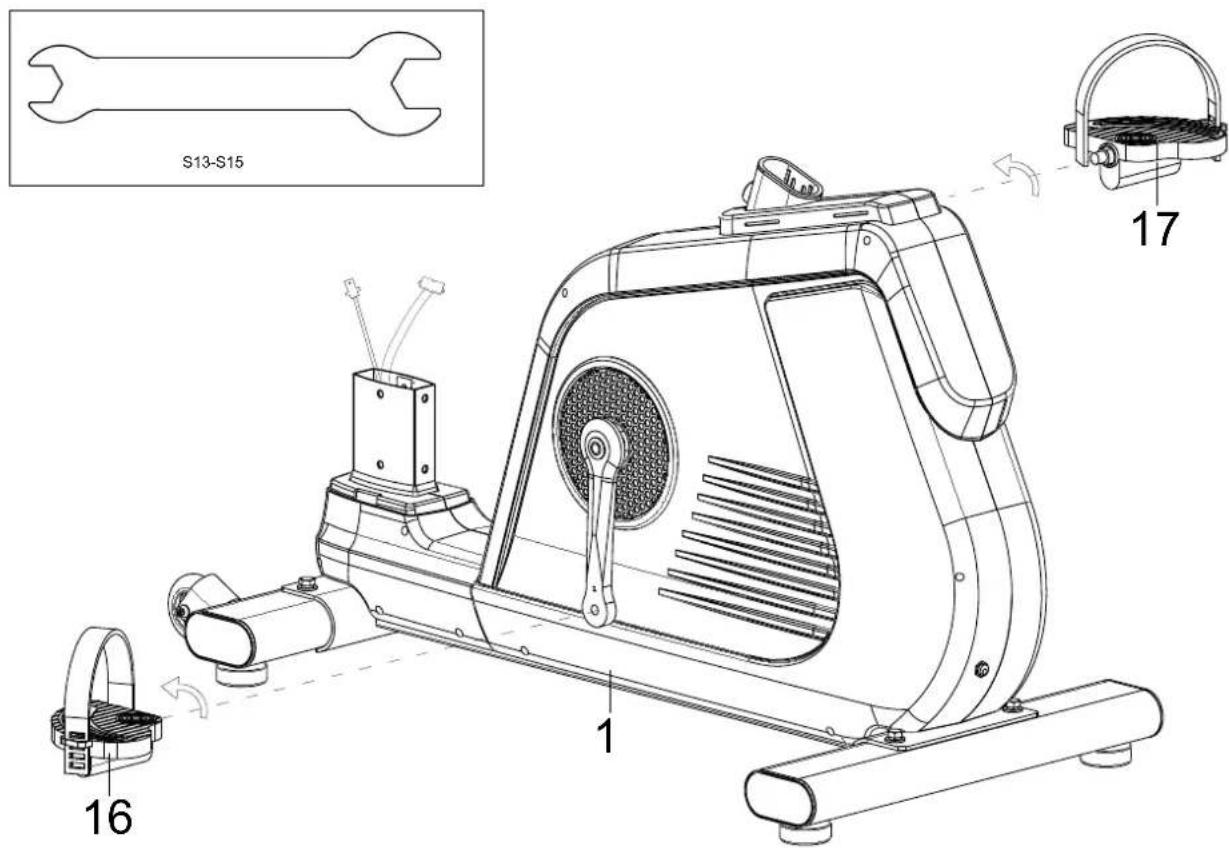
Fit the left and right pedals (16 & 17) to the left and right pedal cranks. Ensure the correct direction of rotation as shown. The left pedal must be mounted anti-clockwise and the right pedal clockwise. The pedals, pedal cranks and pedal belts are labelled „R“ for right and „L“ for left.
text_image
S13-S15 16 1 17STEP 4
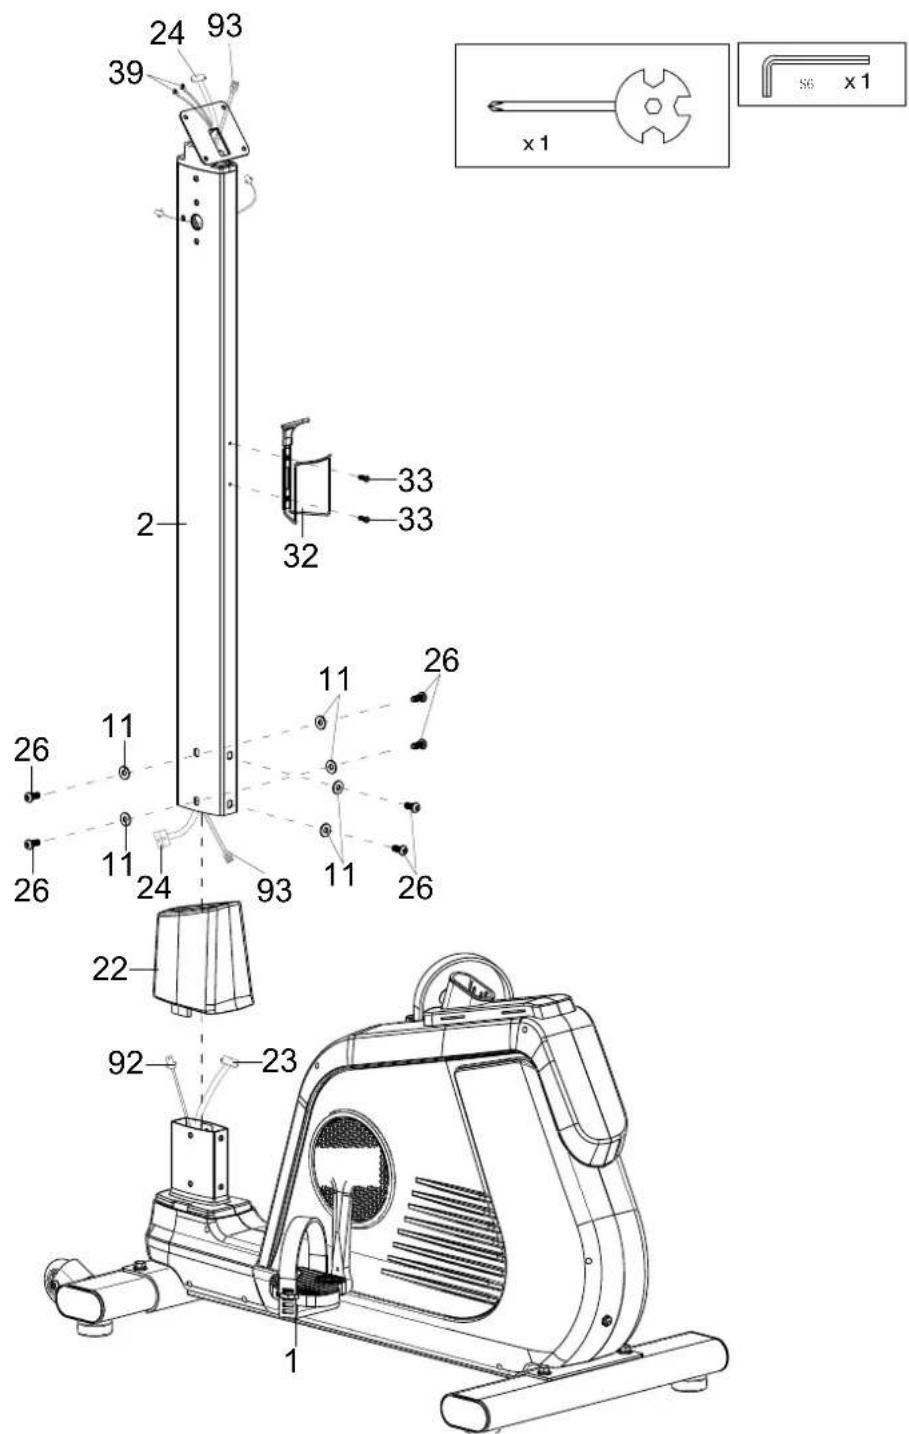
Remove 6 screws (26) and 6 washers (11) from the main frame (1) and slide the lower cover (22) onto the pipe connection from the main frame (1) as shown.
Connect the cable parts (23 with 24) and (92 with 93).
Then carefully connect the handle support (2) and the main frame (1) (make sure not to pinch any cables) and fix them together using the 6 screws (26) and 6 washers (11).
Now remove the two screws (33) from the handle support (2) and use them to attach the bottle holder (32).
text_image
24 93 39 2 32 33 33 x1 26 11 11 26 24 93 11 26 22 92 23 1STEP 5
Attach the saddle (34) to the saddle adjuster (31) and then the saddle adjuster (31) to the seat post (5) using the washer (11) and the quick adjuster (29).
Place the cover (28) on the main frame (1) as shown below and then fix the seat post (5) in the desired position using the quick adjuster (27).
You can later adjust the seat height and the horizontal saddle position to your requirements by loosening and refastening the quick adjusters (27 or 29) in the desired position.
However, make sure that the quick adjusters are always guided through a hole and tightened securely and that the marked maximum positions (STOP mark on the tube) are never exceeded.
text_image
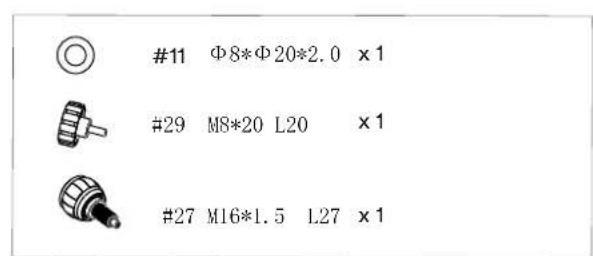
#11 Φ8*Φ20*2.0 x 1 #29 M8*20 L20 x 1 #27 M16*1.5 L27 x 1
natural_image
Simple line drawing of a mechanical component with a central hexagonal cutout and a pointed tip, labeled 'x 1' (no text or symbols on the diagram itself)
text_image
Technical diagram of a stationary exercise machine with numbered parts for identification and assembly reference.STEP 6
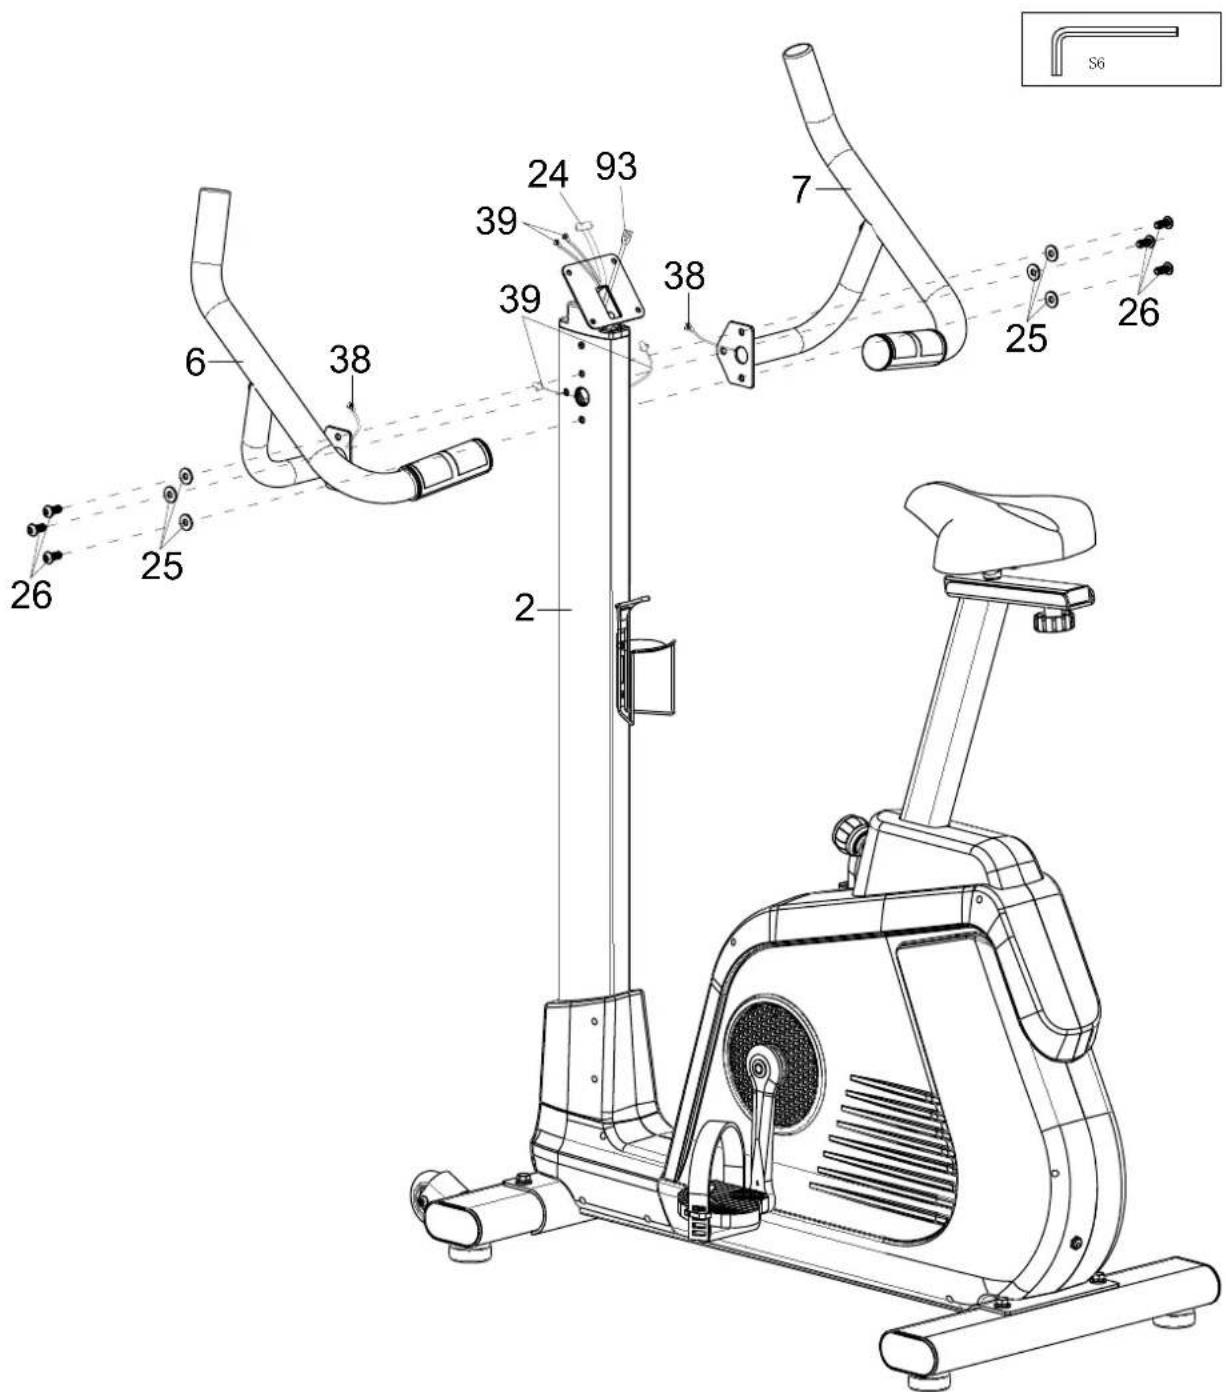
Remove the 6 screws (26) and washers (25) from the handle support (2).
Connect the hand pulse cable (38) from the left handle (6) to the cable extension (39) from the handle support (2) and then attach the left handle (6) to the handle support (2) using 3 screws (26) and 3 washers (25).
Proceed in the same way with the right handle (7).
text_image
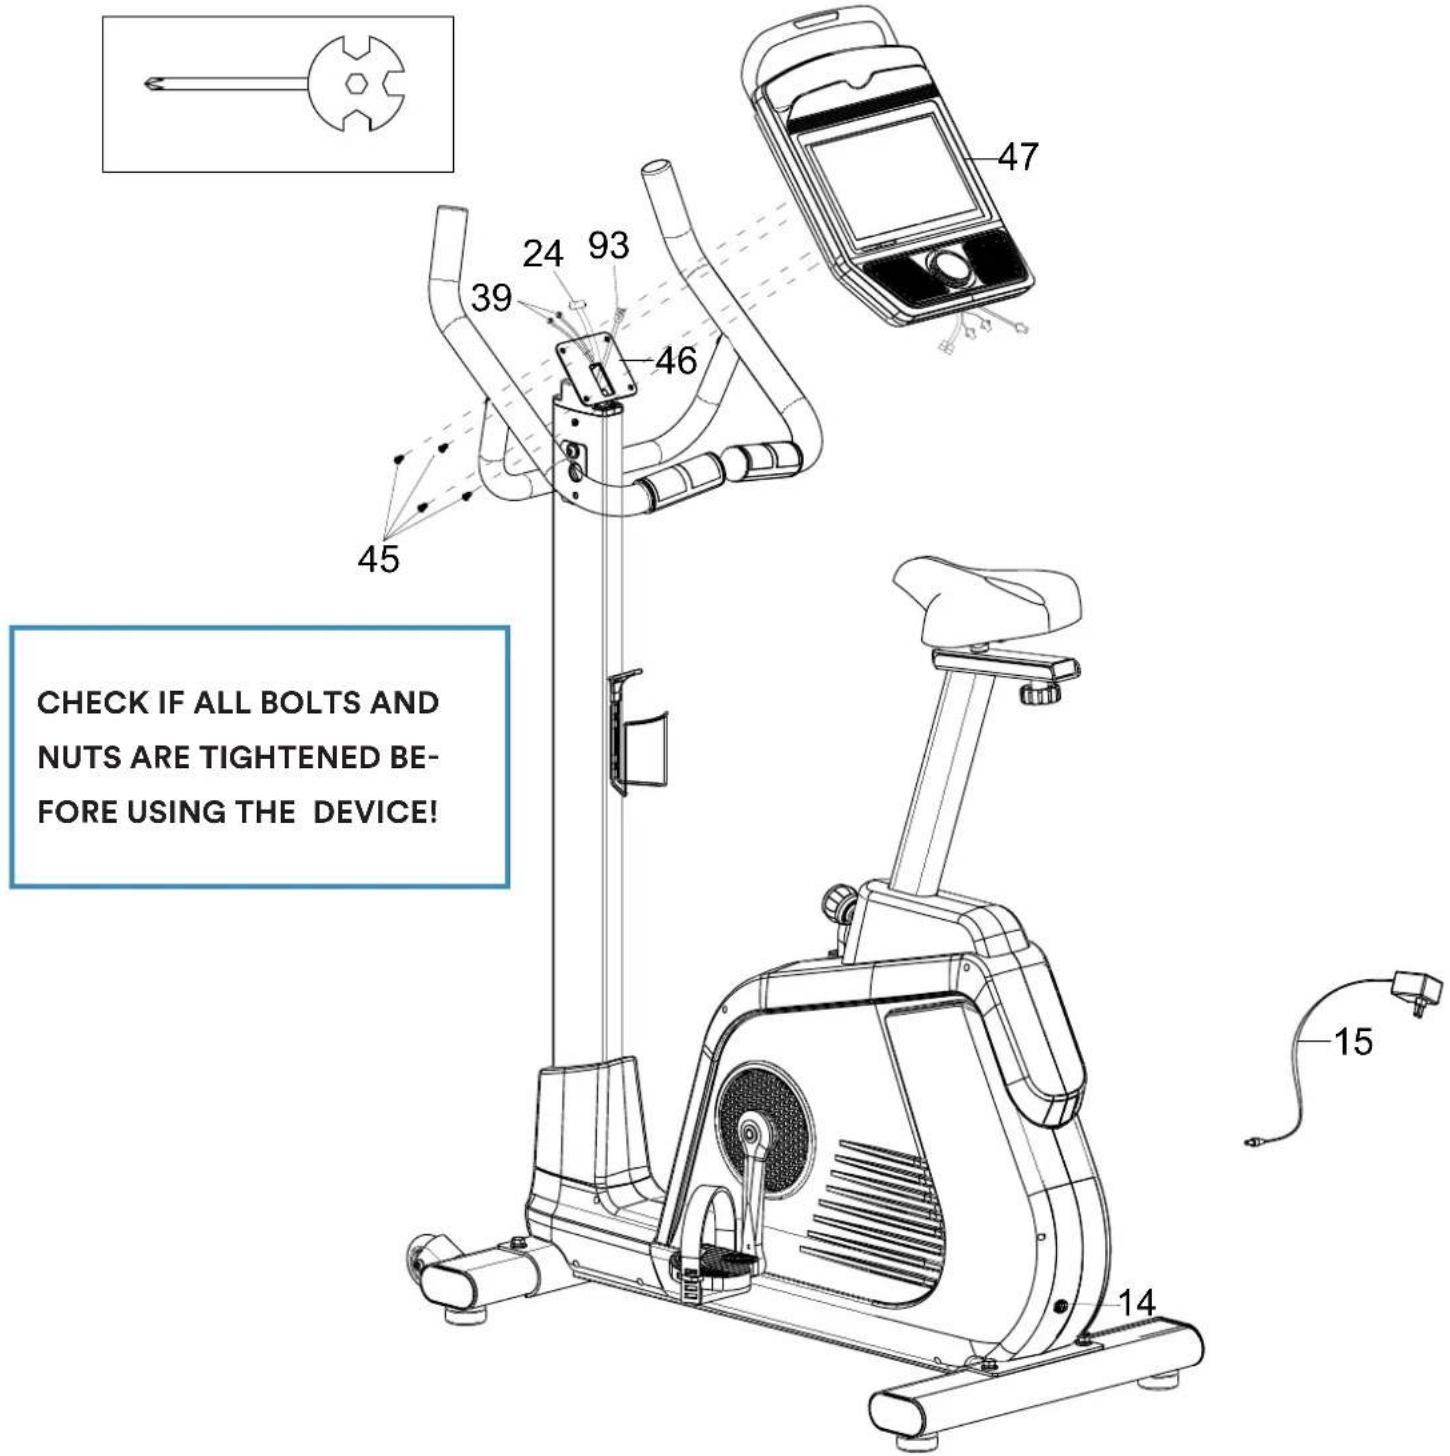
Technical diagram of an exercise machine with numbered components and labeled partsSTEP 7
Remove the 4 screws (45) from the back of the computer (47).
Connect the cable extension (39), the computer cable (24) and the earthing cable II (93) to the appropriate connections on the computer (47).
Then mount the computer (47) on the computer bracket (46) using the 4 screws (45).
Now connect the device to the power supply by plugging the power supply unit (15) into the power supply connection (14) on the device and connecting it to a suitable socket.
text_image
CHECK IF ALL BOLTS AND NUTS ARE TIGHTENED BE- FORE USING THE DEVICE!The touchscreen computer has 2 main input options, which are described in more detail below:
- Physical control knob
- Homepage- / Workout-Controls via Touchscreen
Physical control knob
Press the button (an acoustic signal is emitted):
- Switch on the computer or (if already switched on) activate training mode
- During training mode, pressing the button pauses or resumes training
- Turn the button (an acoustic signal is emitted):
- Turn clockwise = increase the pedalling resistance
- Turning anti-clockwise = decreases the pedalling resistance
Homepage- / Workout-Controls via Touchscreen
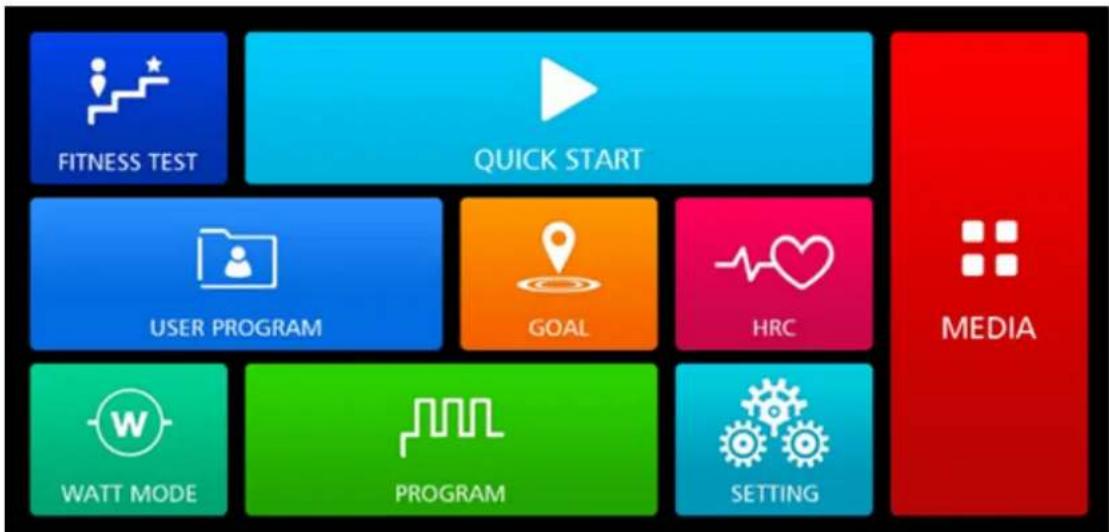
After the initial switch-on screen („android“ lettering), the start screen is displayed:
flowchart
graph TD
    A["FITNESS TEST"] --> B["QUICK START"]
    C["USER PROGRAM"] --> D["GOAL"]
    E["WATT MODE"] --> F["PROGRAM"]
    G["SETTING"] --> H["MEDIA"]
You can access the various functions by touching the relevant button. The selection options shown below may vary depending on the settings, training mode or device configuration.
If there is no interaction for approx. 3 minutes, the computer automatically returns to the start screen.
SHARE FUNCTIONS OF THE 7 EXERCISE MODES
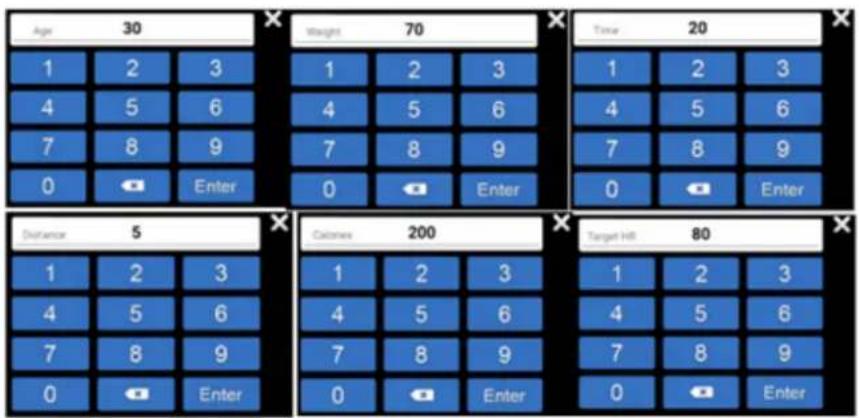
After selecting one of the 7 training modes („Fitness Test“, „Quick Start“, „User Program“, „Goal“, „HRC“, „Watt mode“ or „Programme“), input windows appear for entering target values within the respective training mode:
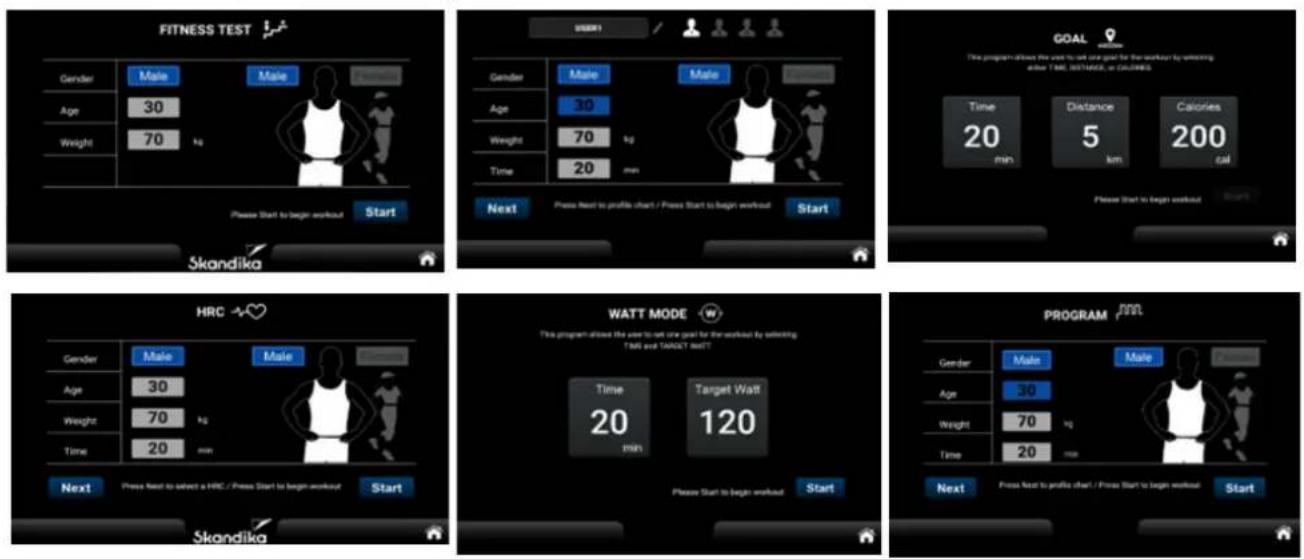
TIME: A target time must be more than 5 minutes (max. 999 minutes). In Watt mode, a target time of 0 is automatically assumed to be 5 minutes and in Goal mode at least 1 minute. A maximum of 999:59 minutes can be displayed, after which the display starts again from 0.
DISTANCE: Adjustable from 1 to max. 999 kms or miles.
CALORIE: Adjustable from 10 to 9.999 kcal.
TARGET WATT: Adjustable from 10 to 350 watt.
SEX: Male or Female.
AGE: Adjustable from 10 to 90 years.
WEIGHT: Adjustable from 20 to 200 kgs (44 to 440 lb.).
HRC / Target Heart Rate: We will explain these functions later in this manual Display in beats per minute.
Press the HOME button always returns to the display of the switch-on screen.
„START“ begins the training. The numeric keypads help you to enter the corresponding numerical values:
WORKOUT
Training begins after touching „START“. The computer switches to WORKOUT mode:

text_image
MEDIA Level Time Distance Calories Pulse Watt RPM 1 00:06 0.0 km 1 cal 0 25 71 LEVEL 32 24 16 8 0 QUICK START Level - II Level +Computer functions:
Level: Level 1 = easy to max. Level 32 = very difficult.
Time: Training time up to max. 999:59 (minutes:seconds). If a target value has been set for the time, a countdown to 0 will be started, then the training stops at 0.
Distance: Distance up to max. 999.9 km. You may also set a target distance (countdown to 0).
Calories: Burned calories up to max. 9999 kcal. You may also set a target calorie value (countdown to 0). Remark: This value is only used to compare different training sessions and must not be used as the basis for a medical/physiological analysis.
Pulse: Pulse rate display (40 to 200 beats per minute, measured using hand sensors). If the pulse rate is 0 (or no measured value), the red heart symbol lights up continuously; if a pulse rate is measured, the heart symbol flashes once large and once small.
Watt resp. Mets: Display of the watt value (1 to 529 W) resp. metabolic rate.
RPM / Speed: Display of rounds per minute resp. speed (km/h) - from 1 to max. 150.
The central graphical display:
This graphically illustrates which resistance (vertical, level 1 to 32) is set or how far the training has already progressed (horizontal, 30 columns). The 30 segments jump to the next column every minute - exception: a target time has been set. In this case, the target time is divided by the 30 segments, example: target time = 60 minutes divided by 30 segments = 2. This means that the segment jump occurs every 2 minutes.
Other displays:
At the top right of the display, the WiFi connection status is shown on the left and the Bluetooth status on the right.
Summary
At the end of a training session, the computer displays a summary (see illustrations below). You can switch between the individual pages by swiping to the right or left.
Press the HOME button always returns to the display of the switch-on screen.
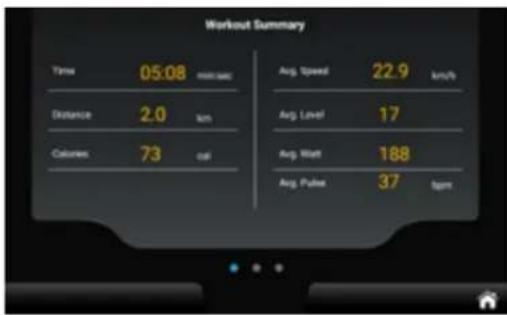
text_image
Workout Summary Time 05:08 min/sec Avg. Speed 22.9 km/h Distance 2.0 km Avg. Level 17 Calories 73 cal Avg. Watt 188 Avg. Pulse 37 bpm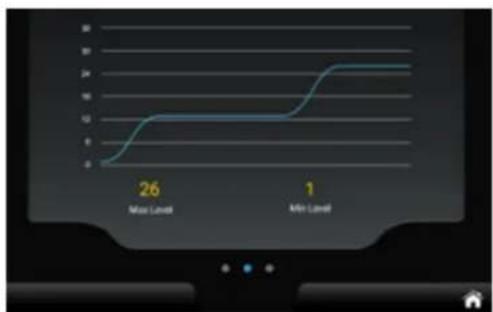
line
| Time Point | Value | | :--- | :--- | | Max Level | 26 | | Min Level | 1 |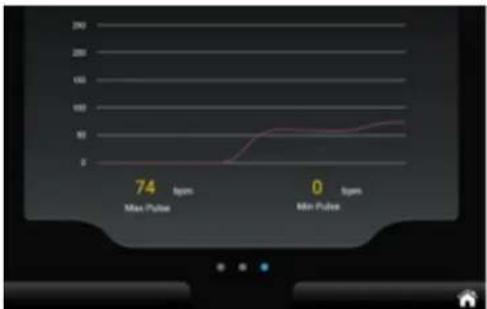
line
| Time | Pulse Count | |------|-------------| | Max | 74 | | Min | 100 |FUNCTIONAL AREA "MEDIA"
You can select the „MEDIA“ function area directly on the home screen or via the sidebar (see illustration below). From here you can directly access the shortcuts for YouTube, Chrome, Amazon, Amazon Video, Twitter, Facebook, Instagram, Spotify, Netflix, Kinomap, MUSIC, VIDEO.

text_image
LEVEL 32 16 8 0 LEVEL QUICK START LEVEL - TIME Distance Calories Pulse Watt RPM MEDIA 4 18:59 13.5 km 153 cal 120 100 105 YouTube Chrome Facebook Instagram Amazon Spotify prime video Netflix X iGmap LEVEL + LEVELWithin the function area, you can select the screen size (full or partial screen), switch back to workout mode using the "BACK" button or stop playback using "STOP".
If you return to workout mode, all video or audio playback is automatically paused.
PROGRAM MODE
You can choose between 32 different programmes - the respective programme profile is shown on the central graphic display. If you have entered a preset time, the training programme ends automatically when the time has elapsed.
GOAL MODE
In this mode, you can set either the training time (TIME), the distance (DISTANCE) or the calories (CALORIE).
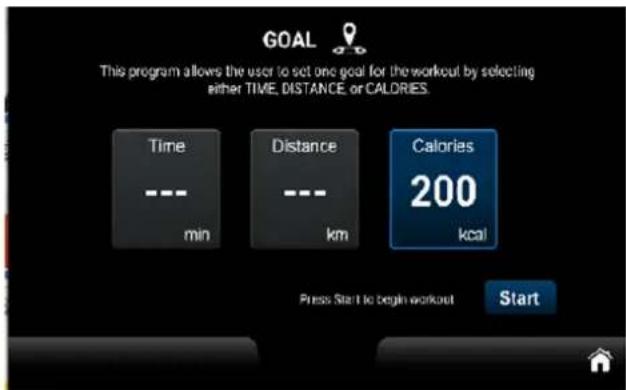
text_image
GOAL This program allows the user to set one goal for the workout by selecting either TIME, DISTANCE, or CALORIES. Time --- min Distance --- km Calories 200 kcal Press Start to begin workout Start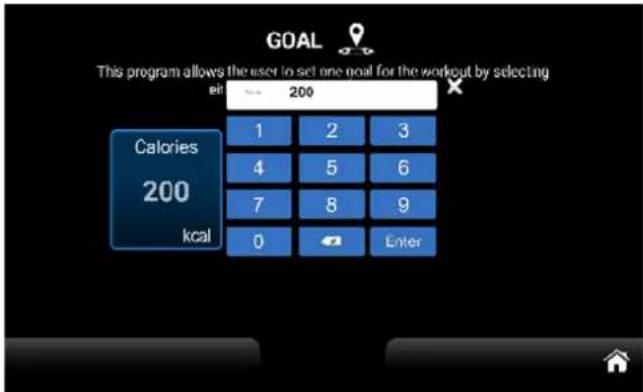
text_image
GOAL This program allows the user to set one goal for the workout by selecting in 200 Calories 200 kcal 1 2 3 4 5 6 7 8 9 0 EnterOnce you have reached the preset target value, the training ends and the display switches to the summary view.
QUICK START
When you touch the Quick Start button, you can start training immediately without entering any further parameters. Default values are assumed for personal data such as gender, age or weight.
HEART RATE CONTROLLED MODE (HRC)
After selecting „HRC“, please enter the required personal data and then select a percentage (60% or 80% of the maximum heart rate [=220-age]) or the exact target value for the heart rate (Target HR). Once training has started, the computer automatically adjusts the resistance so that the set heart rate is reached as accurately as possible. This is done according to the following scheme:
- If the currently measured heart rate is max. 4 beats above or below the target rate, the pedalling resistance is not changed.
- If the currently measured heart rate is between 5 and 14 beats above or below the target rate, the pedalling resistance is reduced or increased by 1 level.
- If the currently measured heart rate is between 15 and 24 beats above the target rate, the pedalling resistance is reduced by 1 level.
- If the currently measured heart rate is between 15 and 24 beats below the target rate, the pedalling resistance is increased by 2 levels.
- If the currently measured heart rate is more than 24 beats above the target rate, the pedalling resistance is reduced by 2 levels.
- If the currently measured heart rate is more than 24 beats below the target rate, the pedalling resistance is increased by 3 levels.
If heart rate error messages such as „No HR detected“ or similar appear during training, the training session is ended after approx. 15 seconds.
FITNESS TEST
The computer allows you to perform a fitness test. The resistance cannot be adjusted manually, but is controlled automatically by the computer. The fitness test begins with a 3-minute warm-up (can be skipped by touching „Skip“ if necessary). This is followed by 3 further sections, each lasting 3 or 4 minutes (depending on the respective performance or heart rate).

text_image
MEDIA Level 1 Time 02:53 Distance 0.0 km Calories 0 cal Pulse 131 Watt 0 RPM 0 WARM UP SKIP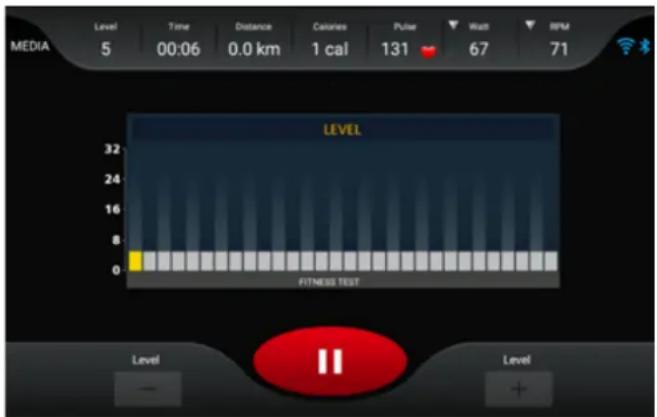
text_image
MEDIA Level 5 00:06 Time 0.0 km Distance Calories 1 cal Pulse 131 Watt 67 RPM 71 LEVEL 32 24 16 8 0 FITNESS TEST Level - II LevelIn test mode, the current resistance level is displayed in yellow. The speed and heart rate are checked regularly in order to optimise the following settings. Manual intervention by the user is not intended. Training is cancelled in the following cases:
- if the heart rate cannot be measured or if the heart rate exceeds 85% of the maximum heart rate for more than 2 seconds,
- with no measurable speed (pedalling) for more than 30 seconds,
- at a speed above 65 rpm or below 45 rpm for more than 30 seconds.
In the above cases, a corresponding error message is displayed. Therefore, always try to drive at a speed between 45 and 65 rpm.
Automatic adjustments are made according to this scheme:
The power heart rate range is between 110 beats/min and 85% of the calculated maximum heart rate. If the currently measured heart rate is below this range, the computer increases the resistance by one level every second. If the target heart rate range is not reached even after reaching level 32 (highest resistance), training is cancelled. If the heart rate in sections 2 to 4 (the adjustments based on the heart rate do not take effect in the warm-up phase) is within the performance heart rate range, the sections are extended by a further minute up to a maximum of 4 minutes per section.
The test is completed when the heart rate reaches 85% of the calculated maximum heart rate or when the final heart rate of successive stages in sections 2 to 4 is between 110 and 85% of the calculated maximum heart rate. For example, if the user's 85% heart rate is 150 bpm and the final heart rate is 120 bpm in the second stage and 120 bpm in the third stage, the test is completed.
The duration of the test depends on the user's physical condition and can be terminated at any time if the conditions are met. At the end of the test, the VO2 MAX value is displayed and the screen automatically switches to the SUMMARY page:
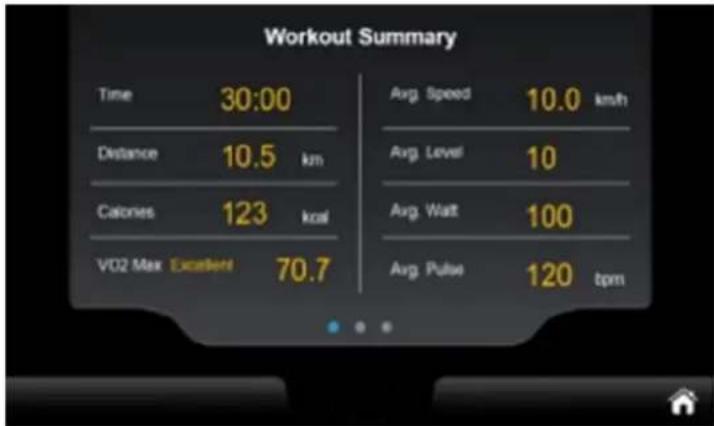
text_image
Workout Summary Time 30:00 Distance 10.5 km Calories 123 kcal VO2 Max Excellent 70.7 Avg. Speed 10.0 km/h Avg. Level 10 Avg. Wait 100 Avg. Pulse 120 bpmThe VO2 MAX value determines how much oxygen a person can absorb and utilise during exercise and is given in ml/min/kg. If this value is known, you therefore know how many millilitres of oxygen the body can absorb and metabolise per minute per kg of body weight during maximum exercise. Depending on the value achieved, a rating is issued (e.g. „Excellent“ as above).
The calculation logic for the fitness test is therefore based on the value „85% of the calculated maximum heart rate“. For example, if the test subject is 20 years old, the target heart rate would be calculated as (220 - 20) × 0.85 , which corresponds to 170 beats/min. The test method includes a real-time calculation (target heart rate - real-time heart rate) to determine if the result is greater than or equal to 0. If this is the case, the test continues with the next stage; otherwise the test is terminated immediately. This decision criterion is not used during the warm-up phase.
USER PROGRAM MODE
The computer offers 4 user-definable (User 1/2/3/4) programme profiles that can be programmed accordingly and saved for training.
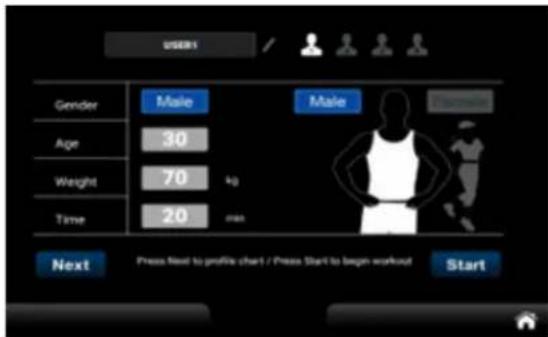
text_image
USER1 Gender Male Male Age 30 Weight 70 kg Time 20 min Next Press Next to profile chart / Press Start to begin workout Start
text_image
USER1 Gender Male Male Age 30 Weight 70 kg q w e r t y u i o p = a s d f g h j k l * z x c v b n m ! ? 1128 . w
bar
| Position | Level | | -------- | ----- | | Back | 1 | | Press Back to setting / Press Start to begin workout | 2 | | Start | 3 |After adjusting the profile, touch START to start a workout with the new profile.
WATT mode
After selecting WATT mode, you can specify a training time or the number of watts. Only one parameter (i.e. either TIME or WATT) can be selected as the target parameter in each training session. If more than one target parameter is set, the last target type/setting, i.e. the one configured last, is the final target parameter. All previous settings are ignored. As soon as the set target conditions are met during training, the system ends the training immediately. In the training information area, you can switch between power level/target watts, watts/metre and speed (rpm) by clicking on the symbols with the inverted triangle in the column for the power level, wattage and speed.
text_image
WATT MODE This program allows the user to set one goal for the workout by selecting TIME and TARGET WATT. Time 20 min Target Watt 120 Please Start to begin workout Start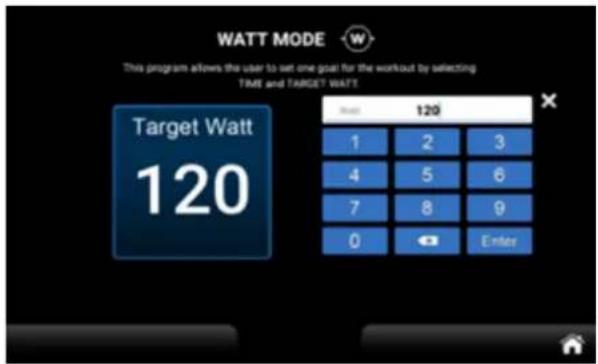
text_image
WATT MODE This program allows the user to set one goal for the workout by selecting TIME and TARGET WATT Target Watt 120 1 2 3 4 5 6 7 8 9 0 Enter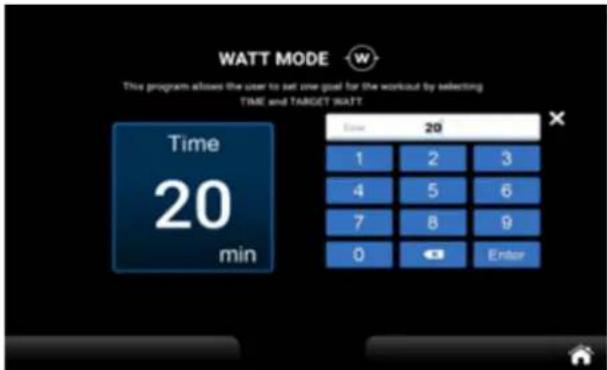
text_image
WATT MODE This program allows the user to set one goal for the workout by selecting TIME and TARGET WATT Time 20 1 2 3 4 5 6 7 8 9 0 Enter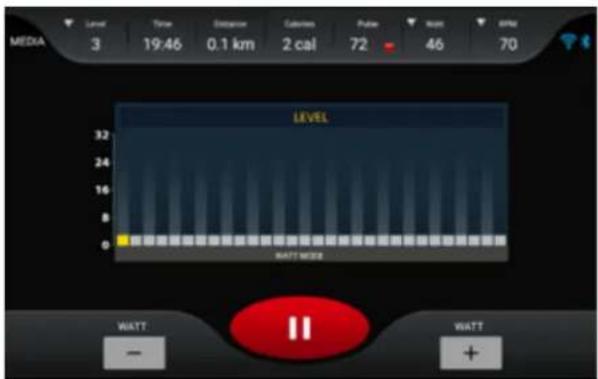
text_image
MEDIA 3 Time Distance Calibration Pulse Reset 46 70 19:46 0.1 km 2 cal 72 LEVEL 32 24 16 8 WATT MORE WATT - + WATTSETTING
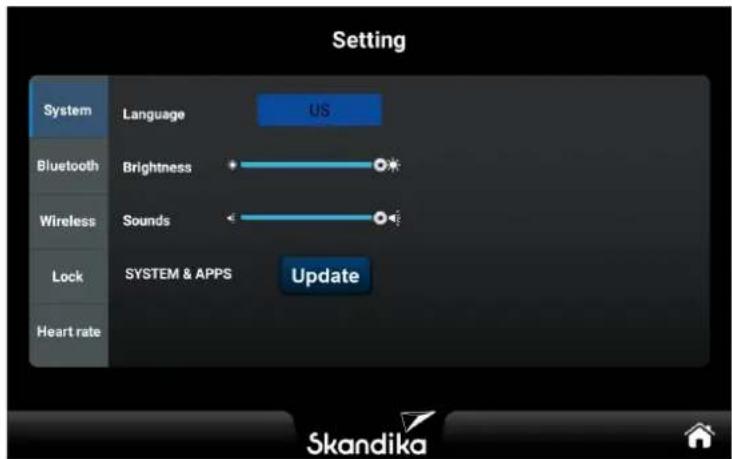
In this function area, you can make general settings for the „System“, „Bluetooth“, „Wireless“, „Lock“ and „Heart rate“ areas. We will briefly explain the individual areas below.
text_image
Setting System Language US Bluetooth Brightness Wireless Sounds Lock SYSTEM & APPS Update Heart rate Skandika„SYSTEM“ SETTINGS
1.1. Language:
The default language is English, you can switch to German. The language change takes effect immediately without the need for a restart.
1.2. Brightness:
Set the brightness of the backlight. Changes take effect immediately without the need for a restart.
1.3. Volume:
Adjust the system volume. Changes take effect immediately without the need for a restart. Note: For audiovisual support, it is not possible to change the volume in the “Bluetooth” menu tab.
1.4. System and Applications:
Clicking on the „Software update“ button opens the application management page. If there are versions that need to be updated, the „Update“ button is activated. If no new updates are required, the „Update“ button is disabled.
1.5. Delete Account:
If you click on „Delete account“, you will be asked for confirmation. If this is confirmed, the message „The device will restart in 5 seconds“ appears. After the restart, the multimedia account will be deleted.
„BLUETOOTH“ SETTINGS

text_image
Bluetooth Devices Available devices ※ A8 Connect Bluetooth Devices Open devices 00 A8 DISCONNECT Available devices2.1 Connection Method: Connect to Bluetooth speaker or Bluetooth headphones, play music via Bluetooth speaker or Bluetooth headphones.
2.2 Switch on Bluetooth and the system automatically searches for Bluetooth speakers and Bluetooth headphones in the vicinity and displays them in the „Available devices“ column. The „Paired devices“ column displays Bluetooth devices that are already paired (including those that cannot currently be recognised). Click on the Bluetooth device with which you want to establish a connection. If the connection is successful, you can play music via Bluetooth speakers, headphones and similar devices. You can also click on the „Disconnect“ button to disconnect. If you click on „Unpair“, unpaired Bluetooth devices will be categorised in the „Available devices“ column.
2.3 Tap on 📋 or swipe towards bottom to update the list of available devices; tap on to exit the current screen.

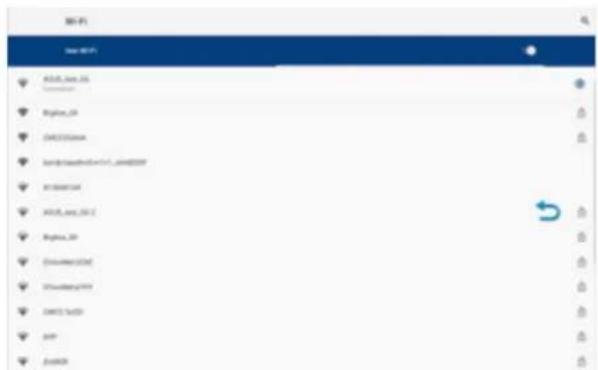
WIRELESS Settings
text_image
BVI-FI File (FVI) ADD1,xxv,35 Regina_20 DWG200000000000000000000000000000000000000000000000000000000000000000000000 BVI-864734 ADD1,xxv,35/2 Regina_20 Downdw12396 Downdw2997 DWG174553 JSP JSPX88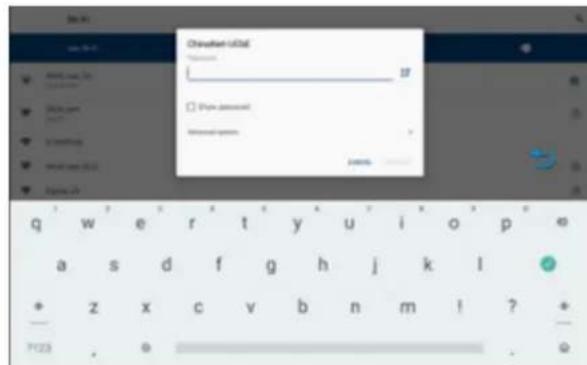
text_image
Password: 0156 Password: 0156 Password: 0156 Password: 0156 Password: 0156 Password: 0156 Password: 0156 Password: 0156 Password: 0156 Password: 0156 Password: 0156 Password: 0156 Password: 0156 Password: 1998 Password: 2000 Password: 2002 Password: 2004 Password: 2006 Password: 2008 Password: 2010 Password: 2012 Password: 2014 Password: 2016 Password: 2018 Password: 2020 Password: 2022 Password: 2024 Password: 2026 Password: 2028 Password: 2030 Password: 2032 Password: 2034 Password: 2036 Password: 2038 Password: 2040 Password: 2042 Password: 2044 Password: 2046 Password: 2048 Password: 2050 Password: 2052 Password: 2054 Password: 2056 Password: 2058 Password: 2060 Password: 2062 Password: 2064 Password: 2066 Password: 2068 Password: 2070 Password: 2072 Password: 2074 Password: 2076 Password: 2078 Password: 2080 Password: 2082 Password: 2084 Password: 2086 Password: 2088 Password: 2090 Password: 2092 Password: 2094 Password: 2096 Password: 2108 Password: 2110 Password: 2112 Password: 2114 Password: 2116 Password: 2118 Password: 2120 Password: 2122 Password: 2124 Password: 2126 Password: 2128 Password: 2130 Password: 2132 Password: 2134 Password: 2136 Password: 2138 Password: 2140 Password: 2142 Password: 2144 Password: 2146 Password: 2148 Password: 2150 Password: 2152 Password: 2154 Password: 2156 Password: 2158 Password: 2160 Password: 2162 Password: 2164 Password: 2166 Password: 2168 Password: 2170 Password: 2172 Password: 2174 Password: 2176 Password: 2178 Password: 2180 Password: 2182 Password: 2184 Password: 2186 Password: 2188 Password: 2190 Password: 2192 Password: 2194 Password: 2196 Password: 2198 Password: 2200Open the WiFi connection; the system automatically searches for WiFi networks in the vicinity. Click on the WiFi name you want to connect to, enter the password and the system will connect with the parameters entered by the user. If the connection is successful, press the "Back" button to return to the settings page and then "Home" to return to the main screen. Note: The blue arrow, which represents the "Back" button, can be moved freely on the screen.
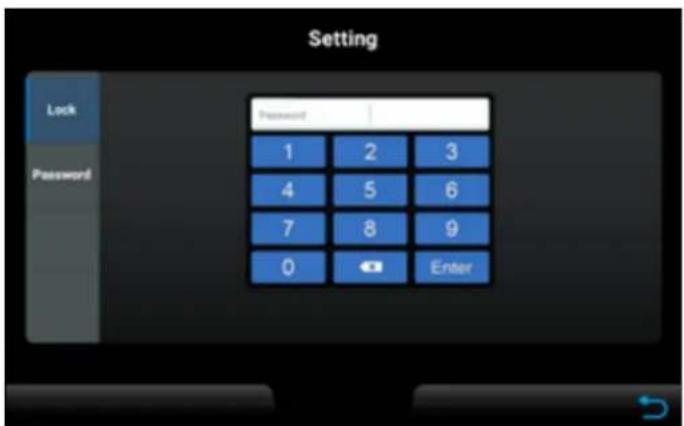
LOCK (Safety & password settings)
Enter the guest password [Default: 0000] or the SR password [Fixed: 1234] to access the password settings. Press „Reset“ to configure the distance/time lock and simultaneously display the remaining distance/time.
Password setting: Guest password [Default: 0000], SR password [Fixed: 1234]. After pressing the „Reset“ button, you can enter the guest password manually.
text_image
Setting Lock Password Password 1 2 3 4 5 6 7 8 9 0 Enter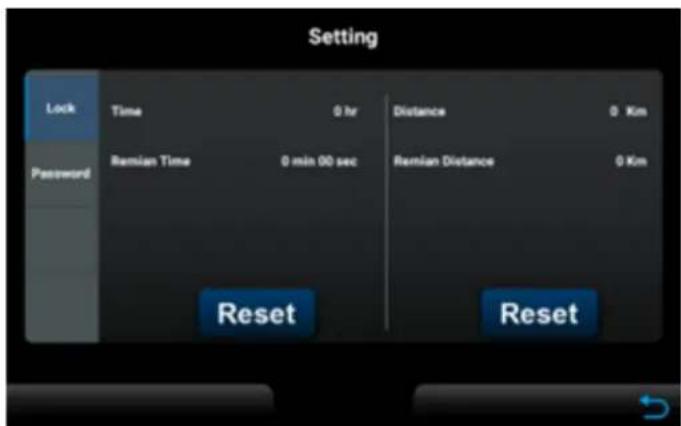
text_image
Setting Lock Time 0 hr Distance 0 Km Password Ramian Time 0 min 00 sec Ramian Distance 0 Km Reset Reset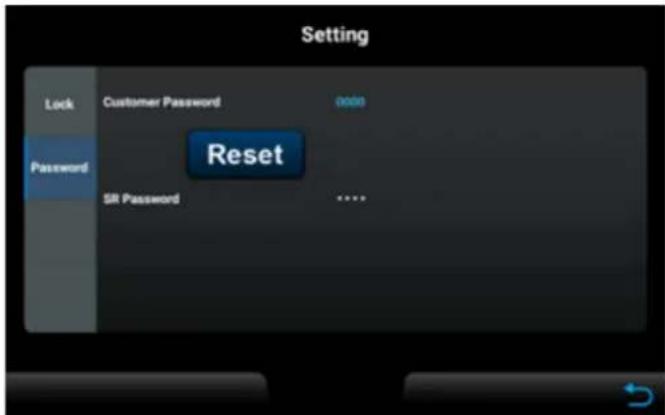
text_image
Setting Lock Customer Password adde Password Reset SR Password **** ?HEART RATE (Heart rate settings)
After selection, the device is automatically in search mode for Bluetooth-enabled heart rate sensors.
If you want to deactivate the search, you can do so by clicking on the „On-Off“ button. You can exit the menu by pressing the „X“ button.

text_image
Heart Rate Device ON OFFAs soon as the connectable Skandika Bluetooth chest strap is in the vicinity of your ergometer, it will be recognised in the menu and displayed as connectable.
If you want to establish the connection, press the „Connect“ button.
If you cannot find your heart rate sensor, refresh the menu interface by clicking on the arrow.

text_image
Heart Rate Device ON OFF TICKR X B91F CONNECTIf your heart rate sensor is connected to the ergometer, you can exit the menu by pressing the „X“ button.
If you want to disconnect the Bluetooth connection, press the „Disconnect“ button.

text_image
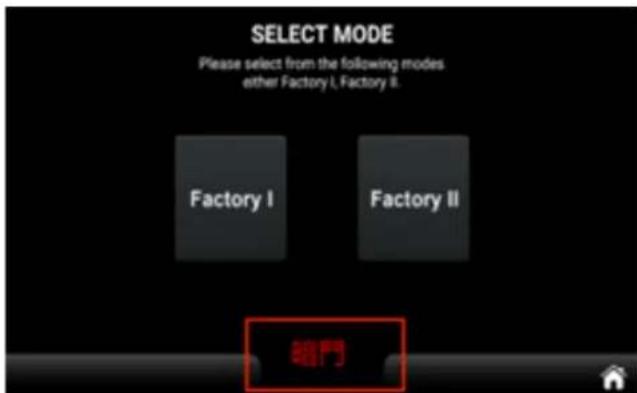
Heart Rate Device ON OFF TICKR X B91F DISCONNECTENGINEERING MODE
ECP (Engineering Control Panel) contains system-related parameter settings and information displays that are not normally required by normal users. These are located separately in the Factory I and Factory II function projects. The settings should only be changed after consultation with customer service. In the HCP (Home Control Panel), click the hidden button at the bottom centre 10 times or hold it down for 10 seconds to automatically switch to the ECP:
text_image
SELECT MODE Please select from the following modes either Factory I, Factory II. Factory I Factory II 開門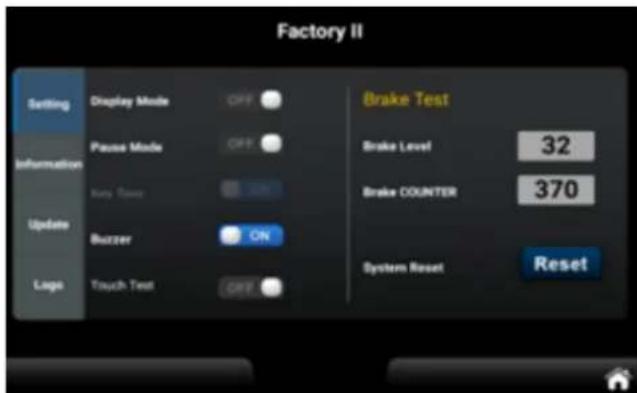
text_image
Factory II Setting Display Mode OFF Brake Test Information Pause Mode OFF Brake Level 32 Burry Tension ON Brake COUNTER 370 Update Buzzer ON Logo Touch Test OFF System Reset ResetEngineering Mode I Functional page
Engineering mode I has two functions, namely unit conversion (Unit) and machine selection (Type).
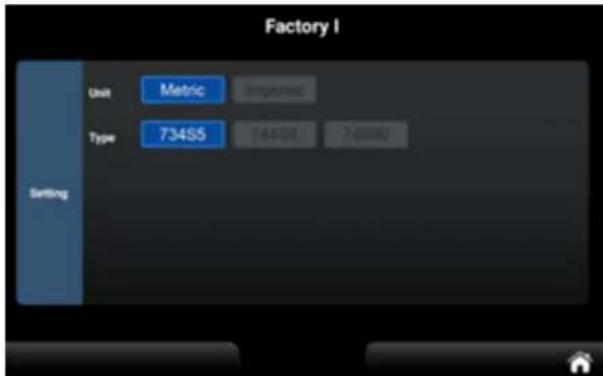
text_image
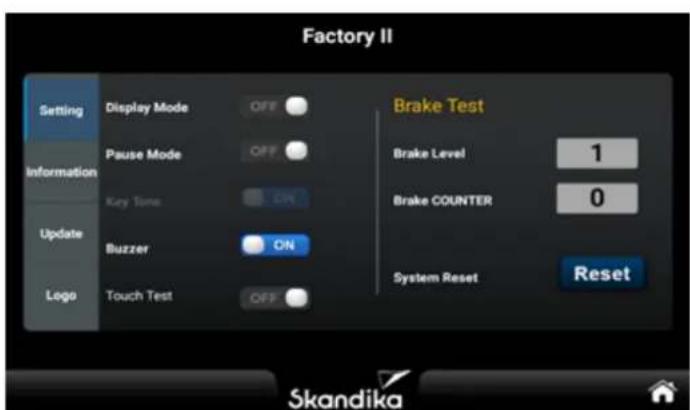
Factory I Unit Metric Importance Type 734S5 74001 7d000 SettingThe Engineering Mode II is divided into 4 categories: Setting, Information, Update and Logo.
text_image
Factory II Setting Display Mode OFF Information Pause Mode OFF Key Tone ON Update Buzzer ON Logo Touch Test OFF Brake Test Brake Level 1 Brake COUNTER 0 System Reset Reset Skandika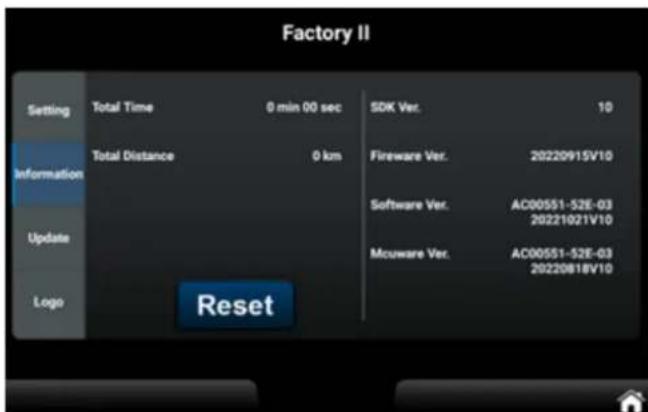
text_image
Factory II Setting Total Time 0 min 00 sec SDK Ver. 10 Information Total Distance 0 km Fireware Ver. 20220915V10 Software Ver. AC00551-52E-03 20221021V10 Update Mcuware Ver. AC00551-52E-03 20220818V10 Logo Reset- If DISPLAY MODE is set to OFF on the main control function page, the system will enter sleep mode if no speed is entered and no button is pressed for five minutes. The backlight and display will turn off, and the resistance during the sleep mode should be set to 1.
-
If PAUSE MODE is set to ON and no speed is entered for 30 seconds, the system enters pause mode.
-
if no button is pressed for 3 minutes, etc., the system enters SUMMARY mode.
If no button is pressed for a further 3 minutes, the system returns to IDLE MODE.
- if the manual exit button is pressed to return to SUMMARY mode and no button is pressed for 3 minutes, the appliance returns to IDLE MODE.
- If PAUSE MODE is switched off and no speed is entered for 30 seconds, the appliance goes into pause mode. If no button is pressed and the device remains on the pause screen, and if the manual exit button is pressed to return to SUMMARY, it will return to EMPTY MODE after 3 minutes.
| Function Description | |
| Total Time Total workout | time |
| Total Distance Total distance | |
| Software Version APP version, not editable | |
| SDK Version SDK version, not editable | |
| Firmware Version Firmware version, not editable | |
| MCU Version | Subordinate firmware version, not editable. |
| Reset | Pressing resets Total Time and Total Distance |
UPDATE function
When the system recognises the file AC00551-52E-03.apk on the U-Disk, the „Update S/W“ indicator lights up. Pressing the „Update S/W“ button displays the file list selection page and initiates the standard Android system update process. This process cannot be customised. Once the update process is complete, the system will automatically restart and return to the HCP. Note that the power supply should not be interrupted during the update, as this may damage the system and prevent normal operation.
If the system recognisesthe file AC00551-52E-03-220818_V10-4094d7c08fc6f4e0-4094d7c08fc6f4e0.bin on the U-Disk, the subordinate firmware update can be performed by clicking on the hidden button next to the „Update S/W“ button. Here too, it is important not to interrupt the power supply during the update process in order to avoid possible system damage.

text_image
Factory II Setting Information Please make sure the USB, which contains the updated software, is inserted into the USB port Update Logo Update S / WERROR MESSAGES
The computer may display various error messages. We have compiled a list of possible errors and how to resolve them here. If you get stuck with a problem, please contact customer service.
CONNECTION ERROR
This is a network connection error.
Check that the computer cables are connected correctly and that the computer itself is not damaged. Disconnect the device from the power supply for at least 2 minutes and check whether the error is still present after switching it on again.
E81
This is a setting error.
Disconnect the appliance from the power supply for at least 2 minutes and check whether the error is still present after switching it on again.
E82 / E83
This is a calibration or reset error.
Disconnect the appliance from the power supply for at least 2 minutes and check whether the error is still present after switching it on again.
WARM-UP and COOL-DOWN
A successful exercise program consists of a warm-up, aerobic exercise and a cool-down. Exercise for at least two or preferably three times a week, resting for a day between workouts. After several months, you may increase the frequency to four or five times per week.
Warm-Up
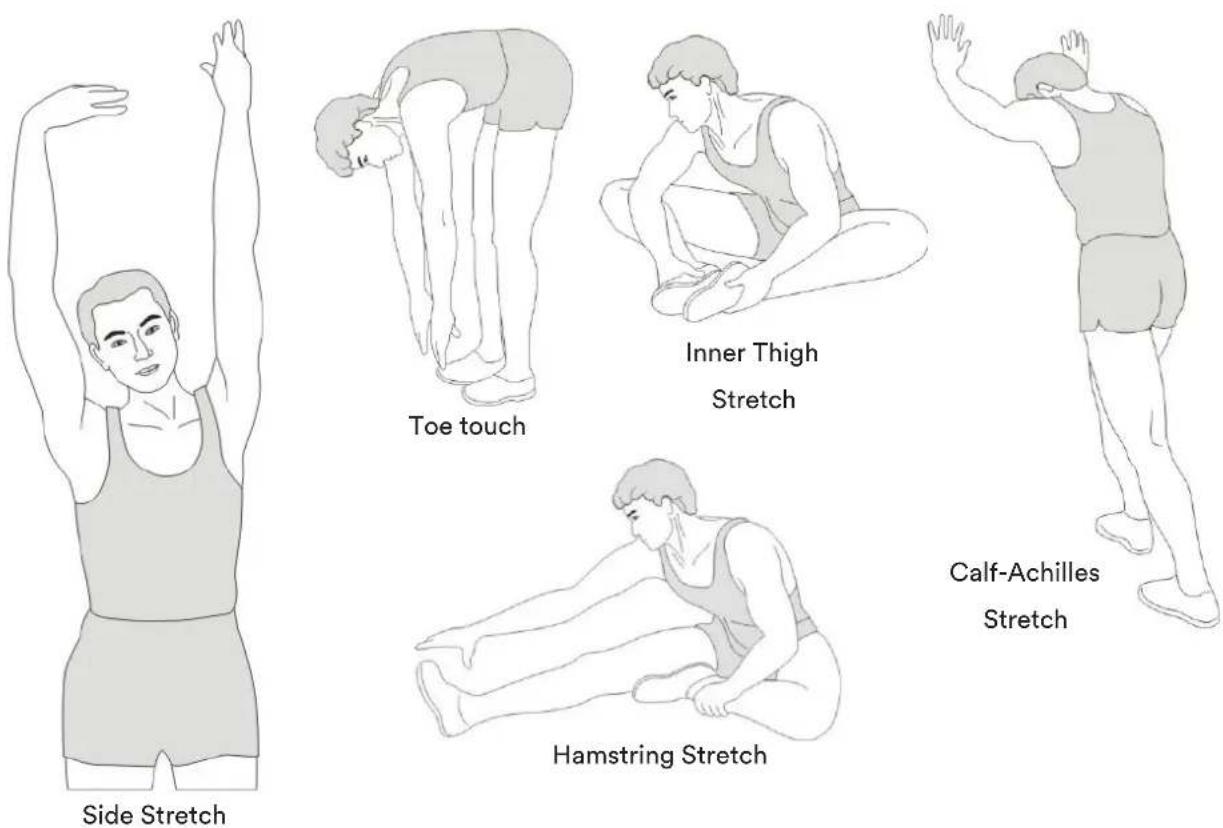
This stage helps to improve the blood circulation and prepares the muscles for your workout. It additionally helps to reduce the risk of injury or cramps. It is recommended to do some stretching exercises as shown here below. Hold each stretching position for approximately 30 seconds. Never force or jerk yourself into a stretching position – if you feel pain, STOP immediately. Warm-up exercises may also include brisk walking, jogging, jumping jacks, jump rope exercises or running in place.
Stretching
Muscles can be stretched more easily when these are warm. This reduces the risk of injury. DO NOT BOUNCE.
text_image
Side Stretch Toe touch Inner Thigh Stretch Calf-Achilles Stretch Hamstring StretchRemember always to check with your physician before starting any exercise program.
Cool-Down
This stage helps to soothe your muscles and your cardiovascular system after your workout.
At the end of your workout, reduce the speed and exercise for approximately 5 minutes at this lower speed level. Afterwards, repeat the warm-up exercises as described above.
Using a chest-belt
The computer can be connected to a compatible SKANDIKA Bluetooth chest strap both via the "Heart rate" menu setting and via the Kinomap app. If you would like to have your heart rate transmitted by the chest strap, proceed as follows:
- Make sure, the correct battery is inserted into the chest belt (button cell of type CR-2032, 3 volts). Battery replacement: Open the battery case cover on the back side of your transmitter (you may use a coin for easier handling) and replace the old battery by a fitting new one. The „+“ symbol should point upwards. Make sure, the sealing ring ist correctly placed. Close the case cover properly.
- The transmitter needs to be attached to the belt with the 2 buttons. Moisten the electrodes slightly before wearing the belt. This increases the contact sensibility and enables a better wireless signal transmitting.
- Put on the chest belt and make sure the electrodes are touching your breast directly. You may adjust the belt to a comfortable length. However, the electrodes must have contact with your skin in order to measure your heart rate correctly.
Do not use the chest-belt if you have a pacemaker, unless you double-checked with the producer of the pacemaker and with your doctor!
Battery-Disposal: Batteries should not be considered as regular garbage. As consumer you are obliged to return finished batteries. The finished batteries can be returned to a collection base at your residential area or at places, where batteries can be bought.

natural_image
Black Bluetooth device with a strap and tag, no visible text or symbols on the device itself.SKANDIKA Bluetooth Chest-belt
For goal-orientated and heart rate-controlled cardio training (HRC), it is important to keep a constant eye on your heart rate during the workout and adjust your performance if necessary.
- Bluetooth interface
- adjustable in size
You can order this product via the following QR code:

KINOMAP
The device computer can be connected to the „KinoMap“ app via Bluetooth (frequency: 2.4 GHz). The free KinoMap app turns your device into a powerful and fun fitness product! Choose from the geotagged video on Kinomap and go! Your position is shown in the video and as icon on the map. Download the Kinomap Fitness app in the app or play store by searching for ‘Kinomap Fitness’ or follow one of the links below.
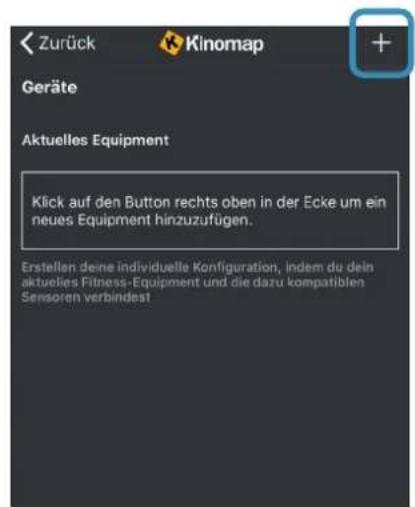
Install and open the app and register resp. log in. Activate Bluetooth. Now add the training device as follows:


text_image
Suchen Kinomap Kinomap SAS ACTUALSENSES 4.3 ★★★★☆ P53 4+ 40 Neue Funktionen Thanks for training on Kinomap. Our daily concern is offering you the best experience there is. Vorschau

text_image
Kinomap FOLGT SIE Kinomap Gespensert STAVANGER, LIMBURG & HONG KONG RACES JOIN THE CHALLENGE HAMMER SERIES in ASSOCIATION WITH wahoo Mehr erfahren >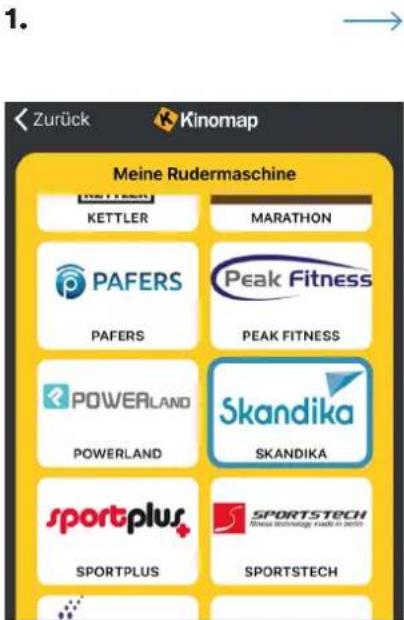
text_image
1. Zurück Kinomap Meine Rudermaschine KETTLER MARATHON PAFERS Peak Fitness PAFERS PEAK FITNESS POWERLAND Skandika POWERLAND SKANDIKA sportplus SPORTSTECH SPORTPLUS SPORTSTECH- Select Skandika
- Home Exercise Bike →

text_image
Zurück Kinomap Meine Rudermaschine KETTLER MARATHON PAFERS Peak Fitness PAFERS PEAK FITNESS POWERLAND Skandika POWERLAND SKANDIKA sportplus SPORTSTECH SPORTPLUS SPORTSTECH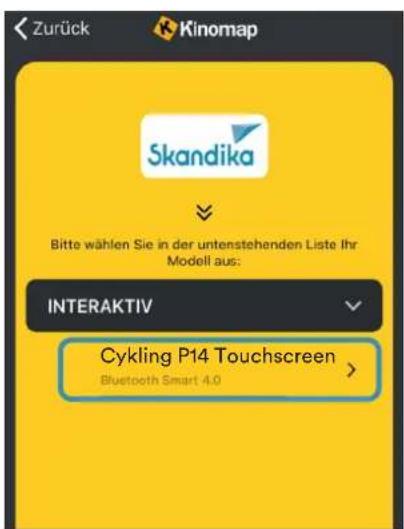
Now tap on OK and return to main menu. You can now choose a course for your exercise (depending on your type of KinoMap account maybe only some free courses). Press Start and begin to exercise!

text_image
Kinomap Free videos Suehens 47.2 10.8 Options Starten Insti Ligordianer HKS4 #1-Hong Kong Harbour HKS4 02:47 02:23 02:47 02:23 02:47 02:23 02:47 02:23 02:47 02:23CLEANING / MAINTENANCE
The appliance can be cleaned with a soft cloth moistened with a mild cleaning agent. Do not use abrasive or corrosive chemical cleaners or solvents, especially for the plastic parts.
After each use, you should wipe off any sweat residue with a dry, absorbent cloth.
Always ensure that no excessive moisture gets onto the computer display, as this could lead to functional problems or defects.
Never expose the device to direct sunlight and regularly check that all screw connections are properly tightened.
Storage
Store the appliance in a clean and dry environment, out of the reach of children.
TROUBLESHOOTING
Problem: The appliance wobbles / wobbles a lot during use or unusual noises occur.
Solution: Ensure that all connections are correctly positioned and that the appliance is level. If necessary, readjust the stand using the adjustable feet (8).
Problem: No display on the computer.
Solution: Check all cable connections and that the power supply is correct.
Problem: Pulse measurement is not possible or the displayed pulse is incorrect.
Solution: Check the cable connections of the hand pulse sensors and grasp the two sensors completely for a few seconds until a correct pulse is displayed. Fully grasp the sensors with both hands, but do not grip them too tightly, only with moderate hand pressure.
text_image
Exploded view diagram of a mechanical device with numbered components and exploded view
text_image
Technical diagram of a mobility device with numbered components and labeled parts, likely for assembly or maintenance purposes.| Part nr. | Description Q'ty | |
| 001 | Main Frame 1 | |
| 002 | Front Post 1 | |
| 003 | Front Stabilizer 1 | |
| 004 | Rear Stabilizer 1 | |
| 005 | Seat Post 1 | |
| 006 | Left Handlebar 1 | |
| 007 | Right Handlebar 1 | |
| 008 | Adjust the foot Pad 4 | |
| 009 | Nut M10 4 | |
| 010 | Stabilizer End Cap | 4 |
| 011 | Big Washer ∅8x∅20×2.0 | 11 |
| 012 | Spring washer ∅8 | 4 |
| 013 | Bolt M8×65 | 4 |
| 014 | Power Supply Wire L=850mm | 1 |
| 015 | Adaptor | 1 |
| 016 | Left Pedal | 1 |
| 017 | Right Pedal | 1 |
| 018 | Bolt M6×15 | 2 |
| 019 | Bearing | 4 |
| 020 | Transportation wheel | 2 |
| 021 | Bolt M6×12 | 2 |
| 022 | Front Post cover 1 | |
| 023 | Sensor Wire | 1 |
| 024 | Computer Extension Wire | 1 |
| 025 | Big Curve Washer ∅8x∅16×1.5 | 7 |
| 026 | Bolt M8×20 | 12 |
| 027 | Locking knob M16 | 1 |
| 028 | Sear Post Cover | 1 |
| 029 | Seat Adjustment Knob | 1 |
| 030 | End Cap for Seat sliding tube | 2 |
| 031 | Seat sliding tube | 1 |
| 032 | Bottle Holder | 1 |
| 033 | Bolt M5×15 | 2 |
| 034 | Seat Cushion | 1 |
| 035 | Screw ST4.2×10 | 4 |
| 036 | Hand pulse A | 2 |
| 037 | Plug A | 2 |
| 038 | Hand Pulse B | 2 |
| 039 | Hand pulse extension wire | 2 |
| 040 | Screw ST4.2×15 | 2 |
| 041 | Plug b | 2 |
| 042 | Bolt M8×40 | 1 |
| 043 | Plastic computer adjust support | 1 |
| 044 | Nut M8 | 2 |
| 045 | Bolt M5×10 | 4 |
| 046 | Computer support | 1 |
| 047 | Computer 1 | |
| 048 | Crank cover cap | 2 |
| Part nr. | Description Q'ty | |
| 049 | Nut M10×1.25 | 2 |
| 050 | Left Crank | 1 |
| 051 | Chain cover cap | 2 |
| 052 | Screw ST4.2×20 | 13 |
| 053 | Screw ST4.2×25 | 25 |
| 054 | Left front post cover | 1 |
| 055 | Right front post cover | 1 |
| 056 | C-clip ∅20×1.0 1 | |
| 057 | Wave washer ∅20x∅24×0.3 1 | |
| 058 | Bearing 6004-2Z | 2 |
| 059 | Nut M12 | 1 |
| 060 | Motor tension wire | 1 |
| 061 | Sensor with wire | 1 |
| 062 | Motor | 1 |
| 063 | Seat Post Bushing | 3 |
| 064 | Spring Hook | 2 |
| 065 | Nut M6 | 3 |
| 066 | Bolt M6×25 | 1 |
| 067 | Nut M10×1.0×9 1 | |
| 068 | Washer ∅30×2 1 | |
| 069 | Flywheel 1 | |
| 070 | Bolt M8×18 | 1 |
| 071 | PC washer ∅47x∅10.5×0.4 | 1 |
| 072 | Press Bracket | 1 |
| 073 | Washer ∅16x∅8×1.5 1 | |
| 074 | Bolt M6×12 | 1 |
| 075 | Washer ∅6x∅12×1.0 1 | |
| 076 | Press Wheel | 1 |
| 077 | C-Clip ∅12×1.0 | 1 |
| 078 | Screw ST2.9×9 2 | |
| 079 | Magnetic bracket A | 1 |
| 080 | Magnet Seat | 1 |
| 081 | Magnetic | 6 |
| 082 | Magnetic Plate Axle | 1 |
| 083 | Nut M6 | 4 |
| 084 | Spring washer ∅6 | 4 |
| 085 | Belt Pulley | 1 |
| 086 | Belt Pulley Shaft | 1 |
| 087 | Right Chain cover | 1 |
| 088 | Right Crank | 1 |
| 089 | Belt | 1 |
| 090 | Right front post cover | 1 |
| 091 | Fixed Tube (can be discarded) | 2 |
| 092 | Ground wire I | 1 |
| 093 | Ground wire II 1 |
Step 2

natural_image
Three identical mechanical shafts with threaded end caps, shown in side profile (no text or symbols)13 Screw M8x65 4 pcs.
natural_image
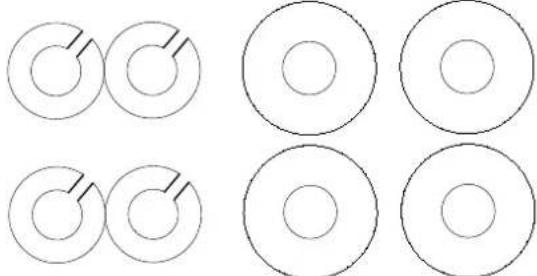
Six circular diagrams with internal lines, no text or symbols present12 Spring washer ∅8 4 pcs.
11 Washer ∅8x∅20x2.0 4 pcs.
text_image
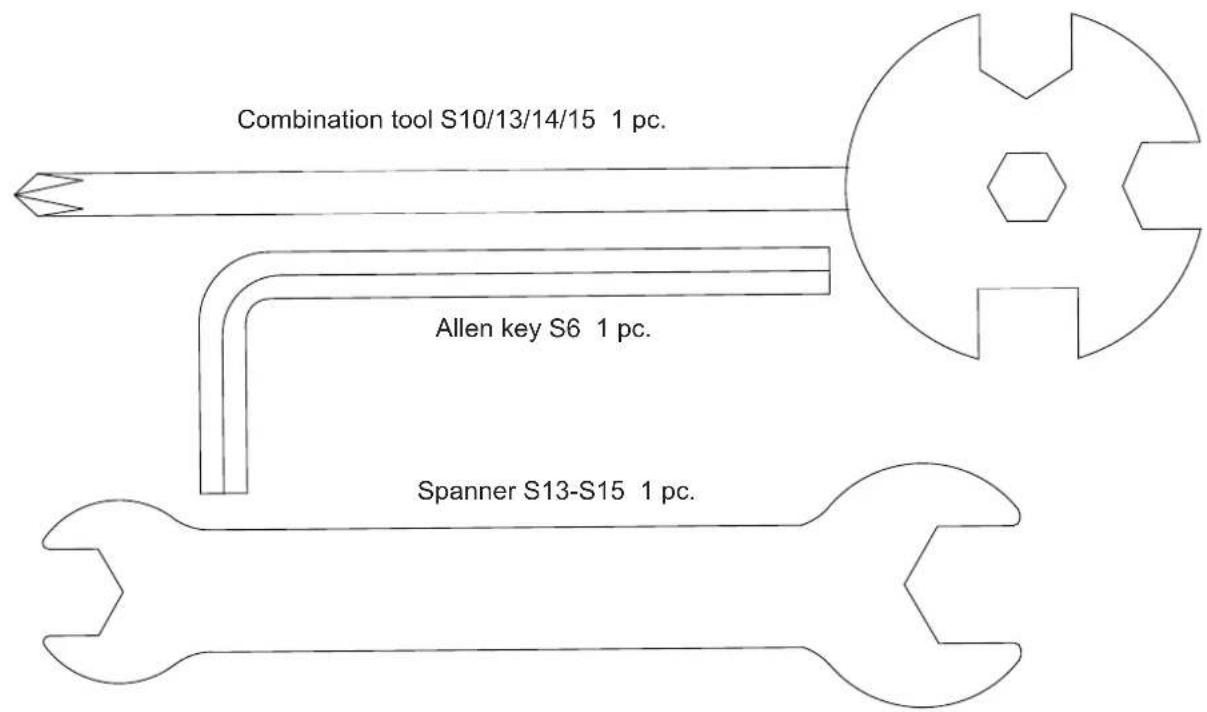
Combination tool S10/13/14/15 1 pc. Allen key S6 1 pc. Spanner S13-S15 1 pc.GUARANTEE CONDITIONS
For our devices we provide a warranty as defined below.
- In accordance with the following conditions (numbers 2-5) we repair defect or damage to the device free of charge, if the cause is a manufacturing defect. Therefore, these defects / damages need to be reported to us without delay after appearance and within the warranty period of 24 months after delivery to the end user. The warranty does not cover parts, which easily break (e.g. glass or plastic). The warranty does not cover slight deviations of the product, which are insignificant for usability and value of the device and damage caused by chemical or electrochemical effects and damages caused by penetration of water or generally force majeure damage.
- The warranty achievement is the replacement or repair of defective parts, depending on our decision. The cost of material and labor will be borne by us. Repairs at customer site cannot be demanded. The proof of purchase along with the date of purchase and / or delivery is required. Replaced parts become our property.
- The warranty is void if repairs or adjustments are made,
which are not authorized by us or if our devices are equipped with additional parts or accessories that are not adapted to our devices. Furthermore, the warranty is void if the device is damaged or destroyed by force majeure or due to environmental influences and in case of improper handling / maintenance (e.g. due to non-observance of the instruction manual) or mechanical damages. The customer service may authorize you to replace or repair defective parts after telephone consultation. In this case, the warranty is not void.
- Warranty services do not extend the warranty period nor do they initiate a new warranty period.
- Further demands, especially claims for damages which occurred outside the device, are excluded as long as a liability is not obligatory legal.
- Our warranty terms - which cover the requirements and scope of our warranty conditions - do not affect the contractual warranty obligations of the seller.
- Parts of wear and tear are not included in the warranty.
- The warranty is void if not used properly or if used in gyms, rehabilitation centers and hotels. Even if most of our units are suitable for a professional use, this requires a separate agreement.
ENVIRONMENTAL PROTECTION

At the end of its life cycle, this product must not be disposed of with household waste but must be taken to a collection unit for the recycling of electric and electronic equipment. The symbol on the product, the instructions for use or the packaging express mention of this. The basic materials can be recycled as specified on the labelling.
When recycling the materials and finding other utilisation for used equipment, you are making a significant contribution towards protecting our environment. Ask at your council about the respective local disposal sites.
In accordance with our policy of continual product improvement, we reserve the right to make technical and visual changes without notice.
For spare parts please contact: service@skandika.de Service centre: MAX Trader GmbH, Wilhelm-Beckmann-Straße 19, 45307 Essen, Germany
Contenu

skandika.com/service
natural_image
Simple line drawing of a mechanical tool with a circular head and hexagonal base (no text or symbols)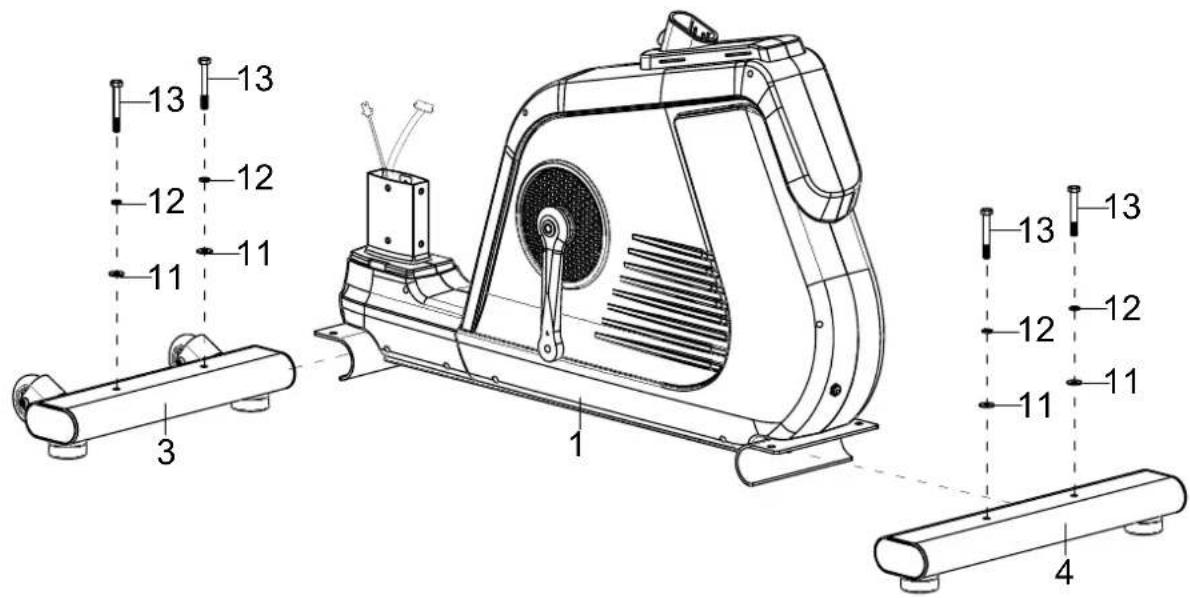
text_image
13 12 11 3 1 11 12 12 13 13 12 12 13 13 12 11 4ÉTAPE 3
natural_image
Simple line drawing of a mechanical component with a central hexagonal cutout and a pointed tip, labeled 'x 1' (no text or symbols on the diagram itself)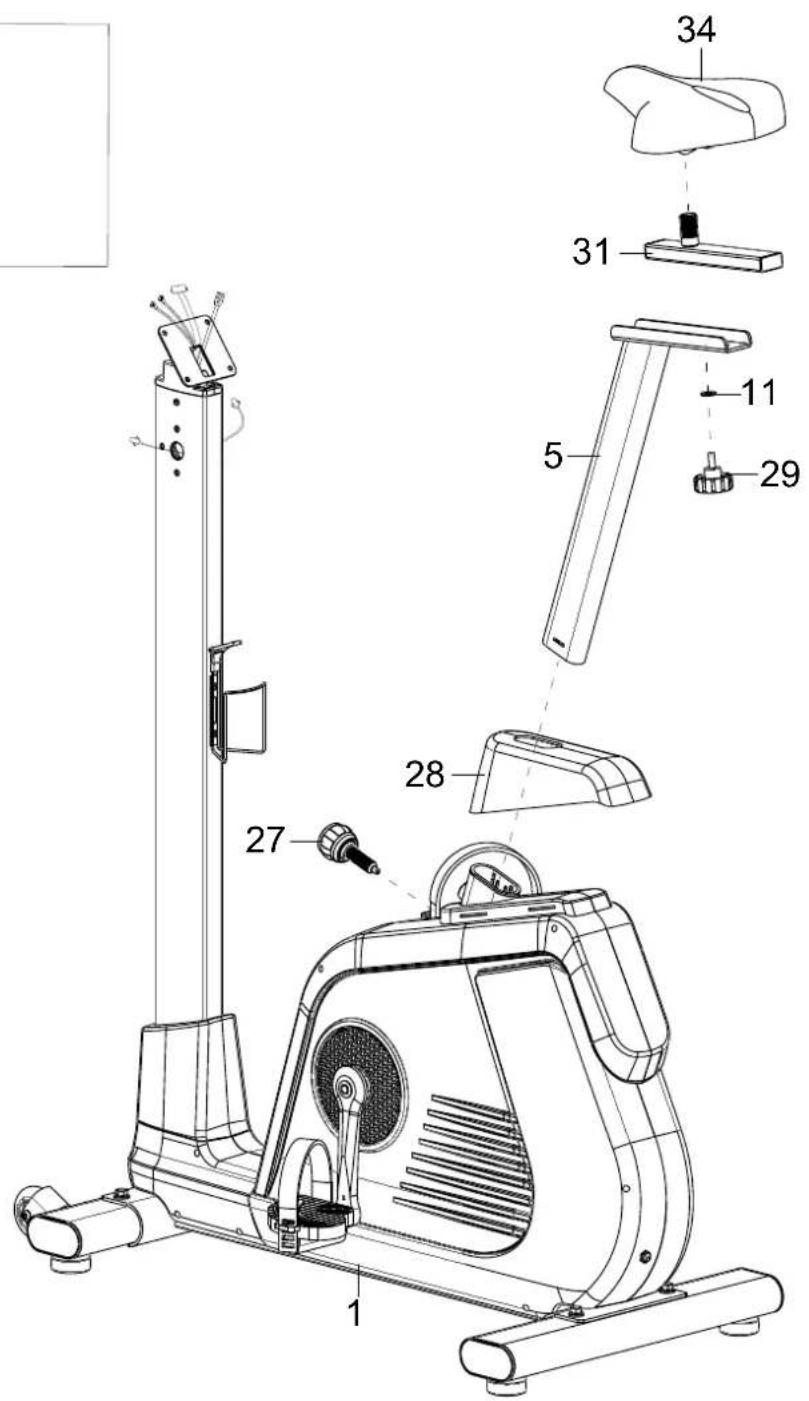
text_image
Technical diagram of a stationary exercise machine with numbered parts for identification and assembly reference.ÉTAPE 6
text_image
Technical diagram of an exercise machine with numbered components and labeled partsÉTAPE 7
line
| Time Period | Pulse Count | | ----------- | ----------- | | Max Pulse | 74 | | Min Pulse | 0 |ZONE FONCTIONNELLE „MEDIA“
text_image
GOAL This program allows the user to set one goal for the workout by selecting either TIME, DISTANCE, or CALORIES. Time --- min Distance --- km Calories 200 kcal Press Start to begin workout Start
text_image
GOAL This program allows the user to set one goal for the workout by selecting cal 200 Calories 200 kcal 1 2 3 4 5 6 7 8 9 0 Entertext_image
USER1 Gender Male Male Age 30 Weight 70 kg Time 20 min Next Press Next to profile chart / Press Start to begin workout Start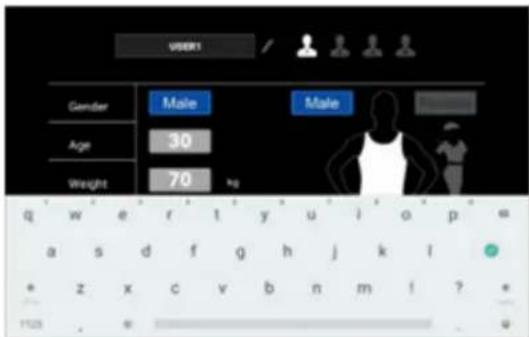
text_image
USER1 Gender Male Male Age 30 Weight 70 kg q w e r t y u i o p = a s d f g h j k l * z x c v b n m i ? 1129 . w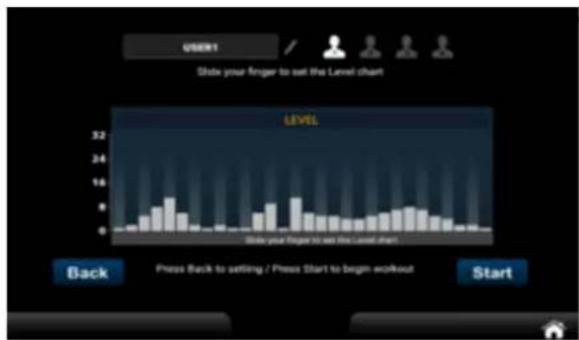
bar
| Position | Level | |--------|-------| | 1 | 1 | | 2 | 2 | | 3 | 3 | | 4 | 4 | | 5 | 5 | | 6 | 6 | | 7 | 7 | | 8 | 8 | | 9 | 9 | | 10 | 10 | | 11 | 11 | | 12 | 12 | | 13 | 13 | | 14 | 14 | | 15 | 15 | | 16 | 16 | | 17 | 17 | | 18 | 18 | | 19 | 19 | | 20 | 20 | | 21 | 21 | | 22 | 22 | | 23 | 23 | | 24 | 24 | | 25 | 25 | | 26 | 26 | | 27 | 27 | | 28 | 28 | | 29 | 29 | | 30 | 30 | | 31 | 31 | | 32 | 32 | | 33 | 33 | | 34 | 34 | | 35 | 35 | | 36 | 36 | | 37 | 37 | | 38 | 38 | | 39 | 39 | | 40 | 40 | | 41 | 41 | | 42 | 42 | | 43 | 43 | | 44 | 44 | | 45 | 45 | | 46 | 46 | | 47 | 47 | | 48 | 48 | | 49 | 49 | | 50 | 50 | | 51 | 51 | | 52 | 52 | | 53 | 53 | | 54 | 54 | | 55 | 55 | | 56 | 56 | | 57 | 57 | | 58 | 58 | | 59 | 59 | | 60 | 60 | | 61 | 61 | | 62 | 62 | | 63 | 63 | | 64 | 64 | | 65 | 65 | | 66 | 66 | | 67 | 67 | | 68 | 68 | | 69 | 69 | | 70 | 70 | | 71 | 71 | | 72 | 72 | | 73 | 73 | | 74 | 74 | | 75 | 75 | | 76 | 76 | | 77 | 77 | | 78 | 78 | | 79 | 79 | | 80 | 80 | | 81 | 81 | | 82 | 82 | | 83 | 83 | | 84 | 84 | | 85 | 85 | | 86 | 86 | | 87 | 87 | | 88 | 88 | | 89 | 89 | | 90 | 90 | | 91 | 91 | | 92 | 92 | | 93 | 93 | | 94 | 94 | | 95 | 95 | | 96 | 96 | | 97 | 97 | | 98 | 98 | | 99 | 99 | | Back | - | | Press Back to setting / Press Start to begin workout Start | - |text_image
WATT MODE This program allows the user to set one goal for the workout by selecting TIME and TARGET WATT. Time 20 min Target Watt 120 Please Start to begin workout Start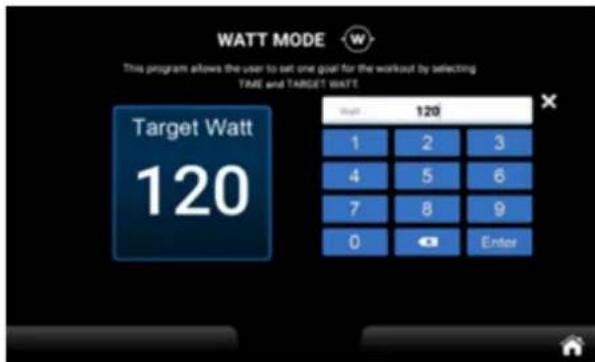
text_image
WATT MODE This program allows the user to set one goal for the workout by selecting TIME and TARGET WATT Target Watt 120 1 2 3 4 5 6 7 8 9 0 Enter
text_image
WATT MODE This program allows the user to set one goal for the workout by selecting TIME and TARGET WATT Time 20 min 1 2 3 4 5 6 7 8 9 0 Enter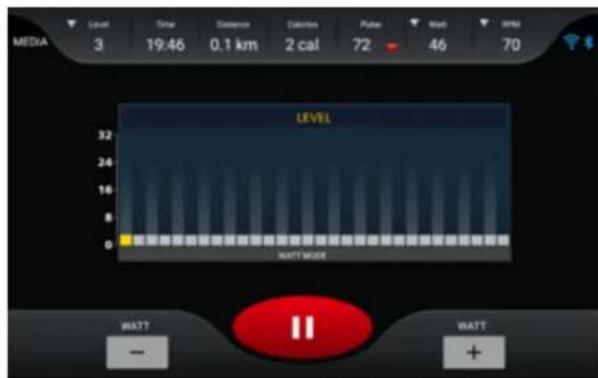
text_image
MEDIA 3 19:46 0.1 km 2 cal 72 46 70 LEVEL 32 24 16 8 0 WATT MODE WATT - WATT +text_image
Setting System Language US Bluetooth Brightness Wireless Sounds Lock SYSTEM & APPS Update Heart rate SkandikaRÉGLAGES „SYSTEM“
1.1 Langue (Language) :
text_image
Bluetooth Devices Available devices 端 A8 Connect Bluetooth Devices Pared devices OD A8 DISCONNECT Available devicestext_image
B1.0 B2.0 B3.0 B4.0 B5.0 B6.0 B7.0 B8.0 B9.0 B10.0 B11.0 B12.0 B13.0 B14.0 B15.0 B16.0 B17.0 B18.0 B19.0 B20.0 B21.0 B22.0 B23.0 B24.0 B25.0 B26.0 B27.0 B28.0 B29.0 B30.0 B31.0 B32.0 B33.0 B34.0 B35.0 B36.0 B37.0 B38.0 B39.0 B40.0 B41.0 B42.0 B43.0 B44.0 B45.0 B46.0 B47.0 B48.0 B49.0 B50.0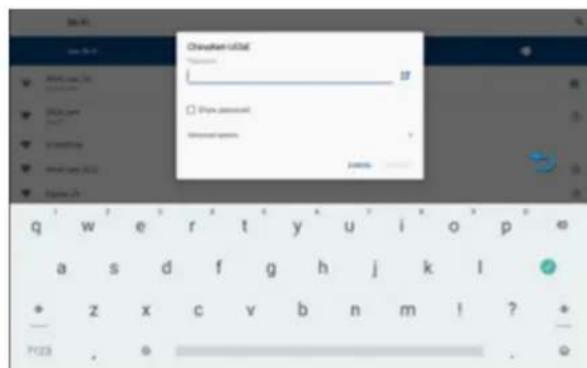
text_image
Change from old 用户名: 密码: password password: passwordtext_image
Setting Lock Password Password 1 2 3 4 5 6 7 8 9 0 Enter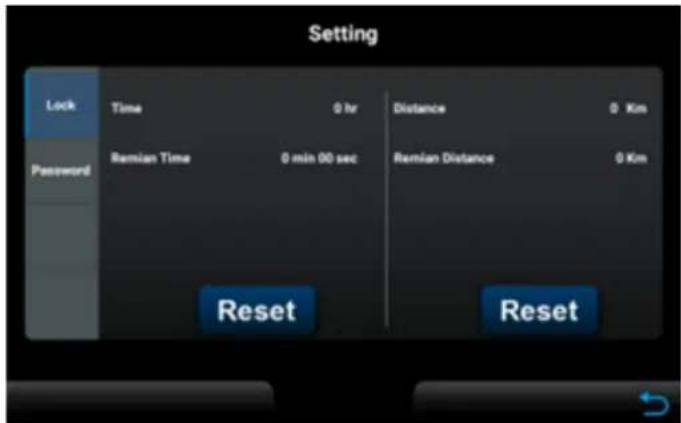
text_image
Setting Lock Time 0 hr Distance 0 Km Password Remian Time 0 min 00 sec Remian Distance 0 Km Reset Reset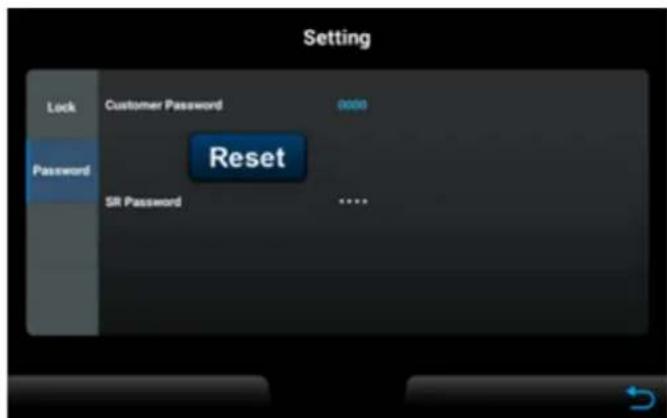
text_image
Setting Lock Customer Password 0000 Password Reset SR Password ****HEART RATE (PARAMÈTRES DE FRÉQUENCE CARDIAQUE)
text_image
SELECT MODE Please select from the following modes either Factory I, Factory II. Factory I Factory II 喻門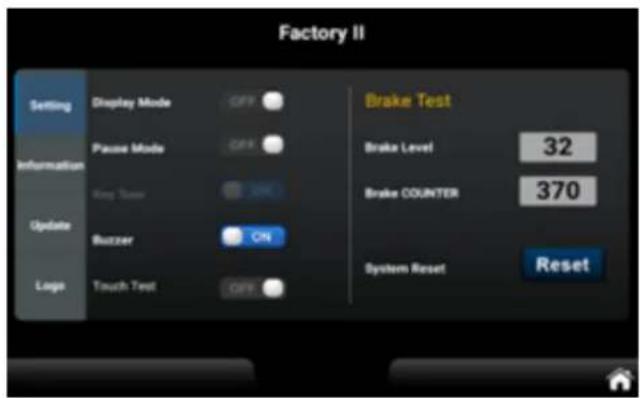
text_image
Factory II Setting Display Mode OFF Information Pause Mode OFF King Turn SMC Update Buzzer ON Logo Touch Test OFF Brake Test Brake Level 32 Brake COUNTER 370 System Reset Resettext_image
Factory II Setting Information Please make sure the USB, which contains the updated software, is inserted into the USB port Update Logo Update $ / WMESSAGES D'ERREUR
natural_image
Black wristband with a Bluetooth logo, no visible text or symbols on the device itselfSKANDIKA Sangle de poitrine Bluetooth
text_image
Exploded view diagram of a mechanical device with numbered components and exploded view