
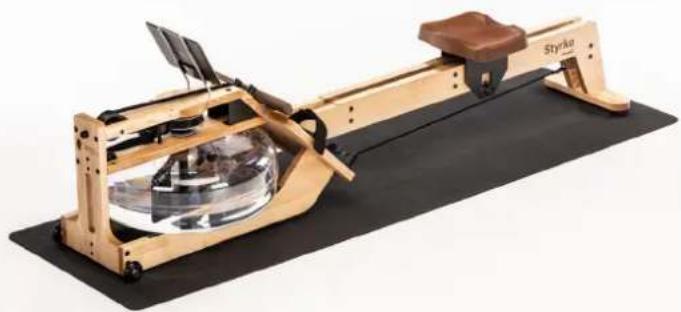
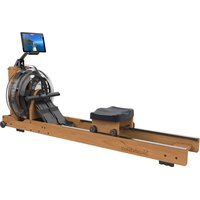
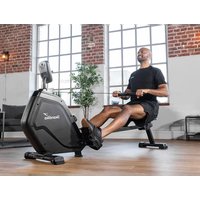
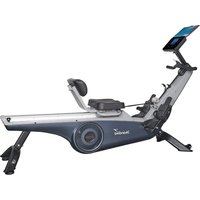
Styrke Premium - Rowing Machine Skandika - Free user manual and instructions
Find the device manual for free Styrke Premium Skandika in PDF.

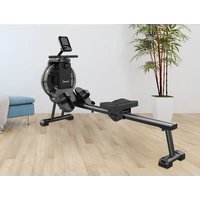
| Product Type | Water Resistance Rowing Machine |
| Brand | Skandika |
| Model | Styrke Premium |
| Weight | 38.6 kg |
| Dimensions (L × W × H) | 211 × 54 × 68 cm |
| Maximum Load Capacity | 180 kg |
| Maximum User Height | 200 cm |
| Resistance | Hydraulic by water, 9 levels (10-15 liters) |
| Tank Material | Transparent PC |
| Handle | With rubber coating |
| Foot Rest | Adjustable to 8 levels, with Velcro straps |
| Seat | Seat cushion with rollers |
| Rails | Aluminum |
| Adjustable Feet | Yes (2 TPR feet) |
| Transport Wheels | Yes (2 wheels on the tank) |
| Bluetooth Module | Yes (for app connection) |
| Compatible Apps | Skandika Training Data, Kinomap |
| Tablet Holder | Yes (iPad holder included) |
| Power Supply | 2 rechargeable AAA batteries (Varta charger included) |
| USB Electric Pump | Yes (for filling/draining the tank) |
| Included Accessories | Tool, Bluetooth receiver, USB pump, chlorine tablets, Varta charger, 2 Varta rechargeable batteries |
| Warranty | 24 months |
| Customer Service | MAX Trader GmbH, service@skandika.de |
| Usage | Household use only |
| Maintenance | Add a chlorine tablet every 2 months, lubricate moving parts |
Frequently Asked Questions - Styrke Premium Skandika
User questions about Styrke Premium Skandika
0 question about this device. Answer the ones you know or ask your own.
Ask a new question about this device
Download the instructions for your Rowing Machine in PDF format for free! Find your manual Styrke Premium - Skandika and take your electronic device back in hand. On this page are published all the documents necessary for the use of your device. Styrke Premium by Skandika.
USER MANUAL Styrke Premium Skandika
natural_image
Wooden Skandika Pilates reformer machine with brown frame and black legs, no visible text or symbols on the device itself.natural_image
Wooden Pilates reformer machine on a black mat, no visible text or symbolsArt.-Nr.: 24942
natural_image
Black wristband with a skandika Bluetooth logo (no text or symbols on the device itself)Art.-Nr.: SF-2285

skandika.com/service/
USB-PUMPE
natural_image
Pure diagram of parallel cylindrical objects with no text or symbols, labeled (43) at bottom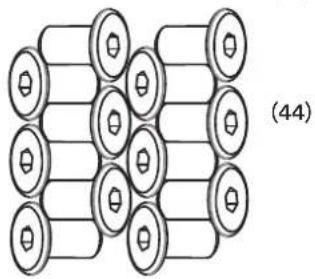
natural_image
Diagram of stacked cylindrical objects with circular elements, no text or symbols presentSCHRITT 4
natural_image
Simple line drawing of two cylindrical objects with circular ends, labeled '43' below (no text or symbols on the objects themselves)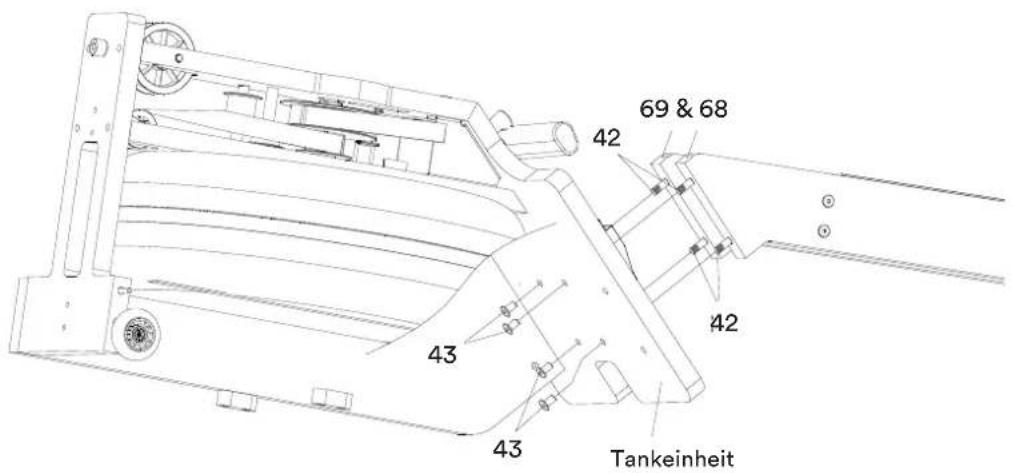
SCHRITT 6
natural_image
Line drawing of a person using a rowing machine (no text or symbols present)natural_image
Line drawing of a person using a rowing machine (no text or symbols present)natural_image
Technical line drawing of a person using a rowing machine (no text or symbols present)natural_image
Technical line drawing of a vertical crane lifting a wall-mounted device, showing structural components and mounting base (no text or symbols)LAGERUNG
we are delighted that you have chosen Skandika and congratulate you on your new Styrke. This wooden rower was conceived and designed with great attention to detail in Germany by Tukiendorf Design.
We are happy to receive your wishes and suggestions regarding your product and look forward to your personal feedback.
Contents
23 Technical data
23 Supplementary articles
24 Service
25 Safety precautions
26 Explosion drawing
27 Parts list
28 Set-up instructions / Video set-up instructions
34 Filling / emptying the water tank
35 Exercise instructions
36 Warm-up and cool-down
37 Transportation and storage
38 Using apps
40 Guarantee conditions
TECHNICAL DATA
| Weight 38,6 kg | |
| Set-up dimensions (L×W×H) | 211 × 54 × 68 cm |
| Max. body height | 200 cm |
| Accessories included | Tool, Bluetooth receiver, USB pump, chlorine tablets, Varta battery charger, 2x Varta batteries |
SUPPLEMENTARY ARTICLES
This might also interest you.
natural_image
Wooden Pilates reformer machine on black mat (no visible text or symbols)Art. No.: 24942
You can purchase this product using the following QR code:

natural_image
Black wristband with a skandika Bluetooth device attached (no text or symbols on the device itself)Art. No.: SF-2285
You can purchase this product using the following QR code:

SKANDIKA
Floor protection mat for rowing machines
Our floor protection mat 'Made in Germany' protects your floor from unsightly pressure marks, nicks or scratches that can occur when using rowing machines. In addition, the mat has a noise-absorbing function.
– Oeko-Tex seal Standard 100
– phthalate-free & environmentally friendly
-65×230cm
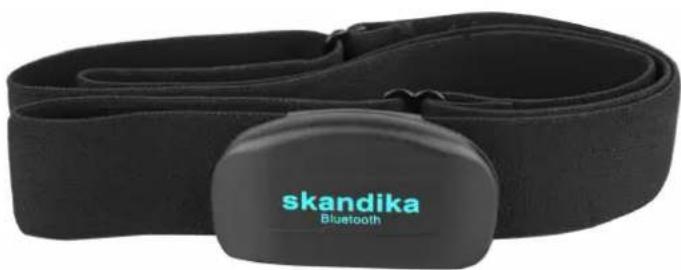
SKANDIKA
Bluetooth chest strap
For a goal-oriented and heart rate controlled cardio training (HRC), it is important to constantly keep an eye on your own heart rate during the workout and to adjust your performance if necessary.
- Bluetooth interface
- adjustable in size
- suitable for the use of apps like Kinomap & Skandika Training Data
SERVICE
Do you need some help?
The Skandika Service page provides information on frequently asked questions (FAQ), the Skandika Training Data App, and the Kinomap App. Manuals for our Skandika products can also be downloaded from here.
If you require spare parts, please contact our Customer Service Team at service@skandika.de.

skandika.com/en/service/
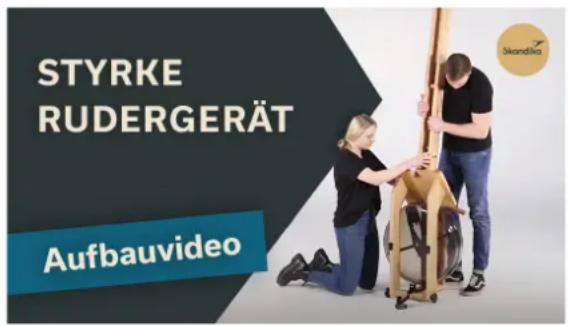
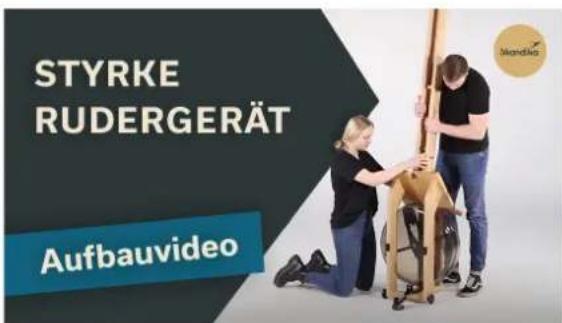
VIDEO ASSEMBLY INSTRUCTIONS
You can find a step-by-step video tutorial on how to assemble your Styrke rowing machine on our Skandika YouTube channel.
You can access the video via this link or by simply scanning the QR-code.

ANY OTHER QUESTIONS?
You can find the latest information on our products, current promotions, competitions, instructions, training guides, and much more here:


instagram.com/skandika


facebook.com/ skandika.german


youtube.com/Skandika_Europe

WARNING
To reduce risk of injury, read and understand this instruction manual before using the device! This machine is intended for home use only in accordance with the instructions provided in this manual. Read the instruction manual carefully before using this device and keep the instruction manual for future use.
SAFETY PRECAUTIONS
- Keep children and pets away from the machine at all times. DO NOT leave children unattended in the same room with the machine.
- Only one person at a time should use the machine. It is not suitable for commercial use.
- If the user experiences dizziness, nausea, chest pain, or any other abnormal symptoms, STOP the workout immediately. CONSULT A PHYSICIAN IMMEDIATELY.
- Position the machine on a plain, leveled surface. DO NOT use the machine near liquids or outdoors. If you want to protect the installation site against pressure marks, dirt, etc., we recommend that you place a suitable, non-slip mat under the device (e.g. the Skandika floor mat for rowing machines).
- Before starting any exercise program, consult your physician to determine if you have any medical or physical conditions that could put your health and safety at risk or prevent you from using the equipment properly. Your physician's advice is essential if you are taking any medication that may affect your heart rate, blood pressure or cholesterol level.
- Always wear appropriate workout clothing when exercising. DO NOT wear robes or other clothing that could become caught in the machine. Running or aerobic shoes are also required when using the machine.
- Use the machine only for its intended use as described in this manual. DO NOT use attachments not recommended by the manufacturer.
- Do not place any sharp objects around the machine.
- Disabled persons should not use the machine without a qualified person or physician, who can provide qualified surveillance / assistance.
- Before using the device, always do stretching exercises to properly warm up.
- Never operate the device if it is not functioning properly.
- Do not place fingers or objects in the range of moving parts of the device.
-
The max. user capacity of this class HC device is 180 KGS.
-
Before using the equipment, check if all nuts and bolts are securely tightened. The safety of the equipment can only be maintained if it is regularly examined for damage and/or wear and tear. No adjustable part should protrude and/or obstruct user movements.
- Do not use this device directly after meals or drinks.
- This device is not suitable for therapeutically use. Only use this unit according to the intended purpose and as directed in the instruction manual.
- Please do not attempt to repair the unit yourself in the event of malfunctions, since this will void all warranty claims. Only have repairs carried out by authorised service centres. It is recommended to lightly lubricate all moving parts from time to time to maintain functionality.
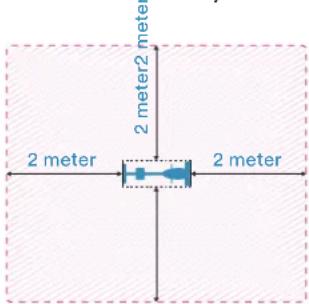
- Please only exercise with a minimum clearance area of 2 meters around the device.
- If you do not use the rower for more than 1 week, please remove the batteries of the Bluetooth module.
Be sure to consult a physician before you start any device program. He may give you proper hints and advice with respect to the individual intensity of stress for you, your workout and sensible eating habits. This is especially important for individuals over the age of 35 or persons with pre-existing health problems.
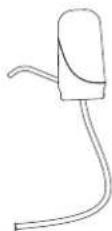
USB PUMP
Your unit comes with an electric (USB) pump with which the water tank can be filled or emptied. It is best to fully charge the battery of the pump before installation.
Your Skandika rowing machine Styrke has already been pre-assembled for the most part by hand. To complete the remaining assembly work, you will find a tool bag with the following contents enclosed:
| Description | Q'ty |
| Slotted screwdriver length 155 mm | 1 |
| Phillips screwdriver length 106 mm | 1 |
| Hexagon spanner size 3 | 1 |
| Hexagon spanner size 4 | 1 |
| Hexagon spanner size 5 | 2 |
| Hexagon spanner size 6 | 1 |
| Open-end spanner M10/13 | 1 |
Note: Most parts arrive pre-assembled on delivery. For this reason, the number of screws may differ from the actual number.
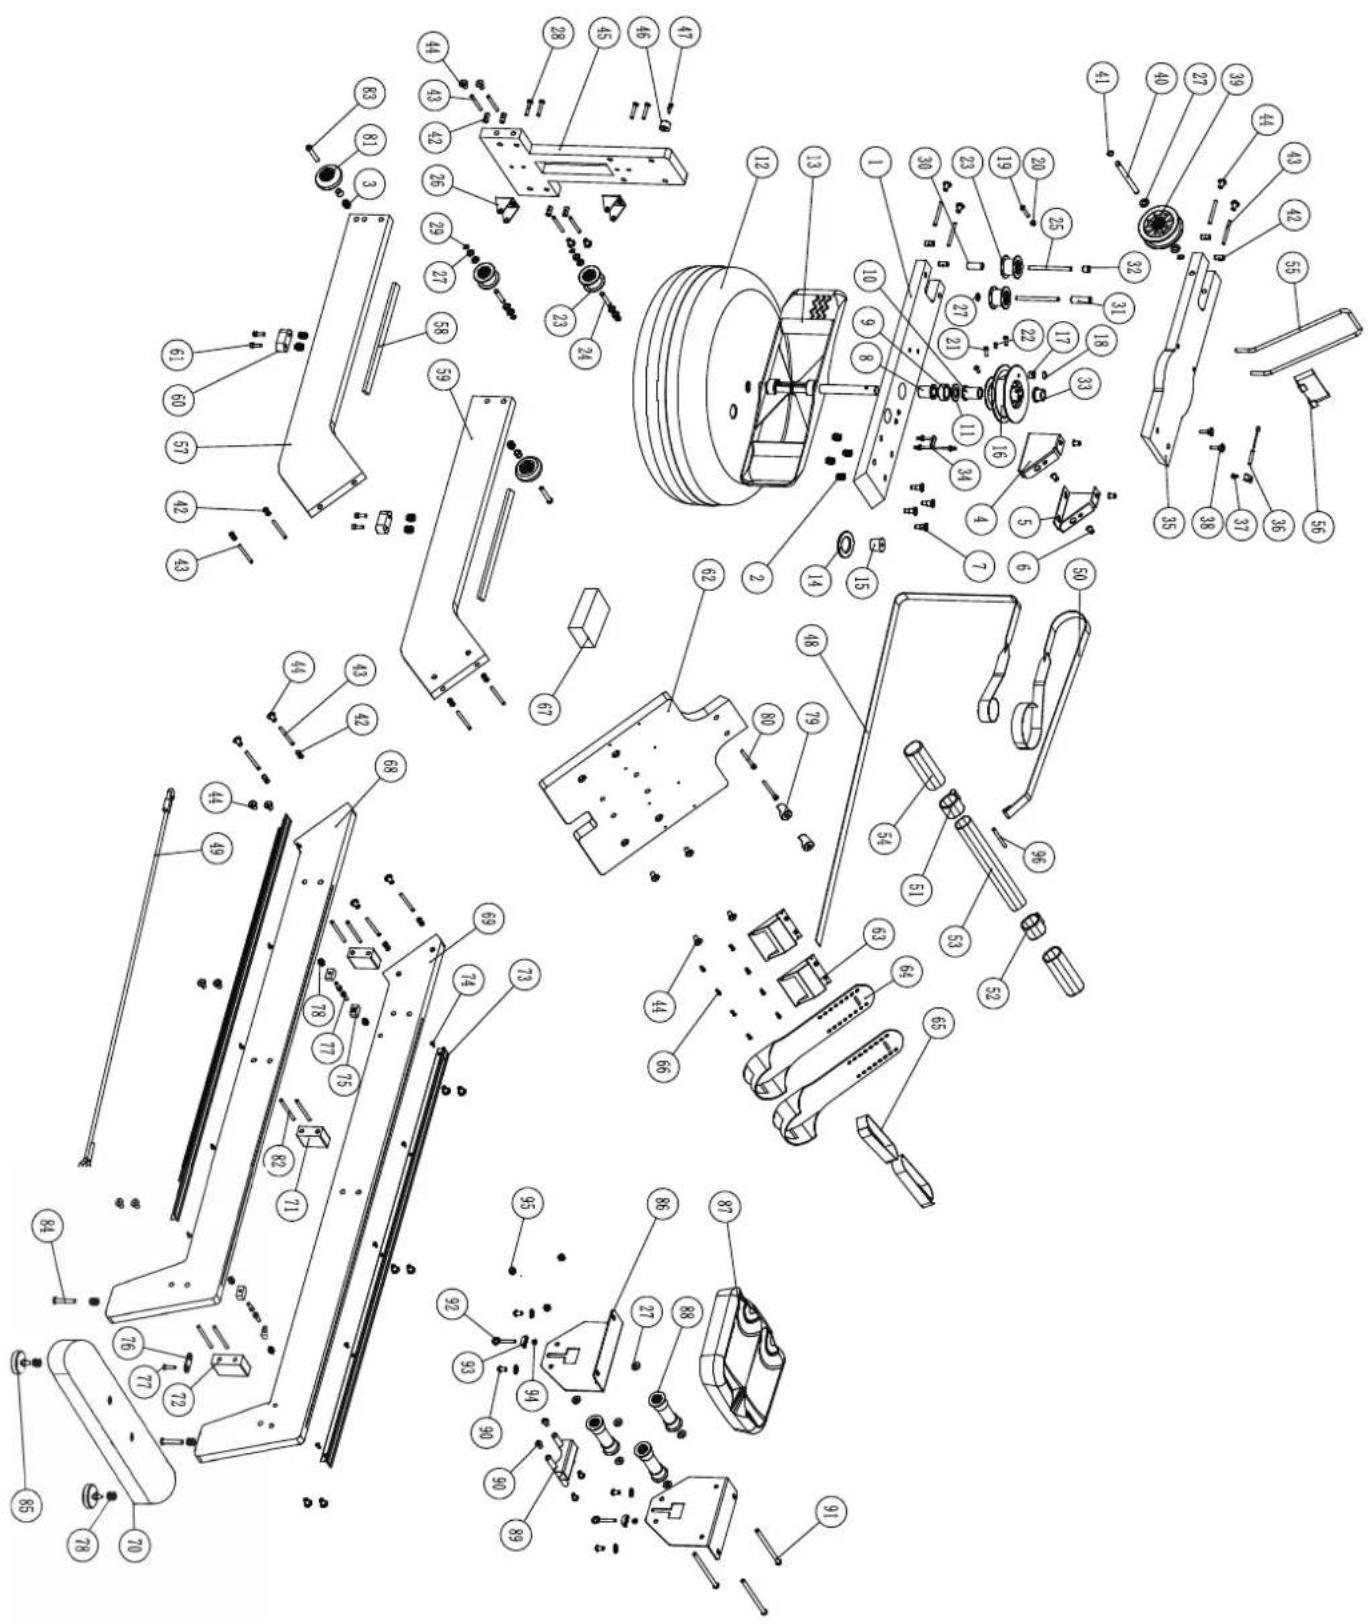
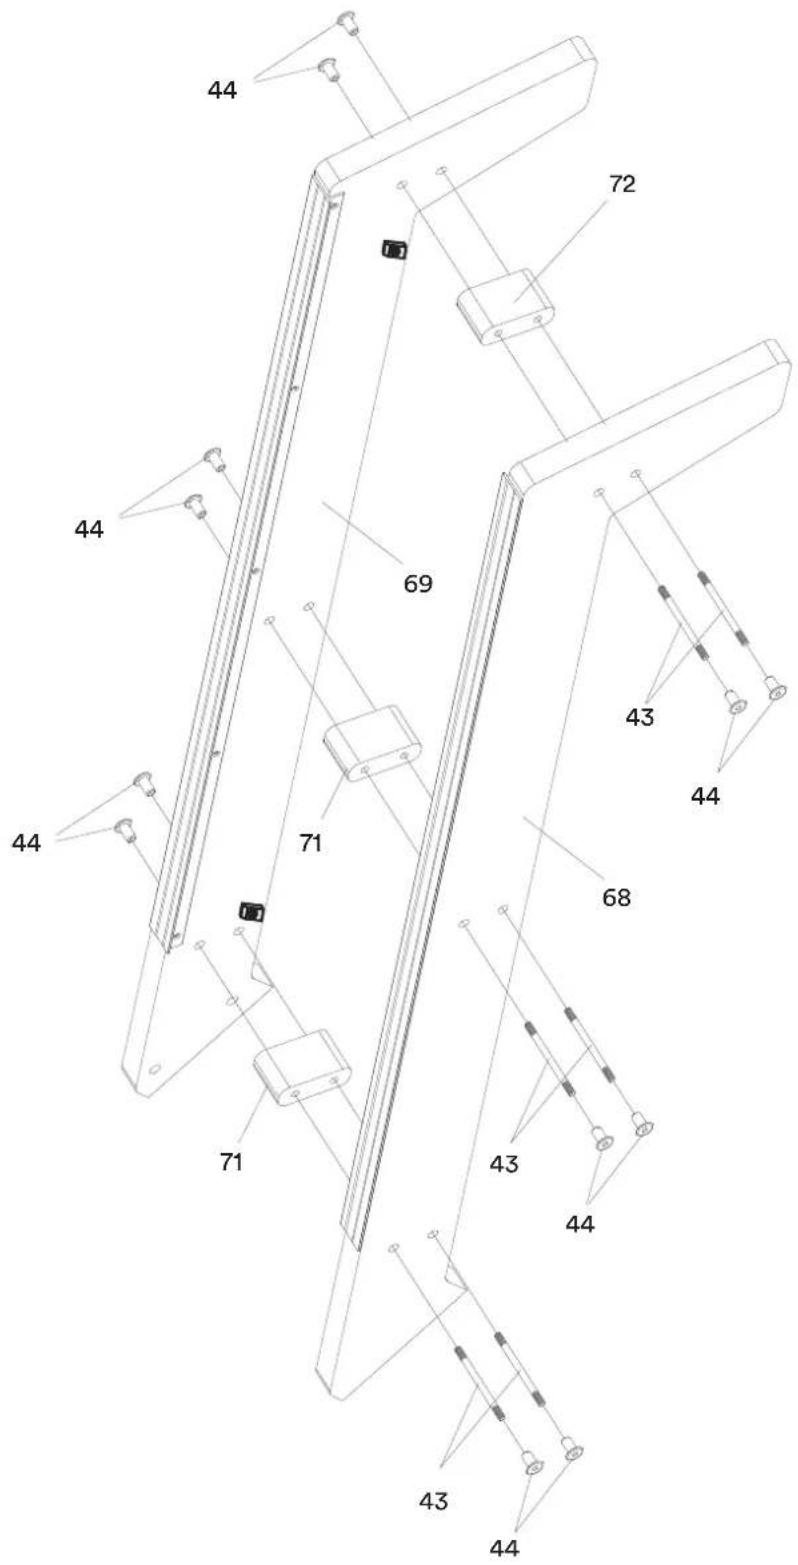
| Part No. | Description | Q'ty |
| 1 Lower connecting plate 1 | ||
| 2 Bolt socket M8 × ø 19.6 × 9.8 4 | ||
| 3 Spacer M8 8 | ||
| 4 Connecting plate left 1 | ||
| 5 Connecting plate right 1 | ||
| 6 Nut M6 × 10 4 | ||
| 7 Cylindrical bolt M8 × 25 4 | ||
| 8 Axis guide ø 20 × ø 25,5 × 35 1 | ||
| 9 Plastic axis guide ø 25.5 × ø 36.5 × 13 1 | ||
| 10 Axis guide ø20 × ø 25.5 × 40 | 1 | |
| 11 | Washer ø 21 × ø 38 × 3 | 1 |
| 12 | Water tank (PC transparent) | 1 |
| 13 | PP paddle | 2 |
| 14 Silicone ring ø 20 × ø 38 × 1.2 1 | ||
| 15 | Tank plug (TPR) | 1 |
| 16 Aluminum webbing roller ø 132 | 1 | |
| 17 | Plastic magnet holder (PP) | 1 |
| 18 | Magnet | 1 |
| 19 Screw M6 × 35 | 1 | |
| 20 | Nut M6 | 1 |
| 21 | Screw M6 × 15 | 3 |
| 22 | Screw M6 × 10 | 1 |
| 23 | Webbing reel set, small (1 webbing roller and 2 × bearing 608ZZ each) | 4 |
| 24 | Webbing roller ø 8 × 48 | 2 |
| 25 | Axle ø 8 × 10⁵ | 2 |
| 26 | Screw M6 × 15 (U-roller) 2 | |
| 27 | Washer ø 8.5 × ø 16 × 1.5 | 17 |
| 28 | Screw M6 × 35 | 4 |
| 29 | C-ring ø8 | 4 |
| 30 | Plastic guide (PA) ø 15 × ø 8.1 × 34.5 | 1 |
| 31 | Plastic guide (PA) ø15 × ø 8.1 × 46 | 1 |
| 32 | Spacer | 3 |
| 33 | Axis guide ø 19 × ø 25.5 × 19 | 1 |
| 34 | Belt limiter (PP) | 1 |
| 35 | Upper connection plate 1 | |
| 36 | Sensor | 1 |
| 37 | Screw ST 3.2 × 13 | 1 |
| 38 | Screw M6 × 30 | 2 |
| 39 | Webbing reel set, large (1 webbing roller and 2 x bearing 6000ZZ) | 1 |
| 40 | Roller axle ø 10 × 126 | 1 |
| Part No. | Description | Q'ty |
| 41 C-ring ø10 | 2 | |
| 42 | Nut M6 × D10 × 15 | 16 |
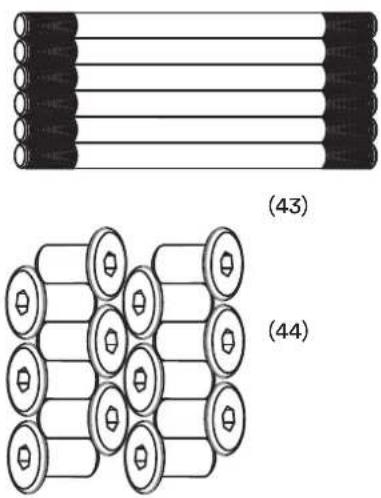
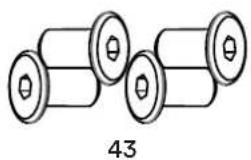
| 43 | Bolt M6 × 60 | 16 |
| 44 | Nut M6 × 18 | 28 |
| 45 | Rear stand board | 1 |
| 46 | Vibration protection (TPR) | 1 |
| 47 | Screw ST 4,2 × 25 | 1 |
| 48 | Nylon webbing L: 1965 mm | 1 |
| 49 | Elastic pull rope 8 × 1050 / 12 × 1050 mm | 2 |
| 50 | Nylon webbing L: 3080mm | 1 |
| 51 | Plastic fixation left (PP) | 1 |
| 52 | Plastic fixation right (PP) | 1 |
| 53 | Handle | 1 |
| 54 | Handle cover (rubber) | 2 |
| 55 | iPad holder (Q235A) | 1 |
| 56 | iPad support (PP) | 1 |
| 57 | Lower base plate left | 1 |
| 58 | EVA pad 150 × 20 | 2 |
| 59 | Lower base plate right | 1 |
| 60 | Foot pads (TPR) | 2 |
| 61 Screw M6 × 20 | 8 | |
| 62 | Footboard 45 | 1 |
| 63 | Plastic pedal fixation (PP) | 2 |
| 64 | Foot pedals (PP) | 2 |
| 65 | Foot strap | 2 |
| 66 | Screw ST 3,8 × 16 | 10 |
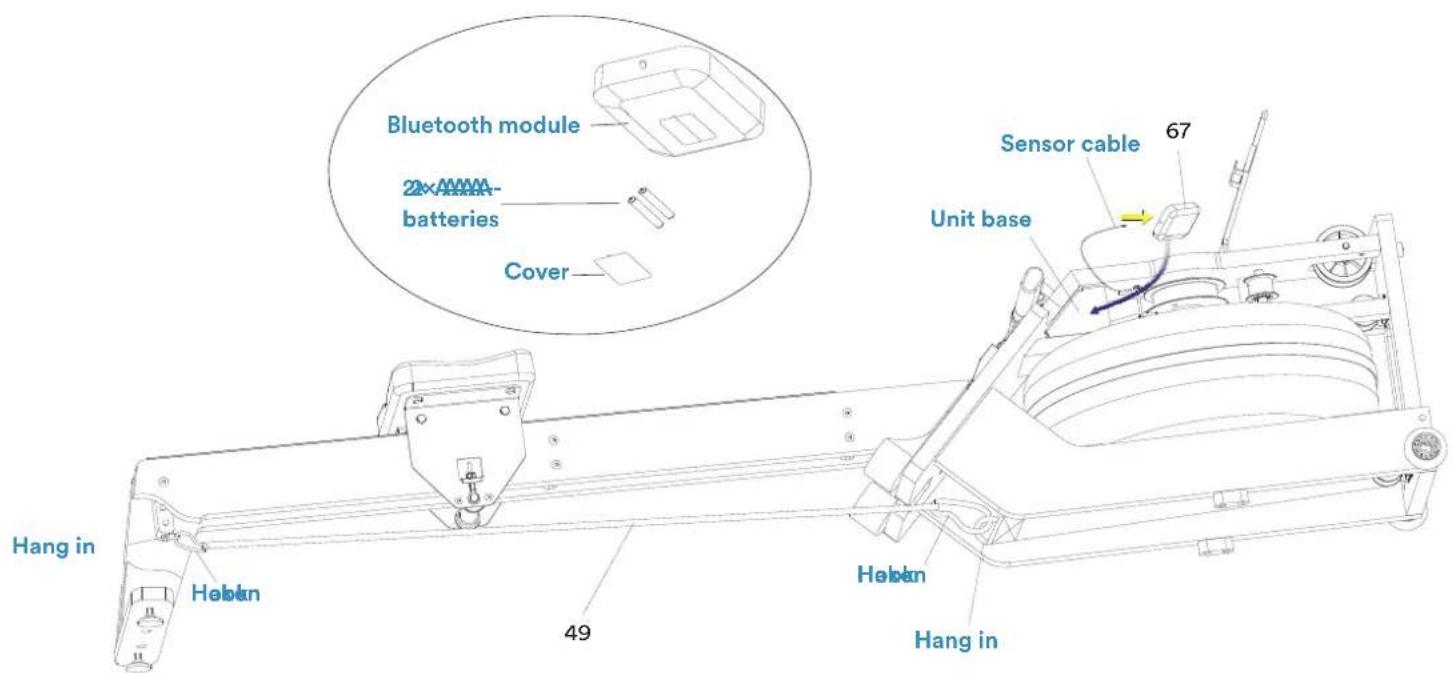
| 67 | Bluetooth module | 1 |
| 68 | Left rail | 1 |
| 69 | Right rail | 1 |
| 70 | Solid wood support foot | 1 |
| 71 | Connecting block 1 | 2 |
| 72 | Connecting block 2 | 1 |
| 73 | Aluminum strip | 2 |
| 74 | Screw ST 4,2 × 12 | 10 |
| 75 Stopper (PA) | 4 | |
| 76 Connecting plate for pull rope | 1 | |
| 77 | Screw M6 × 20 | 5 |
| 78 | Screw M6 × 15 | 5 |
| 79 | Handle stopper (PP) | 2 |
| 80 | Screw M6 × 55 | 2 |
| 81 | Roller set (1 roller and 2 bearings 608ZZ each) | 2 |
| 82 | Screw M6 × 85 | 6 |
| 83 | Screw M8 × 60 | 2 |
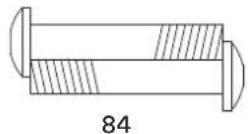
| 84 | Screw M8 × 45 | 2 |
| 85 | Adjustable foot pad (TPR) | 2 |
| 86 | Seat cushion fixation | 2 |
| 87 | Seat cushion | 1 |
| 88 | Upholstery roller set (1 roller and 2 bearings each 608ZZ) | 2 |
| 89 | Stop device | 1 |
| 90 | Screw M8 × 15 | 8 |
| 91 | Screw M8 × 140 | 3 |
| 92 | U-bolt M6 | 2 |
| 93 | U-bolt | 2 |
| 94 | Nut M6 | 2 |
| 95 | Nut M8 | 3 |
| 96 | Axle | 1 |
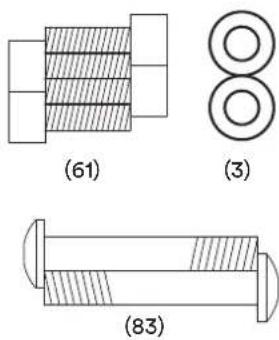
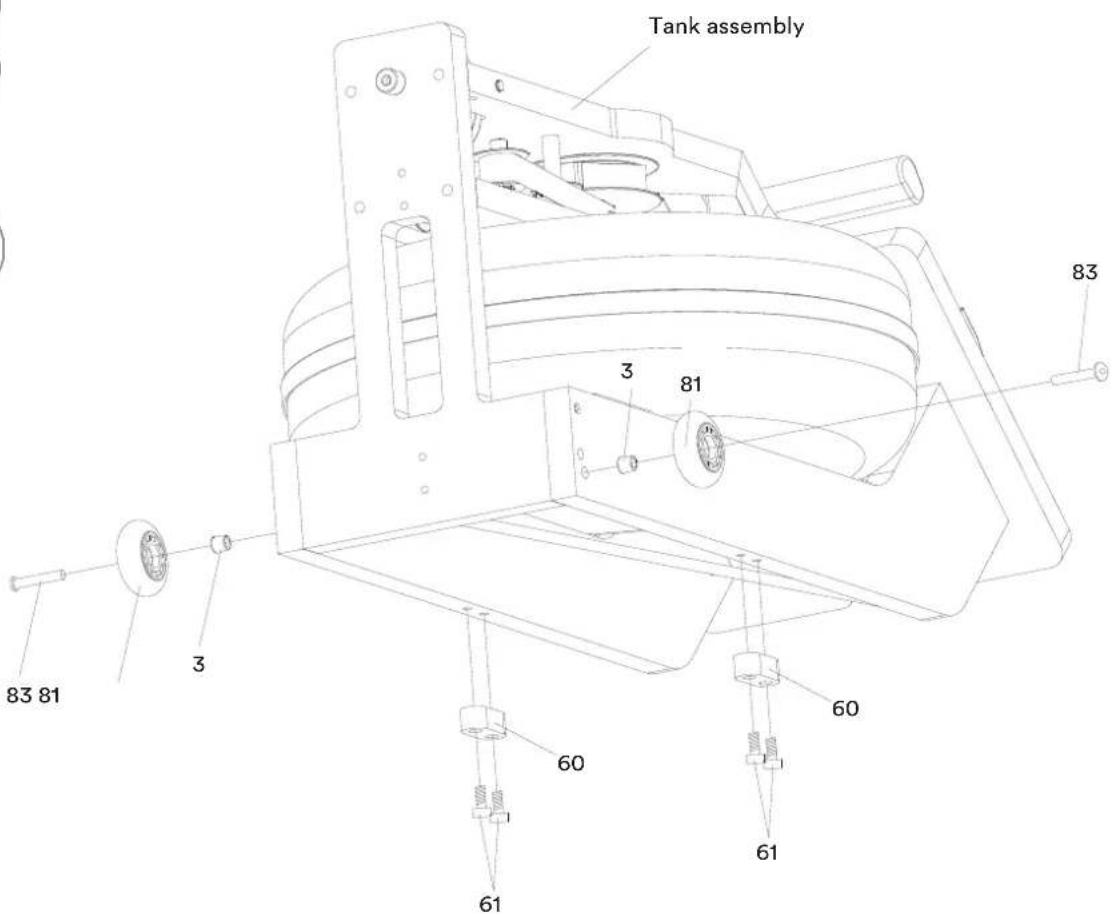
STEP 1
Attach the two foot pads (60) to the tank assembly by fixing it with 4 screws M6 × 20 (61). The rollers (81) and the spacers (3) must then be mounted to the tank assembly with 2 screws M8 × 60 (83).
Or simply watch the set-up video online:
Find our step by step video tutorial on how to assemble Styrke on the Skandika YouTube channel.
You can find the video via this link or simply scan the QR code.

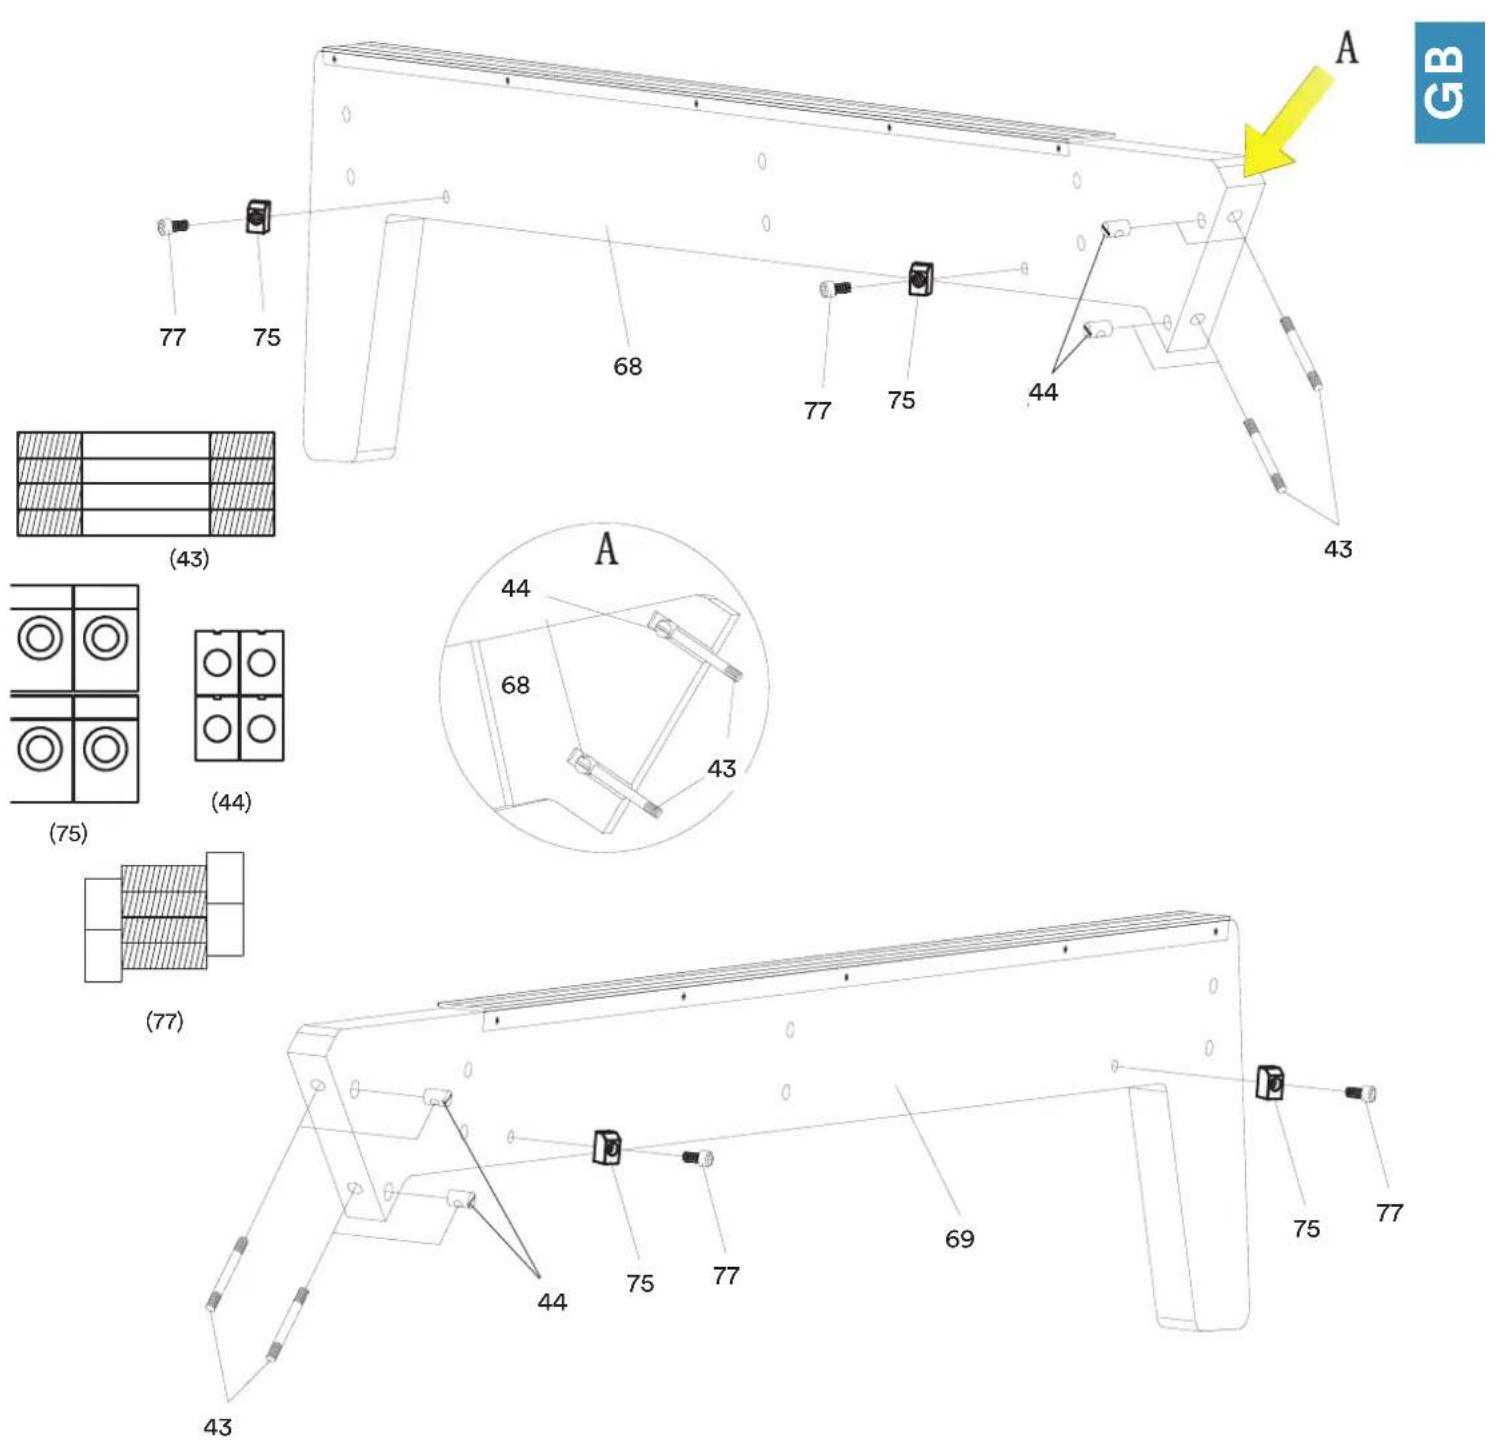
STEP 2
Attach the stoppers (75) to the left (68) and right (69) rails with 2 screws (77) each. Then attach the nut (44) and the bolt (43) to each rail as shown.
STEP 3
Fit the bolts (43) and nuts (44) as shown, thus joining the connecting blocks 1 and 2 (71 & 72) and the two rails (68 & 69).
STEP 4
Attach the adjustable foot pads (85) and the solid wood foot (70) to the left and right rail (68 & 69) using two screws (84) as shown.

STEP 5
Secure the rails (68 & 69) to the tank assembly with 4 bolts (43) and nuts (42) as shown.
natural_image
Simple line drawing of three cylindrical objects with hexagonal ends, labeled '43' below (no text or symbols on the objects themselves)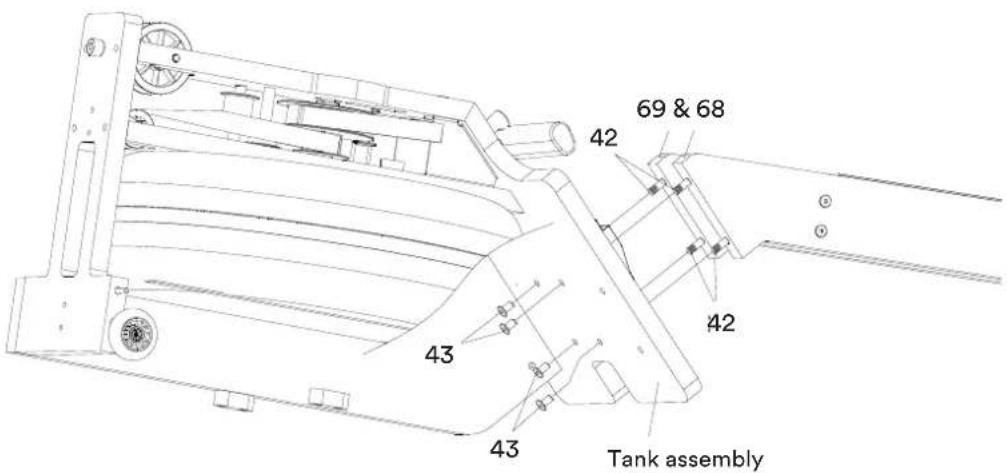
STEP 6
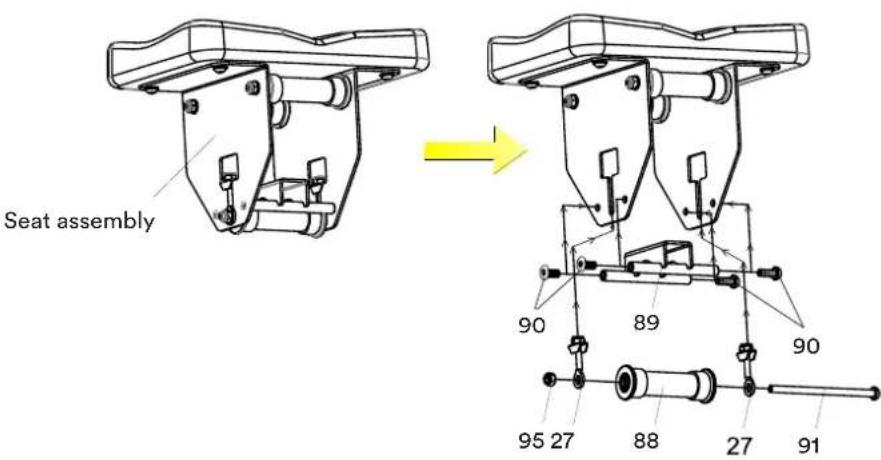
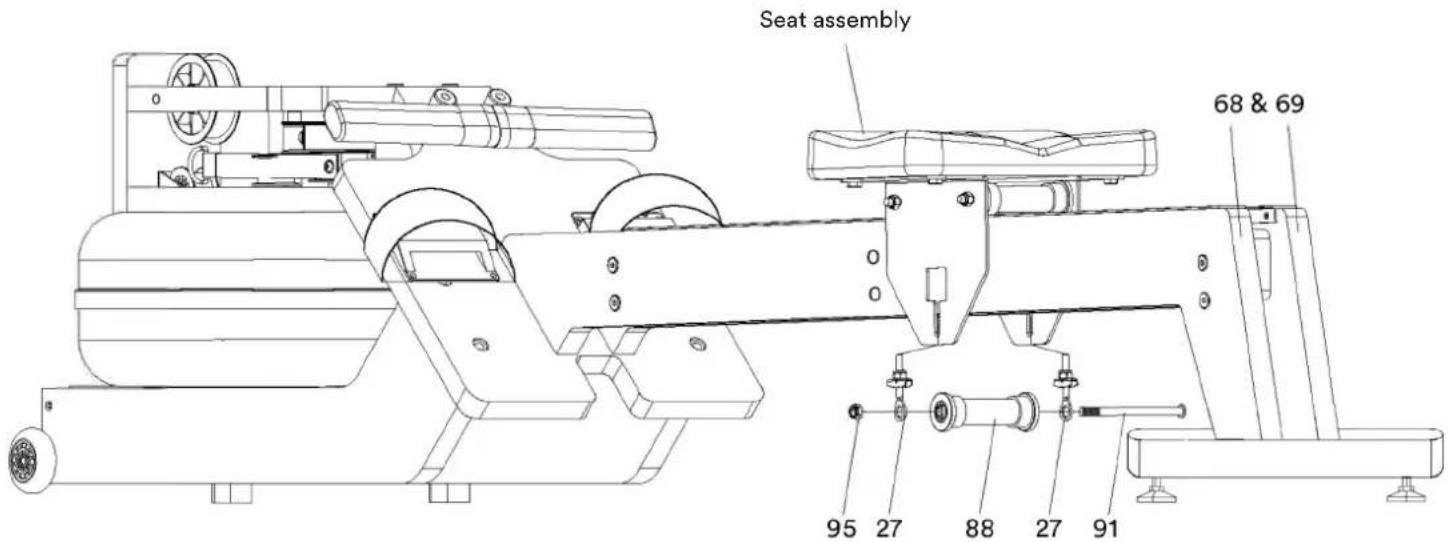
Now the seat assembly has to be attached. The necessary parts [nut M8 (95), washer (27), roller (88), screw M8×140 (91), Socket bolt M8×15 (90), Stop device (89)] must first be removed from the unit in order to attach it to the rails (68 & 69). After assembly, the seat unit should be able to slide on the rails so that the rowing movement can be carried out correctly later.
STEP 7
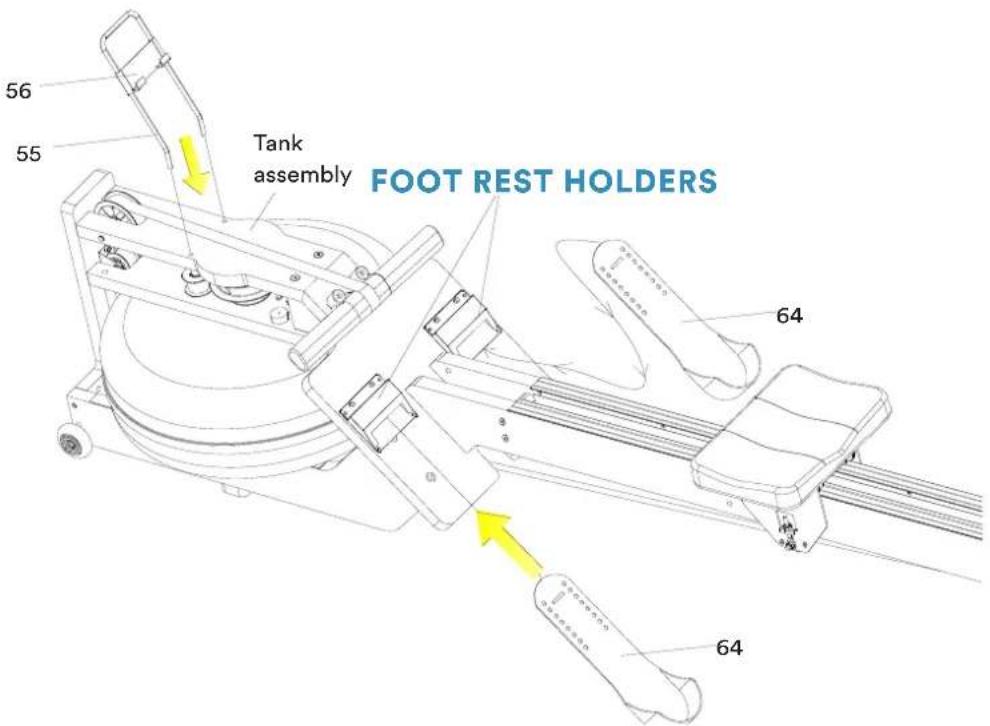
Attach the iPad holder (55) and the iPad support (56) to the tank assembly.
Then fit the foot pedals (64) to the footrest holders as shown. The holders are 8-way adjustable and can thus be adapted to the respective size of the user.
STEP 8
Hang the hooks on both sides of the of the elastic pull rope* (49) as shown below.
The unit comes with a Bluetooth module (67), as well as 2 AAA batteries and a battery charger. This allows you to operate the module in an environmentally friendly way. We recommend that you fully charge the batteries before inserting them for the first time. After inserting them, connect the sensor cable to the module and place the module (67) on the base of the device as shown. The module has a magnet that fixes the module to the base of the unit.
* the pull rope (49) is included 2 times:
a) 1 rope with black end mark (especially recommended for beginners and advanced users) with a standard rowing resistance (independent of the amount of water filled) as well as a standard retraction.
b) 1 rope with red end mark (especially recommended for professionals) with a stronger rowing resistance (independent of the amount of water filled) as well as a faster retraction.
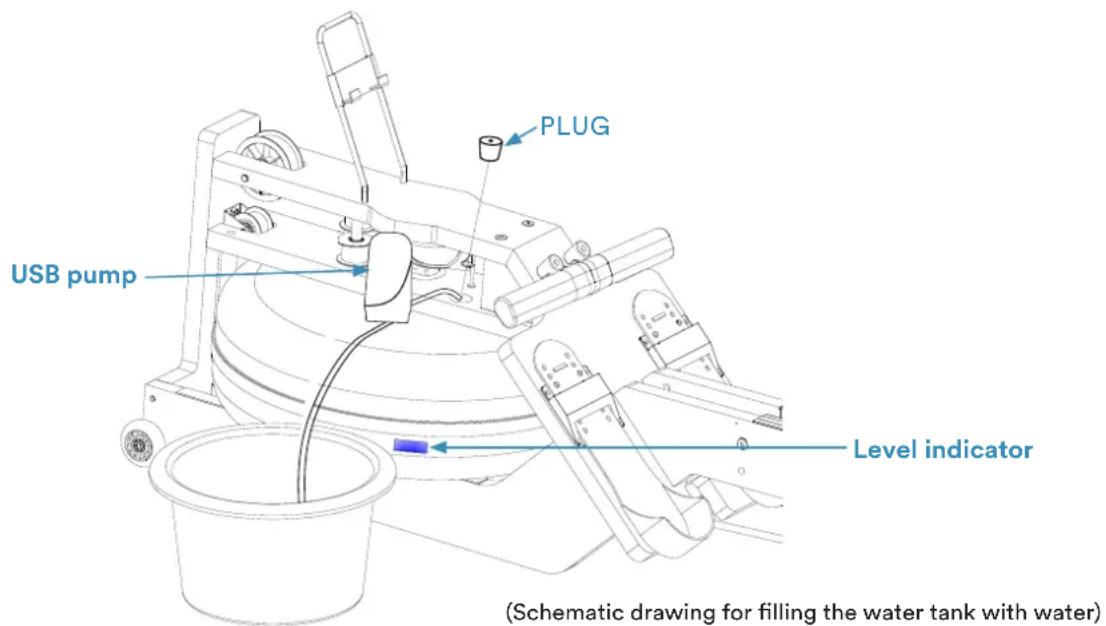
FILLING AND EMPTYING THE WATER TANK
- Remove the plug of the tank.
- The illustration at the bottom of this page shows how to fill the tank with water. Place the transparent hose in a bucket of water and the metal outlet in the tank. Use the USB pump supplied to fill the tank. Pay attention to the filling quantity, which is indicated on the tank side wall by the level indicator.
- Empty the water tank: Place a bucket in close proximity to the water tank and use the supplied USB pump
(transparent hose is now placed in the water tank) to pump water from the tank into the bucket.
- Put the plug back into the tank. If any water has spilled, wipe it away.
NOTES:
- Always fill the tank with tap water or drinking water. Do NOT use distilled water, as this no longer contains any additives and so algae may develop more quickly. Never use pure chlorine bleach instead of a commercially available water treatment/chlorine tablet. Chlorine bleach, unlike chlorine tablets, may damage the tank.
- From now on, add a water treatment tablet to the tank every approx. 2 months. If the water remains cloudy despite the tablet, change the water in the tank.
- We recommend using the enclosed Skandika chlorine tablets. It is usually sufficient to add 1 tablet to the water when filling the tank. Please observe the water quality from time to time. If there is any discolouration, please add another chlorine tablet or replace the water completely.
- Avoid placing the tank directly in sunlight, this can save frequent water changes.
- The water from the tank is not suitable for consumption. After emptying, pour the water away.
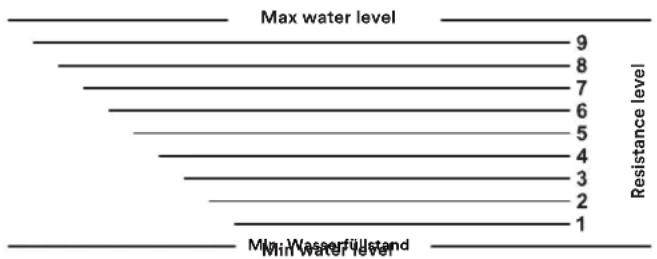
The water level
- The figure shows where the level indicator is located (side wall of the tank). You may fill the tank to a maximum of the 'Max' mark. Never overfill the tank beyond this! This will void the warranty (minimum = 10 litres / maximum = 15 litres).
- The resistance during rowing depends on the fill level of the tank. Filling level 1 means the lowest resistance when rowing, level 9 is the highest resistance.
EXERCISE INSTRUCTIONS
Rowing is a very effective form of exercise. It strengthens the heart and circulation as well as all the major muscle groups: The back, abdomen, arms, shoulders, buttocks and legs.
Rowing basics:
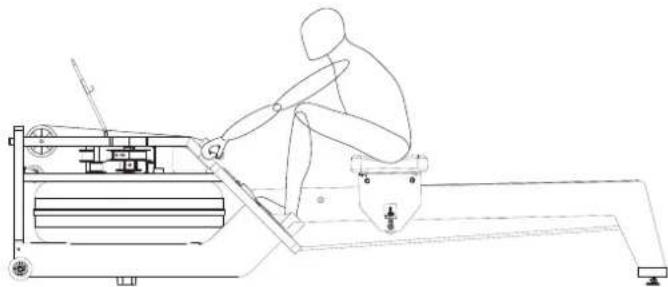
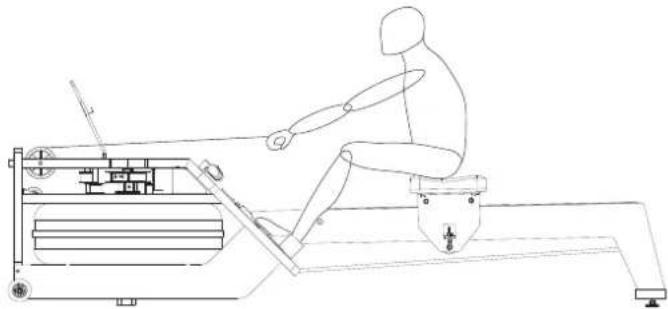
- Sit on the seat and put your feet on the footrests and fix them with the Velcro. Grasp the handles.
- Assume the start position, leaning forward with arms outstretched and bending the legs.
natural_image
Technical line drawing of a person operating a mechanical machine (no text or symbols present)- Push yourself backwards. The back and legs are stretched at the same time and the body slowly opens as the seat slides back.
natural_image
Line drawing of a person using a rowing machine (no text or symbols present)- Carry out this movement until you lean slightly backwards. At this stage the elbows should point outwards. Return to the posture under point 2) and repeat the sequence.
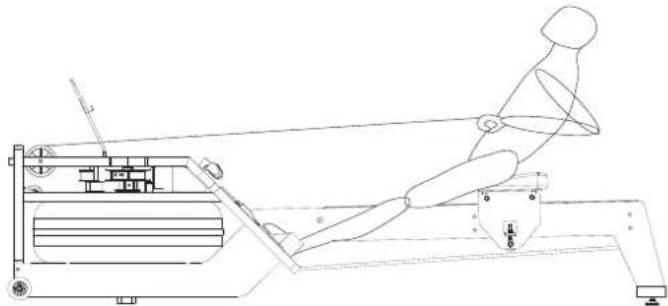
natural_image
Line drawing of a person using a rowing machine (no text or symbols present)As a beginner, you should first learn the correct sequence and the rhythm of movement. You can increase the speed and resistance later.
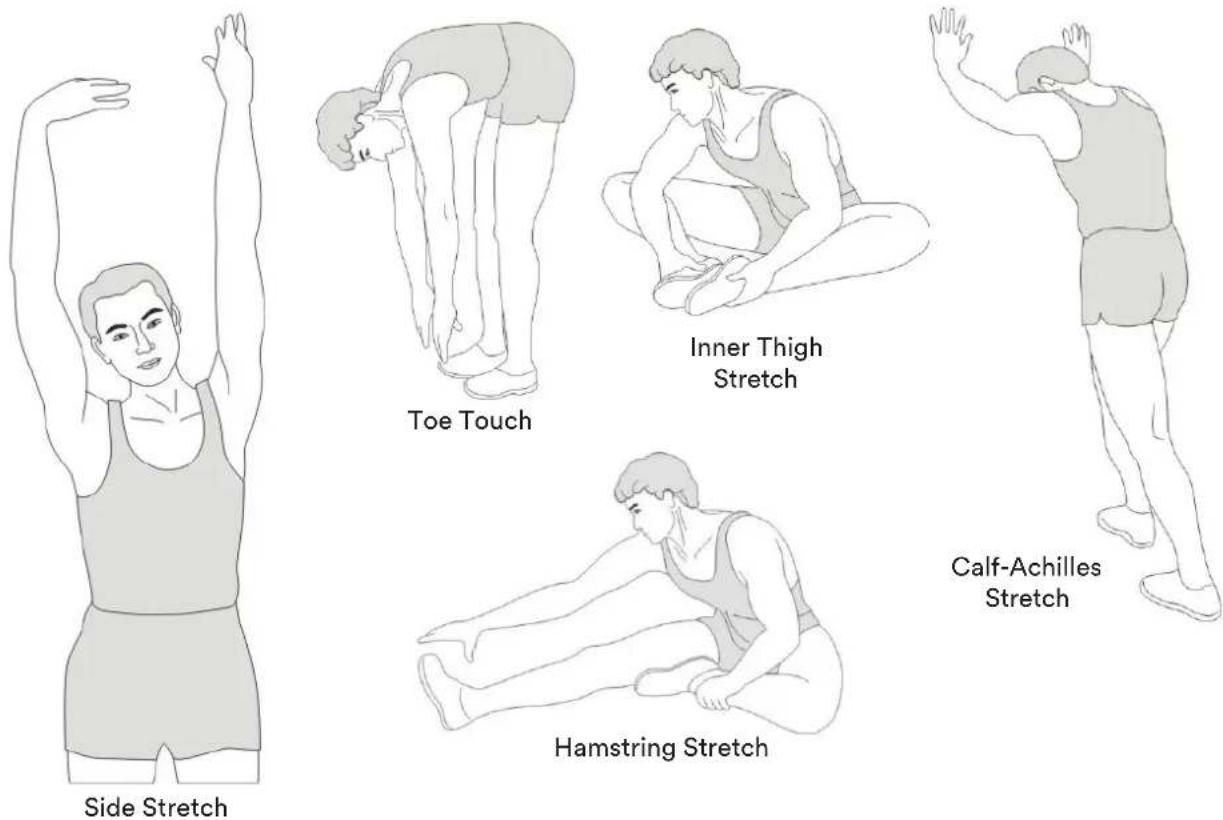
WARM-UP and COOL-DOWN
A successful exercise program consists of a warm-up, aerobic exercise and a cool-down. Exercise for at least two or preferably three times a week, resting for a day between workouts. After several months, you may increase the frequency to four or five times per week.
WARM-UP
This stage helps to improve the blood circulation and prepares the muscles for your workout. It additionally helps to reduce the risk of injury or cramps. It is recommended to do some stretching exercises as shown here below. Hold each stretching position for approximately 30 seconds. Never force or jerk yourself into a stretching position – if you feel pain, STOP immediately. Warm-up exercises may also include brisk walking, jogging, jumping jacks, jump rope exercises or running in place.
STRETCHING
Muscles can be stretched more easily when these are warm. This reduces the risk of injury. DO NOT BOUNCE.
Heart rate monitoring
Determine your personal training frequency range according to your age in order to achieve optimal training success. The following formula provides a guide for determining the maximum heart rate and the optimal training pulse (target heart rate):
maximum heart rate = 220 beats - age
target heart rate = maximum heart rate × 0.85
Always adapt your rowing movement to your well-being and target heart rate.
COOL-DOWN
This stage helps to soothe your muscles and your cardiovascular system after your workout. At the end of your workout, reduce the speed and exercise for approximately 5 minutes at this lower speed level. Afterwards, repeat the warm-up exercises as described above.
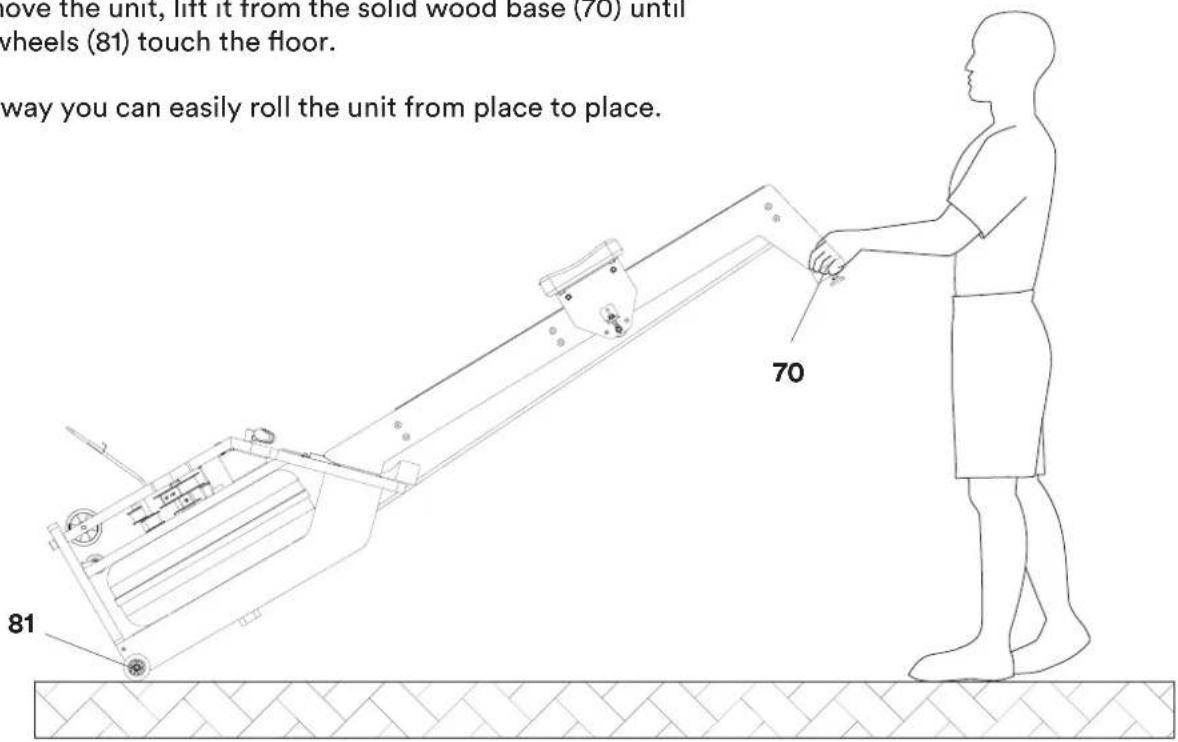
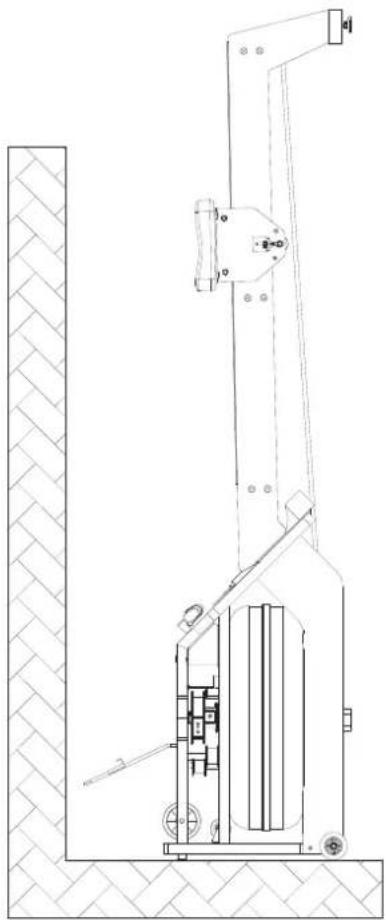
TRANSPORTING THE UNIT
To move the unit, lift it from the solid wood base (70) until the wheels (81) touch the floor.
This way you can easily roll the unit from place to place.
natural_image
Technical line drawing of a mechanical lifting device with no visible text or symbolsSTORAGE
- Store the rowing machine vertically after working out to save space. Empty the tank if it to be stored upright for more than 2 weeks to avoid algae forming in the stagnant water.
- Watch your head when standing the unit upright – you could bump the rear stand!
- Caution! Before setting up the unit in the vertical position, please push the seat all the way forward to the final position!
SKANDIKA TRAINING DATA APP
Turn your smartphone or tablet into a modern Styrke training computer with the Skandika Training Data App. Download the app either via the search function of your app store or by scanning the QR code and then install it on your iOS or Android device. After successful installation, start the app on your mobile device.
In order to record training data, the Styrke must first be connected to the app. For iOS, make sure the Bluetooth connection is switched on. For Android, both the Bluetooth connection and location connection must be switched on.


KINOMAP
Enjoy a powerful workout that's fun with the free Kinomap! Choose one of the videos in the Kinomap app and get started. Download the Kinomap app from the App Store or Play Store (just scan the QR code) or search for Kinomap.
Install and open the app and log in or register. Switch on Bluetooth and then add the training device as follows:


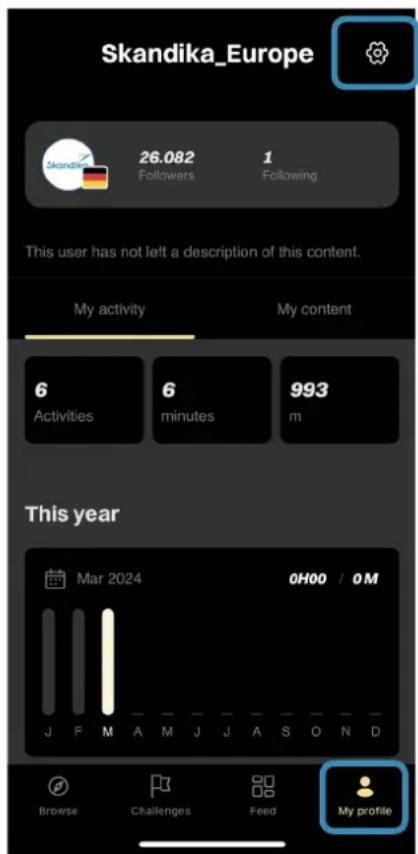
- My profile
- Settings (top right)
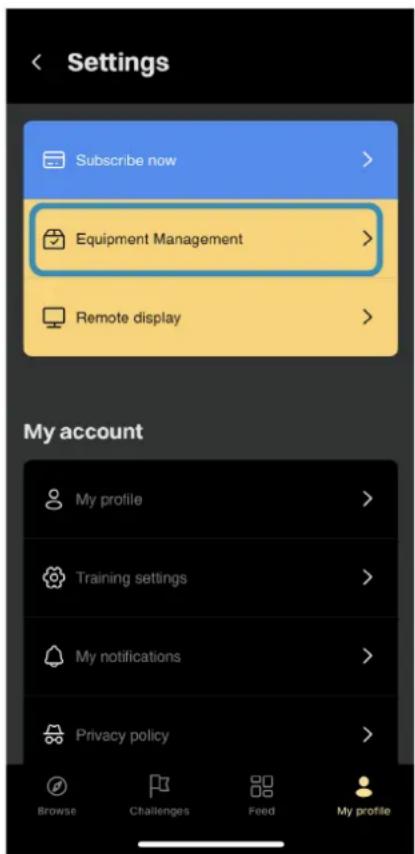
- Equipment
Management
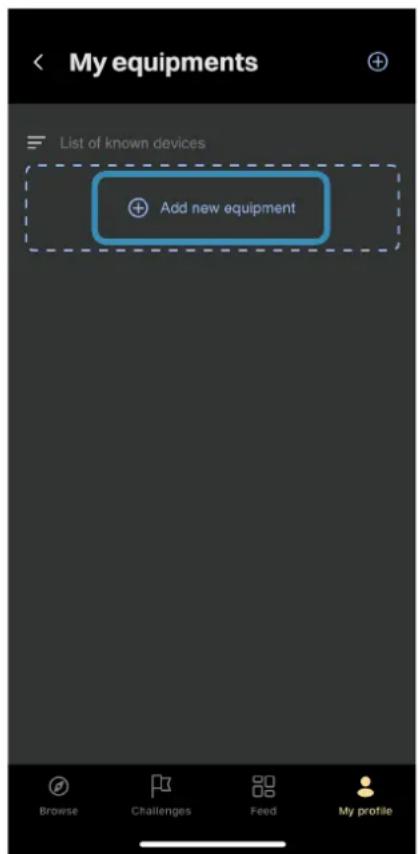
- Add new equipment

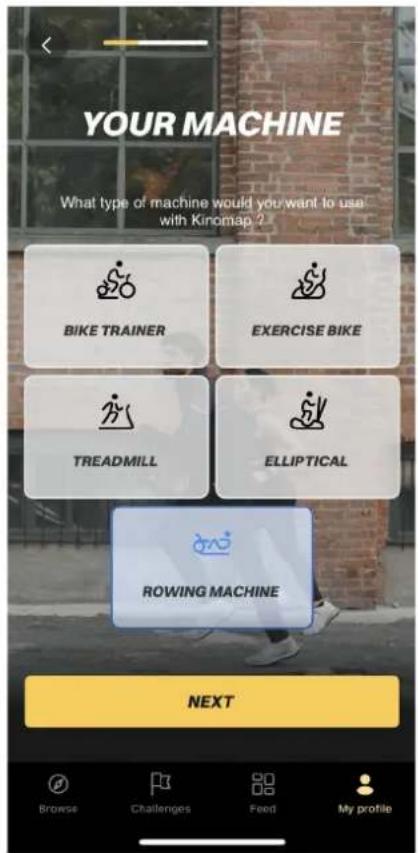
- Select device type

- Select Skandika
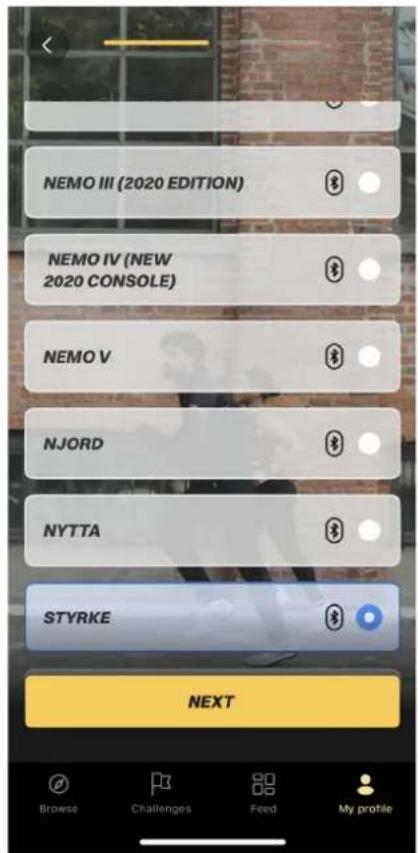
- Select device
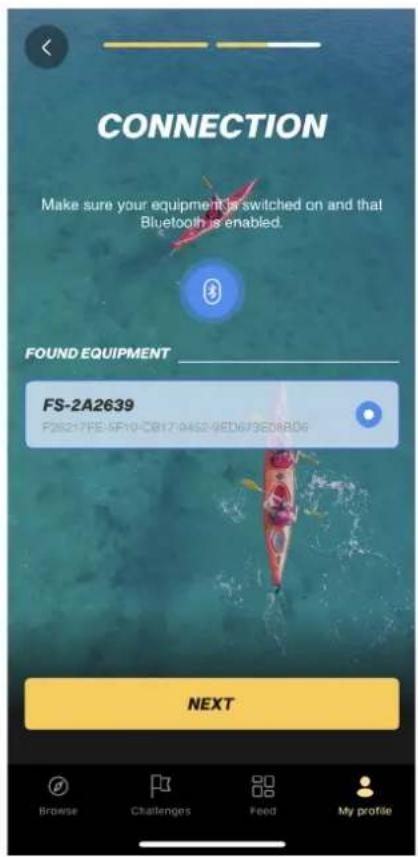
- Select the device from the list of Bluetooth devices found.
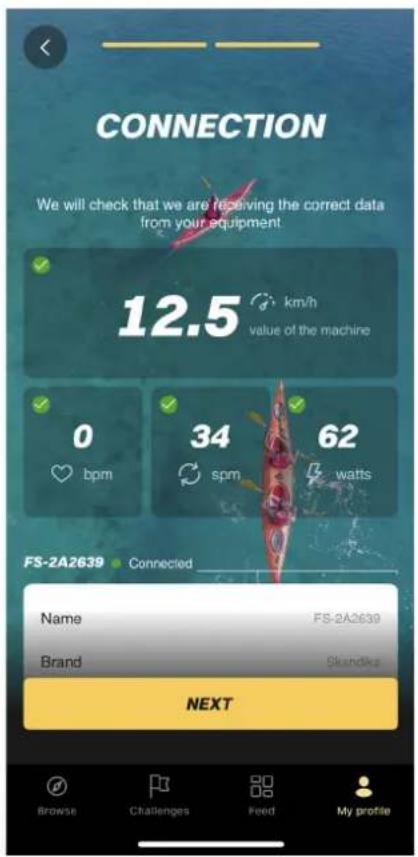
- The connection is established and the data transmission is tested.
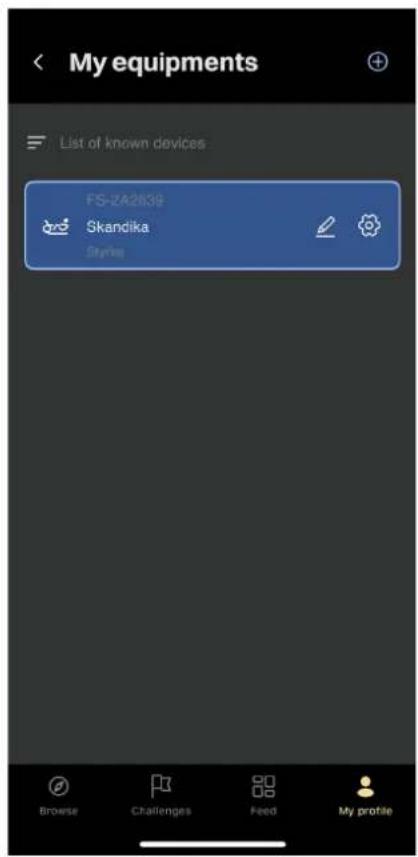
- The device is successfully connected and training can be started.
GUARANTEE CONDITIONS
For our devices we provide a warranty as defined below.
- In accordance with the following conditions (numbers 2–5) we repair defect or damage to the device free of charge, if the cause is a manufacturing defect. Therefore, these defects / damages need to be reported to us without delay after appearance and within the warranty period of 24 months after delivery to the end user. The warranty does not cover parts, which easily break (e.g. glass or plastic). The warranty does not cover slight deviations of the product, which are insignificant for usability and value of the device and damage caused by chemical or electrochemical effects and damages caused by penetration of water or generally force majeure damage.
- The warranty achievement is the replacement or repair of defective parts, depending on our decision. The cost of material and labor will be borne by us. Repairs at customer site cannot be demanded. The proof of purchase along with the date of purchase and / or delivery is required. Replaced parts become our property.
- The warranty is void if repairs or adjustments are made, which are not authorized by us or if our devices are
equipped with additional parts or accessories that are not adapted to our devices. Furthermore, the warranty is void if the device is damaged or destroyed by force majeure or due to environmental influences and in case of improper handling / maintenance (e.g. due to non-observance of the instruction manual) or mechanical damages. The customer service may authorize you to replace or repair defective parts after telephone consultation. In this case, the warranty is not void.
- Warranty services do not extend the warranty period nor do they initiate a new warranty period.
- Further demands, especially claims for damages which occurred outside the device, are excluded as long as a liability is not obligatory legal.
- Our warranty terms – which cover the requirements and scope of our warranty conditions – do not affect the contractual warranty obligations of the seller.
- Parts of wear and tear are not included in the warranty.
- The warranty is void if not used properly or if used in gyms, rehabilitation centers and hotels. Even if most of our units are suitable for a professional use, this requires a separate agreement.
ENVIRONMENTAL PROTECTION
The symbol of the crossed-out dustbin on batteries or accumulators indicates that they must not be disposed of in household waste at the end of their life. If batteries or accumulators contain mercury (Hg), cadmium (Cd) or lead (Pb), you will find the respective chemical symbol below the symbol of the crossed-out dustbin. You are legally obliged to return old batteries and accumulators after use. You can do this free of charge at a retail outlet or at another collection point near you. You can obtain addresses of suitable collection points from your city or local government. Batteries may contain substances that are harmful to the environment and human health. Particular care should be taken when handling batteries containing lithium because of the special risks
involved. The separate collection and recycling of old batteries and accumulators is intended to avoid negative impacts on the environment and human health. Please avoid the generation of waste from old batteries as far as possible, e.g. by giving preference to batteries with a longer life or rechargeable batteries. Please avoid littering public spaces by not carelessly leaving batteries or electrical and electronic equipment containing batteries. Please consider ways to reuse a battery instead of disposing of it, for example by reconditioning or repairing the battery.
In accordance with our policy of continual product improvement, we reserve the right to make technical and visual changes without notice.
For spare parts please contact: service@skandika.de
Service centre:
natural_image
Wooden Pilates reformer machine on a black mat, no visible text or symbolsnatural_image
Black wristband with a Bluetooth logo, no visible text or symbols on the device itself.POMPE ÉLECTRIQUE (USB)
natural_image
Pure diagram of parallel cylindrical pipes with circular ends, no text or symbols present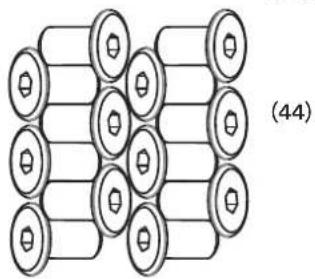
natural_image
Diagram of interconnected cylindrical objects with circular elements, no text or symbols presentÉTAPE 4
natural_image
Simple line drawing of two cylindrical objects with circular ends, labeled '43' below (no text or symbols on the objects themselves)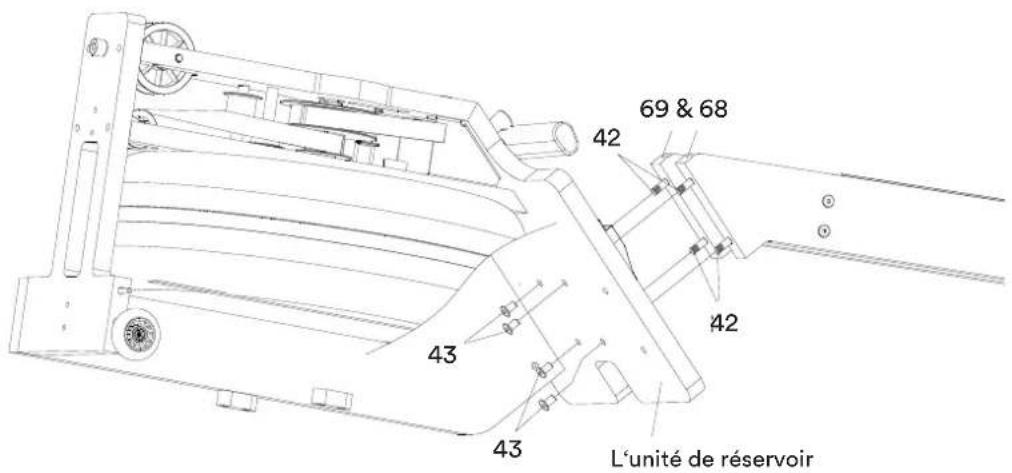
natural_image
Technical line drawing of a mechanical device with a human figure operating it (no text or symbols present)natural_image
Line drawing of a person using a Pilates reformer machine (no text or symbols present)natural_image
Technical line drawing of a human rowing machine with a human figure in motion (no text or symbols)natural_image
Technical line drawing of a vertical crane lifting a wall-mounted device, showing structural components and mounting base (no text or symbols)STOCKAGE
Sales & Service by /
- USB-PUMPE
- SCHRITT 4
- SCHRITT 6
- LAGERUNG
- Contents
- TECHNICAL DATA
- SUPPLEMENTARY ARTICLES
- SKANDIKA
- Bluetooth chest strap
- SERVICE
- VIDEO ASSEMBLY INSTRUCTIONS
- ANY OTHER QUESTIONS?
- WARNING
- SAFETY PRECAUTIONS
- USB PUMP
- STEP 1
- Or simply watch the set-up video online:
- STEP 2
- STEP 3
- STEP 4
- STEP 5
- STEP 6
- STEP 7
- STEP 8
- FILLING AND EMPTYING THE WATER TANK
- NOTES:
- The water level
- EXERCISE INSTRUCTIONS
- WARM-UP and COOL-DOWN
- WARM-UP
- STRETCHING
- Heart rate monitoring
- COOL-DOWN
- TRANSPORTING THE UNIT
- STORAGE
- SKANDIKA TRAINING DATA APP
- KINOMAP
- GUARANTEE CONDITIONS
- ENVIRONMENTAL PROTECTION
- POMPE ÉLECTRIQUE (USB)
- ÉTAPE 4
- STOCKAGE
Brand : Skandika
Model : Styrke Premium
Category : Rowing Machine