KA 4852 - Coffee machine SEVERIN - Free user manual and instructions
Find the device manual for free KA 4852 SEVERIN in PDF.

User questions about KA 4852 SEVERIN
0 question about this device. Answer the ones you know or ask your own.
Ask a new question about this device
Download the instructions for your Coffee machine in PDF format for free! Find your manual KA 4852 - SEVERIN and take your electronic device back in hand. On this page are published all the documents necessary for the use of your device. KA 4852 by SEVERIN.
USER MANUAL KA 4852 SEVERIN
natural_image
Line drawing of a coffee maker with a funnel and side cup (no text or symbols)Art.-No. KA 4852, 4853, 4854, 4855
DE GB FR NL ES IT
Instruction manual....20
natural_image
Line drawing of a coffee maker with a side panel showing internal structure (no text or symbols)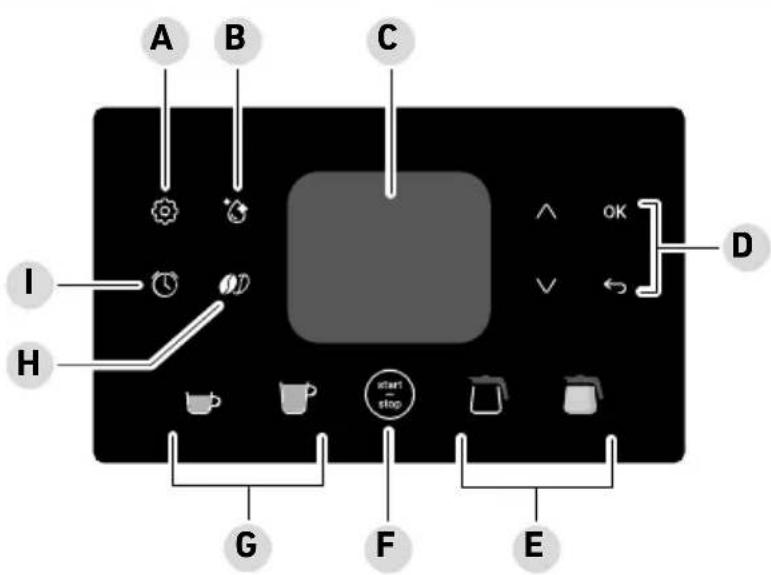
text_image
A B C I H G F E Start stop ^ OK Dtext_image
Diagram showing a device with labeled parts and directional arrows indicating process flowWasserhärte
natural_image
Diagram showing a device with rotating arrow and a close-up of its internal structure (no text or symbols)Wecker
text_image
Technical diagram showing a mechanical assembly with a checkmark and a magnified view of a component with a downward arrow.
text_image
Diagram illustrating coffee maker setup steps with labeled components and actionsnatural_image
Diagram showing a hand operating a device with an eye icon and directional arrows indicating motion (no text or symbols)natural_image
Diagram of a mechanical component with labeled section A, showing a vertical bar and base (no text or symbols beyond label)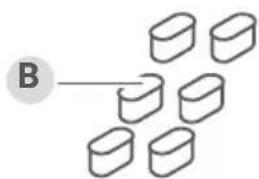
text_image
B
natural_image
Simple line drawing of a cylindrical container with a lid and label 'C' pointing to the side (no text or symbols on the container itself)
natural_image
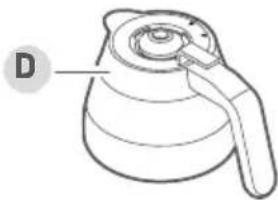
Line drawing of a kettle with handle and lid, labeled 'D' (no text or symbols on the object itself)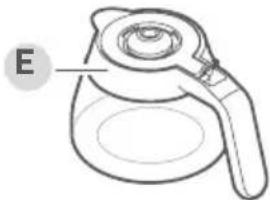
natural_image
Line drawing of a coffee maker with handle and lid, labeled 'E' (no text or symbols on the object itself)
natural_image
Diagram of a container with internal structure and labeled point F (no text or symbols beyond label)
natural_image
3D rendered mechanical component with a labeled section marked 'G' (no text or symbols on the object itself)1 About this manual 21
2 Scope of supply.... 22
3 Display and control panel 23
4 Before the first use....24
Unpacking 24
Cleaning....24
Installation....24
Settings 24
Reset language 26
5 Preparing coffee 29
6 Cleaning and care 30
Descaling....30
Cleaning....31
7 Transport/Storage....33
8 FAQ....34
9 Accessories 35
10 Disposal 36
11 Technical Data.... 36
1 About this manual
General information
These instructions are an integral part of the appliance.
Read them carefully before setting up, installing and using the appliance and keep them for future reference.
▶ Pass them on to any subsequent owner or user of the product.
The appliance must only be used by persons familiar with the safety instructions.
Relevant documents
- Quick start guide
- Safety manual (Safety)
- Warranty declaration (Warranty)
Warning notices

Signal word
Type, source and consequences of the hazard
▶ Measures to avoid the hazard.
Signal word Description
| Danger Imminently | hazardous situation which, if not avoided, will result in death or serious injury. |
| Warning Potentially | hazardous situation which, if not avoided, could result in death or serious injury. |
| Caution Potentially | hazardous situation which, if not avoided, could result in minor injury. |
| Attention Potentially | hazardous situation which, if not avoided, can result in property damage. |

text_image
1 2 3 4 5 6 7 8 9 10 11 121314 SAFETY QUICKSTART GUIDE WARRANTY2 Scope of supply
1 Water tank
2 Water filter holder
3 Water filter cartridge
4 Bean container lid
5 Bean container
6 Filter ring
7 Gold tone filter
8 Filter insert
9 Jug
10 On/off switch
11 User manual
12 Safety instructions
13 Quick start guide
14 Warranty declaration

www.severin.com
3 Display and control panel

natural_image
Line drawing of a coffee maker with a side panel showing the lid and base (no text or symbols)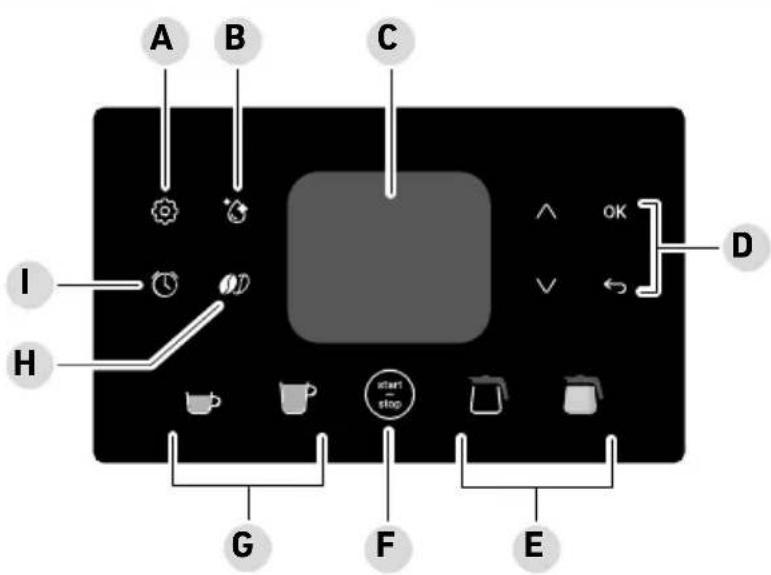
text_image
A B C I H G F E start stop ^ OK V DA Settings: Beans/Powder, Signal Tones, Water filter, Water hardness, Time, Instructions, Language, Expert, Keep warm, Reset
B Cleaning: Rinsing, descaling, powder dispensing
C Display
D Navigation: Use △▼ select the various setting options, to confirm, to return to the previous menu item or to leave the menu
E Jug type: Glass jug or thermal jug (depending on the type)
F start - stop: Use this button to start and stop coffee dispensing or to activate the machine when in standby mode
G Cup size: Small cup: 100 - 150 ml, large cup: 175 - 350 ml in 25 ml increments
H Coffee strength
I Timer
Unpacking
▶ Remove all parts from the packaging.
Remove all packaging material, protective film and stickers.
! Never remove the rating labels; they must always remain on the appliance.
▶ Check the scope of delivery for completeness and damage.
Cleaning
▶ Clean all accessories, as described in Chapter 6 Cleaning and care.
▶ Perform rinsing three times, see pageRinsing.
Installation
▶ Place the appliance on a dry, waterproof and heat-resistant surface.
- Do not place the appliance on marble or wooden surfaces without protection (risk of coffee/descaling stains).
- Keep the appliance away from hot surfaces (e.g. hobs).
Insert the power plug into an earthed power outlet.
▶ Use the switch on the bottom rear of the appliance to switch it on.
Settings
Before using the appliance for the first time or after resetting to factory defaults, the display provides an introduction to the appliance functions and selectable symbols. Follow the instructions on the display.
You can also change the settings as follows:
General settings
Signal Tones
▶ Select on the display.
▶ Use △V to switch to Signal Tones and press OK to confirm.
▶ Follow the instructions on the display, confirm with OK and press ← to return to the main menu.
Water filter
The appliance can be used with and without a water filter.
When using the appliance without a water filter, adjust the water hardness setting, Water hardness see page 25, Water hardness.
Change the water filter every 2 months or after approx. 50 litres of coffee.
▶ Fit the filter cartridge into the holder.
▶ Put the water filter holder into the empty water tank.
Pour water into the water tank and wait at least 10 minutes before use.
▶ Select on the display.
▶ Use △V to switch to Water filter and press OK confirm.
▶ Follow the instructions on the display, confirm with OK and press to return to the main menu.
text_image
Diagram showing a device with labeled components and directional arrows indicating process flowWater hardness
The water hardness should only be adjusted if no water filter is used.
▶ Secon the display.
▶ Use △V to switch to Water hardness and press OK to confirm.
▶ Follow the instructions on the display, confirm with OK and press ← to return to the main menu.
Water hardness
| soft | |
| medium | |
| hard |
Time
▶ Select on the display.
▶ Use △V to switch to Time and press OK to confirm.
▶ Follow the instructions on the display, confirm with OK and press ← to return to the main menu.
Instructions
▶ Select on the display.
▶ Use △V to switch to Instructions and press OK to confirm.
▶ Scan the QR code to access the instructions.
Language
▶ Select on the display.
▶ Use △V to switch to Language and press OK to confirm.
▶ Follow the instructions on the display, confirm with OK and press ← to return to the main menu.
Resetting to factory defaults (default settings)
▶ Select on the display.
▶ Use △V to switch to Reset and press OK twice to confirm.
Wrong language selected?
▶ Pre to return to the main menu.
▶ Press 📋 use ⚠️ to navigate all the way down (grey bar at the bottom of the display) and press ⚡vice to confirm.
If this does not work, press OK repeatedly until the main menu is displayed. Then, press and proceed as described above.
The appliance settings will be reset and the language can be selected again.
Standby mode
The appliance switches to standby after 5 minutes.
The display only shows the time and start stop
▶ or swivel open the filter to exit the standby mode.
Coffee preparation settings
Beans/powder
▶ Select on the display.
▶ Navigate to Beans/Powder and press OK to confirm.
▶ Select Beans or Powder, confirm with OK and press ← to return to the main menu.
Coffee strength
With coffee beans selected, you can choose between 5 levels of coffee strength after selecting the vessel:
▶ Press the button 📋 to change the coffee strength and press 🔒 to start preparation.
Expert
Expert mode enables you to customise the coffee strength.
The default setting is 100%. The lower the setting, the milder the coffee.

Attention!
Filter overflow can cause damage to the appliance, surfaces and furniture.
▶ When >130% is set, no more than 6 cups may be dispensed when using a jug.
▶ Select on the display.
▶ Use △V to switch to Expert and press OK to confirm.
▶ Follow the instructions on the display, confirm with OK and press → to return to the main menu.
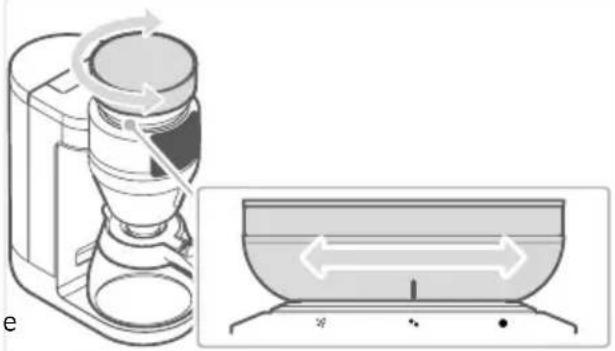
Grind

Attention!
Never change the grind level when the grinder is inactive as this can damage the appliance.
The grind level may only be changed when the grinder is active.
The grind level can be continuously adjusted.
With the grinder active, align the mark on the bean container with the desired grind setting.
natural_image
Diagram showing a device with rotating arrow and a close-up of its internal structure (no text or symbols)Timer
Before using the "Timer" function, make sure the time is set correctly.
With the alarm clock function activated, the preset amount of coffee is dispensed at the specified time.
Right before brewing, ensure the appliance is assembled correctly, coffee beans or powder and water are filled in sufficient quantities and a suitable vessel is placed under the spout.
▶ Select on the display.
▶ Follow the instructions on the display, confirm with OK and press ← to return to the main menu.
The alarm clock function must be reactivated before it can be used again. The settings are retained.
Keep warm
The keep warm function with the glass jug starts automatically after the brewing process. The time is factory preset to 30 minutes. Press △△▽change the time once (15-60 minutes). To
permanently change the keep warm time, select 📊 on the display. Use 🎨 switch to warm and press ⬆ confirm.
Follow the instructions on the display, confirm with OK and press ← to return to the main menu.
You can activate the keep warm function from the main menu by pressing and holding
5 Preparing coffee

Warning!
Risk of scalding.
▶ Do not keep any body parts under the spout while the appliance is in operation.
Pour no more than 2000 ml of cold, clear tap water into the water tank.
▶ Fit the filter insert.
Insert the gold tone filter or disposable filter.
Put on the filter ring.
▶ Depending on the selected preparation method, fill beans into the bean container or coffee powder into the coffee filter.
Place the vessel of choice under the spout.
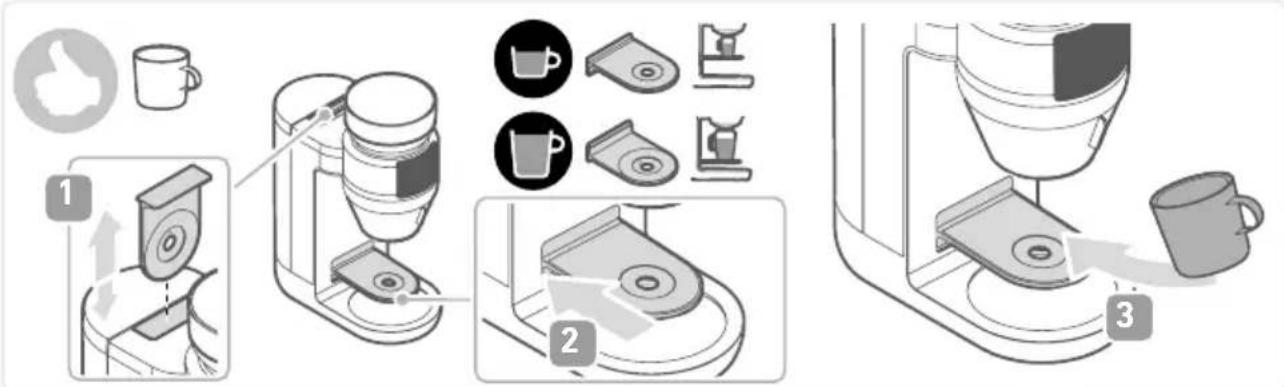
text_image
Diagram illustrating coffee maker setup steps with labeled components and actionsSelect the vessel on the display:
Adjust the quantity and coffee strength.
▶ Press to start the brewing process.
▶ Press the button again to cancel the brewing process.
Descaling
The appliance must be descaled depending on the water hardness and frequency of use. Any warranty claim will be null and void if the appliance malfunctions due to insufficient descaling.
The indicator lights up red on the display when the appliance needs to be descaled. The descaling process takes about 20 minutes.
Descaling requires 70 ml of vinegar essence and 930 ml of water. You can also use 1 litre of descaling agent instead.

Caution!
Avoid emptying descaling agents into enamelled or other acid-sensitive sinks. This can damage the sink surface.
▶ Ensure the sink can withstand the descaling agent used.
▶ Dispose of the descaling agent properly.

Warning!
During descaling, vinegar fumes are produced. These fumes can cause damage to your health if inhaled.
▶ Ensure adequate ventilation during descaling, and do not inhale the vinegar fumes.
Starting the descaling process
▶ Select the button on display.
▶ Use △V to switch to Descaling and press OK to confirm.
▶ Follow the instructions on the display.

Warning!
Residual quantities of descaling solution in the water tank can cause injury.
▶ Empty the water tank completely before refilling it for rinsing.
The descaling process takes approx. 20 minutes to complete.
Rinsing
For hygiene reasons, rinse the appliance thoroughly after prolonged storage.
▶ Select the button on display.
▶ Use △V to switch to Rinse and press OK to confirm.
▶ Follow the instructions on the display.
Cleaning

Warning!
Risk of injury from electric shock.
▶ Always pull out the power plug before attempting any cleaning.

Attention!
Improper cleaning may damage the appliance.
▶ Do not immerse the appliance in water.
▶ Do not clean the appliance under running water.
▶ Do not clean the appliance in a dishwasher.
▶ Pull out the power plug and allow the appliance to cool down.
▶ Use a soft, lint-free cloth to clean the surface.
▶ Swivel open the swivel filter and remove the filter insert. Dispose of the paper filter with the used coffee grounds.
▶ Clean the water tank, filter insert, filter ring and gold tone filter with rinsing water and dry.
▶ After use, clean the glass jug with warm rinsing water and dry it.

Attention
The thermal jug may be damaged due to improper cleaning.
▶ Do not immerse the thermal jug in water.
Do not clean the thermal jug in a dishwasher.
- Rinse the inside of the thermal jug, wipe the outside with a damp cloth and dry.
▶ Wipe the bean container lid and swivel filter with a damp cloth and dry them.
Glass jug, filter insert, filter ring and gold tone filter can also be cleaned in the dishwasher.
Cleaning the powder dispenser
For hygienic reasons, clean the powder dispenser regularly (recommendation: weekly).
▶ Select the button on display.
▶ Use △V to switch to Powder dispensing and press OK to confirm.
Place a container under the powder dispenser to catch any powder residue that falls out.
▶ Follow the instructions on the display.
natural_image
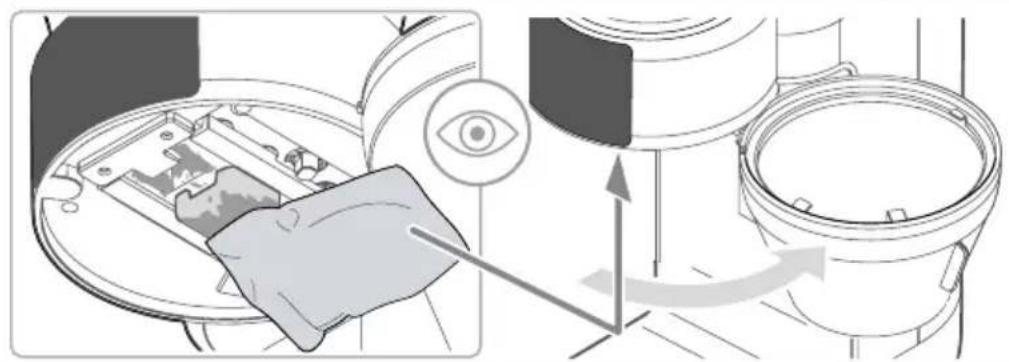
Diagram showing a hand inserting a device into a device with an eye icon and directional arrows indicating motion (no text or symbols)Cleaning the grinder and bean container
Clean the grinder and bean container regularly (it is recommended to do this when soiling is visible or after changing beans).
▶ Pull out the power plug and allow the appliance to cool down.
Remove coffee beans from the bean container.
▶ Turn the bean container counter-clockwise and remove it.
Remove coffee bean residues with a hand-held vacuum cleaner.
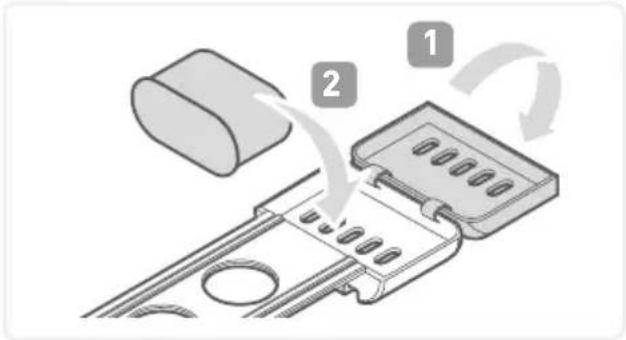
▶ Unfold the handle on the grinder insert, turn the grinder counter-clockwise and remove it.
You can only turn the insert, not the grinder itself.
▶ Clean the grinder insert and grinder with a brush.
Insert the grinder insert and lock it by turning it clockwise.
▶ Wipe the bean container with a damp cloth, clean the lid in rinsing water and dry them thoroughly.
Replace the bean container (and turn it to the left (
▶ Select the desired grind level before grinding coffee beans.
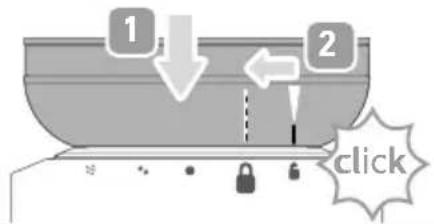
text_image
1 2 click7 Transport/Storage
Clean and rinse the appliance, as described in chapter cleaning and care.
▶ Store the appliance in a dry place.
8 FAQ

Warning!
Risk of injury from operating a faulty appliance. Operating a faulty appliance can lead to electric shock.
▶ Never use a faulty appliance.
▶ Never attempt to repair the appliance yourself, but contact Severin Service.
Before contacting our customer service, check the table below to see if you can rectify the problem yourself.
Question / problem Solution
| The coffee is too weak. | The grind setting is too coarse. ▶ Set a finer grind, as described in chapter Before the first use/Grind. |
| No coffee comes out of the swivel filter. | The glass jug is not properly placed underneath the outlet. ▶ Place the coffee pot correctly on the heating plate and check whether the outlet valve is opened. |
| All display indicators are flashing. | The appliance is defective. ▶ Contact customer service. |
Display Problem / Remedy
 | Not enough water.▸ Refill the water tank and press the button. |
 | The appliance must be descaled.▸ Descale the appliance, see page 30 Cleaning and care / Descaling. |
 | The appliance undergoes descaling.▸ Follow the instructions on the display. |
Display Problem / Remedy
 | The bean container is fitted incorrectly.► Pull out the power plug and install the bean container correctly, as described in chapter 6, Cleaning and care / Cleaning the grinder. |
 | The appliance is defective.► Contact customer service. To do this, scan the QR code. |
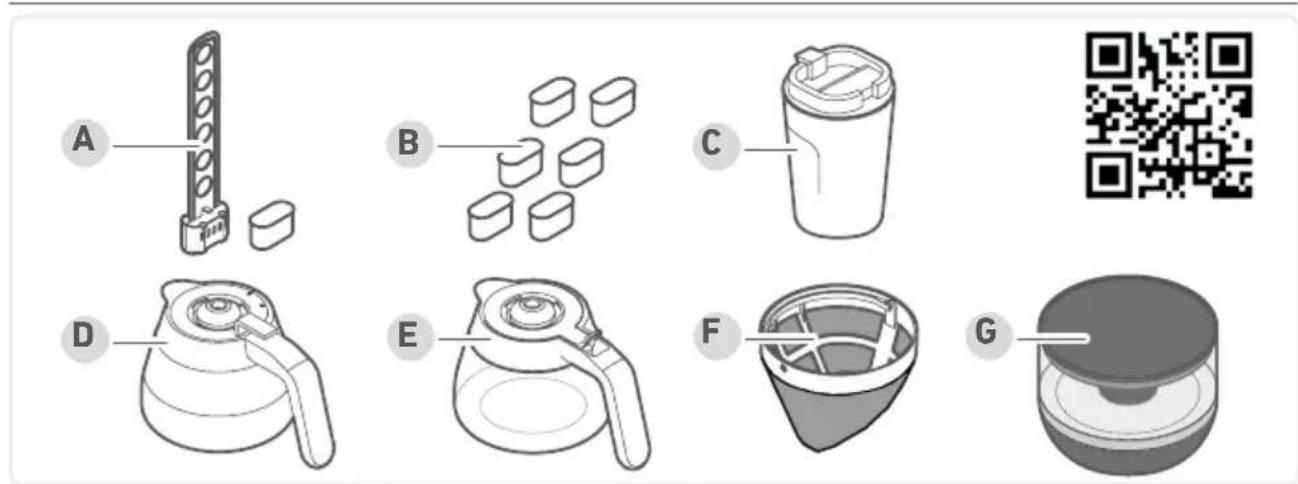
9 Accessories
text_image
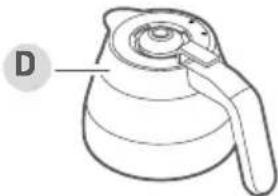
A B C D E F GA Water filter holder with water filter cartridge (item no. 5562.000)
B Water filter cartridges, 6 pieces (item no. 5557.000)
C Thermal mug "To Go" (item no. 5555.000)
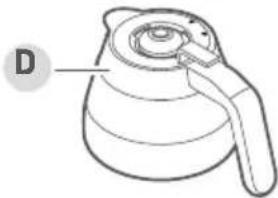
D Thermal jug (stainless steel item no. 5554.000 / Dark Inox item no. TK 5571.000)
E Glass jug (stainless steel item no. 5553.000 / Dark Inox item no. GK 5556.000)
F Gold tone filter (item no. 5561.000)
G Additional bean container for flexible bean changing
(Stainless steel item no. ZB 5572.000 / Dark-Inox item no. ZB 5573.000)
10 Disposal
Appliances marked with this symbol must be disposed of separately from household waste. These appliances contain valuable raw materials that can be recycled. Proper disposal of these items protects the environment and public health. Your local authority or retailer can provide detailed information on proper disposal.
11 Technical Data
| Item numbers KA 4852, KA 4853, KA 4854, KA 4855 | |
| Power 1,280 – 1,520 W | |
| Water tank capacity 2 l | |
| Bean container capacity 235 g | |
| Dimensions 46 x 38.2 x 17 cm | |
| Net weight 5.6 kg | |
Contenu
natural_image
Illustration of a coffee maker with an open lid and side arm, accompanied by a lowercase 'i' symbol (no text or labels on the diagram itself)
www.severin.com
natural_image
Line drawing of a coffee maker with a side panel showing internal structure (no text or symbols)
text_image
A B C I H G F E start stop ↑ OK ← Dtext_image
Diagram showing a device with labeled parts and directional arrows indicating process flowDureté de l'eau
natural_image
Diagram showing a device with rotating arrow and a close-up of its internal structure (no text or symbols)Réveil
text_image
Diagram illustrating coffee maker setup steps with labeled components and a coffee cup, showing steps from feeding to processing.natural_image
Diagram showing a hand operating a device with an eye icon and directional arrows indicating motion (no text or symbols)natural_image
Diagram of a mechanical component with a labeled section A, showing a vertical structure and a separate base (no text or symbols present)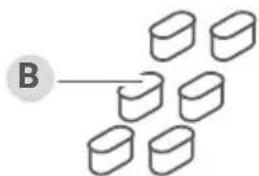
text_image
B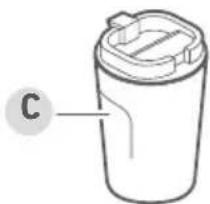
natural_image
Simple line drawing of a cylindrical container with lid and label 'C' (no text or symbols on the object itself)
natural_image
Line drawing of a kettle with handle and spout, labeled 'D' (no text or symbols on the object itself)
natural_image
Line drawing of a teapot with handle and lid, labeled 'E' (no text or symbols on the object itself)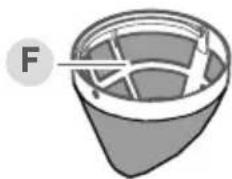
natural_image
Diagram of a container with internal structure and labeled point F (no text or symbols beyond label)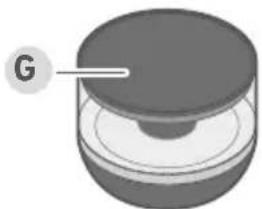
natural_image
3D rendered diagram of a mechanical component with a labeled section 'G' (no text or symbols on the object itself)natural_image
Line drawing of a coffee maker with a side panel showing the lid (no text or symbols)
text_image
A B C I H G F E start stop ^ OK V Dtext_image
Diagram showing a device with labeled parts and directional arrows indicating rotation or assembly.Waterhardheid
text_image
Diagram illustrating coffee maker setup steps with labeled components and actionsnatural_image
Diagram showing a hand operating a device with an eye icon and directional arrows indicating motion (no text or symbols)Molen en bonenreservoir reinigen
natural_image
Diagram of a mechanical component with a labeled section A, showing a vertical structure and a separate rectangular block (no text or symbols present)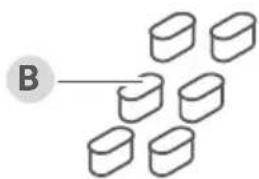
text_image
B
natural_image
Simple line drawing of a cylindrical container with lid and label 'C' (no text or symbols on the object itself)

natural_image
Line drawing of a kettle with a handle and spout, labeled 'D' (no text or symbols on the object itself)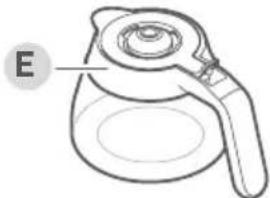
natural_image
Line drawing of a teapot with handle and lid, labeled 'E' (no text or symbols on the object itself)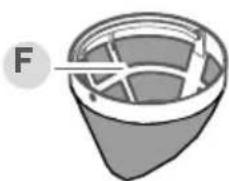
natural_image
Simple line drawing of a container with internal structure and label F (no text or symbols)
natural_image
3D rendered mechanical component with a labeled section 'G' (no text or symbols on the object itself)natural_image
Line drawing of a coffee maker with a side panel showing the lid (no text or symbols)
text_image
A B C I H G F E start stop ↑ OK ← Dtext_image
Diagram showing a device with labeled components and directional arrows indicating process flowDureza del agua
natural_image
Diagram showing a kitchen mixer and a bowl with directional arrows indicating flow or movement (no text or symbols)text_image
Diagram illustrating coffee maker setup steps with labeled components and directional arrowsnatural_image
Diagram showing a hand operating a device with an eye icon and directional arrows indicating motion (no text or symbols present)natural_image
Diagram of a mechanical component with labeled section A, showing a vertical cylindrical structure and a separate rectangular block (no text or symbols present)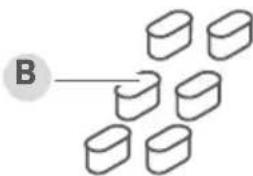
text_image
B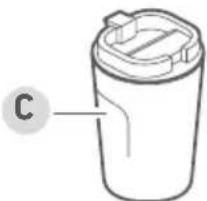
natural_image
Simple line drawing of a cylindrical container with lid and label 'C' (no text or symbols on the object itself)
natural_image
Line drawing of a kettle with a handle and label D (no text or symbols on the object itself)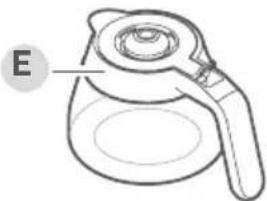
natural_image
Line drawing of a coffee maker with handle and lid, labeled 'E' (no text or symbols on the object itself)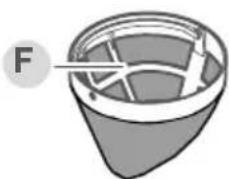
natural_image
Diagram of a container with internal structure and labeled point F (no text or symbols beyond label)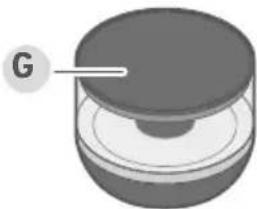
natural_image
3D rendered mechanical component with a labeled section 'G' (no text or symbols on the object itself)natural_image
Illustration of a coffee maker with an open lid and side arm, accompanied by a lowercase 'i' symbol (no text or labels on the diagram itself)
www.severin.com
natural_image
Line drawing of a coffee maker with a side panel showing internal structure (no text or symbols)
text_image
A B C I H G F E start stop ^ OK Dtext_image
Diagram showing a mechanical assembly with labeled parts and directional arrows indicating rotation or movement.Durezza dell'acqua
natural_image
Diagram showing a device with rotating arrow and a close-up of its internal structure (no text or symbols)text_image
Technical diagram showing a mechanical assembly with a checkmark indicating a detail and a magnified view of the component.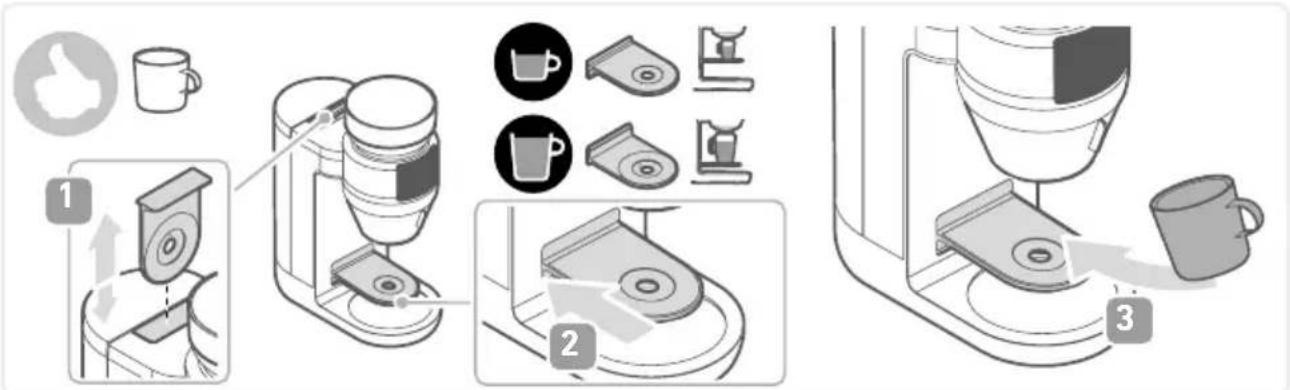
text_image
Diagram illustrating coffee maker setup steps with labeled components and a coffee cup, showing steps from feeding to processing.natural_image
Diagram showing a hand inserting a device into a device with an eye icon, and another device with arrows indicating flow or movement (no text or symbols present)www.severin.com/socials
SEVERIN
Model specifications are subject to change.