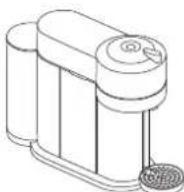
Nespresso Vertuo Next XN910B40 - Coffee machine KRUPS - Free user manual and instructions
Find the device manual for free Nespresso Vertuo Next XN910B40 KRUPS in PDF.

User questions about Nespresso Vertuo Next XN910B40 KRUPS
0 question about this device. Answer the ones you know or ask your own.
Ask a new question about this device
Download the instructions for your Coffee machine in PDF format for free! Find your manual Nespresso Vertuo Next XN910B40 - KRUPS and take your electronic device back in hand. On this page are published all the documents necessary for the use of your device. Nespresso Vertuo Next XN910B40 by KRUPS.
USER MANUAL Nespresso Vertuo Next XN910B40 KRUPS
natural_image
Technical line drawing of a cylindrical device with a lid and base plate (no text or symbols)VERTUO NEXT
MY MACHINE\*
KRUPS
NESPRESSO®

* Ma machine
Content
Table des matières
ASSISTANCE VIDEOS ARE AVAILABLE ON WWW.NESPRESSO.COM - VISIT THE "MACHINES" SECTION
UNE ASSISTANCE VIDÉO EST DISPONIBLE SUR LE SITE WWW.NESPRESSO.COM - VOIR LA PAGE DES MACHINES
THESE INSTRUCTIONS ARE PART OF THE APPLIANCE. Read all instructions and all safety instructions before operating the appliance.
Emptying the system before a period of non-use, for frost protection or before a repair /
Cleaning/Nettoyage 22
Descaling/Détartrage 24
Limited warranty/Garantie 31
Packaging Content
① Coffee Machine
Machine à café
②User Manual
Nespresso Vertuo is an exclusive system creating a perfect coffee, from the Espresso to the large Alto, time after time. Nespresso Vertuo machines are equipped with the unique Centrifusion® technology to gently extract Alto, Mug, Gran Lungo, Double Espresso and Espresso at the touch of a button. Each extracting parameter has been carefully defined by our coffee experts to ensure that all aromas from each capsule can be extracted to give the coffee body and create an exceptionally rich and generous crema.
Office use: At least one copy of this user manual should be kept in a location available at all times to maintenance and management staff.
CAUTION: the safety precautions are part of the appliance. Read them carefully before using your new appliance for the first time. Keep them in a place where you can find and refer to them later on.
CAUTION: when you see this sign, please refer to the safety precautions to avoid possible harm and damage.
CAUTION: use of controls, adjustments or performance of procedures other than those specified here in may result in hazardous radiation exposure.
i INFORMATION: when you see this sign, please take note of the advice for the correct and safe usage of your appliance.
WARNING: risks of injuries if you don't use this appliance correctly.
Magnets inside.
No ferromagnetic tools or materials.
• The appliance is intended to prepare beverages according to these instructions.
- Do not use the appliance for other than its intended use.
- This appliance has been designed for indoor and non-extreme temperature conditions use only.
- Protect the appliance from direct sunlight effect, prolonged water splash and humidity.
- This appliance is intended to be used in households and similar applications such as: staff kitchen areas, offices and other
working environments, farm houses; by clients in hotels, motels and other residential environments; bed and breakfast type environments.
- This appliance may be used by children of at least 8 years of age, as long as they are supervised and have been given instructions about using the appliance safely and are fully aware of the dangers involved.
- Cleaning and user maintenance shall not be made by children unless they are older than 8 and they are supervised by an adult.
- Keep the appliance and its cord out of reach of children under 8 years of age.
- This appliance may be used by persons with reduced physical, sensory or mental capabilities, or whose experience or knowledge is not sufficient, provided
they are supervised or have received instruction to use the appliance safely and understand the dangers.
• Children shall not use the device as a toy.
• The manufacturer accepts no responsibility and the guarantee will not apply for any commercial use, inappropriate handling or use of the appliance, any damage resulting from use for other purposes, faulty operation, non-professional repairs or failure to comply with the instructions.
- Machine contains magnets.
Avoid risk of fatal electric shock and fire.
- In case of an emergency: immediately remove the plug from the power socket.
- Only plug the appliance into suitable, easily accessible, earthed mains connections.
Make sure that the voltage of the power source is the same as that specified on the rating plate. The use of an incorrect connection voids the guarantee.
- The appliance must only be connected after installation.
- Do not pull the cord over sharp edges, clamp it or allow it to hang down.
- Keep the cord away from heat and damp.
- If the supply cord or plug are damaged, they must be replaced by the manufacturer, its service agent or similarly qualified persons, in order to avoid all risks.
-
If the supply cord or the plug are damaged, do not operate the appliance. Only return the appliance to the Nespresso Club or to a Nespresso authorized representative.
-
If an extension cord is required, use only an earthed cord with a conductor cross-section of at least 1.0 ~mm^2 .
• To avoid hazardous damage, never place the appliance on or beside hot surfaces such as radiators, stoves, ovens, gas burners, open flame, or similar.
• Always place it on a horizontal, stable and even surface. The surface must be resistant to heat and fluids, like water, coffee, descaler or similar. - The appliance shall not be placed in a cabinet when in use.
-
Disconnect the appliance from the mains when not in use for a long period. Disconnect by pulling out the plug and not by pulling the cord itself or the cord may become damaged.
-
Before cleaning and servicing, remove the plug from the mains socket and let the appliance cool down.
- Do not use any strong cleaning agent or solvent cleaner. Use a damp cloth and mild cleaning agent to clean the surface of the appliance.
- To clean machine, use only fresh and clean tools (fresh and clean cloths, fresh and clean sponges, clean paper towels).
• Always follow the cleaning instruction to clean your appliance. - To disconnect the appliance, stop any preparation, then remove the plug from the power socket.
- Never touch the cord with wet hands.
-
Never immerse the appliance or part of it in water or other liquid.
-
Never put the appliance or part of it in a dishwasher.
• Electricity and water together is dangerous and can lead to fatal electrical shocks. - Do not open the appliance. Hazardous voltage inside!
- Do not put anything into any openings. Doing so may cause fire or electrical shock!
- The use of accessory attachments not recommended by the manufacturer may result in fire, electric shock or injury to persons.
Avoid possible harm when operating the appliance.
- Never leave the appliance unattended during operation.
- Do not use the appliance if it is damaged or not operating perfectly. Immediately remove the plug from the power socket.

Safety Precautions
Contact the Nespresso Club or Nespresso authorized representative for examination, repair or adjustment.
- A damaged appliance can cause electrical shocks, burns and fire.
- Risk of scalding by hot liquids. If the machine is forced open hot liquids and coffee grounds may splash. Always lock the system completely and never open it during operation.
- Do not put fingers under coffee outlet, risk of scalding.
- Do not insert fingers into capsule compartment when machine head is closing. Risk of injury.
- Do not put fingers into capsule compartment or the capsule shaft. Danger of injury!
- Be careful not to injure
yourself on sharp points or trap your fingers when reaching inside the machine.
- Never use an already used, damaged or deformed capsule.
- Fill the water tank only with fresh drinking water.
- Empty water tank if the appliance will not be used for an extended time (holidays, etc.).
- Do not use any other liquids (such as cow's milk, soya milk, enriched milks, flavoured liquids, etc.).
- Replace water in water tank when the appliance is not operated for a weekend or a similar period of time.
- Do not use the appliance without a cup placed at the suitable cup support level and ensure the cup support is in place after any usage, to avoid spilling any liquid on surrounding surfaces or
connector.
- This appliance is designed for original Nespresso Vertuo coffee capsules available exclusively through the Nespresso Club or your Nespresso authorized representative.
- All Nespresso appliances pass stringent controls. Reliability tests under practical conditions are performed randomly on selected units. This can show traces of any previous use.
- Nespresso reserves the right to change instructions without prior notice.
Descaling
- The descaling solution can be harmful. Avoid contact with eyes, skin and surfaces.
- Nespresso descaling agent, when used correctly, helps ensure the proper
functioning of your machine over its lifetime and that your coffee experience is as perfect as the first day.
- For coffee and coffee&milk machines, descale according to Quick Start Guide recommendations or specific alerts.
SAVE THESE INSTRUCTIONS Pass them on to any subsequent user.
This instruction manual is also available as a PDF at nespresso.com
keeping the button pressed.
When the Bluetooth®/Wi-Fi is switched ON, the machine will blink once for 1 s white. When the Bluetooth®/Wi-Fi is turned OFF the machine will blink in orange in the same way. By default, the Bluetooth®/Wi-Fi is switched on. Factory reset will also switch the Bluetooth®/Wi-Fi on.
①② Rinse and clean the water tank and the lid before filling it only with fresh drinking water. Put the water tank in place and make sure it's properly attached.
natural_image
Line drawing of a portable coffee maker with cups and a side panel, no text or symbols presentEnsure the capsule container and the cup support (if necessary for the selected cup size) are in place. For your safety, operate the machine only with cup and capsule container in position.
natural_image
Illustration of a portable water heater with a mesh base and directional arrows (no text or symbols)3 Plug in the power cord. NOTE: to close the machine, push-down optimized heating time, close and lock the machine to turn the machine ON.
- If the machine is already closed and locked, turn the machine ON by pressing the button.
5 Light will blink while the machine is heating up. Steady light indicates the machine is ready.
6 Place a container of at least 1 L under the coffee outlet.
natural_image
Technical line drawing of a mechanical device with cylindrical and rectangular components (no text or symbols)Make sure no capsule is inserted during the cleaning process. N'insérez aucune capsule pendant le processus de nettoyage.
7 Make sure that the machine is still locked. Press the button 3 times within 2 seconds to start cleaning and let the cleaning procedure complete automatically. It will take less than 2 minutes before start of the flow.
8 This operation may take up to 7 minutes. The procedure can be stopped at any time by pushing the button. Once the cleaning is finished, a steady light will appear on the machine. In case you want to resume the cleaning process, push the button again.
When interrupting the cleaning procedure, the machine may not stop immediately. Never open the machine during the cleaning procedure.
① Fill the water tank with fresh drinking water and place it into its position.
natural_image
Line drawing of a kitchen brush and blender with a handle, no text or symbols present3 Light will blink while the machine is heating up. Steady light indicates the machine is ready.
4 The factory settings for the coffee sizes are the following. Please make sure your recipient is big enough to prevent overflow.
Alto: 414 ml
Mug: 230 ml
Gran Lungo: 150 ml
5 Adjust position in height of the cup support. The cup support has 3 positions and can be temporarily removed to accommodate various cup sizes. Make sure the cup support is properly secured.
natural_image
Three-panel line drawing showing a kitchen appliance with a cup, a mug, and a coffee cup on a stand (no text or symbols)6 Unlock and open the machine head completely.
natural_image
Illustration of a coffee maker with a circular diagram and a separate view of its mechanical components (no text or symbols)7 This machine operates with Nespresso Vertuo capsules. Nespresso classic capsules cannot be used in this machine.
8 Insert a capsule with the dome shape at the bottom. Be careful not to injure yourself on sharp points or trap your fingers when reaching inside the machine.
natural_image
Line drawing of a coffee maker with cups and lid (no text or symbols)NOTE: to avoid damaging the machine, use only fresh, unused capsules. Ensure previous capsule has been ejected before inserting a fresh one.
9 Close the head and lock the machine by turning the handle left to the lock symbol on the machine head.
natural_image
Illustration of a coffee maker with a circular inset showing its internal components (no text or symbols)NOTE: ensure that no capsules are lying on the machine top before closing the head. If capsules are lying they should be removed and the capsule container should be emptied.
Place a cup of sufficient capacity under the coffee outlet. Risk of scalding may occur due to overflowing.
natural_image
Line drawing of a portable electronic device with cylindrical and rectangular components (no text or symbols)EN FR Coffee preparation Préparation du café
11 Push the button to start the coffee preparation. It will take some time before the coffee flow comes out (due to barcode reading, coffee pre-wetting and infusion time).
NOTE: the machine will automatically recognize the inserted capsule and select the coffee preparation parameters and cup length defined by Nespresso coffee experts to extract the coffee blend at its best.
NOTE: you can do this even when the machine is still heating up. The coffee will then flow automatically when the machine is ready.
12 To stop the coffee flow early, push the button.
To manually top up your coffee, push the button and push again to stop when desired volume is reached.
NOTE: top up can be activated only during 45 seconds after the end of the extraction.
Please wait until coffee preparation is done to unlock the handle and / or switch off the machine. Turn the handle to the right and open the head to automatically eject the capsule.
natural_image
Technical illustration of a coffee maker with a circular dial and mechanical components (no text or symbols)The machine can be turned OFF at any time (when not operating) by holding the button for 3 seconds. Automatic OFF Mode: the machine will turn off automatically after 2 minutes of non-use.
NOTE: in special cases, the machine can take up to 5 minutes to automatically turn OFF.
The programming is specific to each capsule type, Alto, Mug, Gran Lungo, Double Espresso or Espresso. Cup sizes may be programmed from 20 ml to 500 ml.
2 Open the machine head; insert the capsule you want to program; close the head; lock the machine.
3 Light will blink while the machine is heating up. Steady light indicates the machine is ready.
4 Push and hold the button until desired volume is reached.
5 Water volume level is now stored for the capsule type used for the programming.
NOTE: once a customer-specific volume is programmed by the user, every time that capsule type is inserted in the machine, the preparation will stop at the user-programmed cup size.
Reset to factory settings
Resetting to factory settings will reset all reprogrammed volumes.
Open the machine head and let the used capsule be ejected.
natural_image
Technical line drawing of a mechanical device with no visible text or symbols
Close the head. Leave the handle in "UNLOCKED" position.
natural_image
Technical line drawing of a mechanical device with cylindrical components and a circular base (no text or symbols)
Push the button 5 times within 3 seconds. The button blinks 5 x orange and changes than to steady white.
②③ Empty the water tank and put it in place.
Place a container under the coffee outlet.
natural_image
Line drawing of a mechanical device with cylindrical and rectangular components, no text or symbols presentUnplug the power cord.
4 Open the machine head and let the used capsule be ejected.
natural_image
Technical line drawing of a mechanical device with no visible text or symbols⑤ Empty capsule container, the drip tray and the cup support.
natural_image
Illustration of mechanical components including a folded paper, cube, ring, and gear (no text or symbols)6 Close the head and turn handle left until "LOCKED" position.
natural_image
Technical line drawing of a mechanical device with a close-up inset showing internal components (no text or symbols)8 It will take approximately 30 seconds for the machine to complete the emptying. Machine turns OFF automatically when machine is empty. La vidange dure environ 30 secondes. La machine s'éteint automatiquement lorsque la procédure est terminée.
7 Push and hold the button while plugging the power cord. Release the button when the machine starts the emptying procedure.
⚠️ CAUTION: caution should be exercised when plugging in the coffee machine with the button pressed. Small quantities of steam may emit from the machine as it evacuates the remaining liquids.
The machine has a predefined cleaning procedure that can be launched at user discretion. Office use: daily cleaning.
Rinse and clean the water tank and the lid before filling it with fresh drinking water. Put the water tank in place.
natural_image
Line drawing of a kitchen appliance with a handle, lid, and base (no text or symbols)②
Rinse the cup support. Place a container of at least 1 L under coffee outlet.
natural_image
Illustration of a portable electronic device with cylindrical and rectangular components (no text or symbols)3
Open the machine head and let the used capsule be ejected. Empty and rinse the capsule container and the drip tray.
natural_image
Technical line drawing of a mechanical device with exploded view and mounting features (no text or symbols)4
Close the head and turn handle left until "LOCKED" position.
text_image
Diagram of a microwave oven with labeled parts and a close-up view showing internal components.5 Light will blink while the machine is heating up. Steady light indicates the machine is ready.
7 The procedure can be stopped at any time by pushing the button. The button will go to a steady light. In case you want to resume the cleaning process, push the button again. To brew a coffee, open the head and insert a capsule, then close, lock the machine by turning the handle left and push the button.
⑥ Wait for the machine to complete heating up. The light will be steady white. Push the button 3 times within 2 seconds. The button will blink quickly during the procedure. It will take less than 2 minutes before a flow comes out. The cleaning procedure will run automatically for 7 minutes.
CAUTION: do not use any strong or abrasive cleaning agent or solvent cleaner. Do not put in a dishwasher. Never immerse the appliance or part of it in water. Clean the coffee outlet regularly with a clean damp cloth. Please use only clean cloths for cleaning the machine.
NOTE: water may accumulate inside the machine's head during cleaning. If this happens please dry visible parts with a clean dry cloth.
NOTE: duration: approximately 20 minutes. REMARQUE : durée approximative : 20 minutes.
NOTE: descale mode cannot be interrupted or exited. If the machine is unplugged during the descale procedure the machine will enter the Descale Mode upon start. Both cycles, descaling and rinsing, must be repeated after this.
natural_image
Exploded view diagram of a handwashing device showing cup, container, and sink components (no text or labels)- For an optimized heating time, close and lock the machine to turn the machine ON. - If the machine is already closed and locked, turn the machine ON by pressing the button. - Pour un temps de chauffe optimal, fermez et verrouillez la machine pour l'allumer. - SI la machine est déjà fermée et verrouillée, allumez-la en appuyant sur le bouton ON.
Blinking light indicates the machine is heating up. When the light is steady, the machine is ready.
⑤④ Open the machine head and let the capsule be ejected.
natural_image
Line drawing of a portable kitchen appliance with lid, vent, and mesh base (no text or symbols)6 Reclose the machine and leave the lever in "UNLOCKED" position, towards the front of the machine.
text_image
Technical diagram of a microwave oven with labeled parts and a circular dial showing angular measurements.7 To enter the descaling mode, hold the button for at least 7 seconds.
- Let the machine stays drinking the bed. You now have 45 seconds to enter descaling mode by following the next steps, otherwise the machine will return to the ready for brewing coffee mode.
left to the lock symbol and unlock by turning right. Hold the button for at least 7 seconds in "UNLOCKED" position.
⑩ Place a container (minimum 1 L) under the coffee outlet.
natural_image
Line drawing of a mechanical device with cylindrical and rectangular components (no text or symbols)11 To start descaling, lock the machine by turning the lever left to locked symbol and push on the button. The machine will stop automatically when the first phase of descaling is completed.
12 Empty and rinse water tank, drip tray and cup support thoroughly.
natural_image
Line drawings of kitchen utensils including a faucet, a cylindrical container, a mesh bowl, and a folded paper (no text or symbols)13 Fill the water tank with fresh drinking water.
natural_image
Line drawing of a smart coffee maker with cups and glassware (no text or symbols)- When ready, push the button to rinse the machine. Machine will stop automatically when complete.
15 The button will stop blinking rapidly and become steady. Descaling is completed. Allow the machine to dry for 10 minutes before using it.
16 The machine is now ready for use.
NOTE: water may accumulate inside the machine's head during rinsing. If this happens please dry visible parts with a clean dry cloth.
| 1. No light on the button. | - The machine has turned OFF automatically; push the button or "UNLOCK" the machine. | - Check the mains, plug, voltage, and fuse. |
| 2. No coffee, no water. - Check that the water tank is filled. | - Check that a fresh capsule is inserted in correct position, that the handle is properly locked and push the button to start. | - Descale if necessary.- Open the machine head and let the capsule be ejected. Then perform a cleaning as per cleaning section. |
| 3. Coffee is not hot enough. | - Preheat cup with hot drinking water from the tap. | - Descale if necessary. |
| 4. The machine doesn't start and has light steady on. If blinking, see next points. | - Check that handle is properly locked.- If you want to brew a Coffee or Espresso, check that a fresh capsule is inserted in correct position, that the handle is properly locked and push the button to start. | - If you are cleaning, descaling or emptying the system, check that no capsule is inserted then close, lock the machine and push the button to start one of these operations. |
| 5. The machine doesn't start and light blinks alternately; 1 blink and 1 pause. | - Fill the water tank and push button to start. - Check that handle is properly locked. | |
| 6. Light blinks while machine is running. | - If coffee is flowing normally, this indicates the machine is working properly.- If only water is flowing, the machine is executing a user request for either cleaning, descaling or emptying the system. Refer to the corresponding paragraph in this user manual. | - If there is no intention to clean, descale, or empty the system, then push the button to stop the machine.If problem persists, call Nespresso. |
| 7. Light blinks and machine is not running. | - It will take some time before the coffee flow comes out (due to barcode reading and pre-wetting the coffee).- Check that a fresh capsule is inserted in correct position, that the handle is properly locked and push the button to start.- Fill the water tank and push button to start. | - Turn the machine to "OFF mode" by pushing the button for 3 seconds and then push it again to turn the machine ON. Now wait approximately 20 minutes to allow the machine to cool down after extensive use. |
| 8. Light blinks alternately; 2 blinks and 1 pause continuously. Machine is not running. | - During regular Coffee/Espresso preparation: 1) Unlock the handle and open the machine head to check that a fresh undamaged capsule is inserted in the correct position. 2) Check that the handle is in "LOCKED" position. 3) Check that the water tank is filled.- During Descaling, Emptying and Cleaning: 1) Check that capsule is ejected. 2) Check that the handle is in "LOCKED" position.- During Programming Volume: 1) Check if a capsule has been well inserted. 2) Please refer to the corresponding chapter. | - If problem persists:1. Unlock the handle and open machine head.2. Replace capsule (if needed).3. Disconnect powercord from the outlet and plug the machine back into outlet after 10 seconds.4. Close the head and press the button to turn ON and press again to start brewing. If problem persists, call Nespresso. |
| 9. Leakage or unusual coffee flow. - Check that the water tank is well positioned. | ||
| 10. Machine turns to "OFF mode". | - To save energy the machine will turn off after 2 minutes of non-use. | - See paragraph on "Energy Saving Concept". |
| 11. Light alternately blinking 3 times and then steady on. | - Descaling needed: machine can be operated when alert appears only a few times after this alert before descaling becomes necessary. | |
| 12. Coffee grounds in the cup. | - Perform the cleaning procedure twice. | - See paragraph on "Cleaning". |
Dépannage
FR
UNE ASSISTANCE VIDEO EST DISPONIBLE SUR LE SITE WWW.NESPRESSO.COM - VOIR LA PAGE DES MACHINES
Should you need any additional information, in case of problems or simply to seek advice, call Nespresso.
Contact details for your nearest Nespresso can be found in the welcome material in your machine box or at nespresso.com
This appliance complies with the EU Directive 2012/19/EC. Packaging materials and appliance contain recyclable materials.
Your appliance contains valuable materials that can be recovered or can be recycled. Separation of the remaining waste materials into different types facilitates the recycling of valuable raw materials.
Leave the appliance at a collection point. You can obtain information on disposal from your local authorities.
To know more about Nespresso sustainability strategy, go to www.nespresso.com/positive
Krups guarantees this product against defects in materials and workmanship for a period of two years from the date of purchase. During this period, Krups will either repair or replace, at its discretion, any defective product at no charge to the owner. Replacement products or repaired parts will be guaranteed for only the unexpired portion of the original guarantee or six months, whichever is greater. This limited guarantee does not apply to any defect resulting from accident, misuse, improper maintenance, or normal wear and tear. Except to the extent allowed by applicable law, the terms of this limited guarantee do not exclude, restrict or modify, and are in addition to, the mandatory statutory rights applicable to the sale of the product to you. If you believe your product is defective, contact Krups for instructions on where to send or bring it for repair.