Everest - Grill plate UFESA - Free user manual and instructions
Find the device manual for free Everest UFESA in PDF.

User questions about Everest UFESA
0 question about this device. Answer the ones you know or ask your own.
Ask a new question about this device
Download the instructions for your Grill plate in PDF format for free! Find your manual Everest - UFESA and take your electronic device back in hand. On this page are published all the documents necessary for the use of your device. Everest by UFESA.
USER MANUAL Everest UFESA
natural_image
Exterior view of a stainless steel grater with 'ufesa' branding, showing digital display and control buttons (no readable text beyond branding)CÓMO USAR EL PRODUCTO
natural_image
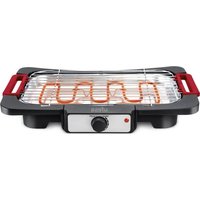
Steak grater with cutlery and red meat, no visible text or symbolsRetire todas as embalagens
natural_image
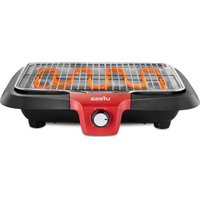
Steak grater setup with meat, strawberries, and baked goods on a black grater (no text or symbols visible)WE WOULD LIKE TO THANKS YOUR FOR CHOOSING UFESA, WE WISH THE PRODUCT PERFORMS TO YOUR SATISFACTION AND PLEASURE.
WARNING
PLEASE READ THE INSTRUCTIONS FOR USE CAREFULLY PRIOR TO USING THE PRODUCT. STORE THESE IN A SAFE PLACE FOR FUTURE REFERENCE.
DESCRIPTION
- Handle
- Upper Housing
- Height Fixed hinge/ Locker
- 180 degree open button
- Control panel
- Grill Non-stick Plate
- Plate release button
- Bottom Housing
DISPLAY
- Temperature button
- Time button
- Temperature display
- Time display
- Increase Time/Temperature button
- Decrease Time /Temperature button
- Power light (Pre heating)
- Ready to use light
- Rare cooking light
- Medium cooking light
- Well done light
- Power button
- OK button
- Preset programs
SAFETY INSTRUCTIONS
If the supply cord is damaged it must be replaced by the manufacturer, its service agent or similarly qualified persons in order to avoid a hazard.
This appliance can be used by children aged from 8 years and above and persons with reduced physical, sensory or mental capabilities or lack of experience and knowledge if they have been given supervision or instruction concerning use of the appliance in a safe way and understand the hazards involved.
Children shall not play with the appliance. Cleaning and user maintenance shall not be made by children unless they are older than 8 and supervised. Keep the appliance and its cord out of reach of children less than 8 years.
Appliances are not intended to be operated by means of an external timer or separate remote-control system.
Proceed according to maintenance and cleaning section of this manual for cleaning.
This device is designed for use at a maximum altitude up to 2000m above sea level.
IMPORTANT WARNINGS
Any incorrect use or improper handling of the product shall render the warranty null and void. Prior to plugging in the product, check that your mains voltage is the same as the one indicated on the product label.
The mains connection cable must not be tangled or wrapped around the product during use. Do not use the device, or connect and disconnect to the supply mains with the hands and / or feet wet.
Do not pull on the connection cord in order to unplug it or use it as a handle. Unplug the product immediately from the mains in the event of any breakdown or damage and contact an official technical support service.
In order to prevent any risk of danger, do not open the device. Only qualified technical personnel from the brand's Official technical support service may carry out repairs or procedures on the device.
To protect against risk of electric shock, do not immerse the cord, plug or cooking unit in water or any other liquid. Unplug from outlet when not in use and before cleaning. Allow to cool before cleaning appliance.
The use of accessory attachments not recommended by the manufacturer may result in fire, electrical shock, or risk of injury to persons.
Do not use outdoors or for commercial purposes. Do not let power cord hang over the edge of the table or counter, or touch hot surfaces. Do not place on or near a hot gas or electric burner or heated oven.
Unplug the unit when finished using. Do not use appliance for other than intended use.
To reduce the risk of electric shock this appliance has a grounded plug. If the plug does not fit fully into the electrical outlet contact a qualified electrician. Do not modify the plug in any way or use an adaptor.
B&B TRENDS SL. disclaims all liability for damages that may occur to people, animals or objects, for the non-observance of these warnings.
INSTRUCTIONS FOR USE BEFORE FIRST USE
Remove all packaging. Clean the cooking plates by wiping a sponge or cloth dampened in warm water. Do not immerse the unit and do not run water directly on the cooking surfaces. Dry with a cloth or paper towel. For best results, lightly coat the cooking plates with a little cooking oil or cooking spray.
Notice: When your Contact Grill is heated for the first time, it may emit slight smoke or odor. This is normal with many heating appliances. This does not affect the safety of your appliance.
HOW TO USE
Before using the appliance for the first time, peel off any promotional materials and packaging materials, and check that the cooking plates are clean and free of dust. If necessary, wipe over with a damp cloth. For best results, pour a teaspoon of vegetable oil on to the non-stick plates. Spread over with an absorbent kitchen towel and wipe off any excess oil.
PREPARING YOUR CONTACT GRILL
-
Close the Contact Grill and plug it into the wall outlet, the buzzer will sound once and all lights will flash once, then, only power button (12) and power light (7) will flash.
-
Press the power button (12), preset programs (14) and temperature button light (1) turn on, Power light (Pre heating) (7) flashes. Now you can choose one of the preset programs or use it manually.
WORKING WITH PRESET PROGRAMS
Press your desired program button, the light will be on and the rest turn off. Preset temperature for this program will appear in Temperature display (3), then Power light (Pre heating) (7), OK button (13) and Temperature display (3) will flash.
After 5 seconds, it will automatically enter in preheating mode, or directly push OK button (13) for preheating.
Preheating takes about 3-5 min. After preheating is completed, three beeps will be sound, the red light (7) is now fixed, and the green light of Ready to use (8) is on, OK button(13) flashes. Now you can start baking food.
If user does not have any operation after preheating is completed, after 30 minutes three beeps will be sound and it will automatically enter standby mode.
Prepare the burgers, meat or other foods and place them into the bottom cooking plate.
Close the top cooking plate which has a floating hinge (3) that is designed to evenly press down the food.
The top plate must be fully lowered to achieve grill marks on the selected foods. For thin food move it to Low position, for thicker food move it to High position.
For each program you can select the cooking level (Rare-Medium-Well Done) by pressing +/- buttons (5-6), then press ok button (13) to start cooking with your preferences. After 3 beeps, a countdown will start in Time display (4).
Each cooking level has a preset time which is shown in the Time display (4).
In the below table you can check all parameters of time and temperature:
| Food Type Temperature Rare Medium Well Done | ||||
| Steak 230 °C | 2:30 3:30 5:00 | |||
| Chicken 220 °C | 3:00 5:00 7:00 | |||
| Fish 200 °C - | 4:30 6:00 | |||
| Sandwich | 210 °C | 2:30 3:30 4:30 | ||
| Hamburguer | 220 °C 3:00 | 4:00 5:00 | ||
When the frying is completed, the machine beeps 3 times, the product stops heating, power button (12) and power light (7) will flash, and all other lights are off (turn to standby).
WORKING IN MANUAL MODE
Press the TEMP button (1), the temperature display (3) will display the temperature of the baking pan and flash. The temperature can be adjusted as per your preferences by pressing the +/- buttons (5-6).
After 5 seconds, it will automatically enter the program of the selected temperature, and the temperature value is always on and does not flash. If you need to adjust the temperature again, you need to press the TEMP button (1) again and adjust temperature.
Press the TIME button (2), the time display shows the time and flashes. Time can be adjusted by the +/- buttons (5-6).
After 5 seconds, it will automatically enter the selected time program, and the time will start to enter the countdown mode. If you need to change the set time, you need to press the TIMER button again.
When countdown finishes and the frying is completed, the machine beeps 3 times, the product stops heating, the power light flashes, and all other lights are off (turn to standby).
SAFETY PROTECTION FUNCTION
If user does not have any operation, and it will automatically shut down after 60 minutes.
Power button (12) and power light (7) will flash. No buzzer sounds.
If the system detects abnormality in the temperature sensing system, it will alarm, all the lights will flash, the buzzer will continue to sound.
(E1 stand for the temperature sensor is broken).
(E2 stand for the temperature sensor is shorted).
SAFETY PROTECTION FUNCTION
natural_image
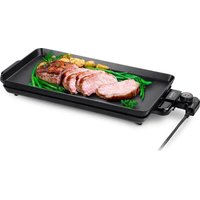
Steak grater setup with raw meat, strawberries, and baked goods arranged on a black grater (no text or symbols visible)Place Grill Toaster on a clean flat surface where you intend to cook. The Grill Toaster can be positioned in flat position.
Upper plate/cover is level with lower plate/base. The upper and lower plates line up to create one large cooking surface. To put the Grill Toaster to this position, locate the hinge release lever on the right arm.
Hold the handle (1) with your left hand and hold the 180^ open button (4) with your right hand. Push the handle back until the cover rests flat on the counter. The unit will stay in this position until you lift the handle and cover to return it to the closed position.
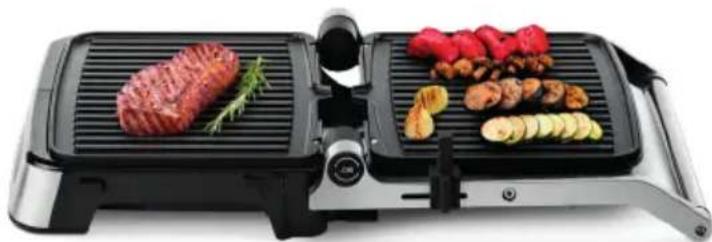
Use the Grill Toaster as an open grill to cook burgers, steak, poultry (we do not recommend cooking bone-in chicken, since it does not cook evenly on an open grill), fish and vegetables.
Cooking on the open grill is the most versatile method of using the Grill Toaster. In the open position, you have double the surface area for grill.
You have the option of cooking different types of foods on separates without combining their flavors, or cooking large amounts of the same type of food. The open position also accommodates different cuts of meat with varying thicknesses, allowing you to cook each piece to you liking.
CLEANING AND CARE
Always unplug the Grill Toaster and allow it to cool before cleaning. The unit is easier to clean when slightly warm. There is no need to disassemble Grill Toaster for cleaning. Never immerse the Grill Toaster in water or place in dishwasher.
The cooking plates can be cleaned in water or dishwasher.
This grill has detachable plates. To remove the plates push the Plate release buttons (7) to disassemble them from main body.
Once cleaned, put them back in the right position and press them down until they are properly fixed.
Wipe cooking plates with a soft to remove food residue. For baked on food residue squeeze some warm water mixed with detergent over the food residue then clean with a non abrasive plastic scouring pad or place wet kitchen paper over the grill to moisten the food residue.
Do not use anything abrasive that can scratch or damage the non-stick coating.
Do not use metal utensils to remove your foods, they can damage the non-stick surface.
Wipe the outside of the grill toaster with a damp cloth only. Do not clean the outside with any abrasive scouring pad or steel wool, as this will damage the finish. Do not immerse in water or any other liquid.
Do not place in the dishwasher.
Remove and empty the drip tray after each use and wash the tray in warm, soapy water. Avoid the use of scouring pads or harsh detergents as they may damage the surface. Rinse and dry thoroughly with a clean, soft cloth and replace.
PRODUCT DISPOSAL

This product complies with European Directive 2012/19/EU on electrical and electronic devices, known as WEEE (Waste Electrical and Electronic Equipment), provides the legal framework applicable in the European Union for the disposal and reuse of waste electronic and electrical devices. Do not dispose of this product in the bin, instead going to the electrical and electronic waste collection center closest to your home.
FRANÇAIS
NOUS VOUS REMERCIONS POUR L'ACHAT D'UN PRODUIT UFESA. NOUS ESPÉRONS QUE LE PRODUIT SERA CONFORME À VOS ATTENTES.
AVERTISSEMENT
VEUILLEZ LIRE ATTENTIVEMENT LE MODE D'EMPLOI AVANT D'UTILISER LE PRODUIT. CONSERVEZ-LE DANS UN ENDROIT SÛR POUR POUVOIR LE CONSULTER ULTÉRIEUREMENT.
DESCRIPTION
natural_image
Steak grater setup with cutlery and meat, no visible text or symbolsMISE AU REBUT DU PRODUIT

natural_image
Steak grater setup with raw meat, red peppers, and baked goods arranged on a black grater (no text or symbols visible)natural_image
Steak grater setup with cutlery and meat, no visible text or symbolsnatural_image
Steak grater setup with cutlery and meat slices (no visible text or labels)natural_image
Steak grater setup with cutlery and meat, no visible text or symbolsB&B TRENDS, SL. guarantees compliance of this product, for the use for which it is, during the period established by the legislation in force in the country of sale. In the case of breakdown during the term of this warranty, users are entitled to repair or else the replacement of the product at no charge if the former is unavailable, unless one of these options proves impossible to fulfil or is disproportionate. In this case, you can then opt for a reduction in price or cancellation of the sale, which must be dealt with directly with the sales vendor. This also covers replacement of spare parts provided that the product has been used according to the recommendations specified in this manual for both cases, and has not been tampered with by any third party that is not authorised by B & B TRENDS, SL. The warranty will not cover any parts subject to wear and tear. This warranty does not affect your rights as a consumer in accordance with the provisions in Directive 1999/44/EC for member states of the European Union.
USE OF WARRANTY
Customers must contact a B&B TRENDS, SL., authorised Technical Service for repair of the product. Since any tampering of the same by anyone not authorised by B&B TRENDS, SL., or the careless or improper use of the same shall render this warranty null and void.
You must keep the purchase invoice, receipt or delivery docket in order to exercise your warranty rights.
For technical service and after-sales care outside the Spanish territory, please submit your query to the point of sale where you purchased the item.
BON DE GARANTIE
Check out your nearest service station at https://sat.ufesa.com/
ufesa
B&B TRENDS, S.L. · C.I.F. B-86880473