
S52200 - Slicer GRAEF - Free user manual and instructions
Find the device manual for free S52200 GRAEF in PDF.

| Product type | Professional universal slicer |
| Brand | Graef |
| Model | S52200 |
| Power supply | 220-240 V, 50-60 Hz |
| Body material | Plastic motor, glass base plate, aluminum profile |
| Blade material | Stainless steel |
| Cutting thickness adjustment | Graduation with discreet lighting |
| Operating modes | Momentary and continuous switch |
| Tilt function | 30° tilt for gravity assistance |
| Included accessory | MiniSlice "2 in 1" for small foods |
| Child safety | Carriage lock and control lock |
| Stop plate | Removable for cleaning, covers blade in closed position |
| Carriage | Removable with lock, guide to be lubricated monthly |
| Blade maintenance | Hand wash with damp cloth, do not put in dishwasher |
| Lubrication | Graef petroleum jelly recommended every 2-14 days depending on use |
| Continuous use duration | 10 minutes max, then 1 hour cooling |
| Motor warranty | 5 years from date of purchase |
| Customer service | +49 (0) 29 32- 97 03 677 or service@graef.de |
| Suitable foods | Bread, ham, sausage, cheese, carrots, cucumbers, fruits, vegetables |
| Unsuitable foods | Frozen foods, bones, wood, metal |
| Cleaning | Never immerse, do not use abrasive cleaners |
Frequently Asked Questions - S52200 GRAEF
User questions about S52200 GRAEF
0 question about this device. Answer the ones you know or ask your own.
Ask a new question about this device
Download the instructions for your Slicer in PDF format for free! Find your manual S52200 - GRAEF and take your electronic device back in hand. On this page are published all the documents necessary for the use of your device. S52200 by GRAEF.
USER MANUAL S52200 GRAEF
natural_image
Illustration of a GRAEF optical instrument with a circular lens and base plate (no text or symbols on the device itself)EN erating Instructions
Produktbeschreibung
natural_image
3D mechanical component diagram with labeled 'GRAEF' and number 8 (no readable text or symbols beyond labels)Allgemeines
Product description....20
General aspects.... 21
Information on these operating instructions....21
Intended use....21
Limitation of liability....21
Warning messages and symbols....22
Safety 23
General safety instructions....23
Danger caused by electric current....24
Safety instructions for the electrical connections 24
Requirements on the installation location 25
Unpacking the unit....25
Prior to first use 25
Basic cleaning....25
Initial operation and use 26
Child protection....26
Using the MiniSlice-attachment "2 in one" as food holder 26
MiniSlice-attachment "2 in one"......27
Tilting by 30 deg....27
Cleaning and maintenance 28
Cleaning the cutter on the outside....28
Removal and cleaning of the slide 28
Removal and cleaning of the blade....29
Ensure value preservation of the blade 29
Greasing the unit on the inside 29
After-sales service 30
Accessories 30
Disposal 30
Disposal of the packaging 30
Disposal of the unit....31
Guarantee 31
Five-year motor guarantee 31
Product overview
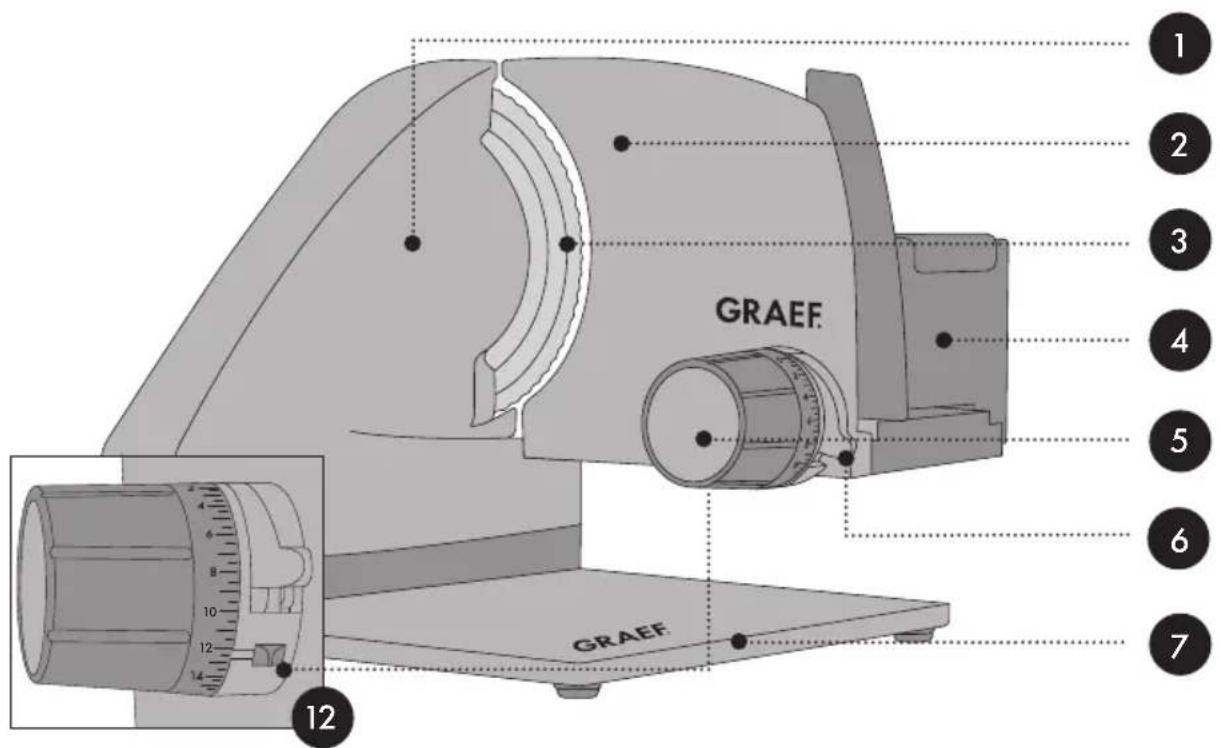
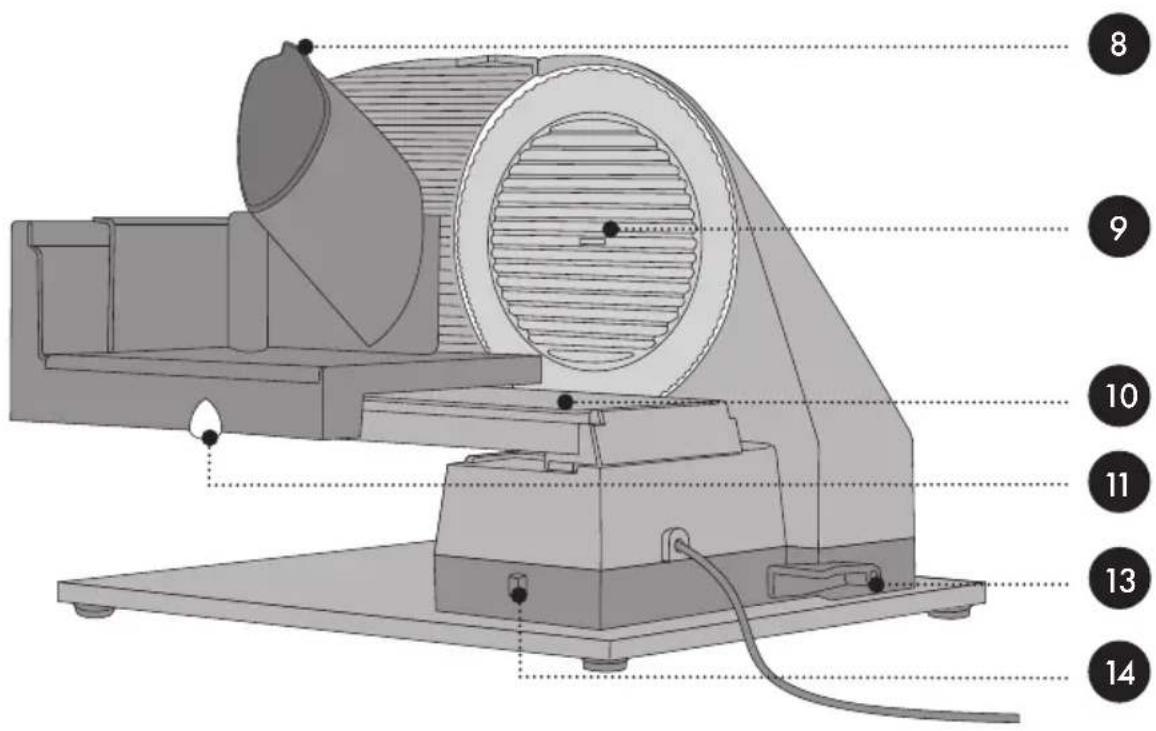
Product description
1 Motor body
2 Stop plate
3 Blade
4 Slide
5 Setting of cutting thickness
6 Quick-action and continuous operation switch
7 Glass base plate
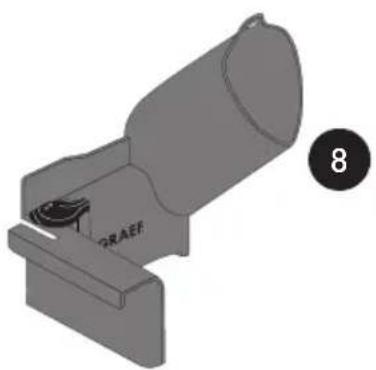
8 MiniSlice-attachment "2 in one"
9 Blade cover plate
10 Aluminium profile
11 Carriage unlocking
12 Safety slide for the Child safety lock
13 Tilting lever
14 Locking head
natural_image
3D mechanical component diagram with labeled parts and a numbered circle (8), no readable text or symbols beyond labelsGeneral aspects
Dear Customer,
You have made a good choice by buying the professional universal cutter. You have purchased a highly appreciated quality product. Thank you very much for buying our product. We wish you a lot pleasure with your new universal cutter.
Information on these operating instructions
These operating instructions provide important information on putting into operation, safety, intended use and the care of the universal cutter (hereinafter referred to as unit). The operating instructions shall have to be available at the unit at all times. The instructions have to be read and applied by every person who deals with
- Initial operation,
- Operation,
- Fault correction and/or
- Or is instructed to clean the unit.
Keep these operating instructions and pass them on to the next owner along with the unit. These operating instructions cannot take into consideration every conceivable use. For further information or in case of problems which are not dealt with or not dealt with sufficiently in these instructions, please get in touch with Graef customer service or your specialist dealers.
Intended use
This unit is not intended for commercial use. Use the universal cutter in closed-up rooms only. It can be used to cut bread, ham, sausage, cheese, carrots, cucumber, fruit, vegetables, et cetera. By no means cut hard matter, such as frozen food, bones, wood, sheet metal, or the like. Another or any exceeding use shall not be considered intended. This unit is intended for use in a household.
The appliance can cause dangers, if is not used as intended.
- Use the unit exclusively as intended.
- Observe the procedures described in these operating instructions.
Claims of any kind caused by damage by unintended use shall be excluded. The risk shall be borne sole by the operator.
Limitation of liability
All technical information, data and notes on the installation, the operation and the care contained in these operating instructions correspond to the last status before printing, and are rendered under consideration of our previous experience and to the
best of knowledge. No claims may be derived from the particulars, illustrations and descriptions in these instructions.
The manufacturer shall not assume any liability for damage caused by:
• Non-observation of the instructions
- unintended use
- incorrect repairs
- technical modifications
• Use of unapproved spare parts.
Translations shall be carried out to the best of knowledge. We shall not assume any liability for translation mistakes. The original German text only shall be binding.
Warning messages and symbols
In these operating instructions, the following warning messages, signal words and symbols are used:

WARNING!
This signal symbol / word indicates a hazard with average risk level which, if not prevented, may result in death or a severe injury.

CAUTION!
This signal symbol / word indicates a hazard with low risk level which, if not prevented, may results in slight to moderate injury.
NOTE!
This signal work warns against potential material damage.
i
This symbol provides additional information on operation.
Safety
General safety instructions
This device conforms to the relevant safety regulations. For safe handling of this unit, please observe the following safety instructions:
• However, incorrect handling may lead to injury and damage.
- Before using this unit for the first time, check it for visible outer damages on the housing, connection cable and plug. Do not operate a damaged unit.
- If the connection cable is damaged, it must be replaced by the manufacturer, the after-sales service or a similarly qualified person in order to prevent danger.
- Repairs may be carried out only by an expert or by Graef after-sales service. Incorrect repairs may cause considerable hazards for the user. In addition, any claim under guarantee is forfeited.
- Defective parts must be replaced by original spare parts only. It is only with these parts that the safety requirements are met.
• This unit must not be used by children.
- Keep the unit and its connection cable away from children.
- This appliance can also be used by children aged from 8 years and above and persons with reduced physical, sensory or mental capabilities or lack of experience and/or knowledge if they have been given supervision or instruction concerning use of the appliance in a safe way and understand the hazards involved. Cleaning and user maintenance must not be carried out by children unless they are 8 years or older and are supervised.
- Children should be supervised to ensure that they do not play with the appliance.
- The unit is not intended to be used with an external timer or a separate remove control.
- Always disconnect the connection cable by using plug; do not pull the connecting cable.
- Be careful not to let the power cord hang freely, this could cause the fall of the unit.
- Packaging materials must not be used for playing. There is a danger of suffocation.
- In the absence of supervision and prior to assembly, disassembly or during cleaning, always disconnect the unit from the mains.
• After a continuous operation of 10 minutes, let the motor cool down for an hour. - This unit must be used with slide and the MiniSlice-attachment "2 in one" in normal operating condition, unless the size and shape of the slicing material do not permit their use.
- Clean the unit, the MiniSlice-attachment "2 in one" and the slide using a damp cloth or a mild cleaning agent.
- Clean the Blade with a damp cloth. Caution: risk of injury!
- KEEP THE OPERATING INSTRUCTIONS.
Danger caused by electric current
Mortal danger is caused by contact with energised cables or components!
Please observe the following safety instructions in order to prevent an exposure to electric current:
- Do not use the unit if the mains cable or plug are damaged.
- In this case, you should let the Graef Customer Service install a new connection cable before using the unit again. This may be done also by an authorised specialist.
- Do not open the housing under any circumstances. If live connections are touched or the electrical and mechanical construction are modified, there is the danger of electric shock.
- Never touch live parts. This can cause an electric shock and may cause even death.
Safety instructions for the electrical connections
For safe and fault-free operation of the unit, the following requirements have to be met during the electrical connection:
- Before connecting the unit, compare the connecting data (voltage and frequency) on the type plate with those of your energy network. These details must correspond so that no damage occurs to the unit. In case of doubt ask your trained electrician.
- The socket has to be protected at least by a 10 amps circuit breaker.
-
Make sure that the power cable is not damaged and is not laid across hot surfaces or sharp edges.
-
The connecting cable must not be stretched tightly.
- The electric safety of the unit is ensured only when it is connected to a socket with protective conductor installed correctly. Operation on a socket without protective conductor is forbidden. If in doubt, let the house installation checked by a trained electrician. The manufacturer shall not assume responsibility for damage which has been caused by absent or interrupted protective conductor.
Requirements on the installation location
For safe and fault free operation of the unit, the following requirements of the installation location have to be met:
- The unit has to be placed on a solid, flat, horizontal, and non-slipping surface with a sufficient weight-carrying capacity.
• Make sure that the unit cannot topple over. - Choose the location in such a way that children cannot reach the blade of the unit or the supply lines.
- Never use the unit outdoors, and always keep it in a dry place.
- The unit is not designed for installation in a wall or a built-in cupboard.
- Do not set up the unit in a hot, wet or moist environment.
- The socket has to be easily accessible so that the power cable can be removed easily in case of emergency.
Unpacking the unit
When unpacking the unit, proceed as follows:
- Remove the unit from the box.
- Remove the packaging parts.
- Remove any stickers on the unit (do not remove the type plate).
Prior to first use

CAUTION!
Danger of injury!
The very sharp blade can cause injuries.
• Proceed with caution when wiping the blade.
Basic cleaning
Prior to first use, the blade of the unit must be wiped off using a moist cloth in order to remove any possible production residue. See chapter "Cleaning and maintenance".
Initial operation and use

WARNING!
Danger of injury!
The very sharp blade can cut off body parts. Your fingers and thumbs especially are at risk.
- Never reach into the space between the stop plate and blade as long as the stop plate is not completely closed, i.e. set to ▪below "O").
- Do not touch the blade with your fingers.
Child protection
To secure the blade (stop plate must be closed, i.e. positioned below "O"), push the slide in front of the blade and press the slide latch in. The slide is secured. To enable the child-proof safety catch, the adjustment knob must be turned clockwise past the zero setting up to the limit. Now push the safety slide to the outside as far as possible. The adjustment knob and on/off switch are not blocked.
Using the MiniSlice-attachment "2 in one" as food holder
NOTE!
Please also refer to the operating instructions of the MiniSlice-attachment "2 in one".
This unit must be used with slide and MiniSlice-attachment "2 in one" in normal operating condition, unless the size and shape of the slicing material do not permit their use.
- Insert the plug into the socket.
- Place the slicing material on to the slide.
- Place the MiniSlice-attachment "2 in one" on the rear wall of the slide at the slicing material. The locking lever should be open. Observe the corresponding lock symbols.
- Set the requested cutting thickness.
- Place the tray under the unit.
- Press the slicing material lightly against the stop.
- Either hold down the momentary switch or press the momentary the momentary switch and slide it down to switch to continuous operation operation.
- Evenly move the slide towards the blade.
- When you have finished cutting, either release the moment switch or push it back up or push the switch back up.
- Close the stop.
TIP
- Soft slicing material (such as cheese or ham) can be cut best when chilled.
- Soft slicing material can be cut better when moved forward slowly.

After a continuous operation of 10 minutes, let the motor cool down for an hour.
MiniSlice-attachment "2 in one"
- Put the MiniSlice-attachment "2 in one" on the slide back wall. Note the corresponding lock symbols.
- Turn the locking lever firmly.
- Put the slicing material, e.g. cucumber, carrots, mushrooms, cocktail tomatoes etc., into the filling shaft.
- If necessary, place the insert (optional accessory) in the feed chute. It slides down automatically. Do not press.
- Set the requested cutting thickness.
- Place a tray under the knife.
- Switch on the continuous switch or use the intermittent switch.
• Evenly move the slide towards the blade. - When you have finished cutting, release the MiniSlice-attachment "2 in one".
- After use, clean the MiniSlice-attachment "2 in one". Frequent cleaning in the dishwasher can lead to discolouration. Cleaning under running water by hand is recommended.
Tilting by 30 deg
The tilting function is especially useful for cutting bread, hard-cured sausage and vegetables. By means of the tilting function, the natural gravity force of the product to be cut is used for feeding.
Proceed as follows to tilt the unit:
- Press the lock knob The unit is unlocked.
- Use the swivelling lever to pull the unit up forcefully until it locks in audibly.
- When the unit has been locked in audibly, it is secured.
- Now proceed as described under "Using the MiniSlice attachment "2 in one" as a remnant holder".
- When the cutting process is finished, turn the unit back.
- Turn the swivelling lever down.
- Press the rear part of the profile to lock the locking bolt.
Cleaning and maintenance

WARNING!
Danger of injury!
Inexpert cleaning may lead to injuries.
- Switch the unit off before cleaning and pull the power cord from the electric socket.
- Let the unit cool down before cleaning.
- Check whether the stop has been closed (the blade edge must be covered).
• Proceed with caution when wiping the blade.
Cleaning the cutter on the outside
Use a soft and moist cloth to clean the outer surfaces of the unit. Use a mild detergent in case of heavy soiling.
NOTE!
Risk of damage!
Improper handling of the cutter can lead to damages of the unit.
- Do not use any aggressive or abrasive detergents and no solvents.
- Do not scratch off stubborn soiling with hard objects.
- Do not immerse the unit in water.
- Do not put the unit in the dishwasher and do not use it under running water.
- Never put the slide into the dishwasher.
- Never put the blade into the dishwasher which may affect the sharpness and the corrosion resistance (salt attacks the blade). Handling the blade when loading and unloading from the dishwasher is another danger point.
Removal and cleaning of the slide
In order to clean the slide better, it can be removed from the unit.
- Pull out the slide latch.
- Remove the slide.
- Use a moist cloth or running water to clean all parts.
- Once a month, add some drops of resin-free oil or petroleum jelly to the slide-way.
- Use a soft cotton wool cloth to remove excessive oil / petroleum jelly.
- After completion of the cleaning process, put the slide back onto the guiding profile and press the slide latch in such a way that it fits flush with the side of the slide.
Removal and cleaning of the blade
- Remove the plug from the socket.
- Pull the slide latch outward.
- Remove the slide.
- Loosen the blade cover plate by turning it 45^ in the direction of the arrow.
- Turn the blade closure to the right and carefully remove the blade.
- Clean the inside of the blade using a damp cloth.
- Remove the black wiper ring from the unit.
- Clean the wiper ring using a damp cloth.
- Clean the inside of the unit using a damp cloth.
- Insert the blade back again in reverse order.
Ensure value preservation of the blade
For long-lasting sharpness and value retention of your Graef blade, were recommend to clean it in regular intervals, especially after cutting up salted meat and/or ham.
These foodstuffs contain salts, when they stay on the surface of the blade for a longer period of time, may even form a rust film (even on "stainless" steel).
When cutting up slicing material which contains a lot of water, such as tomatoes or cucumbers, lacking or wrong (too "wet") cleaning may also lead to a rust film on the blade surface. For this reason we recommend to use a moist cloth, and if necessary some washing-up liquid, to clean the blade directly after use.
From time to time, unscrew the blade and clean the unit on the inside. Especially, when "juicy" slicing material (vegetables, fruit, roasts, et cetera) have been cut. Treat the blade with the upmost of care.
Greasing the unit on the inside
Regular greasing will increase the service life of your unit. For this purpose, exclusively use Graef petroleum jelly which is matched to our units. You can obtain them in our online shop at www.graef.de under item No. 141842.

Regularly grease the unit:
• In case of frequent use, every two to three days.
- When the unit runs for 10 minutes every day, every fortnight.
When greasing the blade, proceed with utmost care as follows:
Remove the blade.
- Grease the gearwheel with petroleum jelly.
- Grease the blade bolt with petroleum jelly.
-
Also grease the blade screw with petroleum jelly.
-
Place the wiper ring in the unit again and grease it using petroleum jelly.
- Place the blade back in again.
After-sales service
If your unit is defective, please contact your specialist dealer or the Graef customer service on +49 (2932) 9703677 or write an e-mail to service@graef.de
Accessories
You can order other accessories in our online shop www.graef.de or from your specialist dealer.
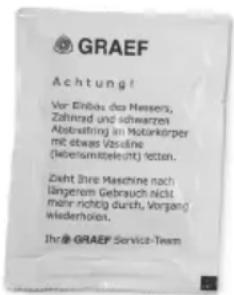
Bag of petroleum jelly (5 g)
Article No. 141842
Disposal
Disposal of the packaging

The packaging protects the unit against transport damage. The packaging materials are selected according to the environmental compatibility and disposal-related aspects and can therefore be recycled. The return of packaging into the material cycle saves raw material and reduces the waste volume. Dispose of the packaging material no longer needed at collection points for the "Green Dot" recycling system (in Germany).

If possible, keep the original packaging during the guarantee period of the unit in order to be able to pack the unit correctly in case of guarantee.
Disposal of the unit

At the end of its service life, this product cannot be disposed of in normal domestic waste. The symbol on the product and in the operating instructions point out to this fact. Reuse the materials according to their marking. With the reuse, recycling or other forms of recycling of old equipment, you make an important contribution to the protection of our environment. Please ask your municipal administration for the disposal point.
Guarantee
Five-year motor guarantee
For this product we assume an additional guarantee on the motor of 60 months beginning with the date of sale. Your legal warranty claim in conformity with Section 439 et seq. of the German Civil Code (BGB) shall remain unaffected by this regulation. The guarantee does not cover any damage which is caused by incorrect handling or use as well as defects which only slightly influence the function or the value of the unit. Moreover, transport damage provided we are not responsible shall be excluded from the claims under guarantee. Guarantee shall be ruled out for damage, the repair of which has not been carried out by us or one of our represenations. In case of justified complaints, we shall repair the defective product or replace it by a product without defects at our discretion.
Table des matières
natural_image
3D mechanical component diagram with labeled section 'GRAEF' and number 8 (no readable text or symbols beyond labels)Généralités
Chère cliente, cher client,
natural_image
3D mechanical component diagram with labeled part 'GRAEE' and number 8 (no readable text or symbols beyond labels)Algemeen
Geachte klant,
natural_image
3D mechanical component diagram with labeled 'GRAEE' and number 8 (no readable text or symbols beyond labels)Generalità
Gentile Cliente,
natural_image
3D mechanical component diagram with labeled part 'GRAEE' and number 8 (no readable text or symbols beyond labels)Generalidades
Estimado/a cliente:
Produktbeskrivelse
natural_image
3D mechanical component diagram with labeled parts and a numbered circle (8), no readable text or symbols beyond the label.Generelt
Kære kunde,
Opis produktu
natural_image
3D mechanical component diagram with labeled parts and a numbered circle (8), no readable text or symbols beyond the label.Informacje ogólne
Szanowna Klientko, Szanowny Kliencie,


- Produktbeschreibung
- Allgemeines
- Product overview
- Product description
- General aspects
- Information on these operating instructions
- Intended use
- Limitation of liability
- Warning messages and symbols
- WARNING!
- CAUTION!
- NOTE!
- Safety
- General safety instructions
- Danger caused by electric current
- Safety instructions for the electrical connections
- Requirements on the installation location
- Unpacking the unit
- Prior to first use
- Danger of injury!
- Basic cleaning
- Initial operation and use
- Child protection
- Using the MiniSlice-attachment "2 in one" as food holder
- Please also refer to the operating instructions of the MiniSlice-attachment "2 in one".
- TIP
- MiniSlice-attachment "2 in one"
- Tilting by 30 deg
- Cleaning and maintenance
- Cleaning the cutter on the outside
- Risk of damage!
- Removal and cleaning of the slide
- Removal and cleaning of the blade
- Ensure value preservation of the blade
- Greasing the unit on the inside
- After-sales service
- Accessories
- Disposal
- Disposal of the packaging
- Disposal of the unit
- Guarantee
- Five-year motor guarantee
- Table des matières
- Généralités
- Algemeen
- Generalità
- Generalidades
- Produktbeskrivelse
- Generelt
- Opis produktu
- Informacje ogólne
Brand : GRAEF
Model : S52200
Category : Slicer