GE-SR 18/22 Li - Garden spreader EINHELL - Free user manual and instructions
Find the device manual for free GE-SR 18/22 Li EINHELL in PDF.

User questions about GE-SR 18/22 Li EINHELL
0 question about this device. Answer the ones you know or ask your own.
Ask a new question about this device
Download the instructions for your Garden spreader in PDF format for free! Find your manual GE-SR 18/22 Li - EINHELL and take your electronic device back in hand. On this page are published all the documents necessary for the use of your device. GE-SR 18/22 Li by EINHELL.
USER MANUAL GE-SR 18/22 Li EINHELL
Danger! - Read the operating instructions to reduce the risk of injury.
Caution! Keep other persons and animals away from the danger zone.

Caution! Wear a breathing mask. Harmful dust can be generated.

Caution! Wear safety goggles. Splinters, chips and dust generated during work can cause loss of sight.

Wait until all parts of the machine have come to a complete stop before touching them.

Never reach into openings.

Important! Protect the machine from the dampness and never expose it to rain.
EN

Switch off the machine and remove the battery/batteries before you make any adjustments or clean the machine.

Store the batteries only in dry rooms with an ambient temperature of 50^ to 104^ (+10^ to +40^) Place only fully charged batteries in storage (charged at least 40% ).
EN
DANGER!
When using the equipment, a number of safety precautions must be observed to avoid injuries and damage. Please read the complete operating instructions and safety information with due care. Keep these operating instructions in a safe place so that the information is available at all times. If you give the equipment to any other person, hand over these operating instructions and the safety information as well. We cannot accept any liability for damage or accidents which arise due to failure to follow these instructions and the safety information.
1. Safety information
Read All Instructions
WARNING: When using electric gardening appliances, basic safety precautions should always be followed to reduce the risk of fire, electric shock, and personal injury, including the following:
FOR ALL APPLIANCES
- Avoid dangerous environments - do not use appliances in damp or wet locations.
Don't use in rain. - Keep children away - all people and pets should be kept at a distance from the work area.
- Dress properly - do not wear loose clothing or jewelry. They can be caught in moving parts. Wear protective clothing; use of work gloves, long pants, a long sleeved shirt and safety footwear is recommended when working outdoors. Wear protective hair covering to contain long hair.
Use safety glasses - always use face or dust mask if the area in which you are working is dusty. The purpose of the safety rules is to attract your attention to possible dangers. The safety symbols and the explanations with them, require your careful attention and understanding. The safety warnings do not by themselves eliminate any danger. The instruction or warnings they give are not substitutes for proper accident prevention measures. - Use right appliance - do not use appliance for any job except that for which it is intended.
-
Do not force appliance - it will do the job better and with less likelihood of a risk of injury at the rate for which it was designed.
-
Do not overreach - keep proper footing and balance at all times.
- Stay alert. Use common sense. Do not operate appliance when you are tired or under the influence of drugs, alcohol or medication.
- When not in use, appliances should be stored indoors in dry places out of reach of children.
- Maintain appliance with care. Follow instructions for lubricating and changing accessories. Keep handles dry, clean, and free from oil and grease.
- Check damaged parts. Before using the appliance, make sure the safety guards are intact. Never use a tool without its safety guard. Check the alignment of the moving parts, the binding of the moving parts.
- Check for broken or defective parts that can affect the safe operation of your tool. A guard or other part that is damaged should be properly repaired or replaced by an authorized service centre unless indicated elsewhere in this manual.
- Recharge only with the charger specified by the manufacturer. A charger that is suitable for one type of battery pack may create a risk of fire when used with another battery pack.
Use appliances only with specifically designated battery packs. Use of any other battery packs may create a risk of injury and fire. - When battery pack is not in use, keep it away from other metal objects, like paper clips, coins, keys, nails, screws or other small metal objects, that can make a connection from one terminal to another. Shorting the battery terminals together may cause burns or a fire.
Under abusive conditions, liquid may be ejected from the battery; avoid contact. If contact accidentally occurs, flush with water. If liquid contacts eyes, additionally seek medical help. Liquid ejected from the battery may cause irritation or burns. (This advice is considered correct for conventional NiMh, NiCd, lead acid and Lithium-ion cell types. If this advice is incorrect for a cell design that differs from these, then the correct advice may be substituted.) - Do not use a battery pack or appliance that is damaged or modified. Damaged or modified batteries may exhibit unpredictable behavior resulting in fire, explosion or risk of injury.
- Do not expose a battery pack or appliance to fire or excessive temperature. Exposure to fire or temperature above 266^ (130^) may
EN
cause explosion.
- Follow all charging instructions and do not charge the battery pack or appliance outside of the temperature range specified in the instructions. Charging improperly or at temperatures outside of the specified range may damage the battery and increase the risk of fire.
- Have servicing performed by a qualified repair person using only identical replacement parts. This will ensure that the safety of the product is maintained.
- Do not modify or attempt to repair the appliance or the battery pack (as applicable) except as indicated in the instructions for use and care.
1.) FOR ALL BATTERY-OPERATED APPLIANCES:
- Do not charge appliance in rain, or in wet locations.
- Do not use battery-operated appliances in the rain. Always remove or disconnect battery pack before adjusting, cleaning, servicing or transporting the garden appliances.
2.) FOR ALL BATTERY-OPERATED PRODUCTS EMPLOYING A DETACHABLE OR SEPARABLE
BATTERY:
Use only the following type and size battery: 18V 1.5Ah PXC Lithium-ion battery 18V 2.0Ah PXC Lithium-ion battery 18V 2.5Ah PXC Lithium-ion battery 18V 3.0Ah PXC Lithium-ion battery 18V 4.0Ah PXC Lithium-ion battery 18V 3.0Ah PXC Plus Lithium-ion battery 18V 5.2Ah PXC Plus Lithium-ion battery 18V 4.0Ah/6.0Ah PXC Plus Lithium-ion battery
- Do not dispose of the battery in a fire. The cell may explode. Check with local codes for possible special disposal instructions.
- Do not open or mutilate the battery. Released electrolyte is corrosive and may cause damage to the eyes or skin. It may be toxic if swallowed.
Exercise care in handling the battery in order not to short it with conducting materials such as rings, brackets, and keys. The battery or conductor may overheat and cause burns.
3.) AVOID UNINTENTIONAL STARTING - DO NOT INSERT BATTERY WHILE YOUR FINGER IS ON THE SWITCH. BE SURE SWITCH IS OFF WHEN INSERTING THE BATTERY.
GENERAL SAFETY WARNINGS FOR THE BATTERY PACK
BATTERIES MUST BE RECYCLED.
- Dispose of used battery promptly and properly. When disposing of secondary cells or batteries, keep cells or batteries of different electrochemical systems separate from each other.
- Keep battery out of reach of children and in original package until ready to use.
- Never put batteries in one's mouth. If swallowed, contact local poison control centre immediately.
- CAUTION - The battery used in this device may present a risk of fire or chemical burn if mishandled. Replace battery with Einhell/ lawn master brand only. Use of another battery may present a risk of fire or explosion.
WARNING: Do not use a visibly damaged battery pack or appliance.
WARNING: Do not modify or attempt to repair the appliance or the battery pack. - Do not short-circuit a cell or battery. Do not store cells or batteries haphazardly in a box or drawer where they may short-circuit each other or be short-circuited by conductive materials.
- Do not subject cells or batteries to mechanical shocks.
- Keep cells and batteries clean and dry. Wipe the cell or battery terminals with a clean dry cloth if they become dirty.
- Do not maintain secondary cells and batteries on charge when not in use.
- Retain the original cell and battery. Do not use any charger other than that specifically provided for use with the equipment. Secondary cells and batteries need to be charged before use. Always use the correct charger and refer to the manufacturer's instructions or equipment manual for proper charging instructions.
- When possible, remove the battery from the equipment when not in use.
- Prevent unintentional starting. Ensure the switch is in the off-position before connecting to the battery pack, picking up or carrying the appliance. Carrying the appliance with your finger on the switch or energizing appliances
EN
that have the switch on invites accidents.
- Disconnect the battery pack from the appliance before making any adjustments, changing accessories, or storing appliance. Such preventive safety measures reduce the risk of starting the appliance accidentally.
Under abusive conditions, liquid may be ejected from the battery; avoid contact. If contact accidentally occurs, flush with water. If liquid contacts eyes, additionally seek medical help. Liquid ejected from the battery may cause irritation or burns.
- Have servicing performed by a qualified repair person using only identical replacement parts. This will ensure that the safety of the product is maintained.
- Protect your rechargeable battery against moisture, rain and high humidity. Moisture, rain and high humidity can cause dangerous cell damage. Never charge or work with batteries which have been exposed to moisture, rain or high humidity – replace them immediately.
If your equipment is fitted with a detachable battery, remove the battery for safety reasons after you have finished your work.
IMPORTANT SAFETY INSTRUCTIONS FOR CHARGER
WARNING: This product may contain lead, phthalate or other chemicals known to the State of California to cause cancer, birth defects and other reproductive harm. Please wash your hands after use.
Always inspect the equipment visually before using it. Do not use the equipment if safety devices are damaged or worn. Never disable any safety devices.
- Stop using the equipment when there are people - particularly children - or pets nearby.
- You are responsible for safety in the operating area.
Make sure you stand squarely at all times while working.
- Never leave the equipment unsupervised in the work area. If you stop work for a while, leave the equipment in a safe place.
If you stop your work in order to go to another area to work, you must make sure that the equipment is switched off while you are going there.
- Never use the equipment while it is raining or in damp or wet surroundings.
- Protect your equipment against moisture and
rain.
- When working with fertilizers and dusty products, wear suitable eye and breathing protection. Protect your skin and eyes from dust.
- Do not use the equipment for distributing liquids, powder, pesticides, herbicides or chemicals intended for conventional, commercial or industrial use.
Prior to working with the spreader material, read the instructions on the relevant fertilizer or seed packaging and be sure to follow these instructions. - When the equipment is in operation, you must always hold it away from your body!
- Do not switch on the equipment when it is turned around or when it is not in working position.
- Never point the equipment directly at yourself or at any other person.
- When you are not using the equipment, keep it in a dry place out of the reach of children.
- Do not use the spreader material compartment to store unneeded spreader material.
Clean the spreader material compartment before filling. - Make sure that the ON/OFF switch is not activated before you remove any blockages, clean the equipment, perform any maintenance or place the equipment in storage.
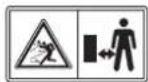
- Never remove blockages with your fingers - use a stick or a similar tool.
- Be careful not to touch the moving parts of the equipment.
SAVE THESE INSTRUCTIONS
2. Layout and items supplied
2.1 Layout
- Operating unit
- Steady grip
- Handle counterpart
- Speed controller
- Spreading quantity adjuster
- Long handle tube
- Connecting line
- Bowden wire
8.1 Bowden wire (female thread)
8.2 Bowden wire (male thread) - Spreader material compartment
EN
10.Wheel
11.Wheel cap
12. Spreading width controller
13. Foot
14. Spreader wheel
15. Spacer
16. On/Off switch
17. Lock-off button
18. Battery compartment cover
19. Push-handle
20.Wheel lock
21.Wheel axle washer
22. Self-tapping screw (long)
23. M6 screw, washer, cap nut
24. Self-tapping screw (short)
25. Axle
26. Axle hole
27. Clips
28. Recesses for wheel caps
29. Base tube
30. Base tube mounts
31. Cable holder
32. Operating unit mounts
33. Support
34. Plug
35. Cable
36. Hole for plug
37. Slider
38. Spreader wheel housing
39. Pushlock button
40. Battery capacity indicator
41. Battery capacity indicator button
2.2 Items supplied
Please check that the article is complete as specified in the scope of delivery. If parts are missing, please contact our service center or the store where you made your purchase at the latest within 5 work days after purchasing the article and upon presentation of a valid bill of purchase.
- Open the packaging and take out the equipment with care.
- Remove the packaging material and any packaging and/or transportation braces (if present).
- Check to see if all the items are supplied.
- Inspect the equipment and accessories for transport damage.
If possible, keep the packaging until the end of the guarantee period.
Danger!
The equipment and packaging material are not toys. Do not let children play with plastic bags, plastic sheets and small parts. There is a risk of choking and suffocating!
- Cordless Broadcast Spreader
- Original operating instruction with safety information
Separately available accessories
18V 1.5Ah PXC Lithium-Ion battery
18V 2.0Ah PXC Lithium-Ion battery
18V 2.5Ah PXC Lithium-Ion battery
18V 3.0Ah PXC Lithium-Ion battery
18V 4.0Ah PXC Lithium-Ion battery
18V 3.0Ah PXC Plus Lithium-lon battery
18V 4.0Ah PXC Plus Lithium- ion battery
18V 5.2Ah PXC Plus Lithium- ion battery
18V 4.0Ah/6.0Ah PXC Plus Lithium-Ion battery
18V 5.0Ah/8.0Ah PXC Plus Lithium-Ion battery
18V PXC Dual Port Fast Charger
18V PXC Fast Charger
Contact your local retailer for more specific models of batteries and charger available in your area. You can also explore battery + charger options at Einhell.com.
3. Intended use
The equipment is designed solely for spreading grass seeds, fertilizers, rock salt and deicer outdoors. The equipment cannot be used for spreading sand and powdery (fl oury) fertilizer.
The equipment is allowed to be used only for its prescribed purpose. Any other use is deemed to be a case of misuse. The user/operator and not the manufacturer will be liable for any damage or injuries of any kind resulting from such misuse.
Please note that our equipment has not been designed for use in commercial, trade or industrial applications. Our warranty will be voided if the equipment is used in commercial, trade or industrial businesses or for equivalent purposes.
EN
4. Technical data
Motor power supply: 18V
No load speed RPM: 330-700
Max. coverage area per load: 16,145 sq.ft.
Spreading width: 5 - 20 ft.
Filling volume /container bulk weight (approx.): 6 Gallon/66 lbs.
Weight (Tool Only): 14.3 lbs
Wear ear-muff s.
The impact of noise can cause damage to hearing.
Reduce noise generation and vibration to a minimum!
Use only equipment that is in perfect condition.
- Maintain and clean the equipment regularly.
Adapt your way of working to the equipment.
Do not overload the equipment.
- Have the equipment checked if necessary.
- Switch off the equipment when not in use.
CAUTION!
Residual risks
Even if you use this electric power tool in accordance with the instructions, certain residual risks cannot be eliminated. The following hazards may arise in connection with the equipment's construction and layout:
- Lung damage if no suitable protective dust mask is used.
- Damage to hearing if no suitable ear protection is applied.
- Health damage caused by hand-arm vibrations if the equipment is used over a longer period or is not properly guided and maintained.
- Risk of eye damage if essential safety goggles are not worn.
5. Before starting the equipment
The machine is supplied without batteries and without a charger!
Follow the instructions step by step and refer to the pictures when assembling.
5.1 Fitting the wheels on the foot (Fig. 4-7)
Push a washer (Item 21), a wheel (Item 10) and another washer (Item 21) onto the axle (Item 25). Then press the straight part of the wheel lock (Item 20) through the axle hole (Item 26) and secure the wheel. Fit the second wheel in the same way.
5.2 Fitting the wheel caps (Fig. 8)
Place the wheel caps (Item 11) on the wheels (Item 10) so that the clips (Fig. 3/Item 27) of the wheel caps and the recesses (Fig. 3/Item 28) of the wheels are aligned with each other. Press the wheel caps onto the wheels.
5.3 Fitting the foot on the spreader material compartment (Fig. 9)
Insert the base tubes (Item 29) in the base tube mounts (Item 30) and fasten with the short self-tapping screws (Item 24).
5.4 Fitting the spacers on the long handle tube (Fig. 10)
Important! Be sure to observe the correct alignment of the spacers (Item 15)! The cable holder (Item 31) must be on the right-hand side. Push the spacers (Item 15) onto the two long handle tubes (Item 6) and use the short self-tapping screws (Item 24) to secure to the respective long handle tube (Item 6).
5.5 Fitting the long handle tubes on the spreader material compartment (Fig. 11-12)
Important! Be sure to observe the correct alignment of the screws! Insert both long handle tubes (Item 6) in the tube mounts of the spreader material compartment (Item 9) and secure with the M6 screws, washers and cap nuts (Item 23).
5.6 Fitting the handle on the long handle tube (Fig. 13-14)
Insert the tube mounts of the operating unit (Item 1) into both long handle tubes (Item 6), line up the operating unit mounts (Item 32). Then place the
EN
handle counterparts (Item 3) on top on both sides and use the long self-tapping screws (Item 22) to secure them to the operating unit (Item 1).
5.7 Connecting the Bowden wire (Fig. 15-17)
Screw together the lower part (Item 8.2) and the upper part (Item 8.1) of the Bowden wire so that they are firmly joined together. Align the Bowden wire (Item 8) and the connecting line (Item 7) so that they are inside the cable holders (Fig. 10/ Item 31).
5.8 Mount the support on the base (Figure 18-19)
Slide the support (Item 33) under the spreader wheel housing (Item 38) and fasten it to the foot (Item 13) with two short self-tapping screws (Item 24).
5.9 Fitting the battery (Fig. 20)
Note: The battery compartment cover is self-closing and is held shut by magnets. Inserting: Open the battery compartment cover (Item 18) and insert the battery in the battery mount.
Removing: Open the battery compartment cover (Item 18), press the battery pushlock button (Item 39) and pull out the battery.
6. Operation
Explanation of the function label (Fig. 29)
- Specify how wide the spreader material opening can be opened.
- Specify the speed of the spreader wheel.
- Switch on the tool with the previously selected values.
6.1 Recommended spreading settings (Fig. 22/Item 5)
Each spreader material is supplied with instructions on how many grams per square foot are to be spread. Set a low flow rate for smaller quantities and increase the flow rate for larger quantities.
The following settings are recommended:
Setting 1+2: Fine grass seeds
Setting 3+4: Light fertilizer
Setting 5+6: Heavy fertilizer or deicer
Note:
Numerous variable factors (such as walking speed, spreader wheel speed etc.) do not allow a specific recommendation for the spreader setting. Rather, the optimum setting must be determined by the user when starting with the work.
6.2 Spreading (Fig. 22-27)
Note:
Measure the area over which you intend to spread the spreader material and determine the size of the area in square feet. Work out the amount of spreader material required by referring to the amounts given on the fertilizer/seed packaging. Set the speed of the spreader wheel (Item 14) with the speed controller (Item 4) (1 = lowest / 6 = highest speed). Use the mechanical spreading width controller (Item 12) to infl uence the spreading width on the left-hand side. Proceed at normal speed over the area where you want to spread the material.
- Ensure that the adjustable speed controller (Item 4) is set to position "1".
- Place the spreader on a paved surface and fill spreading material into the spreading material compartment (Item 9).
- Use the spreading quantity adjuster (Item 5) to set the level recommended for the spreading material in question.
- Use the speed controller (Item 4) and the mechanical spreading width controller (Item 12) to set the required spreading width. If you do not know whether the settings conform with the required spreading width, begin with a low speed and a small spreading width.
- Gently press and hold the On/Off switch (Item 16): the spreader wheel (Item 14) will rotate. Press more firmly on the lock-off button (Item 17) to release the slider and the On/Off switch (Item 16): the slider (Item 37) will open and the tool will begin spreading.
- After carrying out work on a small area, adjust the settings if necessary.
Note: If the slider (Item 37) of the spreader material opening becomes jammed, you can release it by pulling several times on the pushhandle (Item 19).
6.3 Continuous operation (Figure 28)
It is possible to use the device in continuous operation with the additional plug (Item 34). The cable (Item 35) must first be attached to the right long handle tube (Item 6).
- Press and hold the lock button (Item 17).
- Press the On/Off switch (Item 16), the slider
EN
opens, and the device begins to spread.
- Insert the plug (Item 34) into the hole provided (Item 36) to lock the On/Off switch (Item 16).
The lock button and On/Off switch can now be released. The device is now running in continuous operation.
To switch off continuous operation, the plug (Item 34) must be removed from the hole (Item 36).
6.4 Charging the Lithium-Ion battery (not included)
The corresponding instructions can be found in the original operating instructions for your charger.
6.5 Battery capacity indicator (Fig. 21 / item 40)
Press the battery capacity indicator switch (Item 41). The battery capacity indicator (Item 40) shows the charge status of the battery using 3 LEDs.
All 3 LEDs lit:
The battery is fully charged.
2 or 1 LED(s) lit:
The battery has an adequate remaining charge.
1 LED flashing:
The battery is empty, recharge the battery.
All LEDs flashing:
The temperature of the battery is too low. Remove the battery from the device and leave it at room temperature for a day. If the error occurs again, this means that the battery has been completely depthdischarged and is defective. Remove the battery from the device. Never use or charge a defective battery.
7. Cleaning and maintenance
HAZARD!
Always take the battery out of the equipment before starting any cleaning work.
7.1 Cleaning
- Keep all safety devices, air vents and the motor housing free of dirt and dust as far as possible. Wipe the equipment with a clean cloth or blow it down with compressed air at low pressure.
We recommend cleaning the equipment immediately each time after use.
Clean the equipment regularly with a damp cloth and some soft soap. Do not use cleaning agents or solvents; these may be aggressive to the plastic parts in the equipment. Ensure that no water can get into the interior of the equipment. The penetration of water into an electric power tool increases the risk of an electric shock.
7.2 Maintenance
There are no other parts inside the equipment which require maintenance.
8. Disposal and recycling
The equipment is supplied in packaging to prevent it from being damaged in transit. The raw materials in this packaging can be reused or recycled. The equipment and its accessories are made of various types of material, such as metal and plastic. Never place defective equipment in your household refuse. The equipment should be taken to a suitable collection center for proper disposal. If you do not know the whereabouts of such a collection point, you should ask in your local council offices.
9. Storage
Store the equipment and its accessories out of children's reach in a dark and dry place at above freezing temperature. The ideal storage temperature is between 50^ and 104^ (10^ and 40^) . Keep the electric tool in its original packaging.
EN
Transport
- Protect the machine from damage and the strong vibrations that can occur particularly when transporting in vehicles.
- Secure the machine against slipping and tipping over.
The reprinting or reproduction by any other means, in whole or in part, of documentation and papers accompanying the products is strictly subject to the express consent of Einhell Germany AG.
Subject to technical changes.
FR

18V 4,0Ah/6,0Ah PXC Plus battery Li-ion