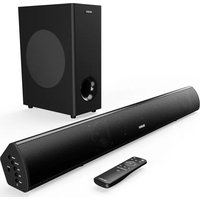
Teton Plus - Soundbar Majority - Free user manual and instructions
Find the device manual for free Teton Plus Majority in PDF.


| Product Type | Soundbar with wireless subwoofer |
| Brand | Majority |
| Model | Teton Plus |
| Soundbar dimensions (W×H×D) | 81.2 × 9.6 × 10.2 cm |
| Subwoofer dimensions (W×H×D) | 15 × 38.2 × 28 cm |
| Net weight | 5.92 kg |
| Power supply | DC 24V, 1.7A (two power adapters provided) |
| Frequency response | 30 Hz - 20 kHz |
| Signal-to-noise ratio (SNR) | 75 dB |
| Stereo separation | 65 dB |
| Bluetooth | Version 5.0 |
| Connectivity | Bluetooth, HDMI ARC, optical, RCA, AUX (3.5 mm), USB (playback) |
| Audio modes | Music, Dialogue, Movie, Flat (adjustable EQ) |
| Bass and treble adjustment | From -8 dB to +8 dB (except Movie mode) |
| Auto standby function | After 180 minutes without audio signal |
| Wall mounting | Yes, with brackets and fixings included |
| Box contents | Soundbar, subwoofer, remote control, AUX cable, RCA cable, two power adapters, manual, AAA batteries, screws and wall plugs |
| Maintenance and cleaning | Unplug before cleaning; use a dry cloth. Do not use liquid or abrasive products. |
| Safety | Unobstructed ventilation, avoid water and heat sources. Wall mounting by qualified personnel. |
| Spare parts and repairability | Repairs by qualified personnel only. Spare parts not listed; contact support. |
| Warranty | 1 year standard, extendable to 3 years after registration at www.majority.co.uk |
Frequently Asked Questions - Teton Plus Majority
User questions about Teton Plus Majority
0 question about this device. Answer the ones you know or ask your own.
Ask a new question about this device
Download the instructions for your Soundbar in PDF format for free! Find your manual Teton Plus - Majority and take your electronic device back in hand. On this page are published all the documents necessary for the use of your device. Teton Plus by Majority.
USER MANUAL Teton Plus Majority
What's In the Box? 3
Controls And Functions.... 4
Instructions Guide.... 7
Basic Operation.... 7
Mode Indicator Lights.... 8
Audio Settings....9
Wall Mounting.... 10
Product Set Up.... 10
Mains Supply.... 13
USB Input.... 14
RCA Input.... 15
HDMI ARC Input.... 16
Optical Input.... 17
Aux In Connection.... 18
Bluetooth.... 19
Troubleshooting.... 20
Specification.... 21
Warranty.... 21
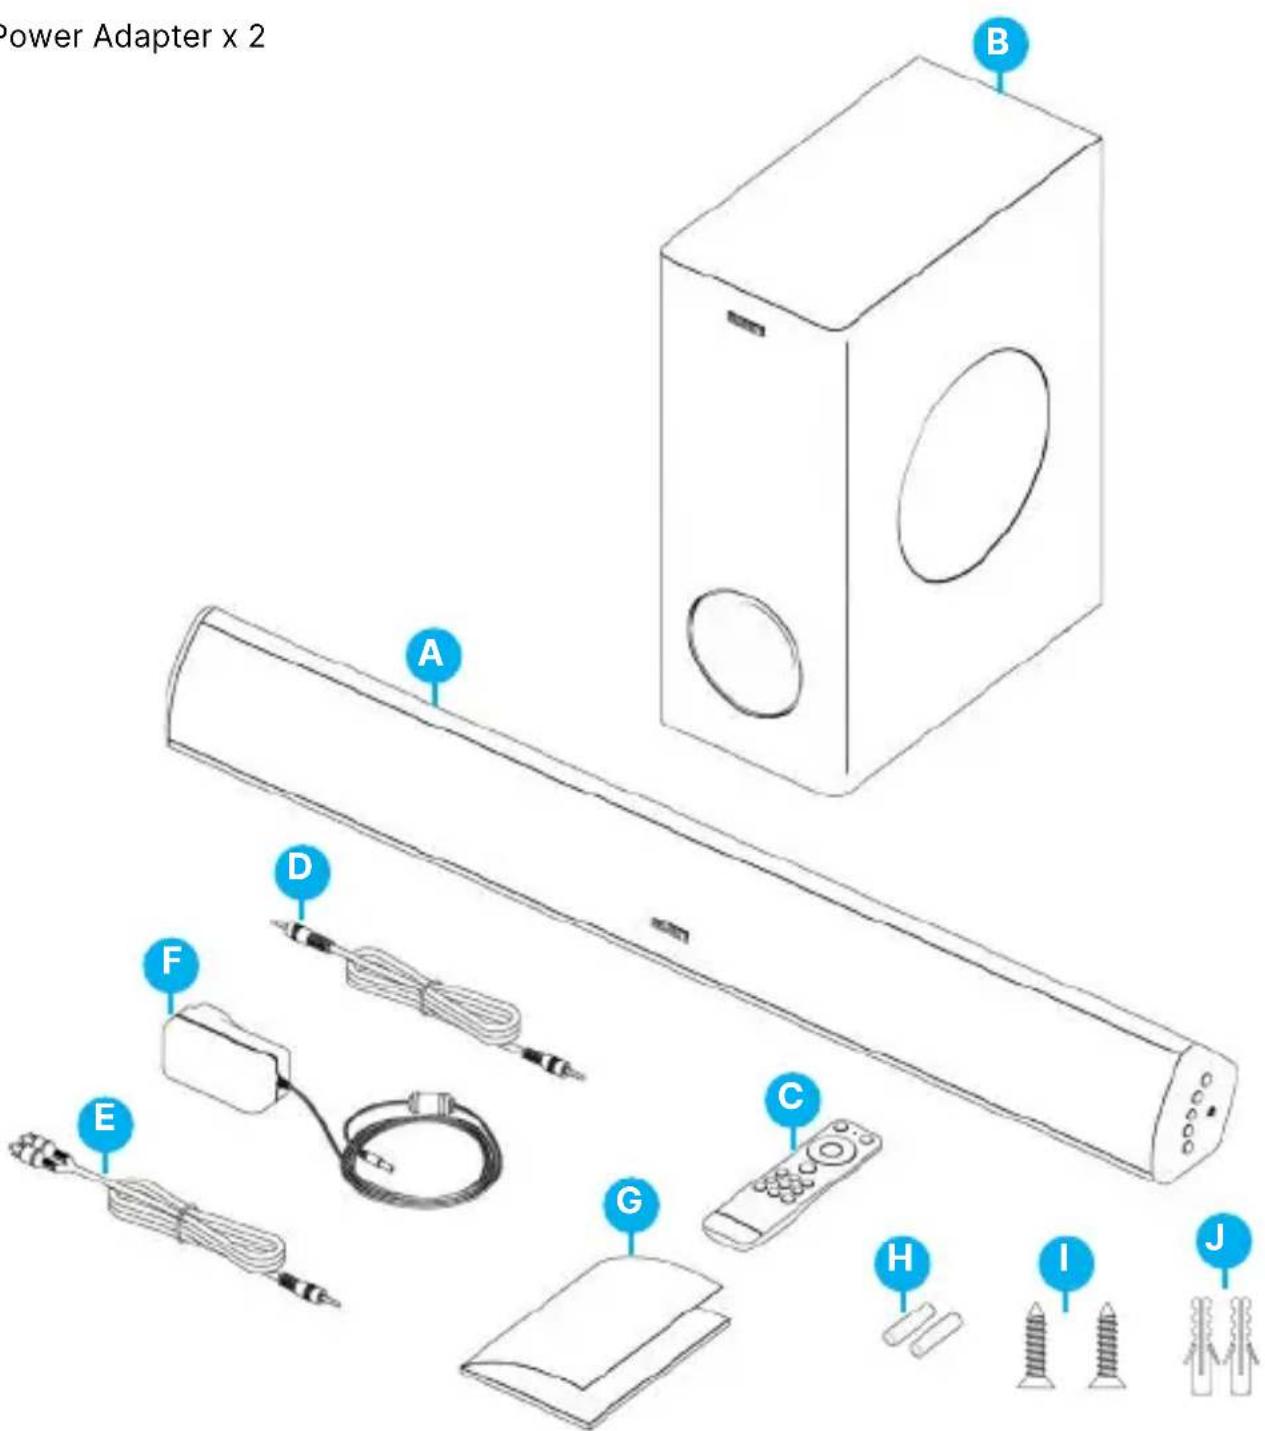
What's in the Box?
A. Majority Teton Plus Soundbar
B. Subwoofer
C. Remote Control
D. 3.3 to 3.5mm Audio Cable (AUX)
E. RCA to RCA Stereo Audio Cable
F. Power Adapter x 2
G. User Manual
H. AAA Batteries x 2 (remote)
I. Screws
J. Wall Plugs
Front View

- Speaker drivers
- Remote Control sensor
- LED Indicator Light
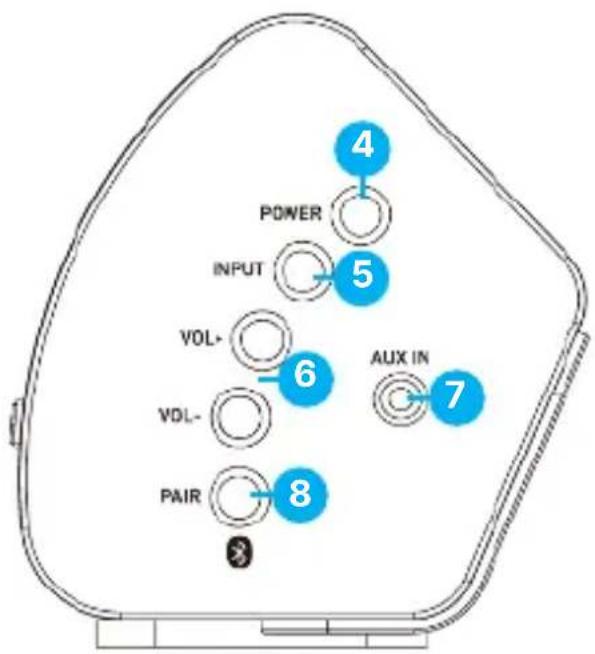
Side View
- Power Button (On/Off)
- Input Button (Change mode BT, OPTICAL, AUX, RCA, USB, ARC)
- Volume (Adjust Volume)
- 3.5mm AUX Input Port
- Bluetooth Pair Button
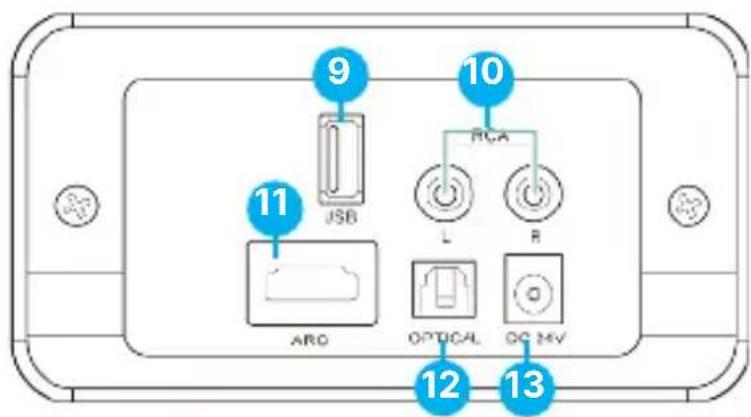
Back Panel
- USB Port (Playback-Reader)
- RCA Port
- ARC/HDMI in port
- OPTICAL port
- DC 24V socket
Subwoofer
Back panel
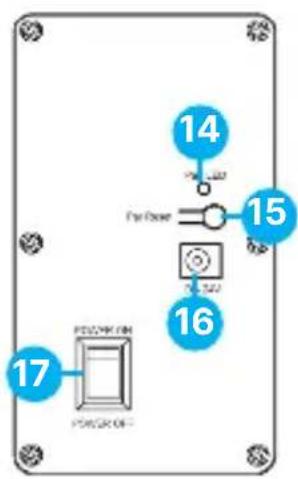
-
Pair LED Light
-
Pair Reset Button
-
DC 24V port
-
Power On/Off - Switch Button
Remote Control
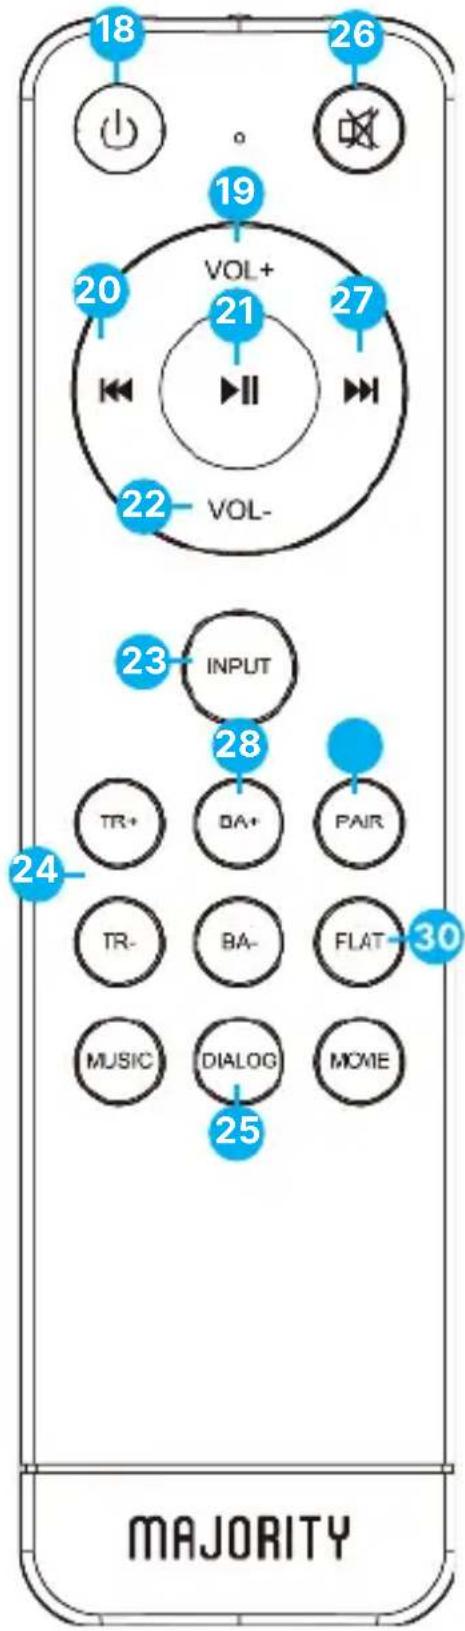
- Power On/Off
- Volume +
- Back: Use in Bluetooth and USB modes to go back a track
- Play/Pause: In Bluetooth/USB mode, press to play/pause media
- Volume -
- Input: Change Modes
- Treble increase/decrease
- Media Modes: Select Music, Dialogue or Movie EQ Mode
- Mute/Unmute
- Forward
- Bass increase/decrease
- Pair: Connect and disconnect from a Bluetooth device
- Flat: press to cancel EQ
Basic Operation
Automatic Subwoofer Pairing
The Majority Teton Plus soundbar will automatically pair to the subwoofer when both items are switched on. The 'Pair LED' on the rear of the subwoofer will flash when searching for a connection, then remain static when connected.
Important
The Pair Reset button on the rear of the subwoofer (Ref.15) should not be pressed unless you need to pair with a new subwoofer. If this button is accidentally pressed, the soundbar has a default reset that will reconnect to the existing subwoofer after 90 seconds.
Automatic Power Off Function
The Majority Teton Plus will automatically go into standby mode after 180 minutes if the connected TV is switched off, or if there isn't any audio signal.
Mode Indicator Lights
| State Indicator Lights | |
| Power Off Red | |
| AUX Mode Green | |
| USB Mode Purple | |
| RCA Mode White | |
| ARC Mode Light Blue | |
| Optical Mode Yellow | |
| Bluetooth Ready Flashing Blue | |
| Bluetooth Connected | Blue – steady colour |
Subwoofer Light Indications
| Indicator Status | |
| Flashing slowly The subwoofer is disconnected | |
| Flashing rapidly | Soundbar is wirelessly pairing with Subwoofer |
| Stops flashing and shows solid orange light | Wireless subwoofer has paired successfully |
Audio Settings
| Mode Bass/Treble Options | Db (decibels) refers to sound levels |
| Music | Manually changes BASS and TREBLE settings (between 0Db and +8Db) |
| Dialogue | BASS+ BASS- TRE+ TRE- functions are disabled |
| Movie | BASS+ BASS- TRE+ TRE- functions are disabled |
| Flat | Restores to default settings and manually changes BASS and TRE settings between -8Db and +8Db |
Wall Mounting
Safety
- Installation must be carried out by qualified personnel only. Incorrect assembly can result in severe personal injury and property damage. If you are going to install this soundbar yourself, you must have studied installations, such as electrical wiring and plumbing that may be buried inside the wall. It is installer's responsibility to verify that the wall can safely support the total load of the soundbar.
- Additional tools are required for the installation (not included).
- Do not over-tighten screws.
- Keep this user manual for future reference.
- Use an electric stud finder to check the wall type before drilling and mounting (not included).
Tools & fixings required (not included)
- Drill fitted with masonry drill bit
- Pencil
- Spirit level
- Screwdriver
- Ruler
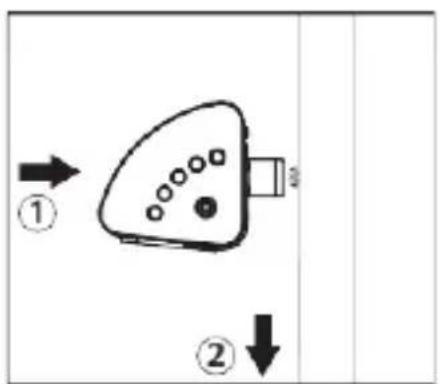
Place the soundbar in the desired position and using a spirit level, check that the soundbar is level.
Make a light pencil mark on the wall at the top edge of both fixing brackets. The mark should be positioned directly above each bracket. Note the mounting points on the soundbar (one is 160mm from the end while the other is 160mm from the other end), so you should use the soundbar as a template to get the right mounting positions.
Place the soundbar away from the work area and then mark two fixing points 7mm below the light pencil marks for the screws. These marks should be 430mm apart and level. Before drilling, use a spirit level to check that the fixing points marked are level.
Distance between the holes of two metal brackets

If fixing to a solid masonry wall, use a masonry drill bit, drill holes to a depth of approximately 30mm and insert the wall plugs. Insert the screws into the wall plugs and drive home the screws until the heads stand proud on the wall by about 1mm.
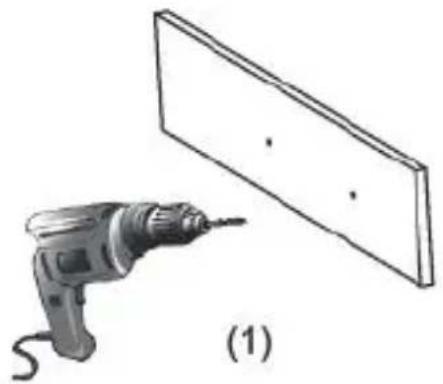
natural_image
Illustration of a power drill and a flatboard with holes, labeled (1), showing no text or symbols on the diagram itself.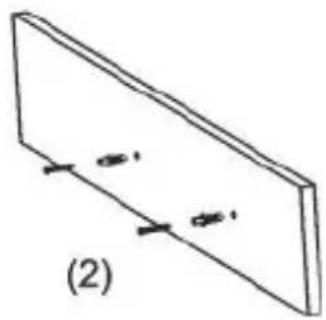
natural_image
Simple line drawing of a rectangular plate with two small oval marks and a diagonal line, labeled (2) (no text or symbols on the plate itself)If fixing to timber, follow the directions above, but only drill a small pilot hole for each screw and do not use the wall plugs provided.
If fixing to hollow plaster board walls, use a drill bit suitable for wood and replace the wall plugs with wall anchors appropriate for the application. Locate the fixing points into wall studs and cross braces where possible.
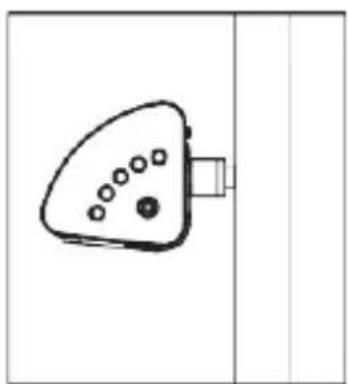
Locate the soundbar onto the screw heads and check that the screws are fully engaged into the keyhole mount before releasing your hold.
natural_image
Simple line drawing of a triangular object with circular holes and a rectangular base, no text or symbols present.Product Set Up
Tips before setting up the Majority Teton Plus
The Teton Plus subwoofer should be within 8 metres range of the soundbar in an open area. The closer they are located, the better the performance.
Do not place anything on the top of the subwoofer.
The Soundbar
The soundbar carries most of the dialogue, music, and movie sound effects.
If your TV is on a table or stand, place the soundbar directly in front and center of the TV.
The Subwoofer
The subwoofer is designed to produce powerful low bass sound effects.
The performance is directly related to its placement within the room. When setting up the Teton Plus, find the best location for maximum bass performance.
Connecting to the Mains Supply
Ensure that the power supply voltage is within the range of 100V\~240V. Any other voltage may cause damage to the unit.
Unwind the mains cable to its full length. Connect the mains plug to a wall socket. Ensure that the mains plug is fully inserted into the wall socket.
The mains plug/appliance coupler is used as the disconnect device. The disconnect device must remain readily operable.
Connect both adapters into the power port on the soundbar (Ref.13) and subwoofer (Ref.16).
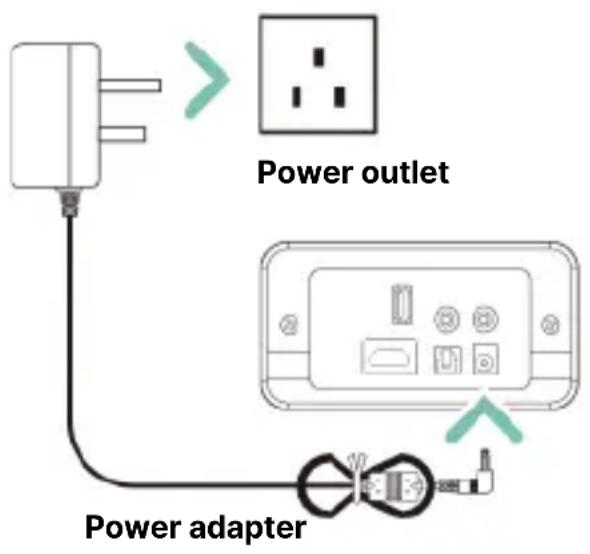
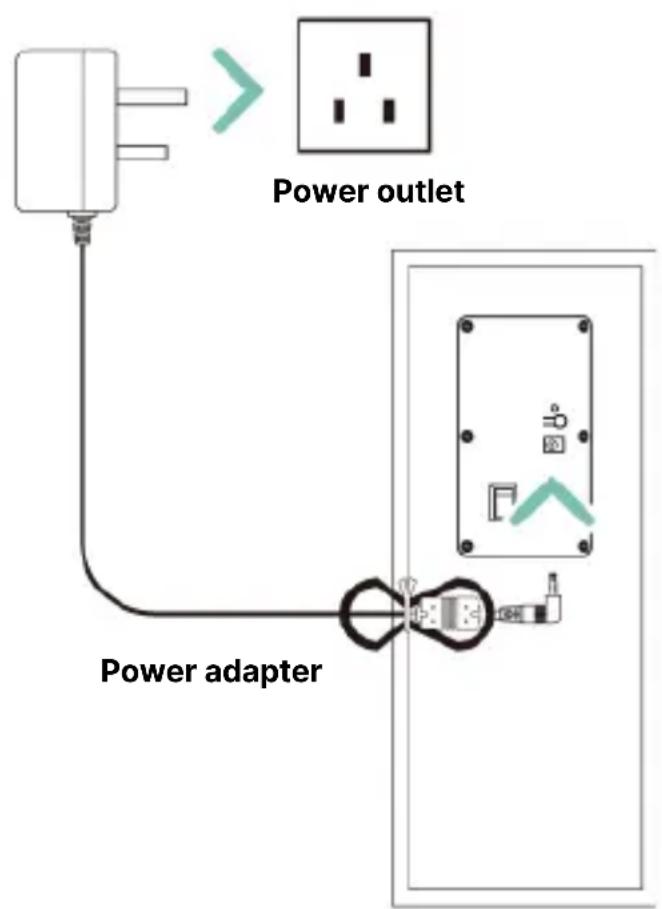
Ensure all audio cable connections of the unit are properly inserted before connecting to the mains power socket. Unplug the power cord from the outlet when the unit is not in use for an extended period of time.
Using the USB Input
Insert your USB stick into the USB port (Ref.9) on the soundbar for playback.
Press repeatedly the 'INPUT' button on the remote control (Ref.23) or press the 'INPUT' button on the soundbar (Ref.5) repeatedly to change the mode into USB. The LED light mode indicator will turn purple.
You will now be able to play audios files from the USB stick through the soundbar.
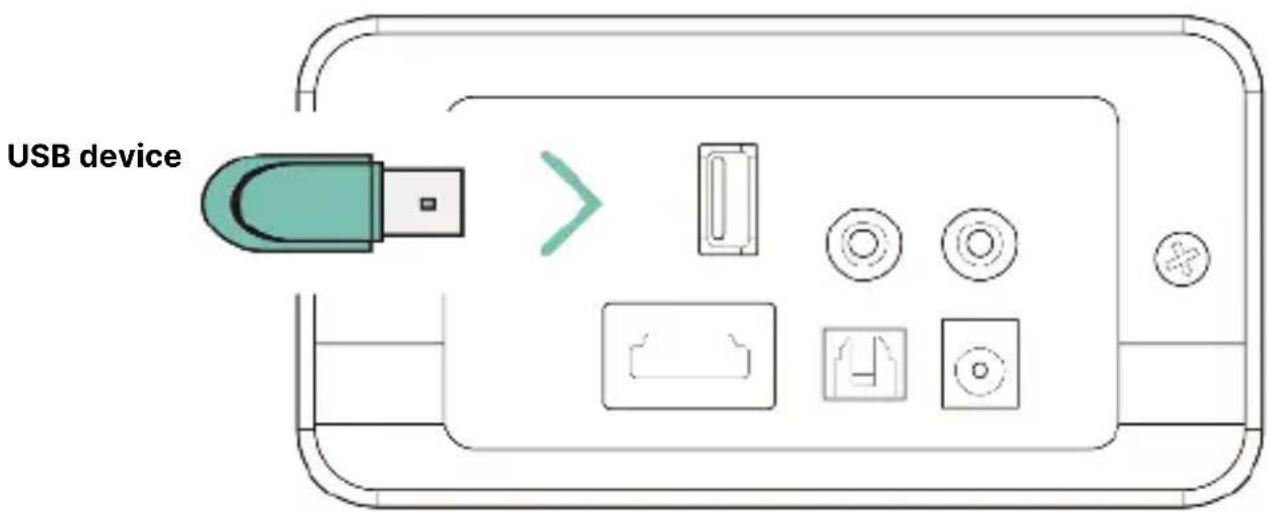
Rear panel of soundbar
Note: The USB port of the Teton Plus cannot be used as a connection port as this is only for playback.
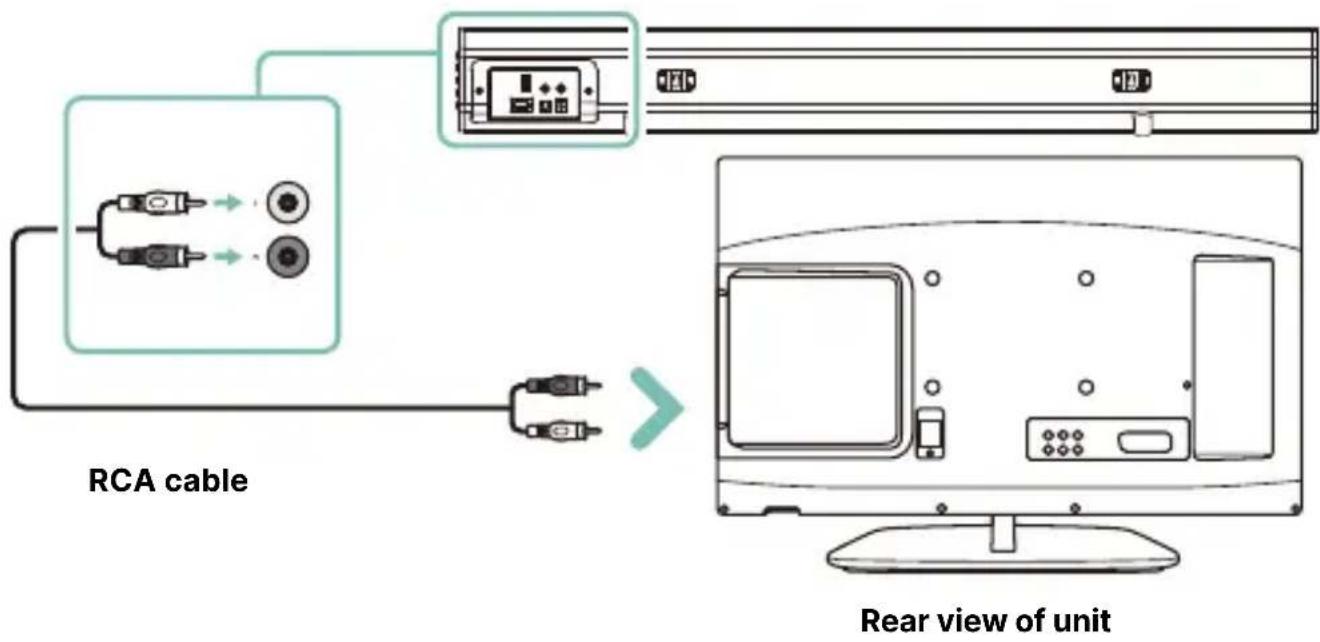
Using the RCA Input
Use the RCA Stereo Audio Cable to connect the TV's stereo RCA(L/R) audio output socket to the RCA(L/R) sockets on the unit (Ref.10).
Press the 'INPUT' button repeatedly on the remote control (Ref.23) or press the 'INPUT' button on the soundbar (Ref.5) repeatedly to change the soundbar mode into the RCA MODE. The LED light mode indicator will turn white.
Once connected, check your TV audio settings, and set these to 'PCM' or 'Analogue'.
Note: If you are not receiving a picture or encountering interference, or have no sound, please ensure that the RCA cable is inserted into the RCA 'output' ports on your TV set. This will ensure that the sound is being exported correctly. If your TV does not have output RCA ports, please use an alternative cable connection method.
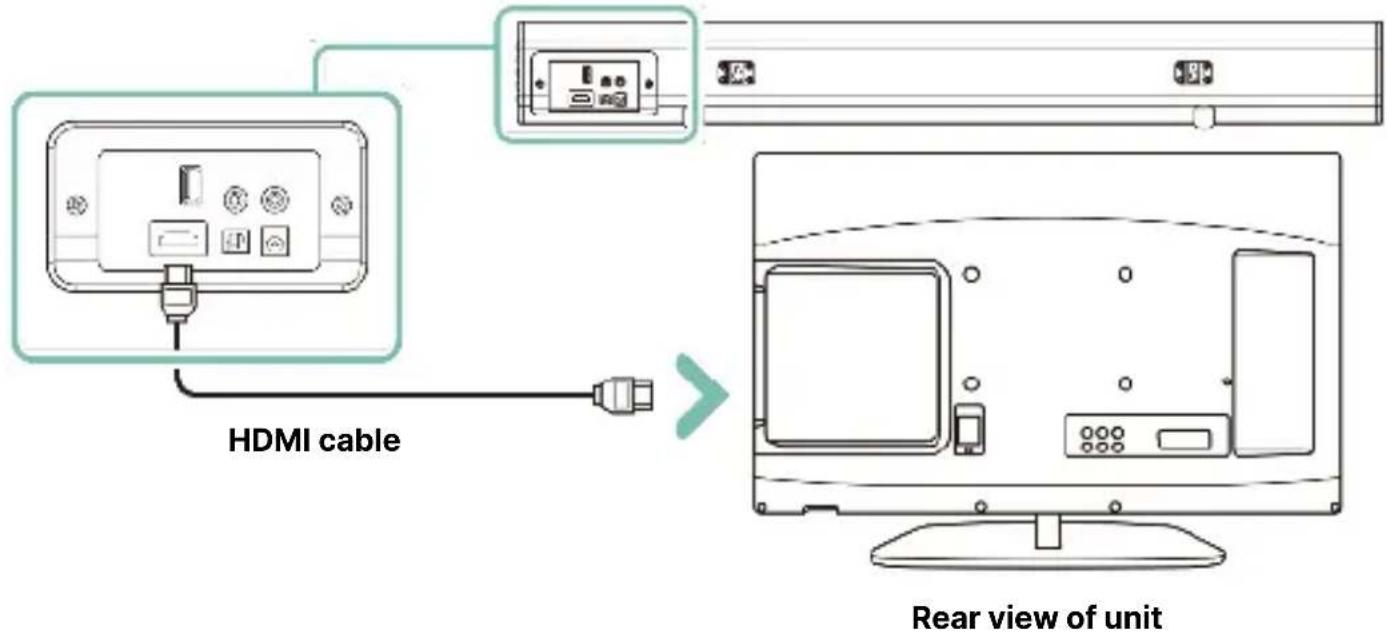
Using the HDMI ARC Input
Insert the HDMI cable (not included) into the HDMI ARC port on the back of the soundbar (Ref.11) and the other end into the HDMI (ARC) port on the TV.
Press the 'INPUT' button repeatedly on the remote control (Ref.23) or press the 'INPUT' button on the soundbar (Ref.5) repeatedly to change the soundbar mode into the ARC MODE. The LED light mode indicator will turn light blue.
Note: In the HDMI ARC mode, if your speakers have no audio output and the indicator light is flashing quickly, use your source device (such as a TV, CD player, or cable/satellite receiver) audio settings. The audio output mode is set to PCM, or turn off the sound source output.
The transmission of digital audio signals between devices doesn't work for every TV brand, because some branded TVs do not offer cross-brand compatibility. If this is the case, try a different type of cable connection.
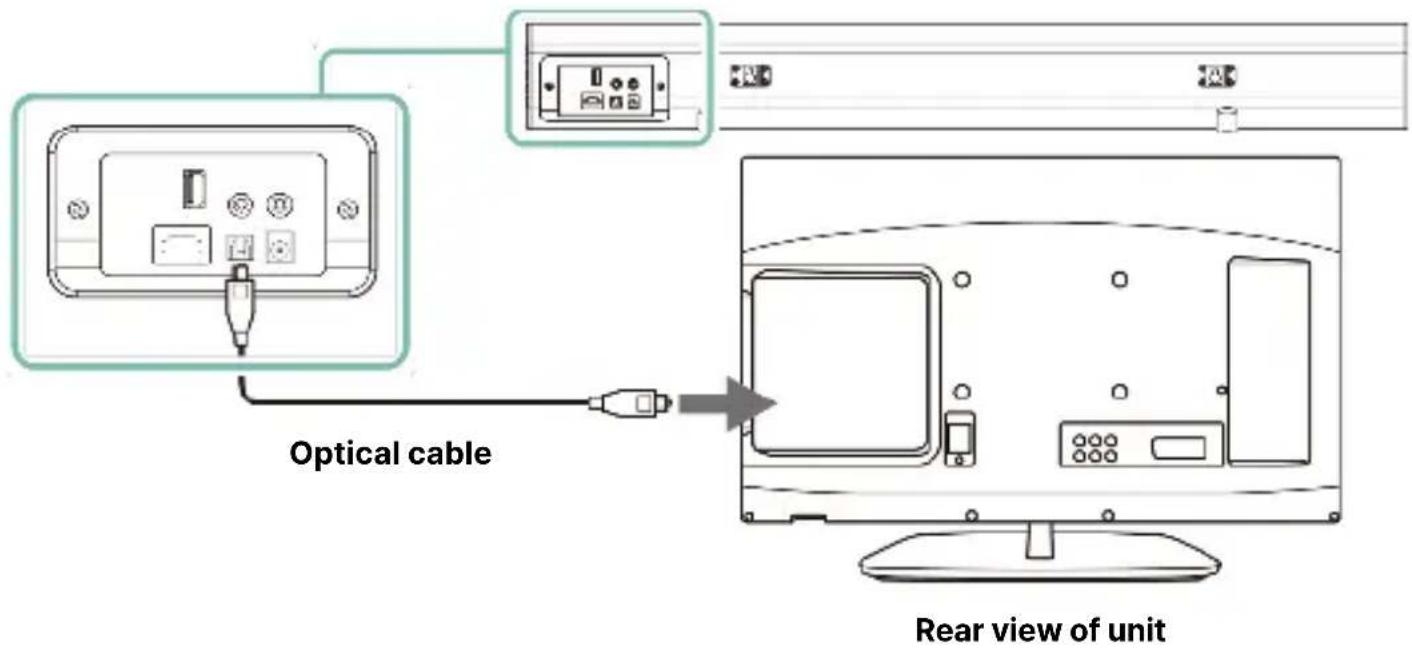
Using the Optical Input
Insert a Digital Optical Audio cable (not included) into the soundbar optical in port (Ref.12) and the other end to your TV/other device optical audio output port.
Press the 'INPUT' button on the remote control repeatedly (Ref.23) to switch to Optical Mode or press the 'INPUT' button (Ref.5) repeatedly on the soundbar to select Optical mode. The LED light mode indicator will turn yellow.
Using the native controls on your TV/ connected device, make sure the audio settings are set to PCM or Optical Audio out.
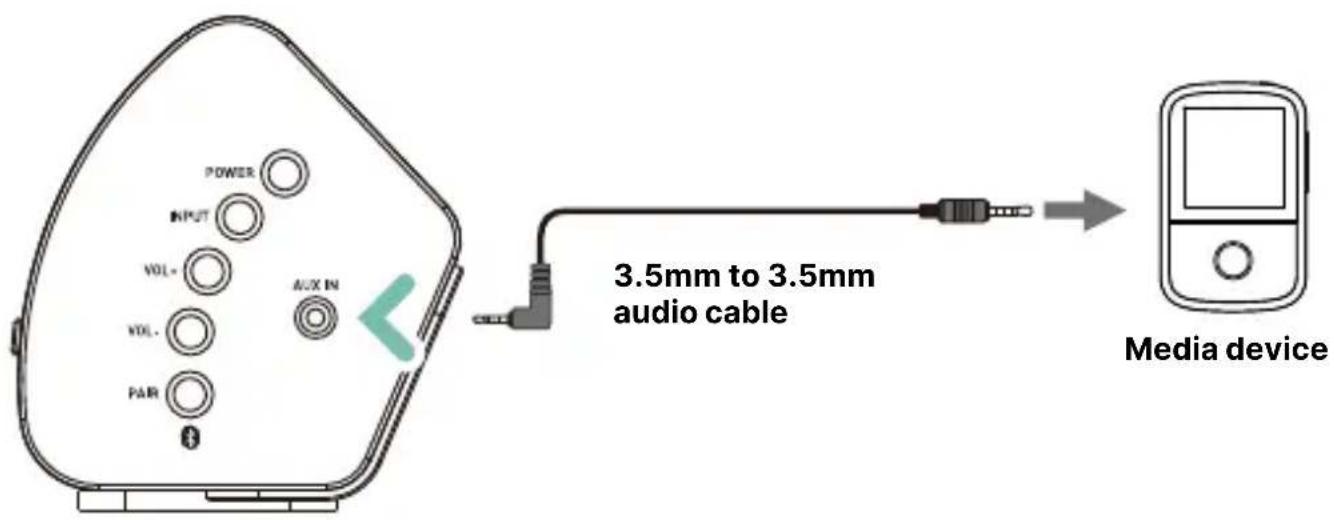
Using the AUX In Connection
Insert one end of the 3.5mm audio input cable (included) into the 'Line in' port on the soundbar (Ref.7) and the other end into your device AUX output port or headphone jack port.
Press the 'INPUT' button repeatedly on the soundbar (Ref.5) or press 'INPUT' on the remote control (Ref.23) repeatedly until 'LINE in' mode is selected. The Led light mode indicator will turn green.
Audio played through the connected device, for example from an MP3 player, will now be heard through the speakers.
Bluetooth
Pairing a Bluetooth Device for the First Time
Pairing a Bluetooth device such as a TV, a PC, phone or tablet or other similar device to play audio from via Majority Teton Plus soundbar.
Press the 'INPUT' button repeatedly on the remote control (Ref.23) or press the 'INPUT' button on the soundbar (Ref.5) repeatedly until Bluetooth mode is selected. The LED light mode indicator will flash blue, indicating that the Teton Plus is now searching for a device to pair via Bluetooth.
From your Bluetooth device, select the 'Majority Teton Plus' when prompted to choose a Bluetooth device.
If a password is required, enter '0000'. If you encounter issues at this stage, please refer to the user manual for your Bluetooth device for instructions on pairing and connecting Bluetooth devices.
When successfully connected, a beep will be heard from the soundbar and a solid blue LED light will be displayed. After initial pairing, the unit will stay paired unless manually unpaired by the user, or until the device is reset.
If your device should become unpaired or you find it is unable to connect, repeat the above steps.
Note: Majority Teton Plus soundbar is not compatible with Bluetooth earbuds.
| Observation Potential Cause/Solution | |
| No power/function | Check that the power is switched on.Ensure the power adaptors are properly connected to the power outlet. |
| No sound | Check whether the unit is set to MUTE.Check that the cables are properly installed. If cables are properly installed, please try connecting to your TV using an alternative cable.Check that the unit is switched on and in correct mode. |
| No sound in Bluetooth mode | Check that your Bluetooth device is paired. Check that you have pressed the PAIR button before pairing.Check whether external device requires password:'0000'. |
| Function disturbance | Switch off and unplug the unit. Leave for 2 minutes and switch on again.If a particular mode is causing problems, please try an alternative connection to your TV such as Optical or Bluetooth. |
| Remote control function issues | Check whether the battery needs replacing, and replace if necessary.Check whether there are obstacles blocking the remote sensor. |
| No sound when connected and switched to OPTICAL IN mode | Check and ensure the audio setting of the input source (e.g. TV, games console, DVD player, etc) is set to PCM Mode while using digital connection (such as Optical, HDMI and COAXIAL). |
Support
If you require further assistance with your Majority product, please contact our support team on the Majority website: www.majority.co.uk/support
Specification
| Power Supply DC 24V 1.7A | |
| Frequency Response 30Hz - 20KHz | |
| SNR 75dB | |
| Separation 65dB | |
| Bluetooth V5.0 | |
| Soundbar Dimensions (WxHxD) | 81.2 × 9.6 × 10.2cm |
| Subwoofer Dimensions (WxHxD) | 15 × 38.2 × 28cm |
| Net Weight 5.92kg |
Warranty
All products come with a standard 12 month warranty. All items must be registered on www.majority.co.uk for the warranty to be valid. Once on the web page, use the menu to find 'Register Your Product'. You will also be given the chance to extend your warranty for an additional 24 months, free of charge.

natural_image
Solid dark blue background with no visible text, symbols, or objects.Teton Plus Soundbar
Benutzerhandbuch
MAJORITY
- LED-Anzeigeleuchte
Seitenansicht
natural_image
Illustration of a power tool and a blank board with holes, labeled (1) (no text or symbols on the diagram itself)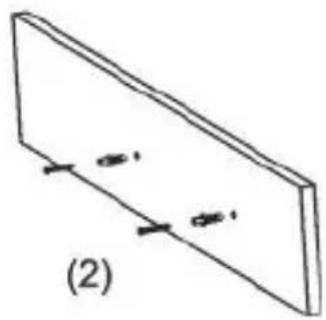
natural_image
Simple line drawing of a rectangular block with two small circular marks and a diagonal line, labeled (2) at the bottom (no text or symbols on the diagram itself)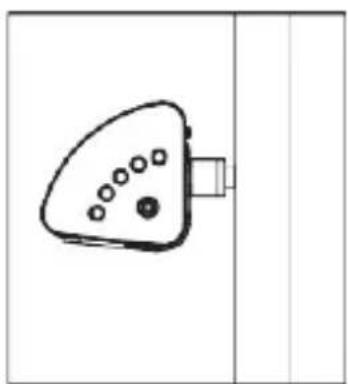
natural_image
Simple line drawing of a triangular object with circular holes and a rectangular base, connected to a vertical line (no text or symbols)Produktaufstellung
www.majority.co.uk/support
Spezifikation
Vue latérale
natural_image
Illustration of a power drill and a flatboard with holes, labeled (1), showing no text or symbols on the diagram itself.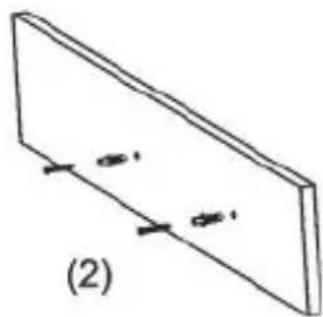
natural_image
Simple line drawing of a rectangular block with two small oval shapes on its surface, labeled (2) at bottom (no text or symbols on the diagram itself)
natural_image
Simple line drawing of a triangular device with circular holes and a rectangular base, no text or symbols present.Pannello posteriore
natural_image
Pure diagram of a control panel with no text, numbers, or symbolsnatural_image
Illustration of a power drill and a flatboard with holes, labeled (1), showing no text or symbols on the diagram itself.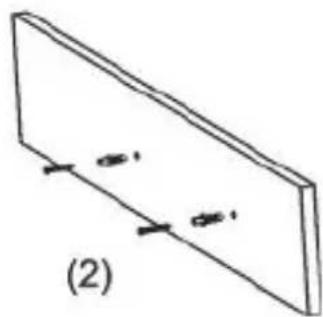
natural_image
Simple 3D diagram of a rectangular block with two small circular features and directional arrows, labeled (2) (no text or symbols on the object itself)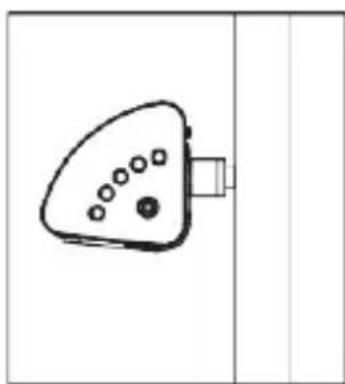
natural_image
Simple line drawing of a triangular device with circular holes and a rectangular base, no text or symbols present.Vista Lateral
natural_image
Illustration of a power drill and a flatboard with screw holes (no text or symbols)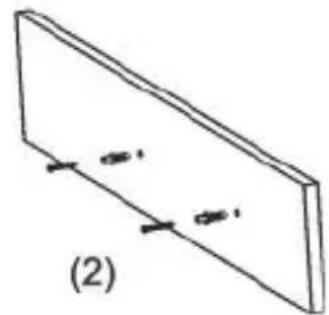
natural_image
Simple line drawing of a rectangular block with two small oval shapes on its side, labeled (2) at bottom (no text or symbols on the diagram itself)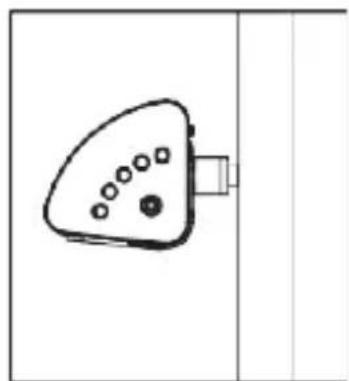
natural_image
Simple line drawing of a triangular object with circular holes and a rectangular base, no text or symbols present.EN Safety and Usage Guidelines (All where applicable)
General Safety Information - Read and Retain: Review all safety and operating instructions before use; keep them for future reference. Follow Instructions: Adhere strictly to all safety and operational guidelines. Water Exposure: Keep the device away from water; avoid placing liquids near it. Ventilation: Ensure ventilation openings are unobstructed to prevent overheating. Heat Sources: Keep the device away from heat-emitting appliances. Wall Mounting - Installation Safety: Follow the manufacturer's instructions and use approved mounting kits only. Avoid drilling into areas with cables, gas, or water lines. Use proper tools and safety apparatus. Regular Maintenance: Inspect regularly for wear or damage, especially if wall-mounted. Relocation: Detach from the wall mount before moving. Child Safety: Keep out of children's reach and ensure heavy items are securely mounted. Seismic Precautions: Use specialized mounts in earthquake-prone areas. Electrical Safety - Power Source: Use the specified power source; consult an electrician if unsure. Cable Management: Protect the power cord from damage. Power Disconnection: Keep the main plug accessible; unplug during storms or long periods of non-use. Battery Safety - Charging: Use the manufacturer's charger; avoid extreme conditions. Heat Exposure: Keep batteries away from heat to prevent explosion or leakage. Battery Condition: Discontinue use if the battery is damaged; dispose of it properly. Replacement: Only use recommended batteries; incorrect types can cause hazards. External Batteries: Use only specified types, observing correct polarity. Battery Removal: Remove batteries if not used for an extended period. Disposal: Follow local regulations for battery disposal; do not incinerate. Connectivity Safety - Cable Connections: Power off devices before connecting or disconnecting cables. Bluetooth Pairing: Ensure a secure connection; avoid interference from other devices. Volume Control: Keep volume moderate to prevent hearing damage. Connectivity and Data Security - Wireless Security: Review privacy policies and secure your network. Software Updates: Keep software updated for security and performance. Children's Safety Warnings - Product Use: Intended for adults; keep away from children. Battery Warning: Keep batteries and items containing batteries out of children's reach. Volume Control: Maintain a safe volume level to protect children's hearing. Fire Hazard - Flammable Materials: Do not place open flames near the product. Overheating: Avoid covering the product to prevent overheating and fire risks. Disposal and Recycling - Product Disposal: Dispose of at a recycling centre according to local laws. Environmental Compliance: Follow regulations for battery and electronic waste disposal. User Maintenance - Cleaning: Unplug before cleaning; use a dry cloth only. Servicing: Only qualified personnel should perform repairs. Data Protection: Reset to factory settings before returning or disposing of the product. Disclaimer: Failure to follow these instructions may result in injury, death, or property damage. The manufacturer is not liable for damage caused by improper use.
Declaration of Conformity:
We, Izilla Ltd, Newton House, 2 Pioneer Court, Histon, Cambridge, CB24 9PT declare under our sole responsibility that the product:
Product Name: Teton Plus Soundbar Model: 1000002898/1000002899
Brand Name: Majority
To which this declaration referred is in conformity to the following harmonized standards or normative documents (CE & Rohs 2.0);
EN 55035:2017, EN 55032:2015, EN61000-3-2:2014, EN61000-3-3:2013, EEN62368-1:2004+A11:2017, ETSI EN 301 489-1 V2.2.3(2019-11), ETSI EN 301 489-17, V3.2.2(2019-12), ETSI EN 300 328 V2.2.2 (2019-07), EN 62479: 2010, IEC 62321-3-1:2013, IEC 62321-4:2013, IEC 62321-5:2013, IEC 62321-6:2015, IEC 62321-7-1:2015, IEC 62321-7-2:2017, IEC 62321-8:2017, (EC)NO 1275/2008, EN50564:2011, (EC)NO 801/2013.
Complying with the requirements or provisions of Council Directives which relate to:
EMC Directive 2014/30/EU, RED Directive 2014/53/EU, LVD Directive 2014/35/EU, Directive (2011/65/EU) and its amendment directives 2015/863/EU (RoHS 2.0) of the, European parliament, ERP Directive 2009/125/EC.
All essential test suites have been carried out.
Point of Contact: Eddie Latham | Founder
Signed: E.Latham Date of Issue: January 2024 Place of Issue: Cambridge, UK
Importer's Addresses:
UK: iZilla Ltd, Newton House, 2 Pioneer Court, Histon, Cambridge, CB249PT
Email: techsupport@majority.co.uk
EU RP: AR Experts, Po Box 5047, 3620 AA Breukelen, The Netherlands
Email: info@ar-experts.eu
US: iZilla Ltd C/O A.N.Deringer Inc, 19520 Wilmington Ave, Rancho Dominguez, CA, 90220
Email: techsupport@majority.co.uk

ATTENTION
RISK OF ELECTRIC SHOCK DO NOT OPEN


CAUTION
RISQUE D'ELECTROCUTION NE PAS OUVRIR


IMPORTANT: Please read all instructions carefully before use and keep for future reference
MAJORITY
www.majority.co.uk



- What's in the Box?
- Front View
- Side View
- Back Panel
- Subwoofer
- Basic Operation
- Automatic Subwoofer Pairing
- Important
- Automatic Power Off Function
- Wall Mounting
- Safety
- Tools & fixings required (not included)
- Product Set Up
- Tips before setting up the Majority Teton Plus
- The Soundbar
- The Subwoofer
- Connecting to the Mains Supply
- Using the USB Input
- Using the RCA Input
- Using the HDMI ARC Input
- Using the Optical Input
- Using the AUX In Connection
- Bluetooth
- Pairing a Bluetooth Device for the First Time
- Support
- Warranty
- Teton Plus Soundbar
- Seitenansicht
- Produktaufstellung
- Vue latérale
- Pannello posteriore
- Vista Lateral
- EN Safety and Usage Guidelines (All where applicable)
- Declaration of Conformity:
- To which this declaration referred is in conformity to the following harmonized standards or normative documents (CE & Rohs 2.0);
- Complying with the requirements or provisions of Council Directives which relate to:
- Importer's Addresses:
- MAJORITY
Brand : Majority
Model : Teton Plus
Category : Soundbar