
SOLIX Solarbank E1600 - Power bank Anker - Free user manual and instructions
Find the device manual for free SOLIX Solarbank E1600 Anker in PDF.

| Product type | Solar power bank |
| Brand | Anker |
| Model | SOLIX Solarbank E1600 |
| Battery capacity | 1600 Wh |
| Battery type | LiFePO4 (Lithium Iron Phosphate) |
| Dimensions (L × W × H) | 420 × 232 × 240 mm |
| Weight | 20 kg |
| Protection rating | IP65 (dust tight and protected against water jets) |
| Connectivity | Bluetooth 4.0, Wi-Fi 2.4 GHz |
| Input ports (PV) | MC4 × 2 (solar input) |
| Output ports (PV) | MC4 × 1 (output to microinverter) |
| Maximum input power | 800 W (30 A max, 11-60 V DC) |
| Rated output power | 800 W (30 A max, 11-60 V DC) |
| Charging temperature | 0 °C to 55 °C |
| Discharging temperature | -20 °C to 55 °C |
| Warranty | 10 years |
| Key features | Solar energy storage, cascade possible (up to 2 units for 3200 Wh), control via Anker app, energy scheduling |
| Maintenance and cleaning | Clean with a cotton cloth and water. Store on a flat surface. For long-term storage, charge/discharge every 3 months (20% to 80%) |
| Safety | Do not disassemble, do not expose to fire or temperatures >130 °C, do not immerse, use in a ventilated area |
| Spare parts and repairability | Spare parts available via Anker after-sales service. Repairs by a qualified technician only |
| General information | Heavy item (20 kg), do not use on board an aircraft. Compliant with EU directives 2014/53 and 2011/65. |
Frequently Asked Questions - SOLIX Solarbank E1600 Anker
User questions about SOLIX Solarbank E1600 Anker
0 question about this device. Answer the ones you know or ask your own.
Ask a new question about this device
Download the instructions for your Power bank in PDF format for free! Find your manual SOLIX Solarbank E1600 - Anker and take your electronic device back in hand. On this page are published all the documents necessary for the use of your device. SOLIX Solarbank E1600 by Anker.
USER MANUAL SOLIX Solarbank E1600 Anker
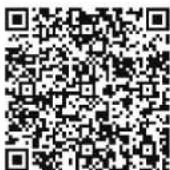
For tutorial videos, FAQs, manuals, and more information, please visit:
https://support.anker.com
Or scan the QR code below:


@anker_official @anker_jp

@AnkerDeutschland @AnkerJapan @Anker

@AnkerOfficial @Anker_JP
ANKER SOLIX

PAP 22
Raccolta Carta
Product Number: A17C0 51005004073 V01

Anker SOLIX Solarbank E1600
USER MANUAL
bar
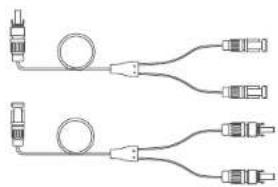
| Language | Value | |---|---| | English | 01 | | Deutsch | 11 | | Español | 22 | | Français | 32 | | Italiano | 42 | | Nederlands | 52 |What's in the Box
Anker SOLIX Solarbank E1600
natural_image
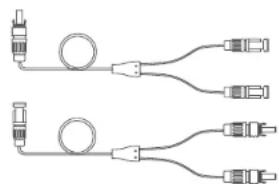
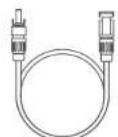
Pure electrical circuit lines without any symbolsMC4 Y Output Cable ×2
Solar Panel Extension Cable ×4

Wrench for Removing MC4
Connectors

User Manual
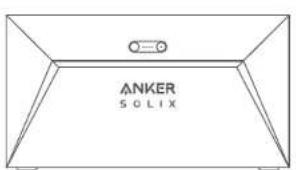
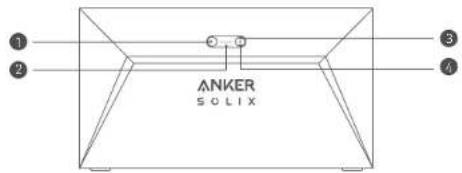
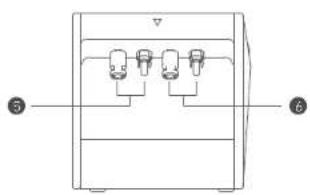
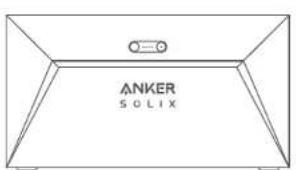
Overview
Product Overview
natural_image
Pure technical diagram of a mechanical or electrical component with no text, numbers, or symbols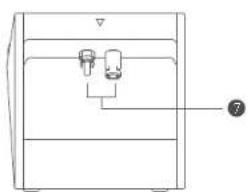
natural_image
Simple line drawing of a container with two ports and a label pointing to the bottom-right corner (no text or symbols present)| 1 Power button Power status LED | 2 |
| 3 IoT button IoT status LED | 4 |
| 5 MC4 ports for PV input 1 MC4 ports for PV | 6 at 2 |
| 7 MC4 ports for PV output |
Button Controls
| Button Action Function | ||
 | Press for 2 seconds. Turn Solarbank on | |
| Press for 2 seconds. Turn Solarbank off | ||
| Press once when powered on. Check current battery level. | ||
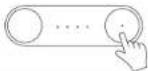 | Press once. Enable Internet connection | |
| Press for 2 seconds. Disable Internet connection | ||
| Press for 7 seconds. Reset Bluetooth and Wi-Fi | ||
 | Simultaneously press for at least 15 seconds | Reset Solarbank |
LED Guide
| LED Indication Status | ||
| Breathing white Being charged | ||
| Steady white Current battery level | ||
| Flashing green | Disconnected to the Internet | |
| Steady green | Connected to the Internet | |
| Light off | Connection disabled | |
| Flashing red | Malfunction warning |
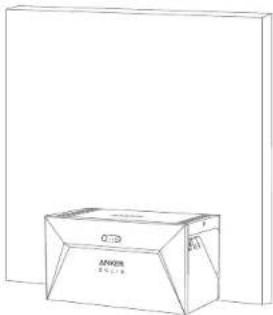
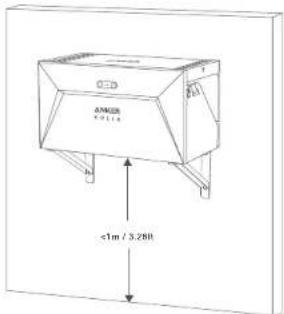
Installing Your Solarbank
Option A: Position your Solarbank on a hard, level floor
natural_image
Line drawing of a 3D box with no text or symbolsOption B: Mount your Solarbank onto a solid concrete wall using additional mount brackets.
* Please scan the QR code to buy mount brackets.
Connecting Cables
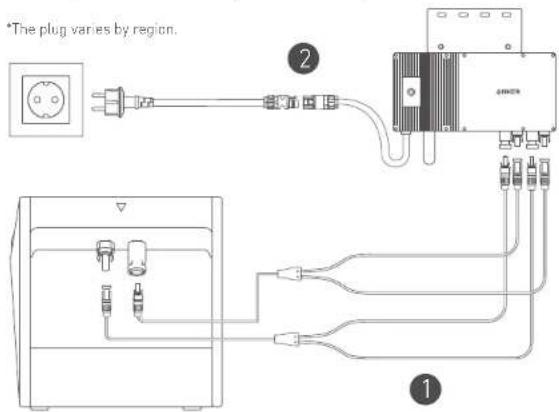
Single Solarbank
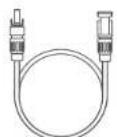
- Connect Solarbank to the micro inverter using the included MC4 Y output cables.
- Connect the micro inverter to a home outlet using the original cable.
- Connect the solar panels to Solarbank using the included solar panel extension cables.
flowchart
graph TD
    A["Device 1"] --> B["Component 1"]
    C["Device 2"] --> D["Component 2"]
    E["Device 3"] --> F["Component 3"]
    G["Device 4"] --> H["Component 4"]
    I["Device 5"] --> J["Component 5"]
    K["Device 6"] --> L["Component 6"]
    M["Device 7"] --> N["Component 7"]
    O["Device 8"] --> P["Component 8"]
    Q["Device 9"] --> R["Component 9"]
    S["Device 10"] --> T["Component 10"]
    U["Device 11"] --> V["Component 11"]
    W["Device 12"] --> X["Component 12"]
    Y["Device 13"] --> Z["Component 13"]
    AA["Device 14"] --> AB["Component 14"]
    AC["Device 15"] --> AD["Component 15"]
    AE["Device 16"] --> AF["Component 16"]
    AG["Device 17"] --> AH["Component 17"]
    AI["Device 18"] --> AJ["Component 18"]
    AK["Device 19"] --> AL["Component 19"]
    AM["Device 20"] --> AN["Component 20"]
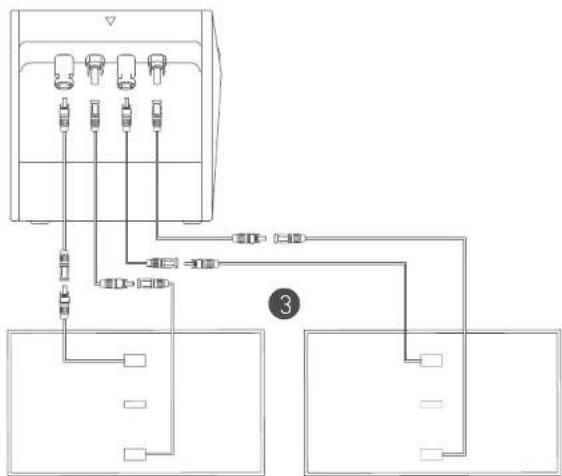
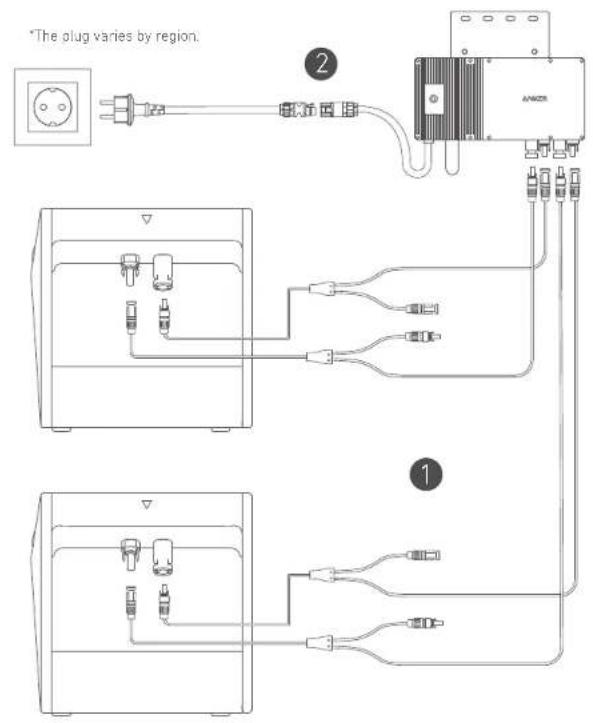
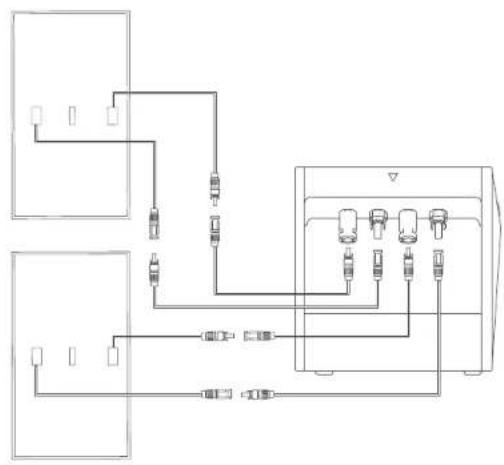
Cascaded Solarbanks
Only two Solarbanks can be cascaded to double the capacity to 3,200 Wh.
- Connect each Solarbank to the micro inverter using the included MC4 Y output cables.
- Connect the micro inverter to a home outlet using the original cable.
- Connect solar panels to Solarbanks using the included solar panel extension cables.
flowchart
graph TD
    A["Device 1"] --> B["Switch"]
    C["Device 2"] --> D["Switch"]
    E["Device 3"] --> F["Switch"]
    G["Device 4"] --> H["Switch"]
    I["Device 5"] --> J["Switch"]
    K["Device 6"] --> L["Switch"]
    M["Device 7"] --> N["Switch"]
    O["Device 8"] --> P["Switch"]
    Q["Device 9"] --> R["Switch"]
    S["Device 10"] --> T["Switch"]
    U["Device 11"] --> V["Switch"]
    W["Device 12"] --> X["Switch"]
    Y["Device 13"] --> Z["Switch"]
    AA["Device 14"] --> AB["Switch"]
    AC["Device 15"] --> AD["Switch"]
    AE["Device 16"] --> AF["Switch"]
    AG["Device 17"] --> AH["Switch"]
    AI["Device 18"] --> AJ["Switch"]
    AK["Device 19"] --> AL["Switch"]
    AM["Device 20"] --> AN["Switch"]

flowchart
graph TD
    A["Component 1"] --> B["Switch"]
    C["Component 2"] --> D["Relays"]
    E["Component 3"] --> F["Device 1"]
    G["Component 4"] --> H["Device 2"]
    I["Component 5"] --> J["Device 3"]
    K["Component 6"] --> L["Device 4"]
    M["Component 7"] --> N["Device 5"]
    O["Component 8"] --> P["Device 6"]
    Q["Component 9"] --> R["Device 5"]
    S["Component 10"] --> T["Device 4"]
    U["Component 11"] --> V["Device 5"]
    W["Component 12"] --> X["Device 4"]
    Y["Component 13"] --> Z["Device 5"]
    AA["Component 14"] --> AB["Device 4"]
    AC["Component 15"] --> AD["Device 5"]
    AE["Component 16"] --> AF["Device 4"]
    AG["Component 17"] --> AH["Device 5"]
    AI["Component 18"] --> AJ["Device 4"]
    AK["Component 19"] --> AL["Device 5"]
    AM["Component 20"] --> AN["Device 4"]

Before connecting cables, ensure that the micro inverter, solar panels, and the home grid are connected, and Solarbanks are turned off.
Using Your Solarbank
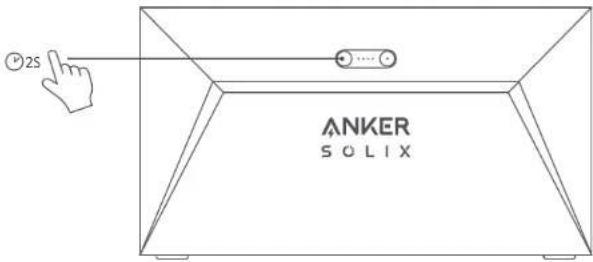
Power On
Press the power button for 2 seconds to turn on your Solarbank.
When powered on, the power status LED will flash white and IoT status LED will flash green simultaneously three times.
Anker App for Smart Control
Download the Anker app to get full functionality of your Solarbank.
- Download the Anker app from the App Store (iOS devices) or Google Play (Android devices), or by scanning the QR code. After installing the app, sign up for an account.

- Follow the on-screen instructions to complete the setup.
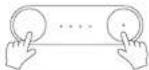
- Connect to the Internet: To remotely interact with your home system, connect your Solarbank to the Internet via Wi-Fi 2.4GHz or Bluetooth 4.0 network.
- Establish a home system: Create a home system or join an existing one, and you can monitor energy flow and make an energy plan for your home.
- Transfer energy: Customize your energy usage and storage preferences by period.
- Check energy data: Get insight into your system's energy generation, usage, and storage with energy graphs.
Storage and Maintenance
For optimal performance, follow the instructions below to store and maintain your Solarbank regularly.
- Keep the product on a flat surface when using, charging, and storing.
- Use a cotton cloth and water to clean. Do not use steel wool or other hard materials for cleaning.
- For long-term storage, charge and discharge Solarbank once every 3 months (discharge Solarbank to 20% , then recharge it to 80% ).
FAQ
Q1: Can Solarbank be charged and discharged at the same time?
No. Solarbank uses the same port for input and output connections.
Q2: Can Solarbank be charged with solar panels from a different brand?
Yes, please use solar panels that meet the following specifications for charging.
It is recommended that the total PV Voc (open circuit voltage) be between 30-55V.
PV Isc (short circuit current): 36A max Input voltage: 60VDC max
Q3: How can I prolong the lifespan or better maintain my Solarbank that is mounted on the floor?
If your balcony is often flooded, we recommend raising your Solarbank. This will prevent malfunctions due to prolonged soaking.
Specifications
Specifications are subject to change without notice.
*Considering the power and voltage fluctuation of the solar panels, and to match the operating voltage of the micro inverter, it is recommended that the total PV Voc open circuit voltage be between 30-55V.
| Capacity 1600Wh | |
| Battery type LiFePO4 | |
| Wireless type Bluetooth, 2.4GHz W-F | |
| Input port MC4 | |
| Input power (charging) 800W max | |
| Input current 30A max (15A ×2) | |
| *Voltage range 11-60VDC | |
| Output port MC4 | |
| Rated output power (discharging) 800W max | |
| Output current 30A max | |
| *Nominal voltage range | 11-60VDC |
| Charging temperature | 0-55°C |
| Discharging temperature | -20-55°C |
| Dimensions | 420×232×240mm |
| Weight | 20kg |
| Waterproof rating IP65 | |
| Warranty 10 years | |
Safety Information
IMPORTANT SAFETY INSTRUCTIONS
Read all instructions before you use this product. Do not make any changes or create settings that are not described in this manual. If physical injury, loss of data, or damage is caused by failure to follow instructions, the warranty does not apply.
• To reduce the risk of injury, close supervision is necessary when the product is used near children.
- Do not put fingers or hands into the product.
- Use of an attachment not recommended or sold by the product manufacturer may result in a risk of fire, electric shock, or injury to persons.
- To reduce risk of damage to the electric plug and cord, pull the plug rather than the cord when disconnecting the product.
- Do not use the product in excess of its output rating. Overload outputs above the rating may result in a risk of fire or injury to persons.
- Do not use the product or attachment that is damaged or modified. Damaged or modified batteries may exhibit unpredictable behavior resulting in fire, explosion, or risk of injury.
- Do not operate the product with a damaged cord or plug, or a damaged output cable.
- Do not disassemble the product. Take it to a qualified service person when service or repair is required. Incorrect reassembly may result in a risk of fire or electric shock.
- Do not expose the product to fire or high temperatures. Exposure to fire or temperatures above 130^ may cause an explosion.
• To reduce the risk of electric shock, unplug the power pack from the outlet before attempting any instructed servicing.
- Have servicing performed by a qualified repair person using only identical replacement parts. This will ensure that the safety of the product is maintained.
- When charging a device, the product may feel warm. This is a normal operating condition and should not be a cause for concern.
- When charging the internal battery, work in a well-ventilated area and do not restrict ventilation in any way.
- Do not clean the product with harmful chemicals or detergents.
- Misuse, dropping, or excessive force may cause product damage.
- When disposing of secondary cells or batteries, keep cells or batteries of different electrochemical systems separate from each other.
- Do not use or store this product in direct sunlight for a long period, such as in a car, cargo bed, or any other place where it will be exposed to high temperatures. Doing so may cause the product to malfunction, deteriorate, or generate heat.
- Servicing of batteries should be performed or supervised by personnel knowledgeable about batteries and the required precautions.
- Do not use this product near strong static electricity or strong magnetic fields.
- Do not expose this product to flammable, explosive gas, or smoke.
- Do not stand on the product.
- Do not immerse the product in water. If the product accidentally falls into water, place it in a safe, open place and keep it away from fire until it is completely dry.
General Instructions Regarding Removal and Installation of Batteries
- When replacing batteries, replace with the same type and number of batteries or battery packs.
- Do not dispose of batteries in a fire. The batteries may explode.
- Do not open or damage batteries. Released electrolytes may be toxic and are harmful to skin and eyes.
- A battery can present a risk of electrical shock and high short-circuit current. The following precautions should be observed when working on batteries:
a) Remove watches, rings, or other metal objects.
b) Use tools with insulated handles.
c) Wear rubber gloves and boots
d) Do not lay tools or metal parts on top of batteries.
e) Disconnect the charging source prior to connecting or disconnecting battery terminals.
f) Determine if the battery is inadvertently grounded. If inadvertently grounded, remove the source from the ground. Contact with any part of a grounded battery can result in electrical shock. The likelihood of such shock can be reduced if such grounds are removed during installation and maintenance applicable to equipment and remote battery supplies not having a grounded supply circuit).
Warning:
- Replacing a battery with an incorrect type may nullify safeguards and create danger;
- Disposal of the battery/product in a fire, a hot oven, or another source of significant heat, or by mechanically crushing or cutting the battery/product may result in an explosion;
• Leaving the battery/product in an extremely hot environment may result in an explosion or leakage of flammable liquids or gases; - Subjecting the battery/product to extremely low air pressure may result in an explosion or leakage of flammable liquids or gases.

CAUTION: RISK OF EXPLOSION IF BATTERY IS REPLACED BY AN INCORRECT TYPE. DISPOSE OF USED BATTERIES ACCORDING TO THE INSTRUCTIONS.
Attention

Not permitted on aircraft.

Declaration of Conformity
Hereby, Anker Innovations Limited declares that this product is in compliance with Directives 2014/53/EU & 2011/65/EU. The full text of the EU declaration of conformity is available at the following internet address: https://www.anker.com.
The following importer is the responsible party (contract for EU matters):
Anker Innovations Deutschland GmbH | Georg-Muche-Strasse 3, 80807 Munich, Germany

This symbol means the product must not be discarded as household waste, and should be delivered to an appropriate collection facility for recycling. Proper disposal and recycling helps protect natural resources, human health, and the environment. For more information on the disposal and recycling of this product, contact your local municipality, disposal service, or the shop where you bought this product.
Bluetooth
The Bluetooth ^® word mark and logos are registered trademarks owned by the Bluetooth SIG, Inc. and any use of such marks by Anker Innovations Limited is under license. Other trademarks and trade names are those of their respective owners.
Lieferumfang
Anker SOLIX Solarbank E1600

natural_image
Pure electrical circuit lines without any symbolsnatural_image
Pure technical diagram of a mechanical or electrical component with no text, numbers, or symbols
natural_image
Simple line drawing of a container with two ports and a handle, no text or symbols presentnatural_image
Line drawing of a 3D box with no text or symbols on the body, showing internal structure (no readable text or symbols)Anker SOLIX Solarbank E1600
natural_image
Pure electrical connector diagram showing two types of cable connections without any text or symbolsCable de salida Y MC4 ×2
natural_image
Simple line drawing of a rectangular container with internal components and a numbered label (7) pointing to one section, no text or symbols present.natural_image
Line drawing of a cardboard box with no visible text or symbols on the bodySolarbank Individual
Anker SOLIX Solarbank E1600

natural_image
Pure electrical connector diagram showing two types of cable connections without any text or symbols
natural_image
Simple line drawing of a refrigerator with two speakers and a numbered label (7) on the side, no text or symbols present.natural_image
Line drawing of a cardboard box with visible branding and label (no text or symbols on the box itself)Anker SOLIX Solarbank E1600

natural_image
Pure electrical connector diagram without any text, numbers, or symbols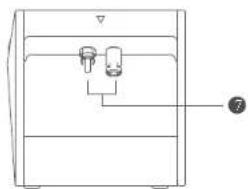
natural_image
Line drawing of a mechanical device with two ports and a numbered label (7) pointing to the bottom section (no text or symbols on the device itself)natural_image
Line drawing of a cardboard box with visible internal components (no text or symbols)Anker SOLIX Solarbank E1600

natural_image
Pure electrical connector diagram showing two types of cable connections without any text or symbolsMC4 Y Uitgangskabel ×2
Zonne-Paneel Verlengkabel
×4

natural_image
Line drawing of a device casing with internal components and a numbered label (7) pointing to the bottom section.natural_image
Line drawing of a cardboard box with visible branding and label (no text or symbols on the box itself)support.mea@anker.com (For Middle East and Africa Only)

(US/CA) +1 (800) 988-7973
(UK) +44 (0) 1604 936 200
(DE) +49 (0) 69 9579 7960
+49 (800) 000 2522 (Anker SOLIX)
(Middle East & Africa) +971 529 750 842
(UAE) +971 8000 320 817
(KSA) +966 8008 500 030
(Kuwait) +965 2206 9086
(Egypt) +20 8000 000 826
(AU) +61 3 8331 4800
(TR) +90 (850) 460 1414
(RU) +8 (800) 511 8623
(India) +91 1800 3138831
(中国) +86 400 0550 036
(日本)+81 03 4455 7823
(한국) +82 02-1661-9246