Capri - Coffee machine Prixton - Free user manual and instructions
Find the device manual for free Capri Prixton in PDF.

| Product type | Coffee machine with built-in grinder |
| Brand | Prixton |
| Model | Capri |
| Product reference | AX-006ZC |
| Rated voltage | 220-240 V ~ |
| Frequency | 50/60 Hz |
| Heating power | 600 W |
| Motor power | 120 W |
| Water tank capacity | 450 ml (maximum) |
| Coffee cup capacity | 400 ml (maximum) |
| Cup material | Stainless steel |
| Main functions | Automatic grinding and brewing, ground coffee possible |
| Auto shut-off | Yes, audible signal (3 beeps) at end of cycle |
| Filter | Removable filter screen |
| Maintenance | Clean removable parts with warm water; regular descaling |
| Recommended descaling frequency | Soft water: every 3 months; Hard water: every month |
| Safety | Do not immerse the appliance; grounding required |
| Spare parts and repairability | Contact after-sales service via Prixton website |
| Warranty | Compliant with applicable law in country of purchase |
| Country of manufacture | Not specified in the manual (estimate: China) |
| Weight | Not specified (estimate: ~2 kg) |
| Dimensions (approx.) | Not specified (estimate: 25 x 20 x 30 cm) |
Frequently Asked Questions - Capri Prixton
User questions about Capri Prixton
0 question about this device. Answer the ones you know or ask your own.
Ask a new question about this device
Download the instructions for your Coffee machine in PDF format for free! Find your manual Capri - Prixton and take your electronic device back in hand. On this page are published all the documents necessary for the use of your device. Capri by Prixton.
USER MANUAL Capri Prixton
natural_image
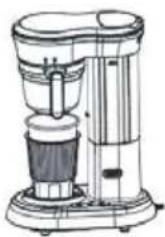
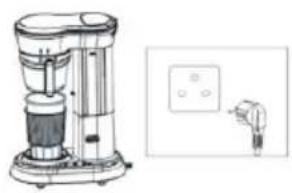
Line drawing of a modern blender with a side panel and base, no text or symbols presentCAFETERA COFFEE MACHINE
©
natural_image
Diagram of a mechanical device with a cylindrical component inserted into a curved housing (no text or symbols visible)natural_image
Line drawing of a mechanical device with a handle and internal components (no text or symbols)natural_image
Illustration of a modern coffee maker with a glass cup beside it (no text or symbols visible)natural_image
Technical line drawing of a blender with an inset showing its electrical outlet (no text or symbols present)natural_image
Illustration of a blender with a control panel and a hand gesture (no text or symbols)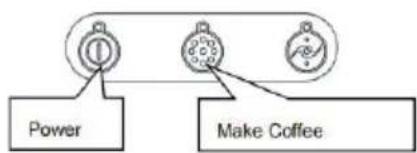
flowchart
graph TD
    A["Power"] --> B["Circle 1"]
    C["Make Coffee"] --> D["Circle 2"]
Warning: When you notice similar signs, please refer to safety precautions to avoid possible harm and damage.
Attention: Please read the following recommendations for the correct and safe use of your coffee machine to prevent deadly electrical shorts and fires.
-Read all the instructions carefully.
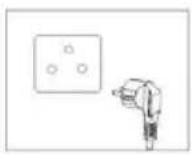
-The appliance must be securely connected to a grounded power source, ensuring that the power is suitable for the machine.
-Do not immerse the machine, power cord, or plug in water or any other liquid.
-Avoid pulling, clamping, or suspending the power cord on sharp edges. Do not place the power cord on heated or damp surfaces.
-To prevent any dangerous injuries, do not place hot objects near or on the appliance. The coffee machine must be placed on a stable tabletop.
-Make sure the machine is in the off state before plugging it into a wall outlet.
-Do not use cross-wiring or unauthorized extension cords for powering the machine.
-There might be a slight odor when using the machine for the first time. This is caused by insulation materials and the heating element and will disappear after a few minutes.
-Keep the power cord away from hot parts of the machine.
-When disconnecting the power, do not directly unplug the power cord.
-Cut off the power supply after using the machine.
-Do not remove the protective casing of the machine for any reason.
- Without strict supervision, this machine should not be operated by children or disabled individuals. Additionally, the machine should not be operated without proper guidance on its usage.
-Avoid using the machine when barefoot or with wet hands.
-Unplug the power and ensure no operations are being performed before cleaning the machine.
-This product is not suitable for individuals (including children) with physical, sensory, or mental disabilities, or those lacking the necessary experience and knowledge, unless under the supervision of someone responsible for their safety.
-The appliance must not be submerged in water.
-If the power cord is damaged, to avoid danger, it must be replaced by a professional from the manufacturer, their repair department, or a similar professional.
-The instruction manual should include information on the operation time and speed settings for accessories.
-Please keep these instructions and your purchase receipt to ensure your legal rights.
Product Specifications:
Product Model: AX-006ZC
Rated Voltage: 220-240VAC
Frequency: 50/60Hz
Heating Power: 600W
Motor Power: 120W
Water Tank Capacity: 450ml (maximum)
Coffee Capacity: 400ml (maximum)
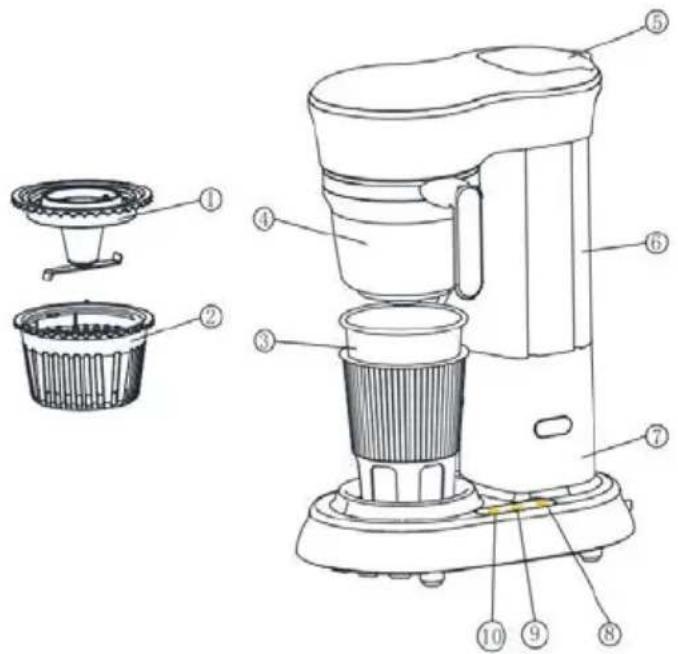
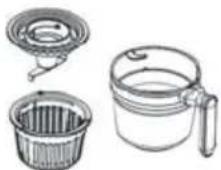
- Grinding Blade Base
- Filter Screen
- Stainless Steel Cup
- Coffee Cup
- Water Tank Lid
- Water Tank
- Main Unit
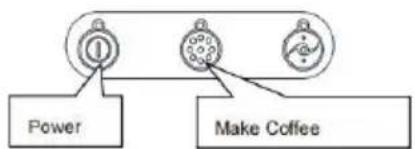
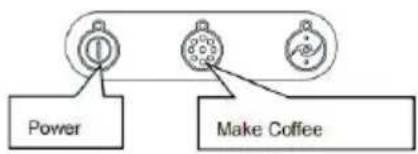
- Grinder and Brew Switch
- Ground Coffee Brew Switch
- Power Switch
Instructions for use
Preparation for Brewing Coffee - Initial Setup (Machine Cleaning)
Warning: Ensure that the connected power supply is suitable for this machine to avoid any damage to the machine.

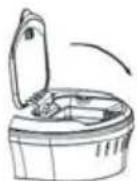
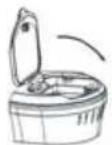
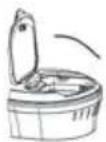
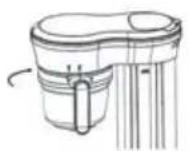
Open the water tank lid in the direction shown in the diagram.
natural_image
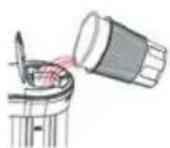
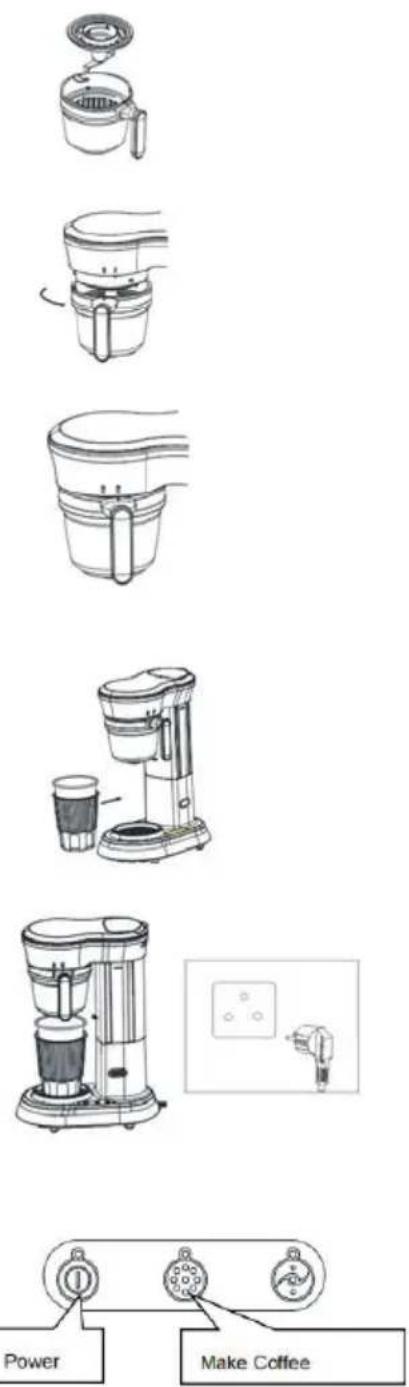
Diagram of a mechanical device with a cup pouring liquid into a cylindrical component (no text or symbols)Fill the stainless steel cup with an appropriate amount of purified water, making sure the water level does not exceed the "MAX" water level mark on the water tank.
Close the water tank lid in the direction shown in the diagram.
natural_image
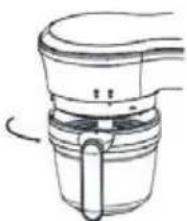
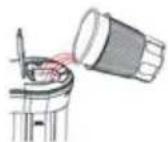
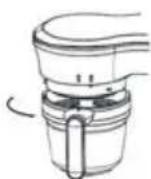
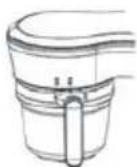
Line drawing of a mechanical device with a curved handle and internal components (no text or symbols)Align the handle with the "LOCK" symbol as shown in the diagram and clockwise rotate the coffee cup onto the main unit.
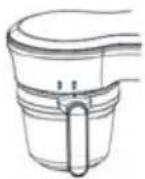
Ensure that the coffee cup knob is in place, with the arrow on the handle aligned with the "LOCK" symbol on the main unit.
natural_image
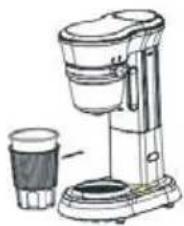
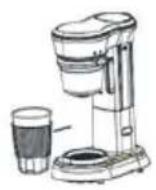
Line drawing of a modern blender with a glass cup beside it (no text or symbols)As shown in the diagram, place the stainless steel cup on the tray slot of the main unit.
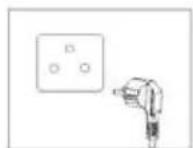
Once the stainless steel cup is properly positioned, plug the main unit's power cord into the power outlet, ensuring that the power voltage matches the rated voltage of the machine and establishing a reliable connection.
flowchart
graph TD
    A["Power"] --> B["①"]
    C["Make Coffee"] --> D["②"]
    C --> E["③"]
To begin cleaning the coffee machine, first press the power switch, then press the ground coffee brew switch. The main unit will start working. Wait for the main unit to draw out all the water from the water tank and listen for three beeps "beep" "beep" "beep" from the machine. At this point, you can pour out the water from the cup, indicating that the cleaning process is complete. The coffee machine is now ready for normal use.
Note: Pay attention to the installation of the coffee funnel in Step 5. Make sure to install it correctly according to the diagram, as the machine will not function otherwise. When the coffee cup is properly in place and the machine is connected to the power supply, there will be a "drip" sound indication, and the power switch indicator light will turn on. After installation, check the gap between the top of the coffee funnel and the machine casing. If it is not consistent, reinstall it before proceeding to the next step. Otherwise, it may cause damage to the machine.
Open the water tank lid in the direction shown in the diagram.
Fill the stainless steel cup with an appropriate amount of purified water, making sure the water level does not exceed the "MAX" water level mark on the water tank.
Close the water tank lid in the direction shown in the diagram.
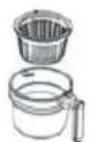
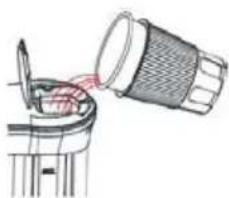
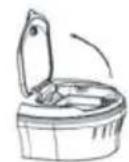
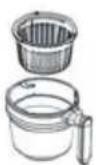
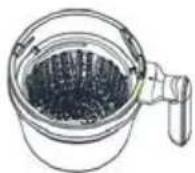
Place the filter screen into the coffee cup as shown in the diagram.
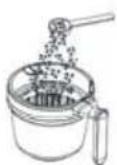
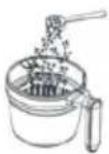
Using the provided spoon, add 2-3 spoons of coffee beans into the filter screen.
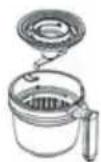
After placing the coffee beans, insert the grinding blade base into the coffee cup.
Align the handle with the "lock" symbol and rotate the coffee cup clockwise onto the main unit as shown in the diagram.
Ensure that the coffee cup knob is in place, with the arrow on the handle aligned with the "lock" symbol on the main unit.
Place the stainless steel cup on the tray slot of the main unit as shown in the diagram.
natural_image
Illustration of a blender with control panel and plug (no text or symbols)Once the stainless steel cup is properly positioned, plug the main unit's power cord into the power outlet, ensuring that the power voltage matches the rated voltage of the machine and establishing a reliable connection.
flowchart
graph TD
    A["Power"] --> B["Circle 1"]
    C["Make Coffee"] --> D["Circle 2"]
Start grinding and brewing coffee by first pressing the power switch, then pressing the grinder and brew switch. The main unit will start working. During the grinding process, the machine will intermittently operate, which is normal. After grinding the beans, the machine will automatically start brewing the coffee. When you hear three beeps "beep" "beep" "beep" from the machine, it indicates that the coffee is ready. You can now enjoy a delicious cup of coffee.
Coffee powder to make coffee
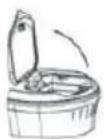
Open the water tank lid in the direction shown in the diagram.
Fill the stainless steel cup with an appropriate amount of purified water, making sure the water level does not exceed the "MAX" water level mark on the water tank.
Close the water tank lid in the direction shown in the diagram.
Place the filter screen into the coffee cup as shown in the diagram.
Using the provided spoon, add 2-3 spoons of coffee into the filter screen.
After placing the coffee , insert thegrinding blade base into the coffee cup.
Align the handle with the "lock" symbol and rotate the coffee cup clockwise onto the main unit as shown in the diagram.
Ensure that the coffee cup knob is in place, with the arrow on the handle aligned with the "lock" symbol on the main unit.
Place the stainless steel cup on the tray slot of the main unit as shown in the diagram.
Once the stainless steel cup is properly positioned, plug the main unit's power cord into the power outlet, ensuring that the power voltage matches the rated voltage of the machine and establishing a reliable connection.
Start grinding and brewing coffee by first pressing the power switch, then pressing the grinder and brew switch. The main unit will start working. During the grinding process, the machine will intermittently operate, which is normal. After grinding the beans, the machine will automatically start brewing the coffee. When you hear three beeps "beep" "beep" "beep" from the machine, it indicates that the coffee is ready. You can now enjoy a delicious cup of coffee.
Cleaning and Maintenance:
1, After brewing coffee, remove the coffee cup from the machine and rinse it under the tap.
Rotate the coffee cup counterclockwise in the direction of the arrow to remove it.
Empty the coffee grounds from the filter screen into the kitchen waste bin.
Empty the coffee grounds from the filter screen into the kitchen waste bin.
- Do not immerse the plug, power cord, or coffee machine in water.
3, Wipe the surface of the coffee machine with a damp cloth, avoiding the use of hard brushes.
4, When cleaning the coffee funnel and other removable parts, you can soak them in warm water or a warm water solution mixed with a specified ratio of specialized cleaning agent for approximately 5 minutes, then rinse with clean water and dry before reassembling.
5, Coffee cups, filter screens, and grinding blade bases are not recommended to be cleaned in the dishwasher.
6, Descaling: The coffee machine must be descaled regularly to prevent affecting the coffee taste or damaging the machine.
-Descaling frequency: Soft water - once every three months; Hard water - once a month.
- Descaling agent: Only use specialized liquid descaling agents for coffee machines, and do not use solid descaling agents.
Common Failures and Solutions
Problem: Coffee maker does not work, no response
Cause Analysis & Solution: Check that the plug of the coffee maker is in the socket and the power is on, and that the coffee cups are in place.
Problem: The coffee making process generates noise and a lot of steam
Cause Analysis & Solution: Coffee maker needs to be descaled
Problem: Coffee is not strong enough or too strong
Cause Analysis & Solution: Check if the ratio of water is correct (450ml of water to 21g of coffee beans/powder is appropriate).
Problem: Press the switch and the machine starts to work but no coffee comes out
Cause Analysis & Solution: Check if there is water in the water tank.
Friendly Reminders:
1, To brew high-quality coffee, always use fresh drinking water.
2, Make sure to promptly remove the used coffee grounds to prevent them from spoiling inside the coffee funnel.
3, This machine allows flexibility in coffee concentration during brewing. Users can adjust the water quantity according to personal taste preferences.
Disposal of Old Machines:
1, When the coffee machine reaches the end of its service life, please do not dispose of it as regular municipal waste. Instead, you can hand over expired coffee machines to local specialized waste collection centers or companies that provide this service.
- Proper disposal of electronic appliances can help prevent adverse environmental effects and safeguard human health. Recycling the components of the machine can also conserve a significant amount of energy and resources.
Electronic appliances require separate disposal procedures. It is strictly prohibited to directly throw them into regular trash bins.
Warranty policy
This product complies with the warranty law in force in the country of purchase. When you have a problem that you can not solve, you must access the web www.prixton.com and click on the contact option to send us your assistance form.
These technical and electrical specifications are those of typical units and may be changed without prior notice in order to provide improved equipment.
Simplified EU Declaration Of Conformity
We, La Trastienda Digital located in Avenida Cervantes 49, módulo 25, Basauri 48970, Bizkaia hereby declare that the following goods, imported and selling at European market:
| BRAND | MODEL NAME DESCRIPTION | CATEGORY |
| Prixton CAPRI | Coffee maker | Cocina |
Are in compliance with the EC Council Directive of 2014/53/EU (EM DIRECTIVE) and harmonized standards and with the board of the 16th of April 2014.
The complete text of the UE Declaration of conformity is available anytime at this website address:
www.prixton.com
LA TRASTIENDA DIGITAL
natural_image
Diagram of a mechanical device with a cup pouring liquid into a cylindrical component (no text or symbols visible)natural_image
Line drawing of a mechanical device with a curved top and central shaft (no text or symbols)natural_image
Illustration of a blender with a control panel and a small hand holding a plug (no text or symbols present)natural_image
Diagram of a mechanical device with a cylindrical component being inserted into a curved housing (no text or symbols visible)natural_image
Line drawing of a mechanical device with a curved top and central shaft (no text or symbols)natural_image
Illustration of a blender with a control panel and plug (no text or symbols)natural_image
Line drawings of three household items: a circular filter, a water dispenser with a lid, and a plastic cup (no text or symbols)natural_image
Diagram of a mechanical device with a cylindrical component being inserted into a housing (no text or symbols visible)natural_image
Line drawing of a mechanical device with a handle and internal components (no text or symbols)natural_image
Illustration of a modern coffee maker with a glass cup beside it (no text or symbols visible)natural_image
Technical line drawing of a blender with an inset close-up showing its electrical socket (no text or symbols)natural_image
Illustration of a blender with a control panel and a small hand gesture (no text or symbols)Instruções de Uso
natural_image
Diagram of a mechanical device with a cylindrical component inserted into a curved housing (no text or symbols visible)natural_image
Line drawing of a mechanical device with a curved top and central base (no text or symbols)natural_image
Line drawing of a modern coffee maker with a cup beside it (no text or symbols)natural_image
Technical line drawing of a blender with a side-view inset showing its electrical outlet (no text or symbols present)natural_image
Illustration of a blender with control panel and indicator lights (no text or symbols)Productspecificaties:
Productmodel: AX-006ZC
Nominale spanning: 220-240VAC
Frequentie: 50/60Hz
Vermogen verwarming: 600W
Vermogen motor: 120W
Watertankcapaciteit: 450 ml (maximaal)
natural_image
Diagram of a mechanical device with a cylindrical component being inserted into a curved housing (no text or symbols visible)natural_image
Line drawing of a mechanical device with a curved handle and base (no text or symbols)natural_image
Line drawing of a coffee maker with a cup and side bowl (no text or symbols)natural_image
Line drawing of a blender with a side panel and control panel (no text or symbols)